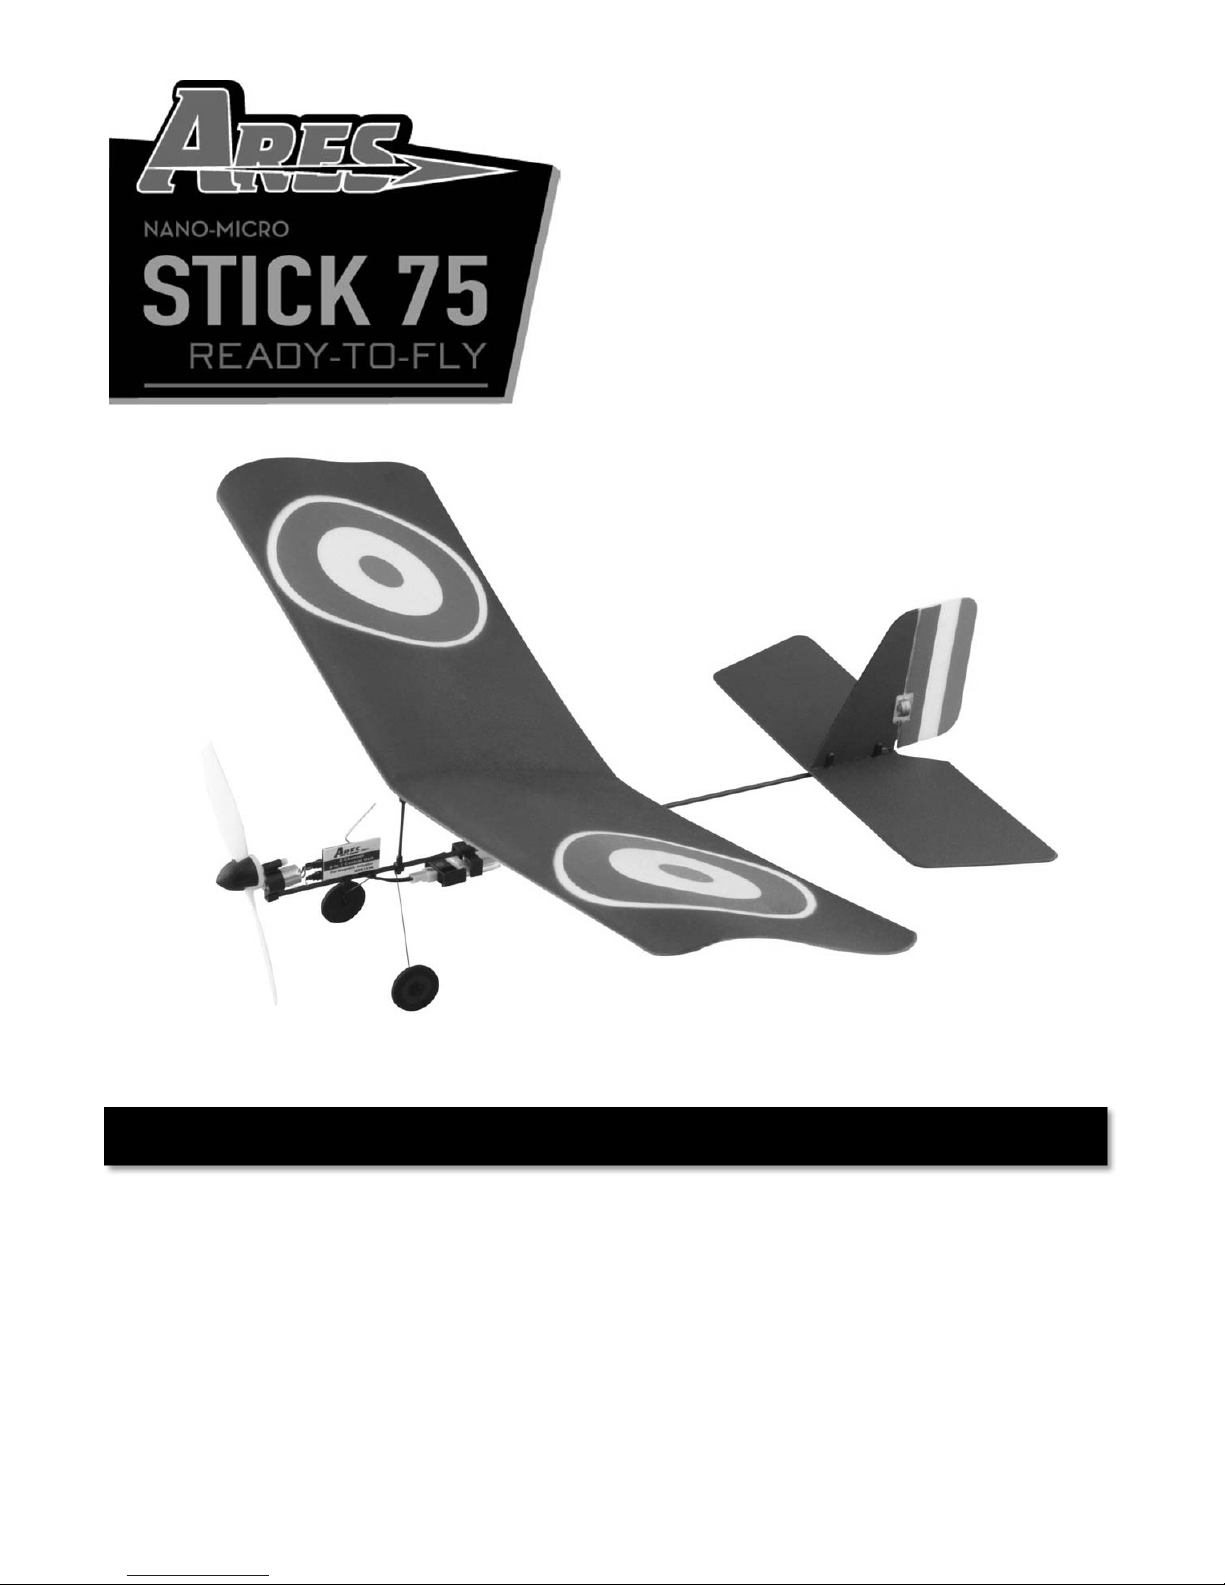
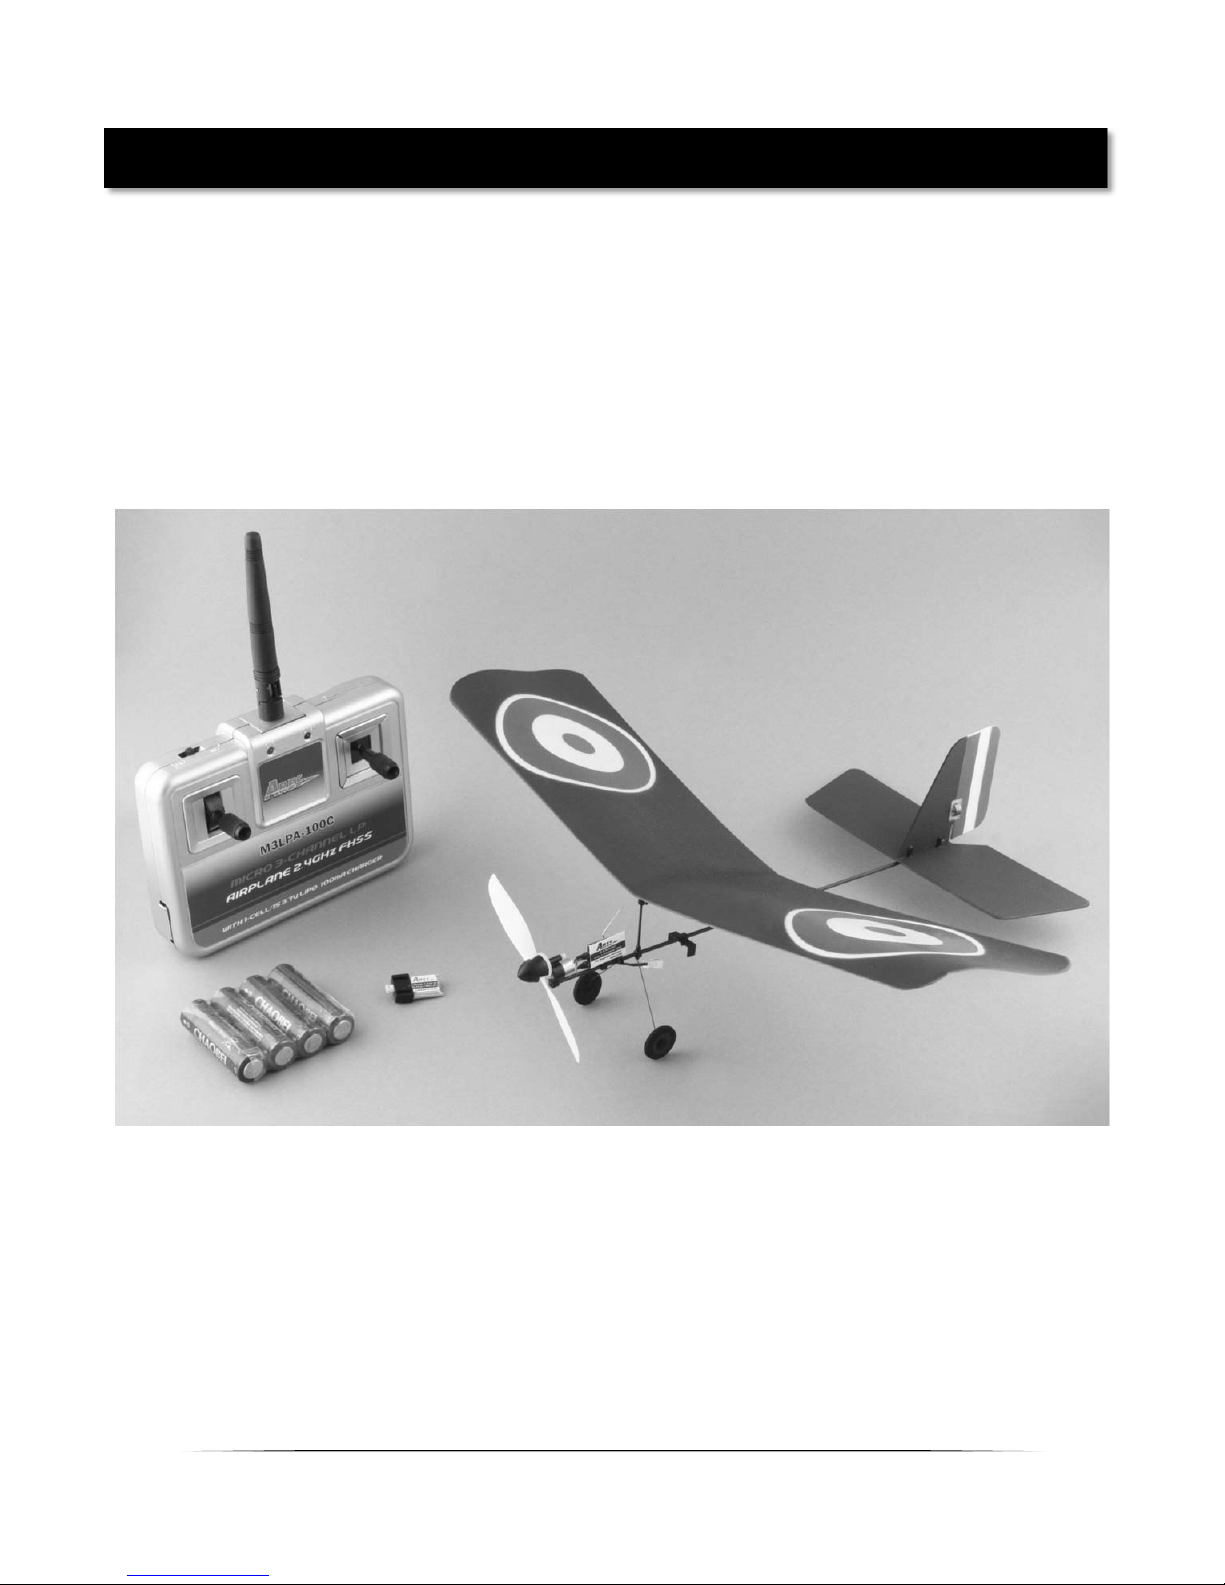
Ares Nano-Micro Stick 75 User manual

1
Wingspan:12.4in(315mm)
Length:10.6in(270mm)
WeightwithBattery: 0.3oz(9g)
Battery:30mAh1S3.7VLiPo(included)
Charger:1S3.7VLiPo(intransmitter,included)
Transmitter:3‐channel2.4GHzw/LiPocharger(included)
On‐BoardElectronics: 2‐in‐1receiver/ESCandmagneticactuator(installed)
S
p
ecifications
Instruction Manual

2
Specifications.............................................................................................................................1
Introduction...............................................................................................................................3
SafetyPrecautionsandWarnings..............................................................................................3
FCCInformation.........................................................................................................................4
Nano‐MicroStick75RTFContents.............................................................................................5
BeforetheFirstFlightChecklist.................................................................................................6
FlightChecklist...........................................................................................................................6
InstallingtheTransmitterBatteries...........................................................................................7
TransmitterDetails....................................................................................................................7
LiPoBatteryWarningsandUsageGuidelines............................................................................8
ChargingtheLiPoFlightBattery...............................................................................................10
InstallingtheLiPoFlightBattery..............................................................................................12
ControlUnitInitializationandArming.....................................................................................13
FlightControlsandTrimming...................................................................................................16
SelectingaFlyingArea.............................................................................................................18
Flying........................................................................................................................................18
AdjustingtheWingPositionandCenterofGravity..................................................................20
TransmitterandReceiverBinding/Linking...............................................................................21
Repairs.....................................................................................................................................22
ReplacementPartsList.............................................................................................................22
Warranty,SupportandService................................................................................................23
Table of Contents

3
Weighinginatonly9gramsreadytofly–about1/4theweightoftypicalultra‐microclass
models–theAres™[air‐eez]Nano‐MicroStick75isagreatchoicewhenlookingfora
lightweightairplanetoflyindoorsinmoreplacesthaneverbefore.Thenano‐microsizeand
weightallowsforslowandeasyflyingeveninsmallerindoorsspacesfromagreatroomat
hometoaconferenceroomattheoffice.Plus,theproportionalthrottleandruddercontrols
makeiteasyforalmostanyonetoflywhileofferingplentyofmaneuverabilityandcontrolfor
experiencedpilotstoo.
TheNano‐MicroStick75’sclassicstick‐styledesignisavailableintwopopularWWI‐eratrim
schemessoyoucanflyinsquadronsorsimulatedogfightswithfriends.Andthedurable,
lightweightconstructionmeansyoudon’talwayshavetoworryaboutdamageafterlessthan
perfectmissionsorlandings.Bestofall,theairframeis100%factory‐assembledandready‐
to‐flyrightoutofthebox–notoolsrequired!
AlsointheboxiseverythingneededtoflyincludingAAbatteriesforthe3‐channel
transmitterequippedwithinterference‐free2.4GHztechnology,digitaltrimsandabuilt‐in
LiPobatterycharger.Andtheincluded30mAh1S3.7VLiPobatterydeliversplentyofpower
andlongflighttimespercharge.Thatmeansthere’snothingextratobuyandyoucanbe
readytoflywithinminutesofopeningthebox.
AndalthoughtheUltra‐MicroTrainer100isready‐to‐flyrightoutthebox,pleasetakethe
timetoreadthroughthismanualformoreinformationaboutbatterysafetyandcharging,
controlchecksandmorebeforemakingyourfirstflight.Pleasealsovisitourwebsiteat
www.Ares‐RC.comforadditionalinformationincludingproductupdates,bulletins,videosand
more.
Failuretousethisproductintheintendedmannerasdescribedinthefollowinginstructions
canresultindamageand/orpersonalinjury.AnRCairplaneisnotatoy!Ifmisuseditcan
causeseriousbodilyharmanddamagetoproperty.
Keepitemsthatcouldbecomeentangledinthepropellerbladesawayfromthepropeller,
includinglooseclothing,tools,etc.Beespeciallysuretokeepyourhands,faceandother
partsofyourbodyawayfromthepropellerblades.
Introduction
Safet
y
Precautions and Warnin
g
s

4
Astheuserofthisproductyouaresolelyandwhollyresponsibleforoperatingitinamanner
thatdoesnotendangeryourselfandothersorresultindamagetotheproductorthe
propertyofothers.
Thismodeliscontrolledbyaradiosignalthatissubjecttopossibleinterferencefromavariety
ofsourcesoutsideyourcontrol.Thisinterferencecancausemomentarylossofcontrolsoitis
advisabletoalwayskeepasafedistancefromobjectsandpeopleinalldirectionsaroundyour
modelasthiswillhelptoavoidcollisionsand/orinjury.
•Neveroperateyourmodelifthevoltageofthebatteriesinthetransmitteristoolow.
•Alwaysoperateyourmodelinanopenareaawayfromobstacles,people,vehicles,
buildings,etc.
•Carefullyfollowthedirectionsandwarningsforthisandanyoptionalsupport
equipment(chargers,rechargeablebatteries,etc.).
•Keepallchemicals,smallpartsandallelectroniccomponentsoutofthereachof
children.
•Moisturecausesdamagetoelectroniccomponents.Avoidwaterexposuretoall
electroniccomponents,parts,etc.notspecificallydesignedandprotectedforusein
water.
•Neverlickorplaceanyportionofyourmodelinyourmouthasitcouldcauseserious
injuryorevendeath.
Thisdevicecomplieswithpart15oftheFCCrules.Operationissubjecttothefollowingtwo
conditions:(1)Thisdevicemaynotcauseharmfulinterference,and(2)thisdevicemust
acceptanyinterferencereceived,includinginterferencethatmaycauseundesiredoperation.
Caution:Changesormodificationsnotexpresslyapprovedbythepartyresponsiblefor
compliancecouldvoidtheuser’sauthoritytooperatetheequipment.
Thisproductcontainsaradiotransmitterwithwirelesstechnologywhichhasbeentestedand
foundtobecompliantwiththeapplicableregulationsgoverningaradiotransmitterinthe
2.400GHzto2.4835GHzfrequencyrange.
Theassociatedregulatoryagenciesofthefollowingcountriesrecognizethenoted
certificationsforthisproductasauthorizedforsaleanduse:USA
FCC Information

5
ItemDescription
NotAvailableSeparately.Nano‐MicroStick75RTFAirframe
AZS1158AMD2.................M3LPA‐100CMicro3‐ChannelLPAirplaneTransmitter
w/100mACharger,Mode2
NotAvailableSeparately.4AABatteries
AZSB301S10UM...............30mAh1‐Cell/1S3.7V10CLiPoBattery,Ultra‐MicroConnector
Nano-Micro Stick 75 RTF Contents

6
PLEASENOTE:ThischecklistisNOTintendedtoreplacethecontentincludedinthis
instructionmanual.Althoughitcanbeusedasaquickstartguide,westronglysuggest
readingthroughthismanualcompletelybeforeproceeding.
Removeandinspectallcontents
InstallthefourAAbatteriesinthetransmitter
Beginchargingtheflightbattery(connectittothechargerinthetransmitter)
Installtheflightbatteryintheairplane(afterit’sbeenfullycharged)
Testthecontrolstoconfirmproperoperation
Familiarizeyourselfwiththecontrols
Findasuitableareaforflying
PLEASENOTE:ThischecklistisNOTintendedtoreplacethecontentincludedinthis
instructionmanual.Althoughitcanbeusedasaquickstartguide,westronglysuggest
readingthroughthismanualcompletelybeforeproceeding.
Alwaysturnthetransmitteronfirst
Plugtheflightbatteryintothecontrolunit
Allowthecontrolunittoinitializeandarmproperly
Flythemodel(hand‐launchortakeofffromaflat/levelsurface)
Landthemodel(landonaflat/levelsurface)
Unplugtheflightbatteryfromthecontrolunit
Alwaysturnthetransmitterofflast
Before the First Fli
g
ht Checklist
Fli
g
ht Checklist

7
InstallthefourincludedAAbatteriesinthebackofthetransmitterbyfirstremovingthe
batterycompartmentcover/door.Ensureproperpolarityofthebatteriesbeforeinstalling
themasnotedbythemarkingsmoldedintothebatterycompartment,thenre‐installthe
compartmentcover/door.
Checkforproperoperationofthetransmitterbyswitchingthepowerswitchon(slideitto
theright).Youshouldhearthreebeeps/tonesfromthetransmitterwhilethe‘POWER’LED
indicatorbeginstoglowsolidred.ThisindicatesthetransmitterispoweredonandtheAA
batteriesareinstalledcorrectly.
TheNano‐MicroStick75RTFincludesanM3LPA‐100CMicro3‐ChannelLPAirplane
transmitterequippedwithinterference‐free2.4GHzFHSStechnology,digitaltrimsanda
built‐in1‐cell/1S3.7V,100mALiPobatterycharger.
Installin
g
the Transmitter Batteries
Transmitter Details

8
LowBatteryPowerIndications
WhentheAAbatterypowerdropstoalevelthat’stoolowforsafecontinuedoperation,
thetransmitteroffersthefollowingindications:
WhenchargingaLiPobatterywiththetransmitterpoweredoff,theyellowCHG
(charge)LEDindicatorwilldimnoticeablyuntiltheAAbatteriesarereplaced.
Whenthetransmitterispoweredon,andwhetherornotaLiPobatteryisbeing
charged,therewillbeaconstantbeep/toneuntiltheAAbatteriesarereplaced.
AntennaPosition/Orientation
TheRFoutputsignalstransmitbest/strongestfromtheshaftoftheantennaratherthan
fromthetip.Asaresultyoushouldneverpointthetipoftheantennadirectlyatthe
model.Also,thetransmitterantennacanberotatedandfoldedupto90°sobesureto
holdthetransmitterandpositiontheantennaasneededtoensurethebestpossible
signaltransmission.
IMPORTANTNOTE:LithiumPolymer(LiPo)batteriesaresignificantlymorevolatilethanthe
alkaline,NiCdandNiMHbatteriesalsousedinRCapplications.Allinstructionsand
warningsmustbefollowedexactlytopreventpropertydamageand/orpersonalinjuryas
mishandlingofLiPobatteriescanresultinfire.
Byhandling,chargingorusingtheincludedLiPobatteryyouassumeallrisksassociated
withLiPobatteries.Ifyoudonotagreewiththeseconditions,pleasereturnyourcomplete
productinnew,unusedconditiontotheplaceofpurchaseimmediately.
Andalthoughthe30mAh1‐Cell/1S3.7V10CLiPoBattery(AZSB301S10UM)includedwith
yourAres™Nano‐MicroStick75RTFisintendedtobechargedsafelyusingtheLiPobattery
chargerbuiltintotheincludedM3LPA‐100CMicro3‐ChannelLPAirplaneTransmitter
w/100mACharger(AZS1158AMD2),youmustreadthefollowingsafetyinstructionsand
warningsbeforehandling,chargingorusingtheLiPobattery.
•YoumustchargetheLiPobatteryinasafeareaawayfromflammablematerials.
•NeverchargetheLiPobatteryunattendedatanytime.Whenchargingthebatteryyou
shouldalwaysremaininconstantobservationtomonitorthechargingprocessand
reactimmediatelytoanypotentialproblemsthatmayoccur.
LiPo Batter
y
Warnin
g
s and Usa
g
e Guidelines

9
•Afterflying/dischargingthebatteryyoumustallowittocooltoambient/room
temperaturebeforerecharging.
•TochargethebatteryyoumustuseonlytheLiPobatterychargerbuiltintothe
includedM3LPA‐100CMicro3‐ChannelLPAirplaneTransmitterw/100mACharger
(AZS1158AMD2)orasuitablycompatibleLiPobatterycharger.Failuretodosomay
resultinafirecausingpropertydamageand/orpersonalinjury.DONOTuseaNiCd
orNiMHcharger.
•Ifatanytimeduringthechargeordischargeprocessthebatterybeginstoballoonor
swell,discontinuechargingordischargingimmediately.Quicklyandsafely
disconnectthebattery,thenplaceitinasafe,openareaawayfromflammable
materialstoobserveitforatleast15minutes.Continuingtochargeordischargea
batterythathasbeguntoballoonorswellcanresultinafire.Abatterythathas
balloonedorswollenevenasmallamountmustberemovedfromservice
completely.
•Storethebatterypartiallycharged(approximately50%charged/3.85Vpercell),at
roomtemperature(approximately68–77°Fahrenheit[F])andinadryareaforbest
results.
•Whentransportingortemporarilystoringthebattery,thetemperaturerangeshould
befromapproximately40–100°F.Donotstorethebatteryormodelinahotgarage,
carordirectsunlightwheneverpossible.Ifstoredinahotgarageorcarthebatterycan
bedamagedorevencatchfire.
•Donotover‐dischargetheLiPoflightbattery.DischargingtheLiPoflightbatterytoa
voltagethatistoolowcancausedamagetothebatteryresultinginreducedpower,
flightdurationorfailureofthebatteryentirely.
LiPocellsshouldnotbedischargedtobelow3.0Veachunderload.Inthecaseofthe
1‐Cell/1S3.7VLiPobatteryusedtopowertheNano‐MicroStick75youwillnotwant
toallowthebatterytofallbelow3.0Vduringflight.
The2‐in‐1controlunitfeaturesasoftlowvoltagecutoff(LVC)thatsmoothlyreduces
powertothemotor/powersystem(regardlessofthepowerlevelyouhavesetwith
theleft‐hand/throttlestick)toletyouknowthevoltageofthebatteryisclosetothe
3.0Vminimum.However,evenbeforethisreductioninpower,ifyoufindthatmore
thanthetypicalamountofthrottle/powerisrequiredtocruiseorclimbyoushould
landthemodelanddisconnectthebatteryimmediatelytopreventover‐discharge.
AndwhileitispossibletopowerthemodelupandflyagainafterthesoftLVCoccurs,
thisisNOTrecommended.ContinueddischargingcanresultinreachingthehardLVC

10
whichmaycausepermanentdamagetotheLiPobatteryresultinginlostpowerand
flightdurationduringsubsequentfights(orfailureofthebatteryentirely).
Also,itisnotrecommendedthatyouflytothesoftLVCeverytimeyoufly.Instead
youshouldbeawareofthepowerlevelofthebattery/airplanethroughoutthe
flight,andifatanytimetheairplanebeginstorequiremorethrottle/powerthan
typicaltomaintaincruiseorclimb,youshouldlandtheairplaneanddisconnectthe
LiPobatteryimmediately.ConstantlydischargingthebatterytothesoftLVCcanstill
causepermanentdamagetothebatterysoit’sbesttouseatimerorstop‐watchto
timethedurationofyourflightsandtostopflyingatareasonabletimebeforethe
softLVCisreached.
Youmustchargetheincluded30mAh1‐Cell/1S3.7V10CLiPoBattery(AZSB301S10UM)
usingtheLiPobatterychargerbuiltintotheincludedM3LPA‐100CMicro3‐ChannelLP
AirplaneTransmitterw/100mACharger(AZS1158AMD2)orasuitablycompatibleLiPo
batterycharger.ChargingtheLiPobatteryusinganon‐LiPobatterycompatiblecharger
(suchasaNiCdorNiMHbatterycharger),orevenadifferentLiPobatterychargerwiththe
incorrectsettings,mayresultindamagetothebatteryorevenfireresultinginproperty
damageand/orpersonalinjury.
PleasefollowthesestepstochargetheLiPobatterywiththetransmitter’sbuilt‐incharger:
Carefullyopenthesmallhatchlocatedontheleftsideofthetransmitternearthe
bottomleftcornerandextendthechargeleadoutsideofthetransmittercase.You
canleavethehatchopenorcloseitbyroutingthechargeleadthroughthesmall
cutout/openinginthehatchdoor.
Connectthebatterytotheconnectorattheendofthechargeleadextendingfromthe
transmitter.YOUMUSTBECAREFULTOENSUREPROPERPOLARITYBEFOREMAKING
THECONNECTIONbyaligningthesmallredcirclemarkingonthehousingofthe
batterywiththesmallredcirclemarkingonthechargeleadconnector.Whilethe
whiteconnectorsare‘keyed’tominimizetheriskofareversepolarityconnection,if
youforcethemitispossibletomakeconnectionwiththeincorrectpolaritypotentially
causingdamagetothebatteryand/orcharger(transmitter).Whenthecirclemarkings
areproperlyalignedforcorrectpolarity,connectingthewhiteconnectorsshould
requireonlyaminimalamountofpressuretoachievethelight‘click’thatindicatesa
secureconnection.
Char
g
in
g
the LiPo Fli
g
ht Batter
y

11
Whenthebatteryisconnectedtothechargeleadsecurelyandwiththeproper
polaritythe‘CHG(charge)’LEDindicatoronthetransmitterwillglowsolidyellow.The
batterywillbecharginganytimetheLEDindicatorisglowingsolidyellowandwhether
ornotthetransmitterispoweredon.
Itwilltakeapproximately25‐40minutestochargeafullydischarged(notover‐
discharged)battery.AndwhenthebatteryisfullychargedtheLEDindicatorwillstop
glowingyellowentirely.WhentheLEDindicatorisnolongerglowingyoucanremove
thebatteryfromthechargerasitisnowfullychargedandreadyforuse.
NOTE:TheLiPobatteryincludedwithyournewmodelwillarrivepartiallycharged.For
thisreasontheinitialchargemayonlytakeapproximately15‐20minutes.
NOTE:It’ssaferandbetterforthelongevityofthebatterytostoreitonlypartially
chargedforanylengthoftime.Storingthebatteryatapproximately50%charged
(whichisapproximately3.85Vpercell)istypicallybest,however,itwilltakesome
carefulmanagementofthechargetimeandtheuseofavoltmetertoachievethis
voltage.
Ifyouhavetheequipmentandskillstoachievethe50%chargelevelforstorageitis
recommended.Ifnot,simplybesuretonotstorethebatteryfullychargedwhenever
possible.Infact,aslongasthebatterywillbestoredatapproximatelyroom
temperatureandfornomorethanafewweeksbeforethenextuse,itmaybebestto
storethebatteryinthedischargedstateafterthelastflight(aslongasthebatterywas
notover‐dischargedonthelastflight).

12
NOTE:YoumustALWAYSturnthetransmitteronfirst,BEFOREconnecting/installingtheLiPo
flightbattery.Andbeforeproceedingwiththefollowingsteps,pleasebesurethetransmitter
ispoweredon.
AftertheLiPobatteryhasbeenfullychargedit’sreadytobeinstalledintheairplane.
However,thefirststepbeforeinstallingthebatteryistoconnectittothe2‐in‐1controlunit.
ALSO,YOUMUSTBECAREFULTOENSUREPROPERPOLARITYBEFORECONNECTINGTHE
BATTERYTOTHE2‐IN‐1CONTROLUNITCONNECTOR.Byorienting/aligningthesmallred
circlemarkingonthehousingofthebatterywiththesmallredcirclemarkingonthe
connectorforthe2‐in‐1controlunityou’llbeabletomaketheconnectionwiththecorrect
polarity.
Also,althoughthewhiteconnectorsare‘keyed’tominimizetheriskofareversepolarity
connection,ifyouforcethemitispossibletomakeconnectionwiththeincorrectpolarity
potentiallycausingdamagetothe2‐in‐1controlunitand/orbattery.Whentheredcircle
markingsareproperlyalignedforcorrectpolarity,connectingthewhiteconnectorsshould
requireonlyaminimalamountofpressuretoachievethelight‘click’thatindicatessecure
connection.
AftertheLiPobatteryisconnectedtothe2‐in‐1controlunittheuniquemagneticattachment
designmakesitquickandeasytoinstallthebattery.Simplyplacethesideofthebatterywith
themagneticattachmentagainstthemagnetlocatedinthebatterysupportandthebattery
willbemountedsecurelyintheairplane.
Installin
g
the LiPo Fli
g
ht Batter
y

13
ToremovetheLiPoflightbattery,liftitawayfromthemagnetthendisconnectitfrom
the2‐in‐1controlunit.DONOTpoweroffthetransmitteruntiltheLiPoflightbatteryis
removedfromtheairplaneandthe2‐in‐1controlunitispoweredoff.REMEMBER:The
transmitterisalwaysonfirstandalwaysofflast!
YourNano‐MicroStick75isequippedwithacompactandadvanced2‐in‐1controlunit.The
controlunitisalightweightcombinationof2.4GHzreceiveranelectronicspeedcontrol(ESC).
Thischecklistincludesthestepsyoumustfollowtoensureproperinitialization,armingand
operationofthecontrolunit:
Beforeeachflightyoushouldalwaysturnthetransmitteronbeforeconnecting
theflightbatterytothecontrolunit.Neverconnecttheflightbatterytothe
controlunitbeforepoweringthetransmitteronfirst.Aftereachflightyou
shouldalwaysdisconnecttheflightbatteryfromthecontrolunitbefore
poweringoffthetransmitter.
Theleft‐hand/throttlestickmustbesetinthelowestpossiblepositioninorder
fortheESCofthecontrolunittoarm.
Control Unit Initialization and Armin
g

14
NOTE:Ifthisisthefirstflight,orafirstflightfollowingrepairs,youshouldcenter
therudder(aileron)controltrim.Usethedigitaltrimbuttonsanddeterminethe
centertrimpositionusingtheaudiblebeeps/tonesforreference.
PoweronthetransmitterandconfirmthattheLEDindicatorisglowingsolidred.
ThenconnectandinstalltheLiPoflightbatteryintheairplane.
Withtheflightbatteryconnectedtothecontrolunit,theruddershouldmove
backandforthbrieflytoindicatethatthecontrolunithasinitializedproperly.
NOTE:Ifyouhearahumming/buzzingsoundcomingfromthemagnetic
actuatorfortherudder(orlackthereof)afterinitializationiscompletethisis
normaldependingonthecurrenttrim/neutralpositionfortherudder.Also,the
rudderwilltypicallyonlymovebackandforthbrieflywhentherudderand
verticalfinareinaverticalorientation.
Andifyouhadtheleft‐hand/throttlesticksettothelowestpossibleposition
duringtheinitializationprocess(orifnot,lowerthesticktothelowestpossible
positionnow),theESC/motorwillnowbearmed.Usecautionasthepropeller
willnowspinwhentheleft‐hand/throttlestickisraisedbeyondthelowest
possibleposition!
Incasetherudderdoesnotmovebackandforthbrieflyand/ordoesnotrespondtocontrol
stickinputs:
•Iftherudderdoesnotmovebackandforthbrieflyand/ordoesnotrespondto
controlstickinputsyoudonothaveapositiveradiofrequency(RF)linkbetween
thetransmitterandreceiverofthecontrolunit.First,checktobesurethe
transmitterispoweredonandthatthePOWERLEDindicatoronthetransmitter
isglowingsolidred.Ifthetransmitterispoweredonandfunctioningproperly,
disconnecttheflightbatteryfromthecontrolunit.Then,reconnecttheflight
batteryandthecontrolunitshouldinitializeproperly.Theruddershouldnow
respondtocontrolstickinputsaslongasit’sinaverticalorientation.
Intheeventtherudderstilldoesnotrespondtocontrolstickinputswe
recommendre‐binding/linkingthetransmitterandreceiverthentryingagain.
Pleaseseethe‘TransmitterandReceiverBinding/Linking’sectionofthismanual
formoreinformation.

15
Incasetherudderdoesrespondtocontrolstickinputsbutyouhavenocontrolofthe
motor:
•Iftherudderdoesrespondtocontrolstickinputsbutyoudonothavecontrolof
themotoryouhaveapositiveRFlinkbetweenthetransmitterandreceiverbut
theESC/motordidnotarmbecausetheleft‐hand/throttlestickmaynothave
beensettothelowestpossibleposition.Checktobesuretheleft‐hand/throttle
stickisinthelowestpossibleposition,andonceinthecorrectpositionthe
ESC/motorshouldbearmedandrespondtocontrolstickinputsaccordingly.
AfterconfirmingthecontrolunitisinitializedandtheESC/motorhasarmedproperly
yourNano‐MicroStick75isreadytofly.However,pleasereviewthefollowingsections
ofthemanualBEFOREproceedingwiththefirstflight.

16
IntheeventyouarenotfamiliarwiththecontrolsofyourNano‐MicroStick75,pleasetake
thetimetofamiliarizeyourselfwiththemasfollowsandbeforeattemptingyourfirstflight.
Theleft‐handstickonthetransmittercontrolsthethrottle.Whentheleft‐handstick(also
knownasthe‘throttle’stick)isinthelowestpossiblepositionthepropellerwillnotspin.
Movingtheleft‐handstickupwardwillincrease
thespeed/RPMofthepropeller.Increasingthe
speedofthepropellerincreasesthespeedof
themodelandalsoprovidesthethrustneeded
toclimb/increasealtitude.
Decreasingthespeed/RPMofthepropellerby
loweringtheleft‐handstickwilldecreasethe
speedofthemodelandreducethrustmaking
itpossibletodescend/decreasealtitude.
Duringflightyoucanalsoadjustthethrottletoaposition(typicallyhavingtheleft‐handstick
settobetween1/3and1/2ofitstravelabovethelowestpossibleposition)tocruiseata
givenaltitude.
Fli
g
ht Controls and Trimmin
g

17
Theright‐handstickcontrolstherudder.Movingthesticktotheleftwillmovetherudderto
theleft.Thiswillroll/turntheairplanetotheleft.
Movingthesticktotherightwillmovetheruddertotheright.Thiswillroll/turntheairplane
totheright.
NOTE:Theruddermaynotalwaystravelthesameamounttotheleftandtotheright.This
isnormaldependingonthecurrenttrim/neutralpositionfortherudder.Also,therudder
mustbeinaverticalorientationinordertocheckforpropermovementwhentheairplane
isnotflying.Anyhumming/buzzingsoundcomingfromthemagneticactuatorforthe
rudder(orlackthereof)isalsonormal.
Theruddertrimcanbeusedtohelpkeeptheairplanefromdrifting/turningleftorright
duringflightwithnoright‐handstick/ruddercontrolinput.Forexample,iftheairplanedrifts
totherightinflight,addlefttrimuntiltheairplanefliesasstraightaspossiblewithout
drifting.
Andonceyou’refamiliarwiththeprimarycontrolsoftheairplaneyou’realmostreadytofly!

18
TherelativelysmallsizeandlightweightoftheNano‐MicroStick75makesitidealforflying
indoorsinsuitablespaces,suchasagreatroomathomeoraconferenceroomattheoffice,
approximately15‐feetby15‐feetwith8+footceilings.However,westronglyrecommend
whetheryou’reafirst‐timeorexperiencedpilotthatyoumakeyourfirstflightsinalarger
indoorspace,suchasabasketballgymorwarehouse,untilyouarefamiliarwiththe
handlingandcapabilitiesofthemodelandit’sproperlytrimmed.Also,ifyouareafirst‐
timepilotwehighlyrecommendallowingamoreexperiencedpilottotestflyandproperly
trimthemodelbeforeattemptingyourfirstflight.Aprovenflyableandproperlytrimmed
modelissignificantlyeasierandmoreenjoyabletofly!
Whenyou’rereadytomakeyourfirstflightsyou’llwanttoselectasuitableopenareafreeof
peopleandobstructions.Andafteryou’veproperlytrimmedtheairplaneandbecome
familiarwithitshandlingandcapabilitiesyou’llbeabletoflyinsmallerandlessopenareas.
PLEASENOTE:TheNano‐MicroStick75isdesignedtoonlybeflownindoors.
Nowthatyou’veselectedasuitableflyingareayourNano‐MicroStick75isreadytofly.And
whenmakingyourfirstflightswesuggestfollowingthesesteps:
TherearetwowaystogettheNano‐MicroStick75intotheair.Thefirst,andour
suggestedmethodforfirst‐timepilotsandforthefirstfewflightsforexperienced
pilots,istohand‐launchthemodel.Thisiseasytoaccomplishbyholdingthefuselage
stickofthemodel(justbehindthebattery)betweenyourindexfingerandthumbwith
thewingsandnoselevel.Then,raisetheleft‐hand/throttlesticktoapproximately1/2
(themodelwilltypicallyclimbslowlyormaintainaltitudeatthisstickposition/throttle
setting)andgently‘push’themodelforward.Theairplanewillbeflyingalmost
immediatelyafteritleavesyourhandallowingyoutofocusonusingtherudderto
keepthewingslevelandthrottletomaintainthedesiredaltitude.
ThesecondwaytogetthemodelintotheairistoperformaRiseOffGround(ROG)
takeofffromasmooth,levelsurface.However,inordertoperformanROGtakeoff
yourchosenindoorflyingareaMUSThaveasuitableamountofopenspace.To
performanROGtakeoff,setthemodelonthetakeoffsurfacethenadvancetheleft‐
hand/throttlesticktoapproximately3/4tofulltravel.Whenthemodelreachesflying
speeditwillriseofftheground,anddependingontheamountofspaceavailableuntil
Selectin
g
a Fl
y
in
g
Area
Fl
y
in
g

19
themodelreachestheceiling,itmaybenecessarytoquicklyreducethestick
position/throttlesettingtoapproximatelycruise(between1/3and1/2stickposition)
inordertoavoidacollision.
NOTE:Afterhand‐launchortakeoffyoumustbesuretonotraisethenoseofthe
airplanetoomuch(morethanapproximately20‐30degrees)asdoingsocouldcause
theairplanetostallandcrash.Thisisoneofthemostcommonwaysforfirst‐time
andlow‐timepilotstocrash.Tolowerthenoseoftheairplane,lowertheleft‐hand
stickposition/throttlesetting.
Inmostcasesitwillbebesttofocusonturninginonlyonedirectionuntilyouhavea
goodfeelforthehandlingandcapabilitiesofthemodel.Youwillalsofindthatit’s
possibletoturnwellatapproximatelycruisespeed(between1/3and1/2left‐hand
stick/throttleposition)butthatyoucanturnfasterwithmorethrottle/speedand
ruddercontrolinput.However,besureyoudon’taddtoomuchthrottle/speedasit
willcausethemodeltoclimbduringaturn(anddon’tusetoolittleasthemodelwill
descendduringaturn).
Whenturningfromonedirectiontoanother,inthecaseofperformingafigure8for
example,you’llfindthatincreasingthrottle/speedquicklywhenchangingthedirection
oftheturn,thendecreasingitagainafterestablishingtheturninthenewdirection,
willhelpreducetheamountofspacerequiredtochangedirectionasneeded.Thiswill
takesomepracticetogetusedtosoit’sbesttoonlychangedirectionsifyourindoor
flyingareaallowsforitcomfortably.
Ifyoufindtheairplaneconstantlydrifts/turnsleftorrightwithoutanyruddercontrol
inputyou’llneedtomakeadjustmentstotheruddertrimsettingusingthetrim
buttonsonthetransmitter(youcanfindmoreinformationregardingthelocationand
functionofthetrimbuttonsinthe‘TransmitterDetails’and‘UnderstandingtheFlight
ControlsandTrimming’sectionsofthismanual).
It’simportanttocontinuemakingtrimadjustmentsasneededuntiltheairplane
maintainsstraightandlevelflightwithverylittledriftingorruddercontrolinput.Also,
ifthisisyourfirstairplanemodelwehighlyrecommendallowingamoreexperienced
pilottoproperlytrimthemodel.Aproperlytrimmedmodelissignificantlyeasierand
moreenjoyabletofly!
Toland,reducetheleft‐hand/throttlestickpositionto1/4orless.Atapproximately4
to6inchesabovethegroundlowerthestick/throttlecompletelywhileallowingthe
airplanetodescendnaturally.Insomecasesyoucanalsoaddasmallamountof

20
throttlejustbeforetheairplanecontactsthegroundtoraisethenoseslightlyand
‘flare’forasmoothlanding.
INTHEUNFORTUNATEEVENTOFACRASHORPROPELLERSTRIKE,NOMATTERHOW
MAJORORMINOR,YOUMUSTLOWERTHELEFT‐HAND/THROTTLESTICKTOTHE
LOWESTPOSSIBLEPOSITIONASQUICKLYASPOSSIBLETOPREVENTDAMAGETOTHE
ESCOFTHECONTROLUNIT.
Ifyoudonotlowertheleft‐hand/throttlesticktothelowestpossiblepositioninthe
eventofacrash/propellerstrikeitcanresultindamagetotheESCwhichmay
requirereplacementofthecontrolunit.
NOTE:Crashdamageisnotcoveredunderwarranty.
IMPORTANTNOTE:Therubberspinnerprotectsobjectsfromthetipofthepropeller
shaftintheunfortunateeventofcontactandalsoprotectsthepropeller,shaft,
gearboxandairframebyabsorbingimpacts.Ifthespinnerevercomesloose,orwhen
replacingthepropellerwithanewone,besuretoALWAYSre‐installthespinner
beforethenextflight.Mostglueswillnotworkwellforinstallingthespinnersowe
suggestusingsilicone,shoegoooranyothersuitableadhesivetogluethespinnerto
thesidesofthepropellerhub.Also,besurethespinnerisalignedproperlybefore
theadhesivesets/driesforsmooth,vibrationfreeperformance.
It’spossibletoadjustthepositionofthewingandcenterofgravity(CG)tofine‐tunethe
overallflightperformanceandhandlingoftheNano‐MicroStick75invariousflyingareasand
conditions.Forexample,movingthewingforward/towardthefrontofthemodelwillresult
inalessnoseheavyCGthatallowsthemodeltoflymoreslowlyandwithamore‘nosehigh’
attitudeincruiseflight.Thisisparticularlydesirablewhenflyinginsmallerindoorareaswhile
movingthewingbackward/towardtherearofthemodelresultsinamorenoseheavyCGfor
fastercruiseflightinlargerindoorareas.
Outoftheboxthefront/leadingedgewingandlandinggearmountonthefuselagestickis
typicallypositionedapproximately1‐7/8”(47.5mm)fromthefrontofthegearbox.This
wing/CGpositionworksverywellinmostflyingareasandconditions.However,byloosening
thescrewinthefront/leadingedgewingandlandinggearmountandcarefullymovingthis
andtherear/trailingedgewingmountonthefuselagestickyoucanchangetheoverallwing
positionandCG.
Ad
j
ustin
g
the Win
g
Position and Center of Gravit
y
Table of contents
Other Ares Toy manuals

Ares
Ares Gamma V2 User manual

Ares
Ares Gamma 370 Pro User manual

Ares
Ares Mini Gamma AZSA3150 User manual

Ares
Ares Gamma 370 Pro User manual

Ares
Ares Crusader II RTF Manual

Ares
Ares Chronos FP 110 User manual

Ares
Ares Chronos CX 100 User manual

Ares
Ares Optim 80 CP User manual

Ares
Ares sopwith pup Manual

Ares
Ares Alpine 1200 Operator's manual

Ares
Ares V-Hawk X4 User manual

Ares
Ares Gamma 370 Pro User manual

Ares
Ares Gamma V2 Float Set User manual

Ares
Ares Taylorcraft 130 User manual

Ares
Ares fokker D.VII User manual

Ares
Ares Gamma 370 Pro User manual

Ares
Ares V-Hawk X4 Manual

Ares
Ares Gamma Pro V2 User manual

Ares
Ares GAMMA 370 V2 User manual

Ares
Ares Alara Manual