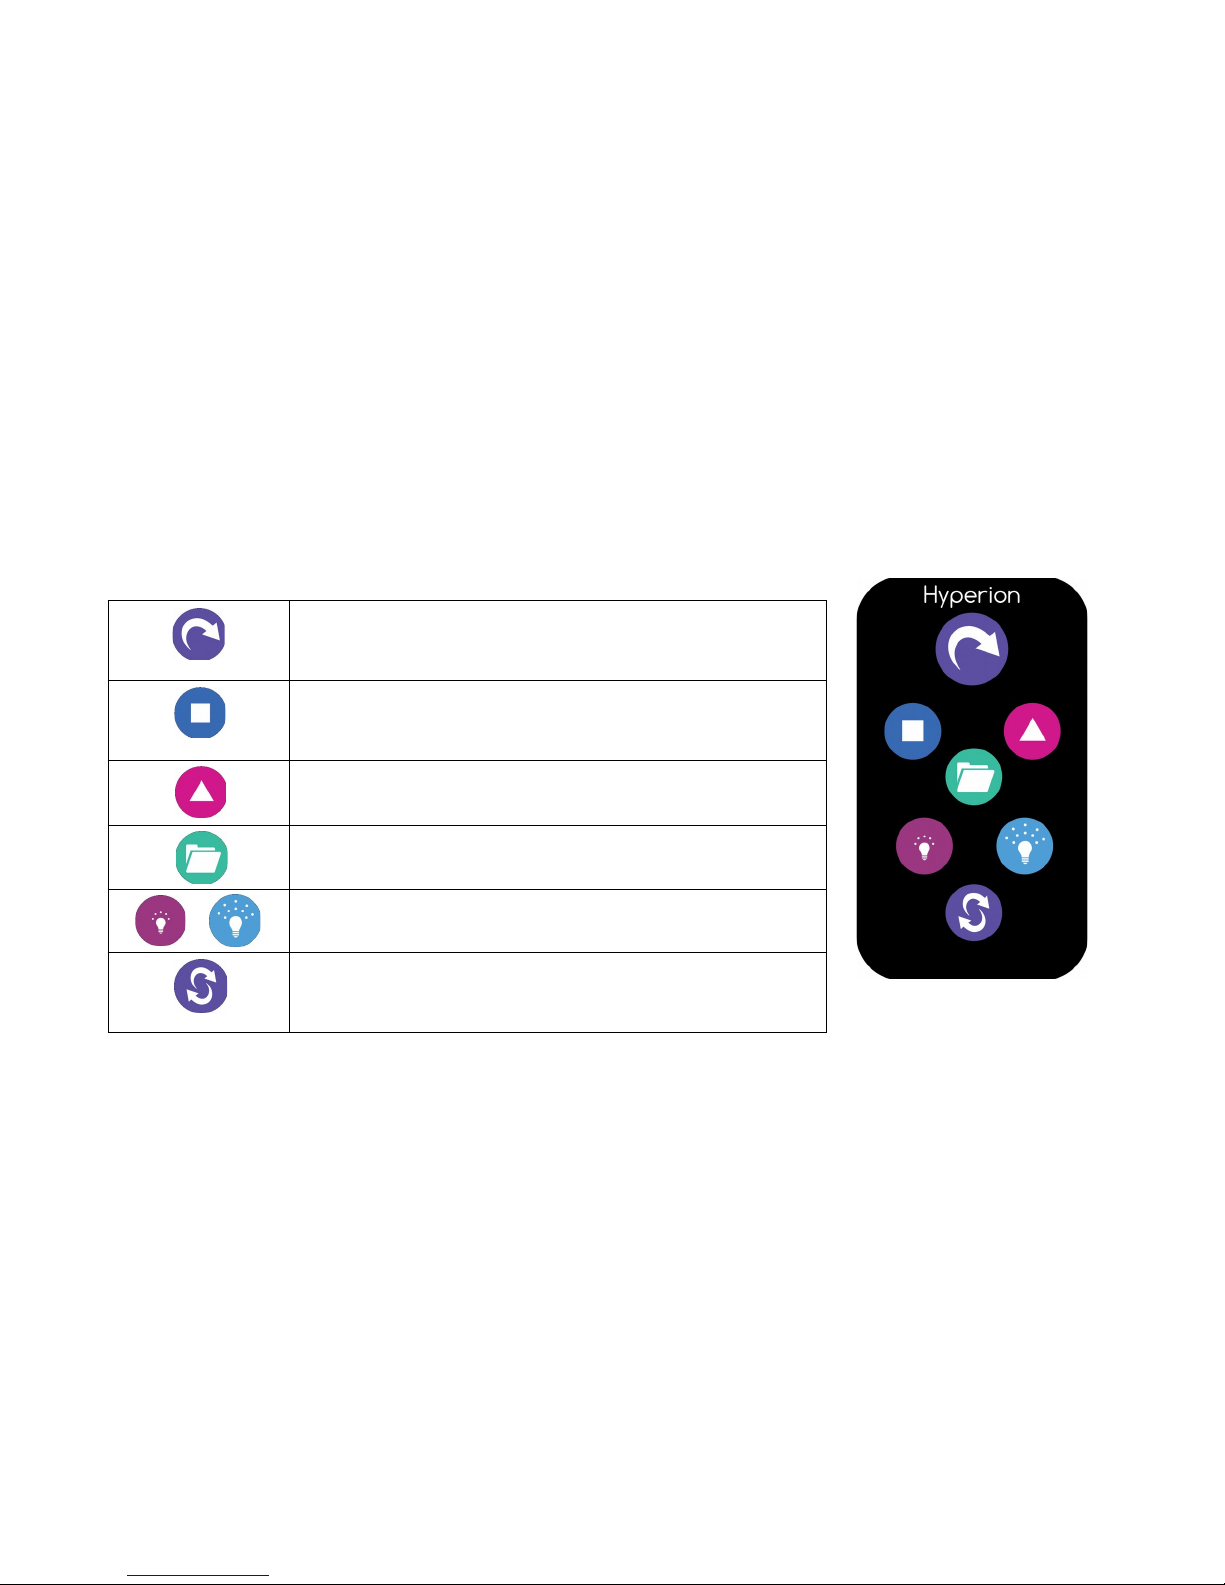
manuals.online logo
Brands
  1. Home
  2. •
  3. Brands
  4. •
  5. Argent Data Systems
  6. •
  7. Lighting Equipment
  8. •
  9. Argent Data Systems Hyperion Hoop User manual

Argent Data Systems Hyperion Hoop User manual

This manual suits for next models

2

Popular Lighting Equipment manuals by other brands

Life 39.9F70020C quick start guide

Life

Life 39.9F70020C quick start guide

EuroLite LED ML-20 user manual

EuroLite

EuroLite LED ML-20 user manual

LIGMAN OD-50141 installation manual

LIGMAN

LIGMAN OD-50141 installation manual

Home Accents Holiday 1002461144 instructions

Home Accents Holiday

Home Accents Holiday 1002461144 instructions

Experia IRiS Ripple Light instruction manual

Experia

Experia IRiS Ripple Light instruction manual

Erco Gecko Mounting instructions

Erco

Erco Gecko Mounting instructions

Inter-lux ZTA.100.Surface Installation and maintenance instructions

Inter-lux

Inter-lux ZTA.100.Surface Installation and maintenance instructions

Whelen Engineering Company TN Series installation guide

Whelen Engineering Company

Whelen Engineering Company TN Series installation guide

IKEA BJÖRKSPIREA manual

IKEA

IKEA BJÖRKSPIREA manual

Toolland PM 6640 instruction manual

Toolland

Toolland PM 6640 instruction manual

GTD GTD-LP200 user manual

GTD

GTD GTD-LP200 user manual

LIVARNO home 1105-W-UK manual

LIVARNO home

LIVARNO home 1105-W-UK manual

ProLights EclPar IPMFC user manual

ProLights

ProLights EclPar IPMFC user manual

Velvet EVO Series user manual

Velvet

Velvet EVO Series user manual

IDTOLIGHT GENT installation instructions

IDTOLIGHT

IDTOLIGHT GENT installation instructions

MAYTONI S35 installation manual

MAYTONI

MAYTONI S35 installation manual

MaxLite MLFP14DP4535 user manual

MaxLite

MaxLite MLFP14DP4535 user manual

SLV Elektronik 550621 instruction manual

SLV Elektronik

SLV Elektronik 550621 instruction manual

manuals.online logo
manuals.online logoBrands
  • About & Mission
  • Contact us
  • Privacy Policy
  • Terms and Conditions

Copyright 2025 Manuals.Online. All Rights Reserved.

Hyperion
Hoop
Owner’s Manual
Revised 12/3/2018
Includes 2018 Phoenix Hoop and Hyperion ite
This manual has information for casual and advanced users, plus troubleshooting
and repair information. You probably don’t need to read the whole thing, but we
recommend at least skimming the first section.
Sales, service and support:
[email protected]om
(800) 274-4076 (or from outside the US, + 805 6 9 45 5)
Argent Data Systems, Inc.
2 Tama Ln Ste B
Santa Maria, CA 93455
Important Notes
Your hoop comes pre-loaded with more than a thousand patterns and is ready to use, but
please read this section first!
For hoops with removable batteries:
Use only 145 size lithium-ion rechargeable batteries in your hoop (1 44 size for
the Hyperion Lite).
Put only one battery at a time in your hoop.
Don’t try to use the hoop’s batteries in a device designed for regular AA batteries.
The higher voltage may cause damage to the device.
Don’t short the battery terminals! The battery can get extremely hot or even catch
fire. Don’t keep it in a pocket with your car keys, for example. We’re speaking from
personal experience on this one.
When the hoop shows a single flashing red light, the battery is nearly dead. Shut off
the hoop, change batteries, or connect it to a USB charger. Draining the battery
more than necessary will shorten the battery's life.
Phoenix hoops ship with their battery disconnect switch in the ‘off’ position. This switch is
located inside the open end of the hoop. Press this switch until it clicks to activate your
hoop. You’ll normally only use this switch for long-term storage or shipping. Out is ‘off’, in
is ‘on’.
Right out of the box your hoop may be a bit out of round. Leave it flat on the ground,
preferably in a warm place, and it will return to its normal shape.
Batteries come partially charged. You can use them right away but they might not last
long until they’ve been fully charged. If you're the patient type, you can put them in the
charger while you read this manual.1
About this Manual
This is very possibly the longest manual ever written for a hoop that includes no
information on how to actually hoop. Don’t be intimidated by the size of the manual or
the number of buttons on the controls – you can get started by just turning on the hoop
and experimenting. It’s safe to press any button on either remote to see what happens.
All of the functions that have lasting effects require a button to be held down. Everything
else can be undone by turning the hoop off and back on again.
Software updates for the hoop can add and change features and the functions of the
remote controls. This manual applies to the latest software version at the time it was
printed. If you install software updates, you should check the Hyperion website for
updated instructions.
Or if you're like 90% of new hoop owners, you're probably only reading this manual now because you ran all of the batteries down as soon as
you got the hoop out of the box and now you have to wait for them to recharge. We understand.
This manual covers both the original Hyperion hoop and Hyperion Phoenix hoops starting
with the 2 18 model. The main difference between the two is the battery configuration.
The original Hyperion has a single removable battery, and the Phoenix has five
permanently installed batteries. Their software is identical. The Hyperion Lite has
different software but functions essentially the same, except for the lack of wireless
connectivity and USB charger.
Turning on the Hoop – Removable battery models
Put a charged battery in the open end of the hoop, with the positive end (marked with a
‘+’) facing out. Be careful – leaving a battery in backwards could damage the charging
circuit in some hoops. Adding a bit of tape to the ‘+’ end of the battery can make it easier
to identify by sight and feel2.
Connect the two ends of the hoop. A spring button locks the connector into one of two
positions. The outer hole is the ‘off’ position, and the inner is the ‘on’ position. The hoop
should turn on as soon as the connector is closed completely.
Turning on the Hoop – Internal battery models
Phoenix hoops have two power switches. One is located inside the open end of the hoop.
This is the battery disconnect switch, and it’s used to completely disconnect the internal
batteries. You can normally leave this switch on unless you’re not planning to use your
hoop for an extended period, if you need to ship your hoop, or if you need to reset the
electronics.
Once the battery disconnect switch is on, you can turn on the hoop by pressing the button
located next to the USB port, or hold down any button on the remote.
2 We like to use glow-in-the-dark tape to make the batteries easy to find in the dark. Especially when you drop them on the ground in the
middle of a crowd at a music festival.
Startup
The hoop will always display a short startup pattern to indicate it’s starting and to test all
of the LEDs. The first LED will light red and the last will light blue, and all of the LEDs will
light either white or green (depending on the software version) in quick succession. If you
don’t see the red and blue LEDs or if any of the other LEDs fail to light, follow the
troubleshooting information found later in this manual.
Out of the box, your hoop is set to shuffle mode and will change to a random pattern
every 1 seconds. The default brightness is about 75%.
Changing Patterns and Modes
Most of the hoop’s functions are controlled by the two remote controls. The small
keychain remote has just the basics. The large remote has more options and buttons to
jump directly to favorite patterns and folders.
The patterns that come loaded on the hoop are organized into 16 folders. The hoop will
start out playing patterns from every folder. You can access a specific folder by pressing
one of the 16 unlabeled color buttons on the big remote. The first button, in the upper left,
corresponds to the first folder, with the folders arranged in alphabetical order. This
manual won’t list the details of the pattern folders because they’re frequently being
updated and occasionally reorganized. Generally each folder sticks to a theme, like
rainbows or characters and logos.
If you press a folder button, the hoop will only play patterns from that folder until you
choose another folder or press the ‘next folder’ button to exit folder mode.
To make the hoop stay on the current pattern, press the play/pause button or hold the
button. To resume cycling through patterns, press the button again.
When its battery runs low, the hoop will start dimming the LEDs to squeeze a few more
minutes out of the battery. Once the battery is too low to keep the hoop running, it will
switch to showing a single blinking red LED.
In some cases the hoop might die before giving a low battery warning, particularly if you
put in a battery that was already almost dead. If this happens, the pattern will freeze and
will usually appear red or orange. Remove the dead battery promptly; leaving a battery to
run down until it’s completely dead will shorten its life.
Charging
Removable batteries are charged using the provided 2-slot charger, which comes with its
own instruction manual. They can also be charged more slowly, one at a time, when
installed in the hoop if the hoop is connected to a USB power source. Note that the
Hyperion Lite does not have an internal charger.
Non-removable batteries must be charged via USB. Simply plug your hoop in to any USB
power source with the provided cable, or any Micro-USB cable.
Automatic Sleep Mode
When it’s flat on the ground and not moving, the hoop will automatically go to sleep after
a few seconds. It’ll wake up again as soon as you move it. This function can be turned off
in the configuration file. It’s useful for working with multiple hoops on stage or if you’re
just taking a break at a festival. It still uses some power, though, and shouldn't be left in
sleep mode for more than a couple of hours.
hat To Do hen Something Goes rong
If you have trouble with your hoop, please jump to the troubleshooting section of this
manual for things to check and fixes for common problems.
hat's in the box?!
Your hoop comes with an accessory pack that contains several items. The contents may
vary a bit from what's in this manual, but presently the kit includes:
•Battery charger. (Removable battery models only.) Charges one or two batteries
at a time, and includes an AC wall adapter and a DC car adapter. The charger
includes its own manual. It's not nearly as interesting as this manual.
•Remote controls. We'll get to those a little later on.
•USB cable. A standard micro USB type B cable like most cell phones use for
charging. You can use this both to charge the battery and to connect the hoop to a
computer.
•Spare remote control battery. CR2 25 size coin cell. Both remotes have a small
battery tray at one end that can be pulled out after squeezing the tab in with a
fingernail.
•Petroleum jelly. If the connector gets too tight to open and close easily, a tiny dab
of this stuff will help it slide.
•Sandpaper. You can use this to add some grip to your hoop.
•Manual. Looks like you’ve figured this one out already.
•O-ring. Earlier models sometimes had a small gap between the ends of the hoop
that was filled by an o-ring, and this one was included as a spare. It's still included in
case your hoop develops a gap over time as it breaks in.
•Hex key. Also called an Allen wrench – it's the black L-shaped metal tool. . 5 ”
size for current hoops, . 35” for older ones. This tool can be used to disassemble
your hoop or to tighten the screws if they start to work loose.
Grip
Your hoop ships smooth, with no grip treatment. One of the most popular ways to add
grip is to lightly sand the inside of the hoop. The accessory pack includes two different
grades of sandpaper that you can use to customize the grip to your liking. You can also
add grip with tape – ½” gaffer tape or 3M Nexcare first aid tape both work well. Sanding
and taping will both tend to cause the hoop to collect more dirt. See the maintenance
section for cleaning tips.
If you add tape to your hoop, be sure you don’t cover up the remote control receiver. The
receiver is located on the inner edge of the hoop, just below the USB port.
About the Name
It’s pronounced hy-PEER-ee-en. In Greek mythology, Hyperion (“The High One”) was the
Titan of light, son of Gaia (goddess of Earth) and Uranus (god of the sky). It's also the
name of a moon of Saturn3, a great series of books by Dan Simmons, the genus of a really
scary-looking beetle, the world's tallest known living tree, Los Angeles' main sewage
treatment plant, an unfinished epic poem by John Keats, Jim Raynor's flagship in StarCraft,
and a horribly boring piece of database reporting software that this author used in a
previous life when it was called something else. The hoop's named after the Titan,
though.
3Saturn seems like the obvious answer when you think of hoop-themed celestial bodies, but Jupiter’s largest moon, Ganymede, is named for the mythological
Trojan youth abducted by Zeus to be his cup-bearer, and in ancient Greek art as far back as 5 BC he’s depicted with a hoop. He’s also shown running
naked and holding a cockerel while rolling his hoop and I’m not sure what’s up with that, but you could probably still get away with it at Burning Man today.
As long as you didn’t get feathers everywhere, anyway.
Remote Control Functions
Your hoop comes with two remote controls: a 7-button keychain remote with the most
commonly used functions, and a 44-button remote with more functions and presets.
The instructions here are for the current versions of the remotes. If you have an older
hoop, the remotes may have different labels. The functions are all the same, only the
labels have changed.
Keychain remote functions
Press for next pattern, hold to toggle shuffle
mode
Press for next chaser mode, hold to change
chaser motion
Next pattern motion mode
Next folder
Brightness up/down
Press to change rotate interval, hold to stay
on current pattern
44-Key remote functions (from upper left to lower right)
Brightness up/down
Hold current pattern or resume auto-play
Thumbs up / down – see playlist management
Show battery level
Next folder
Jump to folder 1-16 (numbered buttons)
Next / previous pattern (purple arrow buttons)
Next / previous palette (painter’s palette icon)
Change motion mode (color swirl icon)
Faster / slower auto-play time (rabbit and turtle)
Saved favorite patterns (stars 1-6)
Sync to music tempo (music note icon)
Shuffle on / off (twisted arrows icon)
Wireless link control
Sleep
Special functions
Menu (reserved for future use)
For best results, aim the remote control directly at the receiver. It’s located on the inner
edge of the hoop below the USB port.
Any Hyperion remote will work with any Hyperion hoop. If you’re using multiple hoops
close together, you can disable the hoop’s remote receiver temporarily to avoid
interference during a performance. To disable the remote receiver, press brightness up –
down – up – down. The hoop will briefly flash yellow, and the remote control will be
disabled until the next time the hoop is powered on. You can also disable the remote in
the configuration file.
About Pattern Files, Chasers, and Motion Modes
In its most basic mode, the Hyperion plays repeating light patterns at a constant rate.
Simple patterns, like fine texture patterns, may repeat faster than 1 times a second.
Slower color fading patterns might take several seconds to repeat, and some patterns are
constant. More than a thousand patterns come pre-loaded on your hoop. More
information about creating and managing patterns can be found later in this manual.
Some modes use only a single pattern file to create a pattern. Others use combinations of
overlay
or
palette
files as well to create more complex effects. Each pattern file can
optionally have a configuration file (with the same name as the pattern file but with a .ini
file type) that tells the hoop how to combine the files and what effects to apply.
Overlays are special single-line patterns, stored in their own folder, which the hoop can
display on top of regular patterns. Most often they are relatively simple, consisting of
points of light. Overlays can be set to move independently of the pattern. They work best
with dark or sparse patterns. Bright, dense patterns will tend to wash out the overlays and
make them hard to see.
Palettes are also image files, but instead of defining a pattern, they provide a set of colors
that are applied to other pattern files. Not all patterns are designed to work with palettes.
Several motion modes control how the chasers and patterns move. You can use the
motion mode buttons on the 44-key remote to select modes. Some of the modes will
rotate the pattern or chasers at a fixed rate and some will cause them to react to the
motion of the hoop. Try rotating the hoop on each axis to get a feel for how the different
motion modes work.