ARIDEA SOLUTIONS Pool Guardian User manual

3
Table of Contents Disclaimer
Disclaimer………………………………………………………………………….……..……………..….3
Privacy Policy……………………………...…………………………………………..……………..…..4
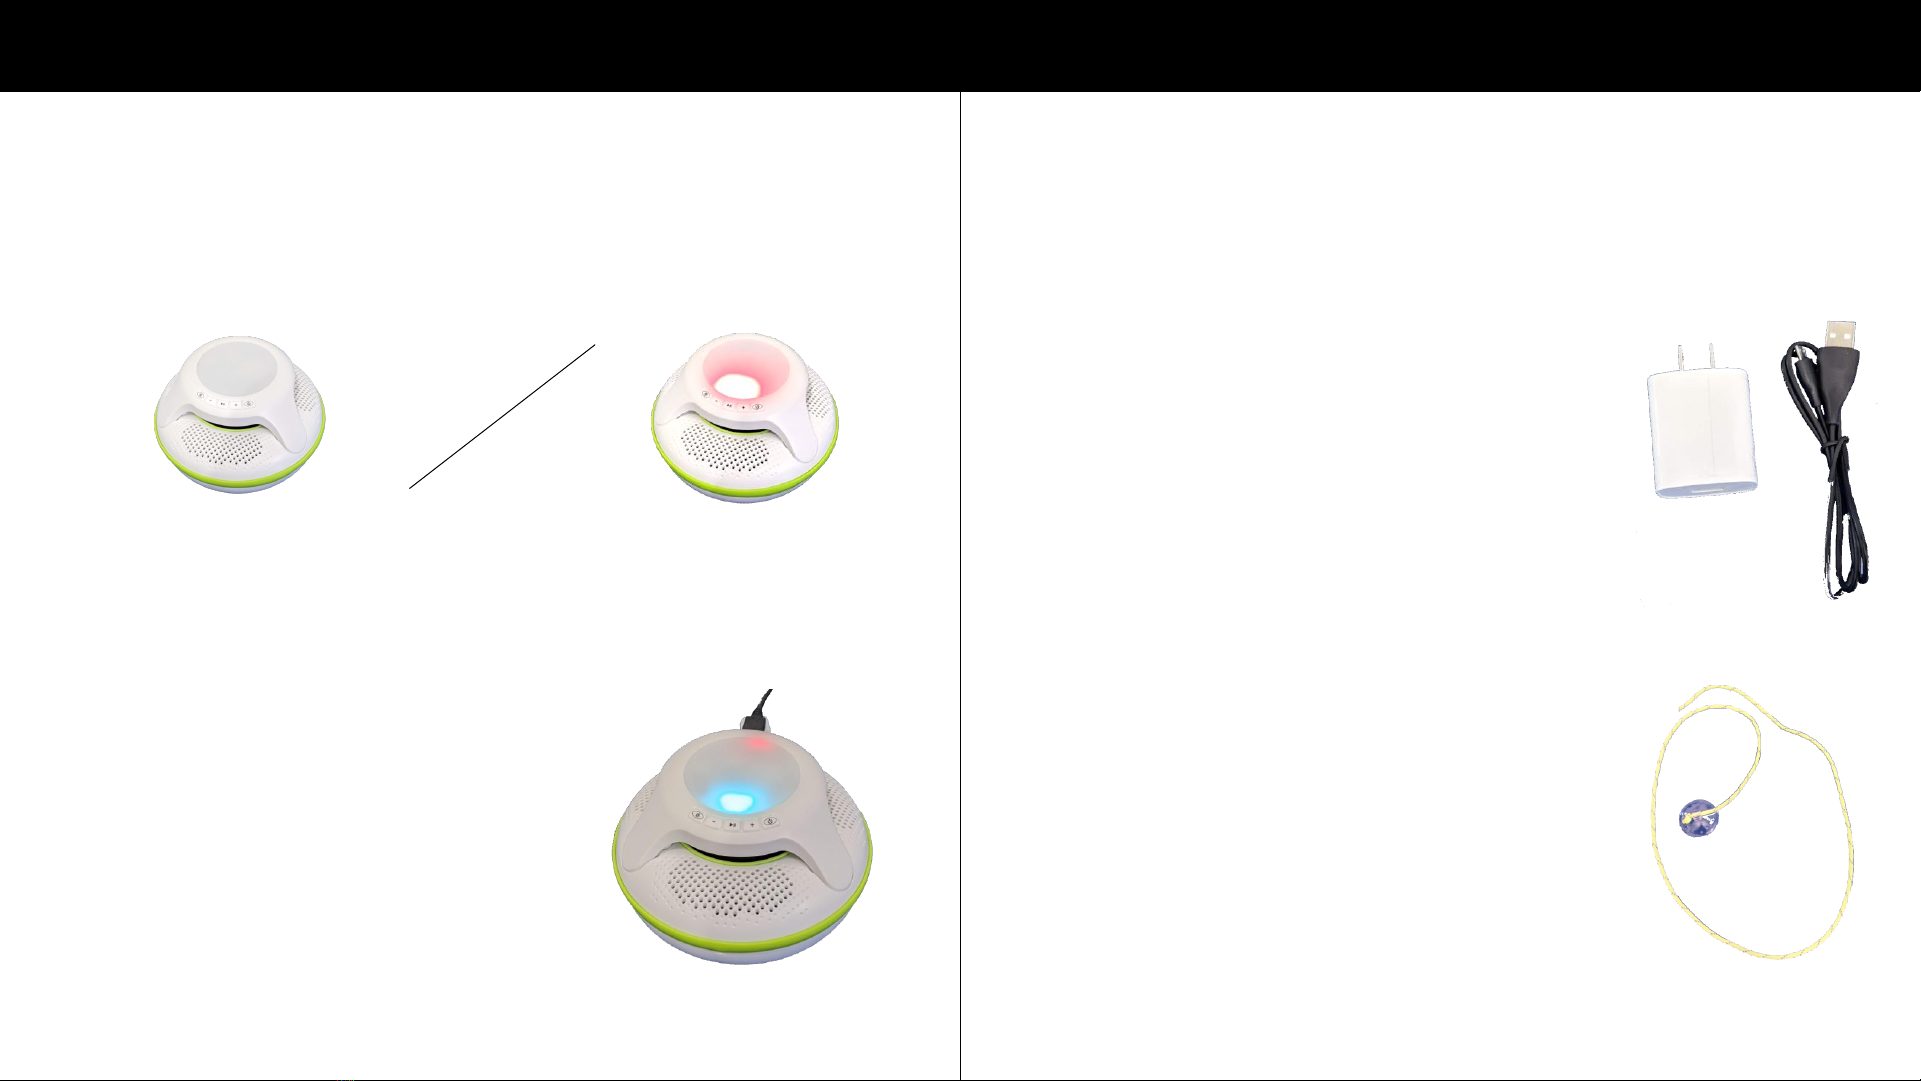
Package Contents…………………..................................................…..…………..…6-7
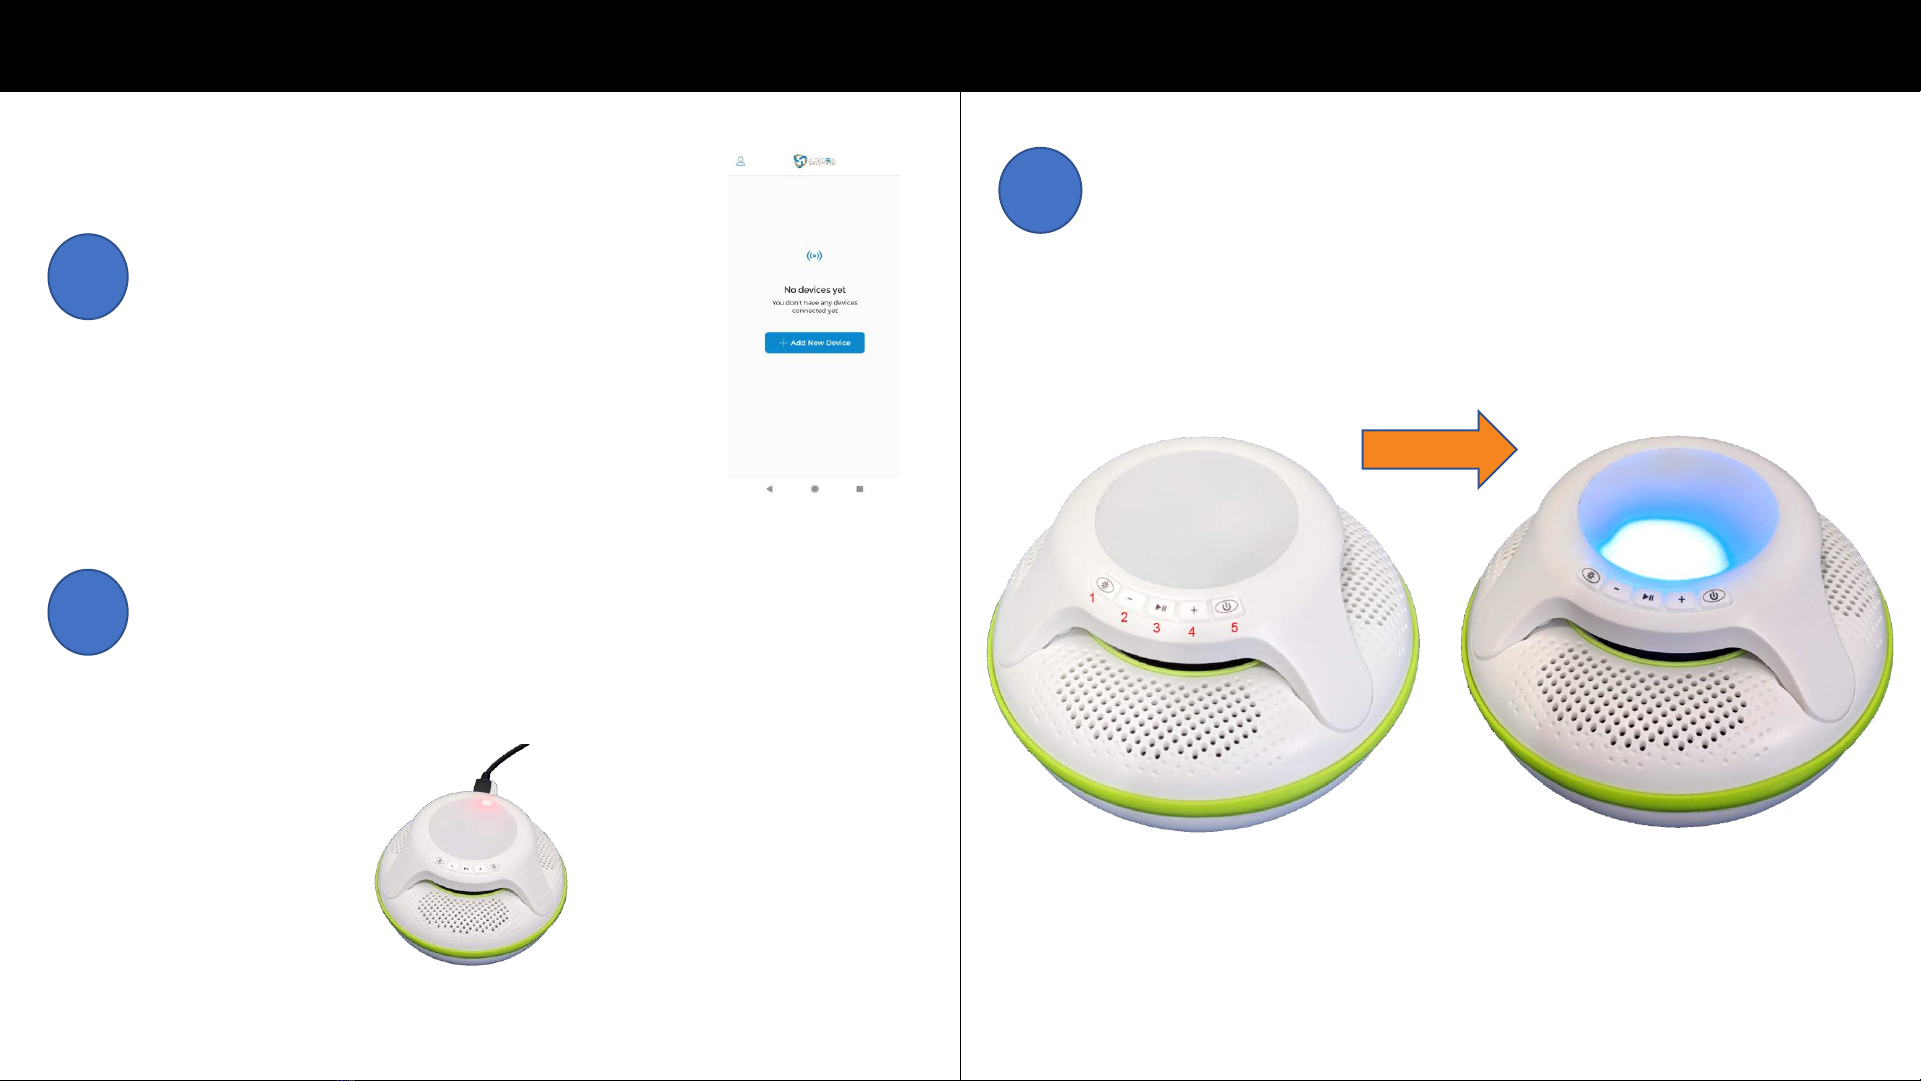
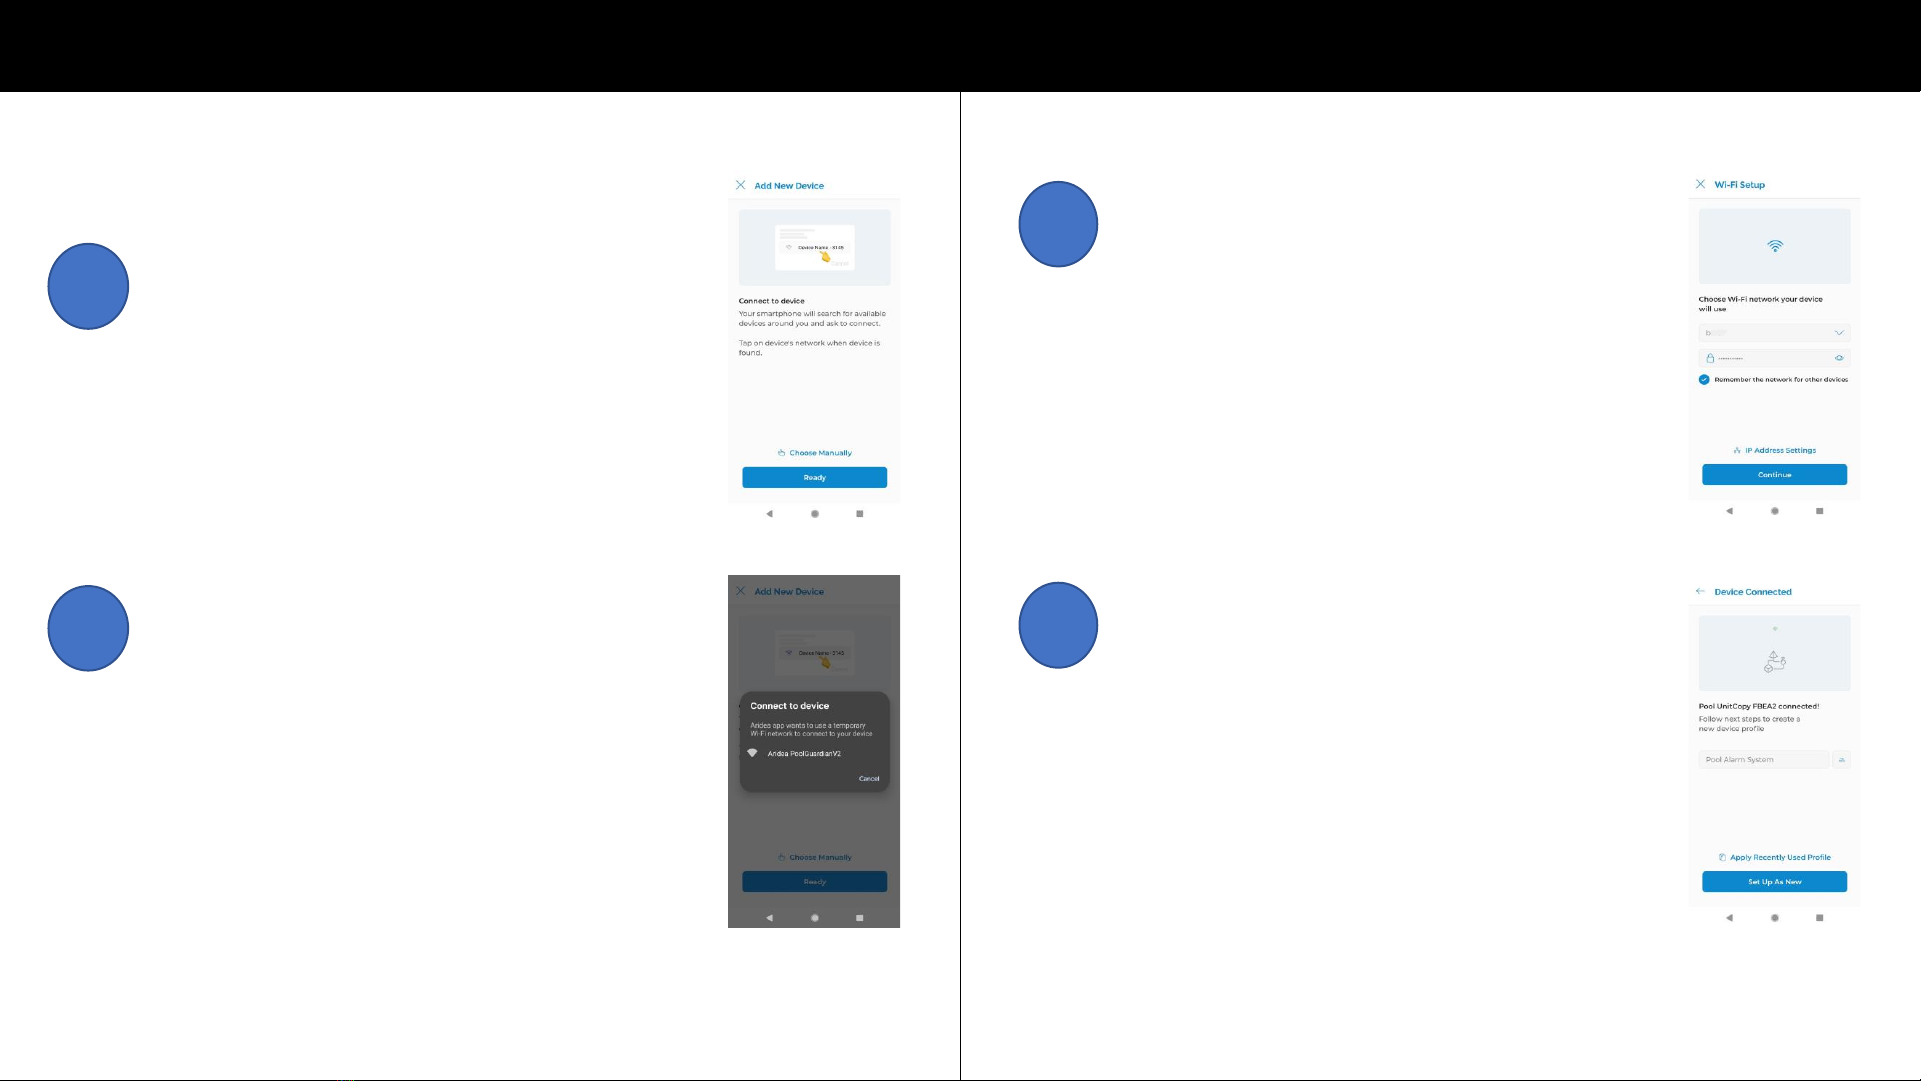
Initial Setup….…………………………………………………..…………………….................8-16
Pool Guardian System Hardware………..………………………………..………………17-25
Buttons……………………………....................................……..............17
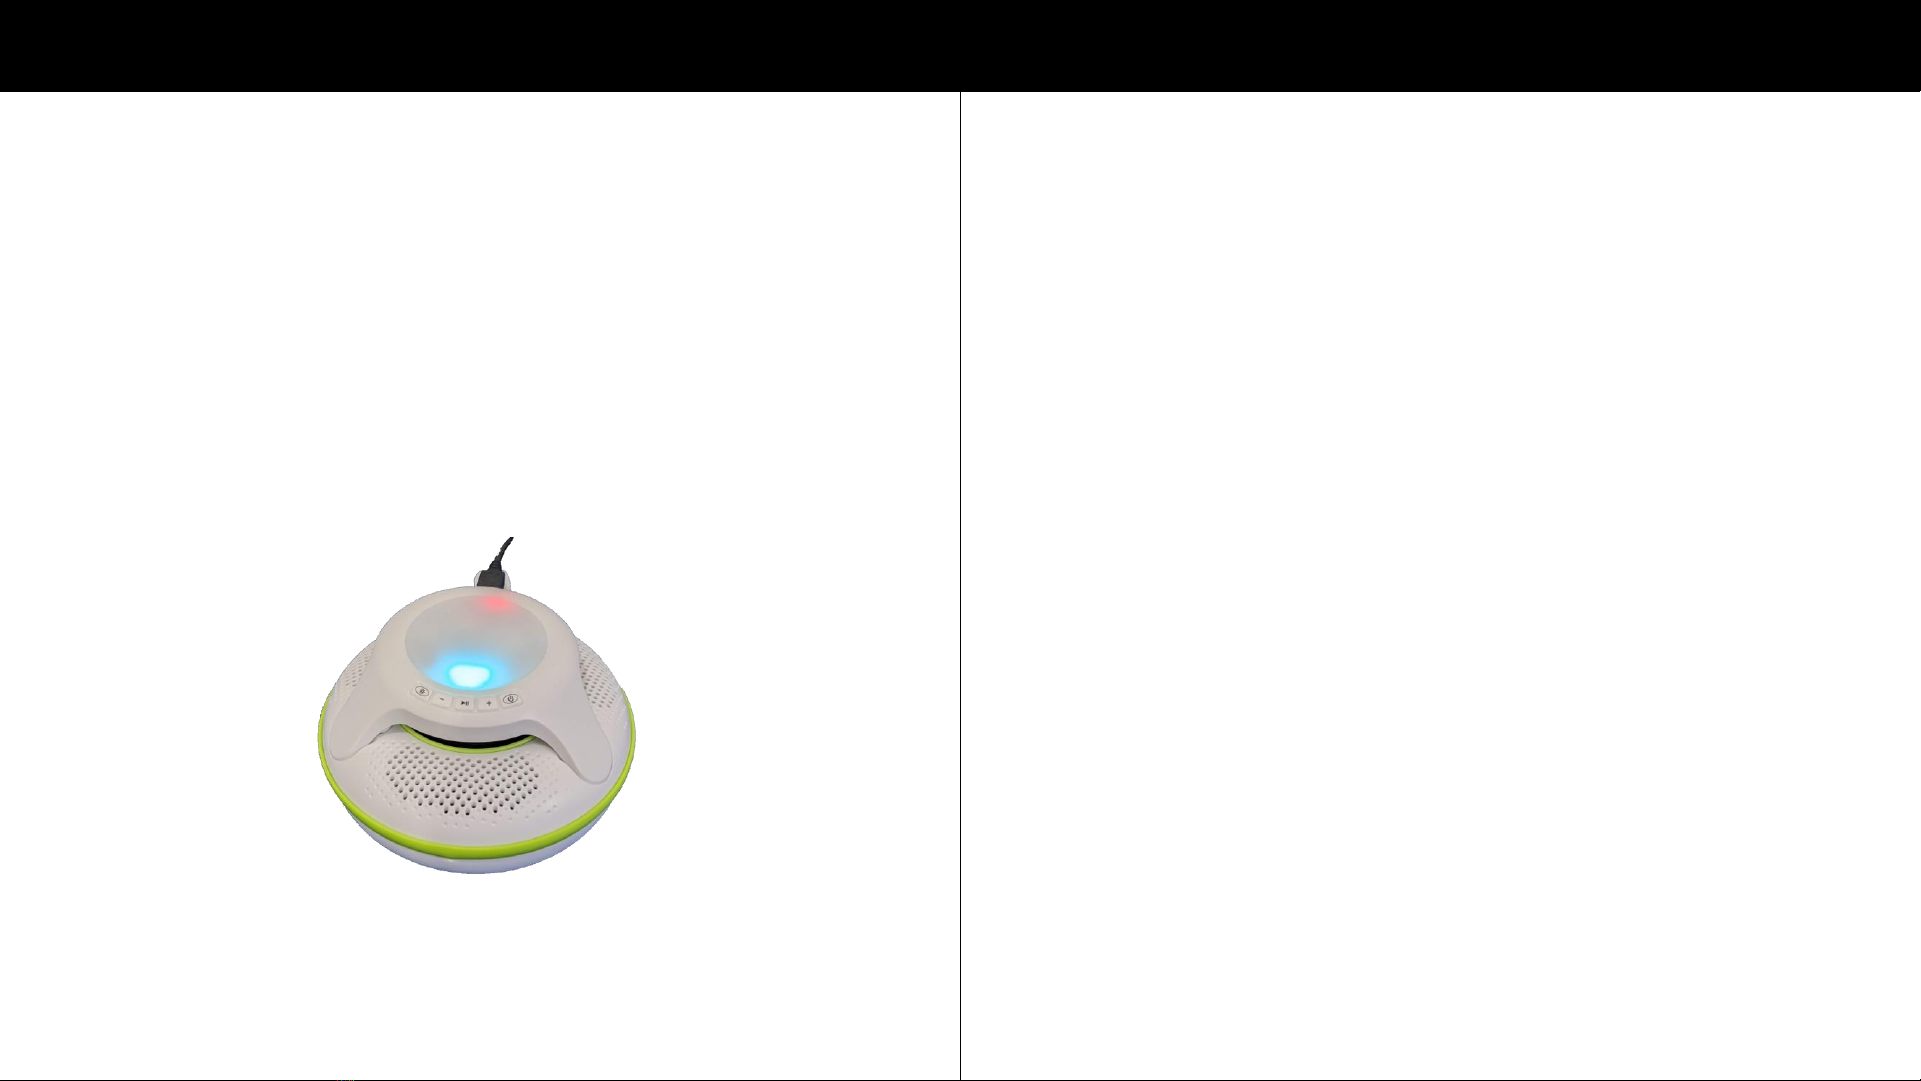
Turning Units On……………..……………………………………………...18-19
Turning Units Off………………..…………………………………..…………...20
Swapping Indoor/Outdoor Units………….………………..…………....21
Wireless Network Overview…………………………………………………22
Indoor Unit Placement………………………………………………………...23
Charging………..……………………………………………………………….24-26
Tethering………………………………………………………………....…………27
Using the App (iOS/Android)……………………………………………..……………...28-41
Menu………………………………………………………………..……….....28-30
Device…………………………………….........................................21-33
Bluetooth Operation…………………………………………………..…34-36
Hibernation Mode…………………………………………………………37-38
Notifications…………………………………………………………..………….39
Notification Types……………………….........................................40
Automations (Feature Release in Future Update)……...........41
Storage Information………………………………..................................................42
Pool Recommendations……………………………………………………………..............43
Troubleshooting…………………………………………………………………………………….44
Safety……………………………………………………………………………………………....45-46
Warranty………………………………………….……..................................................47
This device is intended for monitoring
purposes only and is not a substitute for pool
supervision, lifeguards, fences, gates, pool
covers, locks, or any other safety measures.
The Pool Guardian may not detect gradual
entry into the water and is not intended to
prevent drowning.
This device is not intended to replace any
other safety consideration; that is, adult
supervision, lifeguards, fences, gates, pool
covers, locks, and so forth, and some devices
may not detect gradual entry.

4 5
Privacy Policy
This privacy policy discloses the privacy practices
for Aridea Solutions. We are the sole owners of
the information collected through our website
and iOS/Android app. We will not sell or rent this
information to anyone.
We will use your information to respond to you,
regarding the reason you contacted us. We will
not share your information with any third party
outside of our organization, other than as
necessary to fulfill your request.
Unless you ask us not to, we may contact you via
email in the future to tell you about specials,
new products or services, or changes to this
privacy policy.
This page is intentionally left blank.

6 7
Package Contents Package Contents Continued
Outdoor Unit
Indoor Unit
The primary function of the outdoor unit is to alert when
there is a disturbance in the water.
The indoor unit acts as the
“communication base”, and alerts
loudly when a water disturbance is
sensed by the outdoor unit.
The Pool Guardian Pool Alarm System contains 2
swappable (interchangeable) units.
Charging Cable
Accessories
•24” USB to Micro-USB cable
•120VAC to 5VDC power
adapter (2.1A, 3.1A Max)
Outdoor Unit Tether
•1.5” diameter suction cup
(3/32” thru-hole)
•39” (1 meter) tether line
Reflective glow-in-the-dark
braided nylon (1/16” diameter)

8 9
Initial Setup Initial Setup Continued
Go to the App Store (iOS) or Google
Play (Android). Search for “Aridea
Solutions” and download the Aridea
app.
1
2
2
Open the app and tap Sign Up.
Enter your email address and agree
to the Terms and Conditions. Tap
Continue.
3Check your email for the confirmation message from
Aridea. Tap Create Password when you receive the
email. Create your password and tap Log In.

10 11
Initial Setup Continued Initial Setup Continued
Login to the app. Once logged in, tap
Add New Device.
4
5Unbox your Pool Guardian Pool Alarm System if
you have not already done so. Charge one of
the units for a minimum of 4 hours. Charger
connection is indicated by a red light above the
charging port.
6Begin charging the 2nd unit. Once the second
unit is plugged in, hold down the power button
for 5-6 seconds(number 5 pictured below, far
right button). The unit will go through a startup
sequence and begin flashing a quick, blue light.

12 13
Initial Setup Continued Initial Setup Continued
In the app, tap Ready.
7
8Your phone will search for a new Wi-
Fi network created by the unit. Once
found, tap on this network to
temporarily connect to it.
Note: you may need to enable
permission on your phone to allow
the app to connect to a new Wi-Fi
network.
9Tap Continue in the Choose Your Wi-
Fi Network screen.
Tap on your Wi-Fi network.
Enter your Wi-Fi password and tap
the option to Remember the
network for other devices.
Tap Continue.
The app will now configure the unit.
Once complete, you can name your
Alarm system and then tap Set Up As
New.
Note: Name them unique if you
employ more than one Pool Guardian
System.
10

14 15
Initial Setup Continued Initial Setup Continued
14
11 Select your time zone and tap Next.
At the Review Page, tap Finish.
12 Once finished you will see your alarm system as a
tile on the main screen. Tap your Pool Guardian’s
name(step 10 ) to access it..
Remove sticker and hold the power button down
on the previously charged (disconnected) unit for
5-6 seconds. It will go through a startup sequence.
After the red flashing light stops flashing, this unit
has associated with the other unit. There will be
no LED light on the disconnected unit at this point.
This disconnected unit is now configured to be the
outside unit (in the pool).
13
Lightly shake the disconnected unit to test. You will
see the light turn red, and then both units will
begin to alert. You will also see a notification on
your phone.
Clear the notification and tap Disarm in the app or
clear the current alarm by pressing the
“play/pause” middle button 3 for 3 seconds on
either unit.
Tap Arm to rearm the unit. You will want to adjust
and tune the threshold for proper sensitivity in
your pool.

16 17
Initial Setup Continued Buttons
Your device is now setup and ready to go!
Please Note: It is recommended to keep
the inside unit plugged into the charging
cable and the charging cable plugged into a
120VAC outlet.
Please make sure the rubber charging plug
is securely in place before placing the
outdoor unit in the pool.
If you have issues with any of these steps
please refer to our FAQ/Troubleshooting
section. We have several frequently asked
questions there, as well as some common
troubleshooting steps that should help you.
http://www.aridea.com/poolguardian
1. Swap: Hold to swap units (see page 21)
2. - (Minus): Used for factory reset (see
FAQ/Troubleshooting page on our site)
3. Play/Pause: Hold for 3 seconds on
either unit to mute current alarm.
4. + (Plus): N/A (future expansion)
5. Power: Hold 5-6 seconds for ON, and
10-12 seconds for OFF.

18 19
Turning Units On Turning Units On Continued
To turn the system ON, hold the power
button on the indoor unit for 5-6 seconds.
When a unit turns on you will see the LED
light go through a startup cycle. The indoor
unit if provisioned on the app will settle to a
slow fading teal blue when added to the
app, otherwise it is dark blue and blinking.
Indoor unit with light blue / teal light
(and rear red charging light)
Note: If the Outdoor unit is turned on
before the Indoor unit is on and in range,
the outdoor unit cannot connect to the
network and will go back to sleep.
Once the indoor unit is on, hold the power
button on the second unit for 5-6 seconds.
This unit will power on and become the
outdoor unit.
The outdoor unit will power up, flash dark
blue once, then the LED light will quickly
flash red for approx. 15 seconds and then
will go off(sleep) until the unit is disturbed
and triggers an alarm. The outdoor unit will
display a solid red light when an alarm is
triggered.

20 21
Turning Units Off Swapping Units
To turn the system OFF, hold the power
button on the indoor unit for 10-12 seconds.
After the indoor unit is off, hold the power
button on the outdoor unit for 10-12 seconds
to turn it off. Shake to ensure that it is off.
When a unit turns off you will see no light
from the LED (top display window).
Off unit
1. Disarm the system through the app. Bring
the outside unit in and place next to the
indoor unit.
2. Plug the charger into the outdoor unit. Make
sure that the red charging light is visible.
Lightly shake the unit to wake it.
3. The LED will start white, move to solid red
then start flashing red. When flashing red
press and hold the swap button.
4. Release the swap button when the LED turns
solid teal.
5. Once the unit starts slowly pulsing teal / light
blue, it has swapped to being the indoor unit,
and the former indoor unit has now become
the outdoor unit.
Dark Blue Teal / Light Blue

22 23
Wireless Network Overview Indoor Unit Placement
Dependability of the Pool Guardian Pool Alarm System is
predicated on quality wireless coverage.
Wireless Network Overview
The Pool Guardian Pool Alarm System operates on Wi-Fi 2.4 GHz
(802.11 b/g/n).
The indoor unit connects to your Wi-Fi network and relays status
updates through the internet to your mobile app.
The indoor unit also connects with the outdoor unit over a 2.4
GHz Wi-Fi channel. The indoor unit receives alarms and sends
updates over this channel.
Therefor, placement of the indoor unit is CRITICAL to ensuring
these two wireless connections are robust and dependable.
It is generally recommended to place the indoor unit in your
home somewhere along the exterior wall nearest your pool. You
may need to experiment with different locations to provide the
best possible Indoor Signal and Outdoor Signal.
Balancing Signal Strength
If Outdoor Signal is < 50%, move the indoor unit closer to the
outdoor (pool) unit.
For the best system performance and dependability, try to
balance Indoor and Outdoor Signal Strength so they are
approximately even.
Note: If your home Wi-Fi network cannot provide good signal in
the areas where you need to place the indoor unit, it is
recommended to move your Wi-Fi router and/or add a Wi-Fi
network extender to your homes Wi-Fi network.
Indoor and Outdoor Signal
In the app device view, there are bar graphs
showing these signal strengths. Indoor Signal is
the indoor units signal strength with your home
Wi-Fi network. Outdoor Signal is the strength of
the signal between the indoor and outdoor units.

24 25
Charging Charging Continued
The Pool Guardian Pool Alarm system includes a
Micro-USB charging cable and AC power adapter.
It is recommended that the indoor unit is always
left on the charger. This is because the indoor
unit handles device communications which draws
more power; therefor a fully charged battery on
an indoor unit will drain after approximately 3
hours if not connected to a charger. Additionally,
if left on a charger, the indoor unit will be fully
charged when the outdoor unit battery is low and
the units need to be swapped.
A fully charged outdoor unit will last
approximately 1 month before needing to swap
units (recharge the battery).
Note: This timing may differ with use of Bluetooth
Speaker Mode.
Remove the pool unit from the water and dry
charging port completely before charging.
Waterproofing the Charging Port
It is CRITICAL that the charging port plug is
properly replaced before an outdoor unit is
placed in the water. The plug should fit flush (flat)
against the profile of the unit. The attachment
line CANNOT BE BUNCHED UP, otherwise the unit
will allow water into the circuit board chamber.
Water-damaged circuit boards are NOT covered
by warranty. It is CRITICAL that the charging port
plug is inserted correctly!
*See video on our FAQ/Troubleshooting page that
addresses the rubber plug.

26 27
Charging Continued Tethering
Tethering the Pool Unit
In many pools water movement is caused by the filtration and
heating systems. Because of this, it may be necessary to tether
the pool unit so that it is not pulled into the filter or bumped into
the pool sidewalls.
To tether the unit, tie the tether line around one of the legs of the
pool unit and attach the suction cup to the sidewall or edge of the
pool. If the suction cup will not work with your pool’s
composition material, tie the tether to something that sits in
place such as a pool ladder.
Note: If neither option works and you need to develop a solution
that will work for your pool, please take care to connect your line
to the pool unit in a way that is light-weight and allows the unit to
float in a level manner. If the unit is weighed down and floating
lop-sided this will make surface disturbance detection less
effective.

28 29
Using the App- Menu Using the App- Menu Continued
Main Menu
Tap the person symbol in the top left
corner to access the main menu.
My Profile
You can add your name (useful if multiple
users share an account).
Tap the 3 dots in the top right corner to
change username, password or delete
account.
My Organization
Tap on the Members tab to invite
additional users to the account.
On the Information tab you can name
your organization / location, add a
description, and change time zone. This is
useful for users who have multiple
locations and/or alarms.
You can also change between imperial and
metric units.

30 31
Using the App- Menu Continued Using the App- Device
Settings
This submenu allows preference
configuration for Notifications, Interface,
and Security.
About
This submenu provides detailed app
information and configuration on data use
preferences.
Users can also use this submenu to Reload
Account, Send Logs, and Remove Logs
(used for troubleshooting and diagnostic
purposes).
Device
The Device tab is the main view that most will use interface
with their Pool Guardian system.
Features of this page are:
System Name
Indoor/Outdoor Unit Battery Levels
Indoor/Outdoor Unit Signal Levels
Arm / Disarm Buttons
Hibernate Button
Bluetooth Switch
Alarm Activation Threshold

32 33
Using the App- Device Continued Using the App- Device Continued
Arm / Disarm Buttons
Arm the system to detect pool surface
disturbances.
Disarm the system to end an alarm or to
temporarily turn it off.
Note: When changing this status, the
button is gray until the indoor unit
communicates the change to the outdoor
unit. Once the outdoor unit has confirmed
the change, this button will become
orange.
Note: Some Android users may not see
orange due to settings in their phone’s
theme.
Alarm Activation Threshold
The slide bar changes the threshold level of
disturbance required to trigger an alarm.
When changing this value, the number is gray
until the indoor unit communicates the change
to the outdoor unit. Once the outdoor unit has
confirmed the change, this number will become
orange.
Note: A higher threshold means that a larger
disturbance is required to trigger the alarm.
Note: Some Android users may not see orange
due to settings in their phone’s theme.

34 35
Bluetooth Mode Bluetooth Mode Continued
NOTE: When operating in Bluetooth Mode the
Pool Guardian will NOT operate as an alarm.
To use Bluetooth Mode, first turn on the
Bluetooth switch in the app.
Dark Blue Bluetooth Connections
Shake the outdoor unit to trigger an alarm.
Clear the alarm using the app. When the unit
starts flashing dark blue, go to Bluetooth
Connections in your phone and select Pair new
device.

36 37
Bluetooth Mode Continued Hibernation Mode
Pair with the Pool Guardian and begin playing
audio to hold the outdoor unit in Bluetooth
Mode.
NOTE: If you do not begin playing audio, the unit
will drop the Bluetooth connection. This is a
safety feature. After 20 minutes of no audio or
disturbance, the unit will revert back to its
regular alarm mode.
The unit will continue flashing dark blue as long as
it is connected to Bluetooth audio.
To end a Bluetooth session, pause the audio or
disconnect your Bluetooth connection through
your phone.
The unit will flash dark blue for 5 minutes, then
flash red and revert to alarm mode.
Hibernation mode is included as a feature to give
users the ability to temporarily disable their
alarm. This lasts for 24 hours or until hibernation
mode is disabled, whichever happens first.
Hibernation mode disables the motion detection
algorithm of the outdoor unit. This means that
any water disturbance or inverted unit alarms will
not occur.
Use hibernation mode responsibly and at your
own risk.

38 39
Hibernation Mode Continued Using the App- Notifications
To enable hibernation mode,
simply tap on the switch in the
app:
This forces a disarming of the
unit. The unit will rearm after 24
hours have passed or when the
hibernation mode switch is
turned off, whichever happens
first.
Note: When turning off
Hibernation Mode, the unit can
take up to 15 minutes to rearm.
Notifications
When the System detects a disturbance,
you will receive a notification on your
phone.
Disarm the system to end an alarm.
Notification Log
You can view a log of notifications by
tapping Notifications through the main
app page, or for a specific system (if there
are more than 1) by tapping the 3 dots in
the corner of the device view.
Other manuals for Pool Guardian
1
Table of contents