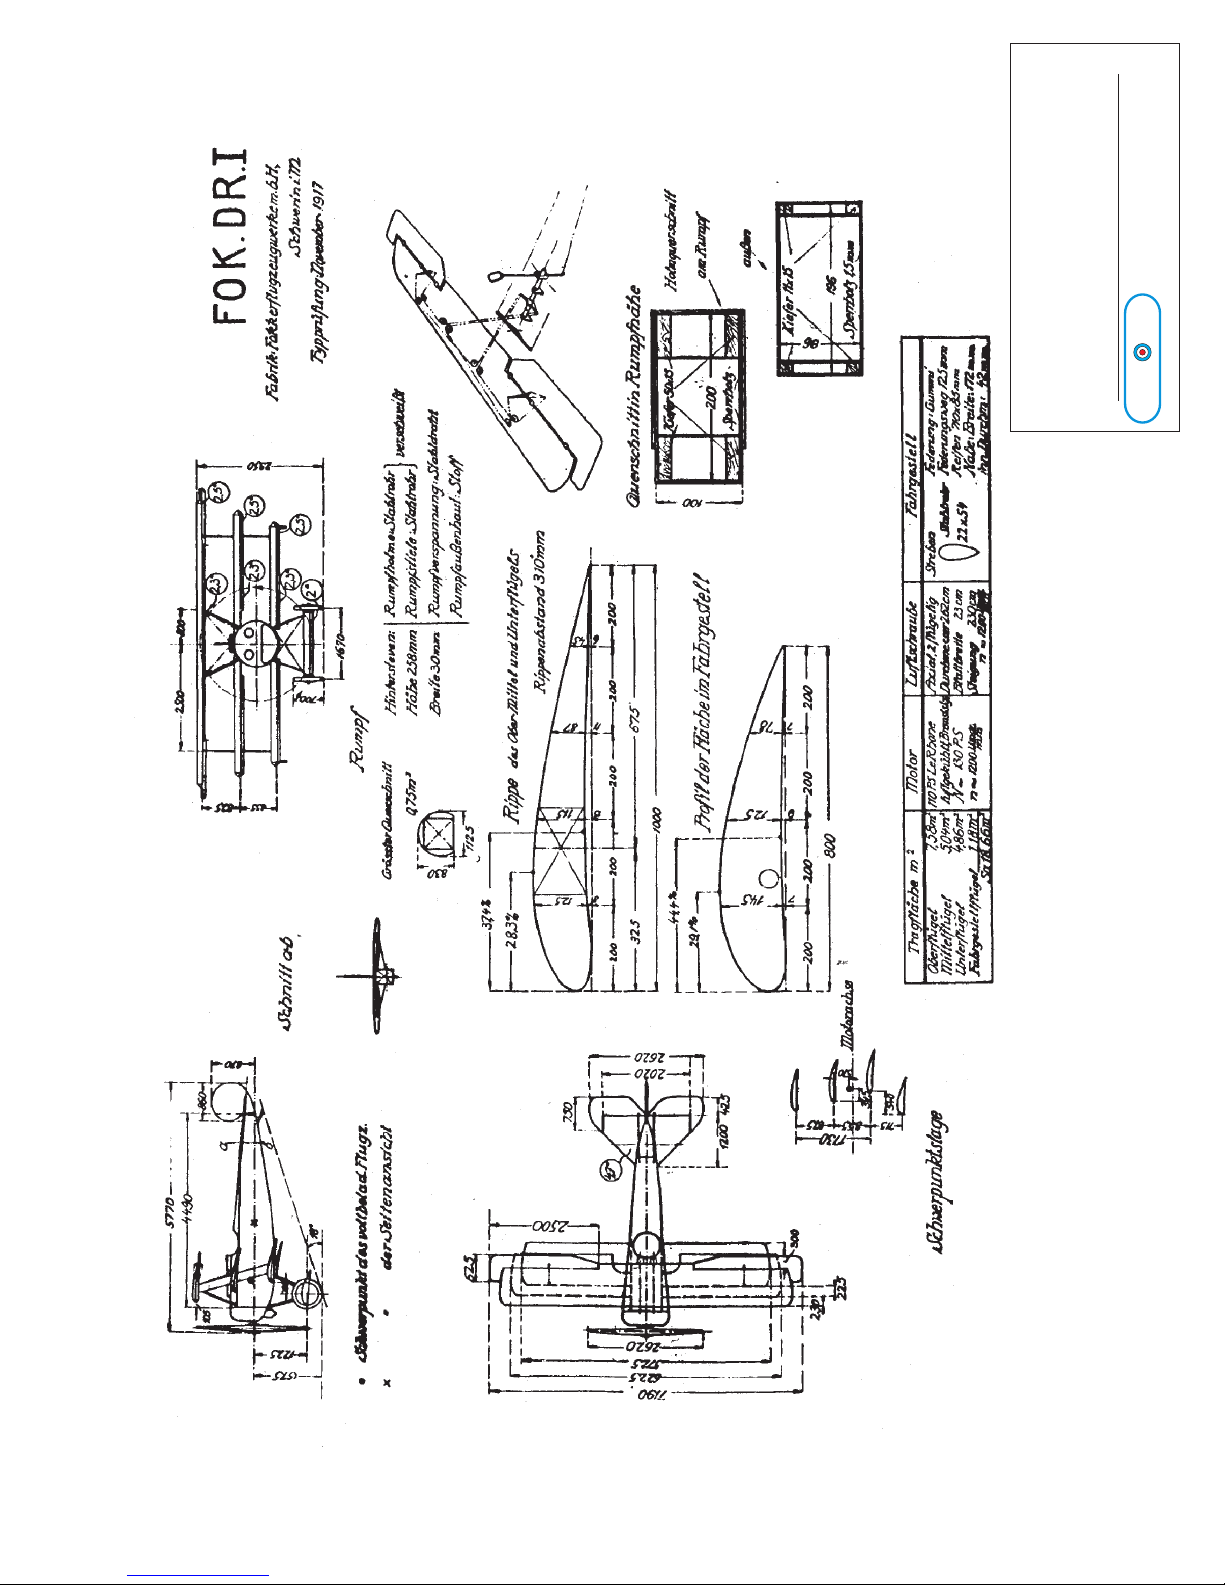
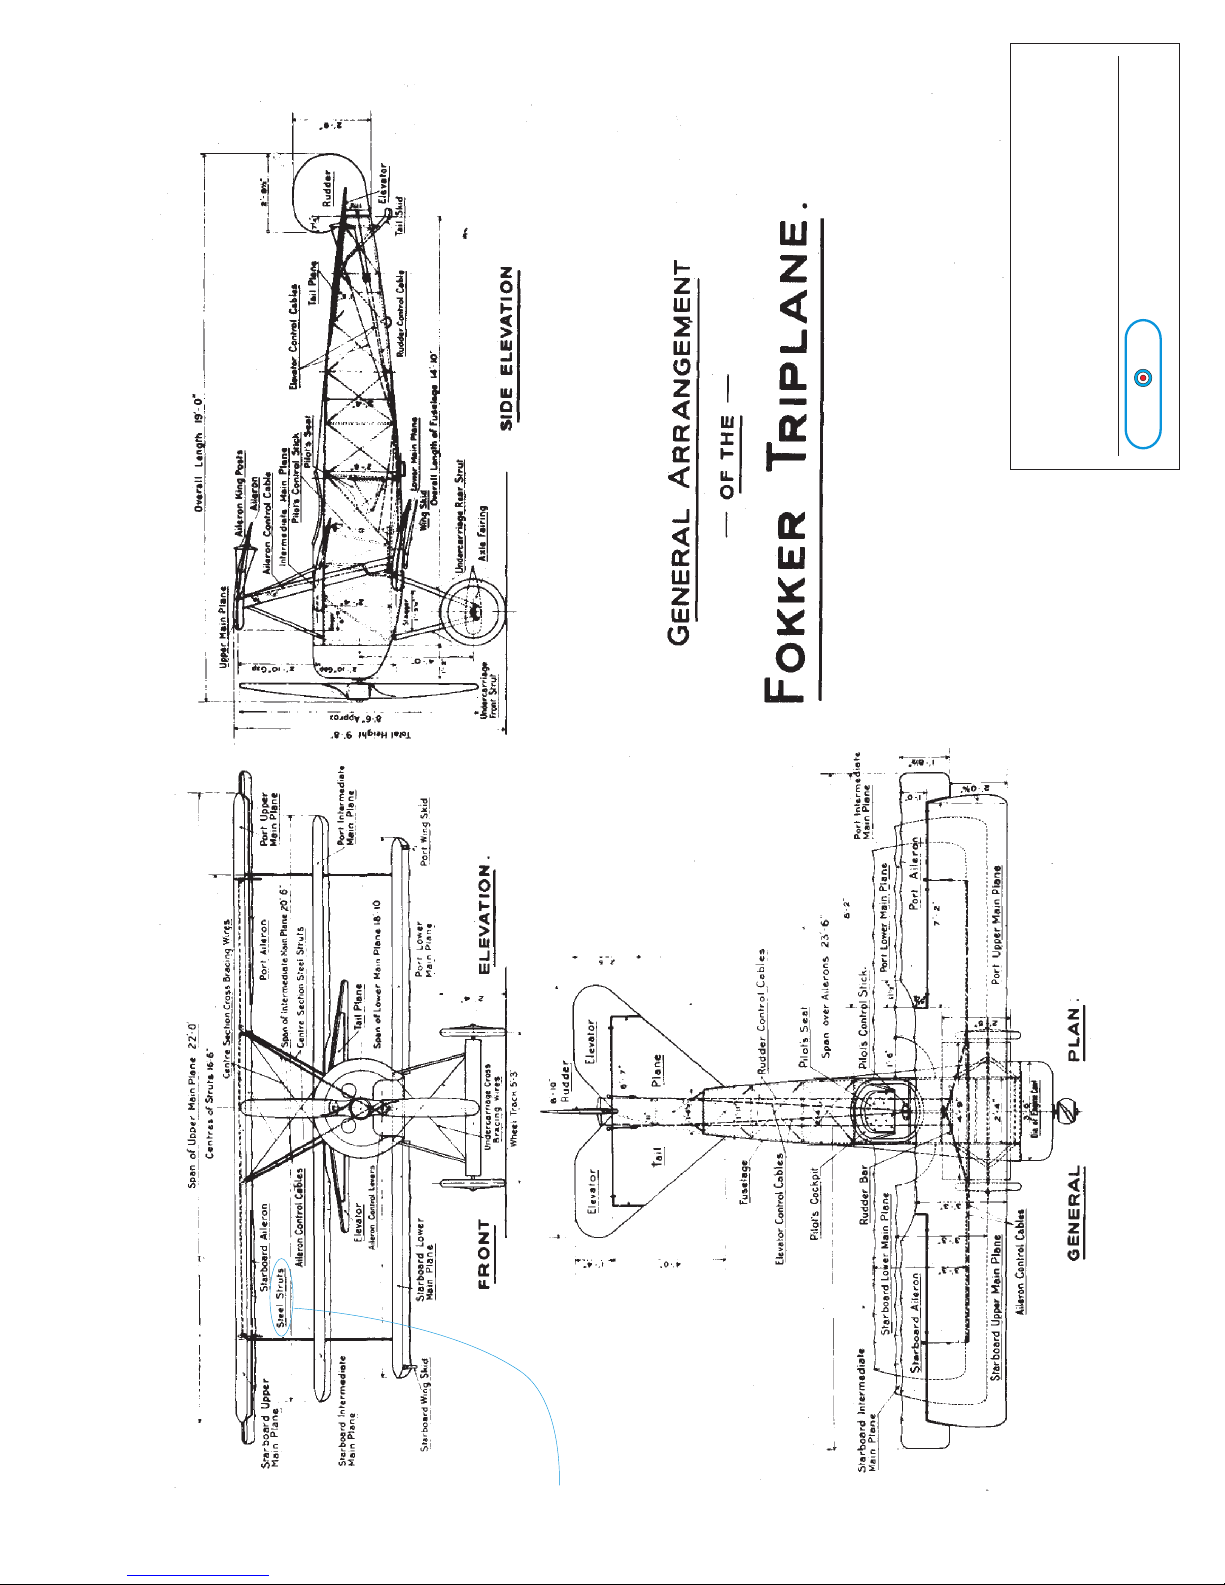
Arizona Fokker Dr.I User manual

A registered tradename of
Digital Design LLC
13814 N. 56th Place, Scottsdale Arizona 85254
Fokker Dr.1
DOCUMENT SET
N
A
RIZ
A
Model Aircrafters
www.arizonamodels.com
“ Last word” by Jim Dietz
Reprinted with permission.


Acknowledgments:
Original Scale Drawings Dan San Abbott
Replica Scale Drawings Walt Redfern
Kit Design and Layout Jaime Johnston
Photographs and Historical Data The Fokker Triplane
By Alex Imrie
Arms & Amour 1992
WWI Aero (Various Issues)
1/3 Scale Prototype and Photos Herman Cholewinski
This airplane kit represents a combined effort of modelers
historians museum personnel and replica pilots. We have
endeavored to produce as accurate as possible a faithful
reproduction ( in reduced scale ) of the famous work of
Anthony Fokker. Since historical documentation is incomplete
regarding this aircraft and no original examples have survived
there are bound to be inconsistencies. What we hope to have
provided you are the basic parts and information with which
to build you DR-1 to what ever level of scale suits your taste.

SHEET 1 of 2
ARIZONA MODEL AIRCRAFTERS
A registered tradename of Prototype Production and Engineering inc.
14795 North 78th Way Unit 800, Scottsdale Arizona 85260.
Copy Original Construction Drawing Nov 1917
Copywrite 1997 by Arizona Model Aircrafters a registered tradename of Prototype Production and Engineering inc.
N
A
RIZ
A
Idflieg Baubeschreibung
( construction description )

SHEET 2 of 2
N
A
RIZ
A
ARIZONA MODEL AIRCRAFTERS
A registered tradename of Prototype Production and Engineering inc.
14795 North 78th Way Unit 800, Scottsdale Arizona 85260.
Copy British General-Arrangement Drawing21 May 1918
Copywrite 1997 by Arizona Model Aircrafters a registered tradename of Prototype Production and Engineering inc.
British Air Technical Services
Document OT5 1680 27’5’18
Note:
Steel was specified for the material
of the wing struts in this British drawing.
The struts were in fact wood.

SHEET 1 of 5
N
A
RIZ
A
ARIZONA MODEL AIRCRAFTERS
A registered tradename of Prototype Production and Engineering inc.
14795 North 78th Way Unit 800, Scottsdale Arizona 85260.
Copywrite 1997 by Arizona Model Aircrafters a registered tradename of Prototype Production and Engineering inc.
Photo Plate 1
Delivery of the first DR-1 to Jasta 11
Marckebeeke Aerodrome near Courtrai August 1917
Shown in the photo
A. Fokker ( in cockpit )
Major General Von Lossberg ( facing Fokker )
M. Richtofen ( looking on )

SHEET 2 of 5
N
A
RIZ
A
ARIZONA MODEL AIRCRAFTERS
A registered tradename of Prototype Production and Engineering inc.
14795 North 78th Way Unit 800, Scottsdale Arizona 85260.
Copywrite 1997 by Arizona Model Aircrafters a registered tradename of Prototype Production and Engineering inc.
Photo Plate 2
Delivery of the first to the front
Serial 1783

SHEET 3 of 5
N
A
RIZ
A
ARIZONA MODEL AIRCRAFTERS
A registered tradename of Prototype Production and Engineering inc.
14795 North 78th Way Unit 800, Scottsdale Arizona 85260.
Copywrite 1997 by Arizona Model Aircrafters a registered tradename of Prototype Production and Engineering inc.
Photo Plate 3a & 3b
Pilot Eberhard Staphenhorst Plane # 144/17 Serial 1856
Credited with the first kill by a DR-1 ( an observation balloon ).
He was later hit by ground fire and forced down behind British Lines.
(Photos British)

SHEET 4 of 5
N
A
RIZ
A
ARIZONA MODEL AIRCRAFTERS
A registered tradename of Prototype Production and Engineering inc.
14795 North 78th Way Unit 800, Scottsdale Arizona 85260.
Copywrite 1997 by Arizona Model Aircrafters a registered tradename of Prototype Production and Engineering inc.
Photo Plate 4
Flare Rack
Modified Wind Screen Altimeter
Flare Pistol
Rear View Mirror
Interior View
Pilot Lt. Alfred Greven Jasta 12
Note the lack of crash pads on the back of the weapons,
the rear view mirror, and the Ogeze reflective gun site.
( not typical of all aircraft )

SHEET 5 of 5
N
A
RIZ
A
ARIZONA MODEL AIRCRAFTERS
A registered tradename of Prototype Production and Engineering inc.
14795 North 78th Way Unit 800, Scottsdale Arizona 85260.
Copywrite 1997 by Arizona Model Aircrafters a registered tradename of Prototype Production and Engineering inc.
Photo Plate 5
Fuel Gauge
Ignition Switch
Deviation Card
Crash Pad
Slotted Ammo Feed Chute
Wind Screen
Interior View of # 581/17
The left side of the cockpit combing has been removed
for a better view showing the compass deviation card
and ignition switch.

Clevis and eyebolt ends for turnbuckles
LH
RH
Band indicates left hand thread.
Hole for safety wire.
Included in the kit are left and right hand dies and brass rod.
To assemble the turnbuckles cut a section of both rods to equal
lengths ( typically 5/8 to 3/4 ). The best way we have found is to use a
Dremel cutoff wheel, its fast and will make a smooth end.
insert into the eyebolt or clevis by drilling the part to a snug fit using the
starter hole. The rods can be secured with silver solder or a good
metal epoxy. (we use JB Weld obtained from a local auto parts
store) If you decide to solder the rods in place take care that the
solder does not wick up excessively onto the end of the rod.
Place the approprate die into a handle (not supplied ) and thread
the rod to fit.
ASSEMBLY NOTES:
TURNBUCKLES
(not required for all kits)
File threads
You may want to drill
the hole slightly larger
for some applications.
Holes for the safety wire
and attachment points come
sized to .030. Different applications
may require larger diameters. We
use a Dremel drill press and a
small vice when necessary. Don't
drill the hole too big so as to weaken
the part.
C/L
C/L
Detain Drawing of Bolt Mounting Tube
Attachment Methods
Method One:
Carefully drill through the tubing and place a cut section
of smaller tube through the larger. Secure in place with
silver solder of metal epoxy ( we recommend J B Weld
brand ) The small tube section should be over long when
installed and filed down when set.
Method Two:
a threaded blind nut can be substituted in place of the
tube section. Instill the nut after trimming the flange off and
mount from the opposite side from where the bolt/screw
ill enter from.

PULLEY WHEEL ASSEMBLY
( all wheels )
Bracket Notes
Aluminum
Wheel
Brass tubing
Cut tubing wider than
the width if the pulley.
Tubing works as a
bushing axle.
Finished assembly should spin
about the center bushing. Some
applications may require two
concentric sections of tubing.
Finished Assembly Nut
Bolt
Washer
Washer
Pulley Bracket
( shown folded )
Dependent on the scale of the model the brackets are photomilled or laser cut
in either case the attachment points (holes) need to be finished to prevent cable
failure.
Expanded cross section view of bracket hole.
Photomilling and laser cutting can leave a sharp edge.
Remove the edge with a small file or drill to prevent
cable failure.
Depending on the scale of model some brackets are laminated
together for additional strength. If this is the case with your model
always connect the parts prior to finishing.
Note:
For the best results when bending brackets use a small
metal brake or a metal jaw vice and small hammer to
obtain a sharp edge at the bend.

Spar Preparation
Wing spars, elevator and aileron spar/hinges will require routing
prior to assembly. This is fast and easy to do. We recommend using
a Dremel or similar router fixture. Use a round head tool that matches
the size of the dowel of tube that the finished piece will need
to fit. Make sure that you clamp guides to prevent the material
from wandering as you pull it through.
Elevator Spar Details
Retaining Block Spacer
Side view of the retaining
block spacer and elevator
hinge spar assembly.
Wing Spar End View
Routing not necessary for static display models.
Aileron Side View
Note rout offset Tube
Wing Top
LE TE
Original Outline

SHEET 1 of 5
N
A
RIZ
A
ARIZONA MODEL AIRCRAFTERS
A registered tradename of Prototype Production and Engineering inc.
14795 North 78th Way Unit 800, Scottsdale Arizona 85260.
Copywrite 1997 by Arizona Model Aircrafters a registered tradename of Prototype Production and Engineering inc.
Photo Plate 1&2
Cable pulley mount and keepers.
Made wood dowel for flying model.
Photo shows temporary string flying wires
used to check alignment before installing
cables and covering.
Tail skid non-scale modification.
Photo also shows temporary cable grommet
locators, used to identify location of cable
grommets sewn into the covering fabric.
Model Assembly Photos
Courtesy Herman Cholewinski

SHEET 3 of 5
N
A
RIZ
A
ARIZONA MODEL AIRCRAFTERS
A registered tradename of Prototype Production and Engineering inc.
14795 North 78th Way Unit 800, Scottsdale Arizona 85260.
Copywrite 1997 by Arizona Model Aircrafters a registered tradename of Prototype Production and Engineering inc.
Photo Plate 5&6
To take advantage of the wire trailing edge giving your model
a true scallop begin covering the model from the underside of
the rear of the wing. Attach the fabric as shown going around
the leading edge and back to the rear. Overlap and attach the
material to itself on the underside
Hinge hardware is pre-fitted before covering when the cabling
and linkages are set up and adjusted. Hardware brackets are
attanhed on top of the covering.
Note:
The wood trailing edge was initially used in the prototype 1/3
scale model and later replaced with the wire
Model Assembly Photos
Courtesy Herman Cholewinski

SHEET 4 of 5
N
A
RIZ
A
ARIZONA MODEL AIRCRAFTERS
A registered tradename of Prototype Production and Engineering inc.
14795 North 78th Way Unit 800, Scottsdale Arizona 85260.
Copywrite 1997 by Arizona Model Aircrafters a registered tradename of Prototype Production and Engineering inc.
Photo Plate 7 & 8
Fully assembling the model before the final covering with all
engine, fuel, radio, and control systems will avoid a time
consuming mistake. Notice in the picture that the cabane struts are
attached with blind nuts. Methods for model breakdown for
transportation to and from the flying field are left to the discretion
of the builder.
Cockpit details shown in the photo.
Scale crash pads were made from leather. Use split fuel tubing
under the leather for the padding. The decking is made from 1/64
plywood cut to fit and then covered with the aluminum foil. To apply
first cut and trim a templet from heavy paper (we used old
manila file folders). Use the templet to trim the plywood. Coat the
plywood with a mild heat activated adhesive (Balsarite) and attach
and trim the foil. This is not regular aluminum foil from the local
food store but rather a softer foil material we included specially for
the construction of the model. Work out any wrinkles and burnish
the surface at the same time by rubbing the material from the center
out with a wide scrap of balsa or basswood (make sure that the edge
is smooth so as not to rip the foil)
Model Assembly Photos
Courtesy Herman Cholewinski

SHEET 5 of 5
N
A
RIZ
A
ARIZONA MODEL AIRCRAFTERS
A registered tradename of Prototype Production and Engineering inc.
14795 North 78th Way Unit 800, Scottsdale Arizona 85260.
Copywrite 1997 by Arizona Model Aircrafters a registered tradename of Prototype Production and Engineering inc.
Photo Plate 9 10 &11
Left
Aileron control linkages shown at the left.
Double servo setup STRONGLY recommended
for ¼ and 1/3 scale sizes. Shown in the picture
is one possible method of control setup. These
servos were mounted to a custom cut mounting
plate attached to the underside of the mid wing.
Right
Rudder and elevator servos mounted to
another custom cut mount attached
forward of the cockpit floor board and
secured to the fuselage frame.
Access door to the radio system.
To help with the mounting and installation of
the radio, servos, and engine, Arizona Models
will cut custom parts for your model. Parts are
available at material plus $ 1.00 per minute for
laser time. Original purchasers of our Fokker
DR-1 kits have a one time credit the laser time
for 10 minutes tword the cutting of these parts
only. Call for details.
Model Assembly Photos
Courtesy Herman Cholewinski

Addendum Notes
1). Added strength for the leading edge of the wing ribs are provided
on the plywood sheets. If required attach one to each side of each rib
on all center ribs and on one side of all end ribs.
2). The templet shown on the plans specifies plywood
for the covering of the leading edge. Use the veneer in place of
the plywood. Sand and varnish for a scale finish, plywood can
be substituted.
4). For your convenience we have included acrylic forms to help
in the bending of the tubing. Tubing can be bent by filling the tubes with
water and plugging the ends with a piece of dowel rod. The bends will
work best if you make sure that there are no air bubbles left inside. DO NOT
suck water through the tube like a straw the inside of the tubing has grease
and metal filings inside.
Another method is to fill the tube with fine sand such as the type used
in a beading machine or sand blaster.
3). Assembling the aluminum parts is easy with either soldering or
epoxy. In either case make sure the parts are clean with a good fit.
JB Weld brand epoxy available at most auto parts shops works well
however it takes some time to cure. This kit was designed with the
intent of assembling the frame parts with silver bering solder.
The aluminum parts can be joined easily with a small propane or butane
torch and aluminum solder paste. We recommend Stay-Clean
paste soldering flux manufactured by J.W. Harris company of Cincinnati,
Ohio. This paste gives an excellent bond between aluminum to aluminum
or aluminum to other metals such as brass. The paste is available from
most welding supply stores. If you really don’t want to use the aluminum
substitute birch dowel and reed in place of the aluminum.

We like to here from our customers. Send us a picture of
your finished model and building tips and hints you may
have. If we use them you can get free stuff.
Good Luck And Good Flying!
This Happy guy is Herman Cholewinski with his 1/3 scale
DR-1whos help was invaluable in the design of this kit.
5). Scale working wing nuts are provided for your model. To assemble
mount the foil part onto a bolt and screw a nut down onto the foil.
Fold the foil up to approximatly a 45 degree angle at the fold line
(Shown in blue). To finish fill in the fold with solder or glue and paint.
Take care not to fill in the nuts threads if you want them to work.
12345

Table of contents
Other Arizona Toy manuals

Arizona
Arizona Siemens Schukert D.111 User manual

Arizona
Arizona DeHavilland Tiger Moth Quick start guide

Arizona
Arizona Lozenge Camouflage User manual

Arizona
Arizona Curtiss Model F User manual

Arizona
Arizona Albatros C.III Owner's manual

Arizona
Arizona DIEUPORT 17 Quick start guide

Arizona
Arizona Hansa Brandenberg W.29 Owner's manual

Arizona
Arizona SOMMER MONOPLANE User manual
Popular Toy manuals by other brands

Authentic Models
Authentic Models ASA107 instructions

Fisher-Price
Fisher-Price InteracTV Quick setup instructions

Nickelodeon
Nickelodeon John Adams Paw Patrol Glowpad manual

marklin
marklin 22470 manual

Hasbro
Hasbro Playskool Sit ’n Spin manual

Hasbro
Hasbro FurReal Friends Butterscotch Pony 76471 care guide