arkmeds Waller User manual

PATIENT SIMULATOR
User Guide.

2

3
Table of Contents
INTRODUCTION ----------------------------------------------------- 4
SAFETY INFORMATION ------------------------------------------- 5
ACRONYMS AND DEFINITIONS --------------------------------- 6
PACKAGING --------------------------------------------------------- 6
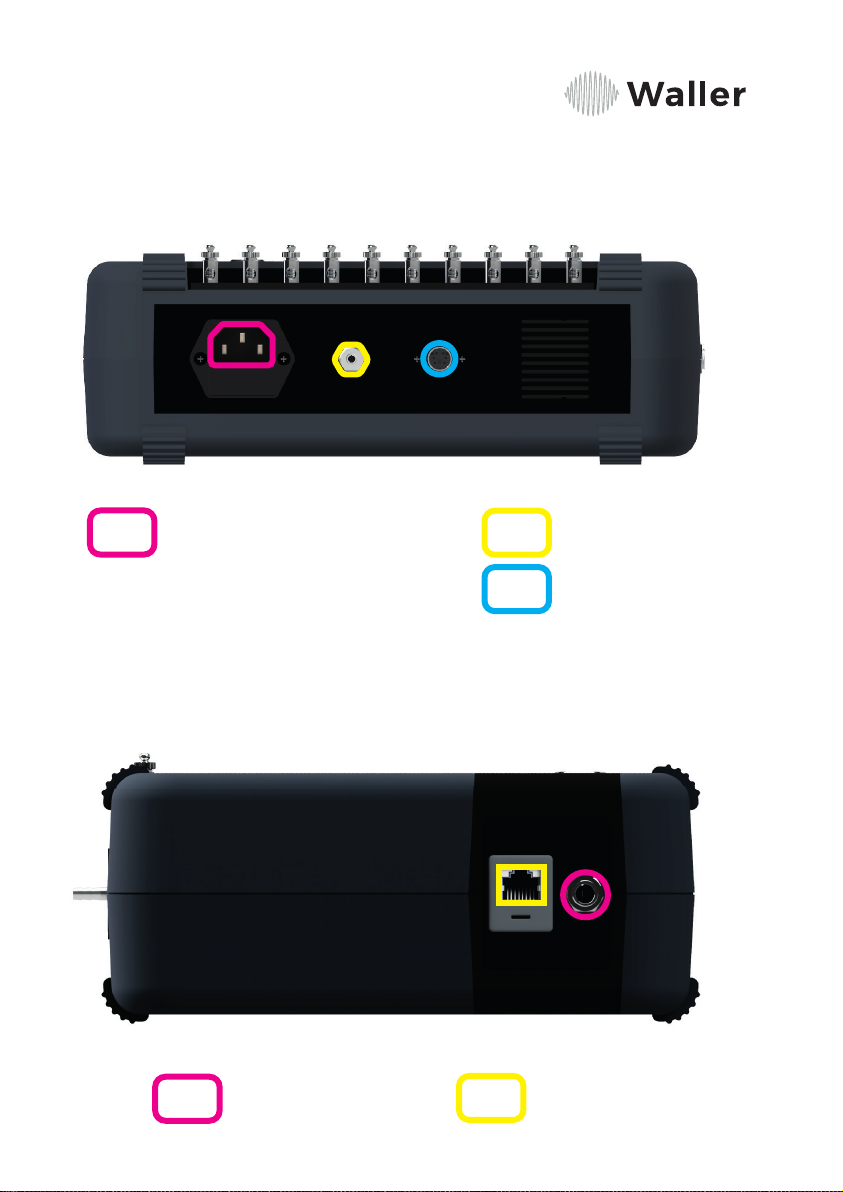
UNDERSTANDING THE DEVICE -------------------------------- 7
TURNING ON THE DEVICE ------------------------------------- 12
TEST MODULES ---------------------------------------------15
NON-INVASIVE BLOOD PRESSUR---------- 15
ELECTROCARDIOGRAM ----------------------- 21
TEMPERATURE ---------------------------------- 26
INVASIVE BLOOD PRESSURE --------------- 30
OXIMETRY ----------------------------------------- 33
SOFTWARE AND APPLICATION ------------------------------- 36
PROBLEMS AND SOLUTIONS --------------------------------- 37
MAINTENANCE ---------------------------------------------------- 38
BATTERY INDICATOR ------------------------------------------- 38
TECHNICAL SPECIFICATIONS ------------------------------- 39
FAQ ------------------------------------------------------------------ 43

4
INTRODUCTION
Waller patient simulator is practical, compact, portable, and
easy to handle. It is used in performance tests of multiparameter
monitors, electrocardiographs, Pulse Oximeters, Polygraphs, Maps,
sphygmomanometers, and related devices.
The vital signs generated by Waller provide electrical, pneumatic,
and light emission analyses in different test modalities.
Waller allows the simulation of:
ECG and
functions
Leakage
Non-invasive
Blood Pressure
Invasive Blood
Pressure
Temperature
400/700 series
Respiration
Oximetry
https://www.arkmeds.us/support

5
SAFETY INFORMATION
For better conservation of your device and to prolong its useful life,
please consider the following:
Do not expose
the device to
high humidity
Insert the connectors
only into the spots
intended for operation.
Replace accessories
if any damage is
identied.
Respect the
device’s battery life.
Replace the power
cord if any damage is
identied.
Always examine the
device before and after
each use.
Do not expose
the device to
temperatures
above 50ºC.
Do not connect this
device to the patient.
Do not open the device
without the expertise
and the manufacturer’s
qualication.
If you notice any irregularity with the device, do not put it into
operation. Depending on the problem, the device may suer
irreversible damage, which will lead to costly maintenance or
discontinuity. Whenever the device fails, set it aside and contact
the Arkmeds Support Team through the channel:
https://www.arkmeds.us/support

6
ACRONYMS AND DEFINITIONS
PACKAGE CONTENT
• NIBP - Non-Invasive Blood Pressure
• ECG - Electrocardiogram
• BPM - Beats per Minute
• IBP - Invasive Blood Pressure
• Saturation - Oxygen Concentration
• Range - Variation Range
• RPM - Respirations per Minute
Waller Patient Analyzer comes with the following items:
1 x Waller (PN 42000004)
1 x Yagi (PN 42000007)*
1 x User Manual (PN 12000039)
1 x Calibration Certicate
Acessories
1 x Temperature Cable - P10 (PN 31000028)
1 x RJ45 Cable - Yagi Connection (PN 11000143)
1 x Carrying Bag (PN 12000040)
1 x Small Case (PN 12000070)
1 x Power Cord**
Brazil (PN 11000015)
USA (PN 11000236)
Europe (PN 11000237)
* Module sold separately.
** The customer chooses the power cord standard.
Notes: After unpacking
the device, connect it to
the power grid to charge
the internal battery.

7
UNDERSTANDING THE DEVICE
Next, the device will be shown with the identification of its connectors
and controls.
FRONT VIEW:
1
1
ECG Connectors.
Touchscreen.
On/Off Button.
2
2
3
3

8
UPPER VIEW:
LEFT SIDE VIEW
1
1
1
Power cord with fuse
holder.
Temperature
Connector.
NIBP connector.
SPO2
Connector.
IBP connector.
2
2
2
3
123

9
RIGHT SIDE VIEW
BACK VIEW
1
1
1
1
Air circulation.
Serial number identi cation tag.

10
YAGI
BOTTOM VIEW:
UPPER VIEW:
1
1
1
1
Serial number identi cation tag.
Yagi identi cation tag.

11
BACK VIEW:
1
1
Ethernet connector for connection to Waller.

12
TURNING ON THE DEVICE
Press the “on/off” button to turn on the device.
The device will perform internal communication tests and display the
settings screen of each module to be tested.
Dragging the
screen downwards,
we have access
to the menu with
options
Bluetooth
Wi-Fi
Language
Card 1
Card 2
Card 3
SCREEN

13
Bluetooth: Enables connection to the cell phone and integration with
Arkmeds Software.
Wi: It allows the device to be connected to the internet to aid in remote
access by the manufacturer. By clicking on the icon, a list of available
networks will appear. Just select the one you want and enter the password.
Language: Allows you to select your preferred language. By clicking on the
icon, the available languages will be displayed. Just select the language and click
on restart. The device will return with the information in the chosen language.

14
Card 1: with only this option enabled, it is possible to view the NIBP
module on full screen.
Card 2: with only this option enabled, it is possible to view the ECG
module on full screen.
Card 3: with only this option enabled, it is possible to view the
Temperature module on full screen.
Notes: With the three Cards enabled, the NIBP, ECG,
and Temperature modules will be displayed.

15
In this section are each of the Waller Patient Simulator functionalities.
The automatic non-invasive measurement of blood pressure is performed
by the oscillometric method. In this method, during cuff inflation and
deflation, the compressed blood in the artery generates a pressure
oscillation when the cuff pressure is between systolic and diastolic
pressure, with the peak of this oscillation occurring at mean pressure.
TEST MODULES
NON-INVASIVE BLOOD PRESSURE
ASSEMBLY
It is necessary, to assemble the test circuit to perform the NIBP test as follows:
1. Connect a T (adapter) between the monitor pressure
line and the cu
2. Connect the third output to Waller

16
On Waller’s home screen, the first option at the top is the non-invasive
blood pressure module. There we can see the following options:
Pressure. Leakage. NIBP. Frequency. Chart.
Settings

17
Pressure: indicates the numerical value of system pressure.
Leakage: option to perform pressure tests and verify leakage in the
system. By clicking on this option it is possible to select the test time
and start the verification. After counting the selected time, the pressure
variation obtained in the test is shown.

18
It is necessary to assemble the test circuit to carry out the leak test, as
follows:
1. Connect a T (adapter) between the pressure line to be tested;
2. On one side of the T (adapter), connect a hand pump system;
3. On the other, connect the device or system to validate leakage;
4. Connect the third outlet to Waller.
Leakage Test Assembly

19
NIBP: option to select different non-invasive blood pressure values.
Waller allows six different pre-configured NIBP points, allowing tests
with systolic pressures from 60 to 170 mmHg and diastolic pressures
from 30 to 125 mmHg. Simply click on the desired option and return
to the home screen.
Frequêncy: option to select different frequency values. Waller allows
the choice of values from 80 to 140 bpm of frequency. Simply click on
the desired option and return to the home screen.

20
Chart: in this space, the pressure curve is represented in real-time.
Thus, you can visualize the operation dynamics during the performance
test, whether simulating a patient signal or checking for leakage.
Table of contents