Lock in position b giving a clockwise quarter turn.This also
activates the sealed-in batter in same time. i.e. powers on
the device simultaneousl .
• Test the alarm for correct operation using test facilit ,
once the alarm is integrated and installed.
DURING OPERATION
Once the smoke alarm has been installed, a small indicator
light (LED) positioned beside the test button, should flash
approximatel once a minute in normal operation. If smoke is
detected the unit will emit a loud pulsating alarm until the air
is clear or the Hush button is pressed.
During normal operation, the smoke alarm wireless function
will be in sleep mode. It will wake up roughl ever 16
seconds to receive transmissions from other alarms in the
group.
TESTING YOUR SMOKE ALARM
It is recommended that ou test our smoke alarm once a
week to ensure the detector is working correctl . Push and
hold the test button for approximatel 3 seconds. A loud
pulsating alarm should sound to indicate the correct function.
During the alarm condition the indicator light will flash
quickl .
If the alarm doesn’t sound, check that it is firml twisted onto
the base. If it isn’t, the batter won’t be connected and our
alarm will be inactive.
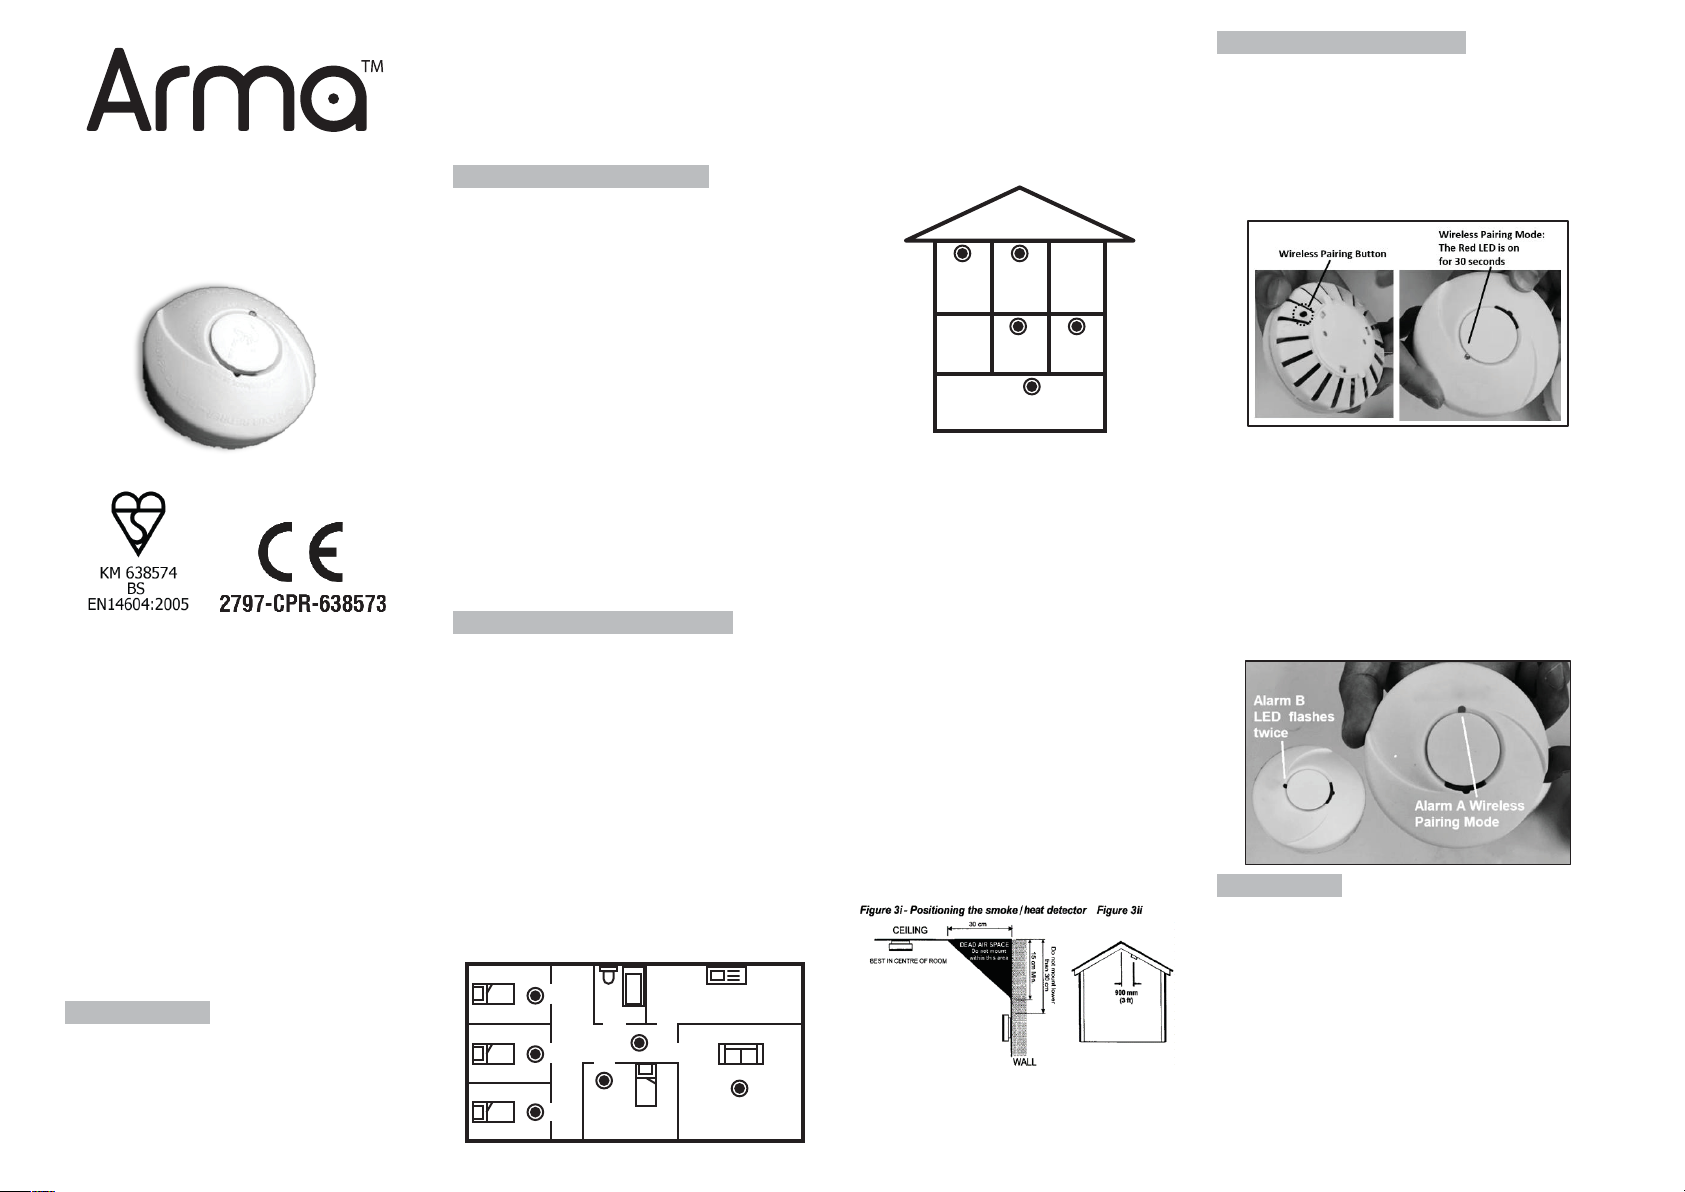
To test two units are paired correctl and within wireless
range, hold down the Test Button until the other paired alarms
activate. This could take up to 20 seconds.
After installation and after reoccupation of the dwelling
following a vacation etc, check all our alarms.
COMMON CAUSES AND AVOIDANCE OF FALSE
ALARMS
The Smoke Alarm ma be triggered b steam, condensation,
normal smoke or fumes. Small insects getting into the smoke
alarm chamber ma cause intermittent alarms. Keep awa
from the sources to avoid nuisance alarms. (See "Areas to be
avoided" in the "Positioning the smoke alarm" section.)
Vacuum smoke alarms monthl to prevent dust and insect
buildup.
HUSH OR SILENCE FEATURE
This Smoke Alarm has a built-in Hush or Silence feature
incorporated into the Test button.
If cooking or other non-hazardous sources cause the
unwanted alarm, it can be temporaril silenced b depressing
the test button and holding for approximatel 1 second. The
alarm will enter a dormant period for 10 minutes. The red
LED will flash ever 10 seconds to indicate the sensitivit is
reduced. At the end of the hush period the alarm will give two
short beeps, the alarm will then reset to normal sensitivit .
NOTE - If the smoke densit increases during this period (i.e.
from a fire) the unit will go into alarm mode again.
LOW BATTERY WARNING
If the smoke alarm emits a short ‘beep’ once ever 40
seconds the batter is at the end of its life and the alarm
should be replaced immediatel . This low voltage warning
will be given for at least 30 da s.
If the red indicator light (LED) does not flash ever 40
seconds then replace the whole smoke alarm unit. In this
case, the other interconnected units in the s stem which are
not in low batter condition will also chirp for a few seconds
once an hour as long as the detector with the “dead” batter
beeps.
BATTERY IS SEALED-IN AND CANNOT BE REPLACED
ACTION IN THE EVENT OF A FALSE ALARM
• If there is a false alarm, simpl press the Test/Hush
Button on the cover to mute the unit for 10 minutes.
• Check the house carefull in case there is a small fire
smouldering somewhere.
• Check whether there are some sources of smoke or
fumes. You should get our famil into a safe place
before our investigation.
• Using a mains powered vacuum cleaner, carefull
vacuum all open vents in the alarm casing to remove an
dust or insects.
• If there are frequent nuisance/false alarms it ma be
necessar to re-locate the device. If for some reason the
unit continues to false alarm, the units can be silenced b
removing the alarm off the mounting bracket. If
vacuuming the alarm does not correct the problem it can
be returned to the retailer where ou bought it along with
proof of purchase.
ACTION IN THE EVENT OF FIRE
• Leave the building as quickl as possible. Check room
doors for heat or smoke. Do not open a hot door. Use an
alternate escape route. Crawl along the floor, if possible,
breathing through a wet cloth or hold our breath. Do not
stop to collect an thing.
• Meet at a pre-arranged meeting place outside the
dwelling and check ever bod is there.
• Call the Fire Brigade from outside the building
immediatel . The brigade should be summoned
regardless of the size of the fire and regardless of
whether there is a facilit for transmission of alarms to a
remote manned centre.
• Do not go back inside a burning building and wait for the
Fire Brigade to arrive.
MAINTAINING YOUR SMOKE ALARM
Clean our smoke alarm regularl to prevent dust build up.
This can be done using a mains powered vacuum cleaner
with the brush attachment. Clean gentl around the front
grilled section and sides. Never use water, cleaners or
solvents since the ma damage the smoke alarm.
When the battery is low, replace with a new smoke alarm.
If the alarm fails to operate correctl , please send back to the
address of manufacturer shown on the back label of the
detector.
NOTE: THE SMOKE ALARM SHOULD NOT BE
EXPOSED TO DRIPPING OR SPLASHING.
PRE-WARNING FAULT SIGNAL
When there is no fire nor smoke accident, if the LED on front
cover lights, it means there ma be dust inside or the unit
cannot function properl . This is a pre-warning signal that the
user should replace the unit with a new smoke alarm.
IMPORTANT SAFEGUARDS
Installation of our smoke alarm is onl one step in our
safet plan. Other important steps should be taken to further
improve our safet :
• Install the smoke alarm properl , following this instruction
leaflet.
• Test our smoke alarm weekl .
• Vacuum our smoke alarm monthl .
• Replace with a new smoke alarm immediatel once
depleted.
• Do not smoke in bed.
• Keep matches and lighters awa from children.
• Store flammable materials in a proper manner and never
use them near naked flames or sparks.
• Maintain emergenc equipment such as Fire
Extinguishers, escape ladders etc and ensure all
occupants know how to use them correctl .
• Plan an escape route/s from our building in advance and
ensure all occupants are aware of them. Re-enforce this
awareness periodicall through-out the ear.
• Make sure escape routes remain free of an obstructions.
• A warning that batteries (batter pack or batteries
installed) shall not be exposed to excessive heat such as
sunshine, fire or the like.
WARNING! IF THERE IS ANY QUESTION AS
TO THE CAUSE OF AN ALARM IT SHOULD BE
ASSUMED THAT THE ALARM IS DUE TO AN
ACTUAL FIRE AND THE DWELLING SHOULD
BE EVACUATED IMMEDIATELY.
THIS PRODUCT IS A SEALED UNIT AND CANNOT BE REPAIRED
– IF THE UNIT IS TAMPERED WITH IT WILL INVALIDATE THE
WARRANTY. IF THE UNIT IS FAULTY PLEASE RETURN IT TO
YOUR ORIGINAL SUPPLIER WITH YOUR PROOF OF PURCHASE.
SMOKE ALARM LIMITED WARRANTY
These Smoke Alarms are warrantied to be free from defects in
materials and workmanships under normal use and service for
a period of ten ears (excludes batter ) from date of purchase.
The compan will not be obligated to repair or replace parts
which are found to be in need of repair because of misuse,
damage or alterations occuring after the date of purchase.
Send the Smoke Alarm with proof of purchase, postage and
return postage prepaid, to local distributor. The liabilit of the
compan arising from the sale of this Smoke Alarm shall not in
an case exceed the cost of replacement of the Smoke Alarm
and in no case shall the compan be liable for consequential
loss or damages resulting from the failure of the Smoke
Alarm.
NEWFIELD GROUP LTD SHALL HAVE NO LIABILITY FOR ANY
PERSONAL INJURY OR PROPERTY DAMAGE, OR ANY SPECIAL
INCIDENTAL, CONTINGENT OR CONSEQUENTIAL DAMAGE OF
ANY KIND RESULTING FROM A FIRE. THE EXCLUSIVE REMEDY
FOR BREACH OF THE LIMITED WARRANTY CONTAINED HEREIN
IS THE REPAIR OR REPLACEMENT OF THE DETECTIVE
PRODUCT AT NEWFIELD GROUP OPTION. IN NO CASE SHALL
NEWFIELD GROUP’S LIABILITY UNDER ANY OTHER REMEDY
PRESCRIBED BY LAW EXCEED THE PURCHASE PRICE. YOUR
SMOKE ALARMS ARE NOT A SUBSTITUTE FOR PROPERTY,
DISABILITY, LIFE OR OTHER INSURANCE OF ANY KIND.
APPROPRIATE COVERAGE IS YOUR RESPONSIBILITY. CONSULT
YOUR INSURANCE AGENT.
This does not affect our statutor rights. This alarm is onl
suitable for single occupanc private dwellings onl and not
intended for multi occupanc private dwellings or commercial
or industrial dwellings.
Waste electrical products should not be disposed of with
normal household waste. Please rec cle where facilities exist.
Check with our Local Authorit or retailer for rec cling advice.
Manufactured for
Newfield Group td
Christchurch
New Zealand
03-348-0799
www.newfield.co.nz
Test & Hush Bu�on
Press Button for test.The test and Hush Button is
located on top of smoke detector.