manuals.online logo
Brands
  1. Home
  2. •
  3. Brands
  4. •
  5. Armstrong
  6. •
  7. Water System
  8. •
  9. Armstrong AGEplus Series User manual

Armstrong AGEplus Series User manual

Page 1 of 2
By using the red dip switch on the print
board, you can either choose to control the
pump manually or remotely. In the manual
mode you control the speeds by the rotat-
ing button. When the pump is controlled
remotely, its controlled analogical.
The dip switch has the following functions:
ON = Remote Control
OFF = Manual Steering
Contact 2 is without function.
This installation guide gives basic instructions which are to be observed
during installation, operation and maintenance of the circulator. It is therefore
imperative that this manual is read by the responsible operator prior to the
installation and should always be kept available at the site.
It is not only the general safety instructions under the ”Safety” section that
are to be observed but also the specific information provided throughout this
guide.
APPLICATION
The AGEplus SERIES circulators are used in all types of heating systems.
By use of the advanced internal speed control, the electronic automatic
adjustment the circulator performance according to system needs. This
feature gives both great electrical and thermal savings together with reduced
noise level in the installation.
CIRCULATOR MEDIUM
Clean, non aggressive and non explosive fluids without any solids or fibres.
Kinematic viscosity: Max. 10mm2/s. Higher viscosity will cause circulator to
regulate improperly. Capacities shown on the data sheets are measured
with water v =1mm2/s at 20ºC.
Suitable for water impurity up to 5mg/dm3.
Please note: If any liquid other than water is being circulated, we
recommend that you contact our representative as the circulator
characteristics may change.
SAFETY
- The surface temperature might be hot.
- When venting the circulator (Fig. 6), it could result in a slight
escape of hot water or steam!
- Circulator should be wired according to the existing regulations
- The circulator must always be earthed..
- All the wires must be disconnected before any work is
carried out on the circulator.
Personnel qualification and training
Personnel responsible for operation, maintenance, inspection and
installation of the circulator must be adequatelyqualified.
The person responsible for the complete installation must ensure that the
contents of this manual are fully understood by any personnel working on
the system.
INSTALLATION
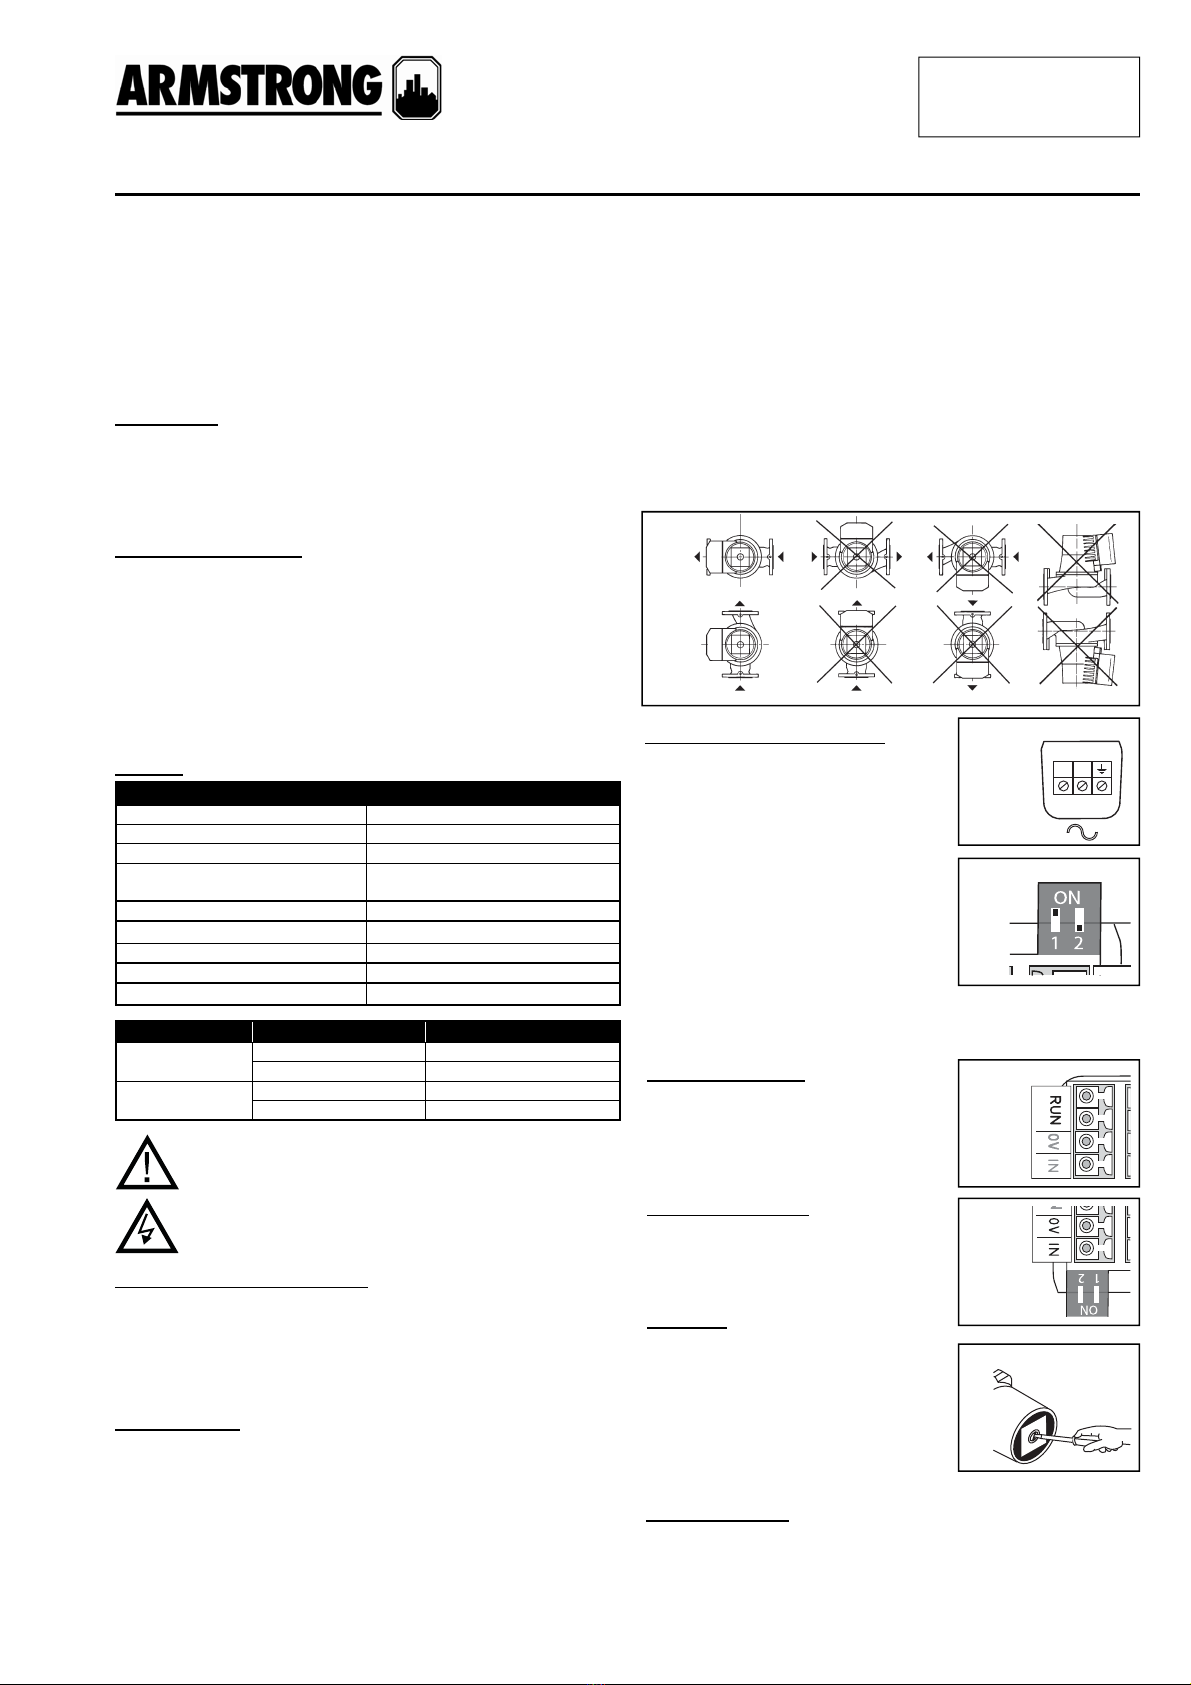
1. The circulator should always be installed with the circulator shaft
horizontal (See Fig. 1). Direction of flow through the circulator casing is
indicated by an arrow located on the casing.
2. If terminal box is to be repositioned by rotating the motor, care must be
taken to ensure the casing 0-ring is correctly positioned.
3. Ensure pipework alignment and adequately supported to both the
circulator and pipework. Sharp bends should be avoided nearby the
circulator.
4. If the circulator is mounted in vertical pipework, flow should be upwards.
If flow is downwards, an air-vent must be fitted at the highest point before
circulator suction.
5. Circulator should never be allowed to operate against a closed valve for
more then a few minutes at the time.
6. To avoid accumulation of impurities in the circulator, make sure that it is
not mounted at the lowest point in a system.
7. It is recommended that isolating valves be fitted eitherside of the
circulator.
8. Before installing a new pump the system should be thoroughly flushed to
clear any foreign objects that may be in the pipework.
AGEplus Series Water temp. max. [C°] Ambient temp. max. [C°]
32-120, 40-100,
40-140 & 50-140 110 30
90 40
90 30
70 40
65-120 & 80-120
Fig. 1
VENTING
Before start up of the circulator, fill the system
and vent the circulator thoroughly. Venting can
be achieved by loosening the plug positioned
in centre of nameplate (See Fig. 6). This proc-
ess should be repeated periodicallyuntil all air
within the system has been removed. Venting
is best done in manual speed 4.
ELECTRICAL CONNECTION
Electrical data is shown on the nameplate.
The circulator needs no external protection but
must be earthed.How to connect the wires
can be seen on the terminals of the circulator.
Technical data
Electrical data: See nameplate
Serial no: See nameplate
Max. working pressure: 10 bar
Min. static head at 80°C: 0,5 bar (65-120 & 80-120
- 0,8 bar)
Min. static head at 95°C 1,5 bar
Sound pressure level
30-120 up to 40-140: Max. 35 dB(A)
50-140 up to 80-120: Max. 50 dB(A)
According to EN 12639
INSTALLATION AND OPERATING INSTRUCTIONS
FILE NO: 10. 823UK
DATE: May. 11, 2011
SUPERSEDES: New
DATE: New
AGEplus SERIES
Analogue 0-10 Volt
The AGEplus can be controlled infinitely
variable by analogue signal from 0-10 V.
0V = Min.speed; 10V = Max. speed
Remote Start-Stop
AGEplus pump has a remote start-stop
function. A cable must be connected to the
RUN contact. If a cable should be discon-
nected, the pump will shut down and the
red light will flash rapidly.
DUTY CONTROL
There are two modes for controlling the circulators.
• Controlled to follow a specific defined differential pressure at different
flows (auto).
Fig. 2
L N
Net
Fig. 3
Fig. 4
Fig. 5
Fig. 6
1
1
2
2
3
3
4
4
Auto max.
Auto min.
Fault Cause Action
The circulator is not
running. See under heading
”Signals” Reset fault indication.
Check main supply and fuses.
Circulator will not start /
is running irregularly. Impurities in the
circulator. See under heading
“Service/ Maintenance”.
The circulatoris running
but no flow. Air in the system.
Closed valve Vent circulator and
system.Open valve.
Circulator noisy. Circulator speed too
high. Static head too
low. Air in system
Decrease set point of
control. Increase inlet
pressure. Vent circulator
and system.
SERVICE / MAINTENANCE
Armstrong’s AGEplus Series range of glandless circulators is virtually
maintenance free and in a well designed system should give many years of
trouble free operation.
If motor shaft is seized as a result of a long period without use or due to
accumulation of impurities, it should be freed. Insert a screwdriver through
the venting plughole and into the slot in the end of the shaft and rotate.
Please note: Any repairs required to the internal electrical parts of the circu-
lator, are to be carried out by an Armstrong approved service organisation.
Transport, Handling and Storage Instructions
a. Transport.
i . AGEplus circulators are despatched fully assembled. AGEplus
circulators are packed for transport by mornal road, sea and air
carriers.
b. Handling
i. Crushing Hazard.
Ii. When lifting an AGEplus circulator above a weight of 25
kg, use lifting equipment haveing a safe working load
rating suitable for the load specified. Use suitable slings
for lifting any circulator..
c. Storage
i. Short term Storage (six weeks). If the AGEplus circulator is not to
be installed immediately after unpacking, then it is to be be stored
in a cool dry dust free location.
Ii. Long term storage. If the AGEplus circulator is not to be installed
for period of longer than six weeks after receipt on site, then it is
to be retained in its packing case. If the casing case is disposed
of, then the inlet and outlet connections are to be blanked off with
suitable clean covers to prevent ingress of damaging solids.
DECLARATION OF CONFORMITY
Armstrong hereby declares that this unit complies with the following
relevant provisions
i. EC Machinery Directives 89/392/EEC, 91/368/EEC, 93/44/EEC,
93/68/EEC
Ii. Electromagnatic compatability standard 89/336/EEC, 02/31/EEC,
93/68/EEC
iii. Applied harmonisation of standards EN809, EN50 081-1,
EN50 082-1, EN50-081-2, EN50-082-2.
• Controlled to follow constant speed for systems with constant demand (1-4).
Setting is done via the rotating button on the top of the terminal box.
Electronic controlled settings
Normal setting, to cover app. 90 % of
all installations.
Factory-setting Auto controlled
performance for
power savings
and extra comfort
where flow
demands are
changing.
Reduced differential pressure. For
systems with little resistance.
Increased differential pressure. For
systems with high resistance as
radiant floor heating systems.
FAULT FINDING
Fixed speed settings
1-4 speeds1. For small
systems and 4. for large
systems or venting
Fixed speed for systems with
constant resistance and radi-
ant floor heating systems.
Signal LED
No light Main supply switched off
Green light Normal operation – power on
Red light Error detected by the electronics
Description
ERROR SIGNALS
The red light on the back of the terminal box will, in case of an error, indicate
the type of error detected by the electronic. Approximately every minute the
light will blink a number of times.
Number of blinks Error
1 Overheating of the electronics
2 Motor overheated
3 Power overload
4 Current overload
5 Speed error
6 Under or over voltage
ERROR RELAY
The AGEplus has a fault relay. The relay
has both a NC and a NO connecting. See
Fig. 9.
SIGNALS
AGEplus circulators have two LED’s on the terminal box for status indica-
tion. Power to the circulator is indicated with the green LED. The red LED
will be on if the circulator detect a fault. Reset is carried out by switching
the mains supply off for 5 sec. and then on again. See Fig. 8.
GENERAL
In all AGEplus circulators, Pressure Loss Compensation (P.L.C.) is included
in the control, which means that the circulator does not follow a constant
differential pressure but takes into account the decreasing pressure needs
at decreasing flow. This setting is in the auto controlling mode. See Fig. 7.
Red = Alam
Green = Power on
For Armstrong locations worldwide, please visit www.armstrongintegrated.com
S. A. Armstrong Limited
23 Bertrand Avenue
Toronto, Ontario
Canada, M1L 2P3
T: 416-755-2291
F: 416-759-9101
Armstrong Integrated Limited
Wenlock Way
Manchester
United Kingdom, M12 5JL
T: +44 (0) 8444 145 145
F: +44 (0) 8444 145 146
© S.A. Armstrong Limited 2011
Fig. 7 Fig. 8
Fig. 9

Other Armstrong Water System manuals

Armstrong E.2 Series User manual

Armstrong

Armstrong E.2 Series User manual

Armstrong 3760 ProVDG Series User manual

Armstrong

Armstrong 3760 ProVDG Series User manual

Armstrong 3760 Mini User manual

Armstrong

Armstrong 3760 Mini User manual

Armstrong ASTRO 2 SERIES User manual

Armstrong

Armstrong ASTRO 2 SERIES User manual

Armstrong ARMflo E Series User manual

Armstrong

Armstrong ARMflo E Series User manual

Armstrong 3760 Pro Series User manual

Armstrong

Armstrong 3760 Pro Series User manual

Armstrong 3760 Pro Series User manual

Armstrong

Armstrong 3760 Pro Series User manual

Armstrong Astro Express 2 User manual

Armstrong

Armstrong Astro Express 2 User manual

Armstrong Astro 2 Series User manual

Armstrong

Armstrong Astro 2 Series User manual

Armstrong E.2 Series User manual

Armstrong

Armstrong E.2 Series User manual

Armstrong AG Series User manual

Armstrong

Armstrong AG Series User manual

Armstrong 3760 Midi Series User manual

Armstrong

Armstrong 3760 Midi Series User manual

Armstrong ASTRO User manual

Armstrong

Armstrong ASTRO User manual

Armstrong 3760 ProDoseVDG Series User manual

Armstrong

Armstrong 3760 ProDoseVDG Series User manual

Armstrong AGE4 User manual

Armstrong

Armstrong AGE4 User manual

Popular Water System manuals by other brands

Marlo Incorporated RO-25T operating manual

Marlo Incorporated

Marlo Incorporated RO-25T operating manual

Kärcher WPC 600 BW operating instructions

Kärcher

Kärcher WPC 600 BW operating instructions

Endress+Hauser ASP 2000 operating instructions

Endress+Hauser

Endress+Hauser ASP 2000 operating instructions

Immergas 3.020001 manual

Immergas

Immergas 3.020001 manual

MECHLINE AQUAJET AJPR50-2 INSTALLATION & CARE INSTRUCTIONS

MECHLINE

MECHLINE AQUAJET AJPR50-2 INSTALLATION & CARE INSTRUCTIONS

Avidity Science GENO20 manual

Avidity Science

Avidity Science GENO20 manual

Viqua D4 owner's manual

Viqua

Viqua D4 owner's manual

Hellenbrand Iron curtain System 2.0 owner's manual

Hellenbrand

Hellenbrand Iron curtain System 2.0 owner's manual

Pfeiffer Vacuum CWK 50 operating instructions

Pfeiffer Vacuum

Pfeiffer Vacuum CWK 50 operating instructions

NEXT pool STERILOR Duo Installation & user guide

NEXT pool

NEXT pool STERILOR Duo Installation & user guide

Sears Craftsman 390.252151 owner's manual

Sears

Sears Craftsman 390.252151 owner's manual

Nimbus Water Systems Sierra manual

Nimbus Water Systems

Nimbus Water Systems Sierra manual

Sonnenkraft FRESH XL manual

Sonnenkraft

Sonnenkraft FRESH XL manual

ESBE GRF100 quick guide

ESBE

ESBE GRF100 quick guide

Covaris AFA ultraCUBE user manual

Covaris

Covaris AFA ultraCUBE user manual

Culligan Aquasential Salt Free Conditioner 9x16 Condo... owner's guide

Culligan

Culligan Aquasential Salt Free Conditioner 9x16 Condo... owner's guide

Watts VB25/32 Series Installation and operating manual

Watts

Watts VB25/32 Series Installation and operating manual

VERIPURE VERIPUREVPC7000 owner's manual

VERIPURE

VERIPURE VERIPUREVPC7000 owner's manual

manuals.online logo
manuals.online logoBrands
  • About & Mission
  • Contact us
  • Privacy Policy
  • Terms and Conditions

Copyright 2025 Manuals.Online. All Rights Reserved.