manuals.online logo
Brands
  1. Home
  2. •
  3. Brands
  4. •
  5. Aroma
  6. •
  7. Blender
  8. •
  9. Aroma ABD-520BD User manual

Aroma ABD-520BD User manual

Other manuals for ABD-520BD

1

Other Aroma Blender manuals

Aroma PROFESSIONAL ABD-650 User manual

Aroma

Aroma PROFESSIONAL ABD-650 User manual

Aroma WattsUp ABD-100-2B User manual

Aroma

Aroma WattsUp ABD-100-2B User manual

Aroma Crush & Blend ABD-530G User manual

Aroma

Aroma Crush & Blend ABD-530G User manual

Aroma WattsUp ABD-100-2B User manual

Aroma

Aroma WattsUp ABD-100-2B User manual

Aroma 600 Series User manual

Aroma

Aroma 600 Series User manual

Aroma ABD-520BD User manual

Aroma

Aroma ABD-520BD User manual

Aroma Crush & Blend ABD-530G User manual

Aroma

Aroma Crush & Blend ABD-530G User manual

Aroma ABD-581M User manual

Aroma

Aroma ABD-581M User manual

Aroma Crush & Blend ABD-530RG User manual

Aroma

Aroma Crush & Blend ABD-530RG User manual

Popular Blender manuals by other brands

Ninja Nutri  QB3000 series quick start guide

Ninja

Ninja Nutri QB3000 series quick start guide

Hamilton Beach HBH550 Operation manual

Hamilton Beach

Hamilton Beach HBH550 Operation manual

Bradex Shake n Take Use & care manual

Bradex

Bradex Shake n Take Use & care manual

Marta MT-1591 user manual

Marta

Marta MT-1591 user manual

BIMG METVISA LARL.1.5 Slim instruction manual

BIMG

BIMG METVISA LARL.1.5 Slim instruction manual

TECHWOOD TBL-751 instruction manual

TECHWOOD

TECHWOOD TBL-751 instruction manual

Philips HR7627 user manual

Philips

Philips HR7627 user manual

Skymsen ls-04 instruction manual

Skymsen

Skymsen ls-04 instruction manual

ROTOR 1125.201 instruction manual

ROTOR

ROTOR 1125.201 instruction manual

Braun Multiquick 5 Vario series User instructions

Braun

Braun Multiquick 5 Vario series User instructions

ARENDO MIRA 305424 user manual

ARENDO

ARENDO MIRA 305424 user manual

Viconte VC-4406 instruction manual

Viconte

Viconte VC-4406 instruction manual

HOFFEN MC-3005 instruction manual

HOFFEN

HOFFEN MC-3005 instruction manual

Nesco BL-90 instruction manual

Nesco

Nesco BL-90 instruction manual

Proline HB300S operating instructions

Proline

Proline HB300S operating instructions

Black & Decker BL8000 user manual

Black & Decker

Black & Decker BL8000 user manual

Duronic BL530 manual

Duronic

Duronic BL530 manual

Exquisit MS 3002 wes instruction manual

Exquisit

Exquisit MS 3002 wes instruction manual

manuals.online logo
manuals.online logoBrands
  • About & Mission
  • Contact us
  • Privacy Policy
  • Terms and Conditions

Copyright 2025 Manuals.Online. All Rights Reserved.

www.AromaCo.com
660000 SSeerriieess
LLiiccuuaaddoorraa pprrooffeessiioonnaall
Manual de instrucciones
ABD-520BD
660000 SSeerriieess
PPrrooffeessssiioonnaall BBlleennddeerr
Instruction Manual
ABD-520BD
www.AromaCo.com
Please read all the instructions before first use.
Published By:
Aroma Housewares Co.
6469 Flanders Drive
San Diego, CA 92121
U.S.A.
1-800-276-6286
www.aromaco.com
© 2007 Aroma Housewares Company All rights reserved.
Favor de leer todas las instrucciones antes de usar.
Publicada Por:
Aroma Housewares Co.
6469 Flanders Drive
San Diego, CA 92121
U.S.A.
1-800-276-6286
www.aromaco.com
© 2007 Aroma Housewares Company. Todos los derechos reservados.
1
1
IIMMPPOORRTTAANNTT SSAAFFEEGGUUAARRDDSS
MMEEDDIIDDAASS IIMMPPOORRTTAANNTTEESS DDEE SSEEGGUURRIIDDAADD
1. Lea todas las instrucciones antes
de usar.
2. Para evitar el riesgo de descarga
eléctrica, no sumerja la licuadora
en agua ni en ningún otro
líquido.
3. Los niños no deben utilizar este
aparato y se debe tener cuidado al
utilizarlo cerca de ellos.
4. Desconecte el aparato del
tomacorriente cuando no lo use,
antes de agregar o sacar piezas y
antes de limpiar.
5. Evite que entre en contacto con
las piezas móviles.
6. No opere aparatos con un cable o
enchufe dañados, o después de
un mal funcionamiento, aparatos
que se dejaron caer o que están
dañados de alguna forma.
Devuelva el aparato al centro de
mantenimiento autorizado más
cercano para examinarlo,
repararlo o realizarle ajustes
eléctricos o mecánicos.
7. El uso de accesorios, incluso las
jarras de enlatado, no
recomendados o vendidos por el
fabricante puede provocar un
incendio, una descarga eléctrica
o lesiones.
8. No la use al aire libre.
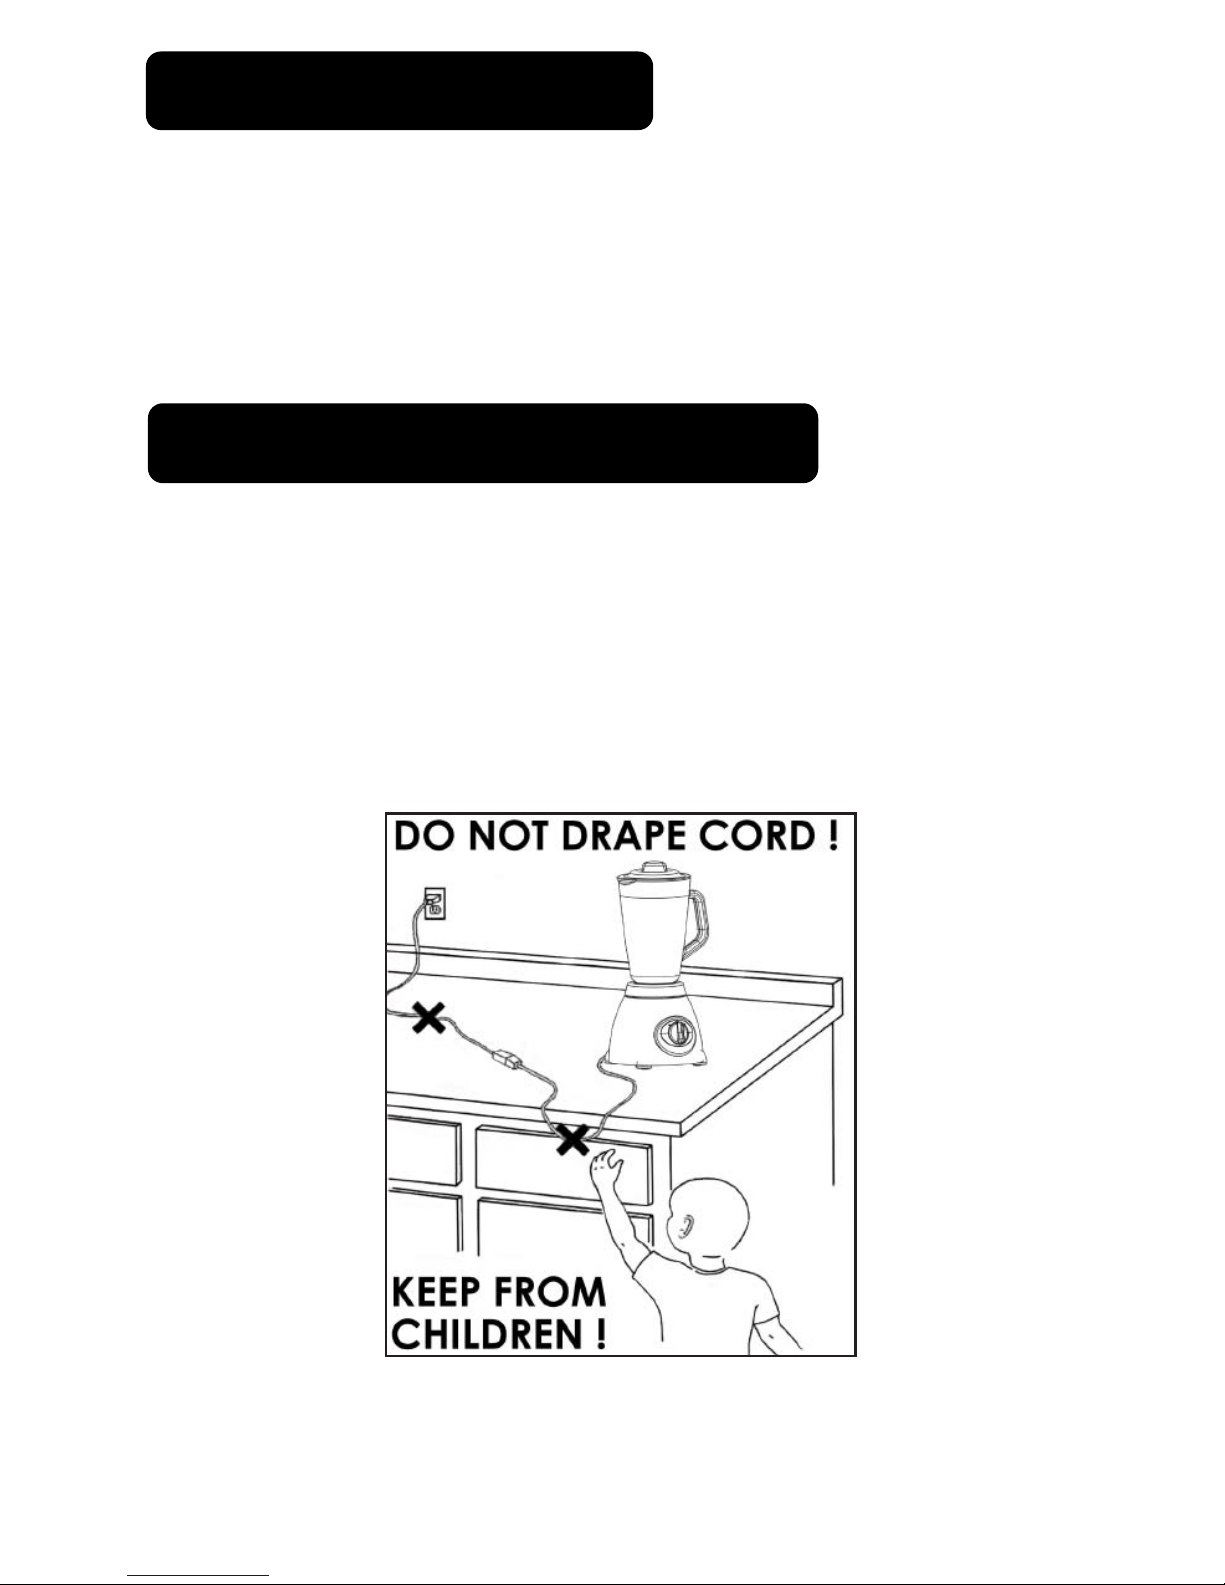
9. No permita que el cable cuelgue
sobre el borde de una mesa o
mostrador.
10.No permita que el cable entre en
contacto con superficies
calientes, incluida la estufa.
11.Mantenga las manos y los
utensilios fuera del recipiente de
la licuadora mientras procesa
para prevenir la posibilidad de
lesiones personales severas o
daños a la licuadora. Se puede
usar una rasqueteadora, pero
sólo se debe usar cuando la
licuadora no está funcionando.
12.Las hojas son filosas.
Manipúlelas con cuidado.
13.Para evitar lesiones, nunca
coloque el ensamblado de las
hojas en la base sin el recipiente
correctamente colocado.
14.Opere siempre la licuadora con
la cubierta en su lugar.
15.No la sumerja en agua.
Cuando se usen aparatos electricos, siempre deberán observarse las precauciones
básicas de seguridad, incluyendo las siguientes:
GUARDE ESTAS INSTRUCCIONES
Basic safety precautions should always be followed when using electrical
appliances, including the following:
1. Read all instructions before
operating.
2. To protect against risk of
electrical shock, do not put
blender in water or other liquid.
3. This appliance should not be
used by children and care
should be taken when used near
children.
4. Unplug from outlet when not in
use, before putting on or taking
off parts and before cleaning.
5. Avoid contact with moving
parts.
6. Do not operate any appliance
with a damaged cord or plug or
after the appliance
malfunctions or is dropped or
damaged in any manner. Return
appliance to the nearest
authorized service facility for
examination, repair, or
electrical or mechanical
adjustment.
7. The use of attachments,
including canning jars, not
recommended or sold by the
manufacturer may cause fire,
electric shock, or injury.
8. Do not use outdoors.
9. Do not let cord hang over edge
of table or counter.
10. Do not let cord contact hot
surfaces, including the stove.
11. eep hands and utensils out of
blender container while
processing to prevent the
possibility of severe personal
injury and/or damage to the
blender. A scraper may be used,
but must only be used when the
blender is not running.
12. Blades are sharp. Handle
carefully.
13. To avoid injury, never place
blade assembly on the base
without container properly
attached.
14. Always operate blender with
cover in place.
15. Do not immerse in water.
SAVE THESE INSTRUCTIONS
IINNSSTTRRUUCCCCIIOONNEESS DDEE CCAABBLLEE CCOORRTTOO
1. A short power-supply cord is provided to reduce risk resulting from
becoming entangled in or tripping over a longer cord.
2. Longer extension cords are available and may be used if care is exercised in
their use.
3. If a longer extension cord is used:
a. The marked electrical rating of the extension cord should be at least as
great as the electrical rating of the appliance.
b. The longer cord should be arranged so that it will not drape over the
counter top or tabletop where it can be pulled by children or tripped over
unintentionally.
2
This appliance has a polarized plug (one blade is wider than the other); follow
the instructions below:
To reduce the risk of electric shock, this plug is intended to fit into a polarized
outlet only one way. If plug does not fit fully into the outlet, reverse the plug.
If it still does not fit, contact a qualified electrician. Do not attempt to modify
the plug in any way.
This appliance is for household use only.
SSHHOORRTT CCOORRDD IINNSSTTRRUUCCTTIIOONNSS
PPOOLLAARRIIZZEEDD PPLLUUGG
PPLLOOYYAA PPOOLLAARRIIZZAADDAA
2
1. Se proporciona un cable eléctrico corto con el propósito de reducir el
riesgo de tropezarse o enredarse con un cable más largo.
2. Hay cables de extensión más largos disponibles y deben ser usados con
sumo cuidado.
3. Si se usa un cable de extensión más largo:
a. La clasificación eléctrica marcada en el cable de extensión debe ser
por lo menos igual que la clasificación eléctrica del aparato.
b. El cable más largo debe ser colocado de manera que no cuelgue por el
borde del mostrador o mesa en donde pudiera ser jalado por un niño o alguien
pudiera tropezarse con el cable sin querer.
Este aparato cuenta con una clavija polarizada (una espiga es más ancha que la
otra); siga las siguientes instrucciones:
Para reducir el riesgo de choque eléctrico, esta clavija debe ser conectada a una
salida o enchufe eléctrico polarizado solamente de una manera. Si la clavija no
entra completamente en el enchufe, voltee la clavija.
Si aún no queda bien en el enchufe, póngase en contacto con un electricista
especializado. No trate de modificar la clavija.
ESTE APARATO ES PARA USO DOMÉSTICO.
¡MANTÉNGASE
LEJOS DE LOS
NIÑOS!
¡NO DEJE QUE EL CABLE CUELGUE!
1. Utilice este producto solamente con un tomacorriente calificado con
voltaje de CA.
2. Asegúrese de desenchufar el cable de CA cuando no utilice la
licuadora.
3
PPRREECCAAUUCCIIÓÓNN
3
1. Do not open the lid of the blender until the blades have stopped
turning.
2. Unplug the cord after each use.
3. Do not submerge the base of the blender in water or other liquids. The
base is NOT dishwasher safe.
4. Do not place hard objects into this machine such as hard fruit pits (i.e.
peach or avocado pits).
5. Make sure that the blender and motor assembly are firmly affixed to
the blender base before turning on the blender.
6. Blades are extremely sharp. Always use a spoon or spatula to remove
food from the blender.
7. Always remove the carafe from the blender base before scrubbing.
SSAAFFEETTYY CCOONNSSIIDDEERRAATTIIOONNSS
1. No abra la tapa de la licuadora hasta que las hojas hayan dejado de
girar.
2. Desenchufe el cable después de cada uso.
3. No sumerja la base de la licuadora en agua ni en otros líquidos. La
base NO es apta para lavaplatos.
4. No coloque comidas duras como carozos de fruta duros (es decir,
carozo de durazno o aguacate) en esta máquina.
5. Asegúrese que la licuadora y el ensamblaje del motor encajen
firmemente en la base de la licuadora antes de encenderla.
6. Las hojas son extremadamente filosas. Utilice siempre una cuchara o
espátula para retirar comida de la licuadora.
7. Retire siempre la jarra de la base de la licuadora antes de fregar.
AADDVVEERRTTEENNCCIIAA DDEE SSEEGGUURRIIDDAADD
1. Use this product with rated voltage AC outlet only.
2. Be sure to unplug the AC cord when blender is not being used.
CCAAUUTTIIOONN
4
PPAARRTTSS IIDDEENNTTIIFFIICCAATTIIOONN
1. Blender base
2. Digital control panel
3. Pulse button
4. Low / High speed indicator lights
5. On button
6. Off button
7. 60-second Pulse & Pulverize™button
8. Auto indicator light
9. Detachable lid cap
10. Removable lid
11. Hinged safety switch
12. Polycarbonate carafe
13. Hexa-Blade™assembly
14. Dispensing spigot
15. Side cap
4
IIDDEENNTTIIFFIICCAACCIIOONN DDEE LLAASS PPAARRTTEESS
1. Base de la licuadora
2. Panel de control digital
3. Botón Pulse (pulsar)
4. Luces indicadoras de velocidad Alta/Baja
5. Botón On (encendido)
6. Botón Off (apagado)
7. Botón de Pulse & Pulverize de 60 segundos
8. Luz indicadora de Auto
9. Tapón desmontable de la tapa
10. Tapa desmontable
11. Interruptor de seguridad con bisagras
12. Jarra de policarbonato
13. Ensamblaje de las hojas
14. Llave expendedora
15. Tapón lateral
1
15
14
13
12
11
10
9
8
7
6
5
4
3
2
1
15
14
13
12
11
10
9
8
7
6
5
4
3
2
5
1. Read all instructions and important safeguards.
2. Remove all packaging materials and make sure items are in good
condition.
3. Tear up all plastic bags as they can pose a risk to children.
4. Wash lid, lid cap, carafe and blade assembly in warm soapy water.
Rinse and dry thoroughly.
5. Wipe blender base with a soft, damp cloth.
• Do not use abrasive cleaners or scouring pads.
• Do not immerse blender base, cord or plug in water at any time
5
1. Lea todas las instrucciones y medidas de seguridad importantes.
2. Retire todos los materiales del empaque y asegúrese que los artículos
estén en buen estado.
3. Rompa todas las bolsas de plástico dado que pueden constituir un
peligro para los niños.
4. Lave la tapa, el tapón de la tapa, la jarra y el ensamblaje de las hojas
en agua tibia jabonosa. Enjuague y seque bien.
5. Limpie la base de la licuadora con un paño suave y húmedo.
• No use limpiadores abrasivos ni estropajos.
• No sumerja la base de la licuadora, el cable ni el enchufe en agua en
ningún momento.
UUSSIINNGG YYOOUURR BBLLEENNDDEERR
CCOOMMOO UUSSAARR EELL AAPPAARRAATTOO
BBeeffoorree FFiirrsstt UUssee
TToo OOppeerraattee YYoouurr BBlleennddeerr
1. Place blender base on a sturdy, level surface.
2. Attach the side cap or the dispensing spigot to the
side of the carafe by screwing on clockwise. When
using the dispensing spigot, make sure that the
knob is turned to the OFF position.
3. Place carafe into the blender base, gently turning
side to side to ensure that the undercarriage of the
carafe lines up properly with the base.
4. Place ingredients into the carafe.
5. Attach the lid cap to the lid by lining up the two
pegs on the bottom with the indentations in the lid
and turning clockwise to lock in place. (See
Diagram 1)
6. Slide the lid onto the hinged safety switch (see
diagram 2) and close the lid, making sure that it fits
snugly onto the carafe.
7. Plug the power cord into a wall outlet.
8. To operate:
PPUULLSSEE Press and release the Pulse button as needed to pulse at
high speed. The motor will stop when the Pulse button
is released. This function is best for blending large
chunks such as ice or frozen food, because stopping the
motor allows pieces to settle closer to the blades.
AAnntteess ddee uussaarrllaa ppoorr pprriimmeerraa vveezz::
1. Coloque la base de la licuadora en una superficie
firme y plana.
2. Adjunte el tapón lateral o la llave expendedora al
costado de la jarra ajustando en el sentido de las
agujas del reloj. Al usar la llave expendedora,
asegúrese que la perilla esté en la posición OFF
(apagado).
3. Coloque la jarra en la base de la licuadora,
girando suavemente de un lado al otro para
asegurar que el tren de aterrizaje de la jarra esté
bien alineado con la base.
4. Coloque los ingredientes en la jarra.
5. Conecte el tapón a la tapa alineando los dos
pasadores del fondo con la hendidura de la tapa
y girando en sentido de las agujas del reloj para
asegurarla en su lugar. (Vea la diagrama 1)
6. Deslice la tapa dentro del interruptor de seguridad
con bisagras (vea la diagrama 2) y cierre la tapa,
asegurándose que quede bien ajustada a la jarra.
7. Enchufe el cable eléctrico al tomacorriente de la
pared.
PPaarraa uussaarr ssuu lliiccuuaaddoorraa::
Diagram 2
Diagram 1
Diagram 2
Diagram 1
UUSSIINNGG YYOOUURR BBLLEENNDDEERR
LLOOWW SSPPEEEEDDPress the ON button once. The “Low” indicator light will
illuminate. The low speed is best for mixing soft
ingredients.
HHIIGGHH SSPPEEEEDDPress the ON button twice. The “High” indicator light
will illuminate. The high speed is best for ultra-fine
blending.
PPUULLSSEE &&Press the 60 Sec/Auto button. The “Auto” indicator
PPUULLVVEERRIIZZEE™light will illuminate. The blender will start a pre-
programmed cycle. First, it will pulse ingredients in
10-second intervals, followed by 30 seconds of
continuous grinding. The motor will automatically shut
off after 60 seconds and a beep will sound to alert you
that the cycle has finished.
9. Press the OFF button at any time to stop the motor.
10. If the lid is opened at any point during operation, the motor will stop.
11. To add ingredients during the blending cycle, turn the lid cap counter-
clockwise and lift up. Carefully insert ingredients through the lid
opening, and then reattach the lid cap.
12. To dispense without the dispensing spigot, press the OFF button and
lift up the lid. Lift the carafe off of the blender base by the handle. Pour
out ingredients into serving containers.
DDIISSPPEENNSSIINNGG SSPPIIGGOOTTTo use the spigot, leave the lid in place after
blending. Place cup or container under the
spigot. Turn the spigot knob to the ON
position. Press the PULSE button to move the
mixture through the spigot. Turn the handle to
the OFF position when finished dispensing.
CCOOMMOO UUSSAARR EELL AAPPAARRAATTOO
8. Para operar:
PPUULLSSAARR Oprima y libere el botón Pulse según sea necesario para
pulsar a Alta velocidad. El motor se detendrá cuando
suelte el botón Pulse. Esta función es ideal para licuar
trozos grandes como hielo o comida congelada ya que la
detención del motor permite que las piezas se asienten
alrededor de las hojas.
BBAAJJAA VVEELLOOCCIIDDAADDOprima el botón “ON” (encendido) una vez. La luz
indicadora de “Baja” velocidad se iluminará. La
velocidad baja es ideal para mezclar ingredientes blandos.
AALLTTAA VVEELLOOCCIIDDAADDOprima el botón “ON” (encendido) dos veces. La luz
indicadora de “Alta” velocidad se encenderá. La
velocidad alta es ideal para un licuado ultra fino.
PPUULLSSEE YYOprima el botón 60 Sec/Auto. La luz indicadora de
PPUULLVVEERRIIZZEE ™“Auto” velocidad se encenderá. La licuadora
comenzará un ciclo preprogramado. En primer lugar,
oprimirá los ingredientes en intervalos de 10 segundos,
seguido de un molido de 30 segundos continuos. El
motor se detendrá automáticamente luego de 60
segundos y un sonido lo alertará de que ha finalizado el
ciclo.
9. Oprima el botón de OFF (apagado) en cualquier momento para detener el
motor.
10. Si la tapa se abre en cualquier momento durante la operación, el motor se
detendrá.
11. Para agregar ingredientes durante el ciclo de licuado, gire el tapón de la tapa
en sentido contrario a las agujas del reloj y levante. Inserte cuidadosamente los
ingredientes a través de la abertura de la tapa, y vuelva a colocar el tapón de
la tapa.
12. Para expender sin la llave expendedora, oprima el botón OFF y levante la
tapa. Levante la jarra de la base de la licuadora por el mango. Vierta los
ingredientes en recipientes para servir.
LLLLAAVVEEPara usar la llave, deje la tapa en su lugar luego de
EEXXPPEENNDDEEDDOORRAAlicuar. Coloque la taza o el recipiente debajo de la llave.
Coloque la perilla de la llave en la posición ON
(encendido). Oprima el botón PULSE para mover la mezcla
a través de la llave. Coloque la manija en la posición OFF
(apagado) cuando haya finalizado de expender.
6
6
1. Dispense contents of carafe completely.
2. Place carafe, lid, lid cap, dispensing spigot (in the ON position)
and/or side cap into warm soapy water.
3. Wipe the carafe clean with a soft cloth, taking care not to touch the
blades. It may help to collect some soapy water in the carafe and
shake gently to jar loose any food particles.
4. Rinse carafe completely.
5. Wash the other accessories with a soft cloth and rinse completely.
6. Dry all parts thoroughly before storing.
7
HHOOWW TTOO CCLLEEAANN
Always unplug unit and allow to cool
completely before cleaning.
TThhee ddiissppeennssiinngg ssppiiggoott mmuusstt bbee aattttaacchheedd ttoo tthhee ccaarraaffee iinn oorrddeerr ttoo uussee tthhee
SSeellff CClleeaann ffeeaattuurree..
1. Dispense contents of carafe completely.
2. Make sure that the dispensing spigot is attached to the carafe.
3. Add warm water and dish soap to the carafe.
4. Place the carafe firmly on the blender base and close the lid.
5. Press the 60 Sec/Auto button. When the cycle is complete, place a
container beneath the dispensing spigot and turn the handle to the
ON position. The soapy water will drain out of the carafe.
6. Turn the handle on the spigot to the OFF position.
7. Add warm water to the carafe. Close the lid and press the PULSE
button a few times to rinse the inside of the carafe.
8. Place a container beneath the dispensing spigot and turn the handle
to the ON position. The water will drain out of the carafe.
9. Repeat steps 6 through 8 as needed until blender is completely
rinsed.
10. Allow the lid to remain open for several hours in order to let the
carafe dry.
SSeellff--CClleeaanniinngg
HHaanndd WWaasshhiinngg
1. Expenda el contenido completo de la jarra.
2. Coloque la jarra, la tapa, el tapón de la tapa, la llave expendedora (en
posición ON) y el tapón lateral en agua tibia jabonosa.
3. Limpie la jarra con un paño suave, cuidando de no tocar las hojas.
Para facilitar este proceso, puede juntar un poco de agua jabonosa en
la jarra y sacudir suavemente para aflojar cualquier partícula de
comida.
4. Enjuague la jarra completamente.
5. Lave los otros accesorios con un paño suave y enjuague
completamente.
6. Seque todas las partes bien antes de guardarlas.
CCOOMMOO LLIIMMPPIIAARR
Desconecte siempre la unidad y deje que se enfríe
completamente antes de limpiarla.
LLaa llllaavvee eexxppeennddeeddoorraa ddeebbee eessttaarr ffiijjaaddaa aa llaa jjaarrrraa aa ffiinn ddee uuttiilliizzaarr llaa
ffuunncciióónn ddee lliimmppiieezzaa aauuttoommááttiiccaa.. ..
1. Expenda el contenido completo de la jarra.
2. Asegúrese que la llave expendedora esté ajustada a la jarra.
3. Agregue agua caliente y detergente a la jarra.
4. Coloque la jarra firmemente en la base de la licuadora y cierre la
tapa.
5. Oprima el botón 60 Sec/Auto. Cuando el ciclo esté completo,
coloque un recipiente debajo de la llave expendedora y coloque la
manija en la posición ON (encendido). El agua jabonosa drenará de
la jarra.
6. Coloque la manija de la llave en la posición OFF (apagado).
7. Agregue agua caliente a la jarra. Cierre la tapa y oprima el botón
PULSE varias veces para enjuagar el interior de la jarra.
8. Coloque un recipiente debajo de la llave expendedora y coloque la
manija en la posición ON (encendido). El agua drenará de la jarra.
9. Repita los pasos 6 al 8 como sea necesario hasta que la licuadora
esté completamente enjuagada.
10.Permita que la tapa permanezca abierta por varias horas a fin de
permitir que se seque la jarra.
LLiimmppiieezzaa aauuttoommááttiiccaa
LLaavvaaddoo aa mmaannoo
7
IINNGGRREEDDIIEENNTTEESS MMOOJJAADDOOSS
Esta licuadora funciona mejor con ingredientes húmedos.
Cuando licue hielo, frutas congeladas, vegetales duros u otros
“alimentos secos”, será de ayuda agregar una pequeña cantidad
de agua u otro líquido a la jarra antes de licuar.
IINNTTEERRRRUUPPTTOORR DDEE SSEEGGUURRIIDDAADD
El motor no funcionará si la tapa no se ajusta firmemente a la
jarra o si la jarra no está alineada adecuadamente con la base de
la licuadora. Vea a la sección Identificación de las Partes en la
página 4 para ver la localización del interruptor de seguridad.
EELL HHIIEELLOO
Al mezclar hielo con ingredientes más blandos como frutas y
vegetales, es mejor colocar los alimentos más blandos en la
jarra primero y luego colocar los cubos de hielo en la parte
superior.
AALLIIMMEENNTTOOSS AATTAASSCCAADDOOSS
Si se traba hielo o alimento en las hojas, apague el motor. Una
vez que las hojas hayan parado de rotar, use una espátula u otro
utensilio largo para desprender el fragmento estancado. Retire el
utensilio, vuelva a colocar la tapa y vuelva a encender el motor.
AAPPAAGGAARR AAUUTTOOMMÁÁTTIICCAAMMEENNTTEE
La licuadora tiene una función de apagado automático que
apagará el motor luego de 60 segundos de operación. Para
continuar licuando luego de 60 segundos, oprima los botones
Pulse, On o Auto nuevamente.
8
8
CCOONNSSEEJJOOSS ÚÚTTIILLEESS
Sugerencias útiles:
WWEETT IINNGGRREEDDIIEENNTTSS
This blender operates best with wet ingredients. When blending ice,
frozen fruits, hard vegetables or other “dry foods”, it will help to
add a small amount of water or other liquid to the carafe before
blending.
SSAAFFEETTYY SSWWIITTCCHH
The motor will not operate if the lid is not firmly attached to the
carafe or if the carafe is not properly aligned on the blender base.
See Parts Identification on page 4 for the location of the safety
switch.
IICCEE
When mixing ice with softer ingredients such as fruit and
vegetables, it is best to place the softer foods into the carafe first
and then place ice cubes on top.
JJAAMMMMIINNGG
If ice or food becomes stuck around the blades, turn the motor off.
Once the blades have stopped rotating, use a spatula or other long
utensil to dislodge the stuck fragment. Remove the utensil, replace
the lid and restart the motor.
AAUUTTOO SSHHUUTT--OOFFFF
The blender has an auto shut-off function which will turn off the
motor after 60 seconds of operation. To continue blending after 60
seconds, press the Pulse, On, or Auto button again.
BBLLEENNDDIINNGG GGUUIIDDEE
Tips for Getting Started