ARTE BOX Guide

BOX
WOOD STOVE
Manual and
User Guide

CONTENTS page
1. ARTE®WOOD STOVE - A GREEK QUALITY PRODUCT 28
1.1 The ARTE®storage heating stove BOX 28
2. FACTS ABOUT WOOD AND THE ENVIRONMENT 29
2.1 Why Use Wood? 29
2.2 Buying Firewood 29
2.3 Storing Your Wood 30
2.4 Wood types and calorific value 31
3. APPROVALS AND CERTIFICATIONS 32
3.1 Approval 32
3.2 CE conformity 32
3.3 Ratings plate 32
4. PACKAGING 33
5. FIRE PROTECTION 33
5.1 Safety distances 33
5.2 General safety instructions 33
5.3 Chimney safety instructions 34
5.3.1 Common chimney problems 34
5.4 Conduct during malfunctions - SHUTTING DOWN safely 34
6. OPERATING INSTRUCTIONS 35
6.1 Before firing the stove for the first time 35
6.2 About the stove 35
6.3 General information 35
6.3.1 When the stove paint dries 35
6.3.2 Preparations for firing 36
6.3.3 Air pipe inlet for combustion and air ventilating system 36
6.3.4 Heating in the transition time and in difficult conditions 36
7. FIRING THE STOVE 37
7.1 Traditional firing 37
7.2 Firing the stove without CO emissions (TOP-DOWN) 37
8. SECONDARY COMBUSTION 39
9. CLEANING AND CARING FOR YOUR STOVE 40
9.1 Exterior Maintenance 40
9.2 Internal maintenance 40
9.3 Cleaning the Stove and the Flue 42
9.4 Inside parts 43
9.5 Leaving the stove for extended periods 44
10. TIPS & TRICKS 44
11. DIMENSIONS 45
12. TECHNICAL DATA 46
13. WARRANTY 47
13.1 Warranty terms 47
13.2 Excluded from the warranty 47
13.3 Responsibility 47
13.4 Extraordinary maintenance 47
13.5 Responsibility for installation 47
13.6 Use 48
13.7 Legal guarantee 48

BOX WOOD STOVE 28 |29
1.1 The Arte®storage heating stove BOX
Box is a technically sophisticated heat storage stove. The heat that generated by burning wood is absorbed by
the chamotte firebricks core, a material with high heat storage volume and a very low thermal conductivity.
Once the wood has completely burned, this core, as a heat exchanger, gives off its heat for a long period
with relatively little mass.
Box is capable of heating many hours after the last filling; the stove is still 60°C after 8 hours.
Heat output from the last filling.
The Box is filled 4 times with
x 2 logs (~2kg).
2. FACTS ABOUT WOOD AND THE ENVIRONMENT
2.1 Why Use Wood?
With proper forest management, burning wood does not deplete the earth’s resources. Heating with wood
usually does not contribute to global warming. The young trees that replace the trees in your wood stove
absorb carbon dioxide from the air. Burning firewood releases only as much CO2as the tree has absorbed
from the atmosphere during its growth. Wood rotting in the forest generates the same amount of CO2as
the same wood burning.
Besides being environmentally friendly, the heat from a wood stove warms you like the warming rays of the
sun during the sunny winter days. It is the radiated heat that transmitted by electromagnetic waves in the
infrared range. Even when the air is very cold you can feel the warm rays of the sun on your skin.
Another advantage to wood is that it is produced locally, which creates local employment, and more tax
revenues stay in the province.
2.2 Buying Firewood
Where can I get my firewood?
Buying ready-to-burn firewood
Regenerated ready-to-burn firewood can be purchased from dealers:
>Stove-ready, stored for at least two years
>Pre-dried, stored for one year
>Fresh from the forest
When purchasing, check-out the following:
>Is the fuel the right type and size for your stove?
>Are the logs green or seasoned? (Is there specified moisture content?) Consider how much space you
need if drying your logs - you need space for at least one winter, preferably two).
>Some log suppliers supply by the “load” - what does this mean? Request a volume measurement in
cubic meters.
>Where is the wood fuel coming from? Is the woodland sustainably managed, and reasonably nearby?
(Have they been imported?)
>Hardwood or Softwood logs?
>Does the supplier offer a stacking service?
Whether you have cut your own wood or bought it, the important thing is: the wood should be dried for at
least two years before it is burned.
The ideal residual moisture is 12 - 15% and should be no higher!
1. ARTE®WOOD STOVE - A GREEK QUALITY PRODUCT
Thank you for buying an ARTE®wood stove - we believe that you will have as much pleasure from our
product as we have.
Your ARTE®wood stove is made in such a way, to extract the maximum possible energy from the wood
with the minimum possible emissions, using the most innovative technology and the most robust design
- made in Greece!
These instructions contain interesting and informative facts and all you need to know about the subjects of
heating, wood, and operating your ARTE®wood stove. Please read these instructions carefully before using
your stove for the first time and keep them in a safe place.
The manuals which are enclosed with the product must be kept
throughout the product’s entire service life.

30 |31
BOX WOOD STOVE
2.3 Storing Your Wood
The full potential for heat will not be realized if you neglect the simple chore of piling and protecting your
wood. Proper storage is essential to avoid moisture, bacteria, and insect problems in your home.
To avoid problems with insects and moisture, store the wood as far from your house as is practical. Do not
store wood in your basement; one cord of wood can give off more than 500 liters of water. The basic rule is
to hide the wood from water, but not from the sun or wind (Figs. 1 & 2). Green wood will dry slowly or not at
all if unprotected, while seasoned wood left unprotected may become unseasoned.
There are three basic rules to follow when storing wood:
1. Allow air circulation by piling one tier wide if possible
2. Protect wood from rain and snow by covering with a tarp or woodshed roof
3. Pile wood off the ground on scrap lumber or wooden pallets
The time-honored way to cure wood is to buck, split, and stack wood off the ground for one full year. How-
ever, wood can generally be reduced to 20 per cent moisture content in two to three months. The ideal 10%
to 15% may take longer (almost 18 months).
Fig. 1 Fig. 2
2.4 Wood types and calorific value
A wood’s efficiency does not depend only on its type, but also on its humidity, as well as the temperature of
the combustion chamber.
For more efficient and longer burning, without emission of hazardous substances, woods must be dry. Ide-
ally, their humidity percentage must not exceed 10% to 15%.
If this percentage is over 20%, the wood is not burned properly, whereas if the piece of wood has been cut
recently, the humidity is over 60% making it unsuitable for burning. The reason for that is that the fire will
be weak and pale and will produce dense smoke, unburned tar and creosote, soiling the ceramic glass and
the smoke duct.
It is preferable to get your wood supplies during the summer months and store them, to ensure better
combustion quality during the winter.
Useful tips
1. Always choose dry firewood
2. Avoid wood that pops (chestnut, conifers such as cedar, spruce and pine), as they may damage your
fireplace or the smoke duct
3. Pay attention to the size of the woods. Good firewood must have been cut at least twice
4. You should prefer oak, beech, olive wood, hard wood with high density since they will burn for longer
Briquettes
They ignite very easy, and burn slowly. They are economically advantageous because you will burn smaller
quantities compared to common firewood and they are easily stored. Also, you have less quantity of ashes
vs. to wood.
0% humidity
10% humidity
30% humidity
50% humidity
100% thermal efficiency
88% thermal efficiency
63% thermal efficiency
39% thermal efficiency

32 |33
4. PACKAGING
ARTE®is dedicated to protecting the environment, using wherever possible recyclable and least possible
packaging materials without cutting corners on product transportation safety.
Unpacking
1. Remove the stretch film and the nylon
waterproofing. (be careful with sharp in-
struments)
2. Take off all the pieces inside the combus-
tion chamber.
3. Unscrew the screws (1) from the wood-
burning stove so as to free it from the
palette.
4. Carefully loft the stove off the palette and
place it where it is to be installed.
2
1
1
1. Screws
2. Wooden palette
5. FIRE PROTECTION
Installation of a wood stove must be according to local codes and regulations in each country.
All local regulations, including those which refer to national and European standards, must be ob-
served when installing the product. The installation can only be put into use after it has been checked by a
qualified inspector. Contact your local building authorities before installing a new wood stove.
5.2 General safety instructions
>Never leave children alone or unattended at a burning stove
>Teach your children how to behave properly and operate safely the stove
5.1 Safety distances
Safety distance A
The side and rear panels must be no closer than 25 cm to
flammable materials e.g. furniture, cloths, etc.
Safety distance B
Smoke pipes must be no closer than 25 cm to flammable
materials
Safety distance C + D
Flammable floor materials must be no closer than 50 cm to
the front and 30 cm to the sides
Safety distance E
Firing chamber apertures must be no closer than 80 cm to
flammable materials within the radiation zone
Safety distance F
The minimum distance from the ceiling is 60 cm
BOX WOOD STOVE
Birch
Soft wood ignites easily with great thermal energy production. It produces less smoke and ash compared to
other wood and burns silently. The same characteristics apply for lime and chestnut.
Beech
Hard wood ideal for firewood requires a high temperature to ignite. It weights a lot; it is dense and burns with
a calm and long fire for a longer time. Best when well seasoned. The same applies for oak, but seasoned
for 2-3 years.
The various wood types have various calorific values
The values are based on 15% residual wood moisture
3. APPROVALS AND CERTIFICATIONS
3.1 Approval
Your ARTE®wood stove has been tested under the following standards: EN13240
3.2 CE conformity
The manufacturer, G. Karnoutsos & CO, confirms that the ARTE®wood stove conforms to the standards
under EN 13240 and that the quality requirements are constantly monitored.
3.3 Ratings plate
The ratings sing is located on the bottom of the stove.
An ARTE® Wood Stove can be fired with all of the above wood types
Wood Type Thermal Capacity (Kcal/h-1Kg)
Briquette 5.000
Birch 4.800
Walnut 4.731
Oak 4.619
Beech 4.578
Fir 4.588
Common Oak 4.548
Pine 4.457
Olive wood 4.100
Poplar 4.022
860Kcal/h = 1Kw/h

34 |35
Stovepipe
Εξωτερικός
αέρας
Σύστηµα
καθαρισµού
τζαµιού
Combustion Chamber
>Avoid touching the outside surfaces when the stove is operating. Every stove gets hot when fired: risk of
burning!
>It is prohibited to use the stove as a waste incinerator
>Do not burn, refused or painted wood
>Dispose of the ashes only after they have cooled completely
>Ash should be placed outdoors or be emptied in a place where it will not present a potential of hazard
>Inform your specialized dealer without delay of defect gaskets
>Do not use chemicals or fluids to start the fire
5.3 Chimney safety instructions
The condition and functionality of your chimneys must be inspected by a chimney sweep or specialist before
the ARTE®wood stove is installed. (EN 13384-1 & EN 13384-2)
This will provide the optimal conditions for trouble-free heating.
5.3.1 Common chimney problems
>Retrofitting an old chimney: Frequently, old chimneys are too big for today’s wood stoves. That means
the amount of air they draw is not proportional to the amount of heat the stove produces. A too-big chim-
ney means you’ll burn more wood than you need, and likely spend more time than necessary on fire
maintenance. You’ll need to install a “liner” stovepipe within the chimney. It should run the entire length
of the chimney, and nowhere along its length should it be any bigger than the stove’s exhaust opening.
But -- before you go jamming pipe up the chimney -- you should know how the chimney was built, and
what sort of insulation it contains. The heat produced by a wood-burning stove is different from the heat
produced by an open fireplace, and your chimney may not be up to the task without some work.
>Setting the stovepipe to minimum height requirements: A short chimney may look nicer (though that’s a
matter of opinion), but it may not supply an optimal draft to the stove. Work with a professional to figure
out the right stovepipe height for your stove.
>Running too much horizontal stovepipe: A venting system works best when it’s vertical. Some hom-
eowners, rather than create chimney holes in the roof, run stovepipe out windows or through walls. But
this is a very bad idea.
>Running the stovepipe along an exterior wall: This isn’t a safety issue so much as an efficiency issue. The
stove will heat more of the house if the pipe travels up along an interior wall, so all the heat from the pipe
stays in the house.
>Creating too many twists and turns: Venting systems should be direct and straight. Twists and turns in a
stovepipe invite the buildup of creosote, and that raises the risk of fire.
5.4 Conduct during malfunctions - SHUTTING DOWN safely
In rare cases, also a pilot fire can fail to generate a draught in the flue.
You must then ask your chimney sweep for advice. On no account must you attempt to light a larger fire.
When smoke escapes from your stove, air the room immediately and contact your chimney sweep. You
should then refrain from firing your stove.
Observe the information in our operating instructions and make
a proactive contribution to fire prevention and the protection of
our environment.
6. OPERATING INSTRUCTIONS
6.1 Before firing the stove for the first time
You have now been instructed by one of our specialized dealers on how to fire your ARTE®wood stove.
In these operating instructions we wish to set down each step that you must take if you are to encounter no
problems when operating your ARTE®wood stove.
Your specialized dealer will be pleased to assist you with any questions you may have.
ARTE®wood stove is equipped with the following controls:
6.2 About the stove
6.3 General information
6.3.1 When the stove paint dries
When the stove is fired for the first few times the paint on the stove emits an odour when it dries.
Let the fire burn with a high draught until all traces of the gas have disappeared and no smoke or odour
can be detected.
The gas is not toxic but the room should be thoroughly ventilated.
Postcombustion Control, Fig. 4A Handle for door, Fig. 4Β
Pushed in: Closed
Pulled out: Open Door is opened by pulling handle out.
Fig. 3 Fig. 4
BOX WOOD STOVE
Α
B

36 |37
6.3.2 Preparations for firing
Have ready an adequate supply, of chopped firewood, ecofriendly lighting aids and kindling. You are best
storing the wood in a warm room for a number of days before firing.
6.3.3 Air pipe inlet for combustion and air ventilating system
Operation with indoor air: Extractor hoods and ventilating systems can affect the operation of your ARTE®
wood stove. Please make sure that there is adequate incoming air for multiple installations. Operating the
extractor hood and ventilating system can force dangerous flue gases out of the stove and into the room.
Under the firing regulations, joint operations are permitted only in conjunction with a flue gas controller.
When the extractor hood or ventilating system is put into operation, at least one window in the room must
be open.
Operation with external fresh air: Make sure the room is adequately ventilated when your stove is operat-
ing with external fresh air. When the firing chamber door is opened for more firewood, there must be no
sustained under pressure in the room.καλό είναι να κρατάτε την πόρτα περίπου 1.5 cm ανοιχτή για 5 με 6 δευ-
τερόλεπτα και ύστερα να την ανοίγετε.
6.3.4 Heating in the transition time and in difficult conditions
In damp or foggy weather, at outdoor temperatures from ≥15 °C, and during the transition time you are
advised to light a pilot fire before firing the stove proper. This serves to displace the cold, heavy air in the
chimney and to create the right conditions for the optimal extraction of smoke.
This pilot fire is lit with paper in the chimney’s inspection aperture until extraction is assured.
The ARTE®wood stove give you the opportunity to work with internal or
external air (kit for external AIR)
7. FIRING THE STOVE
7.1 Traditional firing
When first lighting the stove, a large volume of air is needed. When the stove is cold, you should leave the
door open to the first latch so there is an air gap around it (or if you do not have a handle with two latch, 1
– 2cm ) for the first few minutes and open the primary & secondary air supply completely.
To form a reasonable bed of ash on the floor of the stove, you should use 1 - 2 kg of dry kindling at the initial
lighting. If possible, maintain a 2-3 cm layer of ash on the floor of the combustion chamber for added insulation.
1. Put 2-4 fuel tablets or 7-10 rolled up sheets of newspaper underneath 1 - 2 kg of dry kindling.
2. Open the combustion air by pulling it out all the way (Fig.4A).
3. After the fuel tablets/rolled up sheets have caught fire, leave the fire door ajar about 1 - 2 cm (or to the
first latch of handle), so that the chimney draws well.
4. When you can see that the chimney is hot enough to draw (after 5 - 10 minutes), close the door. If all the
necessary conditions are met, a thick layer of embers will have been formed in the combustion chamber
after another 15 - 20 minutes, and there will be a high temperature in the combustion chamber, which
is necessary in order to be able to continue the combustion.
5. If the condition in step 4 is met, place 2 - 3 pieces of wood with a total weight of 1.5 - 3 kg over the embers,
with a distance of approximately 1 cm.
6. Open the air supply to maximum, and close the door. The fresh wood will be lit within 2 - 3 minutes. If it
does not light, open the door slightly to allow in enough air to ignite the wood. Close the door again once
the wood has caught.
7. Reduce the amount of combustion air to the desired position, and the optimal combustion will continue.
Make sure that there is always enough air (oxygen) to maintain clear, lasting flames when, and after,
reducing the amount of combustion air.
8. Once the fire has been reduced to a thick layer of embers, a new portion of wood can be added by
repeating steps 5 & 7.
7.2 Firing the stove without CO emissions (TOP-DOWN)
1. Open the combustion air by pulling it out all the way (Fig.4 A). If necessary, keep the door slightly open about
1 - 2 cm (or to the first latch of handle).
2. Place 2 - 3 pieces of wood with a total weight of 1.5 - 3 kg and a length of 30 - 35 cm in/out on each side of the
base. (Fig. 5 A&B)
While the door is open, do not leave the stove unattended.
In order to avoid sooting on the glass, it is important that the log
is not placed adjacent to the glass on the product
BOX WOOD STOVE

38 |39
6. When you can see that the chimney is hot enough to draw (after 5 - 10 minutes), close the door (Fig. 3B).
7. Reduce the amount of combustion air to the desired position, and the optimal combustion will continue.
Make sure that there is always enough air (oxygen) to maintain clear, lasting flames when, and after,
reducing the amount of combustion air. (Fig. 4A).
8. Once the fire has been reduced to a thick layer of embers, a new portion of wood can be added. Stoke the
stove frequently but only add small amounts of fuel max 3,4kg at a time. If the stove is filled too full, the
heat created may cause extreme stress in the chimney. Add fuel to the fire in moderation.
The maximum height of the pile of the wood should be just below the
combustion air holes.
3. Put 2 - 3 fuel tablets or 5 - 8 rolled up sheets of newspaper between these woods
4. Add some kindling wood (1 - 2 kg) in a criss-cross pattern on top (Fig. 5 A&B)
5. Finally, place a medium-sized log on the top of the pile and light the tablets/newspaper
BOX WOOD STOVE
Fig. 5A (Horizontal) Fig. 5B (Vertical)
The fire is best when it is burning well and the smoke from
the chimney is almost invisible.
Avoid smouldering fires as this produces the most pollution.
WARNING: Wood stoves must never be left unattended with
the door open.
If the door is left partly open, gas and flame may be drawn
out of the fireplace stove opening, creating risks from both
fire and smoke. We recommend that you fit a smoke detec-
tor in the room where the stove is installed.
DO NOT OVERFIRE THIS HEATER. Over firing may cause a
house fire, or can result in permanent damage to the stove.
If any part of the stove glows, you are over firing.
The maximum recommended weight of wood fuel per load is 3,4kg/h (approx 3 split logs).
Rules of wood burning
If you want less heat, put fewer logs on the stove and reduce the amount of air. It is still important to main-
tain a good layer of embers.
Less heat - less wood - less air
Greater heat - more wood - more air
Soot deposits will settle on the glass if the stove is run too slowly or if your wood is not well seasoned.
We would strongly recommend that you do not leave your stove alit at night. It harms the environment, and
constitutes very poor use of the wood, as the gases in the wood do not ignite at the low temperature, but
settle as soot (unburned gases) in the chimney and stove instead.
8. SECONDARY COMBUSTION
One of our objectives is to develop wood burners that burn cleaner and more economically than any other
product in relation to the environment.
In traditional heating appliances, wood combustion is never complete. This has as results:
>low efficiency (Partial use of the calorific value of wood resulting in significant wastage)
>pollution (formation of carbon monoxide: CO)
C + O2= CO2+ CO + heat
Thanks to the Double combustion technology applied to our fireplaces and wood stoves, the following
reaction take place inside the burner:
Primary combustion:
C + O2= CO2+ CO + heat
Double combustion:
CO + O2= CO2+ heat

40 |41
9. CLEANING AND CARING FOR YOUR STOVE
9.1 Exterior Maintenance
The stove surface is painted with heat-resistant paint. It is best kept clean by vacuuming with a soft brush
attachment or by wiping with a lint-free cloth.
Over a period of time, the painted surface may become slightly grey. A canister of touch-up ARTE® spray
paint should be available from your stove supplier. This can be applied - in accordance with the instructions
- in just a few minutes. When first firing, after touching up, the stove will give off a slight smell as the paint
cures. Make sure to ventilate the room well during this phase.
9.2 Internal maintenance
Ash managing & disposal
Empty the excess ash on a daily basis or as needed. We recommend always keeping a layer (1 – 2 cm
thickness) at the base of the chamber to act as an insulating medium.
Empty the ash according to this procedure:
>Open the front door, and use a shovel to take out the excess ash.
>Dispose the ash in a metal container with a tight fitting lid.
>The closed container of ashes should be placed on a noncombustible floor or on the ground, well away
from all combustible materials, pending final disposal. If the ashes are disposed of by burial in soil
or otherwise locally dispersed, they should be retained in the closed container until all cinders have
thoroughly cooled.
When performing maintenance on your stove, always pro-
tect yourself, using safety goggles and gloves
Never empty a stove in operation.
Never use your household or shop vacuum cleaner to remove ash
from the stove.
Always remove and dispose of the ash properly.
For normal cleaning, moisten a paper towel with warm water and add some ash from the burn chamber.
Rub it over the glass and then clean the glass with clean water. Dry it well.
For heavier deposits that will not cleaning, use glass-cleaner, applied when the glass is cold, in accordance
with the instructions. Never use abrasive cleaners on the glass surface.
Reasons for dirty glass
>Fuel too wet
>Logs too large or not split
>Combustion temperatures too low
Glass
If the stove is generally run at the correct temperatures, there should be little or no dirt on the glass. If dirt
does settle during lighting, most will burn off as temperatures increase.
If you need to replace the glass, it should be replaced with the high temperature ceramic class supplied by
ARTE®, contact your ARTE®dealer.
Gasket
The gasket around the perimeter of the door may harden over a period of time. It should be replaced if it
becomes difficult to close the doors or if air starts to leak in around the perimeter of the doors, causing the
fire to become a little less controllable. An ARTE®rope gasket kit is available from your stove supplier.
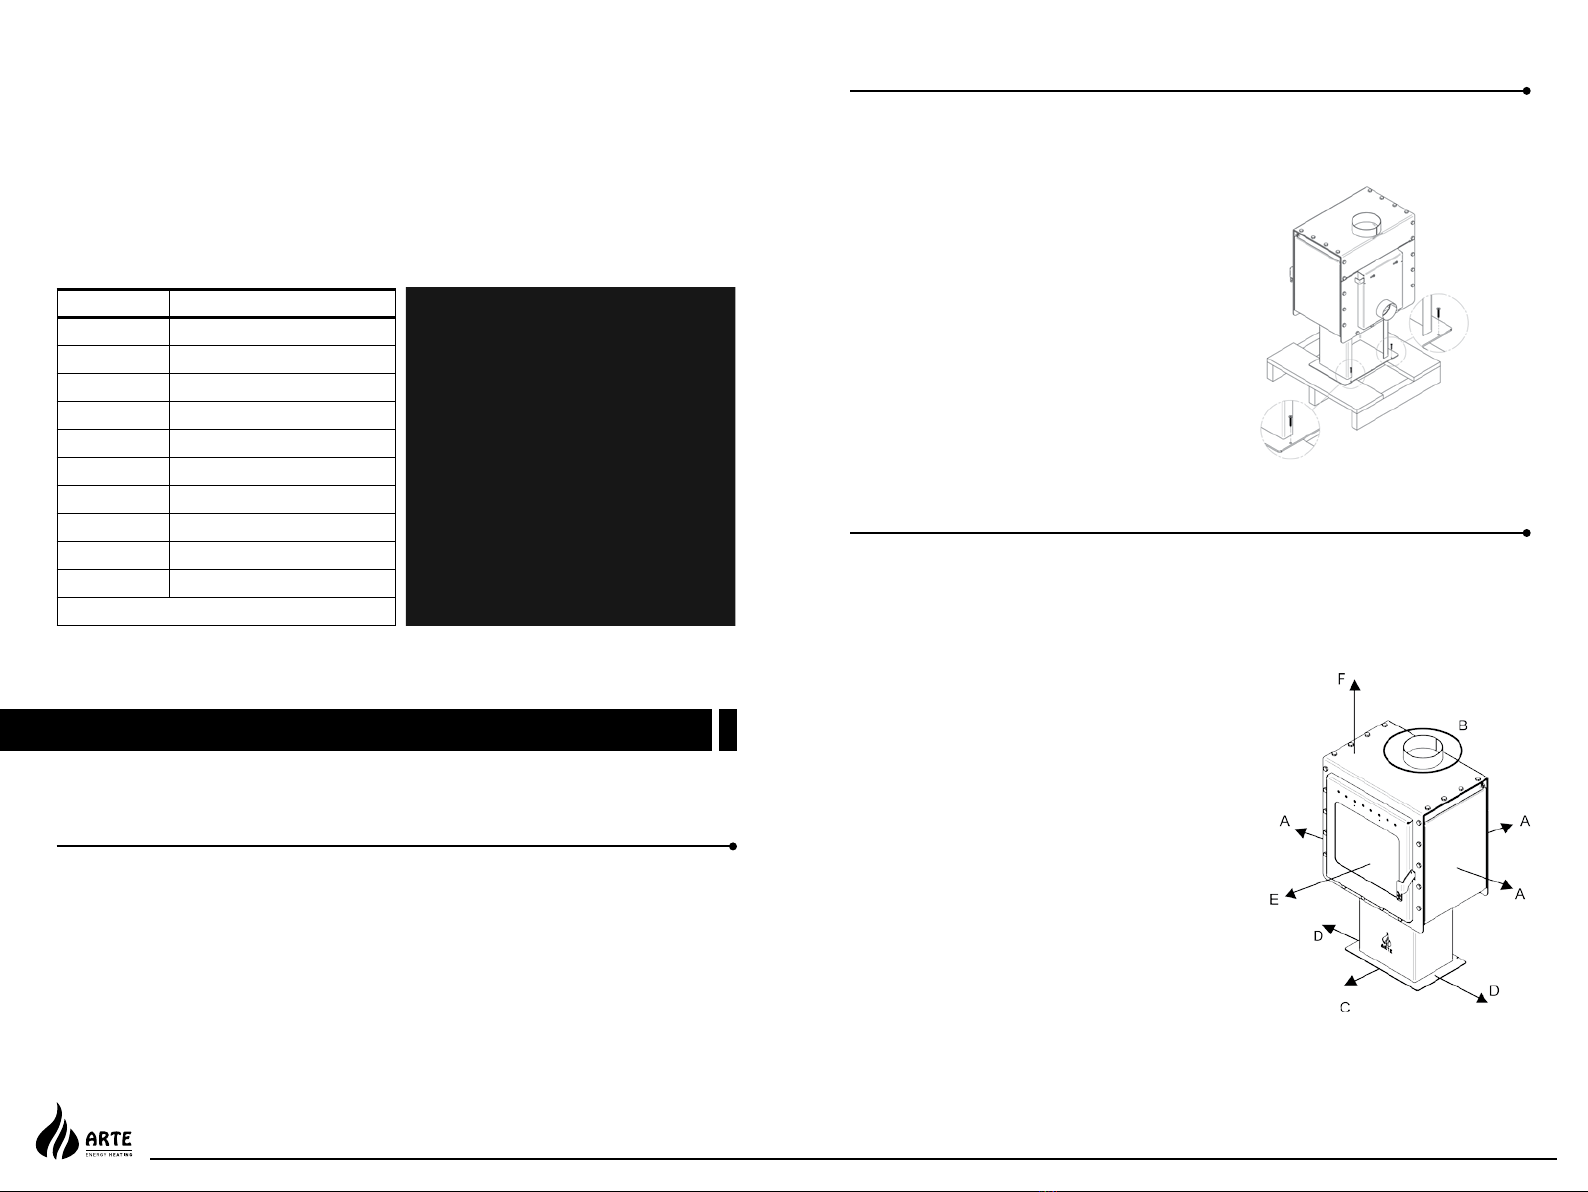
Internal service parts
The flame-path equipment - consisting of the firebricks, the vermiculites, glass, flue collar and metallic
baffle - are subject to the extremes of heat produced by the fire. From time to time, one or other of these
parts may need replacing as a matter of routine maintenance.
All of these service parts can be bought from your ARTE®dealer, and we recommend that damaged parts
are replaced as soon as possible to avoid collateral damage.
Should the baffle be distorted by an over fire, the stove will still function, although its efficiency may be com-
promised. Replace it as soon as possible.
Reasons for fast internal wear and tear
>Persistent heavy firing
>Soot and ashes left to accumulate
The flame-path equipment, the ceramic rope and the paint
finish are not covered by guarantee.
BOX WOOD STOVE
During the combustion of wood, heat and fumes of carbon dioxide, carbon monoxide and water vapors are
produced.
During the secondary combustion, we add pre-heated oxygen at the upper part of the fire; as a result a
re-ignition of the carbon monoxide starts, giving us a high thermal output, along with minimization of the
operating costs and decrease in polluting emissions.
This way, we achieve the production of carbon dioxide and not monoxide which cannot be absorbed by plants.
To reduce the risk of breaking the glass, avoid striking the glass or
slamming the door.
Replace broken glass immediately.
Do not operate your stove if the glass in the door is damaged.

42 |43
BOX WOOD STOVE
9.3 Cleaning the Stove and the Flue
When wood is burned slowly, it produces tar and other organic vapors, which combine with expelled mois-
ture to form creosote. The creosote vapors condense in the relatively cool chimney flue of a slow-burning
fire. As a result, creosote residue accumulates on the flue lining. When ignited this creosote makes an
extremely hot fire.
Check for soot above the baffle plate and around the flue outlet every month or so to start with. If the stove
suddenly becomes sluggish, check for a soot fall around the flue collar or in the flue/chimney.
Clean the flue/chimney - all the way from the stove to the flue terminal point above the house.
A good routine is to clean the flue after each heating season in any case, and inspect prior to the season to
ensure that bird’s nests or other blockages have not occurred during the off season.
Chimney sweeping
Inspect the system regularly during the heating season as part of a regular maintenance schedule.
To inspect the chimney, let the stove cool completely. Then, using a mirror, sight up through the flue collar
into the chimney flue. If you cannot inspect the flue system in this fashion, the stove must be disconnected
to provide better viewing access.
Clean the chimney using a brush the same size and shape as the flue liner. Run the brush up and down
the liner, causing any deposits to fall to the bottom of the chimney where they can be removed through the
clean-out door.
Clean the chimney connector disconnecting the sections, taking them outside, and removing any deposits
with a stiff wire brush. Reinstall the connector sections after cleaning, being sure to secure the joints be-
tween individual sections with sheet metal screws.
If you cannot inspect or clean the chimney yourself, contact your local ARTE®Dealer or a professional chim-
ney sweep.
If you do experience a chimney fire, act promptly and:
>Close the air control.
>Get everyone out of the house.
>Call the Fire Department.
Annual maintenance
Before the heating season, perform a thorough cleaning, inspection and repair:
>Thoroughly clean the chimney and chimney connector.
>Inspect the chimney for damage and deterioration. Replace weak sections of prefabricated chimney.
Have a mason make repairs to a masonry chimney.
>Inspect the chimney connector and replace any damaged sections.
>Check gasketing for wear or compression, and replace if necessary.
>Check the glass for cracking; replace if needed.
>Check door and handle for tightness. Adjust if needed.
How to clean the inside parts of ARTE®
When cleaning the inside parts of the stove in connection with the annual visits from your local chimney
sweep we recommend that you remove the inside parts from the fire chamber. Please be careful as the
vermiculite parts are porous thus fragile. (Chapter 9.4)
9.4 Inside parts
The chimney and chimney connector should be inspected
at least once every two months during the heating season
to determine if a creosote buildup has occurred. If creosote
has accumulated, it should be removed to reduce the risk of
a chimney fire.
Cleaning of the stove must be done when the stove is cold.
Final installation:
Chamotte firebricks 24 pcs 220x55x30
Chamotte firebricks 12 pcs 220x110x30
Vermiculite 2 pcs 305x105x30
Vermiculite 2 pcs 195x50x30
98622 3 4 5
3
11
1(x22pcs)
10 7
AC D B
Fig. 6
Fig. 8 Fig. 9
Upper refractory plates
Refractory plates:
Follow the installa-
tion sequence
Fig. 10
Fig. 7

44 |45
9.5 Leaving the stove for extended periods
IMPORTANT: If the stove is to be left unused for any period of time, clean it out thoroughly and leave the air
control slightly open to allow airflow. Make sure that the flue does not allow rainwater to come anywhere
near the stove; install a chimney cap, but do not block off the flue completely.
These measures should ensure there is a slight movement of air through the stove, and that the body of the
stove remains dry, right into the corners.
Any ash left within an unfired stove can attract moisture like blotting paper. If moisture is allowed to settle
within the stove, rust will form. Rust expands as it takes a grip. This can lead to undue pressure on the stove
joints, and this in turn may result in damage to the stove.
NOTE: It is best to thoroughly clean the stove after the heating season has concluded. Adding a dessicant,
such as kitter litter, into the combustion chamber helps absorb moisture during the summer months. Be
sure to remove this prior to the heating season.
Your specialized dealer will be pleased to assist you with
any further questions you may have.
11. DIMENSIONS
BOX WOOD STOVE
We hope you have many years of carefree warmth with ARTE®wood
stove. Some initial experimentation with loading and running tech-
niques will decide your normal routine. If you have any problems
after this short learning phase, please refer to your stove dealer.
Should they be unable to help for any reason, please contact us in
writing at the address on the front of this publication.
10. TIPS & TRICKS
Wood does not ignite when stove is fired; fire just smoulders away; fire extinguishes:
>Open combustion air slide
>Kindling unsuitable
>Wood too damp
>Firewood too thick
>Too much ash in the combustion chamber
Heavy shooting in the firing chamber; heavy sooting on the window:
>Open combustion air slide
>Too little wood
>Firewood damp or too thick
Smoke escapes from the stove:
>assure adequate extraction in the chimney, light pilot fire
>provide for adequate supply of air

46 |47
12. TECHNICAL DATA
TECHNICAL DATA UNITS BOX
*Global heat rating(efficiency) Kcal/h
Kw
7310
8,5
Hourly fuel consumption Kg/h 2,2
Global efficiency % 80,2
Smoke temperature °C 231
Emissions of CO (at 13% of O2) % 0,27
Performance range (min-max) Kw 4 - 12
Fuel - Wood, Briquette
Burner dimensions ( W x D x H ) cm 39 x 31 x 33
Flue draught Pa 12(±2)
Recommended hourly consumption on fire wood Kg/h 1,1 - 3,4
Heatable surface m260
Weight kg 103
External air intake. Its section must be increased 20% for
each additional meter after the 1metre cm Ø10
Smoke outlet diameter cm Ø15
Stove suitable for rooms of no less than m220
*The stove works with intermittent combustion. Intermittent combustion in this context means normal
use of the wood stove, i.e. fuel is added as soon as the fuel has burnt down to a suitable amount of
embers.
Flue Diameter (cm) Height (cm)
The inside section of the flue must be increased
10% for each 500m in altitude above sea level.
Ø15 ≥400
Ø20 ≥350
BOX WOOD STOVE
13. WARRANTY
We grant a two year warranty for your new ARTE®wood stove. The warranty period begins on the day the
stove is installed and tested by the specialized dealer. We also grant a one year warranty for all the electrical
parts (if any are installed).
Warranty claims become valid when the purchase price for the stove has been paid in accordance with the
agreement and the warranty certificate has been completed and returned within thirty days to ARTE®G.
Karnoutsos & CO.
If one of these conditions is not fulfilled the minimum warranty of six months applies.
13.1 Warranty terms
>Proper installation by a specialized dealer
>The wood stoves are handled in accordance with these operating instructions
>No continuous firing
>No overheating
>Regular maintenance / cleaning (once a year)
>There must be no modifications to the stove structure: these can cause malfunctions and permanent
damage
13.2 Excluded from the warranty
>Wearing parts like gaskets, cast grate, fireclay, and glass
>Smoke and soot damage
>Natural discoloration or deviating colors on the outer cladding
>Cracks in the combustion chamber that have no effect on the safe functioning of the ARTE®wood stove
>Damage incurred through failure to observe these operating instructions
>Damage covered by an insurance policy or other agreement
13.3 Responsibility
Upon delivery of this manual ARTE®declines all liabilities, both civil and penal, for any accidents that may
derive from the total or partial failure to comply with the specifications contained in it.
ARTE®also declines all responsibility resulting from an improper use of the appliance, incorrect use by the
user, from unauthorized alterations and/or repairs, or the use of non-original or non-specific spare parts
for this particular stove.
13.4 Extraordinary maintenance
Extraordinary maintenance on the stove model to which this manual refers, must be carried out by qualified
personnel.
13.5 Responsibility for installation
It is not the responsibility of ARTE®to carry out the work needed to install the stove. Such works are entirely
up to the installer who is requested to check the flue and air intake and to check if the installation solutions
proposed are feasible. All applicable standards and local, national and European legislation in force in the
country where the stove is installed must be respected.

13.6 Use
Use of the appliance is subject to compliance with all the safety standards established by the relevant laws
in force in the place of installation, in addition to the instructions contained in this manual.
13.7 Legal guarantee
The user may only make use of the legal guarantee, as under the EEC directive 1999/44/CE, if he has scru-
pulously complied with the regulations indicated in this manual, and more specifically:
>To work always within the stove’s limits of use
>Maintenance must be constant and careful
>Only allow people who are capable and who have been suitably trained to use the stove
Failure to comply with the instructions provided in this manual will invalidate the guarantee immediately.
NOTES

t. +30 2310 684 148
f. +30 2310 684 149
e. info@arte-fireplace.com
Factory - Head Offices
Makrigianni Str.
Evosmos | Thessaloniki | Greece
Mail
P.O. Box 40 124, P.C. 564 10
Stavroupoli | Thessaloniki | Greece
www.arte-fireplace.com
Table of contents
Other ARTE Wood Stove manuals
Popular Wood Stove manuals by other brands

Eureka
Eureka Pearl Freestanding Operation & installation instructions

PSG
PSG AN-30 Installation and operating instructions

hergom
hergom E-20 SE Use and maintenance instructions

Drolet
Drolet Hunter Wood Stove owner's manual

Drolet
Drolet BLACKCOMB II Installation and operation manual

Contura
Contura 510 installation instructions