ARTE PHOENIX Instruction Manual


Table of contents
1. Arte® Wood stove - A Greek Quality Product........................................................................................................................................................... 2
2. Facts about wood and the environment................................................................................................................................................................... 2
2.1. Why use wood?...................................................................................................................................................................................................................... 2
2.2. Buying firewood...................................................................................................................................................................................................................... 2
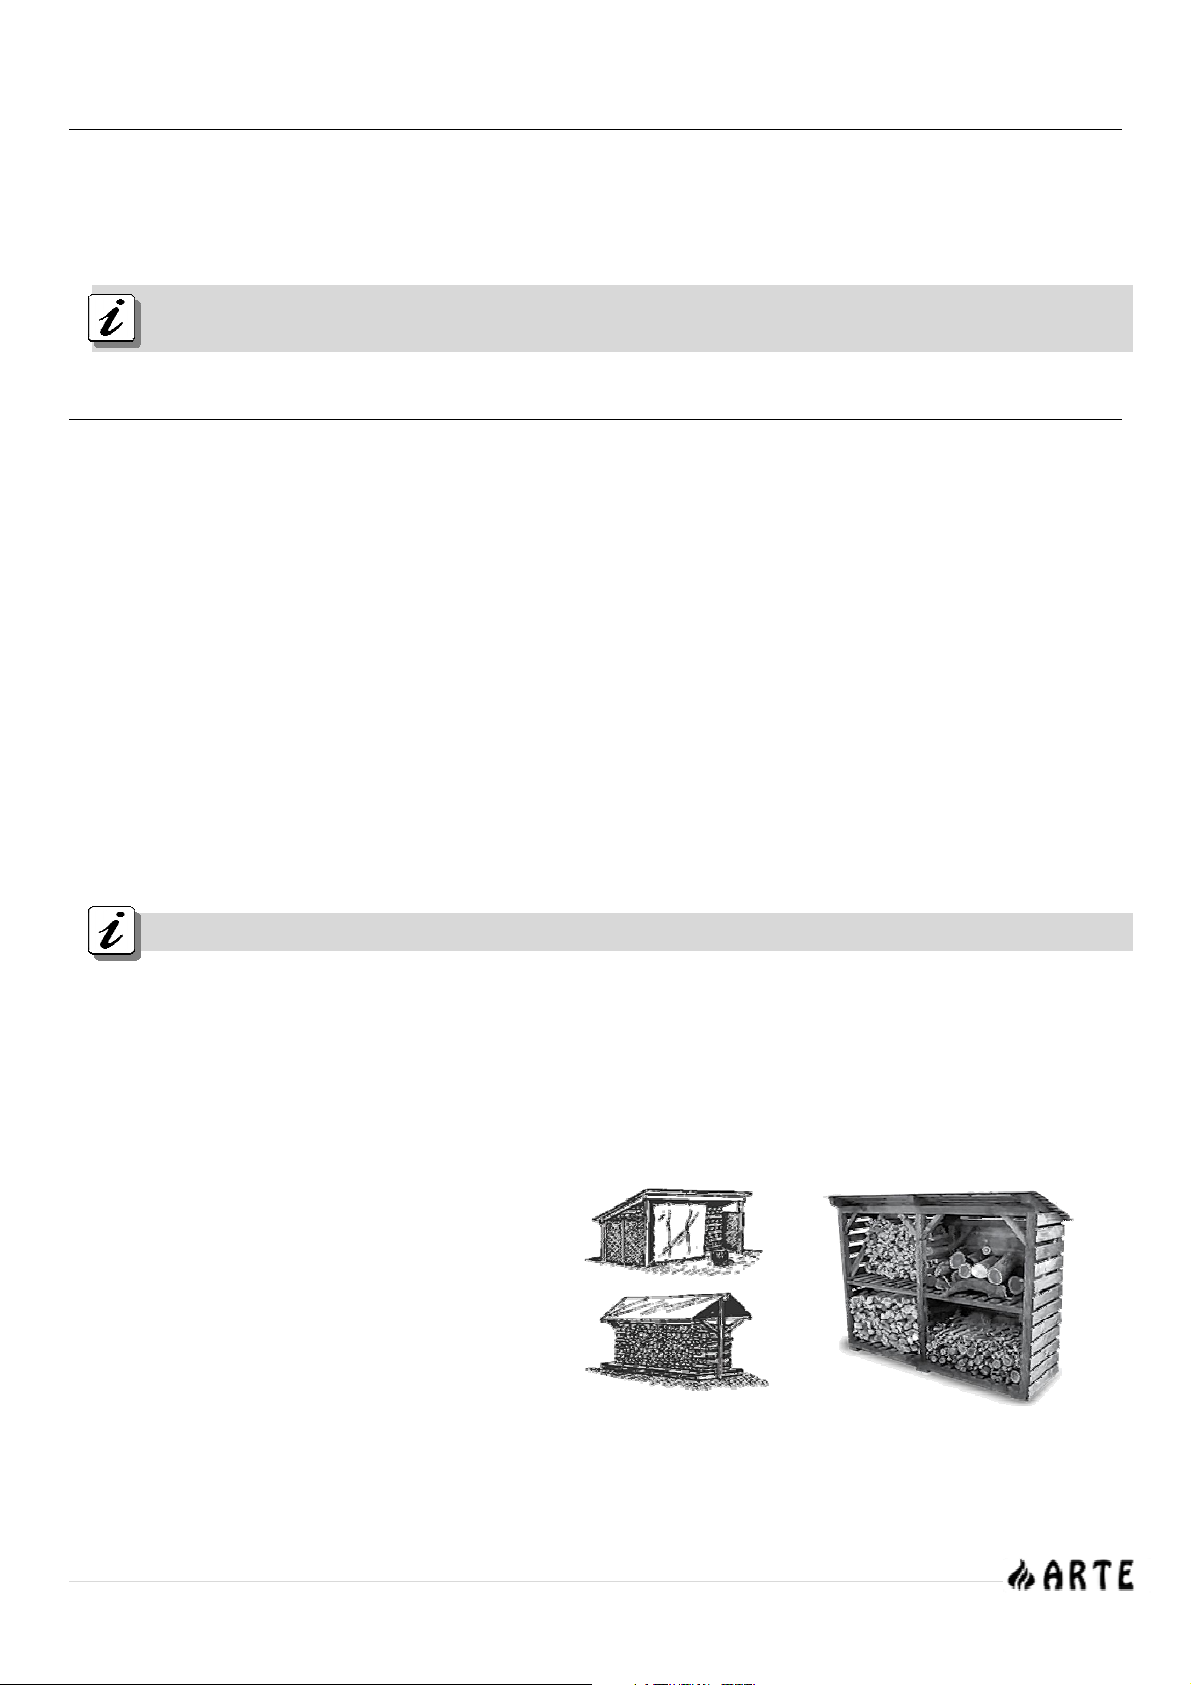
2.3. Storing your wood .................................................................................................................................................................................................................. 2
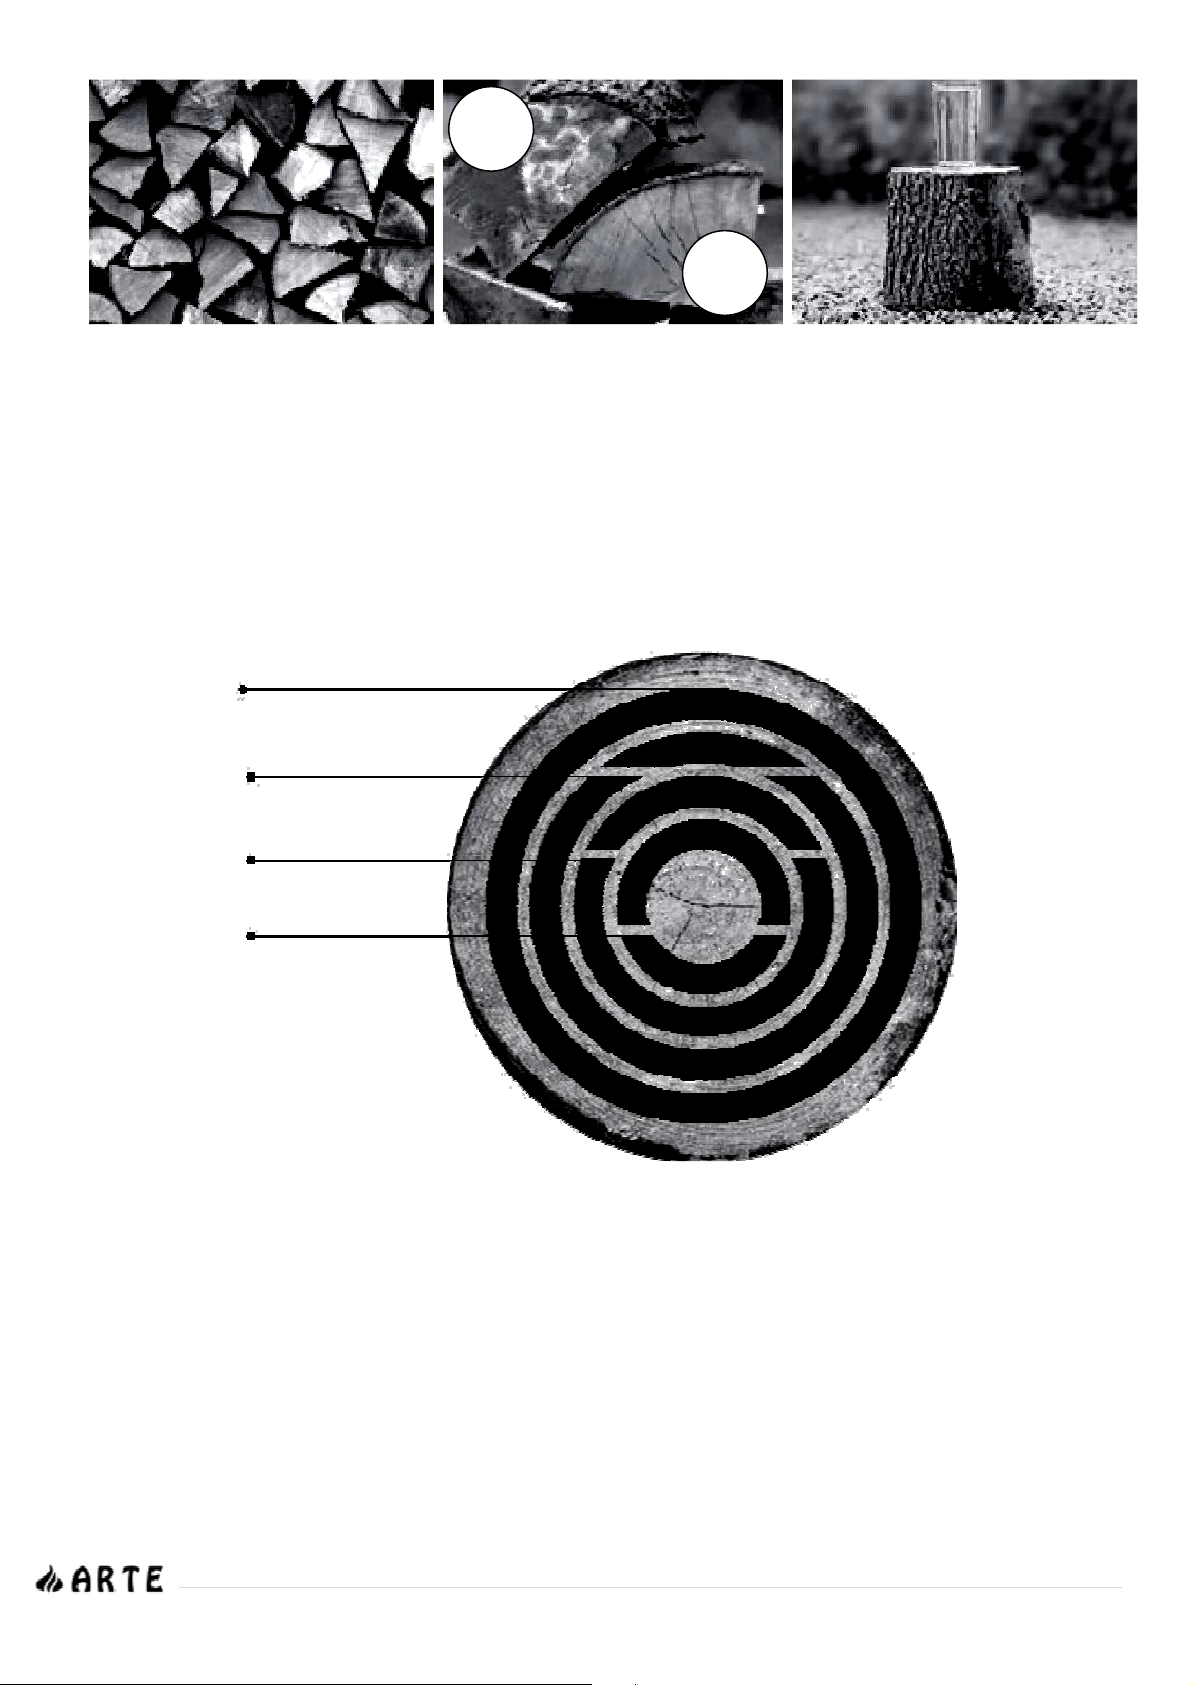
2.4. Wood types and calorific value .......................................................................................................................................................................................... 3
2.5. Determining the heat output ............................................................................................................................................................................................... 4
3. Endorsements & Certifications ..................................................................................................................................................................................... 5
3.1. Endorsement........................................................................................................................................................................................................................... 5
3.2. Declaration of Performance CE .......................................................................................................................................................................................... 5
3.3. Features marking plate ......................................................................................................................................................................................................... 5
4. Packaging ....................................................................................................................................................................................................................... 5
4.1. Unpacking the stove.............................................................................................................................................................................................................. 5
5. Fire safety......................................................................................................................................................................................................................... 6
5.1. Safety distances ..................................................................................................................................................................................................................... 6
5.2. Wooden beams protection.................................................................................................................................................................................................. 6
5.3. General security instructions................................................................................................................................................................................................. 6
5.4. Flue security instructions ........................................................................................................................................................................................................ 6
5.4.1. Basic requirements for proper flue operation................................................................................................................................................................. 6
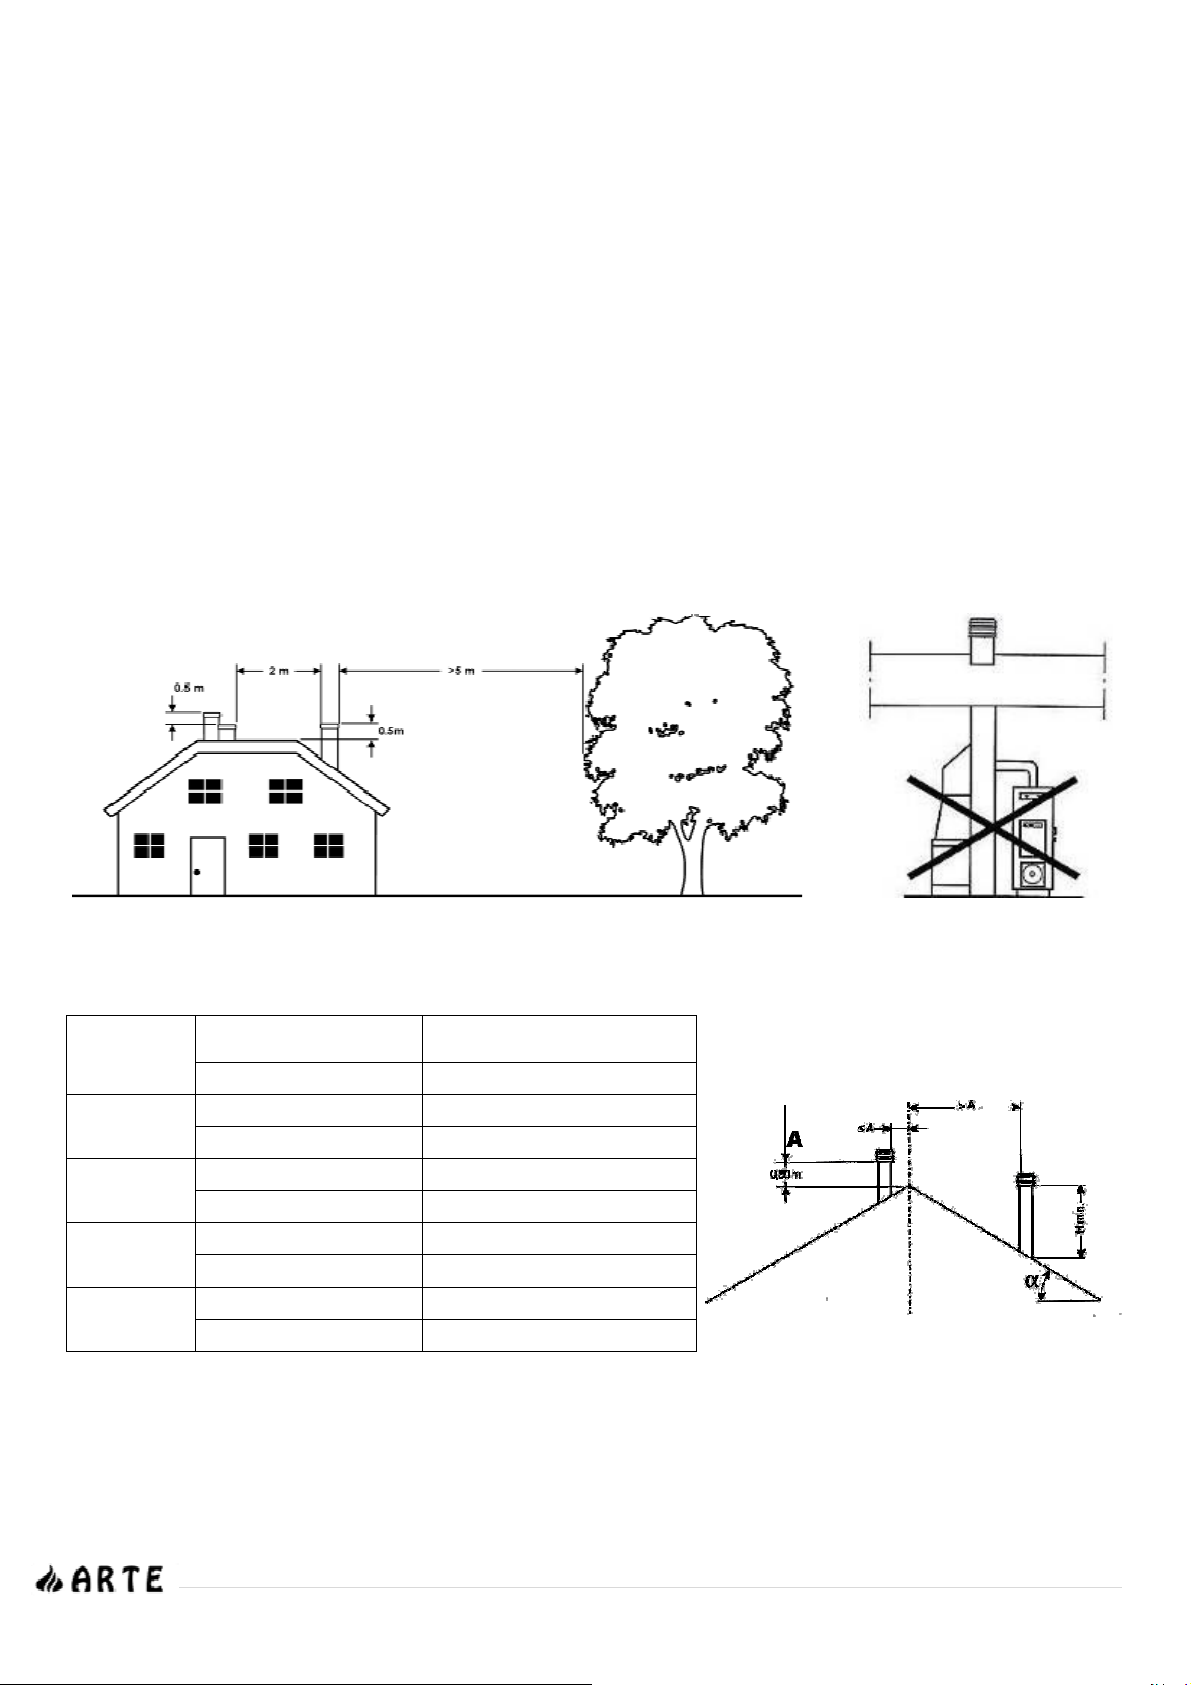
5.4.2. Chimney placement .......................................................................................................................................................................................................... 7
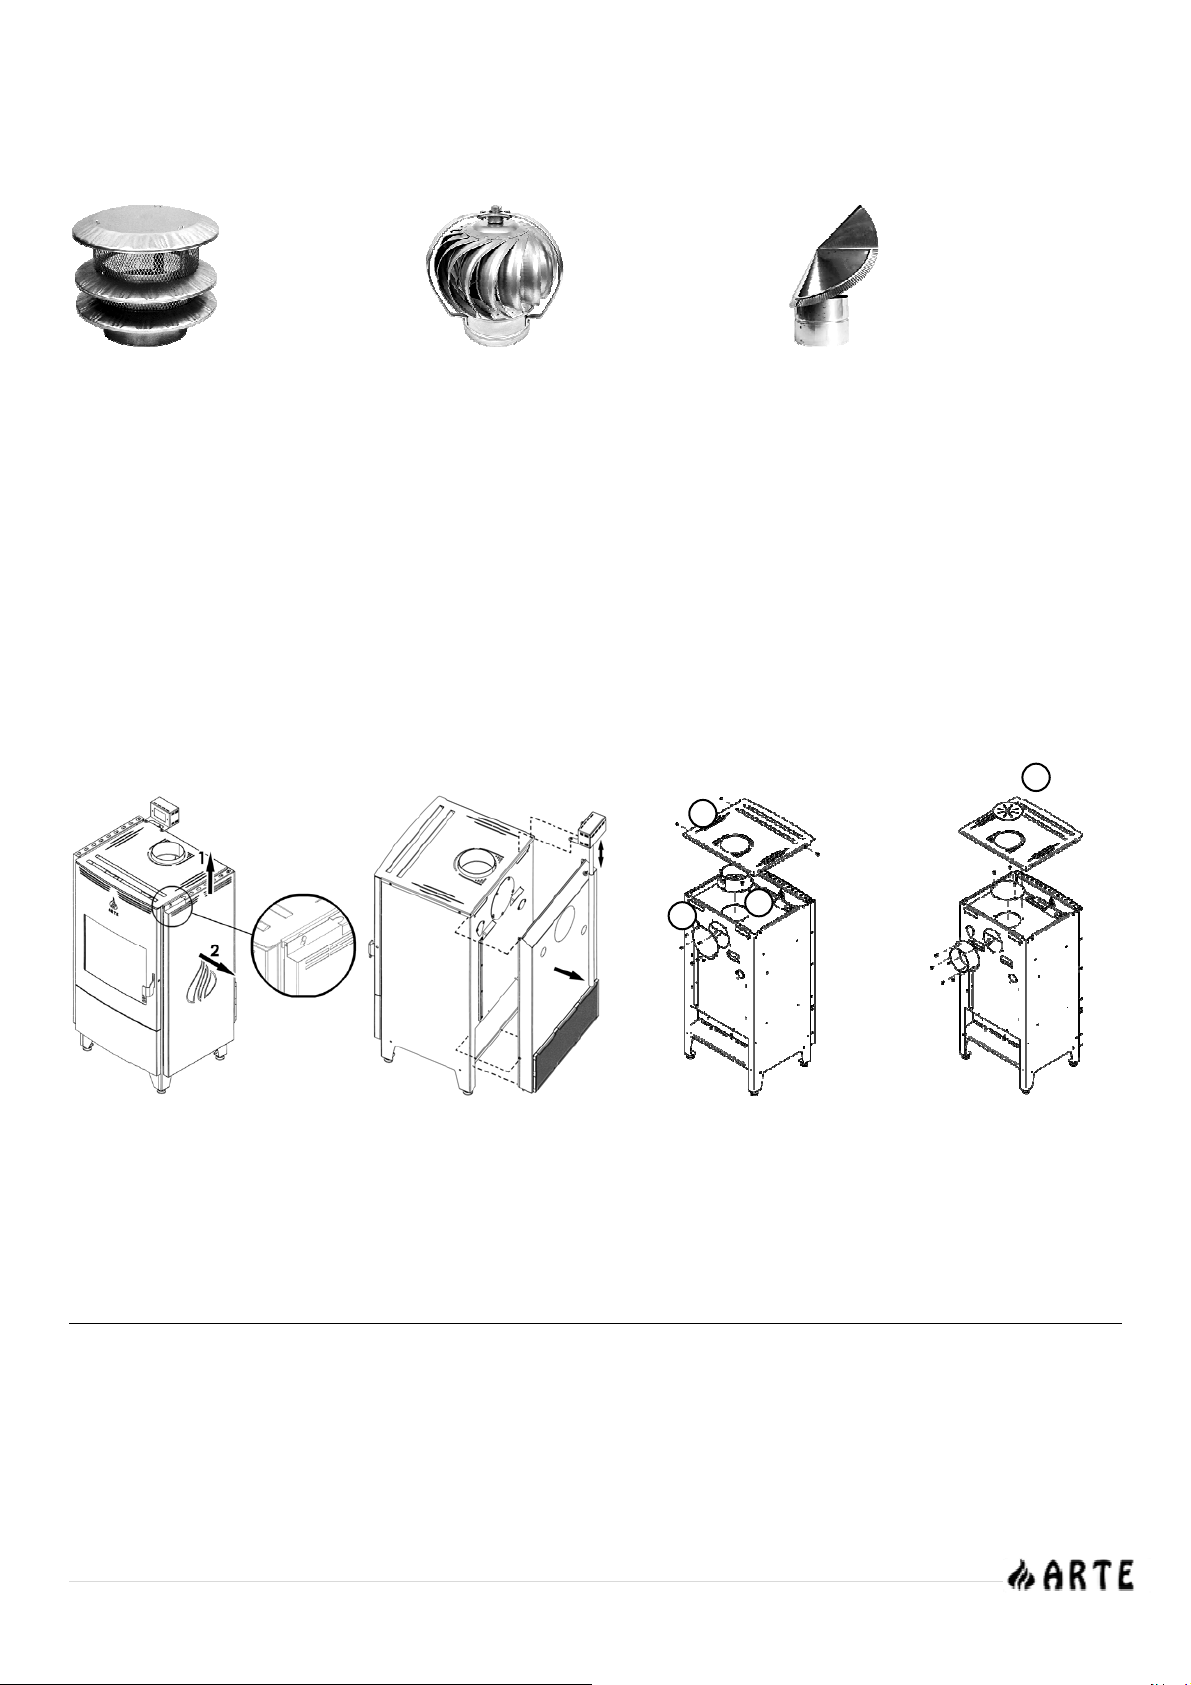
5.4.3. Chimney cap....................................................................................................................................................................................................................... 7
5.4.4. Flue pipe on the top or rear of the stove ........................................................................................................................................................................ 8
5.4.5. Malfunction - Secure woodstove shutdown................................................................................................................................................................... 8
6. Operating Instructions.................................................................................................................................................................................................... 8
6.1. Before initial use of an ARTE® PHOENIX woodstove ......................................................................................................................................................... 8
6.2. About ARTE® PHOENIX woodstove ..................................................................................................................................................................................... 9
6.3. General information .............................................................................................................................................................................................................. 9
6.3.1. When the woodstove paint dries ..................................................................................................................................................................................... 9
6.3.2. Incineration preparation.................................................................................................................................................................................................... 9
6.3.3. Combustion air intake........................................................................................................................................................................................................ 9
6.3.4. Heating during seasonal change or in adverse weather conditions ....................................................................................................................... 10
6.4. Ventilation kit (optional)...................................................................................................................................................................................................... 10
6.4.1. Ventilation kit installation (optional)............................................................................................................................................................................... 11
6.4.2. Air canals instalation (optional)...................................................................................................................................................................................... 12
6.4.3. Use of the electronic control panel ............................................................................................................................................................................... 13
7. Igniting the stove .......................................................................................................................................................................................................... 14
7.1. Traditional method of igniting ............................................................................................................................................................................................ 14
7.2. Igniting without CO emissions (TOP TO BOTTOM) ............................................................................................................................................................ 14
8. Tertiary combustion (patented)................................................................................................................................................................................. 15
9. Cleaning & Maintaining the Woodstove.................................................................................................................................................................. 16
9.1. External maintenance......................................................................................................................................................................................................... 16
9.2. Internal maintenance.......................................................................................................................................................................................................... 16
9.2.1. Ash disposal ....................................................................................................................................................................................................................... 16
9.2.2. Glass.................................................................................................................................................................................................................................... 16
9.2.3. Gasket ................................................................................................................................................................................................................................ 16
9.2.4. Internal parts that need maintenance.......................................................................................................................................................................... 16
9.3. Cleaning the woodstove and the flue ............................................................................................................................................................................. 17
9.3.1. Chimney sweeping........................................................................................................................................................................................................... 17
9.3.2. Annual maintenance....................................................................................................................................................................................................... 17
9.3.3. How to clean the inside parts of ARTE® PHOENIX woodstove................................................................................................................................... 17
9.4. Internal parts removal.......................................................................................................................................................................................................... 18
9.5. Inactive fireplace for prolonged periods ......................................................................................................................................................................... 18
10. Tips & Tricks for Resolving Issues................................................................................................................................................................................ 18
11. Dimensions................................................................................................................................................................................................................... 19
12. Technical Specifications............................................................................................................................................................................................ 20
13. Warranty ...................................................................................................................................................................................................................... 21
13.1. Warranty terms ................................................................................................................................................................................................................... 21
13.2. Excluded from the warranty............................................................................................................................................................................................. 21
13.3. Responsibility....................................................................................................................................................................................................................... 21
13.4. Emergency maintenance................................................................................................................................................................................................. 21
13.5. Responsibility for installation ............................................................................................................................................................................................. 21
13.6. Usage ................................................................................................................................................................................................................................... 21
13.7. Legal guarantee ................................................................................................................................................................................................................ 21

INSTALLATION &USER MANUAL ENERGY EFFICIENT WOODSTOVE | PHOENIX
2 | Page
1. ARTE®WOOD STOVE -AGREEK QUALITY PRODUCT
Thank you for buying an ARTE®wood stove - we believe that you will have as much pleasure from our product as we have.
Your ARTE®wood stove is made in such a way, to extract the maximum possible energy from the wood with the minimum possible emissions,
using the most innovative technology and the most robust design - made in Greece!
These instructions contain interesting and informative facts and all you need to know about the subjects of heating, wood, and operating
your ARTE®wood stove. Please read these instructions carefully before using your wood stove for the first time and keep them in a safe place.
2. FACTS ABOUT WOOD AND THE ENVIRONMENT
2.1. Why use wood?
With proper forest management, burning wood does not deplete the earth’s resources. Heating with wood usually does not contribute to
global warming. The young trees that replace the trees in your wood stove absorb carbon dioxide from the air. Burning firewood releases only
as much CO2 as the tree has absorbed from the atmosphere during its growth. Wood rotting in the forest generates the same amount of CO2
as the same wood burning.
Besides being environmentally friendly, the heat from a wood stove warms you like the warming rays of the sun during the sunny winter days. It
is the radiated heat that transmitted by electromagnetic waves in the infrared range. Even when the air is very cold you can feel the warm
rays of the sun on your skin.
Another advantage to wood is that it is produced locally, which creates local employment, and more tax revenues stay in the province.
2.2. Buying firewood
Where can I get my firewood?
Regenerated ready-to-burn firewood can be purchased from dealers:
Wood stove ready, stored for at least two years
Pre-dried, stored for one year
Fresh from the forest
Whether you have cut your own wood or bought it, the important thing is: the wood should be dried for at least two years before it is burned.
2.3. Storing your wood
The full potential for heat will not be realized if you neglect the simple chore of piling and protecting your wood. Proper storage is essential to
avoid moisture, bacteria, and insect problems in your home.
To avoid problems with insects and moisture, store the wood as far from your house as is practical. Do not store wood in your basement; one
cord of wood can give off more than 500 liters of water. The basic rule is to hide the wood from water, but not from the sun or wind (Pic. 2.3.1
& 2.3.2) Green wood will dry slowly or not at all if unprotected, while seasoned wood left unprotected may become unseasoned.
There are three basic rules to follow when storing wood:
Allow air circulation by piling one tier wide if possible
Protect wood from rain and snow by covering with a tarp or
woodshed roof.
Pile wood off the ground on scrap lumber or wooden pallets.
The time-honored way to cure wood is to buck, split, and stack
wood off the ground for one full year. How-ever, wood can
generally be reduced to 20 per cent moisture content in two to
three months. The ideal 10% to 15% may take longer (almost 18
months).
The ideal residual moisture is 12 - 15% and should be no higher!
The manuals which are enclosed with the product must be
kept throughout the product’s entire service life.
Pic. 2.3.1
Pic. 2.3.2

INSTALLATION &USER MANUAL ENERGY EFFICIENT WOODSTOVE | PHOENIX
3 | Page
2.4. Wood types and calorific value
A wood’s efficiency does not depend only on its type, but also on its humidity, as well as the temperature of the combustion chamber.
For more efficient and longer burning, without emission of hazardous substances, woods must be dry. Ideally, their humidity percentage must
not exceed 10% to 15%.
If this percentage is over 20%, the wood is not burned properly, whereas if the piece of wood has been cut recently, the humidity is over 60%
making it unsuitable for burning. The reason for that is that the fire will be weak and pale and will produce dense smoke, unburned tar and
creosote, soiling the ceramic glass and the flu.
It is preferable to get your wood supplies during the summer months and store them, to ensure better combustion quality during the winter.
Useful tips
Always choose dry firewood.
Avoid wood that pops (chestnut, conifers such as cedar, spruce and pine), as they may damage your wood stove or the flue.
Pay attention to the size of the logs. Good firewood must have been cut at least twice.
You should prefer oak, beech, olive wood, which is hard wood with high density since they will burn for longer.
Briquettes
They ignite very easily, and burn slowly. They are economically advantageous because you will burn smaller quantities compared to common
firewood and they are easily stored. Also, you have less quantity of ashes vs. to wood.
Birch
It’s a soft wood that ignites easily with great thermal energy production. It produces less smoke and ash compared to other wood and burns
silently. The same characteristics apply for lime and chestnut.
WET
DRY
0% humidity
100% thermal efficiency
10%
humidity
88%
thermal efficiency
30%
humidity
63%
thermal efficiency
50%
humidity
39%
thermal efficiency

INSTALLATION &USER MANUAL ENERGY EFFICIENT WOODSTOVE | PHOENIX
4 | Page
Beech
Hard wood is ideal for firewood but requires a high temperature to ignite. It weights a lot; it is dense and burns with a calm and long fire for a
longer time. Best when well seasoned. The same applies for oak, but seasoned for 2-3 years.
The various wood types have various calorific values
Wood type Thermal capacity (Kcal/h-1Kg)
Briquette 5.000
Birch 4.800
Walnut 4.731
Oak 4.619
Beech 4.578
Fir 4.588
Common Oak 4.548
Pine 4.457
Olive 4.100
Poplar
4.022
Table 2.4.1
860Kcal/h = 1 kW/h
The values are based on 15% residual wood moisture.
2.5. Determining the heat output
There is not a specific rule that enables the calculation of the required heat output. This depends on the amount of space that is required to
be heated and mostly on its insulation. In average the required heat output for a properly insulated room and with external temperature of 0ο
is 40 kCal/h per m3.
Taking into account that 1kW equals 860 kCal/h an equivalent of 50W/m3can be used. For example, to heat a 50 m3room (10 x 6 x 2.5m) in
an insulated residence, the output required is 150m3x 50W/m3= 7500W or 7.5 kW.
So for the main heating, a 10kW appliance is enough.
Indicative combustion value
with efficiency ~80%
Required amount relative
to 1kg dry wood
Fuel Unit kCal kW
Firewood (moisture 15%) kg 3600 4.2 1.00
Firewood (moisture 50%) Kg 1850 2.2 1.95
Wood briquettes Kg 4000 5.0 0.84
Coal briquettes Kg 4800 5.6 0.75
Coal Kg 7700 8.9 0.47
Coke Kg 6780 7.9 0.53
Gas m37800 9.1 0.46
Diesel L 8500 9.9 0.42
Electricity kW/h 860 1.0 4.19
Table 2.5.1
An ARTE®wood stove can be fired with all of the above wood types

INSTALLATION &USER MANUAL ENERGY EFFICIENT WOODSTOVE | PHOENIX
5 | Page
3. ENDORSEMENTS &CERTIFICATIONS
3.1. Endorsement
The ARTE® wood stove you chose has been tested according to EN13229.
3.2. Declaration of Performance CE
The constructor G. Karnoutsos & Co. declares that ARTE® wood stoves meet the requirements of the standard EN 13240, also the product’s
performance according to the quality specifications are monitored on a permanent basis.
3.3. Features marking plate
ARTE® wood stove’s feature marking plate is located on the right side of the appliance.
4. PACKAGING
ARTE® is devoted in protecting the environment, so we use as much recyclable materials as possible and the least amount of packaging
materials without compromising the secure transfer of our products.
4.1. Unpacking the stove
1. The product is delivered on a wooden palette. (Pic. 4.1.1)
2. Carefully remove the plastic membrane and the waterproof plastic film and also all the styrofoam on the outside and inside of the
product.
3. Remove the styrofoam that is on the upper part of the baffler and also in the combustion chamber and the ashtray, including any other
components. (Pic. 4.1.2)
4. Unscrew the 4 screws located on the bottom side of the product, in order to release the stove from the palette. (Pic. 4.1.3)
5. Carefully pick up the product and place it on the installation point, making sure that the floor can withstand the weight of the device. If
the existing construction cannot withstand the weight of the device, a load distributing plate is necessary. Also, make sure you provide
proper insulation in case the floor is built using flammable materials.
Pic. 4.1.1
Pic. 4.1.2
Pic. 4.1.3
STYROFOAM
STYROFOAM
STYROFOAM

INSTALLATION &USER MANUAL ENERGY EFFICIENT WOODSTOVE | PHOENIX
6 | Page
5. FIRE SAFETY
It is OBLIGATORY to respect the National and European rules and local regulations concerning building matter and fireproof rules.
The installation MUST be inspected by a qualified auditor, prior to lighting the woodstove. Also the appropriate local authorities must be
informed.
5.1. Safety distances
Safety distance Α
The side panels and the back must be at least 25cm away from any flammable materials, like furniture,
clothes etc. In case there are no side panels or back panel (that has the air motor), that space must be
increased to at least 40cm.
Safety distance Β
The flue pipes must be at least 25cm away from any flammable materials.
Safety distance C + D
Any flammable materials on the floor must be at least 50cm from the front (distance C) and 30cm from
the sides (distance D) of the stove. In case there are no side panels or back panel (that has the air
motor), distance Dmust be increased to at least 40cm.
Safety distance Ε
The combustion chamber opening must be at least 80cm away from any flammable materials that are
inside the heat radiation zone.
Safety distance F
The minimum distance from the ceiling must be 60cm.
5.2. Wooden beams protection
Given its properties, heat is transmitted through radiation. In case there are any wooden beams inside the radiation zone or in the way of the
hot air, the MUST be properly insulated because the continuous exposure in high temperatures can make them deteriorate faster or even
cause self ignition. Use proper insulation materials that are in accordance with European rules or, in case of high thermal stress you can also
use metal linings.
5.3. General security instructions
Never leave children alone or without supervision near the woodstove when it is lit.
Teach children how to operate the woodstove correctly and safely.
Never touch the external surfaces of the woodstove or the glass when it is lit. There is a high risk of burns!
Due to the self closing door, you have to be extra careful when you are filling the woodstove.
It is forbidden to use the woodstove as a waste incinerator.
Don’t use burned or used wood as fuel.
Remove the ash only after it has completely cooled off.
Ash should be placed outdoors or be disposed in a place where there is no risk of ignition.
Immediately inform your specialized local supplier if you find any malfunction.
Don’t use chemicals or liquids as fire starters.
Do not use ANY fuel other than the recommended.
5.4. Flue security instructions
Prior to installing the woodstove ARTE® the chimney sweep or a qualified technician should check the condition and operation of your
chimney in accordance with the standards EN13384-1 & EN13384-2.
This way you ensure the best conditions for heating without issues.
5.4.1. Basic requirements for proper flue operation
The internal section of the flue must preferably be circular. In a case of square or rectangular
flue, the internal corners should have a radius of at least 20mm. In case of rectangular flue, the
ratio of the sides should be at maximum 1: 1.5.
The flue must be properly insulated and waterproof and constructed of materials with thermal
resistance and resistance to combustion products and any deposits.
The flue must have no constrictions; it must have a vertical path and it should not change in
direction that exceeds 45o. (Pic. 5.4.1.1)
Follow the operating instructions supplied with the product to help prevent fire and
protect the environment.
Pic. 5.4.1.1

INSTALLATION &USER MANUAL ENERGY EFFICIENT WOODSTOVE | PHOENIX
7 | Page
In case of an existing flue the construction material should be checked. Materials such as cement with lime, galvanized steel and rough or
porous materials are contraindicated as they create issues in the correct operation of the woodstove. Also, a proper study for the flue size
must be conducted because often old flues have quite large diameters. This means that the amount of air draft is not proportional to the
heat generated by the woodstove and by extension means that you consume more wood than necessary and will spend more time on
maintenance. The solution proposed in these cases is the connection of an inner tube inside the flue. This tube should extend over the whole
length of the flue and at no point should exceed in diameter the outlet flue of the woodstove. If the existing flue has the desired diameter a
proper cleaning by qualified personnel should be done.
Inserting the pipe along the outer wall must be properly studied to avoid heat loss. This solution, however, is contraindicated, as positioning
the flue inside the house warms more spaces as heat of the flue remains in the house.
5.4.2. Chimney placement
The placement of the chimney on the roof is a particularly decisive factor in the convection of the woodstove.
An incorrectly fitted chimney may generate reimbursement of exhaust into the heating space due to down flow of the air.
Follow the instructions below to ensure proper dissipation of smoke. (Pic. 5.4.2.1)
The ending of the chimney must be at least 50cm above the top of the roof.
If there is more than one chimney on the roof, they must be positioned at least 2m apart.
If there are two adjacent chimneys, their ends must be at least 50cm apart.
If there is a tall building or tree next to the house, then you should place the chimney at a distance greater than 5m from the obstacle.
It is prohibited to connect several devices to the same chimney. Every chimney should be autonomous. (Pic. 5.4.2.2)
In case of an inclined roof, the height of the chimney is defined depending on the inclination and the distance of the chimney from the
ridge according to the following table. (Pic. 5.4.2.3)
Inclination
αο
RIDGE – CHIMNEY
DISTANCE
MIN HEIGHT
ABOVE THE RIDGE
Α(m) H (m)
15ο
< 1,85 m 0,50 m OVER THE RIDGE
> 1,85 m 1,00 m OVER THE ROOF
30ο
< 1,50 m 0,50 m OVER THE RIDGE
> 1,50 m 1,30 m OVER THE ROOF
45ο
< 1,30 m 0,50 m OVER THE RIDGE
> 1,30 m 2,00 m OVER THE ROOF
60ο
< 1,20 m 0,50 m OVER THE RIDGE
> 1,20 m 2,60 m OVER THE ROOF Pic. 5.4.2.3
5.4.3. Chimney cap
The chimney draft depends broadly on the adequacy of the cap.
So, in case the chimney is built, its exhaust diameter should be at least twice the inside diameter of the chimney. Knowing that it is necessary
to protrude from the ridge of the roof, the cap must ensure the proper smoke dissipation in case of strong wind.
A chimney cap must meet the following requirements:
Pic. 5.4.2.1
Pic. 5.4.2.2

INSTALLATION &USER MANUAL ENERGY EFFICIENT WOODSTOVE | PHOENIX
8 | Page
Internal diameter must be equal to the diameter of the chimney.
Exhaust diameter be at least twice the inside diameter of the chimney.
It should be constructed in such a way as to avoid the entrance of rain, snow and any foreign body in the chimney.
It can be checked, maintained and cleaned easily.
5.4.4. Flue pipe on the top or rear of the stove
ARTE ® PHOENIX woodstove is designed so the fumes outlet can be reversed from top to rear and vice versa. The stove is produced by
default with top outlet but, during installation, it can be altered as follows:
Remove the sides of the stove (Pic. 5.4.4.1).
Remove, if applicable, the back cover (Pic. 5.4.4.2).
Remove the top cup (Pic. 5.4.4.3-A).
Remove the closing cap by unscrewing the 5 security screws (Pic. 5.4.4.3-B).
Remove the flange with the top smoke outlet pipe, which is 150mm in diameter, by unscrewing the respective security screws and pulling it
upwards (Pic. 5.4.4.3-C).
Reassemble by inverting the smoke outlet flange and cap with respect to their original positions and secure them with the screws removed
previously. Before closing the unused smoke outlet hole, check the correct position of the cap’s fiber seal to avoid the possibility of smoke
coming through over time (Pic. 5.4.4.4).
Reassemble the back cover (if applicable), the two side panels and the top cover.
Place the decorative metal cap in the opening on top (Pic. 5.4.4.4-D).
Pic. 5.4.4.1 Pic. 5.4.4.2 Pic. 5.4.4.3 Pic. 5.4.4.4
5.4.5. Malfunction - Secure woodstove shutdown
In rare occasions even a test fire may not cause sufficient draft in the flue. In this case contact your chimney sweep.
Under no circumstances should you try to light a larger fire. If smoke escapes from the woodstove, ventilate the room immediately and
contact your chimney sweep. DON’T LIGHT THE WOODSTOVE!
6. OPERATING INSTRUCTIONS
6.1. Before initial use of an ARTE® PHOENIX woodstove
One of our qualified dealers has already given you instructions on how to operate the ARTE® PHOENIX woodstove you just bought.
In the guidelines below there are detailed instructions on the steps to follow so you do not encounter any issues during the operation of the
woodstove.
The qualified dealer in your area is at your disposal to answer any of your questions. The ARTE® PHOENIX woodstove is equipped with the
following control systems:
(
(
(
A
B
C
D
Industrial style cap with
protective net
Cap with deflector. It leans
according to the wind and it
provides very good smoke
dissipation
Cap with fan. It provides
very good smoke
dissipation even in case
of weak winds

INSTALLATION &USER MANUAL ENERGY EFFICIENT WOODSTOVE | PHOENIX
9 | Page
6.2. About ARTE® PHOENIX woodstove
Pic. 6.2.1
The woodstove you just received is a device that is designed to offer you optimal heating distribution in your area with very high efficiency.
6.3. General information
6.3.1. When the woodstove paint dries
ARTE ® products are painted in spray booth with as more environmentally friendly and ecological colors as possible. There is although a
possibility that the first few times the woodstove is lighted, the paint emits an odor. Let the fire burn with intense convection until all traces of
gas disappear and there is no longer a smell. The gas is not toxic, but the room should be well ventilated.
6.3.2. Incineration preparation
Prepare sufficient amount of chopped firewood, kindling and branches or torches. Before using the wood it is recommended to store them
in a warm place for a few days.
6.3.3. Combustion air intake
ARTE® PHOENIX woodstoves provide two different options for combustion air intake.
1. Use of internal air:
The presence of kitchen hoods, ventilation systems or other heating appliances may affect the operation of the woodstove. When
operating more than one device, make sure that there is sufficient air intake. The simultaneous operation of a kitchen hood or a ventilation
system with the woodstove may draw in hazardous gases from the woodstove towards the interior of the room.
According to the operating regulations, the concomitant use of similar devices may be acceptable only if there is a flue gas control
device. When there is a kitchen hood, a ventilation system or other heating appliances in use, at least one window in the room must
remain open.
2. Use of external air:
Although the woodstove uses external air for combustion, make sure that the room is ventilated adequately when the woodstove operates
with external fresh air. When you open the door of the combustion chamber for adding firewood there should be no pressure difference
between outdoor and indoor air in the room, so it is good to keep the door open for about 1.5cm for 5-6 seconds and then fully open it.
The air inlet must be positioned so as not to allow being covered.
The air inlet must be communicating with the combustion space and protected by a
grille.
The minimum surface of the air inlet should not be less than ~110cm2
Avoid using air inlets connected with garages, kitchens, bathrooms or boiler rooms.
3.
Grill
5.
Ashtray
1.
Flue
2.
Combustion chamber
6.
Secondary combustion regulator
Pushed in: Closed
Pulled out: Open
4.
D
oor opening handle
Pull to open
7.
Primary combustion regulator
Pushed in: Closed
Pulled out: Open

INSTALLATION &USER MANUAL ENERGY EFFICIENT WOODSTOVE | PHOENIX
10 | Page
ARTE® PHOENIX woodstoves allow fresh air from two different inlets:
Inlet
BEHIND
Inlet
BELOW
6.3.4. Heating during seasonal change or in adverse weather conditions
When humidity is high or there is fog, with temperatures ≥15 ° C, but also during the transitional period between seasons, it is
recommended to light a test fire before normally lighting the woodstove. This will displace the cold, heavy air that is inside the flue and
create the right conditions for optimum smoke dissipation.
6.4. Ventilation kit (optional)
ARTE® PHOENIX woodstoves can also be installed with a hot air ventilation motor o the back of the device. This feature is necessary if you
want to distribute the heat of the stove to the room or even the whole house. By blowing hot air, the ventilation kit lets you increase the heat
radiation output of the stove.
Under no circumstance should you operate the woodstove with the main
door open. You run a serious risk of destroying the device.
WARNING!!!
DO NOT cut or remove the grounding prong from the plug.
DO NOT place the power cord beneath the heater.
Although the ventilation kit is delivered ready to be installed,
it must be connected to the power grid and grounded in
accordance to local regulations ONLY by qualified personnel.
If you want to import air from an external source, you must apply the corresponding 100mm
diameter collar and clamps to mount a flexible conduit.

INSTALLATION &USER MANUAL ENERGY EFFICIENT WOODSTOVE | PHOENIX
11 | Page
6.4.1. Ventilation kit installation (optional)
The hot air ventilation kit is similar to a woodstove ventilation kit. It gives you the opportunity to distribute the hot air not only in the same room
with the stove, but to other rooms of the house too, by using the optional canal kit. This way you can heat all the rooms equally and more
efficiently.
Pic. 6.4.1.1
The installation is very simple, as the kit is delivered ready to install:
Remove the sides of the stove. (Pic. 6.4.1.2)
Install the ventilation kit with 7 screws (supplied) on the sides and bottom of the device. (Pic. 6.4.1.3)
Install the telescopic bracket for the control panel on the top of the stove with 2 screws (supplied). (Pic. 6.4.1.3)
Replace the sides of the stove.
Pic. 6.4.1.2 Pic. 6.4.1.3
ARTE
® PHOENIX
woodstove has an air inlet filter
.
Keep
it
clean
by
using
the
vacuum
cleaner and when it’s needed use water. For replacement filters contact your supplier.
1.
Electronic control panel
with telescopic bracket
3. Hot air ventilation motor
2. Thermostat
4. Air inlet filter

INSTALLATION &USER MANUAL ENERGY EFFICIENT WOODSTOVE | PHOENIX
12 | Page
6.4.2. Air canals instalation (optional)
If you want to distribute the heat from the stove to other areas of your house, ARTE ® PHOENIX enables you to install the air canals kit that
works complementary with the ventilation kit. It gives 3, 80mm in diameter supplies In order to send hot air to other rooms.
The installation should be done by a qualified technician.
Remove the sides of the stove. (Pic. 6.4.2.1)
Unscrew the 2 screws that hold the control panel and move it upwards. (Pic. 6.4.2.2)
Remove the top cup. (Pic. 6.4.2.3-A).
Install the air canal kit with 4 screws (supplied) on the side of the device. (Pic. 6.4.2.3-B).
Reinstall the top cup and the control panel.
In case the flue is in the back, place the decorative metal cap in the opening on top. (Pic. 6.4.2.4)
Pic. 6.4.2.1 Pic. 6.4.2.2
Pic. 6.4.2.3 Pic. 6.4.2.4
Use a hammer to remove ONLY the covers that you will use and install the supplementary 80mm in diameter tubes.
For the distribution of the hot air, use insulated tubes with a minimum diameter of 80mm.
Do not exceed the maximum length of 7m in a straight line, for each outlet of hot air, keeping in mind that every 90oangle corresponds to
1m of tube and each 45oangle corresponds to 0,5m.
The path of the tube must be horizontal or upward. Do not try to install the tube on a downward path. If the tube passes through flammable
walls, insulate the gap thoroughly by placing at least 4cm thick insulation.
A
B

INSTALLATION &USER MANUAL ENERGY EFFICIENT WOODSTOVE | PHOENIX
13 | Page
6.4.3. Use of the electronic control panel
ARTE® PHOENIX woodstoves incorporate two ventilators with total power output of 420m3/h, which are used for heating the air and
redistribute it in the room, which drastically increases the heating capability of the woodstove.
The motors are controlled by an electronic board which settings you can change using the control panel that is located beneath the control
panel door.
To turn the panel ON or OFF, press key A. The state ON/OFF is indicated through LED light L1.
>Operation MODES
1. MANUAL mode (indication MAN – LED light L2)
The ventilator operates at the selected speed regardless of the temperature of the sensor.
2. AUTOMATIC mode (indication MAN – LED light L3)
The ventilator operates at the selected speed when the sensor temperature is higher than that in which the thermostat is set (45oC).
3. PROGRESSIVE mode (indication PROP – LED light L4)
The ventilator automatically increases its speed according to the temperature of the sensor (starting from 45oC). In case you neglect to
turn on the thermostat before lighting the woodstove (it remains in OFF) and the sensor temperature exceeds 100oC, the ventilators are
automatically activated (ON) and start to operate in MANUAL mode, for 10 seconds and then it automatically switches to PROGRESSIVE
mode until the temperature drops to 90oC, in which case it switches back to MANUAL mode. This process is repeated continuously until you
choose another mode.
4. ALARM mode
If the temperature of the sensor exceeds 130oC, then a sound alarm is activated. You can turn that off for 5 minutes by pressing any key.
After five minutes, and if the problem is not yet restored, the alarm is activated again
>Main MENU
1. Mode selection
Press the MENU key (D) to view the selected mode, which is indicated on the screen and the corresponding LED light. By pressing the same
key again, you can choose one of the three operating modes appearing consecutively on the screen and are indicated by the
corresponding LED light. The setting is automatically stored in memory after 4 seconds. LED light L5 indicates the state of the ventilators.
2. Operation speed selection
By pressing keys Bor Cyou can view or change the current ventilation speed.
P0 = OFF (only for MANUAL mode)
P1 = Lowest speed setting
P10 = Highest speed setting
This function is not available in PROGRESSIVE mode.
In AUTOMATIC mode you can choose speed settings P1 ~ P10
>FAILURE or ALARM signals
The control panel can indicate possible sensor failures. In these cases it may display the following on the LCD screen:
LO: indicates low temperature (temperature lower than 0°C): The sensor is open or disconnected
HI: indicates high temperature (temperature higher than 180°C): The sensor has a short circuit
L1
L2
L3
L4
L5
A
B
C
D

INSTALLATION &USER MANUAL ENERGY EFFICIENT WOODSTOVE | PHOENIX
14 | Page
7. IGNITING THE STOVE
7.1. Traditional method of igniting
Every time you ignite the stove, it initially needs a large amount of air. If the stove is cold, leave the door slightly open or secure the handle on
the first latch, in order for air to circulate around it for the first minutes of ignition. Also you must fully open the primary and secondary
combustion air supplies.
To form an adequate layer of ash at the base of the woodstove, use 1-2 kg of dry kindling the first time you ignite it. If it is possible, constantly
maintain a layer of ash with thickness of 2-3 cm at the base of the combustion chamber for added insulation.
1. Put 2-4 fuel tablets or 7-10 rolled up sheets of newspaper underneath 1-2 kg of dry kindling. (Pic. 7.1.1)
2. Open the primary (Pic. 6.2.1, Point 7) and secondary (Pic. 6.2.1, Point 6) air supply in the maximum level by pulling the regulators out.
3. After the fuel tablets/rolled up sheets have ignited, leave the door slightly open or secure the handle on the first latch, in order to ensure an
adequate convection of the flue.
4. Once you ensure the flue is warm enough (after 5-10 minutes), close the door. If all required conditions are met, after 15-20 minutes a thick
layer of cinder will be formed in the combustion chamber and the temperature will rise, which is essential for the continuation of
combustion.
5. Once the requirement described in point 4 is met, place 2-3 logs with overall weight of 1.5-3kg, depending on the size of the woodstove,
on the cinder, with a distance of about 1cm from one another.
6. Open the primary combustion air supply to the maximum level and close the door. The wood will begin to burn within 2-3 minutes. If not,
open the door slightly in order for enough air for combustion to enter. Once the wood ignites close the door again and also the primary
combustion air supply.
7. Adjust the regulator of secondary combustion air to the desired position in order for the optimal combustion to continue. Make sure that
there is always enough air (oxygen) to maintain clear, lasting flames when, and after, reducing the amount of combustion air.
8. Once the fire has been reduced to a thick layer of embers, a new portion of wood can be added by repeating steps 5-7.
7.2. Igniting without CO emissions (TOP TO BOTTOM)
1. Open the primary (Pic. 6.2.1, Point 7) and secondary (Pic. 6.2.1, Point 6) air supply in the maximum level by pulling the regulators out. If
needed, leave the door slightly open or secure the handle on the first latch.
2. Place 2-3 logs with a total weight of 1.5-3 kg and a length of 30-35 cm on the bottom of the combustion chamber.
3. Put 2-3 fuel tablets or 5-8 rolled up sheets of newspaper between the logs.
4. Add some kindling wood (1-2 kg) in a criss-cross pattern on top. (Pic. 7.1.2)
5. Finally, place a medium-sized log on the top of the pile and light the tablets/newspaper.
6. Once you ensure the flue is warm enough (after 5-10 minutes), close the door.
7. Adjust the regulator of secondary combustion air to the desired position in order for the optimal combustion to continue. Make sure that
there is always enough air (oxygen) to maintain clear, lasting flames when, and after, reducing the amount of combustion air.
8. Once the fire has been reduced to a thick layer of embers, a new portion of wood can be added.
Feed the woodstove often but with small amounts of firewood, at most 1.5-4.8kg, depending on the size of the woodstove, each time. If the
woodstove is overly full, t he generated heat may cause excessive strain on the flue. The supply of firewood should be done in moderation.
Pic. 7.1.1 Pic. 7.1.2
The openings of the secondary air supply should not be covered by firewood.
In order to avoid soot on the glass, it is important that the
logs are not placed adjacent to the glass of the door.
Do not leave the stove unattended while the door is open.
Be very careful during the fueling of the woodstove.

INSTALLATION &USER MANUAL ENERGY EFFICIENT WOODSTOVE | PHOENIX
15 | Page
Wood combustion rules
If you want less heat, put a smaller quantity of wood in the woodstove and reduce the amount of air. It is however important to maintain
an adequate layer of cinder.
Less heat = Less wood = Less air.
More heat = More wood = More air.
When the woodstove operates at excessively low power or if the wood is not sufficiently dry, soot might deposit on the glass.
8. TERTIARY COMBUSTION (PATENTED)
The three combustion points
The combustion of wood requires a process of primary, secondary, and tertiary combustion to be efficient.
1. Primary combustion
Primary combustion is the initial wood burning at relatively low temperatures. During the primary combustion, large amounts of soot, creosote
and gas are produced due to the existence of water in the wood. Creosote, in primary combustion, contains 60% of the potential energy of
wood, but it is deposited in the form of soot inside the woodstove and the flue without imparting any heating.
2. Secondary combustion
The combustion chamber is insulated so as to increase the temperature of the core and by providing just the right amount of oxygen
necessary to 600OC, the creosote ignites spontaneously. This creates a chain reaction that increases the temperature inside the woodstove
from 600OC to about 870OC without having to add any more fuel. This is the secondary combustion.
Thereby, the more proper secondary combustion is achieved the higher temperatures are produced
and the less residue is left (gas and particles). The vast majority of secondary combustion is only done in
the upper part of the chamber near the outlet of the flue. Thus a large part of the heat that is achieved,
is discharged directly through the draft of the flue to the exterior and not in the heating area.
ARTE’s® patented chamber manages to provide the maximum
secondary combustion performance. An automatic air intake
regulating system in cooperation with four or five vertical ducts
and the combustion space having openings, in such a way as to
insert the appropriate amount of hot air through the entire
length of the pipeline, onto the calcined side of the combustion
space and the aircurtains of the ceramic glass (Pic. 8.1.1), results
in the fire receiving the right amount of preheated oxygen
throughout the combustion chamber (Pic. 8.1.2). This way the
whole area of the chamber is converted in a secondary
combustion chamber, not only the upper part, and thus its
performance dramatically increasies and inversely gas residue
reduces.
3. Tertiary combustion
The tertiary combustion occurs when the coal that remains on the bottom burns in a proper and coordinated way. Coal contains a large
amount thermal energy that when used provides a large amount of heat. Proper air flow directly on the coals within such a hot room, results
in almost complete consumption and minimizing the amount of ash that collects on the bottom.
The fire should be vigorous and the smoke exiting from the flue must be almost
unnoticeable.
The fire should not be smoldering because it is causing more pollution.
If the door remains slightly open, fire gases and flames may escape from the
opening of the woodstove causing a risk of fire or asphyxiation. We
recommend installing a smoke detector in the room where the woodstove is
located.
Under no circumstance should you operate the woodstove with the main door
open. You run a serious risk of destroying the device.
DO NOT OVERHEAT THE WOODSTOVE! There is risk of fire or permanent damage.
If any part of the
woodstove
starts glowing, then the device is overheating.
Pic. 8.1.1
Pic. 8.1.2

INSTALLATION &USER MANUAL ENERGY EFFICIENT WOODSTOVE | PHOENIX
16 | Page
9. CLEANING &MAINTAINING THE WOODSTOVE
9.1. External maintenance
The stove surface is painted with heat-resistant paint. It is best kept clean by vacuuming with a soft brush attachment or by wiping with a lint-
free cloth. Over a period of time, the painted surface may become slightly grey. A canister of touch-up ARTE®spray paint should be available
from your woodstove supplier. This can be applied - in accordance with the instructions - in just a few minutes. When first firing, after touching
up, the woodstove will give off a slight smell as the paint cures. Make sure to ventilate the room well during this phase.
9.2. Internal maintenance
9.2.1. Ash disposal
Empty the ash pan on a daily basis or as needed. Ash allowed to build up towards the underside of the grate will trap heat and could cause
premature failure of the grate.
Empty the ash pan according to this procedure:
Open the front door, and use a shovel or poker to stir excess ash through the ash slots in the grate down into the ash pan.
Take out the ash pan, making sure to keep it level to avoid spilling ash.
Dispose the ash in a metal container with a tight fitting lid.
The closed container of ashes should be placed on a noncombustible floor or on the ground, well away from all combustible materials,
pending final disposal. If the ashes are disposed of by burial in soil or otherwise locally dispersed, they should be retained in the closed
container until all cinders have thoroughly cooled.
9.2.2. Glass
If the stove generally runs at the correct temperatures, there should be little or no dirt on the glass. If dirt does settle during lighting, most will
burn off as temperatures increase.
For normal cleaning, moisten a paper towel with warm water and add some ash from the combustion chamber. Rub it over the glass and
then clean the glass with clean water and dry it well. For heavier deposits that cannot be cleaned, use glass cleaner, applied when the glass
is cold, in accordance with the instructions.
Never use abrasive cleaners on the glass surface.
Reasons for the presence of dirt on the glass
Firewood is too wet
Logs are too large or not split
Combustion temperatures are too low
If there is a need to replace the glass, it should be replaced with the high temperature ceramic glass supplied by ARTE®. For more information,
please contact your local ARTE®dealer.
9.2.3. Gasket
The gasket around the perimeter of the door may harden over a period of time. It should be replaced if it becomes difficult to close the door
or if air starts to leak in around the perimeter of the doors, causing the fire to become a little less controllable. An ARTE®rope gasket kit is
available on your local ARTE®dealer.
9.2.4. Internal parts that need maintenance
The components that are in the flame route - consisting of the vermiculites, the ceramic glass, flue collar and stainless stell baffle - are subject
to extreme stress beacause of the heat produced by the fire. Occasionally, some of these parts may have to be replaced as part of routine
maintenance.
To reduce the risk of breaking the glass, avoid striking the glass or slamming the door.
Replace broken glass IMMEDIATELY.
Do not operate the woodstove if the glass in the door is damaged.
Never empty a stove in operation.
Never use your household or shop vacuum cleaner to remove ash from the stove.
Always remove and dispose of the ash properly.
When performing maintenance on the woodstove, always
protect yourself, using safety goggles and gloves

INSTALLATION &USER MANUAL ENERGY EFFICIENT WOODSTOVE | PHOENIX
17 | Page
All of these service parts can be bought from your ARTE® dealer, and we recommend that damaged parts are replaced as soon as possible
to avoid consequential damage.
Should the baffle be distorted by overheating, the woodstove will still function, although its efficiency may be compromised. Please replace it
as soon as possible.
Internal wear accelerating factors
Regular overheating
Accumulated soot and ashes
9.3. Cleaning the woodstove and the flue
When wood is burned slowly, it produces tar and other organic vapors, which combine with emitted moisture to form creosote. The creosote
vapors condense in the relatively cool chimney flue. As a result, creosote residue accumulates on the flue lining. When ignited this creosote
makes an extremely hot fire.
Initially, do a monthly check for the presence of soot above the deflector plate and around the outlet flue. If the woodstove suddenly start
operating slowly check for intense presence of soot around the flue collar or in the flue / chimney.
Clean the flue/chimney all the way from the woodstove to the flue end point above the house. A good practice is to clean the flue after
each operating season and to inspect it prior to the start to ensure that bird’s nests or other blockages have not occurred during the off
season.
9.3.1. Chimney sweeping
Inspect the woodstove regularly during the operating season as part of a regular maintenance schedule.
To inspect the chimney, let the woodstove cool completely. Then inspect the chimney through the flue collar by using a mirror. If you
cannot inspect the flue system this way, the woodstove must be disconnected to provide better viewing access
Clean the chimney using a brush with the same size and shape as the flue. Run the brush up and down the flue, causing any deposits to
fall to the bottom of the woodstove where they can be removed the same way as the ash.
If you cannot inspect or clean the chimney by yourself, contact your local ARTE® dealer or a professional chimney sweep.
If you experience a chimney fire, act promptly and:
Close the air regulation
Evacuate the house
Call the Fire Department
9.3.2. Annual maintenance
Before the operating season starts, perform a thorough cleaning, inspection and repair:
Thoroughly clean the chimney and flue connector
Inspect the chimney for damage and deterioration. In case of prefabricated chimney, replace any weak sections. In case of a masonry
chimney, have a mason make any needed repairs
Check the ceramic glass for any cracks and replace if needed
Check the door and handle for tightness. Adjust if needed.
9.3.3. How to clean the inside parts of ARTE® PHOENIX woodstove
During the annual visit of your local chimney sweep and during the cleaning of internal parts of the woodstove, it is recommended to remove
all internal parts of the combustion chamber to be also cleaned. (Κεφάλαιο 9.4)
Maintenance on the woodstove must be done ONLY when the device is
cold.
The flue and its connector should be inspected at least once every
two months during the operating season to determine if a creosote
buildup has occurred. If creosote has accumulated, it should be
removed to reduce the risk of a chimney fire.
Components in the flame route, the gasket and the paint
finish are not covered by the warranty.

INSTALLATION &USER MANUAL ENERGY EFFICIENT WOODSTOVE | PHOENIX
18 | Page
9.4. Internal parts removal
Upper vermiculite baffler removal
Back and side vermivuli
tes removal
9.5. Inactive fireplace for prolonged periods
IMPORTANT NOTICE: If the woodstove is not used for some time, clean it thoroughly and let the air control layout slightly open in order to let
the air circulate. Ensure that the rainwater cannot infiltrate from the flue. Place a chimney cap that does not completely block the flue.
These actions should ensure there is a slight movement of air through the woodstove, and that the body and combustion chamber remain
dry, right into the corners.
Ash that remains in the woodstove, when not in use, can absorb moisture like blotting paper. If moisture settles inside the woodstove, it forms
rust which expands the more it settles. This can cause excessive pressure on the woodstove joints, thus causing damage.
NOTE: It is recommended to thoroughly clean the woodstove at the end of the operating season Adding desiccant in the combustion
chamber, such as cat litter, helps absorb moisture during the summer. Make sure to remove it before the beginning of the operating season.
10. TIPS &TRICKS FOR RESOLVING ISSUES
The wood does not ignite by lighting the fireplace. The fire just smokes. The fire burns out
Open the air supply
You are not using proper kindle
The wood is too wet
The logs are too thick
The ash is over the appropriate limit
Intense smoking in the combustion chamber, intense soot deposition on the glass
Open the air supply
Small quantity of wood
The wood is too wet
The logs are too thick
There is smoke coming out of the fireplace
Check if there is adequate draft into the flue, light a test fire
Make sure there is sufficient air supply
The qualified dealer in your area is available to answer any of your further questions
We hope you enjoy many years of carefree warmth with this
ARTE ® PHOENIX woodstove. Some initial experimentation with
loading and operating techniques will help you decide your
normal routine. If you have any problems after this short
learning period, please contact your local ARTE® dealer. In
case, for any reason, they can’t help, please contact us in
writing at the address on the front of this manual

INSTALLATION &USER MANUAL ENERGY EFFICIENT WOODSTOVE | PHOENIX
19 | Page
11. DIMENSIONS
All dimensions are in centimeters (cm)
Table of contents
Other ARTE Wood Stove manuals
Popular Wood Stove manuals by other brands

Osburn
Osburn 3300 Installation and operation manual

Vermont Castings
Vermont Castings Defiant Operation manual

NESTOR MARTIN
NESTOR MARTIN STANFORD 9 manual

Harrie Leenders
Harrie Leenders Signa manual

Quadra-Fire
Quadra-Fire 4300 Series installation manual

Falcon
Falcon Reginald Installation and operating instructions