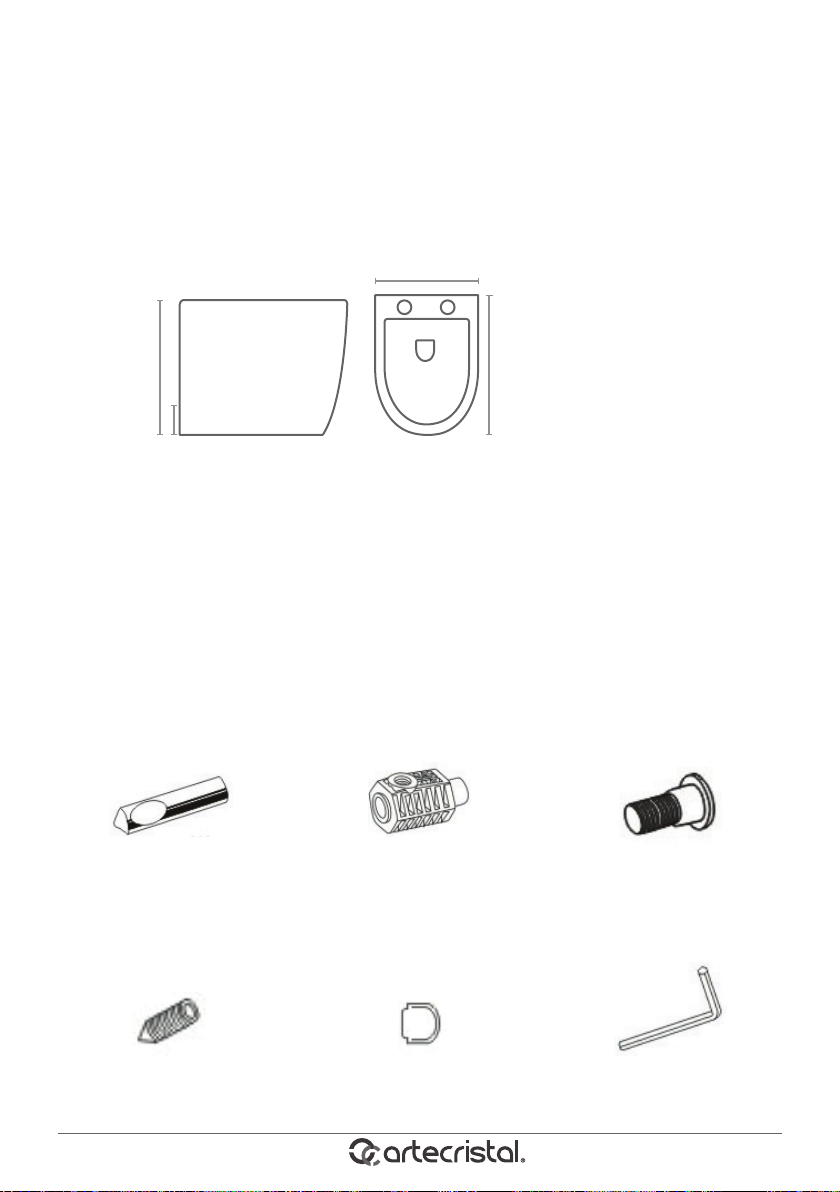
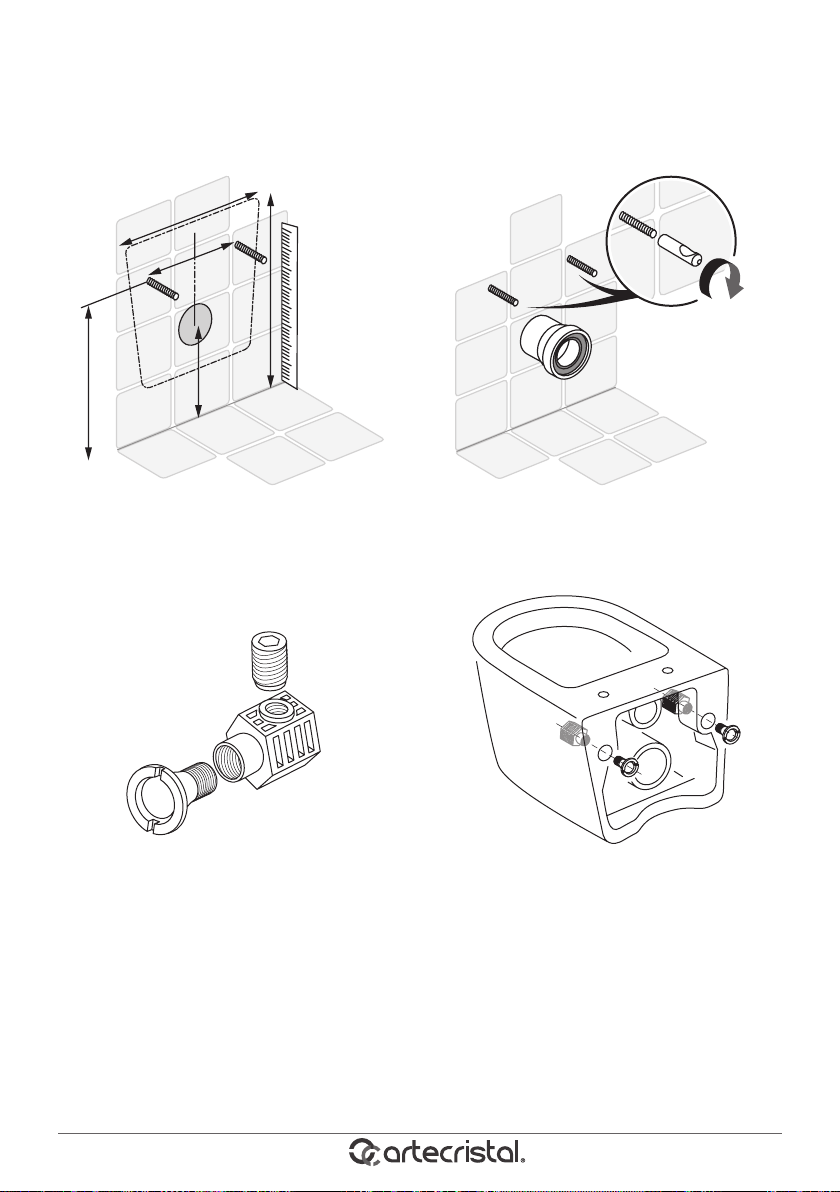
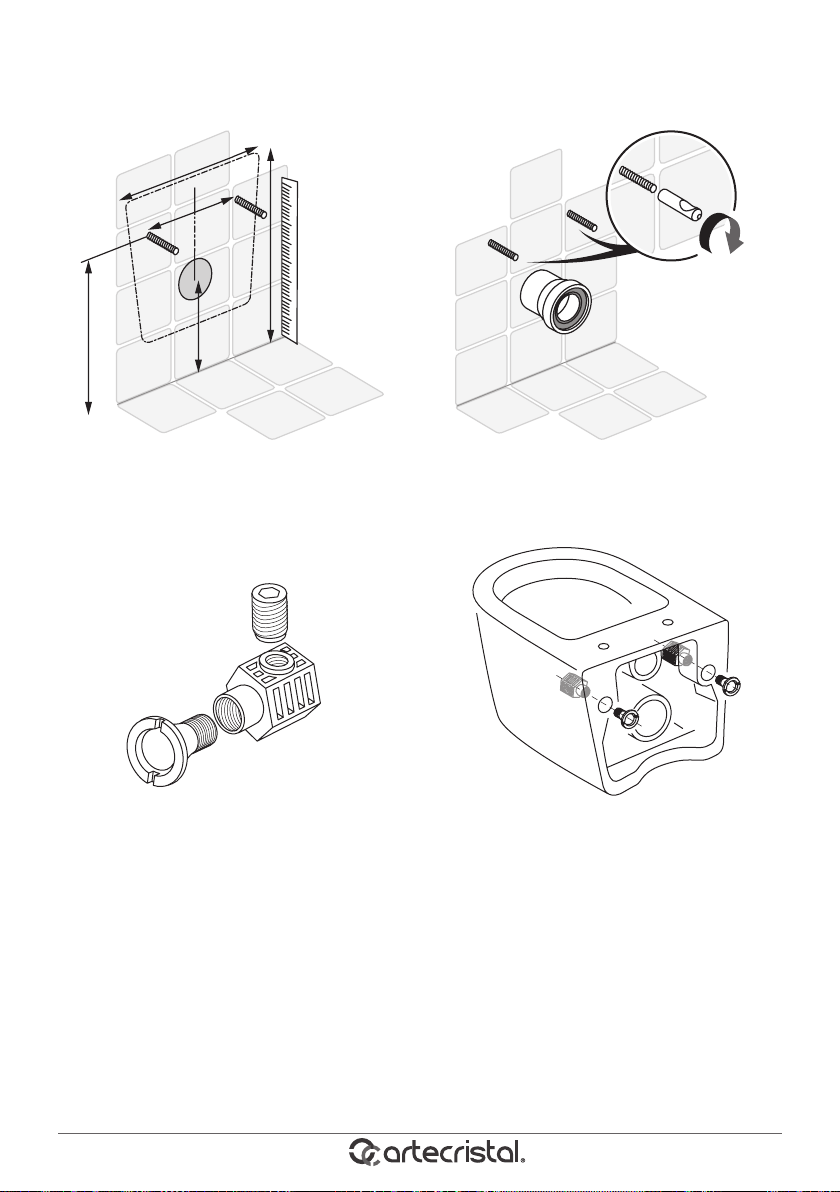
Artecristal BARINE User manual

Manual de instrucciones
Instruction manual
BARINE
INODORO SUSPENDIDO
SUSPENDED TOILET

Instalación
PIEZAS NO INCLUIDAS
MEDIDAS GENERALES
Cabezal con muesca
Tornillo jador
Rosca de PVC
Atornillador plano Destornillador hexagonal
x2
x2
x2 x2
Tapón de rosca
Medidas BARINE SUSPENDIDO: 34 x 35,5 x 55,5 cm
*Medidas sujetas a una variación posible de 1,5 cm debido al enfriamiento de la cerámica al salir del
horno.
34 cm
18 cm
35,5 cm
55,5 cm
HERRAMIENTAS NECESARIAS
(no suministradas)
• Destornillador
• Nivel
• Lápiz marcador
• Taladro eléctrico y herramientas propias
MEDIDAS GENERALES

Instalación
ES
ANTES DE EMPEZAR
• Compruebe el producto y asegúrese que están todas las partes señaladas. En caso contrario,
contacte con el vendedor.
• Reúna todas las herramientas antes de empezar y compruebe que la zona de montaje se encuentra
limpia y seca.
• Garantice que el suministro de agua y las válvulas de desagüe estén en la posición adecuada para
su instalación.
• Precaución: Tenga cuidado a la hora de taladrar paredes y suelo para evitar agujerear tuberías o
cables.
• Gracias por haber elegido nuestro producto. Por favor, lea atentamente estas instrucciones. Es
posible que algunas instalaciones requieran ayuda profesional.

Instalación
Mida en la pared los oricios donde introducir los
tornillos de sujeción y la salida y entrada de agua.
Insertar la rosca de PVC en el oricio de montaje y
mantenga el oricio roscado verticalmente hacia
arriba
Inserte la turca en la rosca de PVC y jelo
Coloque el cabezal en el tornillo-cabezal con
muesca hacía arriba, para posteriormente poder
atornillar, y la pieza de desagüe.
A
B
INSTALACIÓN

Instalación
ES
Instale la rosca de PVC en el tornillo-cabezal con
muesca y jelo con la llave hexagonal.
Ponga silicona en todo el perl del inodoro.
S
ILIC
O
N
E

Instalación
MANTENIMIENTO ADECUADO DEL PRODUCTO.
• Use un limpiador doméstico seguro de porcelana para limpiar el asiento y la manija para
desinfectarlos y evitar las manchas.
• Evite tirar cualquier otra cosa en el recipiente. Si experimenta un inodoro atascado, cierre el agua
con la válvula de cierre de emergencia montada en la pared detrás y debajo del tanque para evitar
el desbordamiento.
• Nunca vierta un limpiador químico de drenaje en su inodoro para dañar las tuberías. Si no puede
reparar un inodoro obstruido por su cuenta, comuníquese con un fontanero profesional para
obtener ayuda.
RECOMENDACIONES
• Para un mejor mantenimiento del asiento, limpie inmediatamente después de cada uso para evitar
la proliferación de bacterias.
• Si es necesario, lije las rozaduras pequeñas y las posibles abrasiones con un compuesto de lijado
suave.
• No dejar nunca restos de jabón u otros productos de limpieza -ya que pueden causar daños
permanentes.
• Nunca mezclar distintos tipos de limpiadores en el inodoro ya que podrían reaccionar y generar
gases nocivos.
No es necesario instalar la parte inferior de aluminio a prueba de agua si la bandeja ya
tiene alrededor impermeable.
EXCLUSIONES DE LA GARANTÍA
Los defectos causados por una incorrecta manipulación no están cubiertos por la garantía.

Instalación
ES
EXCLUSIONES DE LA GARANTÍA
Los defectos causados por una incorrecta manipulación no están cubiertos por la garantía.
CUIDADO DEL MEDIO AMBIENTE
Cuando tire el embalaje, separe los elementos de papel, los de plásticos u otros materiales, y tírelos en
los contenedores adecuados separados según tipo de basura.
Se recomienda que la instalación sea realizada por un instalador autorizado.
¡Atención!
Desconectar la conexión del agua antes de ser manipulada y realizar el cambio de producto solo enton-
ces.
PROBLEMAS Y SOLUCIONES MÁS COMUNES
No funciona la descarga parcial
Compruebe que el nivel de agua de llenado sea
mayor que el otador parcial. Si no es así, ajuste
el nivel del agua más alto o ajuste el otador más
abajo.
No hay descarga o descarga menos después de
presionar el botón.
Compruebe el botón si está empujado a la posi-
ción correcta. Compruebe si la varilla del botón es
demasiado corta. Si es así, ajuste la longitud de la
varilla de ajuste.
Nota: Es normal que el agua uya desde el interior del inodoro en un momento después de la descarga.
Atención: Reduzca el sifón para adaptarlo al nivel de desbordamiento.

Installation
TOOLS NEEDED (not supplied)
• Screwdriver
• Level
• Pencil
• Electric drill
BARINE SUSPENDED measures: 39,5 x 36 x 53 cm
* Measurements subject to a possible variation of 1.5 cm due to the cooling of the ceramic when leaving
the oven.
39,5 cm
53 cm
36 cm
PARTS NOT INCLUDED
Notched head
Fixing screw
PVC thread
Flat screwdriver Hex screwdriver
x2
x2
x2 x2
Screwcap

EN
Installation
BEFORE STARTING TO MOUNT
• Check the product and make sure all the indicated parts are present. Otherwise, contact the seller.
• Gather all tools before starting, verify that the mounting area is clean and dry.
• Ensure that the water supply and drain valves are in the proper position for installation.
• Caution: Be careful when drilling walls and oor to avoid holes in pipes or cables.
• Thank you for choosing our product. Please read these instructions carefully. It is possible that
some facilities require professional help.

Installation
Measure the holes in the wall where to insert the
xing screws and the water outlet and inlet.
Insert the PVC thread into the mounting hole and
hold the threaded hole vertically up.
Insert the turkey into the PVC thread and x it.
Place the head on the screw-head with notch
upwards, to later be able to screw, and the drain
piece.
A
B
INSTALACIÓN

EN
Installation
Install the PVC thread on the socket head screw
and secure with the hex wrench.
Put silicone on the entire prole of the toilet.
S
ILIC
O
N
E

Installation
PROPER TOILET MAINTENANCE
• Avoid using “drop in the tank” cleaners, as these can damage the rubber aps and other
mechanisms.
• Use a porcelain -safe household cleaner to clean off the tank, seat, and handle to disinfect them
and prevent stains.
• Avoid tossing anything else into the bowl. If you do experience a clogged toilet, turn off the water
using the emergency shutoff valve mounted on your wall behind and beneath the tank to prevent
overowing.
• never pour a chemical drain cleaner down your toilet to damage your plumbing pipes. If you can’t
repair a clogged toilet on your own, contact a professional plumber for assistance.
RECOMMENDATIONS
• For better maintenance of the seat, clean immediately after each use to avoid the proliferation of
bacteria.
• If necessary, sand small scratches and possible abrasions with a soft sanding compound.
• Never leave traces of soap or other cleaning products - as they can cause permanent damage.
• Never mix different types of cleaners in the toilet since they could react and generate harmful
gases.
No need to install the bottom waterproof if the tray is already has waterproof surroundings.
WARRANTY EXCLUSIONS
Defects caused by improper handling are not covered by the warranty.

EN
Installation
EXCLUSIONS OF THE WARRANTY
Defects caused by incorrect handling are not covered by the warranty.
ENVIRONMENTAL CARE
Paper, plastic and other materials should be separated into the appropriate containers when throwing
away the packaging.
It is recommended that the installation be carried out by an authorized installer.
Attention!
Disconnect the water connection before being manipulated and make the product change only then.
FAULT AND RESOLVENT
No partial ush
Check the ll water level whether is higher than
the partial oat. If not, adjust the water level
higher or adjust the oat lower.
No ush or ush less after push down the button
1. Check the button whether is pushed to the
proper position.
2. Check the button rod whether is too short. If
yes, adjust the adjustment rod’s length.
Note: It is normal that water ows from the inside of the toilet in a moment after the ush.
Attention: Reduce the siphon to adapt it to the overow level.

ARTECRISTAL BAÑO S.L.
Crta. Andalucía Km 35,7, nave 6
45224 Seseña Nuevo, Toledo, España
www.artecristalbanos.com
Table of contents
Languages:
Popular Toilet manuals by other brands

BERNSTEIN
BERNSTEIN 805 installation guide

Drive DeVilbiss Healthcare
Drive DeVilbiss Healthcare 12027RA instruction manual

Invacare
Invacare Aquatec Pure Bidet user manual

RM69
RM69 RASKE & VAN DER MEYDE EDAM installation instructions

Toto
Toto MS604114CEF installation manual

Vermeiren
Vermeiren 9062 user manual