ArtiVisuals Mix-iT.ATEM User manual

User Guide Mix-iT for ATEM v2.0
- 1 -
User Guide Mix-iT.ATEM v2.0
September 2015

User Guide Mix-iT for ATEM v2.0
- 2 -
Declaration of Conformity
We, manufacturer/representative
ArtiVisuals
Molukkenstraat 200 S3
1098 TW Amsterdam
The Netherlands
declare under our sole responsibility, that the product
Mix-iT
model: Mix-iT.ATEM
s/n.: 15C0070
to which this declaration relates, is in conformity with
EN55022:2010 /AC:2011
EN55024:2010
FCC CFR 47 part 15:2013
EN61000-3-2:2014
EN61000-3-3:2013
EN61000-4-2
EN61000-4-3
EN61000-4-4
EN61000-4-5
EN61000-4-6
EN61000-4-8
EN61000-4-11
as stated in report: ART-20150603-I1 tested at BICON Laboratories BV
in accordance with EMC-directive 2004/108/EC
Manufacturer/representative:
Function: hard/software developer
Date: 11-9-2015

User Guide Mix-iT for ATEM v2.0
- 3 -
Contents
INTRODUCTION ..................................................................................................4
FEATURES ..........................................................................................................4
FRONT PANEL ....................................................................................................5
SIDE PANEL ........................................................................................................7
CONNECTING MIX-IT ..........................................................................................7
MENUS.................................................................................................................8
IP CONFIG MENU ................................................................................................8
BUTTON MAP MENU ........................................................................................10
AUX MENU.........................................................................................................12
MACROS............................................................................................................12
UPDATE FIRMWARE ........................................................................................13
SPECIFICATIONS..............................................................................................14
DIMENSIONS .....................................................................................................14
SERVICE & SUPPORT ......................................................................................15

User Guide Mix-iT for ATEM v2.0
- 4 -
Introduction
Mix-iT is a compact control panel for Blackmagic Design ATEM switchers. The unit
features 31 illuminated broadcast buttons, a fader and 4 rotary controls to
effortlessly control these great switchers. Buttons can be assigned to serve your
needs, direct control of the built-in media players is standard.
Mix-iT may be connected directly to the ATEM, or can live in a network along
with PC or Mac based ATEM software and/or other control hardware.
It can be used to operate the main functions of the ATEM switcher, more detailed
settings can be programmed in the ATEM software van Blackmagic (on PC or
Mac) and stored in the ATEM switcher.
The unit is powered through Power-over-Ethernet or with the supplied 7.5V DC
adapter.
Features
- controls all Blackmagic Design ATEM switchers
- compact form factor: 33,5 x 18,5 x 8 cm
- can be powered with Power over Ethernet (PoE)
- can be used direct with the switcher, no computer needed
- future proof, user updatable
- flexible bus assign and button mapping
- quick select for built in Media players
- option port for future expansion
- macro control
- hyperdeck control

User Guide Mix-iT for ATEM v2.0
- 5 -
Front panel
1. Program bus
The buttons on the program bus are used to switch sources to the program
output of the switcher. The selected source has a red light.
2. Preview bus
The preview buttons are used for selecting the input that you switch to in the
next transition, by using the cut or auto button, or by using the fader. The
selected input on the preview bus has a green light, this will be red during a
transition.
3. Key buttons
By pressing these buttons, the corresponding upstream keyer is switched on.
Pushing the button once more switches the keyer off. These keys can also be
assigned as macro keys.

User Guide Mix-iT for ATEM v2.0
- 6 -
4. LCD panel
During normal operation, the first line of the LCD shows the model of the
connected switcher, and the second line shows a status line.
On this status line you find from left to right: the selected clip in mediaplayer 1, in
mediaplayer 2, the selected color, and optional the selected macro. These
selections correspond to rotaries 1 to 3, and optional 4: turning rotary 1 changes
the selected clip in mediaplayer 1 and so on.
5. Rotary 1 to 3
Rotary 1 to 3 are located directly above buttons 9, 10 and 'col' on the preview
and program bus. By default these buttons are used for selecting mediaplayer 1
and 2, and color.
6. Fader
To manually perform a transition from the source selected in the program bus to
the source in the preview bus. The transition effect is set in the ATEM software.
7. Downstream key buttons
To bring the downstream keyers on air. The downstream keyers are faded in and
out, the duration of this fade can be set in the Blackmagic ATEM software, and
can then be stored in the mixer.
8. Rotary 4
Can be used to control the option port (with Play button), macro's, or a
hyperdeck player or recorder. See menus.
9. Play button
Can be used to control the option port (with Rotary 4), macro's, or a
hyperdeck player or recorder. See menus.
10. Auto button
To run a transition automatically, the speed of the transition is set in the ATEM
software.
11. Cut button
To switch instant between preview and program bus.
For more information see the Blackmagic ATEM operation manual.

User Guide Mix-iT for ATEM v2.0
- 7 -
Side Panel
1. Network connector
2. Power input
3. Option port
Connecting Mix-iT
Before you connect Mix-iT, be sure that the ATEM switcher functions with/ is
recognized by the PC or Mac software.
The Mix-iT controller needs a network connection to the ATEM switcher, this can
be realized with a cable direct to the ATEM, or via a network hub or switch that
connects both devices.
The Mix-iT kan be powered with the supplied main-adapter (7.5V, 500mA), or
through Power over Ethernet if your network switch supports this.
Power up Mix-iT by either connecting the adapter to the mains or by connecting
the network cable with Power over Ethernet. The panel now tries to connect to
the ATEM switcher, if this succeeds the mixer model is shown in the LCD, along
with a statusline (indicating selected media and colour).
If no connection can be established, a message appears in the screen. Check
cabling and IP settings.

User Guide Mix-iT for ATEM v2.0
- 8 -
Menus
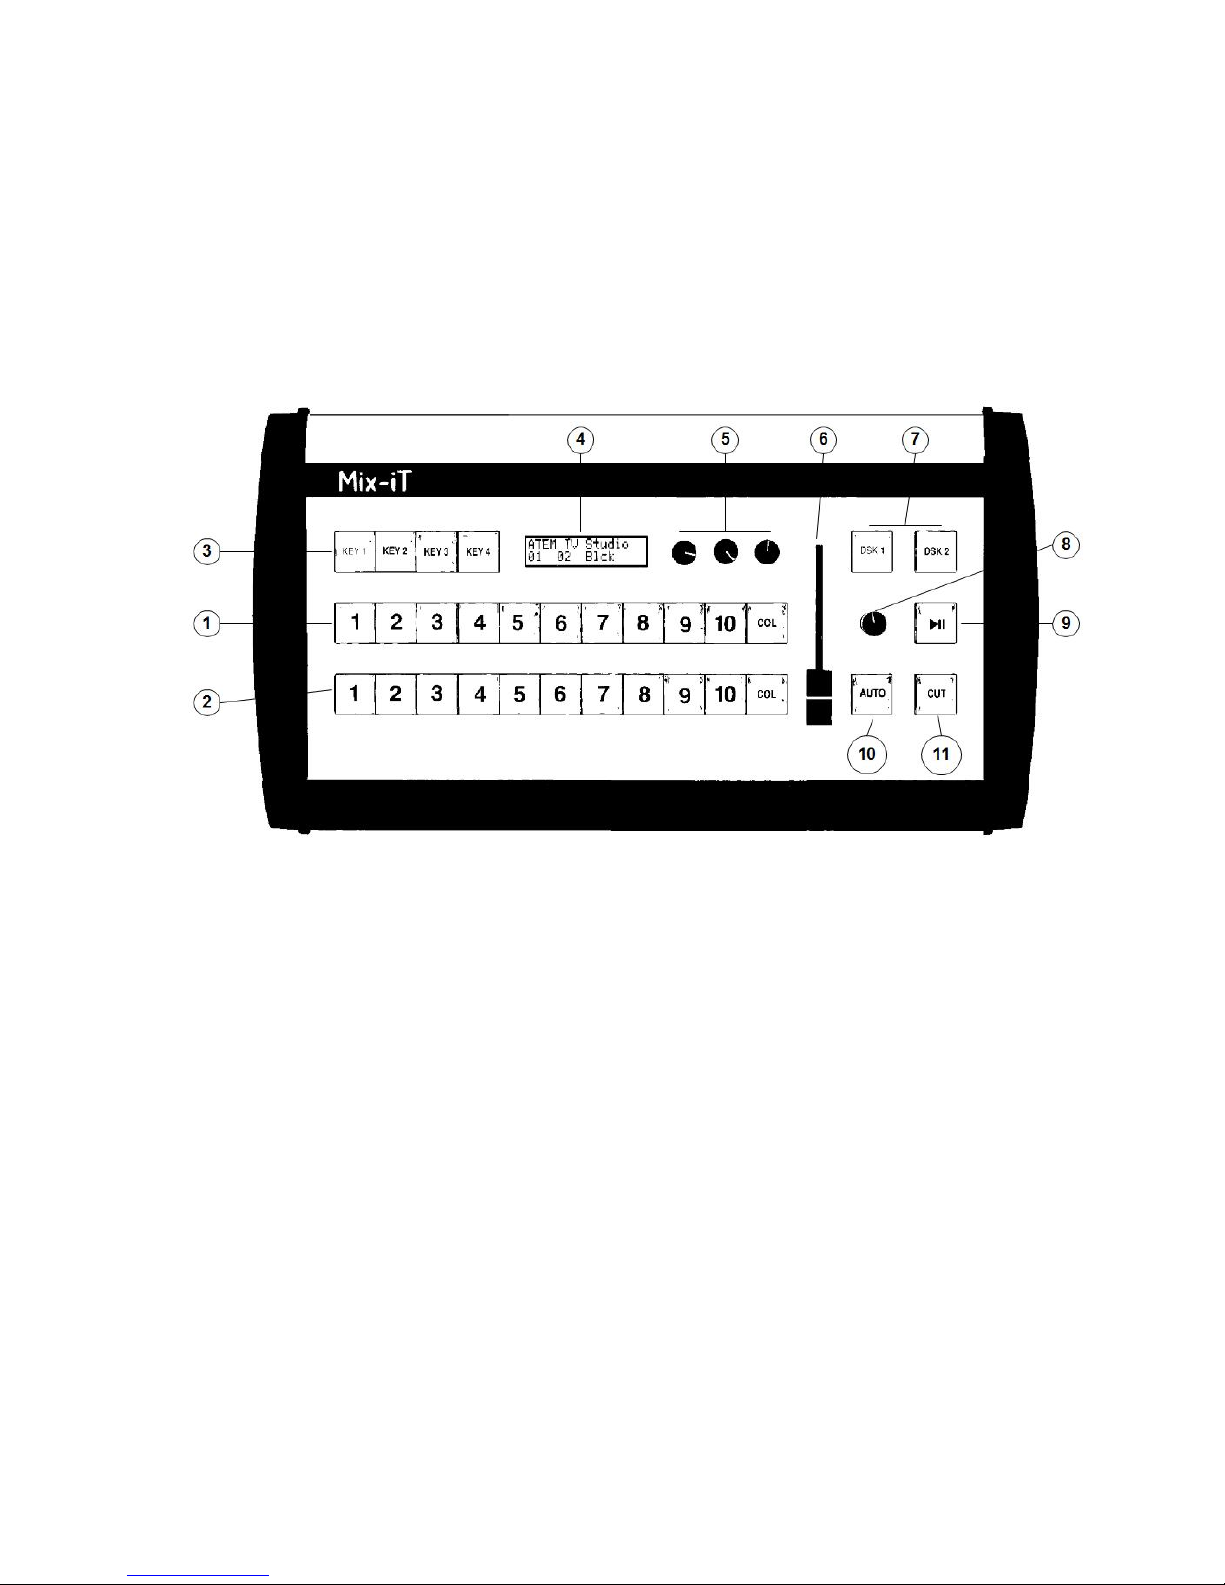
When pressing rotary 1 to 3 you switch to the menus:
Rotary 1 is for the IP-configuration menu,
rotary 2 for button mapping and
rotary 3 for controlling the aux outputs.
IP config menu
Controlling the ATEM switchers is done via a network connection. This can simply be a
cable between switcher and controller, or both devices can be connected via a hub or
switch. In that case, you can connect for instance a Mix-iT, a PC running ATEM
software, and a tally box to the switcher, all at the same time. Changes on one controller
are reflected on the other connected devices.
After you have made the physical connection, you have to check the IP parameters.
Each device or node requires a unique address, and must be told the address of the
ATEM switcher.
Enter the IP configuration menu by shortly pressing rotary one.
Next, you can step through the menu items by turning the rotary knob. Clicking once
more enters that selected menu item.
1. Load Defaults
If you enter this option and confirm by selecting and clicking 'OK', the default
settings for the IP-settings are loaded. These settings are:
192.168.10.99 for the Mix-iT,
and 192.168.10.240 for the ATEM switcher.
If you haven't previously changed the IP addresses of your ATEM switcher or
Mix-iT, they already have these default addresses, and the Mix-iT should connect
immediately.
2. Mix-iT IP address
If you enter this, you can change the IP Address of the Mix-it. You should enter
an address that differs from the ATEM address, but it must be located in the
same subnet. Almost always, only the last number of 3 digits will differ from the
switcher address.
3. Netmask
In most networks this should be 255.255.255.0.

User Guide Mix-iT for ATEM v2.0
- 9 -
4. ATEM switcher
This is an important setting, if it is not correct there will be no connection between
Mix-iT and ATEM switcher. You can find the switcher address in the preferences
window of the ATEM control software for PC or Mac, or with the ATEM setup
utility via USB.
For more information on this topic see the Blackmagic ATEM operation manual -
getting started.
5. Gateway Address
This address is only used if the ATEM switcher and Mix-iT are not located in the
same subnet. The default value for the gateway address is 192.168.10.1
6. Save & Exit
This entry allows you to save the changed IP parameters. If you made any
changes, the Mix-iT will now restart, and connect, using the new parameters.
You may have to powercycle the panel. If you select cancel, changes will not be
stored.
7. Firmware update
To update the firmware, you can download the update utility for Mac or PC from
the website 'Mix-iT.tv'. Here you will also find instructions on how to proceed.
If you accidently selected to update the firmware, powercycling the Mix-iT twice
should bring you back in business.
8. Version info
This entry shows the version of the ATEM -firmware and the version of the Mix-it
firmware. If your ATEM firmware version is lower than 2.12, we advise you to
update the switcher via the USB connector with the ATEM setup utility.
9. MAC address
The MAC address is the unique hardware code for your Mix-IT, and is read-only.
Your network administrator may need it.
Note: If you push and hold down any rotary for 2 seconds, you will return to the status
display. Beware that all changes will be lost in that case.

User Guide Mix-iT for ATEM v2.0
- 10 -
Button map menu
By clicking rotary 2, you enter the button menu. In this menu, you can tailor the Mix-iT to
your needs.
1. Map busses
Here you can select Preview /program (which is standard) or swap the preview
and program bus.
If you use the Mix-iT with a 2 M/E ATEM switcher, you must choose if you want
to control M/E one or two. By using an extra Mix-iT, you can control both ME's at
the same time.
The custom entry allows you to connect each bus to preview, program or one of
the aux outputs.
Finally return brings you back to the button menu.
2. Map Buttons
When you select default, this resets the mapping:
Buttons 1 to 8 are connected to inputs 1 to 8, buttons 9 and 10 control the
mediaplayers, and 'col' is used to select the colors.
SDI first arranges the inputs in such a way, that SDI signals start from switch 1.
This relates to the model of the ATEM switcher.
When you select custom, you can fully customize the link between sources and
buttons. Buttons 1 to 11 can be individually connected to the available sources in
the mixer, but you can also disable a button. Selecting button 0 returns you to the
button menu.
The entry 'key 1-4' is for setting the function of these buttons. By default they are
used to select upstream keyers 1 to 4, but each button can be changed to start a
macro instead. Macro's are recorded in the ATEM control software for PC and
Mac, and are stored in the switcher.

User Guide Mix-iT for ATEM v2.0
- 11 -
3. Player controls.
This sets the function of the player rotary and key. These can be used to control
the option port, macro's, or a hyperdeck player or recorder
We will explain this a bit more:
The option port is used to connect external hardware, such as the RS485-KBD
interface which controls a Mac running Softron On Air Video Express.
When you select macros, the rotary is used to select a macro, and the play
button is used for start, stop and continue. If you press the rotary and the play
button at the same time, the selected macro is played in a loop.
A Blackmagic Hyperdeck can be controlled either as a recorder or as a player
from the Mix-iT. After you select this, the IP-address of the Hyperdeck has to be
entered.
Mix-iT connects to the Hyperdeck at startup, the player key lights up green briefly
if this is succesfull, and red if not.
In play mode, use the rotary to jump to clips. Pressing the rotary once let's you
jog the selected clip. Use the Play button to start and stop the clip.
When you select Hyperdeck recorder, you start or stop recording by pressing
both the key and the rotary. The key lights up red when recording.
Return gets you back to the button menu
4. Shift key Enable.
This option is convenient if you use more than 10 video inputs. It changes the col
button into a shift button, enabling a total of 20 inputs. Inputs 11 to 20 are
selected by -at the same time - pressing shift and key 1-10
5. Player start
This entry entry lets you link the starting of a clip to an input. Here is how this
works:
If you selected 'Hyperdeck play' or 'option port' in the player controls entry,
pressing the play button now cues the selected clip, but it doesn't start it yet. The
clip is started by switching the selected input live with the 'AUTO' or 'CUT' button,
or by directly selecting it in the program bus. The clip can also be started by
pressing the player button once more. You can enter a start delay to compensate
for the player startup time.
6. DIM Leds in the button menu does just that - it enables you to adjust the brightness of
the led's in the switches to the light level of the environment.
7. Save & exit stores the settings you just made in non-volatile memory.

User Guide Mix-iT for ATEM v2.0
- 12 -
Aux menu
The aux menu is entered by pressing rotary 3.
Auxiliaries are extra outputs on the switcher, that can have all sources directed to them.
The number of aux-outputs depends on the ATEM model. The Television studio has
none, a 2 ME switcher has six auxes.
Clicking rotary 3 once lets you select the aux output, clicking once more lets you choose
the source you want to send to this AUX output.
For example AUX1 - Camera 4
After selecting the output you return to the status display.
Macros
Version 2 of the Mix-iT firmware adds support for Macros, the ATEM switcher needs
Blackmagic software 6.3 or higher to run macros. Macros let you automate a sequence
of switcher actions that can be recalled with the press of a button.
Some examples of macros:
- select a program input
- select a transition and/or transition speed
- switch to an input, which is chroma-keyed, with adjusting the key-settings
- send the program signal to aux3
- switch a supersource input
The recording of macros is done in the macros window of the ATEM software on your
PC or Mac, macros are stored in non-volatile memory the switcher.
To recall a macro, Mix-iT offers two options:
1. Use buttons Key1-4: Each of these buttons can be set to either operate the upstream
keyer, or run a selected macro in the range 1-99. Convenient if you need quick access to
a few macro's
2. Use player controls: The rotary and play button are used to select and control macros.
With the rotary you select a macro in a range of 1-99, indicated in the LCD. The play
button is used to start and stop the macro. When the macro has a user-input event, the
play button resumes the macro. By at the same time pressing the rotary and the play-
button, the macro is played in a loop.
For more information on macros, please consult the Blackmagic ATEM operation
manual, 'using macros'.

User Guide Mix-iT for ATEM v2.0
- 13 -
Update firmware
The current version of the firmware can be checked in the Mix-iT with rotary 1 - IP config
menu, entry 8 - version info, this shows the ATEM fw version and Mix-iT fw version.
The Mix-iT firmware can be updated via Ethernet. First you need to download a zip-file
containing the firmware file together with the update tool for your PC or Mac from the
Mix-iT website - suport.
Before continuing, note down the ip-address of the Mix-iT.
Install the software on the PC or Mac
Double click the 'updater' icon
Be sure that the PC is in the same subnet as the Mix-iT
Now enter the IP-address of the Mix-iT in the uploader tool.
In the Mix-iT, enable updating in the IP config menu (rotary 1), entry 9 - Update
firmwre, OK
Powercycle the Mix-iT as indicated
Display should show no text
(If you powercycle the unit once again, it resumes normal operation)
Now press 'connect' in the update tool
If the update tool is able to establish a connection, it shows 'Connected'
You now have 8 seconds to click 'send' in the update tool, after that the Mix-iT wil
restart.
If send is clicked in time, the firmware transfer is started.
When the transfer is done, it shows 'upload finished, disconnected', and the Mix-
iT restarts
Powercycle the Mix-iT
You have now completed the firmware transfer. You can check the firmware version with
rotary 1, entry 8 - version info.

User Guide Mix-iT for ATEM v2.0
- 14 -
Specifications
Input Network - RJ45, PoE enabled
Power - DC jack 5.5/2.1mm
Output Option port - stereo minijack RS485
Supported Video
Switchers
Blackmagic ATEM Television Studio, Production Studio 4K, 1 M/E
Production Studio 4K, 2 M/E Production Studio 4K, 2 M/E Broadcast
Studio 4K, 1 M/E, 2 M/E
Supported ATEM
firmware
Higher than 2.12 (5.0) advised
Power Consumption 7.5V/0.2A (1.5W)
Operating
Temperature
0~50°C [32~114°F]
Storage Temperature -10~ +60°C
Dimension 345mm(W) x 185mm(L) x 60mm(H)
Certifications CE / FCC
Dimensions

User Guide Mix-iT for ATEM v2.0
- 15 -
Service & support
For more information on Mix-iT, check the website www.mix-it.tv. Here you can find the
latest news, the pdf manual and information on updates.
The Blackmagic ATEM operation manual contains more information on operating your
switcher.
Mix-iT ATEM communication is based on the Skaarhoj ATEM Arduino library -
http://skaarhoj.com/wiki/index.php/ATEM_Arduino_Library.
In this website you can find lots of information to get started. Mix-iT source files available
on request.
Table of contents
Other ArtiVisuals Control Panel manuals