Arvento Treyki User manual

www.treyki.com www.treyki.com
GPS Mini-Tracking Device
INTRODUCTION &
USER GUIDE
Arvento Mobil Sistemler A.Ş.
Cyberpark, Cyberplaza A Blok 5.Kat
No:501-A, 06800 Bilkent / ANKARA
P: +090 312 265 0595
F: +090 312 265 0544
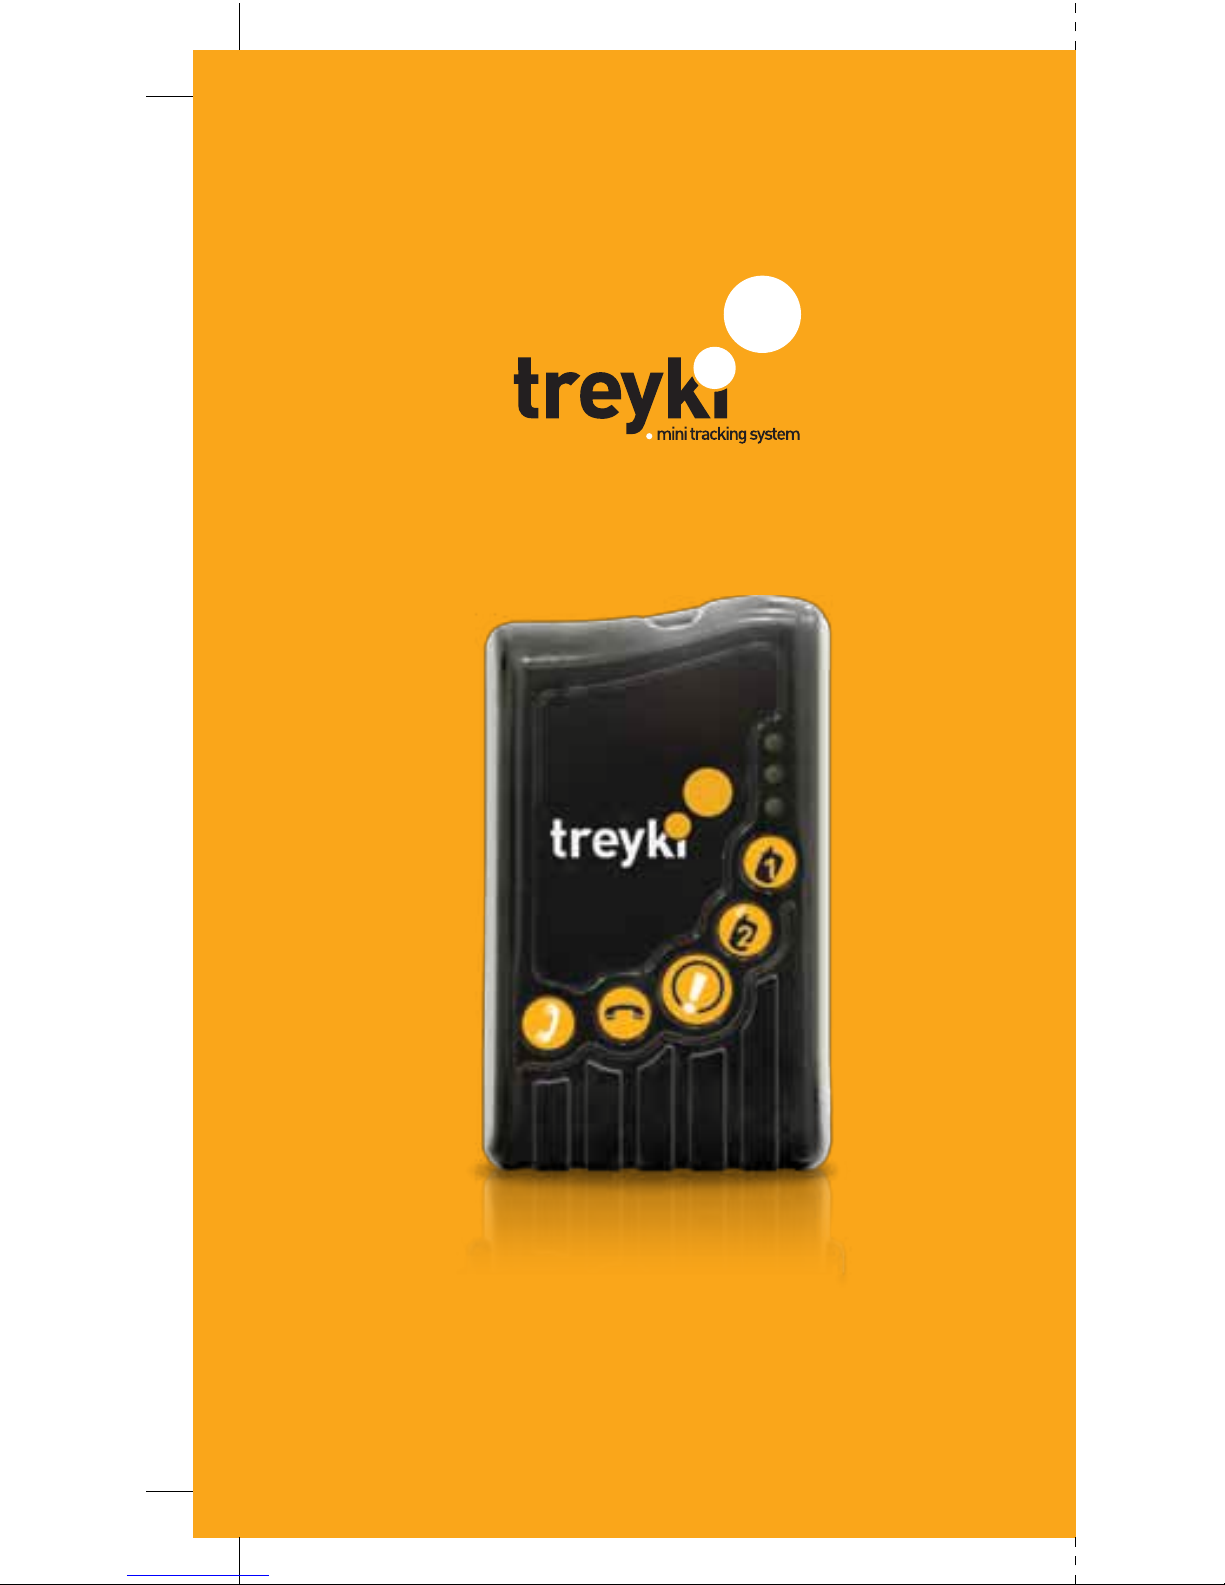
GPS Mini-Tracking Device

CONTENTS
1. Introduction
1.1. Product Description 02
1.2. Main Features 03
1.3. Package Content 04
2. Getting Started 05
2.1. Charging the Battery 05
2.2. Install SIM Card 06
2.3. Appearance 07
2.4. Button Description 08
2.5. LED Indicators 09
2.5.1. Normal Operation 09
2.5.2. Voice Call 10
3. Operating the Device 11
3.1. Turn On / Off 11
3.2. Voice Call 11
4. Technical Specifications 12-13
5. Safety 14
5.1. Product Safety Instructions 14
5.2. Battery Safety Precaution 15
6. Certification 16
6.1. CE Declaration 16
6.2. RF Exposure Information (SAR) 17
7. Warnings and Notes 18
7.1. General Rules 18
7.2. Maintenance and Cleaning 18
8. Guarantee 19
8.2. Guarantee Provisions 19-20
8.1. Guarantee Information 21

1.1.Product Description
Arvento-Treyki device is a mini-tracking and monitoring
system with a compact size and lightweight design. It can be
carried in your bag or in your pocket, or attached to yourself
with a wrist strap.
Treyki locates its position with the signals received from GPS
satellites and sends location info to the Control and
Communication Center via GSM/GPRS/SMS. Location and
address of the device are displayed on digital maps through
the Internet and can be monitored on a mobile phone or PC.
Voice calls can be made using Treyki. Treyki users can answer
an incoming call or place outbound calls to pre-defined
numbers. In case of an emergency, users can request
assistance by pressing the S.O.S. button.
INTRODUCTION
INTRODUCTION & USER GUIDE

1.2.Main Features
»GPS personal locator
»GSM/SMS/GPRS communication
»Omni-directional high sensitive GPS antenna which can
receive GPS signal from all direction
»Operates all over the world, provided that the region is
inside GSM coverage. Supports quad band GSM
850/900/1800/1900 MHz and GPRS Class 10
»Real-time tracking and control devices over the web
»Position information logging
»Periodical programming according to time, geographic
region, distance and angle
»Alarms & event notifications:
» S.O.S. (Emergency)
» Low Battery Alarm
» Geo-fence Alarm
» Over Speed Alarm
» Motion/Idle State Detection
»LED Indicators to display GPS, GSM and battery status
»Built-in speaker and microphone
»Make/Receive voice calls
»Two programmable buttons
»USB charging
»60hours stand-by time
»36 hours operation time (position fix and reporting at 15
minutes interval) (Operation time may change according to
the position fix and reporting interval)
»Firmware over the air (FOTA)
03

1.3.Package Content
INTRODUCTION
INTRODUCTION & USER GUIDE
Treyki
220 VAC Power Adaptor Li-Ion Battery

2.1.Charging the Battery
USB input is used for charging the device via PC or power
adaptor.
Charging with 220 VAC Power Adaptor:
1. Connect Treyki device to the supplied AC power adaptor
via USB
2. Plug-in the AC adaptor. Full charge may take 4-6 hours
3. The device power OFF state when the charging begins
4. During the charging process, the Battery LED color light
turns to orange
5. When the device battery is full charged, Battery LED color
turns to green
Only the 220 VAC power adaptor supplied should be used.
Using other type of adaptors may damage your Treyki device.
Charging with USB cable (optional), via connecting to PC:
1. Connect Treyki device to PC with USB cable
2. Connect the cable to a PC or Notebook USB input, full
charge may take 4-6 hours
3. The device power OFF state when the charging begins
4. During the charging process, the Battery LED color light
turns to orange
5. When the device battery is fully charged, Battery LED color
turns to green
Please note that, it is not possible to turn on the device
during the charging process .
GETTING STARTED
05
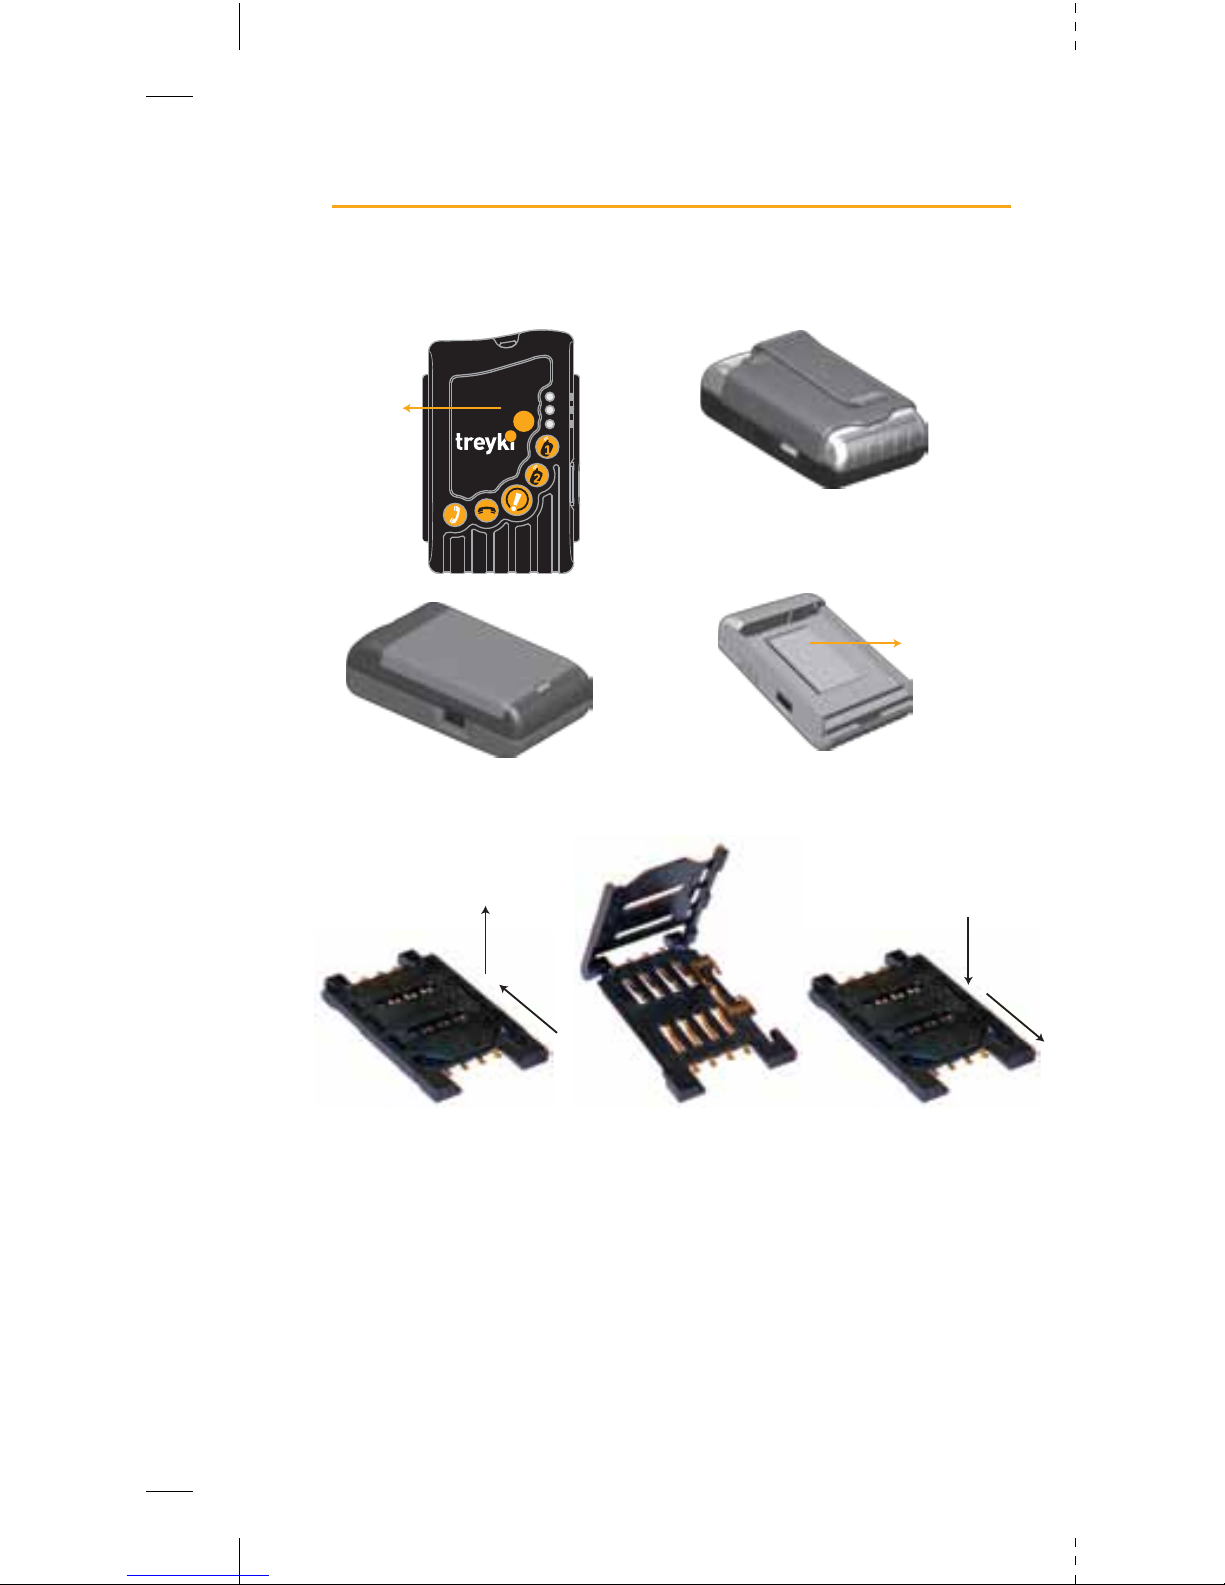
»Open the SIM card holder as shown in the picture above
»Insert the SIM card into the holder and close the cartridge
»Place the battery in Treyki, and close the battery cover.
Please, ensure that the SIM PIN is unlocked before inserted into the
device. (SIM PIN can be disabled through an ordinary mobile phone).
2.2.Install SIM Card
GETTING STARTED
INTRODUCTION & USER GUIDE
Battery
SIM Card Holder
1
2
4
3
»Remove the belt apparatus
»Remove the battery cover »Remove the battery
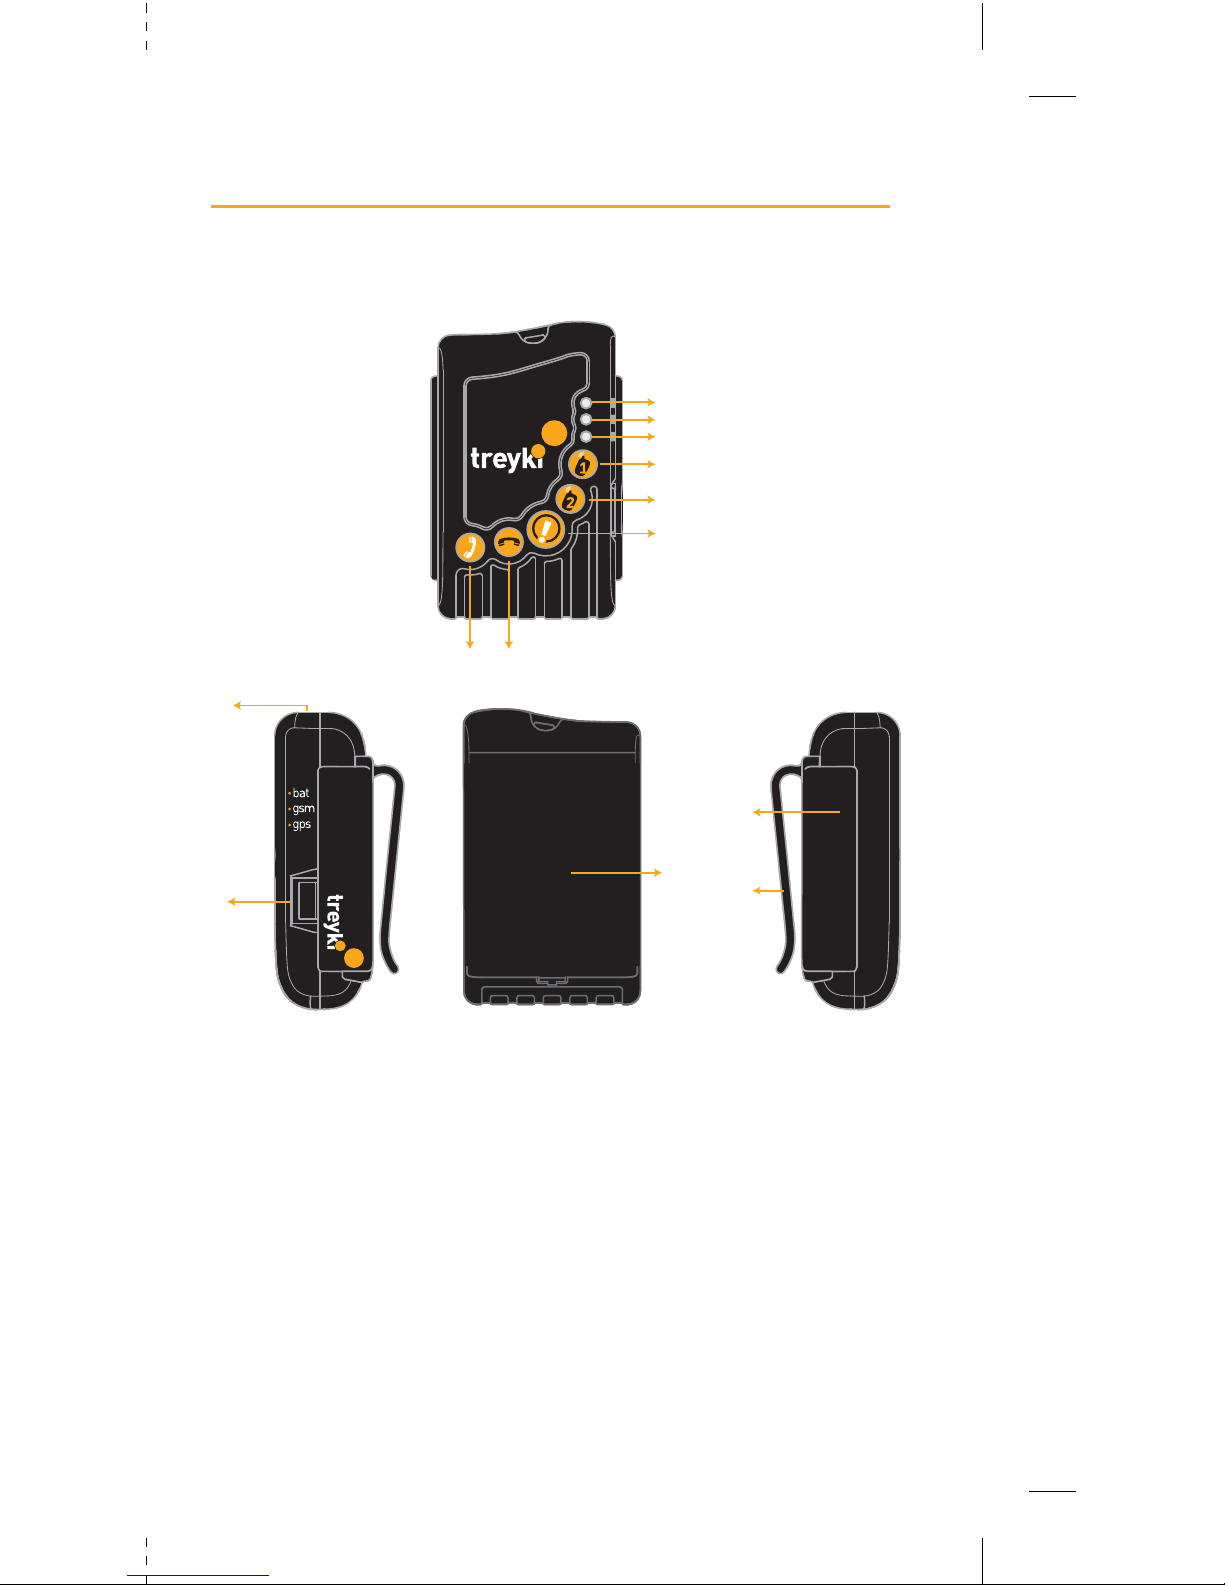
1Battery LED
2GSM LED
(Turn On / Accept Call)
3GPS LED
4Programmable Button #1
5Programmable Button #2
6S.O.S. Button
7 NO Button
(Turn Off / Reject or End Call)
8YES Button
9Speaker
10 Mini USB Connector
11 Battery Cover
12 Microphone
13 Belt Apparatus
2.3.Appearance
07
10
9
12
8 7
6
5
4
3
2
1
11 13

2.4.Button Description
YES
»When the device is turned off; if you keep pressing the
“YES” button for 3 seconds, all LEDs blink for 3 times and
the device turns on
»When there is an incoming call, you may press this button
to answer the call
NO
»When the device is turned on; if you keep pressing the “NO”
button for 3 seconds, all LEDs blink for 3 times and the
device turns off
»When there is an incoming call, you may press this button
to reject the call
»When there is an active call, you may press this button to
end the call
S.O.S.
»Emergency button
1
»Programmable Button #1
The user may program this button using WEB interface
2
»Programmable Button #2
The user may program this button using WEB interface
GETTING STARTED
INTRODUCTION & USER GUIDE

2.5.LED Indicators
2.5.1.Normal Operation
Battery
When the AC adapter or USB cable is plugged for charging
the battery:
»The LED turns ORANGE, while the charging process
continues.
»The LED turns GREEN, when the battery is fully charged.
When the device is on:
»The LED blinks in RED, when the battery power level is
critically low
»The LED blinks in ORANGE, when the battery power is low
»The LED blinks in GREEN, when the battery is fully charged
»The LED blinks quickly in ORANGE, when any button is
held down.
When the device is off:
»The LED blinks in ORANGE, when YES button is held down.
GSM
When the device is on:
»The LED blinks in RED, when the device cannot establish
a GSM data connection
»The LED blinks in GREEN, when the device GSM data
connection
GPS
When the device is on:
»This LED blinks in RED, when the device cannot fix its position
»This LED blinks in GREEN, when the device fixes its position
»This LED blinks in RED twice, when there is an internal
GPS failure
09
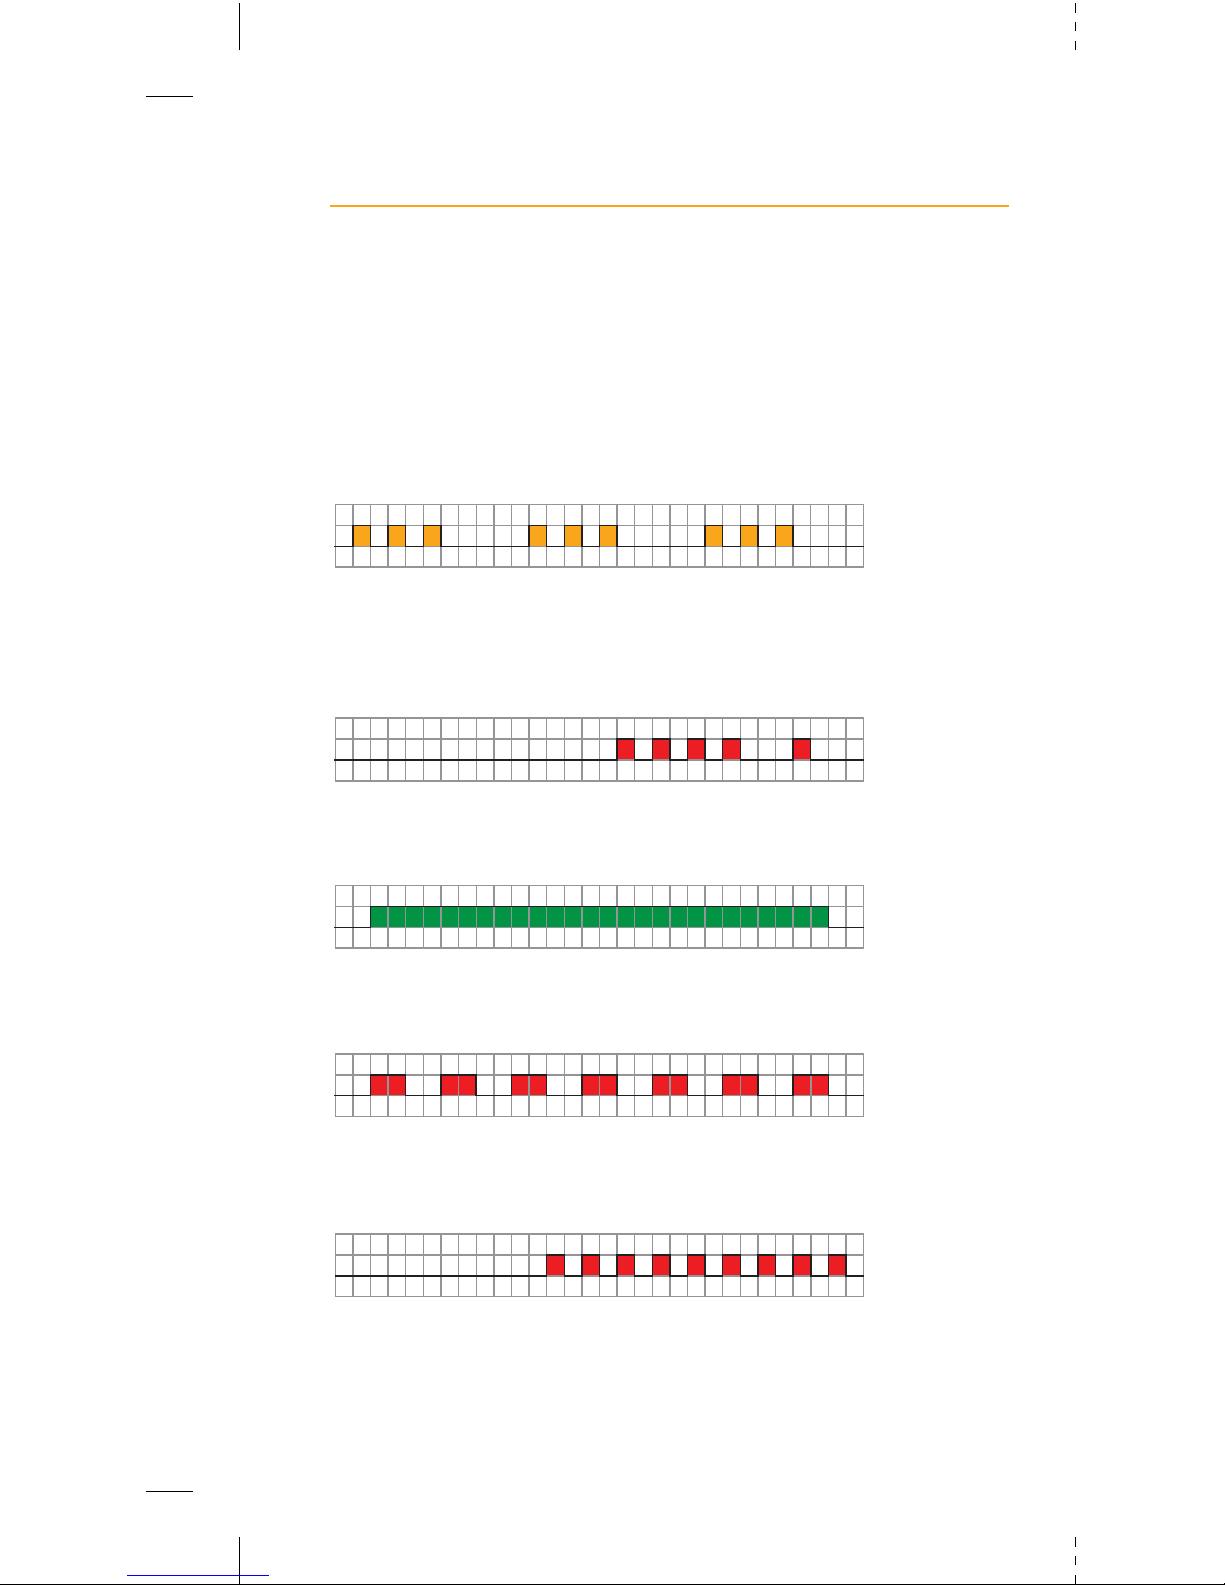
2.5.2.Voice Call
GSM LED is used for indicating the status of a voice call.
»The LED blinks in ORANGE quickly, when any
programmable button is pressed
»The LED blinks in RED quickly with idle intervals,
while it is ringing
»The LED turns GREEN, when the voice call is active
»The LED blinks in RED quickly, when dialed number is busy
»The LED blinks in RED quickly, when there is an incoming call
GETTING STARTED
INTRODUCTION & USER GUIDE

3.2.Voice Call
3.1.Turn On / Off
When the device is off:
Press and hold the YES button
for 3 seconds, all LEDs will
blink for 3 times in GREEN and
the device turns on
When the device is on:
Press and hold the NO button
for 3 seconds, all LEDs will
blink for 3 times in RED and the
device turns off
If there is an incoming call;
»GSM LED blinks in RED quickly
»Press, YES button to answer / NO button to reject the call
If there is an active call;
»GSM LED lights in GREEN
»Press the NO button to end the call
If you press any programmable buttons #1/#2 to place a call:
»GSM LED blinks in ORANGE quickly, until ringing
»GSM LED blinks in RED quickly with idle intervals, when it is ringing
»GSM LED blinks in RED quickly, when dialed number is busy
Please see LED Indicators section for more details.
OPERATING THE DEVICE
11
NO
YES
GSM
BATTERY
GPS

Operating Temperature: 0°C to 60°C deg
Dimensions: 66x38x19 mm
Weight: 55 g
Battery Type: Li-Ion 900mAh
Data Storage: 64 Mb
GSM Modem
» Quad-Band GSM/GPRS 850-900-1800-1900 MHz
» Output power:
Class 4 (2W) @ 850 / 900 MHz
Class 1 (1W) @ 1800 / 1900 MHz
» Sensitivity:
-108 dBm @ 850 / 900 MHz
-107 dBm @ 1800 / 1900 MHz
» GPRS data:
GPRS class 10
Mobile station class B
Coding scheme 1 to 4
PBCCH support
SMS Support
» Superior echo cancellation & noise reduction
GPS Receiver
» 50 Channel
» GPS L1 Frequency, C/A Code
» SBAS: WAAS, EGNOS, MSAS
» Sensitivity: -162 dBm
» AGPS Support
» Accuracy: GPS 2,5 m, GPS+SBAS 2.0 m
TECHNICAL SPECIFICATIONS
INTRODUCTION & USER GUIDE

GSM Antenna
» Internal
Sensors
» G Sensor (for motion and acceleration detection)
Buttons
» “YES”
» “NO”
» “S.O.S.”
» “1”
» “2”
LED Indicators
» Battery
» GSM
» GPS
Connector
» Mini USB (B) (for PC connection and charging)
Certificates: SAR,
* The battery life varies depending on the frequency of sending
the data requested from the device.
13

5.1.Product Safety Instructions
Please follow all safety instruction outlined below. Failure to
follow these instructions may result in serious personal injury
and/or property damage.
Always comply with all applicable regulations in any areas
where Treyki is used. Turn your Treyki off by removing the
battery in areas where its use is prohibited or where it may
cause interference or may pose danger to anyone.
Use of radio equipment is prohibited in hospitals and may
interfere with the use of medical equipment. Do not use Treyki
in hospitals or near medical equipment. The Health Industry
Manufacturers Association recommends that a minimum
separation of six inches (6”) should be maintained between a
handheld wireless device and a pacemaker to avoid potential
interference with the pacemaker.
When boarding a plane, follow all instructions of the flight crew
on the use of wireless devices on board. FCC regulations
prohibit using your wireless device during any air flight. Turn off
your Treyki during flight and at all other times as requested by
the flight crew by removing the battery.
Do not use Treyki in the vicinity of explosives where it might
interfere with remote control RF devices used to set off
explosives.
Although it is rare, wireless phones may generate sparks. Do
not use or store your Treyki around flammable or explosive
gas, liquids, chemicals or any other such materials.
Certain jurisdictions prohibit the use of radio communication
equipment while driving to avoid distractions and prevent
accidents. Do not use Treyki while driving in those jurisdictions.
SAFETY
INTRODUCTION & USER GUIDE

Only qualified personnel can install or repair this unit.
Your unit is not water resistant. Keep it dry. Use waterproof
bag if necessary.
Do not place device in environments with temperatures
exceeding 60°C (140°F).
5.2.Battery Safety Precaution
Only use the battery with a charging system that is
compatible with the system. Use of an incompatible battery or
charger may present a risk of fire, explosion, leakage or other
hazard.
Do not modify or remanufacture, attempt to insert foreign
objects into the battery, immerse or expose to water or other
liquids, expose to fire, explosion or other hazard.
Do not short circuit a battery or allow metallic conductive
objects to contact battery terminals.
Promptly dispose of used batteries in accordance with local
regulations.
Battery usage by children should be supervised.
Avoid dropping Treyki or its battery. If Treyki or the battery is
dropped, especially on a hard surface, and the user suspects
damage, take it to a service center for inspection.
For those host devices that utilize a USB port as a charging
source, the host device's user manual shall include a
statement that the phone shall only be connected to products
that bear the USB-IF logo or have completed the USB-IF
compliance program.
15

6.1.CE Declaration
R&TTE Declaration of Conformity
We, the undersigned Manufacturer,
Arvento Mobil Sistemler A.S.
Cyberpark, Cyberplaza A Blok 5.Kat No:501-A
06800 Bilkent-Ankara
Declare under our sole responsibility that the following product:
Product Name : Treyki
Brand Name : Arvento
Product Type : GPS Mini-Tracking Device
to which this declaration relates is in conformity with the
essential requirements and other relevant requirements of
the R&TTE Directive (1999/5/EC).
The product is in conformity with the following standards
and/or other normative documents:
EN 301 489-01 V1.8.1:2008
EN 301 489-07 V1.3.1:2005
EN 61000-4-2:1995+A1:1998+A2:2001
EN 61000-4-3:2006+A1:2008
EN 60950-1:2005 (2
nd
edition) and/or EN 60950-1:2006
EN 301 511
3GPP 51.010-1
Place and date of issue: Ankara /14.06.2010
Signed for
Arvento Mobil Sistemler A.Ş.:
Name : Özer HINCAL
Title : General Manager
CERTIFICATION
INTRODUCTION & USER GUIDE

6.2.RF Exposure Information (SAR)
This device complies with the EN 50360 “Product Standard to
Demonstrate the Compliance of Mobile Phones with the Basic
Restrictions Related to Human Exposure to Electromagnetic
Fields (300 MHz-3GHz).
The exposure standard for cellular communication devices
employs a unit of measurement known as the Specific
Absorption Rate, or SAR. The tests for SAR have been
conducted based on the standard operating position 15mm
away from body. Please keep this distance at all times when
the device is turned on and in operation.
Product Name: Treyki
Brand Name: Arvento
Product Type: GPS Mini-Tracking Device
to which this declaration relates is in conformity with the
essential requirements and other relevant requirements of the
R&TTE Directive (1999/5/EC).
The product is in conformity with the following standards
and/or other normative documents:
17

7.1.General Rules
The user is obliged to abide by the following rules:
The device should be handled and operated in environments
that provide the conditions specified in the instruction
manual. Otherwise, the guarantee provided by the
manufacturer shall be considered void.
»Spillage on the device of any kind of liquid, opening the case,
attempting to alter the internal hardware or contacting the
internal hardware with any foreign object may lead to a
malfunction in the system. In such events, the device
guarantee is considered void.
»In case of malfunction, the authorized servicing facility
should be notified immediately and no attempt should be
made to fix or repair the device.
»During the guarantee period, any type of maintenance,
repair or assembly of the device should be carried out by
authorized servicing facility. Otherwise, any problems
encountered with the device shall not be considered within the
scope of the guarantee.
7.2.Maintenance and Cleaning
Regular maintenance of the device times are determined by
the authorized servicing facility as they take the operating
environment and conditions into account.
Any dirt on the surface of the device should be wiped off
carefully with a dry cloth.
WARNINGS AND NOTES
INTRODUCTION & USER GUIDE
INTRODUCTION & USER GUIDE
Table of contents


