ASC SP010 User manual

1
SP010 Solar Water Pump Kit Instructions
By All Solar Central
www.allsolarcentral.com
Thank you from the entire ASC family for purchasin
an ASC solar product! Please read this entire booklet
before assembly.
Package contents:
1 x Water Pump with 16 ft. Cable
1 x LED Li ht Rin with 16 ft. Cable
1 x Battery Control Box
2 x Solar Panel with 6.5 ft. Cable
2 x Solar Panel Bracket
4 x Extension Tube
2 x Ground Spike
1 x Set of Fountain Nozzles
Notes: If there is any dama e to the product or missin
parts, please contact us at 1-626-582-8898 or
www.allsolarcentral.com/contactus
Assembly Steps:
1. Connect the bracket, tubes and spike to ether.
Then attach the solar panel to the bracket. Slide
the holdin bracket into the inside lip of the top
half of the solar panel frame. The bracket holds
the wei ht of the solar panel. The solar panel can
be adjusted for optimal sunli ht by usin the
win nut. Please see the dia ram.
2. Insert the spike into the round. Position the
solar panel so it’s facin south (in northern
hemisphere) as much as possible to maximize
dayli ht hours. It is important to an le the solar
panel to face the sun when the sun is at its
hi hest point. Ensure the solar panel is not
shaded by trees, shrubs or buildin s.
3. Connect the Solar Panel, LED Li ht, and Pump to
the Battery Control Box (See dia ram below:)
IMPORTANT!!
Sli htly twist the connectors when connectin to
make sure the rubber seals are fully in the
rooves.
4. The assembled Solar Pump should look like this:
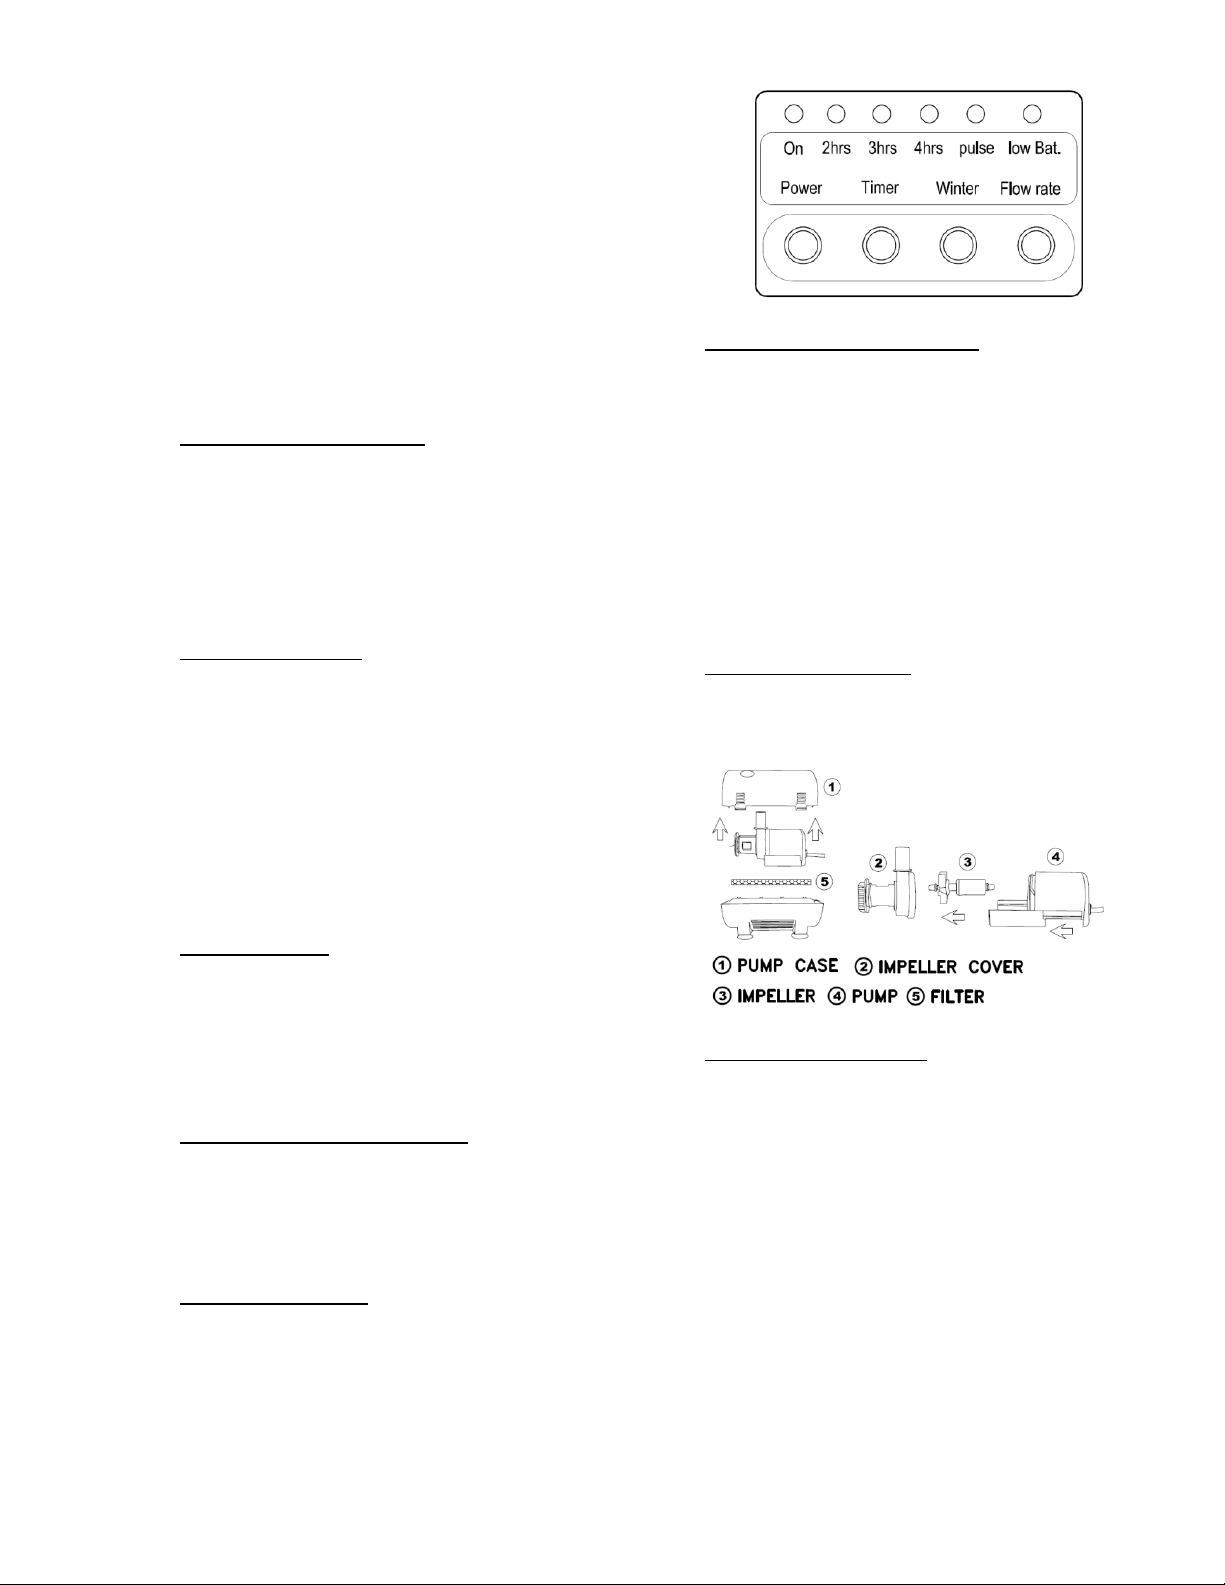
5. BATTERY ONTROL BOX OPERATION
Note: The LED li ht is desi ned to work at ni ht
only
2
The solar pump is desi ned mainly for use durin
summer hours, but it will also work in sprin and
fall as lon as the sunli ht conditions are ood
enou h in your re ion. And the new Winter Mode
will extend battery life time durin the winter.
The pump’s performance depends on the
orientation of the solar panel towards the sun
(see section 2) and the stren th on sunli ht.
This ASC solar pump kit comes with three
operation modes: Continuously On, 2-4hrs Timer,
and Winter mode.
a. ONTINUOUSLY ON MODE: This mode works
best if you want to maximize the pump’s daily
usage. Press [Power] button, the top
indicator li ht [On] will be on. The pump will
run continuously until the battery runs out of
power. The pump will automatically restart
when the battery is rechar ed under proper
sunli ht.
b. DAILY TIMER MODE: This mode works best if
you want the pump run at the same time
every day (The time you start the mode).
Press [Timer] button repeatedly until the
indicator li ht [2hrs], [3hrs] or [4hrs] is lit –
the pump will run for 2, 3, or 4 hours and
shut down (in standby) for 22, 21, or 20
hours. This settin will repeat at the same
time every day. You can reset the pump’s
daily start up time by switchin it to a new
desired time usin this mode.
c. WINTER MODE: This mode works best in
winter or poor weather. Press [Winter]
button, the top indicator li ht [Pulse] will be
on. The pump will run for 20 seconds in every
60 seconds. It is recommended to use this
mode to extend battery life time in winter or
poor weather.
PUMP FLOW ONTROL button: Use this
button to adjust the water flow rate. Press
[Flow Rate] repeatedly to adjust the water
flow rate (total 3 levels). Notes: Hi her water
flow rate will consume more power and
reduce the battery life time.
LOW BATTERY light: The [Low Bat.] indicator
li ht will be blinkin when the battery is low,
and pump/LED li ht will shut down shortly to
protect the battery. The [Low Bat.] indicator
li ht will turn off until the battery is
rechar ed.
6. PERFORMAN E OF THE PUMP
The performance of the pump depends on the
orientation of the solar panel towards the sun
and the sunli ht stren th. In order to achieve
max performance, please make sure the panel is
facin in the direction of the sun. A solar panel
positioned in the shade or in poor weather will
not maximize the char e. This models pump
performance will depend on the battery power
level. The pump will not work if battery power is
too low.
7. PUMP MAINTENAN E
If you find the pump starts losin power or stops
workin , please clean the pump filter and
impeller with clean water.
8. BATTERY REPLA EMENT
If properly maintained this solar pump has been
desi ned to run for many years. The Lead-acid
battery does have a limited life span and mi ht
need to be replaced after 18-24 months of use. If
the battery appears less efficient, please try to
boost char e it. To do this, leave the system off
for 2 to 3 sunny days to allow fully char e to the
battery. It is recommended to do this occasionally
to maximize battery life time.
To replace battery, please follow these steps:
a. Remove the screws from the Battery Box
b. Remove the lid and control panel from
the battery box sli htly

3
c. Disconnect the battery connectors, then
remove and replace the old battery.
NOTES: Please make sure to connect the new
battery correctly: Red for + and Black for - . Only
ori inal battery should be used for replacement
as other alternatives may be incompatible and
may dama e the control panel and will void the
warranty. For parts, please o to
www.allsolarcentral.com
9. TROUBLE SHOOTING
•Check to see if the solar panel, pump and
led li ht are connected properly
•Check to see if the solar panel is correctly
positioned facin the sun. Please ensure
the solar panel is not in the shade or
obstructed by trees, shrubs or a buildin
(see step 2).
•Check if [low bat.] li ht is on. If so, this
indicates that the battery power is low.
Switch off the pump and leave the solar
panel char in under direct sunli ht for 1
or 2 days.
•HARGING TIPS: Press button [Power] to
turn off the system. All indicator li hts
should be off. All solar power will now be
used to char e the battery.
•Check water level and make sure the
pump is fully submer ed in water
•Check to see if the pump filter/impeller is
blocked by debris
•Check to see if the fountain tubin is
blocked by kinks or obstructions
•Check the pump. It may be “air locked”.
Turn the pump on/off switch several
times to clear any air that may have been
trapped.
10. TE HANI AL DATA
•
Max. Water Flow: 1500LPH
•Max. Water Lift: 300CM
•Max. Fountain Hei ht: 160CM
•Workin Volta e: DC15V – DC18V
•Pump Workin Power: 6.6W – 11.2W
•Protection Grade of Pump: IP68
•Solar Panel: 2 x 10.0W; 18V; 0.555A
•Solar Panel Size: 2 x 350x285x18mm
•Protection Grade of Panel: IP44
•Battery: Lead-acid 12V/5AH
•Protection Grade of Battery Box: IP44
•LED Li ht Workin Volta e: DC12V
•LED Li ht Workin Power: 0.12W
•Protection Grade of LED Li ht: IP68
11. WINTER PROTE TION
Indoor stora e is recommended durin winter
months. Normal operatin temperature is
between 50 and 113 °F. Battery can be rechar ed
at temperatures between 32 and 113 °F.
IMPORTANT!!
In order to keep your battery healthy durin lon
stora e times, please make sure the battery is
fully rechar ed before storin . To do this, turn off
the pump by pressin button [Power] and char e
the battery for 1 or 2 sunny days. See Step 9 –
Char in Tips

4
PROPOSITION 65 WARNING:
Battery posts, terminals and related accessories
contain lead and lead compounds, chemicals
known to the State of California to cause cancer
and reproductive harm. Wash hands after
handlin . For more information o to
https://www.p65warnin s.ca. ov/
BATTERY DISPOSE: Never dispose of batteries in
the arba e. Disposal of batteries in the arba e
is unlawful under state and federal
environmental laws and re ulations. Always take
used batteries to your local battery-recyclin
center.
Please visit www.allsolarcentral.com for more
products and offers.
Other ASC Water Pump manuals


Popular Water Pump manuals by other brands

KNF
KNF N963 Operating and installation instructions

KNF
KNF NMP 830 KPDC Operating and installation instructions

Neptune Systems
Neptune Systems APEX PMUP user guide

GORMAN-RUPP PUMPS
GORMAN-RUPP PUMPS S Series Maintenance and repair guide

Xylem
Xylem G&L A-C 8100 Series instruction manual

Teral
Teral LPS instruction manual

Deming
Deming 4021H Installation, operation & maintenance manual

AEM
AEM 320 LPH installation instructions

Becker
Becker KDX 3.60 operating instructions

yellow jacket
yellow jacket 93714 Operation and maintenance manual

Dover
Dover Wilden Saniflo Hygienic Series manual

Edwards
Edwards STP-XA4503 Series instruction manual


