ASCOM TEMS DISCOVERY 2.1 User manual

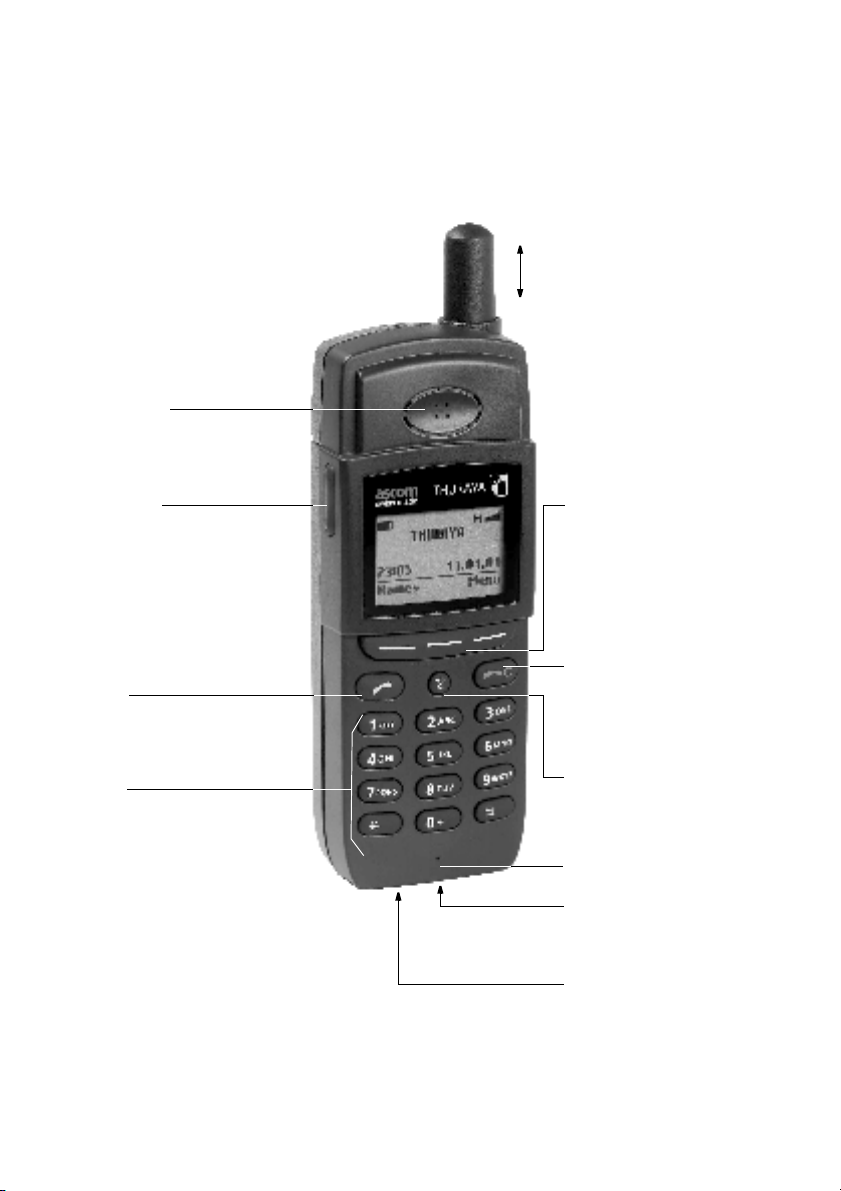
Volume key
increases/decreases volume:
– of loudspeaker or
Keypad
– phone numbers
– short dialling numbers
– one touch dialling numbers
– quick menu access
dials:
edits:
– SMS text
– phonebook entries
– greeting
active audio device
– of ringing
0dials international prefix and enters space
Microphone
Socket
for connecting
&provides access to short dialling numbers,
external devices
Send key
End key
Clear key
Fox key
establishes connection,
ends connection,
switches phone on/off,
rejects incoming calls,
deletes characters,
exits the menu,
1 to 3 context-sensitive zones
operate with softkey actions
as indicated in display line
above the key
redials numbers
Battery
charger
steps back in menu
socket
scrolls through the menu
sends pause for DTMF signal
steps back in menu
Loudspeaker
Antenna
needs to be extended
only when operating
in satellite mode
in phonebook and SMS editor
Overview

Safety Instructions
General
The satellite mobile phone is used for trans-
mitting voice, data and fax via the GSM-900
and the Thuraya satellite network and to uti-
lize the GPS facilities.
Handle your mobile phone with care and
keep it dry.
Avoid exposing your mobile phone to
extreme hot or cold temperatures.
Avoid placing your mobile phone close to
cigarettes, open flames or any source of
heat.
Only use a soft damp cloth to clean your
mobile phone.
To avoid impaired performance, please
ensure your mobile phone’s antenna is not
bent or damaged.
In a car
It is not recommended to use your mobile
phone while driving a vehicle due to traffic
safety reasons. When using a mobile phone,
park the vehicle before telephoning. Do not
place objects, including either permanently
installed or portable mobile phone, in the
area above the airbag or in the airbag de-
ployment area. If an in-vehicle mobile phone
is improperly installed and the airbag inflates,
it could result in serious injury.
Do not transport or store flammable gas,
liquid or explosives in the passenger com-
partment of a vehicle which contains your
mobile phone and accessories.
MIn the vicinity of blasting work and
in explosive environments
Never use the mobile phone where blasting
work is in progress. Observe all restrictions
and follow any regulations or rules.
Areas with a potentially explosive environ-
ment are often, but not always, clearly
marked. Do not use the mobile phone while
at a filling station. Do not use near fuel or
chemicals.
3In aircraft
Turn off your mobile phone before boarding
any aircraft. Do not use it on the ground
without crew permission.
In hospitals
Follow any regulations or rules. Turn off your
mobile phone when near medical equip-
ment.
Electronic devices
Certain electronic equipment may not be
shielded against the RF signals emitted by
your mobile phone.
JQualified service
Do not attempt to disassemble your mobile
phone. A broken warranty seal will void the
warranty. The mobile phone does not con-
tain consumer serviceable components. Only
qualified service personnel may install or re-
pair equipment.
=Batteries and accessories
Use approved batteries and accessories only.
Use of non-approved accessories may result
in loss of performance, damage to the mo-
bile phone, fire, electric shock or injury.
F
FF
FConnecting devices
Never connect incompatible products. When
connecting the mobile phone to any other
device, read its user’s guide for detailed safe-
ty instructions.
HAntenna and SAT reception
Do not remove the antenna yourself. If your
mobile phone’s antenna becomes damaged,
please take it to a certified service partner.
Only use an antenna that has been specifi-
cally designed for your mobile phone.
Unauthorised antennas, modifications or
attachments could damage the mobile

phone and may violate the relevant regula-
tions, causing loss of performance and radio
frequency (RF) energy above the recom-
mended limits.
Do not hold the antenna when the mobile
phone is in use. Holding the antenna affects
call quality, may cause the mobile phone to
operate at a higher power level than needed
and shortens talk and standby times.
Hold the mobile phone
–in GSM mode as you would any other
telephone. While speaking directly into
the microphone, angle the antenna in a
direction up and over your shoulder.
–in SAT mode: Extend the antenna and
point it in the assumed direction of the
satellite. Making and receiving a call is
only possible outside houses or cars and
with no obstructions between the mobile
phone and satellite.
Emergency calls
To make or receive calls, the mobile phone
must be turned on and in a service area with
adequate radio signal strength. Emergency
calls may not be possible on all mobile phone
networks or when certain network services
and/or mobile phone features are in use.
Check with your local service provider.
}With pacemakers and hearing aids
0Pacemakers
The various brands and models of cardiac
pacemakers available exhibit a wide range of
immunity levels to radio signals. Therefore,
people who wear a cardiac pacemaker and
who want to use a mobile phone should seek
the advice of their cardiologist. If, as a pace-
maker user, you are still concerned about in-
teraction with mobile phones, we suggest
you
–maintain a distance of 15 cm (6 inches)
between the mobile phone and your
pacemaker
–do not hold your mobile phone to your
chest, e.g., do not carry the mobile
phone in a breast pocket
–when using the mobile phone, place it to
your ear opposite the pacemaker
–refer to your pacemaker product litera-
ture for information on your particular
device.
If you have any reason to suspect that inter-
ference is taking place, turn off your mobile
phone immediately!
Hearing aids
Most new models of hearing aids are
immune to radio frequency interference
from mobile phones that are more than
2 metres away. Some are also immune to
interference when the mobile phone is
brought up to the same hearing-aided ear.
Many types of older hearing aids may be
susceptible to interference, making it very
difficult to use a mobile phone. Should inter-
ference be experienced, there are things that
can be done which may improve the situa-
tion:
–if possible use the mobile phone with
your non-aided ear
–use a hands-free accessory.

Getting started . . . . . . . . . . . . . . . . . . . . . . . . . . . . . . . . . . . . . . . . . . . . . . . . . . . . . . . . 1
Introduction . . . . . . . . . . . . . . . . . . . . . . . . . . . . . . . . . . . . . . . . . . . . . . . . . . . . . . . . . . . 1
Initial steps . . . . . . . . . . . . . . . . . . . . . . . . . . . . . . . . . . . . . . . . . . . . . . . . . . . . . . . . . . . . 2
Display . . . . . . . . . . . . . . . . . . . . . . . . . . . . . . . . . . . . . . . . . . . . . . . . . . . . . . . . . . . . . . . 4
Using the fox key and the menu . . . . . . . . . . . . . . . . . . . . . . . . . . . . . . . . . . . . . . . . . . . . 6
Making and receiving calls . . . . . . . . . . . . . . . . . . . . . . . . . . . . . . . . . . . . . . . . . . . . . . . . 8
Setting the volumes . . . . . . . . . . . . . . . . . . . . . . . . . . . . . . . . . . . . . . . . . . . . . . . . . . . . 10
Phone number lists . . . . . . . . . . . . . . . . . . . . . . . . . . . . . . . . . . . . . . . . . . . . . . . . . . . . 11
Phonebook . . . . . . . . . . . . . . . . . . . . . . . . . . . . . . . . . . . . . . . . . . . . . . . . . . . . . . . . . . . 11
List of dialled numbers (2-3) . . . . . . . . . . . . . . . . . . . . . . . . . . . . . . . . . . . . . . . . . . . . . . 15
List of missed calls (2-1)/List of received calls (2-2) . . . . . . . . . . . . . . . . . . . . . . . . . . . . . . 16
Options during a call . . . . . . . . . . . . . . . . . . . . . . . . . . . . . . . . . . . . . . . . . . . . . . . . . . . 17
Muting/unmuting the microphone . . . . . . . . . . . . . . . . . . . . . . . . . . . . . . . . . . . . . . . . . 17
Sending DTMF signals during a call . . . . . . . . . . . . . . . . . . . . . . . . . . . . . . . . . . . . . . . . . 17
Put a call on hold . . . . . . . . . . . . . . . . . . . . . . . . . . . . . . . . . . . . . . . . . . . . . . . . . . . . . . 17
Read/write SMS messages . . . . . . . . . . . . . . . . . . . . . . . . . . . . . . . . . . . . . . . . . . . . . . . . 18
See duration of the current call . . . . . . . . . . . . . . . . . . . . . . . . . . . . . . . . . . . . . . . . . . . . 18
Handling more than one call simultaneously . . . . . . . . . . . . . . . . . . . . . . . . . . . . . . . . . . 18
Diverting calls (3) . . . . . . . . . . . . . . . . . . . . . . . . . . . . . . . . . . . . . . . . . . . . . . . . . . . . . . 20
Using the voice mailbox (7-2-6)/(1-4) . . . . . . . . . . . . . . . . . . . . . . . . . . . . . . . . . . . . . . . 20
Diverting voice calls (3-1) . . . . . . . . . . . . . . . . . . . . . . . . . . . . . . . . . . . . . . . . . . . . . . . . . 21
Diverting fax calls (3-2) . . . . . . . . . . . . . . . . . . . . . . . . . . . . . . . . . . . . . . . . . . . . . . . . . . 22
Diverting data calls (3-3) . . . . . . . . . . . . . . . . . . . . . . . . . . . . . . . . . . . . . . . . . . . . . . . . . 22
Clear all diversions (3-4) . . . . . . . . . . . . . . . . . . . . . . . . . . . . . . . . . . . . . . . . . . . . . . . . . 22
SMS messages . . . . . . . . . . . . . . . . . . . . . . . . . . . . . . . . . . . . . . . . . . . . . . . . . . . . . . . . 23
Writing an SMS (1-1) . . . . . . . . . . . . . . . . . . . . . . . . . . . . . . . . . . . . . . . . . . . . . . . . . . . . 23
Reading an SMS (1-2) . . . . . . . . . . . . . . . . . . . . . . . . . . . . . . . . . . . . . . . . . . . . . . . . . . . 25
Handling SMS messages . . . . . . . . . . . . . . . . . . . . . . . . . . . . . . . . . . . . . . . . . . . . . . . . . 26
General SMS parameters (7-8) . . . . . . . . . . . . . . . . . . . . . . . . . . . . . . . . . . . . . . . . . . . . . 27
Info broadcast (1-3) . . . . . . . . . . . . . . . . . . . . . . . . . . . . . . . . . . . . . . . . . . . . . . . . . . . . 28
Switch info broadcast on/off (1-3-1) . . . . . . . . . . . . . . . . . . . . . . . . . . . . . . . . . . . . . . . . 28
Handling info broadcast topics (1-3-2) . . . . . . . . . . . . . . . . . . . . . . . . . . . . . . . . . . . . . . . 28
Set broadcast language(s) (1-3-3) . . . . . . . . . . . . . . . . . . . . . . . . . . . . . . . . . . . . . . . . . . 29
Read an info broadcast . . . . . . . . . . . . . . . . . . . . . . . . . . . . . . . . . . . . . . . . . . . . . . . . . . 29
Security settings (6) . . . . . . . . . . . . . . . . . . . . . . . . . . . . . . . . . . . . . . . . . . . . . . . . . . . . 30
Handling PINs, security code and barring code (6-3/6-4/6-5) . . . . . . . . . . . . . . . . . . . . . . 31
Call Barring (6-1) . . . . . . . . . . . . . . . . . . . . . . . . . . . . . . . . . . . . . . . . . . . . . . . . . . . . . . . 32
Fixed Dial (6-2) . . . . . . . . . . . . . . . . . . . . . . . . . . . . . . . . . . . . . . . . . . . . . . . . . . . . . . . . 34
Closed User Groups (6-8) . . . . . . . . . . . . . . . . . . . . . . . . . . . . . . . . . . . . . . . . . . . . . . . . 35
Table of Contents
Note:
Where code numbers are given in brackets, they provide ’menu quick access’(see page 7)

Phone and call settings (7) . . . . . . . . . . . . . . . . . . . . . . . . . . . . . . . . . . . . . . . . . . . . . . 36
Greeting text (7-2-3) . . . . . . . . . . . . . . . . . . . . . . . . . . . . . . . . . . . . . . . . . . . . . . . . . . . . 36
Time and date (7-5) . . . . . . . . . . . . . . . . . . . . . . . . . . . . . . . . . . . . . . . . . . . . . . . . . . . . . 36
Language (7-2-1) . . . . . . . . . . . . . . . . . . . . . . . . . . . . . . . . . . . . . . . . . . . . . . . . . . . . . . 36
Numbers for voice, fax and data (7-2-4) . . . . . . . . . . . . . . . . . . . . . . . . . . . . . . . . . . . . . 37
Cost settings (7-3-7) . . . . . . . . . . . . . . . . . . . . . . . . . . . . . . . . . . . . . . . . . . . . . . . . . . . . 37
Setting baud rate for data transmission (7-9) . . . . . . . . . . . . . . . . . . . . . . . . . . . . . . . . . . 38
Any key answer (7-3-1) . . . . . . . . . . . . . . . . . . . . . . . . . . . . . . . . . . . . . . . . . . . . . . . . . . 38
Send DTMF tone (7-3-2) . . . . . . . . . . . . . . . . . . . . . . . . . . . . . . . . . . . . . . . . . . . . . . . . . 38
Set call waiting (7-3-3) . . . . . . . . . . . . . . . . . . . . . . . . . . . . . . . . . . . . . . . . . . . . . . . . . . 39
Sending of own number (7-3-4) . . . . . . . . . . . . . . . . . . . . . . . . . . . . . . . . . . . . . . . . . . . 39
Automatic redial (7-3-5) . . . . . . . . . . . . . . . . . . . . . . . . . . . . . . . . . . . . . . . . . . . . . . . . . 39
Activate/deactivate ’one touch dialling’(7-3-6) . . . . . . . . . . . . . . . . . . . . . . . . . . . . . . . . 40
Use in a car (7-4) . . . . . . . . . . . . . . . . . . . . . . . . . . . . . . . . . . . . . . . . . . . . . . . . . . . . . . . 40
Restore factory settings (7-7-2) . . . . . . . . . . . . . . . . . . . . . . . . . . . . . . . . . . . . . . . . . . . . 40
LCD Contrast (7-2-5) . . . . . . . . . . . . . . . . . . . . . . . . . . . . . . . . . . . . . . . . . . . . . . . . . . . . 40
Network management (4/5) . . . . . . . . . . . . . . . . . . . . . . . . . . . . . . . . . . . . . . . . . . . . . 41
Operating mode: GSM and/or SAT (5) . . . . . . . . . . . . . . . . . . . . . . . . . . . . . . . . . . . . . . . 41
Network selection (4-3/4-2) . . . . . . . . . . . . . . . . . . . . . . . . . . . . . . . . . . . . . . . . . . . . . . . 42
Manual SAT registration (4-1) . . . . . . . . . . . . . . . . . . . . . . . . . . . . . . . . . . . . . . . . . . . . . 43
Sound & Alert (7-1) . . . . . . . . . . . . . . . . . . . . . . . . . . . . . . . . . . . . . . . . . . . . . . . . . . . . 44
Ringing volume (7-1-1-8) . . . . . . . . . . . . . . . . . . . . . . . . . . . . . . . . . . . . . . . . . . . . . . . . 44
Ringing melody (7-1-1) . . . . . . . . . . . . . . . . . . . . . . . . . . . . . . . . . . . . . . . . . . . . . . . . . . 44
Ringing type (7-1-1-7) . . . . . . . . . . . . . . . . . . . . . . . . . . . . . . . . . . . . . . . . . . . . . . . . . . . 46
Tones on/off (7-1-2 / 7-1-3 /7-1-4) . . . . . . . . . . . . . . . . . . . . . . . . . . . . . . . . . . . . . . . . . . 46
Sound on/off . . . . . . . . . . . . . . . . . . . . . . . . . . . . . . . . . . . . . . . . . . . . . . . . . . . . . . . . . . 47
Alarms (7-6) . . . . . . . . . . . . . . . . . . . . . . . . . . . . . . . . . . . . . . . . . . . . . . . . . . . . . . . . . . 47
Statistics and information . . . . . . . . . . . . . . . . . . . . . . . . . . . . . . . . . . . . . . . . . . . . . . . 48
Call duration (2-4) . . . . . . . . . . . . . . . . . . . . . . . . . . . . . . . . . . . . . . . . . . . . . . . . . . . . . . 48
Call costs (2-5) . . . . . . . . . . . . . . . . . . . . . . . . . . . . . . . . . . . . . . . . . . . . . . . . . . . . . . . . 48
Remaining Credit (2-6) . . . . . . . . . . . . . . . . . . . . . . . . . . . . . . . . . . . . . . . . . . . . . . . . . . 49
SIM info (6-6) . . . . . . . . . . . . . . . . . . . . . . . . . . . . . . . . . . . . . . . . . . . . . . . . . . . . . . . . . 49
Cell info (7-2-2) . . . . . . . . . . . . . . . . . . . . . . . . . . . . . . . . . . . . . . . . . . . . . . . . . . . . . . . . 49
IMEI number (6-7) . . . . . . . . . . . . . . . . . . . . . . . . . . . . . . . . . . . . . . . . . . . . . . . . . . . . . . 49
Using the GPS facilities (8) . . . . . . . . . . . . . . . . . . . . . . . . . . . . . . . . . . . . . . . . . . . . . . . 50
Display your current position (8-1) . . . . . . . . . . . . . . . . . . . . . . . . . . . . . . . . . . . . . . . . . . 50
Way point manager (8-2) . . . . . . . . . . . . . . . . . . . . . . . . . . . . . . . . . . . . . . . . . . . . . . . . 50
Switch location track on/off (8-3) . . . . . . . . . . . . . . . . . . . . . . . . . . . . . . . . . . . . . . . . . . 51
Show continuous position (8-4) . . . . . . . . . . . . . . . . . . . . . . . . . . . . . . . . . . . . . . . . . . . . 51
Appendix . . . . . . . . . . . . . . . . . . . . . . . . . . . . . . . . . . . . . . . . . . . . . . . . . . . . . . . . . . . . 52
Troubleshooting . . . . . . . . . . . . . . . . . . . . . . . . . . . . . . . . . . . . . . . . . . . . . . . . . . . . . . . 52
Technical specifications . . . . . . . . . . . . . . . . . . . . . . . . . . . . . . . . . . . . . . . . . . . . . . . . . . 56
Using battery and charger . . . . . . . . . . . . . . . . . . . . . . . . . . . . . . . . . . . . . . . . . . . . . . . . 57
Character and digit input in text editor mode . . . . . . . . . . . . . . . . . . . . . . . . . . . . . . . . . 58
Menu system and quick access codes . . . . . . . . . . . . . . . . . . . . . . . . . . . . . . . . . . . . . . . 59
Index . . . . . . . . . . . . . . . . . . . . . . . . . . . . . . . . . . . . . . . . . . . . . . . . . . . . . . . . . . . . . . . 61
1
Phone/Call settingsNetworkSound & AlertStatistics/InfoGPS facilitiesAppendix
Getting started
Introduction
Your ascom 21 is a new generation mobile
phone combining satellite (SAT), GSM-900
(Global System for Mobile communication at
900 MHz) and GPS (Global Positioning Sys-
tem) technologies. This provides you with the
advantages of three technologies in one sin-
gle mobile phone. Its operation in satellite
mode is virtually identical to that of GSM
mode. Operations that you may be familiar
with using a typical GSM mobile phones will
work in a very similar manner when you are
using the Thuraya satellite service. There are,
however, a few specific differences between
GSM and Satellite operation. The purpose of
this section is to make you aware of these
differences.
When the mobile phone is idle on the satel-
lite system and has good signal strength,
calls can be received without the need of
extending the antenna. However, when a
satellite call is answered or initiated the
antenna must be pulled out entirely.
Watch the signal strength indicator on the
display and move the mobile phone for best
connection quality. Satellite calls require the
mobile phone to have a clear open surround-
ings with no obstruction. The presence of
obstacles such as buildings, trees or moun-
tains between the mobile phone and the sat-
ellite will generally prevent communication.
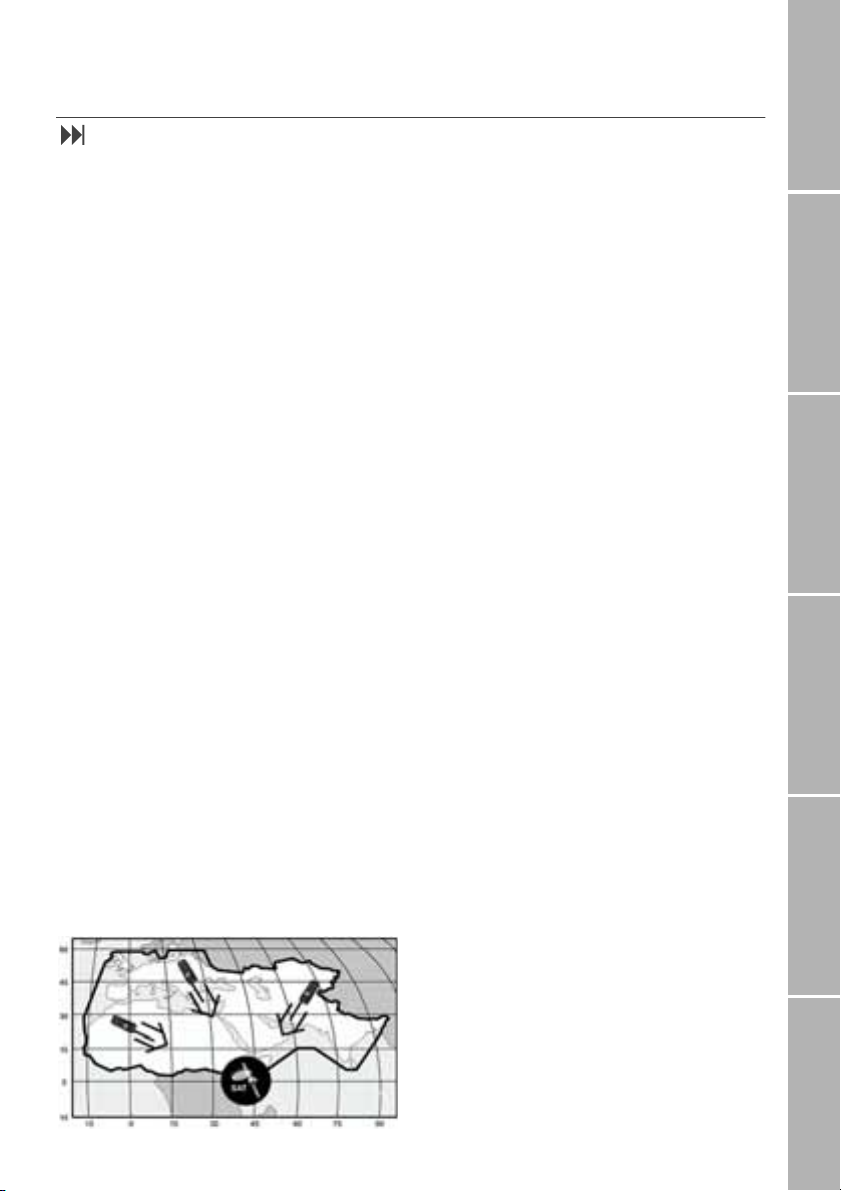
To maintain good call quality, it is also impor-
tant that the mobile phone's antenna be
pointed roughly in the direction of the
satellite:
High Power Alerting
The Thuraya system features a ’High Power
Alerting’capability that allows you to be no-
tified of incoming calls even when your mo-
bile phone has poor signal coverage. When
the mobile phone receives a High Power
Alerting signal it will alert you with an ’early
ring’and a special display message (see page
9). To answer the call, you must immediately
extend the antenna and move the mobile
phone into a position that has a clear ’line of
sight’to the satellite. When this has occurred
the mobile phone display will change,
prompting you to answer the call and pro-
ceed with conversation. If the call is not an-
swered promptly after the High Power Alert-
ing signal is received, the calling party will be
diverted to voice mail and/or an
announcement stating that you are not avail-
able to answer.
Just like GSM, the satellite coverage area is
divided into many different service regions.
The mobile phone searches the network au-
tomatically (see page 42) and determines
which service region is active by registering
its presence with the Thuraya system. If the
mobile phone has not been able to update
this registration due to a weak signal, the
registration information will become out of
date or ’stale’. This is indicated on the display
by a blinking SAT icon in the left of the signal
strength indicator. This condition will clear
automatically once signal conditions improve
and a call is made or a period of time elapses.
You also have the option to speed up that
procedure by manually having the mobile
phone register with the Thuraya system.
This is accomplished with the function SAT
Registration in the mobile phone's menu (see
page 43). Make sure you have good SAT sig-
nal strength before starting this operation.

2
Getting startedPhone number listsDuring a callDiversionSMS/BroadcastSecurity settings
Initial steps
}Inserting the SIM card
The SIM card (Subscriber Identity Module) is
the ’plug’to the network and provides the
mobile phone number, memory for storing
phone numbers and short text messages
(SMS).
To insert the SIM card:
1. Switch off the mobile phone before re-
moving the battery and inserting the SIM
card
2. Lift the battery from the back of the mo-
bile phone and insert the SIM card as
shown in the pictures below
}Connect the charger and
charge the battery
You should charge the battery supplied with
the mobile phone as soon as possible to ob-
tain full battery charge.
To charge the battery:
1. Fit the country specific adapter into the
charger
2. Plug the charger plug into the charger
socket
3. Connect the charger to an AC source
While the battery is charging you see the
6symbol changing to cyclically. The
battery is fully charged after 2 hours. The
charger stops charging automatically when
the battery is full. As long as the charger is
not disconnected it restarts charging after a
while to keep the battery fully charged.
Further information on using charger and
battery is given on page 57.
You may still use the mobile phone while
charging the battery.
The internal clock for time, date (see page
36) and alarms (see page 47) will still keep on
running for about one hour if neither the
battery nor the charger is connected, but no
alarm will sound unless a charged battery is
connected.
SIM card
Lift
Press
Charger plug
Charger socket
Press to fit
adapter

3
Phone/Call settingsNetworkSound & AlertStatistics/InfoGPS facilitiesAppendix
}Switch the mobile phone on/off
Press .for 2 seconds to switch the mo-
bile phone on.
Press .for 2 seconds again to switch
the mobile phone off.
}Enter your PIN
The PIN (Personal Identification Number; 4 to
8 digits) is initially supplied together with the
SIM card by your service provider and can be
changed later (see page 31).
1. Enter PIN using keys on keypad.
Each digit entered is displayed as an
*
2. Press fox key below OK to confirm PIN
Note:
Press !to delete an incorrectly entered digit
(digit to left of cursor position). Then enter
the correct digit.
}Emergency call (SOS)
Until you have entered the correct PIN, you
can make only emergency calls.
To make an emergency call before having
entered the PIN:
1. Press fox key below SOS
2. Press fox key below SOS again
The emergency number is called
or:
1. Enter a specific emergency number
2. Press ,
The softkey SOS is available even
–when the SIM card in your mobile phone
is not valid
–when you have a valid SIM card but no
roaming with the selected service pro-
vider is possible.
After the PIN is accepted, you have to make
an emergency call in the same way as you
make a ’normal’call.
When making an emergency call, remember
to give your name and mobile phone number
as well as the location of the emergency, as
accurately as possible. Remember that your
mobile phone may be the only means of
communication at the scene of an accident
do not cut off the call until given permission
to do so.
Note:
–Emergency calls may not be possible on
all cellular telephone networks or when
certain network services are in use.
–In uneven terrain or close to large build-
ings, the operating range can be limited,
which affects the connection.
–With some service providers it may not be
possible to make an emergency call if no
SIM card is inserted in the mobile phone.
Emergency numbers
Emergency numbers normally are
–in GSM mode: 112
–in SAT mode: 112, 911, 999.
Note:
Check with your network service provider for
local emergency numbers in your area.
Enter PIN:
OK SOS
****
E F G
4
Getting startedPhone number listsDuring a callDiversionSMS/BroadcastSecurity settings
}Lock/unlock the keypad
By locking the keypad you disable the keys so
that a number can not accidentally be
dialled, e.g. while the mobile phone is in your
pocket or bag.
With the keypad locked, you can still answer
incoming calls.
Lock
1. Press fox key below Menu
2. Press fox key below #
(to scroll to Keypad Lock)
3. Press Select
or:
1. Press fox key below Menu
2. Press %within 3 seconds
Unlock
If the keypad is locked, the softkey line
shows Unlock and in the status line the &
symbol is displayed:
1. Press fox key below Unlock
2. Press %within 3 seconds
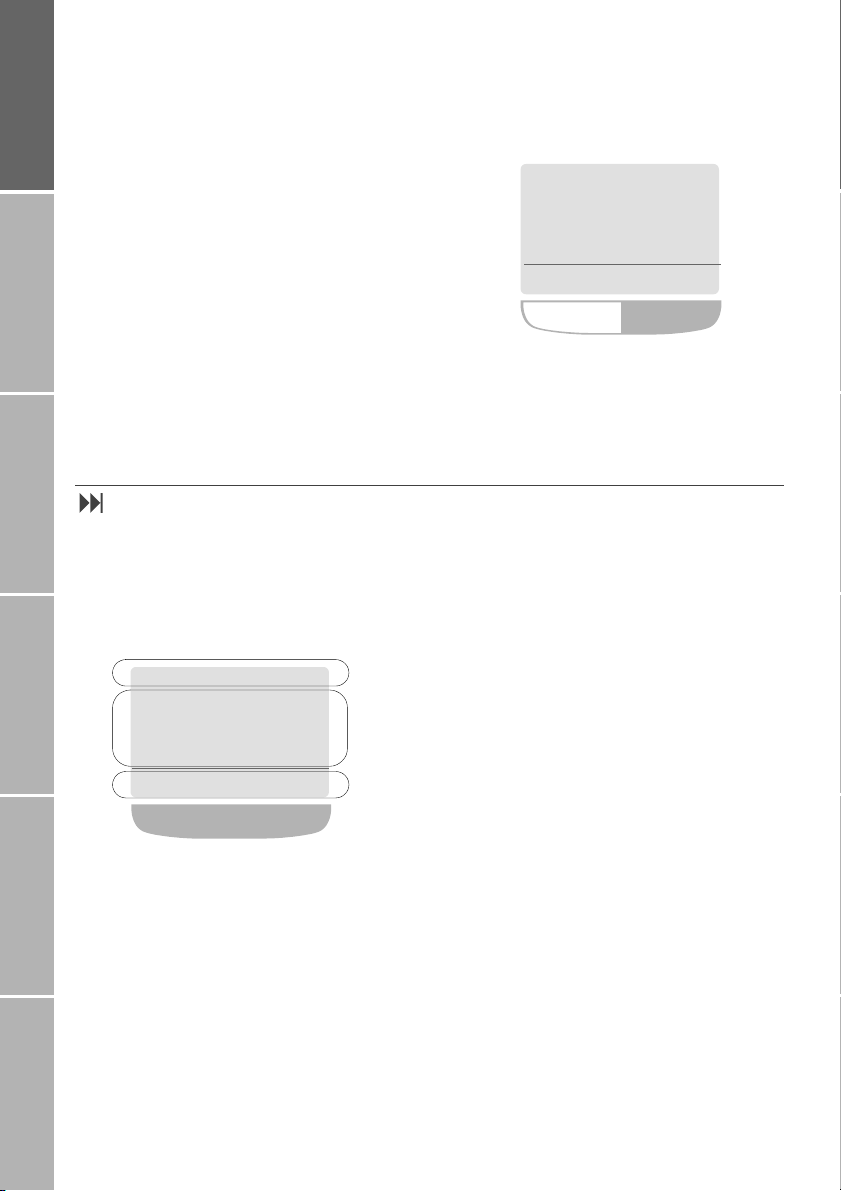
Display
}Display areas
After you have set up your mobile phone
according to the previous section, the display
will look similar to this:
The display is organised into three areas;
every symbol and every input/output dis-
played has its own proper place. This helps
you to keep control over your ’workspace’,
even when your circumstances are changing
constantly.
The pattern of the display areas is simple:
1. The status line shows symbols indicating
the operating conditions of the mobile
phone.
2. The main area shows data relating to
calls, menus and their submenus, and
displays the editors for the phonebook
and SMS messages. In idle mode (stand-
by), the network name, time and date
are displayed.
3. The softkey line operates together with
the fox key beneath this line. It provides
access to menus and controls navigation
(see ’Using the fox key and the menu’on
page 6).
11:05p 11.01.01
Unlock
!
$
Network
&
11:05p 11.01.01
Names Menu
!
$
Network
1.
2.
3.
fox key

5
Phone/Call settingsNetworkSound & AlertStatistics/InfoGPS facilitiesAppendix
}Display symbols
$Battery charge level indicator
(4 filling levels).
6symbol blinking: Battery
empty, one minute is left to end an
active call at the most
%Call set up or call in progress
(Ringing tone is switched off
<An alarm is set
|An unconditional diversion is acti-
vated
&1. Keypad is locked
2. Blinking symbol during a call:
Depending on the network, the
symbol indicates that ciphering
(call encryption) is off
}Simplified menu is activated
*New voice message has arrived
?Unread SMS
=Read SMS
\Saved (draft) SMS
B
u
Active call
Call on hold
vWaiting call
,While editing text in upper case
letters
.While editing text in lower case
letters
E F G Numeric input mode (e.g. phone-
book)
E J N While writing an SMS: ’Character
count-down’, starts with ’160’
S t R While sending to and receiving data
from an external device (e.g. using
the mobile phone as a modem con-
nected to a PC):
S s : Sending data to PC,
r R : Receiving data from PC
7Mobile Phone operates in GPS
(Global Position System) mode.
The icon is blinking if the mobile
phone loses connection to the GPS
!Signal strength in GSM mode:
4 bars indicate best conditions
"Signal strength in SAT mode. The
satellite symbol blinks when SAT
registration is no longer up to date.
Filling of the right symbol indicates
SAT signal strength
Signal strength in High Power
Alerting mode (weak receive sig-
nal). The satellite symbol is blinking
when SAT registration is no longer
up to date
)Roaming sign: Displayed when us-
ing a network different from your
service provider’s network
6
Getting startedPhone number listsDuring a callDiversionSMS/BroadcastSecurity settings
Using the fox key and the menu
In idle mode your mobile phone offers func-
tions and settings which allow you to adapt
the mobile phone to your needs. You access
these functions through menus and sub-
menus by scrolling or by using the appropri-
ate shortcut.
During a call or while you are editing a num-
ber or text, the menu system changes and
gives access to various functions, depending
on the context.
The following section describes the principles
of using the menu.
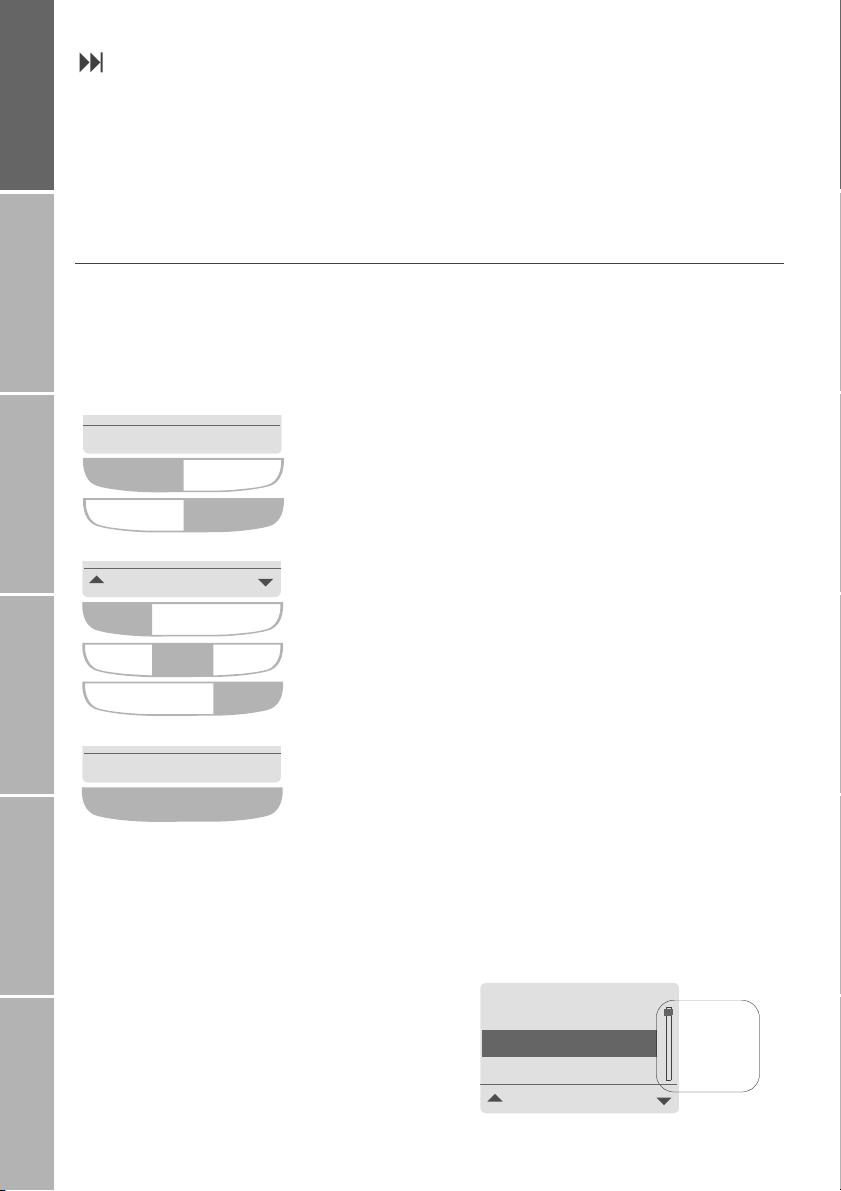
}Softkey actions and menu navigation
Softkey actions for function calls and naviga-
tion in menus and lists is performed through
entries in the softkey line in conjunction with
the the fox key below this line.
Depending on the number of softkey actions
offered (1 to 3), the fox key changes the
number of its available operating zones:
Once you have entered the menu, you may
also scroll through it by pressing the upper
and lower volume key beside the loudspeak-
er (see page 10).
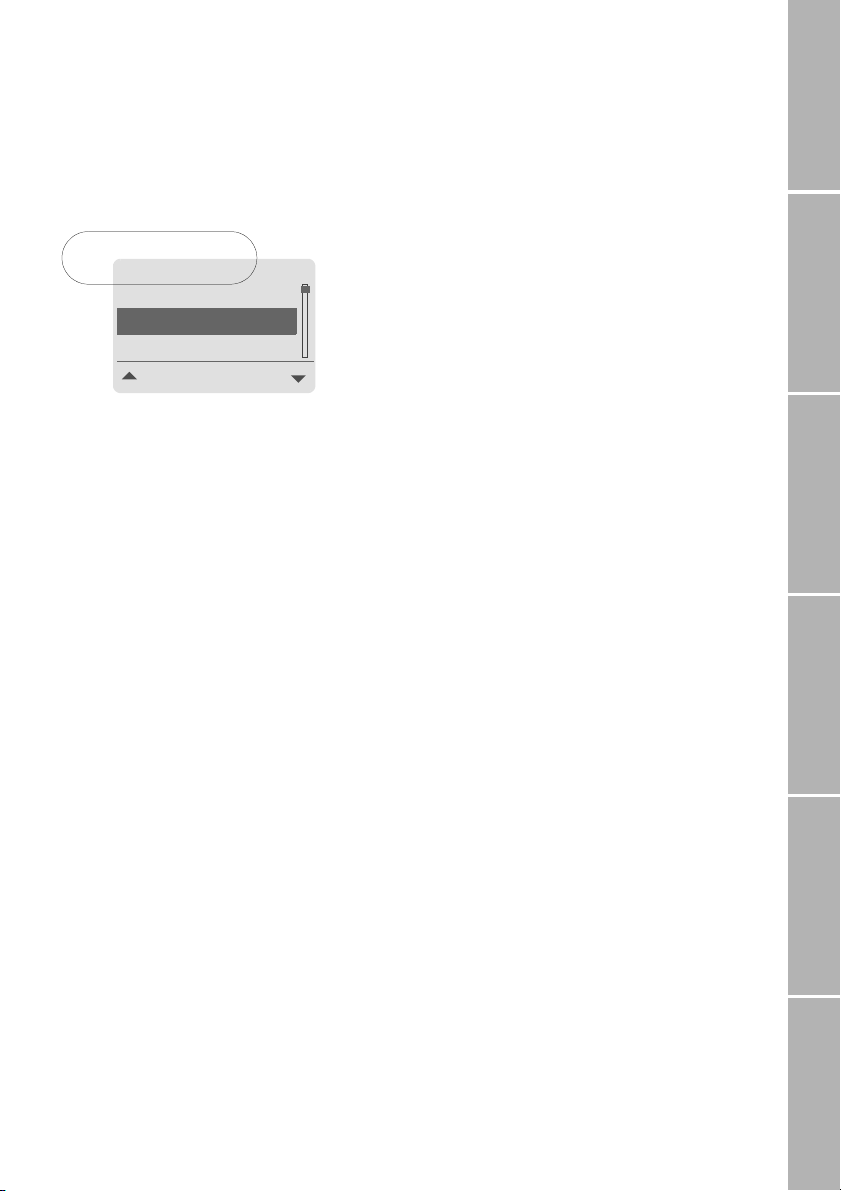
}Menu position indicator
Within a menu level the ’position indicator’
shows you the position of the entry currently
selected:
Names Menu
Press fox key on the left side to select the Names
Press fox key on the right side to select the Menu
Press fox key on the left side to select the left softkey
Press fox key in the middle to select the middle softkey
Press fox key on the right side to select the right softkey
Select
Press fox key anywhere to select a single softkey displayed
Change
(e.g. to scroll up in a list)
(e.g. to scroll down in a list)
Others
Select
Business
VIP
Position
indicator
7-1-1-5-1 !
7
Phone/Call settingsNetworkSound & AlertStatistics/InfoGPS facilitiesAppendix
}Menu navigation using quick
access codes
Instead of navigating by means of softkeys,
you can alternatively navigate the menu by
means of ’quick access codes’. The quick ac-
cess code in the display tells you the current
position in the branch of the menu tree:
To make use of quick access codes for the
example above:
Press fox key below Menu
Press 7115
Step back one menu level
If you want to continue working with the
menu and need to step back one level high-
er:
Press !or .
Exit the menu
If you want to exit the menu system and go
back to idle mode:
Press !for 2 seconds
}Simplified menu
You may find that you do not want to use
the complete menu all the time. In this case,
you can switch to the ’simplified menu’
which offers access to the most important
entries of the standard menu.
To switch to the simplified menu:
Press fox key below Menu for 2 seconds
The }symbol in the display
reminds you that the simplified
menu is activated
To switch back to the standard menu:
Press fox key below Menu for 2 seconds
again
}Notation in this manual
From here on, wherever this manual de-
scribes menu navigation by scrolling with #/
$and pressing Select, this will be presented
using the notation
Select Menu > Settings > Sound & Alert >
Ringing > Caller Groups
instead of a long 9 step presentation like this:
1. Press fox key below Menu
2. Scroll to Settings
3. Press fox key below Select
4. Scroll to Sound & Alert
5. Press fox key below Select
6. Scroll to Ringing
7. Press fox key below Select
8. Scroll to Caller Groups
9. Press fox key below Select
The steps in this example take you to the
point at which you can change the setting.
Quick access notation
The quick access codes will be written in
this manual between brackets like this:
(7-1-1-5).
Furthermore you will find the complete list of
quick access codes together with the menu
tree on page 59.
Others
Select
Business
VIP
Quick access code
7-1-1-5-1 !

8
Getting startedPhone number listsDuring a callDiversionSMS/BroadcastSecurity settings
Making and receiving calls
To make calls you have to be logged in to a
network and the signal strength must be
adequate.
If in SAT mode the SAT icon 2is flashing,
make sure that the mobile phone has a clear
view of the sky so that proper registration
can take place.
Note:
For more information about making and
receiving calls, see ’Options during a call’on
page 17.
}Dial using the keypad
To dial a number in the ’traditional’way:
Enter the number via the keypad.
For international calls press 0
first, until +is displayed.
Then enter the country code with-
out a leading ’0’
Press ,
Note:
To add a pause in your dialling string you
may long press the %key (pis displayed
to indicate the pause).
End a call
Press .
}Receiving a call
When you receive a call this is indicated in
several ways:
–You hear the ringing tone (melody and
volume according to the current setting)
–The %symbol is displayed
–The calling number is displayed if it is
transmitted. If the number is stored in
the phonebook, the corresponding name
is displayed instead of the number
Incoming calls (examples):
Accept a call
Press ,
Reject a call
Press Reject or .
Turn ringing off
If you are called in a situation when ringing is
disturbing, you have the option to turn the
ringing tone off temporarily while the incom-
ing call is being signalled:
Press Silent
Silent
!
$
+6547895894
%
!
$
John Fox
%
Reject
Silent Reject

9
Phone/Call settingsNetworkSound & AlertStatistics/InfoGPS facilitiesAppendix
High Power Alerting
If someone tries to call you in SAT mode, but
field strength is insufficient, the call cannot
be transmitted. Instead of this you will hear a
special ringing melody and the message
’SAT Altering, Find Improved Reception’indicated
on the display and the High Power Alerting
symbol ( ) is displayed:
In High Power Alerting mode a call cannot be
accepted unless the user moves to a better
place for SAT signal reception (see "Introduc-
tion"), it can only be rejected and the High
Power Alerting melody can be silenced.
The call, however, will remain active as long
as the caller doesn’t end it.
Turn High Power Alerting melody off
Press Silent
The High Power Alerting melody is
silenced, you can take measures to
accept the call (see below)
Reject the call
’Rejecting’the call in this case means that the
mobile phone does not try to get a connec-
tion any longer.
Press Reject
The call is definitely terminated
Measures to accept the call
–Try to find a place for improved reception
–Pull out the mobile phone’s antenna
–Point it to the estimated satellite position
–Watch the field strength indicator
As soon as field strength is strong
enough the warnings disappear
from the display; now you can
accept the call as usual
If the call cannot be accepted, it is diverted to
your voice mailbox or another phone number
if activated.
#
SAT Alerting
Reject
Find Improved
Reception
Silent
10
Getting startedPhone number listsDuring a callDiversionSMS/BroadcastSecurity settings
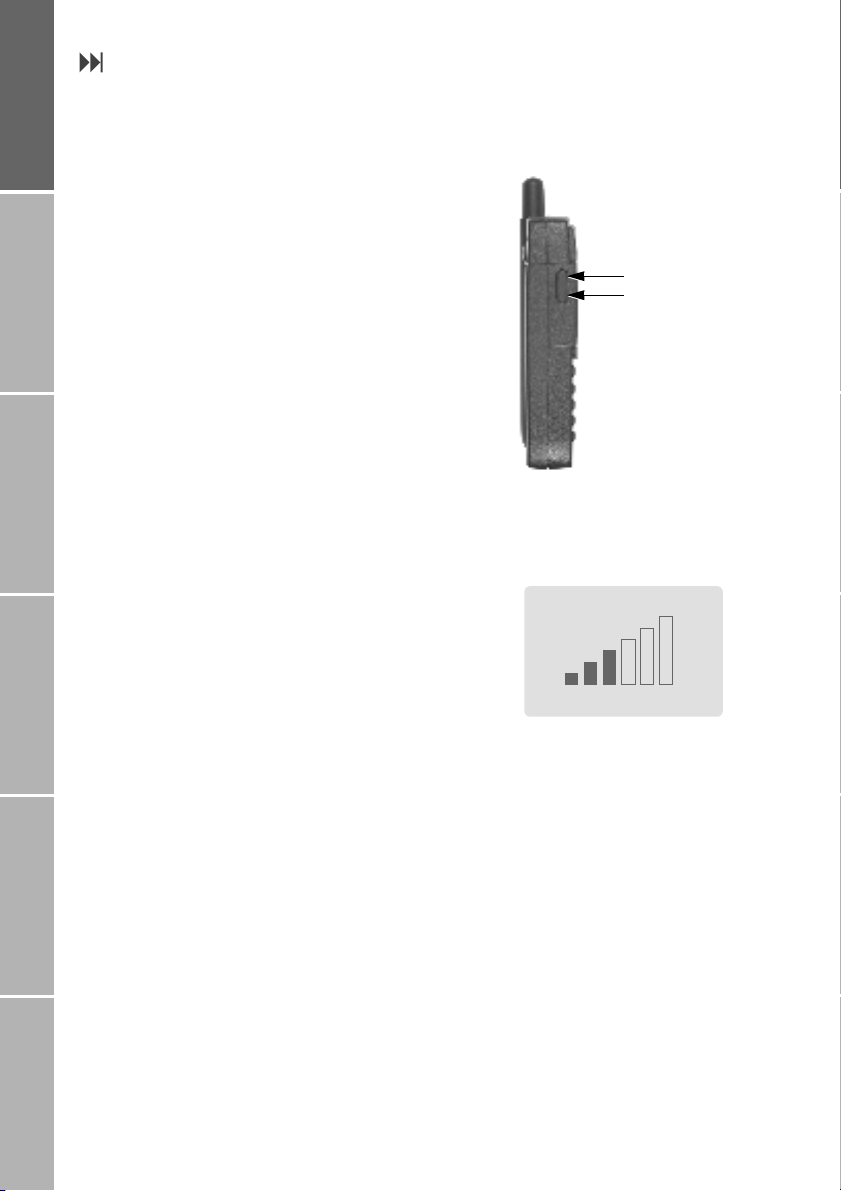
Setting the volumes
You can make volume settings in idle mode
and during a call with the left-hand side key
of the mobile phone. The settings made with
this key apply to
–the ringing volume
–the listening volume
–the listening volume of a connected
earset
The volumes can be set within the range of 6
levels and will be retained until the next
change.
If you want to set the ringing volume only,
refer to page 44.
To set the volumes:
Press the upper or lower key on the left-
hand side of the mobile phone:
With each press of the volume key,
the volumes increase or decrease
and the current level is displayed in
a bar chart:
increase
decrease volumes
Volume

11
Phone/Call settingsNetworkSound & AlertStatistics/InfoGPS facilitiesAppendix
Phone number lists
There are four different lists which are stored in your mobile phone and which you can use to
call phone numbers:
–the phonebook
–the list of dialled numbers,
–the list of received calls
–the list of missed calls
Phonebook
The phonebook you can create on your SIM
card is a convenient aid to allow you to call
people by names instead of numbers.
Only the phonebook entries of the SIM card
presently inserted are available.
The number of phonebook entries you can
store and the maximum number of charac-
ters and digits for each entry depend on the
service provider’s SIM card.
Once numbers and names have been stored
in the phonebook, the mobile phone is able
to identify the names of callers (or SMS send-
ers) by means of the phone numbers trans-
mitted. So instead of numbers, the corre-
sponding names are shown in the display
when you are called from a phone number
which is assigned to a phonebook name.
Moreover, the names from the phonebook
entries are found and displayed in the follow-
ing lists:
–list of dialled numbers
–list of missed calls
–list of received calls.
The phonebook can also be used in all call
functions where it is possible to call another
number.
You can set up another ’phonebook’for
’fixed dialling’, so that only certain numbers
can be called (see page 34).
Input sources for phonebook entries
There are different ways to make a new
phonebook entry:
1. First enter a number to be dialled and
then store the number in the phonebook
by pressing Save.
2. Open the phonebook first and make a
new entry.
3. Store a number from the list of dialled
numbers in the phonebook (see page 15).
And, provided that the number was trans-
mitted:
4. The number of an SMS sender while you
are reading the SMS (see page 26).
5. A number from the list of missed calls
(see page 16).
6. A number from the list of received calls
(see page 16).
Phonebook entries from the service
provider
Some service providers store service numbers
in the phonebook (e.g. hotline numbers);
these entries may possibly not be replaced or
deleted.

12
Getting startedPhone number listsDuring a callDiversionSMS/BroadcastSecurity settings
}Make a phonebook entry
To make a new phonebook entry starting
from idle mode:
Enter the number to be stored
Press Save
The phonebook editor is displayed
Note:
The first entry in the phonebook has always
to be made as described above.
or:
Press Names
The phonebook is displayed
Press Options
Select Add new
Enter the phone number
Press Next
Enter the name to be assigned to the
number
How to enter letters, see ’Charac-
ter and digit input in text editor
mode’on page 58
Press Save
The number is saved in the phone-
book
Tip:
Store numbers with the international prefix
(+) and country code so that they can be
used while roaming.
Assign a short dialling number
After you have saved a phone number and
name in the phonebook, the mobile phone
assigns the entry to a short dialling number
from 2 up to a maximum of 255, depending
on the SIM card. Short dialling number 1 is
automatically assigned to the voice mailbox
number (see page 20). The maximum num-
ber of phonebook entries is determined by
your SIM card.
To change the assignment of a short dialling
number to a displayed phonebook entry:
Press Options
Select Short Dialling
The currently assigned
short dialling number is displayed
Accept the number or enter a different
number
Press Save
Note:
Phonebook entries assigned to a number
from 2 to 9 can be dialled with ’one touch
dialling’, if activated (see page 40).
Assign entry to a caller group
Furthermore you may (but need not) assign
the entry to a special ’caller group’to which
you can also assign a special ringing tone
(see page 45).
You can assign a phonebook entry to one of
the following caller groups:
–VIP
– Business
–Private
– Family
– Others
To assign a phonebook entry to a caller
group:
Select Options > Caller Group
The list of caller groups is displayed
Scroll to the desired caller group
Press Select
Paul|
Insert Name:
.
Save
!$

13
Phone/Call settingsNetworkSound & AlertStatistics/InfoGPS facilitiesAppendix
}Replace a phonebook entry
In case you are about to add a phonebook
entry, but the phonebook memory of your
SIM card is full, you are alerted to this and re-
quested to enter the phonebook in order to
select an existing entry which will be re-
placed by the new one. Phonebook entries
stored by your service provider may possibly
not be replaced.
To replace an existing entry:
Scroll to the entry to be replaced
Press Replace
If you don’t want to replace an entry:
Press !
The new entry will not be added to
the list
}Dial from the phonebook
Dial from the list
Press Names
The phonebook is displayed
Select the name to be called
or:
Press the key with the first letter of the
name to be dialled as often as indicated by
its position on the key
e.g. three times 5; the first
name in the list beginning with ’L’
is displayed
If necessary scroll up or down the list until
the desired name is highlighted
Press ,
Dial short dialling numbers
In idle mode:
Enter the short dialling number assigned to
the phonebook entry (e.g. 25)
Press &
The assigned phonebook entry is
displayed
Press ,
One touch dialling
Phonebook entries assigned to a number
from 2 to 9 can be dialled at the press of a
single key if ’one touch dialling’is activated
In idle mode:
Press 2to 9for 2 seconds
The assigned name is displayed,
the number is dialled automatically
Note:
One touch dial key 1is automatically as-
signed to your voicemail number after you
have activated it (see page 20).
}Check phonebook entries
You can see the complete entry including the
phone number and short dialling number if
assigned.
To check the data of a phonebook entry:
Press Names
The phonebook is displayed
Select the phonebook entry
Press Options
Select Details
All data of the entry is displayed
You may check free capacity for phonebook
entries as described on page 49.
}Send phonebook entry as SMS
You can send a number from the phonebook
together with the corresponding name to an
SMS recipient:
Press Names
The phonebook is displayed
Select the phonebook entry to be sent
Press Options
Select Send As SMS
The SMS editor is displayed (see
page 23) with the phonebook
entry to be sent

14
Getting startedPhone number listsDuring a callDiversionSMS/BroadcastSecurity settings
}Change a phonebook entry
You can edit a complete entry, including the
phone number, caller group assignment and
short dialling number.
Change a number and/or name
Press Names
The phonebook is displayed
Select the phonebook entry
Press Options
Select Edit
Change the number
Press Next
Change the name (see page 58)
Press Save
Change a short dialling number
Press Names
The phonebook is displayed
Select the phonebook entry
Press Options
Select Short Dialling
The current setting is displayed
Change the short dialling number
Press Save
Change a caller group assignment
Press Names
The phonebook is displayed
Select the phonebook entry
Press Options
Select Caller Group
The list of caller groups is displayed
Select the caller group
}Delete a phonebook entry
You can delete the complete entry, including
the phone number and short dialling number
if assigned. Phonebook entries stored by
your service provider may possibly not be de-
leted.
To delete a single phonebook entry
Press Names
The phonebook is displayed
Scroll to the phonebook entry to be
deleted
Press Options
Select Delete
Press Delete
}Delete the phonebook (7-7-1)
If Fixed Dial is not activated:
Select Menu > Settings > Reset > Phonebook
Press OK
If Fixed Dial is activated:
Select Menu > Settings > Reset > Phonebook
Enter PIN2
Press OK
Press OK
Note:
Phonebook entries stored by your service
provider may possibly not be deleted.
Other manuals for TEMS DISCOVERY 2.1
1
This manual suits for next models
1
Table of contents


