Asko D5233 User manual

D5233
Operating Instructions
Dishwasher
Dear customer,
Thank you for choosing this quality product from ASKO.We hope it will meet
all of your expectations and full fill your needs for many years to come.
The Scandinavian design is a combination of clean lines, everyday functionality
and high quality.This is the hallmarks for all of our products and this is why
they are so highly appreciated all over the world.
To get the most out of your new ASKO product, we recommend that you
read the installation and operating instructions before using the machine.

2
Customer Care Center
1-800-898-1879
www.askousa.com
Contents
Detergent

3
Customer Care Center
1-800-898-1879
www.askousa.com
Read through the directions for use before star-
ting to use your machine, especially the Safety,
Child Safety, and Basic Course sections.
Read the Fragile Dishes section before washing
china with unglazed decoration or other hous-
ehold goods made of plastic, wood, or crystal
requiring careful treatment.
Note!
Do you need this Use&Care Guide in spanish? Log onto www.askousa.com/customercare
to download.
¿ Necesita esta Instrucciones de uso y cuidado en español? Entre en www.askousa.com/
customercare y descárguesela.

4
Customer Care Center
1-800-898-1879
www.askousa.com
This manual does not cover all possible
conditions and situations that may occur.
Common sense and caution should always
be used when installing, operating, and
maintaining any appliance.
•Readallinstructionsbeforeusingthedishwas-
her.
•Dishwashersmustbeelectricallygrounded.
Read the Installation Instructions for details.
•Usethedishwasheronlyforitsintendedpur-
pose.
•Donotrunthedishwasherwhileyouareoutof
the home.
•Useonlyautomaticdishwasherdetergents
and rinse agents.
•Toreducetheriskofinjury,keepdetergents
and rinse aids out of the reach of children.
•Donotloadsharpitemsnearthedoor;you
could damage the door seal.
•Placesharpknivesinthecutlerybasketwith
the sharp ends down to avoid the risk of cut-
typeinjuries.
•Donotwashplasticitemsunlesstheyaremar-
ked “dishwasher safe” or the equivalent. For
items not marked, check the manufacturer’s
recommendations. Items not dishwasher safe
could become deformed or melt and create a
potentialrehazard.
•Donottouchtheheatingelementduringor
imediately after use.
•Donotoperatethedishwasherunlessall
enclosure panels are properly in place (i.e.,
guard plate, access panel, toe kick, etc.)
•Donottamperwithcontrolsbyremovingor
changing.
•Donotabuse,siton,orstandonthedishwas-
her door or baskets.
Toreducetheriskofinjury,donotallow
children to play in or on a dishwasher.
•Undercertainconditions,hydrogengasmay
be produced in a hot water system that has
not been used for two weeks or more. HYD-
ROGENGASISEXPLOSIVE.Ifthehotwater
system has not been used for two weeks, be-
fore using the dishwasher turn on all hot water
faucetsandletthewaterowfromeachfor
several minutes. This will release any accumu-
latedhydrogengas.Asthegasisammable,
donotsmokeoruseanopenameduringthis
time.
•Whenremovinganolddishwasherfromser-
vice or discarding it, remove the door to the
washing compartment.
•Donotstoreorusecombustiblematerials,ga-
soline,orotherammablevaporsandliquids
in the vicinity of this or any other appliance.
•Disconnectelectricalpowertodishwasher
before servicing.
•Repairsshouldbedonebyaqualiedtechnici-
an.

5
Customer Care Center
1-800-898-1879
www.askousa.com
Dishwasher detergents and rinse aids are cor-
rosive, so always keep them out of reach of
children.
•Shouldachildswallowdishwasherdetergentor
rinse aid, give plenty to drink immediately, i.e.,
one or two glasses of milk or water. Do not try to
induce vomiting. Seek medical advice immedia-Seek medical advice immedia-
tely:CalltheNationalCapitalPoisonCenterat
1-800-222-1222
•Alwaysclosethedoorandstartthedishwasher
as soon as you put in the detergent.
•Alwayskeepsmallchildrenawayfromthe
machine when it is open. There may be some
detergent residue left inside the machine.
•Ifdishwasherdetergentgetsinsomeone’s
eyes, rinse them with plenty of water for at
least 15 minutes.
•Donotallowchildrentouseorplayinoronthe
dishwasher.
•Loadalllongandsharpitemsintheknife/uten-
sil basket. If this is not possible, load sharp
objectswiththepointedendfacingtheback
of the dishwasher. Sharp items loaded in the
cutlery basket should be loaded with pointed
ends down.
•Engagethechildsafetylock.

6
Customer Care Center
1-800-898-1879
www.askousa.com
Height 32-9/16” - 33-15/16” 830-880mm
Width 24” (610)mm
Depth 24” (610mm)
Weight 105.8lbs(48kg)
Waterpressure 4.2 - 140 psi
0.03-1.0MPa
0.3-10 Bar
Connection Singlephase,120V,60Hz,10A
Maxoutput 1200W
1. Upper basket
2. Spray arms
3. Cutlery basket
4. Lower basket
5. Dishwasher detergent compartment
6. Main power switch
7. Rinse Aid Compartment
8. Filter
9. Type plate
*Detailsmaydierdependingonthemodel
and market!
1
3
2
3
4
5
78
6
9

7
Customer Care Center
1-800-898-1879
www.askousa.com
1.Wineglassshelf
2. Knife stop
3. Upper spray arm
4. Runnerforadjustingbasketheight
5. Catch
•Pullouttheupperbasket.
•Pulloutthecatches(5)oneithersideoftheup-
per basket and lift or raise the upper basket at
the same time.
•Releasethecatchesoncethebasketisinthe
desired position.
11
2
3
4
5
*Detailsmaydierdependingonthe
model and market!

8
Customer Care Center
1-800-898-1879
www.askousa.com
1.Programselector
2. Auto wash
3. Heavy wash
4. Normal wash
5. Delicate wash
6. Quick wash
7. Rinse & Hold
8. Temperature
9. Delayed start
10. Drying
11. Start/stop
Detergent Dispenser
1. Compartment for main wash dishwasher deter-
gent
2. Compartment for pre-wash detergent
3.Rellindicatorforrinse aid (not all models)
4. Rinse aid cover
5. Detergent compartment cover
4
3
2
5
1
4
3
2
18
567910 11
PROG S TA R T
STOP

9
Customer Care Center
1-800-898-1879
www.askousa.com
Below are step-by-step instructions to help you ac-
hieve the best possible dishwashing results.
Thanks to Self Cleaning System, you
do not need to rinse the dishes under running
water. Simply remove large food particles and
debris. Convenient and environmentally-friendly!
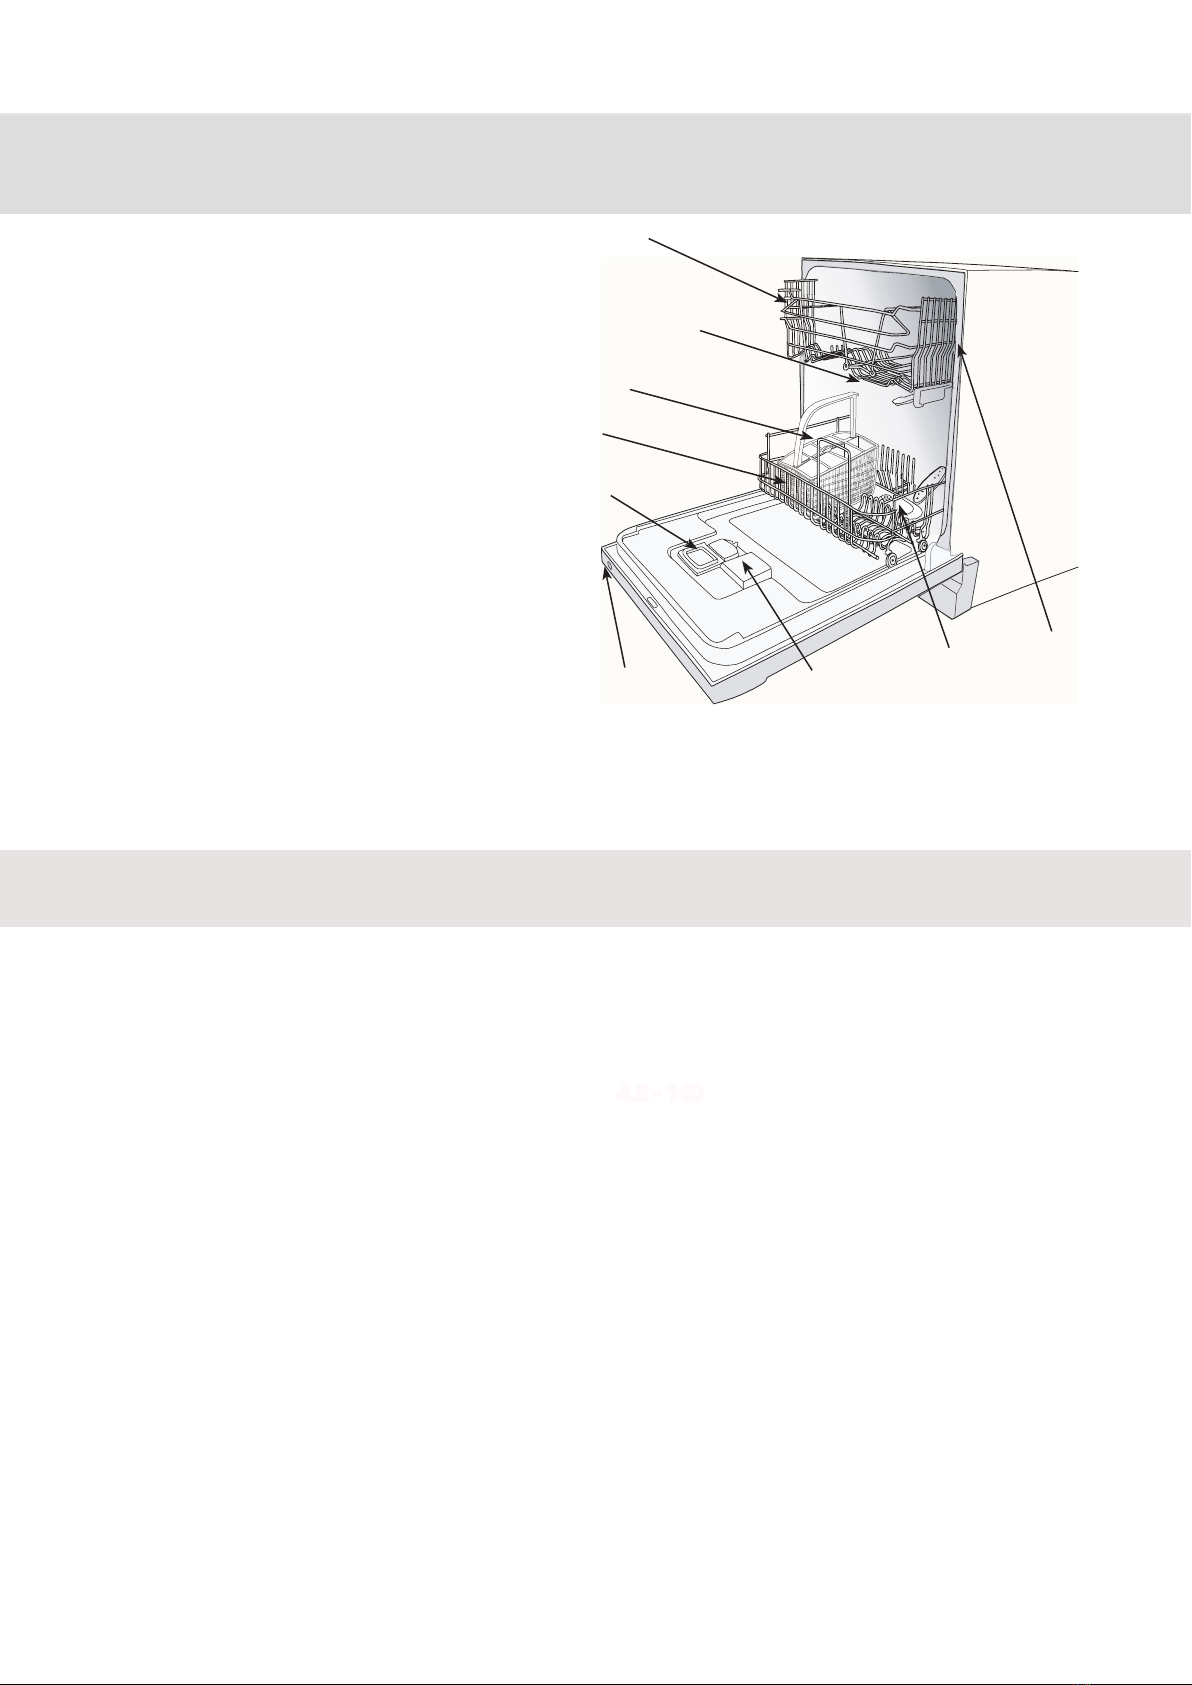
Placeglasses,cups,bowls,sideplates,and
saucers in the upper basket.Wineglassesshould
be hung from or leaned against the wine glass
shelf and knives placed in the knife stand if pre-
sent.
Note!
Ensure that all soiled surfaces face inwards or
downwards!
Placedinnerplates,sideplates,servingdishes,
saucepans, and cutlery (in the cutlery basket)
in the lower basket.The removable plate insert,
which comes with certain models, can be easily
removed to provide room for large plates, sau-
cepans, and pots, or placed in three alternative
positions.
Stand the cutlery with handles downward and as
spread out as possible. Ensure that spoons are
not resting inside each other.
Donotputcutlerymadeofdierentmaterials-
such as silver and stainless steel - in the same
compartment (risk of stains).
Thecutlerybaskethasafoldingapinthe
middle for small items or narrow shafts, such
as electric whisks.
Placelongcutleryandcarvingknivesinthe
special knife box (if present) or in the upper
basket.
Check that the spray arms are able to move
freely. See the section entitled Fragile Dishes if
youwanttowashobjectsthatmaybefragile.
Werecommendthatyouuse
only unscented, granular automatic
dishwashing detergent. Using the wrong
detergentcouldcauseoodingand/or
damage your dishwasher. Do not use deter-
gent that has been wet and is clumped. Also,
check the expiration date on the container.
The amount of detergent needed can vary due
todierencesinwaterhardness.Todeter-
mine the water hardness in your area, contact
your local water utility or area water softening
company. The harder the water, the more
detergent you may need. Refer to the chart be-
low for the recommended detergent amounts
based on water hardness. Remember, you
shouldadjusttheamountofdetergentyou
usebysmallamountsuntilyoundthecorrect
amount.
Twelve grains and higher is extremely hard
water and detergent alone may not be enough.
You may need to use a water softener to
maximize the performance of your dishwasher.
Also, in areas with hard water (9+) you may
need to wash at lower temperatures to prevent
hard water deposits from forming in tank and
wash system.
In hard water areas, both the dishes and the
machinecandevelopawhiteorgraylmafter
a while. This can be removed by replacing the
prewash detergent with two tablespoons of

10
Customer Care Center
1-800-898-1879
www.askousa.com
option
citric acid. If the water is very hard, use a rinse
aid that contains citric acid.
Dierentbrandsofdishwasherdetergenthave
dierentamountsofphosphorousforsoftening
water. If you have hard water and use a deter-
gent with less than 8.7% phosphorous content,
you may need to use more detergent or use a
detergent with more than 8.7% phosphorous
content.
Werecommendthatyoudonotaddprewash
detergent for the Quick wash programs.
If you use a dishwashing detergent with a rinse
aidadditive,youshouldnotlltherinseaiddis-
penser.Thiscouldcausealmonyourdishes.
Halvethetabletifitisdiculttoclosethedis-
penser cover. There is a risk that the dishwasher
detergent will not break down properly to give
the correct dosage if the cover is tight and can-
not be opened correctly.
Note!
Read the directions for use for such products
carefully. If anything is unclear, contact the
detergent manufacturer.
Soft
(0-3 grains per gallon)
Prewash1teaspoon
Main wash 1 to 1-1/2 tablespoons
Medium
(4-8 grains per gallon)
Prewash1teaspoon
Main wash 1 to 2 tablespoons
hard
(9+ grains*)
Prewash1teaspoon
Main wash 2 to 3 tablespoons
* 12 grains and higher is extremely hard water.

11
Customer Care Center
1-800-898-1879
www.askousa.com
The dishwasher will now start. It manages
the entire wash automatically.
Ensure that the door is properly closed or the
machine will not start.
If you want to change program after having star-
ted the machine, press the Start/Stop button for
three seconds. Then select a new program and
press the Start/Stop button.
Make sure there is detergent in the dispenser.
Carefullyopenthedoor;themachinewill
stops automatically, put in the dishes, close
the door and the dishwasher will continue
fromwhereitlefto.
(or in the event of a power cut) before the
washing program has been completed, the
interrupted program will continue when the
power comes back on.
Note!
Ifthepowerisswitchedo,orifthedoorisopen
during drying, the program is interrupted.
7
Oncethemachinehasnished,itonly
draws standby current. Should you wish
todisconnectthepowercompletely,just
switchoatthemainpowerswitch.Turno
the water faucet if the machine is not to be
used for an extended period, such as during
vacations, for example.

12
Customer Care Center
1-800-898-1879
www.askousa.com
Select a program by pressing the program
selector one or more times until the required
programsymbollightsup.SeetheProgram
guide below.
The dishwasher detects how soiled the
dishesareandadjustswaterconsumption
and temperature accordingly.
TheHeavyWashprogramshouldbeused
for heavily soiled dishes, e.g. saucepans,
pots and gratin dishes. If there is still space
in the machine after loading such items, you
can add plates etc.
Used for washing normally soiled dishes
such as plates, serving dishes, cups and
glasses, etc.
If the dishes are not heavily soiled, you
can select Delicate wash. This program is
intendedforglassandchinawhichhasjust
been used and therefore does not need
such a powerful program.
SelectQuickWashifthedishesarevery
lightly soiled. This program is used for very
lightlysoiledglassandchina,e.g.coee
cups.
For rinsing the dishes while waiting for the
machinetobelled.

13
Customer Care Center
1-800-898-1879
www.askousa.com
Auto Rinse &
Program
info
The dish-
washer
detects how
soiled the
dishes are
andadjusts
time, water
consumption
and tempera-
ture accord-
ingly.
For heavily
soiled loads,
such as pots,
pans, casse-
roles, etc.
For nor-
mally soiled
loads such
as plates,
glasses,
bowls, and
lightly soiled
pans.
For glass
and china
which has
justbeen
used and
therefore
does not
need such
a powerful
program.
For lightly
soiled loads
that are
washed
immedi-
ately after
use. This
program
can also
be used
for delicate
items.
To rinse
dishes that
you plan to
wash later
that day.
Options -- --
Prewashes
with SCS*
-- 2 3 -- -- --
Mainwash *** 130°F 150°F 120°F 140°F --
Number of
rinses
last rinse
140°F
3, last
rinse 140°F
3, last
rinse 160°F
2, last
rinse 120°F
2, last
rinse 140°F
1 rinse
1.Washtime
/
min. **
150 190 140 105 60 4
Energy ap-
prox.kWh
0.7 - 1.0 0.8 1.0 0.5 0.7 0.01
2.Washtime
/
min.**
115 - 185 220 180 125 80 4
Energy ap-
prox.
kWh
0.9 - 1.5 1.4 1.7 0.8 1.0 0.01
Watercon-
sumption
(gallon)
2.4 - 4.0
(9 - 15 l)
5.3
(20 l)
5.8
(22 l)
2.7
(10 l)
2.6
(10 l)
0.9
(3 l)
* SCS = Self Cleaning System.
**Allquotedtimesareapproximate.Cycletimeuctuationsmayoccurduetowatertemperature,water
pressure, variations in voltage etc.
1. Hot water connection approx. 120°F (50°C).
2. Cold water connection approx. 50°F (10°C).
*** The listed temperatures are set as the default from the factory. By using the temperature option you can
alter the temperature.

14
Customer Care Center
1-800-898-1879
www.askousa.com
Options
options
To select an option, press one of the option but-
tons.
Withthetemperatureoptionbuttonyoucan
select the wash temperature yourself.You can
vary the temperatures as follows:
Auto
Heavy: 130°F (55°C) 160°F (70°C)
Normal: 130°F (55°C) 150°F (65°C)
Delicate : 90°F (40°C) 120°F (50 °C)
Quick: 85°F (30°C) 140°F (60°C)
The temperature symbol will light up if you have
chosen the high temperature.This selection will
remain in force until a change is made.
Drying
If you desire a better drying result, press the
Drying options button and a symbol showing
three wavy lines will light. If you want a program
without Drying options, press the button again
and the symbol will go out.
If you want the machine to start later, press
the Delayed start option button. The clock sym-
bol on the button lights up. Then press the Start/
Stop button and the machine will start the pro-
gram 5 hours later. To cancel delayed start, hold
down the Start/Stop button for tree seconds.

15
Customer Care Center
1-800-898-1879
www.askousa.com
Waitingtorunthewashuntilthemachineis
full saves energy.
If the dishes are only lightly soiled you can run a
Quick wash program and reduce the tempera-
ture to 86°F (30°C).
To save energy, select Normal dry.You will get a
better drying result if you leave the door slightly
open after the end of the program.
Thanks to the dishwasher’s Self Cleaning Sys-
tem (SCS) you do not need to rinse the dishes
under running water before loading them into the
machine.
Read environmental declarations on the packa-
ge!
For best performance it is recommended
that connection is to cold water.

16
Customer Care Center
1-800-898-1879
www.askousa.com
A number of household goods are not suita-
ble for machine washing. This can be due to
a variety of reasons. Certain materials cannot
withstandintenseheat;otherscanbedamaged
by the dishwasher detergent.
China with decoration on top of the glaze (the
goods have a rough feel) should not be machine
washed.
Placethegoodssothattheydonotknockto-
gether during the wash. Use the lowest possible
wash temperature and the shortest possible pro-
gram. Do not heat dry! Antique and very fragile
items should not be machine washed.
Glass which is machine washed at high tem-
peraturescanintimedevelopagreylmwhich
cannotberemoved.Washneglassatthe
lowest temperature and with a low dosage of
dishwasher detergent.
Silver and stainless steel items should not come
into contact with each other as the silver can
discolor.
Certain types of adhesive cannot withstand
machine washing. In such cases the handles
can come loose.
Wood
Woodenitemsshouldonlybemachinewashed
if they are labeled as dishwasher safe.
Aluminum can be dulled by machine washing.
However, good quality aluminum saucepans
can be machine washed, although a reduction in
luster should be expected.
Certain types of plastic cannot withstand the
high temperature generated in machine dis-
hwashing.
Select a program with a low temperature.

17
Customer Care Center
1-800-898-1879
www.askousa.com
The dishwasher tub is made of stainless steel
and is kept clean through normal use.
However, if you have hard water, limescale de-
posits may form in the machine.
If this happens, run an empty machine with a
normal wash program with two tablespoons of
citric acid in the dishwasher detergent compart-
ment.
Spray arm
Coarse filter
Fine filter
Tubular
strainer
Thecoarseltertrapslargerfoodparticles,
which cannot get past the drain pump.
Emptythecoarselterasnecessary.
1. Liftthecoarselterbythehandle.
2. Emptythecoarselter.Don’tforgettore-
place it!
Debristhatcollectsonthenelterisautomati-
cally rinsed away during each wash.
However,thenelteranditspipesection
should be cleaned once or twice a year.
1. Turn the handle once counter-clockwise.
2. Lift the pipe section straight up by the hand-
le.Freethecoarseltertocleanthepipe
section.
1x
3. Removeandcleanthenelter.
4. Replace in reverse order. Ensure that the
edges are properly sealed when replacing
thenelter.
5. Lockthelterinplacebyturningthehandle
clockwise to the stop position: the handle
should point out from the dishwasher.
1x
The dishwasher must not be used without the
lterinplace!
Animproperlyttedcoarseltermayaectthe
dishwashing result!

18
Customer Care Center
1-800-898-1879
www.askousa.com
The pump can be accessed from inside the
machine.
1. Cut the power to the machine by pulling out
the plug!
2. Removethecoarselterandpipesection.
3. Removethesmallttedpieceattheleftof
the bottom drain (see the image below).
4. You can release and turn the pump blade by
insertingyourngerintotheholeandrelease
anything blocking it.
5. Reinstallthettedpieceandlters.
6. Plugtheplugintothewallsocket.
If the machine still does not start and a
buzzingsoundisheard,theoverowguard
has been activated.
•Shutothewater.
•Pulltheplugoutfromthewallsocket.
•Calltheservicedivision.
NOTE!
Donotforgettoreinstallthettedpiece.
Holes and bearings can sometimes become
blocked.
1. Pullthelowerwasherarmstraightupto
release it.
2. Remove any deposits using a needle or simi-
lar.
The washer arms also have holes under neath.

19
Customer Care Center
1-800-898-1879
www.askousa.com
To release the upper spray arm, the upper bas-
ket must be removed.
1. Pulloutthebasket.
2. Remove the upper spray arm by unscrew-
ing it counter-clockwise from the basket and
clean it.
3. Screw the spray arm back into place.
Door
Whencleaningtheedgearoundthedoor,use
only a slightly damp cloth, possibly with a little
detergent. Do not use a spray bottle or similar
around the door catch. This is to ensure that
water does not penetrate into the door catch
and come into contact with the electrical com-
ponents.
CAUTION!
Do not use a spray bottle or similar around the
door catch.
Tip!
In order to prevent bad odours in the dish-was-
her, clean the strips and corners with a dish
brush and low-lather detergent.

20
Customer Care Center
1-800-898-1879
www.askousa.com
Insomecases,dryingcanbemademoree-
cient by using rinse aid.
Whentherinseaidhasrunoutandmoreis
needed, the rinse aid symbol on the panel
lights up*.
1.Turn and lift up the cover of the rinse aid
compartment to the right of the dispenser.This
is where you top up and set the amount of
rinse aid to be dispensed in each wash.
2. Carefully pour in rinse aid up to the dos
age setting knob. Alter dosage if required.
Do not forget to close the cover.
Afterllingtheremaybeashortdelaybeforethe
signal light goes out.
detegrent dispenser
Thereisarellindicatorinthemiddleofthe
dispenser(seeillustration).Iftherellindica-
toristotallyblack,thereissucientrinseaid.
However, if the indicator has a more transparent
appearance, you need to top up with rinse aid
(see above).
The dispenser is usually set at 1= soft water.
However, depending on the water hardness,
you may need to change the dosage.
Opentherinseaidcover.Hereyouwillndthe
dispenser’sadjustmentdial.Settings1-6:thehar-
der the water, the higher the dosage.
Whenthewaterhardnessexceeds3grains,you
should use rinse aid with citric acid (acid rinse
aid).
Too much rinse aid can lead to the build-up of
foam. If your water is particularly soft, you can
dilute the rinse aid (1 part rinse aid, 1 part wa-
ter).
Too much rinse aid can cause streaks on the
dishes, while too little can result in water stains.
Open
Closed
Refill indicator
Cover for rinse aid
Open by turning and lifting the cover!
Other manuals for D5233
5
Table of contents
Other Asko Dishwasher manuals

Asko
Asko DFI644GXXL User manual

Asko
Asko D5654XXLHS User manual

Asko
Asko DFI5448DXXL User manual

Asko
Asko D5526XLFI User manual

Asko
Asko Superior 1474 Operating instructions

Asko
Asko DW1895 User manual

Asko
Asko DBI865IGXXL User manual

Asko
Asko DSD545K User manual

Asko
Asko D5424WH User manual

Asko
Asko D5424 User manual