Asko TDC145V User manual

Operating Instructions
Tumble dryer
ASKO PROFESSIONAL TDC145V 400V
Dear Customer,
Thank you for choosing this quality product from ASKO. We hope it will
meet your expectations and fulfil your needs for many years to come.
Scandinavian design combines clean lines, everyday functionality and
high quality. These are key characteristics of all our products and the
reason they are greatly appreciated throughout the world.
To get the most out of your new machine, we recommend that you read
the operating instructions before using the machine. The operating
instructions also include information on how you can help protect the
environment.
WARNING: Read the instructions before using the machine.

2
CONTENTS
BEFORE USING YOUR MACHINE FOR THE
FIRST TIME 3
Language selection 3
Laundry labels 3
SAFETY INSTRUCTIONS 4
General 4
Safety 5
Installation 5
Packing material 5
Recycling 5
Child safety 6
Child-safe start 6
DESCRIPTION OF THE TUMBLE DRYER 7
ADVICE AND TIPS BEFORE YOU TUMBLE-
DRY 8
Have the clothes been spun? 8
Materials that can be tumble-dried 8
Materials that must not be tumble-dried 8
Static electricity 8
TUMBLE DRYING 9
Sort your fabrics 9
Select the programme 9
Press the start button. 10
Drying programme finished 10
Programme chart 11
SETTINGS 12
You can carry out the following settings 12
How to choose the settings: 12
Audible volume 12
Language 12
Child-safe 12
Heater 2 12
CARE AND CLEANING 13
Cleaning the lint filter 13
Cleaning the outside of the machine 13
TROUBLESHOOTING 14
The machine will not start 14
The machine loses all power during a program 14
Drying takes too long 14
Error messages 14
TECHNICAL INFORMATION 15
Technical data 15
SERVICE 16
Before contacting the service division 16
Installation 17
Electrical installation 17
Connection on delivery 17
Switch-over 17
DOOR HANGING 18
QUICK GUIDE 20
Original instruction

3
BEFORE USING YOUR MACHINE FOR THE FIRST TIME
LANGUAGE SELECTION
You will be prompted to select the display language when
you have connected your machine and start it for the first
time. Do as follows:
1. Turn the programme selector to choose from: US
English, English, Svenska, Dansk, Norsk, Suomi,
Français, Deutsch, Italiano, Espanol, Русский,
Nederlands.
2. Press Stop to save the setting.
LAUNDRY LABELS
Certain materials are not suitable for tumbledrying.
Always check and follow the instructions on each item’s
laundry label.You can find more information in the Advice
and tips before you tumble-dry chapter.
NOTE!
When starting the tumble dryer for the first time or
after a long period without use, you may notice a slight
thumping noise.This noise is completely normal and
will disappear after a few loads.

4
GENERAL
Read the operating
instructions and keep them in
a safe place!
• The machine may be used in public
areas.
• Repairs and maintenance relating
to safety or performance must be
carried out by a qualified professional.
• The machine should only be used for
tumble-drying as described in these
instructions.
• Repairs and maintenance relating
to safety or performance must be
carried out by a qualified professional.
• Damaged mains cables must only be
replaced by a qualified electrician.
• Sufficient ventilation is required to
prevent smoke from open fires or
fumes from equipment burning other
fuels being sucked into the room
when the tumble dryer is running.
• Do not dry dirty laundry in the tumble
dryer.
• Items that are stained with e.g.
cooking oil, acetone, alcohol, petrol,
kerosene, stain remover, turpentine,
wax and wax remover should be
washed in hot water with extra
detergent before they go in the
tumbler dryer.
• Items such as foam rubber, latex,
plastic, waterproof textiles, rubber-
coated items and clothes and foam-
rubber filled cushions must not be
dried in the tumbler dryer.
• Fabric softener or similar products
should be used as per the
recommendations of the detergent
manufacturer.
• This machine can be used by children
aged 8 and upwards, and by people
with reduced physical capacity,
mental ability, memory loss or lacking
experience and knowledge. These
individuals must be supervised
when using the machine or have
instructions on how to use the
machine and understand the risks
that can occur.
• Children must be watched to ensure
they do not play with the machine.
• Children under 3 years should be kept
away from the machine unless they
are not constantly supervised at all
times.
• Remove all objects such as lighters
and matches.
SAFETY INSTRUCTIONS

5
SAFETY INSTRUCTIONS
SAFETY
• The machine must not be used for
drying items that have been dry-
cleaned at home or fabrics that may
contain residues of flammable liquids.
• The tumble dryer is protected by an
overheating cut-out. This shuts offthe
machine if the temperature gets too
high.
• The last part of the dryer cycle occurs
without heat (cool down cycle) to
ensure that the objects are in a
temperature that ensures that items
are not damaged.
CAUTION! HOT SURFACE!
When the tumble dryer is operating,
the back of the tumble dryer will get
very hot. Leave the machine to cool
completely before touching the back.
WARNING!
Never stop the machine before the
drying cycle end unless all items are
quickly removed from the machine
and spread out so that the heat is led
away.
INSTALLATION
See the separate installation
instructions.
PACKING MATERIAL
Please sort waste materials in
accordance with local guidelines.
RECYCLING
This machine is manufactured and
labelled for recycling. In order to prevent
personal injury, the machine must be
made inoperable after deciding to take
it out of service. Contact your local
authority for information about where
and how your machine should be
correctly recycled.

6
CHILD SAFETY
WARNING!
DO NOT ALLOW CHILDREN TO PLAY
WITH THE TUMBLE DRYER.
• If the door is opened when a
programme is running the garments
may be very hot, with a risk of burn
injuries.
• The tumble dryer does not start
automatically when the door is
closed (if a child pulls the door shut
from the inside, for example).
CHILD-SAFE START
By activating the child-safe start
function you can prevent children from
starting the tumble dryer or changing
the current programme.
See the Settings chapter.
SAFETY INSTRUCTIONS
ACTIVATING/DEACTIVATING CHILD-
SAFE START.
Do as follows to open the settings
menu:
1. Turn offthe machine using the main
power switch.
2. Press the Stop button and switch
on the machine with the main power
switch. Then press the Stop button 5
times within 10 seconds.
3. Select the setting you want to change
by turning the programme selector.
4. Press the Stop button once.
5. Change and save the setting as
described below.
6. Press the Start button to return to the
programme menu.
You can activate the Child-safe start
option to prevent children from starting
the machine.
1. Turn the programme selector and
choose Child-safe On or Child-safe
Off.
2. Press the Stop button once to save
the setting.
You can temporarily deactivate Child-
safe start by pressing the Start and
Stop buttons at the same time. Child-
safe start will be deactivated for 3
minutes.

7
DESCRIPTION OF THE TUMBLE DRYER
1. Main power switch
2. Panel
3. Type plate
4. Lint filter
5. Outer door
1 2 3 54

8
ADVICE AND TIPS BEFORE YOU TUMBLE-DRY
Here are some tips that may help you before you begin
tumble-drying.
HAVE THE CLOTHES BEEN SPUN?
Items to be tumble-dried should be spun at 1000 rpm or
faster. Higher spin speeds save energy and reduce drying
time.
MATERIALS THAT CAN BE TUMBLE-
DRIED
This symbol means that the material is suitable for
tumble- drying. Fabrics best suited to tumble-drying are
cotton fabrics, terry cloth and synthetic fibres. Garments
will be softer and lighter when tumbled than when hung
out to dry.
NOTE!
The tumble dryer does not cause any significant wear
on fabrics. The lint that collects in the lint filter consists
of dust and fibre residues formed when the items are
used.
MATERIALS THAT MUST NOT BE
TUMBLE-DRIED
This symbol means that the material is not suitable
for tumble-drying. Certain materials may melt or become
a fire hazard if exposed to heat, and others can lose their
shape or shrink.
And do not tumble-dry:
• materials labelled ”Do not dry near heat”.
• garments that have been dry-cleaned at home.
• plastic foam.
• fibreglass material.
• wool must not be tumble-dried because of the risk of
felting.
STATIC ELECTRICITY
To reduce the risk of static electricity in the laundry after
tumble drying you can:
• Use fabric softener when washing.
• Wait five minutes after the drying program ends before
opening the door and removing the laundry from the
dryer.
NOTE!
You can stop the tumble dryer by pressing the Stop
button for three seconds or by opening the door. In both
cases the programme is stopped and starts from the
beginning if restarted. If you do not want to restart the
programme then immediately remove all laundry and
spread it out to allow the heat to dissipate.

9
TUMBLE DRYING
Below are step-by-step instructions to help you achieve
the best possible tumble-drying results.
SORT YOUR FABRICS
You will achieve the most uniform drying results if the
items are made of the same type of material. Do up zips
and buttons, fasten belts, sort the items and adjust the
load and temperature.
NOTE!
Do not overload the drum!
Overloading the dryer will result in poor drying results
and wrinkling.
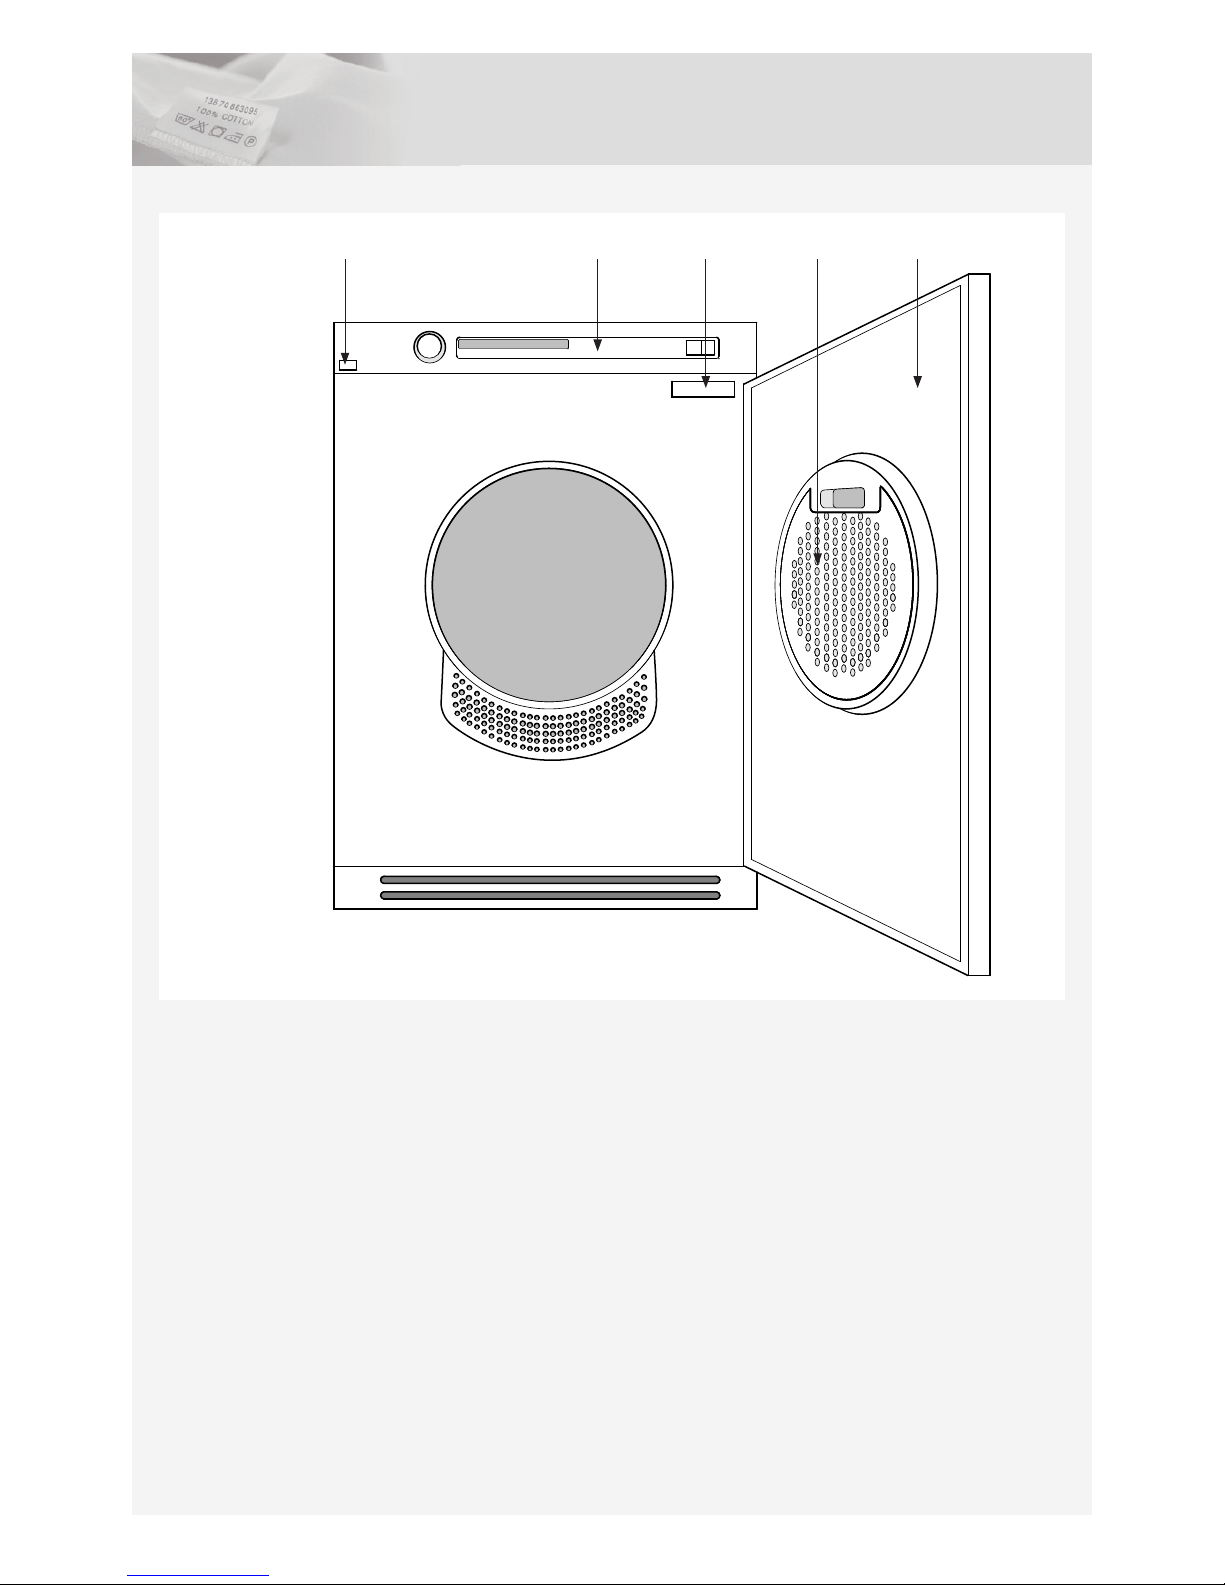
Press the main power switch until the display lights. Open
the door, load the items and then close the door.
NOTE!
Make sure that objects e.g. detergent dispensing balls,
have been removed from the laundry. They could melt
and cause damage to the dryer or the laundry.
NOTE!
To save energy, always observe the maximum load for
each programme (see Program chart)
Select a programme by turning the programme selector. The selected programme is shown in the display window.
Programme selector Display window
Main power switch Start Stop
SELECT THE PROGRAMME
Guidelines as to what specific programmes can be used
for:
The Auto extra dry, Auto dry and Auto normal dry
programmes have two temperature settings. Normal
temperature but also low temperature for more delicate
items.
Auto extra dry
Temperature normal.This programme is for items that are
particularly difficult to dry, such as jeans with very thick
seams.
Auto dry
Temperature normal.These programmes shut offthe heat
once the load is dry but before it is bone dry. The Auto
dry programme shuts offthe heat slightly later than Auto
normal dry. Use trial and error to find out what works best.
Auto normal dry
Temperature normal.These programmes shut offthe heat
once the load is dry but before it is bone dry. The Auto
dry programme shuts offthe heat slightly later than Auto
normal dry. Use trial and error to find out what works best.
Auto extra dry (low temperature)
Energy Save.This programme is for items that are
particularly difficult to dry, such as jeans with very thick
seams.
Auto dry (low temperature)
Energy Save.These programmes shut offthe heat once
the load is dry but before it is bone dry. The Auto dry
programme shuts offthe heat slightly later than Auto
normal dry. Use trial and error to find out what works best.
Auto normal dry (low temperature)
Energy Save.These programmes shut offthe heat once
the load is dry but before it is bone dry. The Auto dry
programme shuts offthe heat slightly later than Auto
normal dry. Use trial and error to find out what works best.
Auto iron dry (low temperature)
This programme shuts offthe heat once the load is just
damp enough for ironing or pressing.

10
TUMBLE DRYING
PRESS THE START BUTTON.
Remaining drying time
An estimate of the remaining drying time will be shown
on the display a few minutes after the drying programme
starts. For example, 1:35 means that it will take
approximately 1 hour and 35 minutes for the load to dry.
If the option.Anti crease has been selected, the drum will
rotate for three seconds per minute for two hours after the
programme is finished.The actual remaining time may
be longer than the estimated time shown on the display.
The remaining time is then shown as 0:15 until the load
is sufficiently dry. If you selected Time Saver the display
will show 0:05 instead. You can stop the tumble dryer by
pressing the Stop button for three seconds or by opening
the door. In both cases the programme is stopped and
starts from the beginning if restarted.
NOTE!
The programme will not be affected if you change the
programme selector after the programme has started.
DRYING PROGRAMME FINISHED
The text Done appears on the display when the
programme is finished. If the Anti crease option has
been selected, the drum will rotate for three seconds per
minute for two hours after the programme is finished..
Backlighting
Two minutes after the drying programme finishes the
backlighting on the display and options buttons enters
energy saving mode. Turn the programme selector if you
want to activate the machine.
NOTE!
Clean the lint filter in the outer door after each load.
See the Care and cleaning chapter.
WARNING!
If the lint filter becomes clogged, the machine’s
automatic overheating cut-out may be triggered.
Clean the filter, wait until the machine has cooled then
try starting it. If it still doesnot start: Call the service
division.
Once drying has finished
Turn offthe main power switch. Remove the clothes and
close the door to prevent small children from climbing into
the machine.

11
TUMBLE DRYING
PROGRAMME CHART
Here we present the energy and time consumption of a few different programmes. The table shows the effect of using
different spin speeds when washing the load. Consumption can vary depending on room temperature, humidity, load,
variations in the power supply and selected options.
For the consumption values given below, the requirements are as follows:
Temperature of intake air: 23 °C
Moisture content of intake air: 55%
Drying temperature: Normal
Programme Material Load Spin speed (rpm) Energy
consumption,
approx. (kWh)
Programme time,
approx. (min)
Auto extra dry Cotton, linen 1/1 600 6,7 75
1000 6,0 70
1200 5,1 65
1400 4,9 60
Auto Dry Cotton, linen 1/1 600 6,0 70
1000 5,4 65
1200 4,6 60
1400 4,4 55
Crease-resistant,
polyester/cotton
1/2 1000 2,8 35
Auto Normal Dry Cotton, linen 1/1 600 5,5 65
1000 4,8 60
1200 4,2 55
1400 3,9 50
Cotton, linen 1/2 1000 2,8 35
Crease-resistant,
polyester/cotton
1/2 600 3,0 40
Auto Iron Dry Cotton, linen 1/1 600 4,8 90
1000 4,2 85
1200 3,9 80
1400 3,7 75
* Test program according to EN61121.

12
SETTINGS
YOU CAN CARRY OUT THE FOLLOWING
SETTINGS
• Language
• Child-safe
• Audible Volume
• Heater 2
HOW TO CHOOSE THE SETTINGS:
Do as follows to open the settings menu:
1. Turn offthe machine using the main power switch.
2. Press the Stop button and switch on the machine with
the main power switch. Then press the Stop button 5
times within 10 seconds.
3. Select the setting you want to change by turning the
programme selector.
4. Press the Stop button once.
5. Change and save the setting as described below.
6. Press the Start button to return to the programme
menu.
AUDIBLE VOLUME
1. Turn the programme selector and choose Buzzer On
or Buzzer Offto set whether the tumble dryer should
audibly indicate that the programme is finished or that
an error has occurred.
2. Press the Stop button once to save the setting.
LANGUAGE
You will be prompted to select the display language when
you have connected your machine and start it for the first
time.
Do as follows:
1. Turn the programme selector and choose from: US
English, EU English, Svenska, Dansk, Norsk, Suomi,
Français, Deutsch, Italiano, Espanol, Русский,
Nederlands.
2. Press the Stop button once to save the setting.
CHILD-SAFE
You can activate the Child-safe start option to prevent
children from starting the machine.
1. Turn the programme selector and choose ”Child-safe
start on” or ”Child-safe start off”.
2. Press the Stop button once to save the setting.
You can temporarily deactivate Child-safe start by
pressing the Start and Stop buttons at the same time.
Child-safe start will be deactivated for 3 minutes.
HEATER 2
1. Turn the programme selector and choose ”Heater 2
On” (5000W/16A) or ”Heater 2 Off” (3000W/10A) to
increase or decrease the heat output.
2. Press the Stop button once to save the setting.
NOTE!
The switchover must be performed by a qualified
electrician.

13
CARE AND CLEANING
CLEANING THE LINT FILTER
The lint filter must be cleaned after each load.
1. Grasp the filter holder handle and pull it towards you
to open the lint filter.
2. Open the lint filter. Use your thumb to press on the
edge as illustrated and pull it out.
3. Use your hand or a soft cloth to remove the lint from
all sides of the filter. If necessary, use a damp sponge
and a small amount of washing-up liquid to remove
any deposits. Dry the filter thoroughly with a towel.
NOTE!
Clean the surface of the lint (fluf) filter after each drying
program.
4. To close the lint filter, follow the reverse order of steps
used for opening.Then, replace the filter by sliding it
back into the door. Close the lint filter before closing
the door.
NOTE!
Clean the filters after each drying.
Do not replace the filters if they are damp or wet. Damp
or wet filters could cause operational faults.
NOTE!
The dryer should never be operated without the filters
in place, or with damaged filters as excessive amount
of accumulated fibres from the fabric could cause
malfunction or failure of the dryer.
CLEANING THE OUTSIDE OF THE
MACHINE
Clean the outside of the machine and the programme
panel with a mild cleaner. Do not use solvents, as these
can damage the machine. Do not hose down or spray the
machine with water.
NOTE!
Do not allow dust to accumulate around the machine.
Keep the area around the tumble dryer clean and cool;
dust, heat and moisture prolong drying times.

14
TROUBLESHOOTING
NOTE!
When starting the tumble dryer for the first time or
after a long period without use, you may notice a slight
thumping noise.This noise is completely normal and
will disappear after a few loads.
THE MACHINE WILL NOT START
Check
• that the door is properly closed.
• that the main power switch is on.
• that the Delayed Start option has not been selected.
To cancel Delayed Start, press the Stop button for 3
seconds.
• that the plug is connected.
• that the main fuses have not blown.
• that the overheating cut-out has not been triggered.
WARNING!
If the lint filter not is cleaned regularly, the machine’s
automatic overheating cut-out may be triggered
because of to high temperature. The heaters in the
machine will then switch offand the drum will continue
to spin to cool down the machine.
Call the service division if:
• Heating fault appears on the display.
• Max program time is shown frequently in the display
and the laundry does not get dry.
THE MACHINE LOSES ALL POWER
DURING A PROGRAM
The overheating cut-out shuts offthe tumble dryer if the
temperature is too high, e.g. because dust is clogging the
lint filter.
• Clean the lint filter
• Wait until the machine has cooled then try starting it. If
it still does not start: Call the service division.
DRYING TAKES TOO LONG
• Check that the lint filter is not blocked. See the Care
and cleaning chapter.
ERROR MESSAGES
• Read Drying takes too long in this chapter if Max
program time appears on the display.
• If Clean Lint Filter appears on the display, clean the lint
filter.
• Call the service division if Thermistor fault appears on
the display.
• Press the Stop button to close any error messages.

15
TECHNICAL INFORMATION
TECHNICAL DATA
Height: 850 mm
Width: 595 mm
Depth: 745 mm
Weight (net): 45 kg
Cylinder volume: 145 l
Max. drying capacity: 8 kg
Speed: 50-55 rpm
Sound pressure level: The sound pressure level is below 66 dB(A)
Rated power: See type plate.
Drum material: Stainless steel
Outer casing material: Powder-coated and hot-galvanized sheet steel or stainless steel
Setup: Stacking or freestanding
Test method for noise measurement: IEC 60 704-2-6.

16
SERVICE
BEFORE CONTACTING THE SERVICE
DIVISION
See the Troubleshooting and Care and cleaning chapters
to see whether you can rectify the problem. If you need to
contact the service division, make sure that you know the
model designation, type designation and serial number.
The model designation (1) can be found on the first page
of the operating instructions and on the machine panel.
The type designation (2) and serial number (3) can be
found on the type plate, which is found on the front of the
tumble dryer inside the outer door.
NOTE!
For repairs and maintenance, original spare parts must
be used.
1
TYPE
3
2
NOTE!
Repair or any warranty claim resulting from incorrect
connection or use of the dryer shall not be covered by
the warranty. In such cases, the costs of repair shall be
charged to the user.

INSTALLATION
See the separate installation instructions included in the
set of documents.
NOTE!
Do not install the machine in a room where there is a
risk of frost occurring. At temperatures around freezing
point the machine may not be able to operate properly.
The room in which the appliance is installed should be
adequately ventilated, with temperature between 15°C
and 25°C.
ELECTRICAL INSTALLATION
Connect the machine by plugging it into an earthed wall
socket.The electrical wall socket must be placed outside
of the installation area to be easily accessible.
CONNECTION ON DELIVERY
• 400 V, 3-phase, 16 A
• 50 Hz
• Heat output 5000W
• Use a type A residual-current device.
NOTE!
Do not connect the machine to the mains electricity
supply by an extension lead.
SWITCH-OVER
The switchover must be performed by a qualified
electrician.
See the Settings chapter.
17
INSTALLATION

18
1. Hinge pins (top and bottom)
2. Cover plate
3. Plastic plugs (on the upper and lower edges)
4. Locking hook
5. Hinges (left + right side)
6. Plinth
DOOR HANGING
321
56
4

19
DOOR HANGING
You can choose whether the door is hung on the right or
the left.
Follow these instructions:
1. Remove the plinth.
2. Remove the hinge, two screws.
3. Lift the door up and remove it. Support the door at the
same time.
4. Remove both door pins (top and bottom). Fit them on
the other side of the machine. Refit the hinge.
pin
5. Also change the hole plug (A) (on top) and the door
hinge bushing (B) (at the top and on the bottom), and
replace them on the other side of the door.
(A) (B)
Use a flat-bladed screwdriver to remove the plugs.
NOTA!
Be careful not to damage the appliance with the
screwdriver.
6. Loosen the screws (13 in total) on the inside of the
door.
7. Loosen the inner part of the door (pull down and lift
out).
8. Switch the catch (magnetic lock) and the cover plate.
First loosen the screw holding the catch (magnetic
lock) in place.Then use a flat-bladed screwdriver to
remove the cover plate. Refit the catch (magnetic
lock) and the cover plate on the other side.
9. Reattach the inner part of the door with the screws
(13 in total).
10. Loosen the two screws holding the handle in place
on the door. Push out the two plastic plugs inside the
screw holes on the other side of the door. Use the two
screws to attach the handle to the other side of the
door and press the plastic plugs into the holes where
the handle was previously fitted.
11. Refit the door by loosening the hinge screws slightly,
affixing the door and closing it. Retighten the hinges.
Replace the plinth.

3.
2.
4.
1.
TD80.C SPO
Professional TDC145V 400V
QUICK GUIDE
PRESS THE MAIN POWER SWITCH.
Load the garments and close the door.
SELECT A PROGRAMME AND ANY OPTIONS
Turn the programme selector to the required programme.
DRYING PROGRAMME FINISHED
The text End appears on the display when the programme is finished.
Clean the lint filter after each load.
Turn offthe main power switch.
Close the door.
PRESS THE START BUTTON
We reserve the right to make changes.
en (01-17)
Gorenje, Partizanska 12, 3320 Velenje, Slovenija
www.asko.com
Other manuals for TDC145V
1
Table of contents
Other Asko Dryer manuals
Popular Dryer manuals by other brands

Van Air Systems
Van Air Systems FP-3 Installation, operation & maintenance instructions

World Dryer
World Dryer Q-Series VERDEdri instruction manual

BROWN
BROWN DragonAir DAK-2408 quick start guide

Kenmore
Kenmore 29" installation instructions

Dexter Laundry
Dexter Laundry T-20 SWD Operator's manual

American Dryer Corp.
American Dryer Corp. AD-530HS Installation & operator's manual

Sterling
Sterling SDAP Reference manual

LG
LG DLEY1201 owner's manual

Bosch
Bosch WTMC1301CN Operating, care and installation instructions

GE
GE Profile DPGT650 Owner's manual and installation instructions

Speedy Dryer
Speedy Dryer CL-5000 UL Instructions and warranty

Coline
Coline DF-ST001/ST003-UK instruction manual