manuals.online logo
Brands
  1. Home
  2. •
  3. Brands
  4. •
  5. Asko
  6. •
  7. Dryer
  8. •
  9. Asko T760 User manual

Asko T760 User manual

Start Stop
P1 P2 P3 P4
Menu Enter
We know you’re excited about owning an ASKO dryer and you’re anxious to get started, so here is a brief summary of the operating
procedures. To get the most of the features of your machine, we recommend that you read your Use and Care Guide.
THE CONTROL PANELTHE CONTROL PANEL
Models T760 and T780 have ASKO’s state-of-the-art EasyControl™ panel, as illustrated below. To select a program, simply press one of the
preset program buttons then press Start. Refer to “Preset Programs” below for a definition of these programs.
StopButton
Press to stop
a program.
Preset Programs
Press one of these buttons
to select a program. LEDWindow
Displays the program, temperature settings,
and program run time.
Dryer Quick Start Guide T760/T780
Power Button
Press to turn on power
to the machine.
Program Selection Controls
These buttons allow you to customize the preset program
settings, such as temperature settings, turning the buzzer off,
setting delay start time, etc. Refer to the Use and Care Guide
for instructions.
Power Indicator Light
Glows when the power
is turned on.
Power ButtonPower Button
The Power button turns the power to the machine on and off. When the power is on, the power indicator light glows red. The power
must be on before you can set the programs or start the machine.
Start and Stop ButtonsStart and Stop Buttons
These buttons start or stop a program. If you open the door during a program, the dryer will stop tumbling automatically. If you
interrupt a program by opening the door, the dryer will remember where in the program it stopped. To continue the program, close
the door and press Start.
You can also interrupt a program by pressing Stop for three seconds. If you stop the dryer this way, however, it cancels the
program in progress. You will have to select a new program to restart.
Preset ProgramsPreset Programs
There are four preset programs, as defined in the table below. To select a program, simply press one of the program buttons and press Start.
For additional programming options, refer to the Use and Care Guide.
With ASKO’s Sensidry™ system, you need never worry about overdrying your laundry. Just select the proper program for the type of fabric
you’re drying and Sensidry does the rest. Once you select a program, Sensidry monitors the temperature and measures the humidity level.
When it detects the appropriate measurements, it automatically shuts off the machine.
Preset Dry
Program Program Types of Laundry Temp Anti-Crease Buzzer
P1 ExtraDry Heavy fabrics, such as denim jeans Normal 1 hour On
P2 Dry Towels, cotton, linen, etc. Normal 1 hour On
P3 Normal Dry Permanent press, synthetics, etc. Normal 1 hour On
P4 Iron Dry Washable silk, acrylics, etc. Low *1 hour On
ASKO’s EasyControl™ panel makes it simple to customize the preset programs to perfectly fit your laundry needs. For example, you can
reprogram the dry temperature, change the cool-down time, set a delayed start, etc. For instructions, refer to “Customizing the Preset
Programs” in your Use and Care Guide.
Start
Stop
Start Button
Press to start
a program.
* The dry temperature for Program P4 on Model T780 is Normal.
P1
P2
P3
P4
Stop
Time
P2 P3 P4
Extra Dry
Dry
Normal Dry
Iron Dry
P1
P2
P3
P4
P1 Start
23
QUICK START PROCEDURESQUICK START PROCEDURES
UNDERSTANDING THE LED WINDOWUNDERSTANDING THE LED WINDOW
The LED window is easy to read and understand. The illustration below explains what each item on the LED window is.
Program Time
When you start a program, the total time the
program runs is displayed. As the program
progresses, the time remaining displays. The
program time toggles between minutes (e.g.,
23) and hours (e.g., 1h).
Stop
Indicates that the program has ended
or that you pressed Stop.
Start
Indicates that you pressed Start
and the program is running.
Preset Programs
Displays the program that
is selected/running.
Program
When you press the Power button,
the display toggles between the
program numbers and the wash
program names, (e.g., Extra Dry,
Dry, etc.)
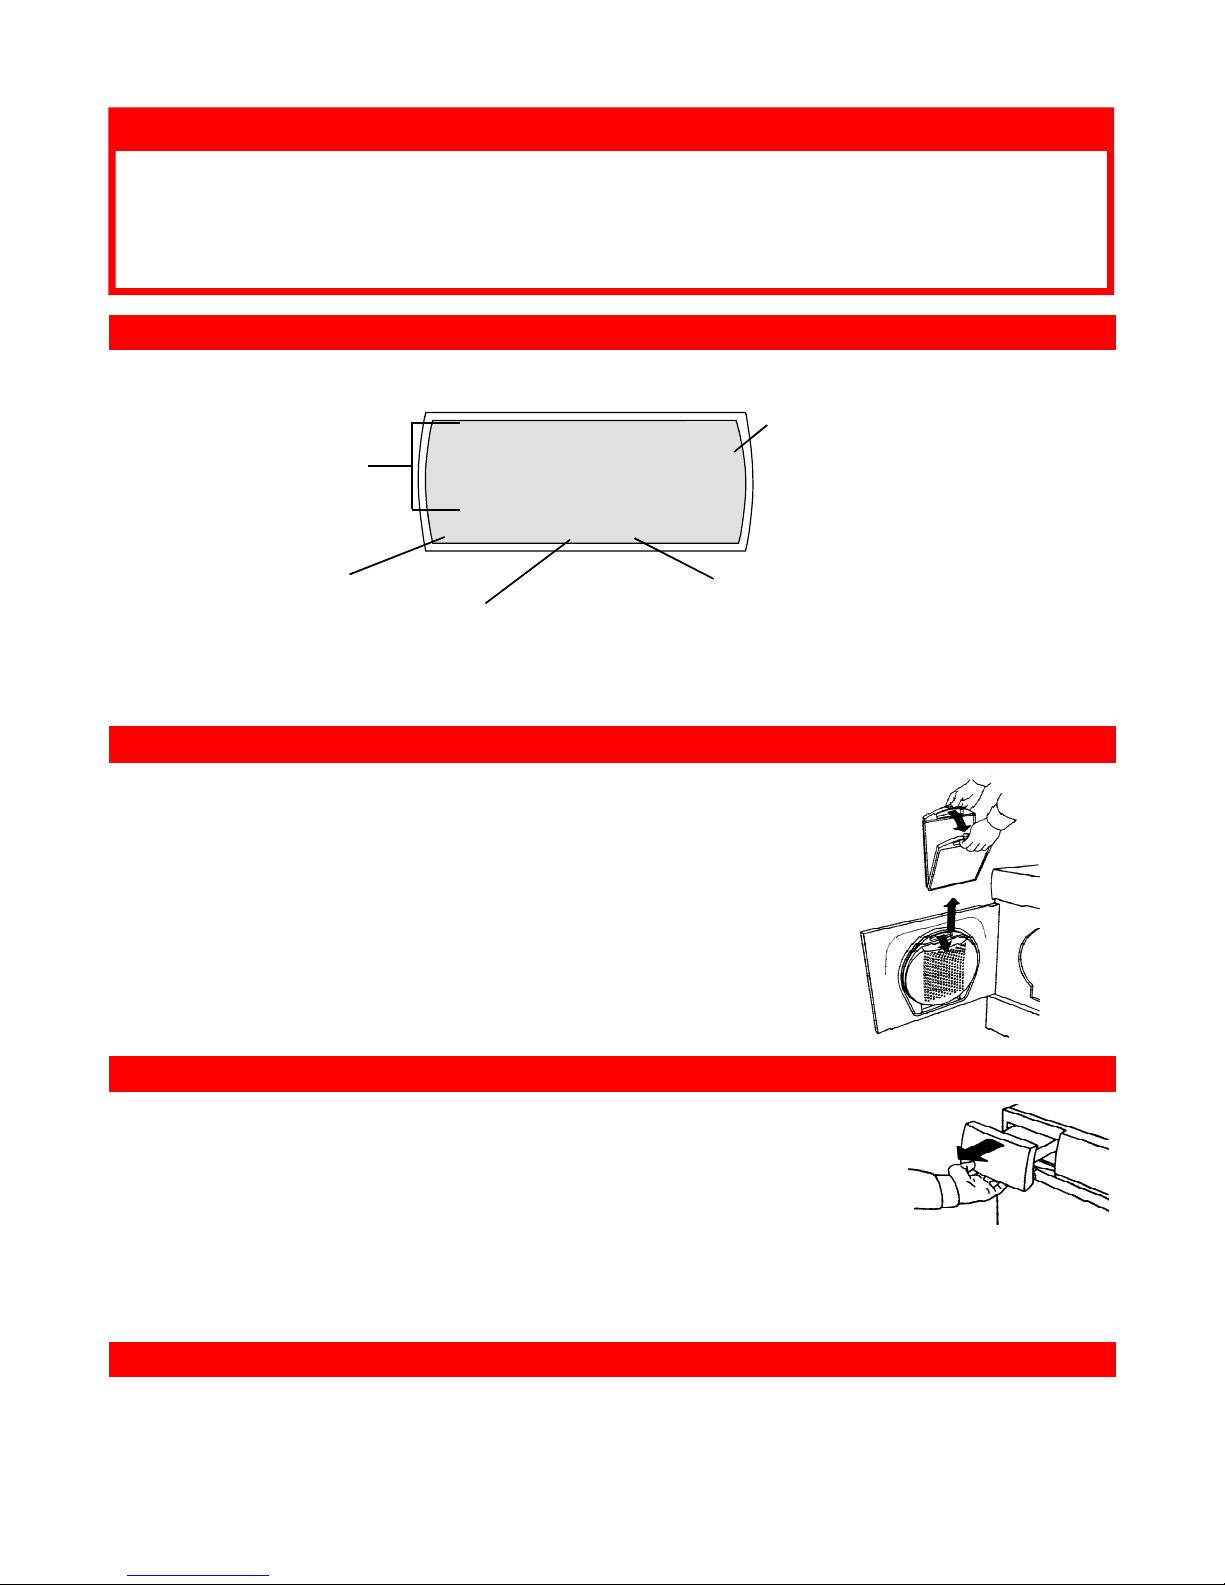
CLEANING THE LINT FILTERCLEANING THE LINT FILTER
Although the lint in your ASKO dryer will be minimal, the lint filter should be cleaned after each load
to ensure maximum air flow and prevent possible overheating. To clean the filter, follow the steps
below:
1. Grasp the handle and pull it toward you.
2. Remove the filter from the holder by pulling it up.
3. Open the filter and gently brush away any lint.
4. Fold the filter together and return it to the holder on the door.
5. Push the holder in until it snaps into place.
We recommend that you clean the lint filter after every load.
NOTE:
OVERHEATING PROTECTIONOVERHEATING PROTECTION
The dryer has a protection device that shuts the machine off if the temperature becomes too high. Overheating could occur if the lint filter is
clogged or if the fan or condenser unit (Model T780) needs to be cleaned. If the dryer shuts off during a program on Model T780, first, make
sure the condensation water container is empty. If that isn’t the problem, check the lint filter. Lastly, it could be the fan or condenser unit needs
to be cleaned. See your Use and Care Guide for instructions on how to clean these items.
The LED window also displays the menus and options available when you customize the preset programs. Refer to your Use and Care
Guide for more details.
1.
2.
3.
4.
5.
6.
Press the Power button to turn on the machine.
Load the dryer.
Check the lint filter. Clean it, if needed.
Check that the door is clear of laundry then close it firmly. (The door won’t shut if it’s slammed.)
Press the button for the desired program (P1–P4).
Press Start. The machine will start.
EMPTYING THE CONDENSATION WATER CONTAINEREMPTYING THE CONDENSATION WATER CONTAINER (T780 only)(T780 only)
If Model T780 is not installed to pump out the condensed water into a drain or a sink, you should empty the
water container every three to five dryer loads, depending on the spin speed you use when you wash the
clothes. For example, clothes spun at 800 rpm will have more moisture when you take them out of the
washer than clothes spun at 1400 rpm. Therefore, the dryer will have to remove more water.
To empty the container, simply pull it out and pour out the water. This water is clean and can be used to
water plants.
If the container becomes too full, the machine with shut down. To restart the program, empty the container
and press Start. It may be a few minutes before the machine starts because it drains the excess water
from the sump before it restarts.
Simply pull out the container
and pour out the water.
Do not remove the water container while the machine is running.
NOTE:
T760/T780

Other manuals for T760

2

This manual suits for next models

1

Other Asko Dryer manuals

Asko T793C FI User manual

Asko

Asko T793C FI User manual

Asko DC 7171 User manual

Asko

Asko DC 7171 User manual

Asko T753C User manual

Asko

Asko T753C User manual

Asko T754CT User manual

Asko

Asko T754CT User manual

Asko TD70 User manual

Asko

Asko TD70 User manual

Asko T884XLCHP User manual

Asko

Asko T884XLCHP User manual

Asko T411HSW User manual

Asko

Asko T411HSW User manual

Asko TL751 XXL Troubleshooting guide

Asko

Asko TL751 XXL Troubleshooting guide

Asko T731 User manual

Asko

Asko T731 User manual

Asko T793C User manual

Asko

Asko T793C User manual

Asko T753 User manual

Asko

Asko T753 User manual

Asko T744C User manual

Asko

Asko T744C User manual

Asko DC7794 User manual

Asko

Asko DC7794 User manual

Asko T408HD W Series User manual

Asko

Asko T408HD W Series User manual

Asko T700 Series User manual

Asko

Asko T700 Series User manual

Asko T793 User manual

Asko

Asko T793 User manual

Asko TLS752 User manual

Asko

Asko TLS752 User manual

Asko T754C Assembly instructions

Asko

Asko T754C Assembly instructions

Asko TD85.C18X User manual

Asko

Asko TD85.C18X User manual

Asko TL751G XXL User manual

Asko

Asko TL751G XXL User manual

Asko T608HX W Series User manual

Asko

Asko T608HX W Series User manual

Asko T741C User manual

Asko

Asko T741C User manual

Asko T884XLHPW User manual

Asko

Asko T884XLHPW User manual

Asko T753C User manual

Asko

Asko T753C User manual

Popular Dryer manuals by other brands

LG DLE2515S owner's manual

LG

LG DLE2515S owner's manual

GE Profile DPGT650 Owner's manual and installation instructions

GE

GE Profile DPGT650 Owner's manual and installation instructions

Frigidaire FASG7073NA uso y cuidado

Frigidaire

Frigidaire FASG7073NA uso y cuidado

Frigidaire FARG4044MW l'utilisation et l'entretien

Frigidaire

Frigidaire FARG4044MW l'utilisation et l'entretien

Beko B3T6823M2 user manual

Beko

Beko B3T6823M2 user manual

Smeg 129530 Instructions for use

Smeg

Smeg 129530 Instructions for use

GE DCCH43EH Dimensions and installation information

GE

GE DCCH43EH Dimensions and installation information

Hotpoint Ariston TCD 93B Instruction booklet

Hotpoint Ariston

Hotpoint Ariston TCD 93B Instruction booklet

Siemens WT45W569DN Installation and operating instructions

Siemens

Siemens WT45W569DN Installation and operating instructions

Hyperion IRT-UVA 1 PrepCure 3 Digital Assembly, Operation and Spares Manual

Hyperion

Hyperion IRT-UVA 1 PrepCure 3 Digital Assembly, Operation and Spares Manual

Estate EGD4100SQ installation instructions

Estate

Estate EGD4100SQ installation instructions

Drieaz Jet CXV TurboDryer F367 owner's manual

Drieaz

Drieaz Jet CXV TurboDryer F367 owner's manual

Drieaz F367-115V owner's manual

Drieaz

Drieaz F367-115V owner's manual

Handy Dryers Tapillo Single Air Tap user manual

Handy Dryers

Handy Dryers Tapillo Single Air Tap user manual

ThinkGizmos TG950 user manual

ThinkGizmos

ThinkGizmos TG950 user manual

Indesit IDCA 7H35 B TM instruction manual

Indesit

Indesit IDCA 7H35 B TM instruction manual

Handy Dryers STERILL user manual

Handy Dryers

Handy Dryers STERILL user manual

MO-EL TWIST 734 Use and maintenance

MO-EL

MO-EL TWIST 734 Use and maintenance

manuals.online logo
manuals.online logoBrands
  • About & Mission
  • Contact us
  • Privacy Policy
  • Terms and Conditions

Copyright 2025 Manuals.Online. All Rights Reserved.