Aspace Salcombe 3097 User manual

Orientation Options (Bunk Bed)
Please refer to the orientation option images below to help you decide and understand
which way to construct the product.
These are the only two recommended options for the orientation of the Bed.
Orientation Option A
Ladder positioned on
the Right.
Orientation Option B
Single holes must always be
positioned on the ladder side
(front).Double holes must
always be positioned on the
non ladder side (back).
7
Single holes must always be
positioned on the ladder side
(front).Double holes must
always be positioned on the
non ladder side (back).
Ladder positioned
on the Left.
Salcombe
Mid Sleeper
Code: 3097
PLEASE READ CAREFULLY & KEEP FOR FUTURE REFERENCE

Welcome
Thank you for buying the Salcombe Mid Sleeper.
Before beginning assembly, please take a few quiet minutes to read these instructions.
Lay the parts out on a clean, soft, flat surface (such as a carpeted floor) and compare with the
parts check list on the next page. Do not throw away any packaging until you are sure that you
have all the parts.
If, for any reason, you wish to return the product, you must disassemble the components and
use the original packaging.
The product must be assembled by an adult. There are small parts: keep small children
clear of the assembly area. Some stages of assembly require more than one person.
The thickness of the Mattress should not exceed 18cm. Maximum
Mattress size: 190cm x 90cm x 18cm (6’3’’ x 3’0’’ x 7’’)
Product Care
Clean your Bed by wiping with a damp cloth & drying with a soft cloth. Never clean
with abrasives, chemical cleaners or household polishes.
Take care when handling or moving the Bed. Careless handling can damage
wooden furniture. Try to lift rather than drag.
Product Safety
Periodically check all fittings to ensure that none have come loose.
The furniture must be set up on an even and stable surface.
Keep away from direct sources of heat, such as electric, gas or coal fires.
Do not allow children to climb on the furniture. Using this furniture other than for its intended
purpose could cause damage to the structure or serious injury to your child.
The Bed should not be used if any structural part is broken or missing
Do not attach items such as ropes, strings, cords, harnesses or belts etc to avoid the risk of
strangulation.
Warning: Children can become trapped between the bed and the wall. To avoid the risk of
serious injury the distance between the top safety barrier and the wall must not exceed
75mm or be more than 230mm.
Customer Service 0800 021 9015 or [email protected]
If you have a problem with this product, please call or email our Customer Service Team,
who will be glad to help.
We can usually provide replacement and / or spare parts promptly; it will help us if you
can identify the specific part using the check list in the next section.
About ASPACE
Many of us at ASPACE are parents, we know what a pleasure it is to provide one’s children
with a lovely space where they can feel cosy, secure, loved and in charge (well, up to a
point!). Our mission at ASPACE is to allow you to give them that space of their own.
Our furniture is available exclusively from ASPACE and is designed and specified by us
with children in mind. We wish you and them many happy years with it.
1
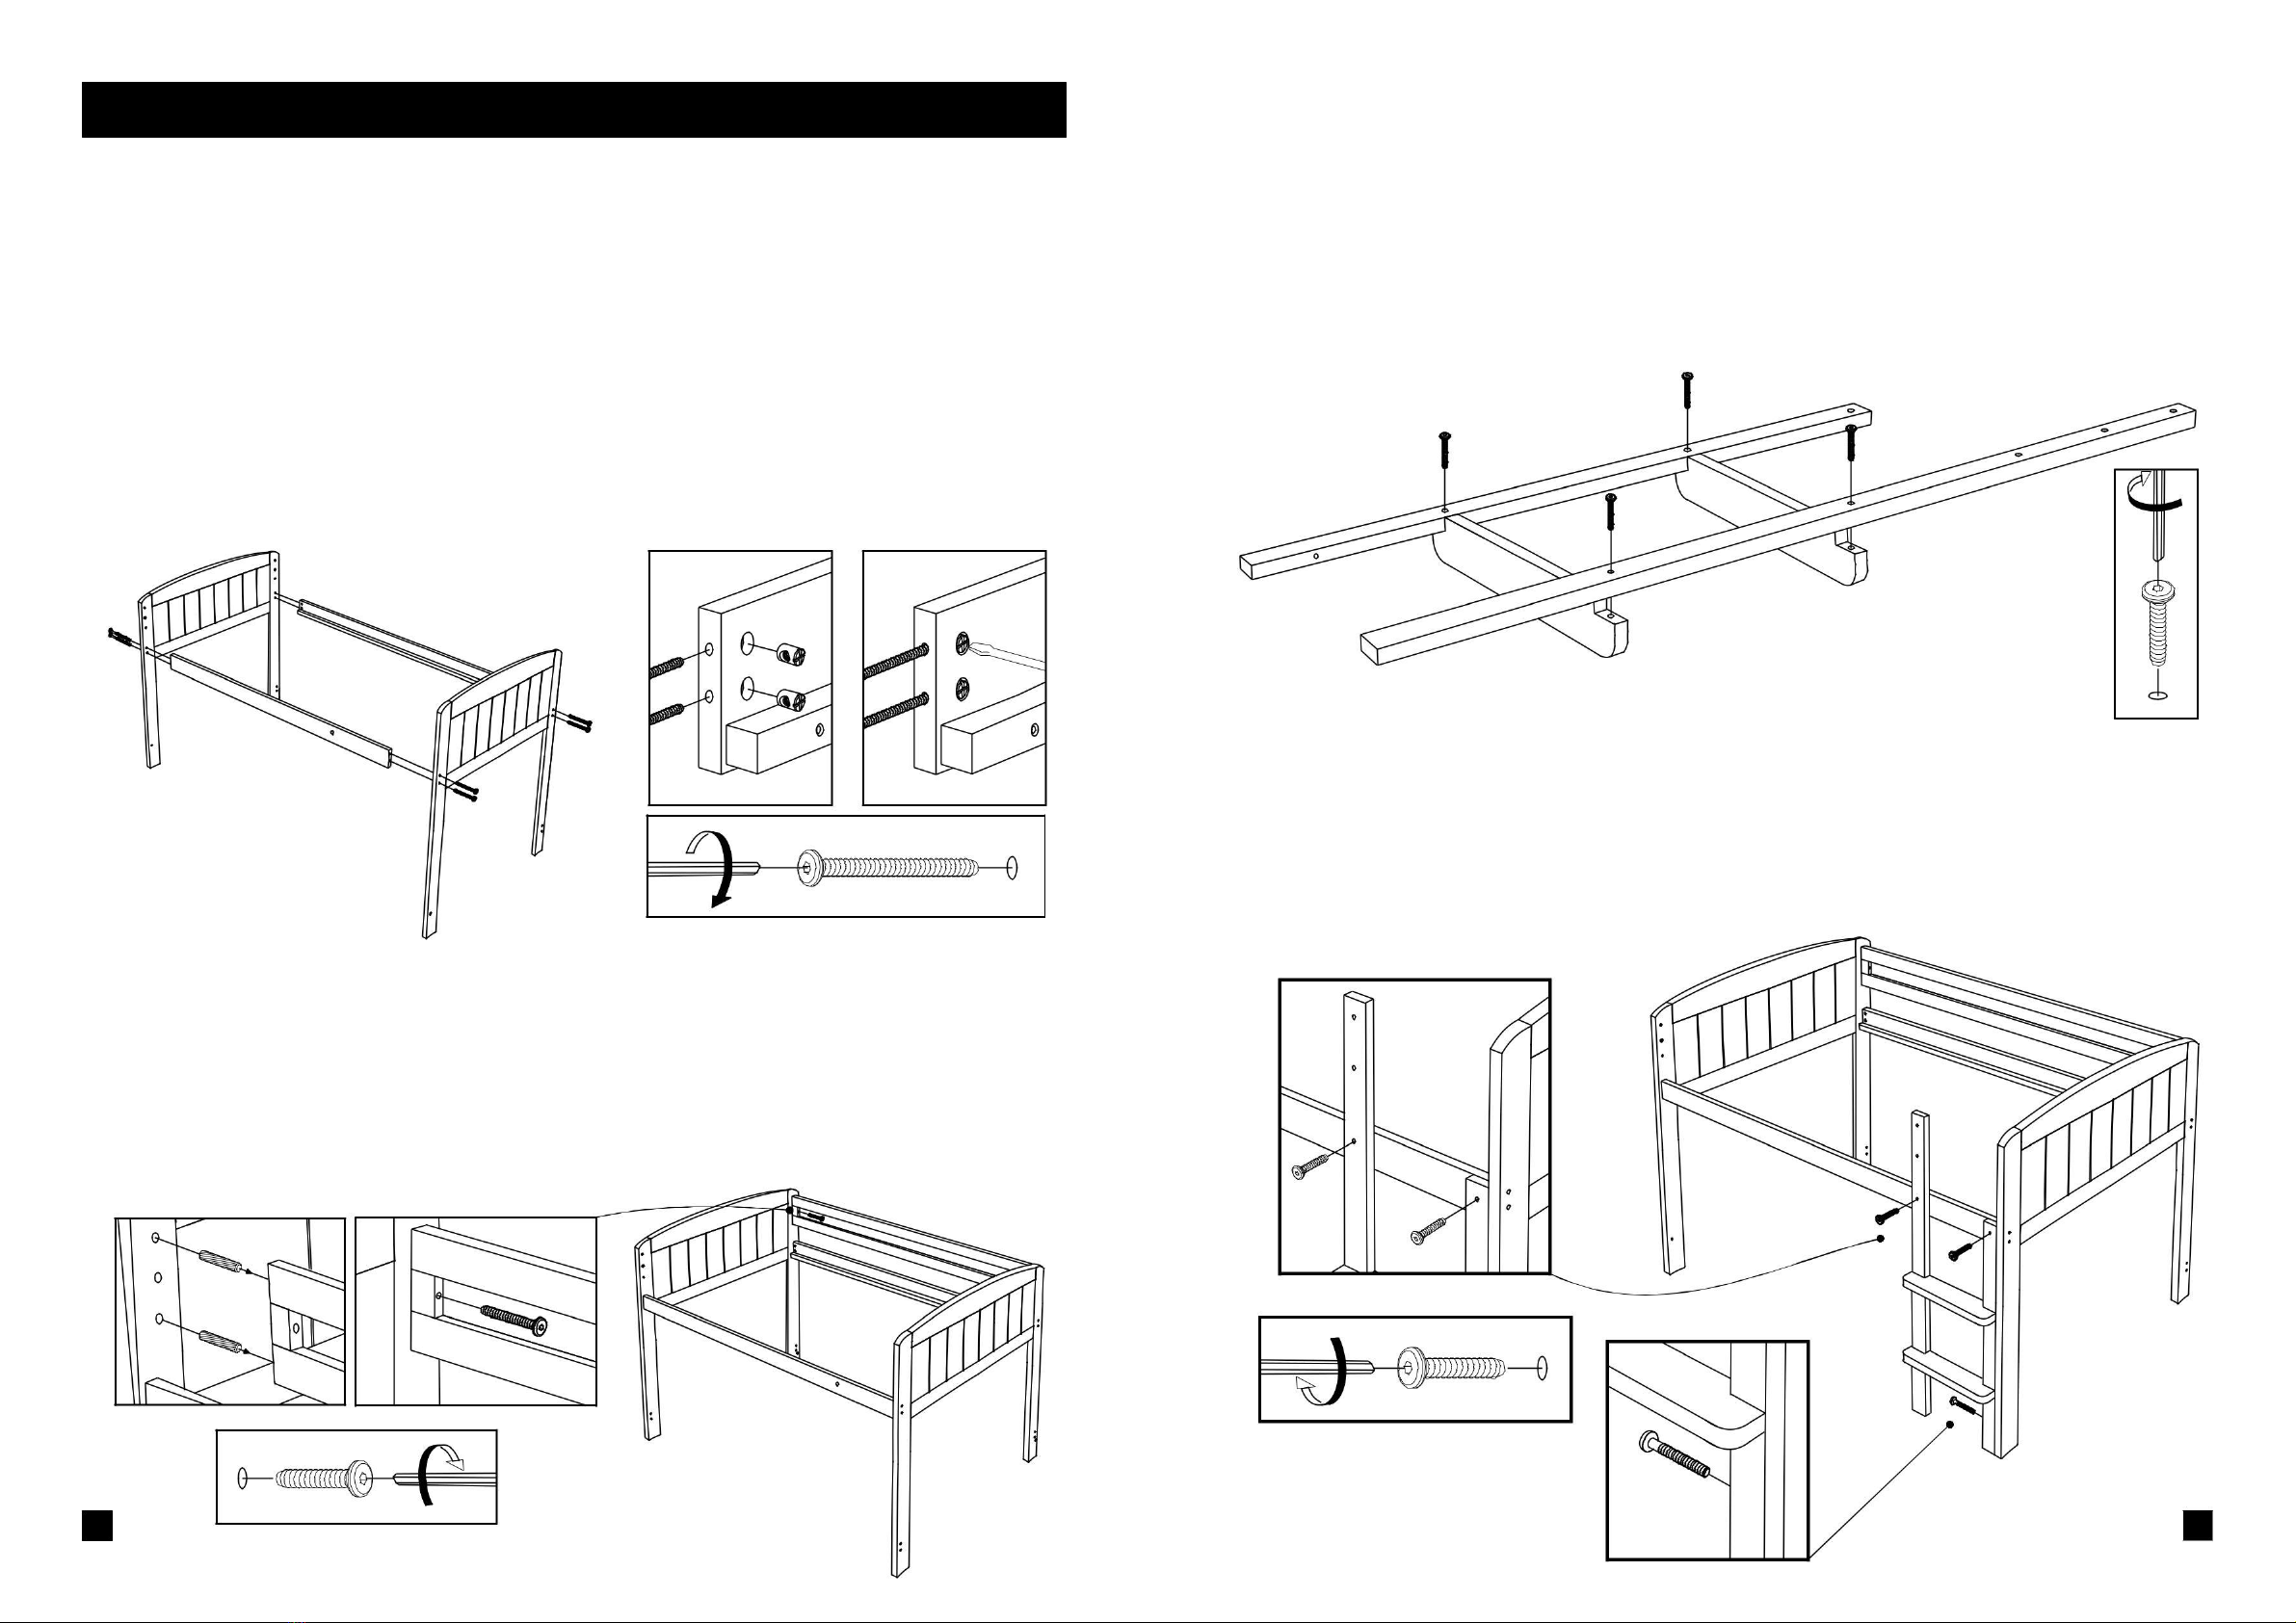
7. Fit the Lower Rear Brace.
You need: 4x Bolts (60mm), 4x Barrel Nuts and an Allen Key.
Carefully fit the lower rear brace between the back legs of each end using 4x bolts
(60mm) and 4x barrel nuts as shown below. Note: the brace can be fitted with the barrel
nut holes facing inwards or outwards (outwards shown below). Please now recheck that
ALL bolts and barrel nuts from the previous instruction stages are fully tightened.
8. Fit the Mattress Base.
You need: 34x Screws (30mm).
Carefully lift and lower the mattress base onto the bed ensuring that the slats rest on the
mattress support rails. Spread the slats out evenly pulling the ends of the base as close to
the bed ends as possible. Secure every slat in position using 2x screws for each slat. Initial
pressure will be needed to allow the screws to ‘bite’ into the mattress supports rails below.
Please now recheck that all
fittings are properly
6
tightened.

5. Attach the Front Guard Rail.
You need: 2x Dowels
Once the ladder is in position, carefully fit the front guard rail. Insert 2x dowels into the large holes
in the ends of the guard rail (Fig 5.1). Once the dowels are fitted, carefully lift the rail into position
aligning and engaging the dowels into the corresponding holes in the bed end. Fully support the
front guard in position until it is secure in place in the next stage of construction.
Fig 5.1
Parts Check List (Not to scale) CR
6. Secure the Front Guard Rail.
You need: 1x Bolt (60mm), 2x Bolts (35mm), 2x Sleeve Nuts and 2x Allen keys.
Once the dowels at the end of the front guard are engaged, align the holes at the opposing
end of the rail with the holes in the top of the long ladder leg. Once all is aligned, secure the
rail in position using 2x bolts (35mm) and 2x sleeve nuts at the ladder end of the rail (Fig 6.1).
2x Ends
(Left and Right)
2x Ladder Treads
1x Mattress Base
1x Rear Guard Rail
1x Front Guard Rail
1x Mattress Rail (Ladder Left)
1x Mattress Rail (Ladder Right)
1x Lower Rear Brace
1x Long Ladder Leg
Use the remaining 1x bolt (60mm) to secure the opposing end of the front guard to the
bed end (Fig 6.2).
Fig 6.1
Fig 6.2
2x Sleeve Nuts
16x Bolts (60mm)
8x Bolts (35mm)
12x Barrel Nuts
34x Screws (30mm)
6x Dowels
1x Short Ladder Leg
2x Allen Keys
You will also need a
Screwdriver (not supplied)
5
2
Assembly
1. Prepare the Assembled Base.
You need: 8x Bolts (60mm), 8x Barrel Nuts, an Allen Key and possibly a Screwdriver
NOTE: Please refer to the orientation option images on the back page of this user guide to help
you understand how the product is constructed. This guide only shows construction with the
Ladder positioned on the Right (Option A). For option B the Mattress Rails must be switched
around so that the Ladder will be positioned on the Left.
With a minimum of two people attach the mattress rails to the ends using 8x bolts (60mm) and 8x barrel
nuts. Fully support the parts and insert each bolt through the hole in the bed end into the hole in the end
of the mattress rail and then finally engaging into the hole in the side of the barrel nut (see Fig 1.1).
Once each bolt is engaged, tighten with an allen key. You may find this process easier if a screwdriver
is used to align the barrel nut holes (Fig 1.2). Note: Do not fully tighten the bolts yet, this will make
it easier to fit the guard rails later in stages 2,5 & 6.
Fig 1.1
Fig 1.2
2. Fit the Rear Guard Rail.
You need: 2x Bolts (60mm), 4x Dowels and an Allen key.
Once the ends and mattress rails are secure, carefully fit the rear guard rail. Insert 4x dowels
into the large holes in the ends of the guard rail (Fig 2.1). Once the dowels are fitted, carefully
lift the rail into position aligning and engaging the dowels into the corresponding holes in the
bed ends. Once all is aligned correctly, secure the guard rail in position using 1x Bolt (60mm)
at each rail end (Fig2.2).
Fig 2.1
Fig 2.2
3. Assemble the Ladder.
You need: 4x Bolts (35mm) and an Allen Key.
Note: The ladder must be constructed to suit the left or right hand of the bed. The ladder
construction shown below only applies for positioning the ladder on the right (orientation
option A). For left hand ladder construction, simply swap the legs over (opposite to what is
shown below). Once you have decided which end the ladder is required, align the holes in the
ladder legs with the holes in the treads. Secure the parts together by inserting the 4x bolts
(35mm) into the holes and tightening each one with an allen key.
4. Attach the Ladder.
You need: 2x Bolts (35mm), 1x Bolt (60mm) and an Allen Key.
Secure the ladder to the assembly using 2x bolts (35mm) for the mattress rail
attachment (Fig 4.1) and 1x bolt (60mm) for the leg attachment (Fig 4.2).
Fig 4.1
3
Fig 4.2
4
Other Aspace Indoor Furnishing manuals


Popular Indoor Furnishing manuals by other brands

Regency
Regency LWMS3015 Assembly instructions

Furniture of America
Furniture of America CM7751C Assembly instructions

Safavieh Furniture
Safavieh Furniture Estella CNS5731 manual

PLACES OF STYLE
PLACES OF STYLE Ovalfuss Assembly instruction

Trasman
Trasman 1138 Bo1 Assembly manual

Costway
Costway JV10856 manual


