manuals.online logo
Brands
  1. Home
  2. •
  3. Brands
  4. •
  5. aspenhome
  6. •
  7. Indoor Furnishing
  8. •
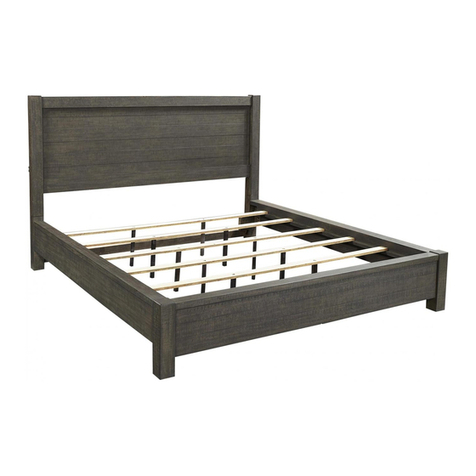
  9. aspenhome I256-412 User manual

aspenhome I256-412 User manual

Page1/6
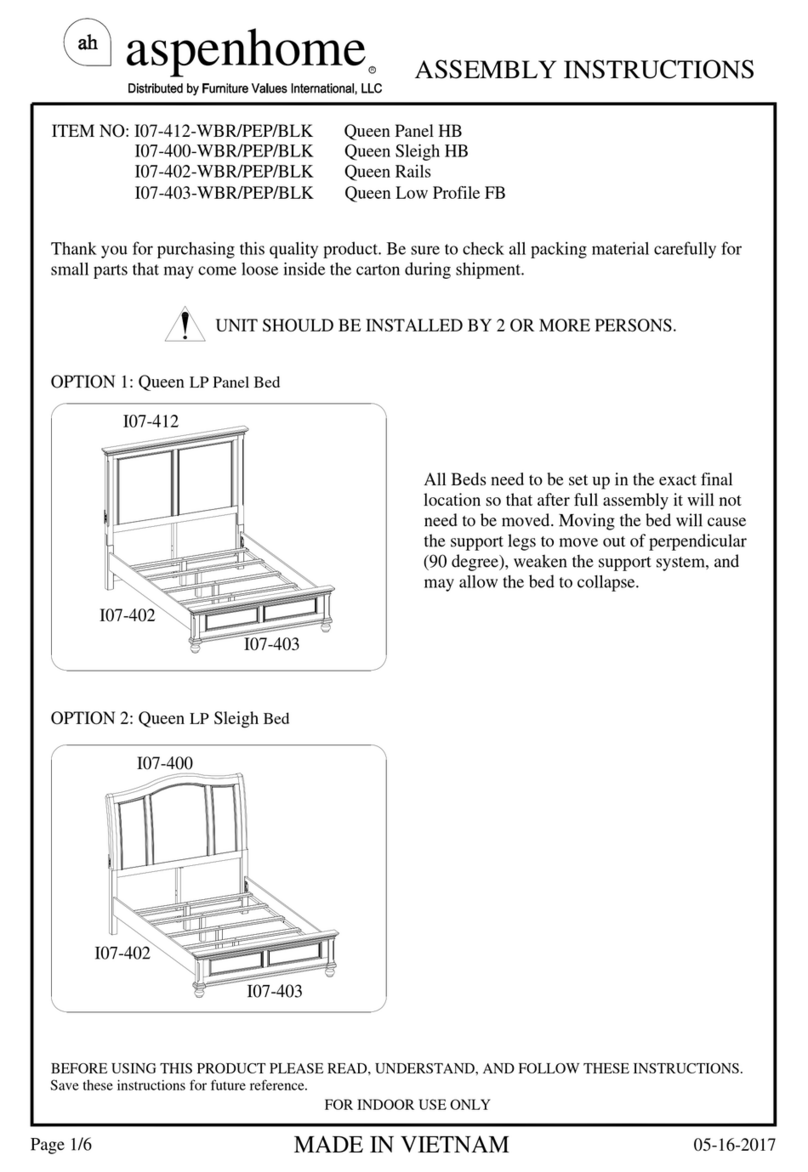
Thankyouforpurchasingthisqualityproduct.Besuretocheckallpacking material carefullyfor
small partsthatmaycomelooseinsidethe cartonduringshipment.
UNIT SHOULDBE INSTALLEDBY2ORMORE PERSONS.
All Bedsneedtobeset upinthe exact final
locationsothatafterfull assemblyit will not
needtobemoved. Moving thebedwill cause
thesupportlegstomoveoutofperpendicular
(90degree),weakenthesupportsystem, and
may allowthebedtocollapse.
aspenhome
RASSEMBLYINSTRUCTIONS
MADEINVIETNAM
ah
BEFORE USING THISPRODUCT PLEASEREAD, UNDERSTAND, AND FOLLOWTHESEINSTRUCTIONS.
Save these instructionsforfuture reference.
FORINDOORUSEONLY
TOOLSREQUIRED (NOTPROVIDED)
PHILLIPSSCREWDRIVER
I256-403
I256-402
I256-412
COMPONENTSLIST:I256-412
No.
1
2
3
5
Description Sketch Quantity
Headboard
LeftLeg
RightLeg
WoodStretcher 1PC
1PC
1PC
1PC
COMPONENTSLIST:I256-402
No.
1
2
Description Sketch Quantity
Bed rails
Slats 4PCS
2PCS
COMPONENTSLIST:I256-403
No.
1
2
Description Sketch Quantity
Footboard 1PC
2PCS
ITEMNO:I256-412Queen Panel HB
I256-402 Queen Rails
I256-403 QueenLowProfileFB
HARDWARELIST:I256-403
No.
L
M
N
Description Sketch Quantity
Allen Wrench 4mm 1PC
2PCS
HARDWARELIST:I256-412
1PC
No.
A
B
C
D
E
Description Sketch Quantity
Allen Wrench 4mm
10 PCS
HARDWARELIST:I256-402
8PCS
No.
F
G
H
I
J
Description Sketch Quantity
HangerBolt 5/16" x4-1/2"
HexNut5/16"
HexWrench 12mm 1PC
Wood Screw M4x1-1/4" 8PCS
8PCS
K
8PCS
MetalLeg
3SupportLeg(forslat) 4PCS
6PCS
10 PCS
HalfMoon Washer 5/16"
Bolt 5/16"x1-1/2"
Lock Washer5/16"
FlatWasher5/16" x7/8"
Bolt 5/16"x2-1/4"
Bolt 5/16"x1-1/2"
Lock Washer5/16"
FlatWasher5/16" x7/8" 2PCS
2PCS
4MetalLeg 2PCS
4PCS
07-09-2021
aspenhome
RASSEMBLYINSTRUCTIONS
MADEINVIETNAM
ah
Page2/6
STEP3: Laytheheadboardfacedownonasoft surface.
Attach theleftlegandright leg toheadboardbyusing 6
bolts(B),lockwashers(C)andflatwashers (D).
STEP4:Attachthewoodstretchertothe legsbyusing
2bolts(A),lockwashers(C)andflatwashers (D).
LeftLeg
RightLeg
B
C
D
E
ITEMNO:I256-412Queen Panel HB
I256-402 Queen Rails
I256-403 QueenLowProfileFB
1/4"
MetalLeg
Buckleplate
A
C
MetalLeg
Left/RightLeg
E
MetalLeg
RightLeg LeftLeg
D
Screw
Screw
STEP1: Puttheleftlegand rightlegupsidedownonasoft surface.
STEP 2: Eachmetallegwillcome withscrewpre-installedwitha1/4"lagasshownbelow.
Adjustasneededtoensurethe 1/4" lag.Insert the screwon eachmetal leg intothe buckleplate
onthe left leg andrightlegand pushit downtothesuitableposition.Attach the metal legsby
using2bolts(A),lockwashers(C)andflatwashers(D).Usetheallenwrench (E)totighten the
twobolts.Iftheleg islooseinthebuckleplate,thelegshouldbe removedand the screw
adjustedasneeded.
07-09-2021
B
C
D
E
A
C
D
E
aspenhome
RASSEMBLYINSTRUCTIONS
MADEINVIETNAM
ah
Page3/6
STEP6:Screwthebolts(F)intoHB&FB.Makesuretheslatbearerisinthe position (b).
Alignthe boltswiththe holesintheendofsiderailsandattach theside railstoHB&FBusing
halfmoonwashers(G)andnuts(H).Thenuseahexwrench(I)totighten all the nuts.
Side Rail
Headboard
Slatbearer
Side Rail
F
Makesuretheslatbeareris
inthe position (b).
I
Position b
Position a
GH
ITEMNO:I256-412Queen Panel HB
I256-402 Queen Rails
I256-403 QueenLowProfileFB
OPTION1: Thesiderailsmaybeusedoneitherside.Arrangetheside railssothe slat
bearersareinUPPERPOSITIONpriortoattachment inSTEP 6.
Buckleplate
K
L
M
MetalLeg
N
Footboard
1/4"
MetalLeg
Screw
Screw
STEP 5: Putthefootboardupsidedownonasoft surface. Eachmetal leg will comewithscrew
pre-installedwitha1/4"lagasshownbelow.Adjustasneeded toensurethe 1/4" lag.Insert the
screwoneachmetallegintothebuckleplateon the footboard andpushit downtothe suitable
position.Attachthemetallegsbyusing2bolts(K),lockwashers(L)and flat washers (M). Use
the allen wrench(N)totightenthetwobolts.Iftheleg islooseinthebuckleplate,the leg should
beremovedandthescrewadjusted asneeded.
Footboard
07-09-2021
aspenhome
RASSEMBLYINSTRUCTIONS
MADEINVIETNAM
ah
Page4/6
WoodScrews(J)
STEP8: Arrangetheslatsontheslatbearers equallyand
attachtotheslatbearerswithwoodscrews (J).
FUNCTIONALITYINSTRUCTION
ITEMNO:I256-412Queen Panel HB
I256-402 Queen Rails
I256-403 QueenLowProfileFB
SinglePoweredUSBPort
for Charging on bothsides
I256-403
I256-412
I256-402
STEP7: Attachthesupportlegswithlevelertotheslats.
Adjustthelevelersonbottomofsupportlegswhen necessary.
SupportLeg
Leveler
ThisEndUp
Slat
07-09-2021
OPTION2: Thesiderailsmaybeusedoneitherside.Arrangetheside railssothe slat
bearersareinLOWERPOSITIONpriortoattachment inSTEP 7.
b
a
STEP6:Theslatbearershavebeenattachedinposition (b) approximately 2"fromthetop of the side
railsforusewithastoragefootboard.Theslatbearersmustbemovedintoposition (a)based on
thisbedconfiguration.Removetheboltsfromtheslatbearersandside railsasshownbelow. Then
re-attachtheslatbearerstothesiderailsinposition(a)withbolts, lock washers, flat washers.
Caution:Donotovertightenboltsasthismayloosenthethreadedinsertsinthesiderails.
STEP7:Screwthebolts(F)intoHB&FB.Makesuretheslatbearerisinthe position (a).
Alignthe boltswiththe holesintheendofsiderailsandattach theside railstoHB&FBusing
halfmoonwashers(G)andnuts(H).Thenuseahexwrench(I)totighten all the nuts.
Side Rail
Headboard
Slatbearer
Side Rail
F
Makesuretheslatbeareris
inthe position (a).
I
Position b
Position a
GH
aspenhome
RASSEMBLYINSTRUCTIONS
MADEINVIETNAM
ah
ITEMNO:I256-412Queen Panel HB
I256-402 Queen Rails
I256-403 QueenLowProfileFB
Page5/6
07-09-2021
WoodScrews(J)
STEP9: Arrangetheslatsontheslatbearers equallyand
attachtotheslatbearerswithwoodscrews (J).
aspenhome
RASSEMBLYINSTRUCTIONS
MADEINVIETNAM
ah
ITEMNO:I256-412Queen Panel HB
I256-402 Queen Rails
I256-403 QueenLowProfileFB
Page6/6
FUNCTIONALITYINSTRUCTION
SinglePoweredUSBPort
for Charging on bothsides
I256-403
I256-412
I256-402
STEP8: Removethesupportlegs(top) asshown in thepicture
to theright.Attachthe support legswithlevelertothe slats.
Adjustthelevelersonbottomofsupportlegswhen necessary.
SupportLeg
Leveler
ThisEndUp
Slat
Remove
SupportLeg(top)
07-09-2021
Page1/6
ITEMNO:I256-415King Panel HB
I256-406 King Rails
I256-410 Cal King Rails
I256-407 KingLowProfileFB
Thankyouforpurchasingthisqualityproduct.Besuretocheckallpacking material carefullyfor
small partsthatmaycomelooseinsidethe cartonduringshipment.
UNIT SHOULDBE INSTALLEDBY2ORMORE PERSONS.
All Bedsneedtobeset upinthe exact final
locationsothatafterfull assemblyit will not
needtobemoved. Moving thebedwill cause
thesupportlegstomoveoutofperpendicular
(90degree),weakenthesupportsystem, and
may allowthebedtocollapse.
aspenhome
RASSEMBLYINSTRUCTIONS
MADEINVIETNAM
ah
BEFORE USING THISPRODUCT PLEASEREAD, UNDERSTAND, AND FOLLOWTHESEINSTRUCTIONS.
Save these instructionsforfuture reference.
FORINDOORUSEONLY
TOOLSREQUIRED (NOTPROVIDED)
PHILLIPSSCREWDRIVER
I256-407
I256-406
I256-415
I256-410
COMPONENTSLIST: I256-406
No.
1
2
Description Sketch Quantity
Bed rails
Slats 5PCS
2PCS
COMPONENTSLIST: I207-410
No.
1
2
Description Sketch Quantity
Bed rails
Slats 5PCS
2PCS
COMPONENTSLIST: I256-407
No.
1
2
3
Description Sketch Quantity
Footboard 1PC
2PCS
HARDWARELIST:I256-407
No.
L
M
N
Description Sketch Quantity
Allen Wrench 4mm 1PC
O
HARDWARELIST:I256-415
1PC
No.
A
B
C
D
E
Description Sketch Quantity
Allen Wrench 4mm
10 PCS
HARDWARELIST:I256-406/410
8PCS
No.
F
G
H
I
J
Description Sketch Quantity
HexNut5/16"
HexWrench 12mm 1PC
10 PCS
8PCS
10 PCS
K
8PCS
Wood Cap(onlyfor410) 8PCS
6PCS
MetalLeg
SupportLeg(forslat)
COMPONENTSLIST: I256-415
No.
1
2
3
4
Description Sketch Quantity
Headboard
LeftLeg
RightLeg
WoodStretcher 1PC
1PC
1PC
1PC
HalfMoon Washer 5/16"
5PCS
Bolt 5/16"x1-1/2"
Bolt 5/16"x2-1/4"
Lock Washer5/16"
FlatWasher5/16" x7/8"
HangerBolt 5/16" x4-1/2"
Wood Screw M4x1-1/4"
Bolt 5/16"x1-1/2"
Lock Washer5/16"
FlatWasher5/16" x7/8"
2PCS
2PCS
2PCS
52PCS
MetalLeg
4PCS
07-09-2021
aspenhome
RASSEMBLYINSTRUCTIONS
MADEINVIETNAM
ah
Page2/6
STEP3: Laytheheadboardfacedownonasoft surface.
Attach theleftlegandright leg toheadboardbyusing 6
bolts(B),lockwashers(C)andflatwashers(D).
STEP4:Attachthewoodstretchertothe
legsbyusing2bolts(A),lockwashers(C)
andflatwashers(D).
07-09-2021
ITEMNO:I256-415King Panel HB
I256-406 King Rails
I256-410 Cal King Rails
I256-407 KingLowProfileFB
B
C
D
E
LeftLeg
RightLeg
1/4"
MetalLeg
Buckleplate
A
C
MetalLeg
Left/RightLeg
E
MetalLeg
RightLeg LeftLeg
D
Screw
Screw
STEP1: Puttheleftlegand rightlegupsidedownonasoft surface.
STEP 2: Eachmetallegwillcome withscrewpre-installedwitha1/4"lagasshownbelow.
Adjustasneededtoensurethe 1/4" lag.Insert the screwon eachmetal leg intothe buckleplate
onthe left leg andrightlegand pushit downtothesuitableposition.Attach the metal legsby
using2bolts(A),lockwashers(C)andflatwashers(D).Usetheallenwrench (E)totighten the
twobolts.Iftheleg islooseinthebuckleplate,thelegshouldbe removedand the screw
adjustedasneeded.
B
C
D
E
A
C
D
E
Page3/6
STEP6:Screwthebolts(F)intoHB&FB.Makesuretheslatbearerisinthe position (b).
Alignthe boltswiththe holesintheendofsiderailsandattach theside railstoHB&FBusing
halfmoonwashers (G)andnuts(H).Thenuseahexwrench(I)totighten all the nuts.
Side Rail
Headboard
Slatbearer
Side Rail
F
Makesuretheslatbeareris
inthe position (b).
I
Position b
Position a
GH
OPTION1: Thesiderailsmaybeusedoneitherside.Arrangetheside railssothe slat
bearersareinUPPERPOSITIONpriortoattachment inSTEP 6.
aspenhome
RASSEMBLYINSTRUCTIONS
MADEINVIETNAM
ah
ITEMNO:I256-415King Panel HB
I256-406 King Rails
I256-410 Cal King Rails
I256-407 KingLowProfileFB
Buckleplate
L
M
N
MetalLeg
Footboard
O
1/4"
MetalLeg
Screw
Screw
STEP 5: Putthefootboardupsidedownonasoft surface. Eachmetal leg will comewithscrew
pre-installedwitha1/4"lagasshownbelow.Adjustasneeded toensurethe 1/4" lag.Insert the
screwoneachmetallegintothebuckleplateon the footboard andpushit downtothe suitable
position.Attachthemetallegsbyusing2bolts(L),lockwashers(M)and flat washers (N). Use
the allen wrench(O)totightenthetwobolts.Iftheleg islooseinthebuckleplate,the leg should
beremovedandthescrewadjusted asneeded.
Footboard
07-09-2021
aspenhome
RASSEMBLYINSTRUCTIONS
MADEINVIETNAM
ah
WoodScrews(J)
STEP8: Arrangetheslatsontheslatbearers equallyand
attachtotheslatbearerswithwoodscrews (J).
ITEMNO:I256-415King Panel HB
I256-406 King Rails
I256-410 Cal King Rails
I256-407 KingLowProfileFB
Page4/6
FUNCTIONALITYINSTRUCTION
SinglePoweredUSBPort
for Charging on bothsides
I256-407
I256-415
I256-406
I256-415
I256-410
I256-407
STEP9:ForCal Kingbed,insertwood capsintotheholeson
headboardandfootboard.ForregularKingbed, skipthisstep. WoodCap(K)
StandardKing Bed
CalKingBed
STEP7: Attachthesupportlegswithlevelertotheslats.
Adjustthelevelersonbottomofsupportlegswhen necessary.
SupportLeg
Leveler
ThisEndUp
Slat
07-09-2021
aspenhome
RASSEMBLYINSTRUCTIONS
MADEINVIETNAM
ah
OPTION2: Thesiderailsmaybeusedoneitherside.Arrangetheside railssothe slat
bearersareinLOWERPOSITIONpriortoattachment inSTEP 7.
STEP6:Theslatbearershavebeenattachedinposition (b) approximately 2"fromthetop of the side
railsforusewithastoragefootboard.Theslatbearersmustbemovedintoposition (a)based on
thisbedconfiguration.Removetheboltsfromtheslatbearersandside railsasshownbelow. Then
re-attachtheslatbearerstothesiderailsinposition(a)withbolts, lock washers, flat washers.
Caution:Donotovertightenboltsasthismayloosenthethreadedinsertsinthesiderails.
ITEMNO:I256-415King Panel HB
I256-406 King Rails
I256-410 Cal King Rails
I256-407 KingLowProfileFB
STEP7:Screwthebolts(F)intoHB&FB.Makesuretheslatbearerisinthe position (a).
Alignthe boltswiththe holesintheendofsiderailsandattach theside railstoHB&FBusing
halfmoonwashers (G)andnuts(H).Thenuseahexwrench(I)totighten all the nuts.
Side Rail
Headboard
Slatbearer
Side Rail
F
Makesuretheslatbeareris
inthe position (a).
I
Position b
Position a
GH
Page5/6
STEP8: Removethesupportlegs(top) asshown in thepicture
to theright.Attachthe support legswithlevelertothe slats.
Adjustthelevelersonbottomofsupportlegswhen necessary. SupportLeg
Leveler
ThisEndUp
Slat
Remove
SupportLeg(top)
b
a
07-09-2021
aspenhome
RASSEMBLYINSTRUCTIONS
MADEINVIETNAM
ah
STEP9: Arrangetheslatsontheslatbearers equallyand
attachtotheslatbearerswithwoodscrews (J).
ITEMNO:I256-415King Panel HB
I256-406 King Rails
I256-410 Cal King Rails
I256-407 KingLowProfileFB
WoodScrews(J)
Page6/6
FUNCTIONALITYINSTRUCTION
STEP10:ForCal Kingbed,insertwood capsintotheholeson
headboardandfootboard.ForregularKingbed, skipthisstep. WoodCap(K)
I256-407
I256-415
I256-406 StandardKing Bed
I256-407
I256-415
I256-410 CalKingBed
SinglePoweredUSBPort
for Charging on bothsides
07-09-2021

This manual suits for next models

2

Other aspenhome Indoor Furnishing manuals

aspenhome Queen Panel HB I34-412-SNA User manual

aspenhome

aspenhome Queen Panel HB I34-412-SNA User manual

aspenhome I287-9150 User manual

aspenhome

aspenhome I287-9150 User manual

aspenhome I256-454 User manual

aspenhome

aspenhome I256-454 User manual

aspenhome I222-366 User manual

aspenhome

aspenhome I222-366 User manual

aspenhome I227-471 User manual

aspenhome

aspenhome I227-471 User manual

aspenhome I349-6641S-WST User manual

aspenhome

aspenhome I349-6641S-WST User manual

aspenhome I631-9150 User manual

aspenhome

aspenhome I631-9150 User manual

aspenhome I262-412 User manual

aspenhome

aspenhome I262-412 User manual

aspenhome I644-9100 User manual

aspenhome

aspenhome I644-9100 User manual

aspenhome I07-360T-PEP/WBR User manual

aspenhome

aspenhome I07-360T-PEP/WBR User manual

aspenhome IHP-316-KHA User manual

aspenhome

aspenhome IHP-316-KHA User manual

aspenhome I221-366 User manual

aspenhome

aspenhome I221-366 User manual

aspenhome ICB407 User manual

aspenhome

aspenhome ICB407 User manual

aspenhome Queen Panel HB I07-412-WBR/PEP/BLK User manual

aspenhome

aspenhome Queen Panel HB I07-412-WBR/PEP/BLK User manual

aspenhome I256-9100 User manual

aspenhome

aspenhome I256-9100 User manual

aspenhome I3048-456 User manual

aspenhome

aspenhome I3048-456 User manual

aspenhome I240-400-RIV User manual

aspenhome

aspenhome I240-400-RIV User manual

aspenhome IML-473-BRN User manual

aspenhome

aspenhome IML-473-BRN User manual

aspenhome I349-297H-WST User manual

aspenhome

aspenhome I349-297H-WST User manual

aspenhome I349-412-WST User manual

aspenhome

aspenhome I349-412-WST User manual

aspenhome Trellis I287-360T User manual

aspenhome

aspenhome Trellis I287-360T User manual

aspenhome Liv360 I215-9140 User manual

aspenhome

aspenhome Liv360 I215-9140 User manual

aspenhome I349-6050-WST User manual

aspenhome

aspenhome I349-6050-WST User manual

aspenhome I644-6000 User manual

aspenhome

aspenhome I644-6000 User manual

Popular Indoor Furnishing manuals by other brands

DEMARTA VIRGINIO 01.09.TS01 user manual

DEMARTA VIRGINIO

DEMARTA VIRGINIO 01.09.TS01 user manual

Costway HW66529-12-22 user manual

Costway

Costway HW66529-12-22 user manual

Axor Citterio 39144XX1 Installation

Axor

Axor Citterio 39144XX1 Installation

Argos Malibu Series Assembly instructions

Argos

Argos Malibu Series Assembly instructions

Flash Furniture NH-WT-2448BSP-GG Assembly instructions

Flash Furniture

Flash Furniture NH-WT-2448BSP-GG Assembly instructions

Crosswater Mada manual

Crosswater

Crosswater Mada manual

MARCKERIC 1D1DR Assembly instructions

MARCKERIC

MARCKERIC 1D1DR Assembly instructions

WIEMANN 990990 Assembly instructions

WIEMANN

WIEMANN 990990 Assembly instructions

Better Homes and Gardens BH17-084-097-45 Instruction booklet

Better Homes and Gardens

Better Homes and Gardens BH17-084-097-45 Instruction booklet

Songmics VASAGLE LET040 Assembly instructions

Songmics

Songmics VASAGLE LET040 Assembly instructions

Madeli B930-36-002 series Specication & installation guide

Madeli

Madeli B930-36-002 series Specication & installation guide

Serta TURNER QUEEN SIZE Assembly instructions

Serta

Serta TURNER QUEEN SIZE Assembly instructions

Coaster 100209 Assembly instructions

Coaster

Coaster 100209 Assembly instructions

Gourmet Guru Grill Guru Vintage Table Assembly instructions

Gourmet Guru Grill

Gourmet Guru Grill Guru Vintage Table Assembly instructions

Songmics VASAGLE OFC071 manual

Songmics

Songmics VASAGLE OFC071 manual

nbf Signature Skoop Collaborative Lounge Chair Aassembly Instructions

nbf

nbf Signature Skoop Collaborative Lounge Chair Aassembly Instructions

Victor DC300 Assembly instructions

Victor

Victor DC300 Assembly instructions

DHP 3265098 manual

DHP

DHP 3265098 manual

manuals.online logo
manuals.online logoBrands
  • About & Mission
  • Contact us
  • Privacy Policy
  • Terms and Conditions

Copyright 2025 Manuals.Online. All Rights Reserved.