Aspes SA613 User manual

PL
S
DK
NL
P
E
F
D
GB
IASCIUGABIANCHERIA 3
TUMBLE DRYER 8
WÄSCHETROCKNER 12
SECHE - LINGE 16
SECADORA DE ROPA 20
SECADORA DE ROUPA 24
CONDENSDROGER
KONDENSTØRRETUMBLER
KONDENSTORKTUMLARE
ZARKA KONDENSACYJNA

L’asciugabiancheria deve essere installata in un locale ben aerato in modo da facilitare l’uscita dell’aria umida prodotta
dall’apparecchio durante il ciclo di asciugatura.
Questa aerazione può essere ottenuta sia aprendo semplicemente una finestra sia tramite un ventilatore.
A seconda del modello che avete scelto, l’asciugabiancheria può avere una o tre uscite per l’aria (una posteriore e due
laterali).
È anche possibile scaricare all’esterno l’aria umida tramite un tubo flessibile.
L’asciugabiancheria può essere installata sul pavimento e posizionata in maniera per-
fettamente orizzontale grazie ai quattro piedini regolabili, oppure può essere messa so-
pra una lavatrice a caricamento frontale, formando così una colonna bucato.
RACCORDO VERSO L’ESTERNO
Se volete scaricare all’esterno l’aria umida
prodotta dall’asciugabiancheria, dovete col-
legare un tubo flessibile nella parte poste-
riore dell’asciugabiancheria.
Troverete in dotazione un tubo flessibile di
2 m. di lunghezza con fascetta di serraggio.
INSTALLAZIONE IN COLONNA
Qualora aveste problemi di spazio, questa asciugabiancheria può essere facilmente in-
stallata sopra una lavatrice a caricamento frontale.
Per questo è necessario un kit di sovrapposizione che vi possiamo fornire su ri-
chiesta. Durante l’installazione non dimenticatevi di regolare i piedini.
CONSIGLI
Per ottenere un miglior rendimento dell’asciugabian-
cheria non installatela in un locale in cui la tempera-
tura ambiente sia inferiore a +10° C.
Prima di effettuare la prima asciugatura pulite l’interno
del cestello con un panno umido in modo da togliere il
velo polvere che potrebbe essersi depositato durante il
trasporto.
INSTALLAZIONE
3
I
ATTENZIONE
L’asciugabiancheria non deve essere assolutamente col-
legata ad un camino.
Attorno all’asciugabiancheria non deve esserci polvere
o lanuggine perché potrebbe essere aspirata all’interno
della macchina.
COLLEGAMENTO ELETTRICO
Prima di inserire la spina nella presa di corrente assicura-
tevi che:
1. il valore della tensione di alimentazione sia uguale a quel-
lo indicato sulla targhetta matricola posta sulla parte
posteriore dell’apparecchio;
2. il contatore, le valvole limitatrici, la linea di alimentazio-
ne e la presa di corrente siano dimensionati in modo ta-
le da poter sopportare il carico massimo richiesto: i va-
lori di potenza e di corrente assorbiti sono indicati
sulla targhetta matricola;
3. la presa e la spina siano tra loro compatibili senza l’in-
terposizione di riduzioni, prese multiple, adattori vari e
prolunghe. Se necessario, fate sostituire la presa del-
l’impianto con una di tipo adatto.
4. Il collegamento dell’apparecchio ad una presa di terra è
obbligatorio ai termini di legge.Tale presa deve essere
facilmente accessibile dopo l’installazione dell’apparec-
chio.
Se il cavo di alimentazione è danneggiato, esso deve
essere sostituito da un cavo o un assieme speciale
disponibile presso il costruttore o il servizio assi-
stenza tecnica.
Il fabbricante non si assume alcuna responsabilità per
danni subiti da persone o cose se le norme di elemen-
tare sicurezza indicate in questo libretto non vengono
rispettate.

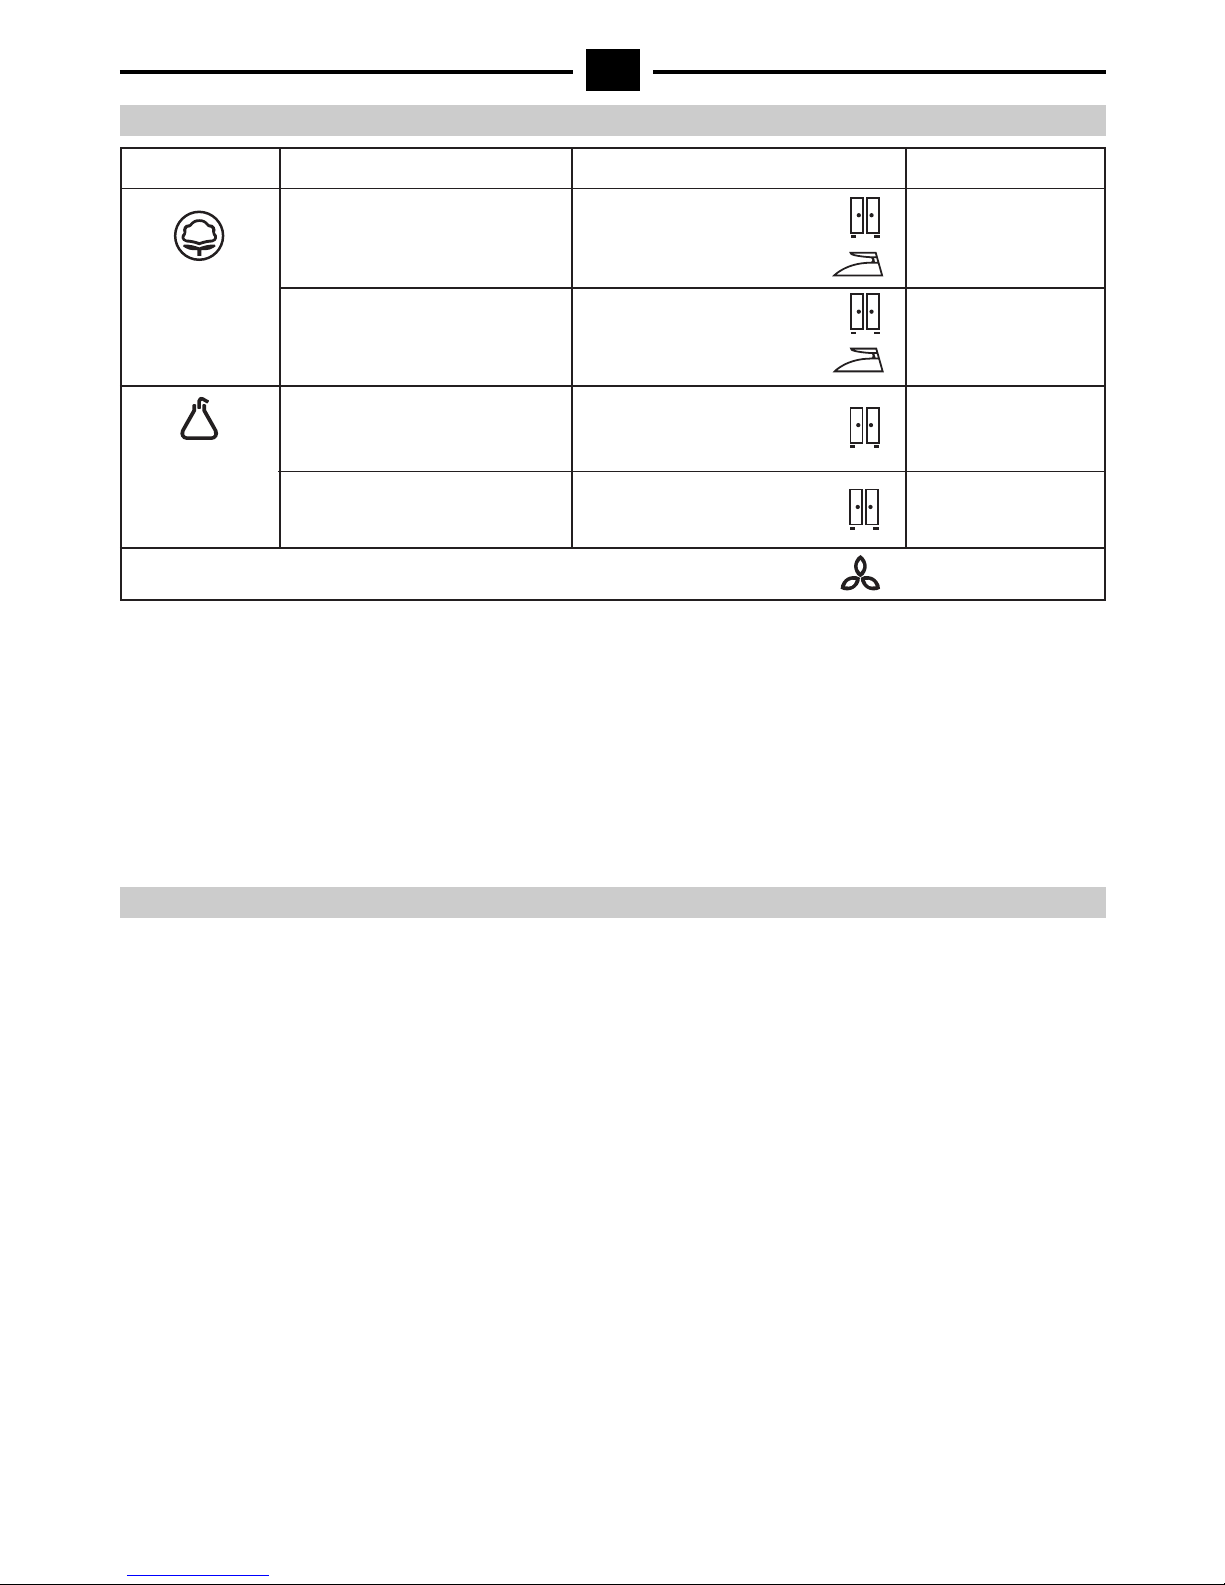
Assicuratevi che la biancheria che state asciugando sia
adatta ad essere asciugata in un’asciugabiancheria. Un’in-
dicazione in merito la troverete sulle etichette della bian-
cheria. I seguenti simboli significano:
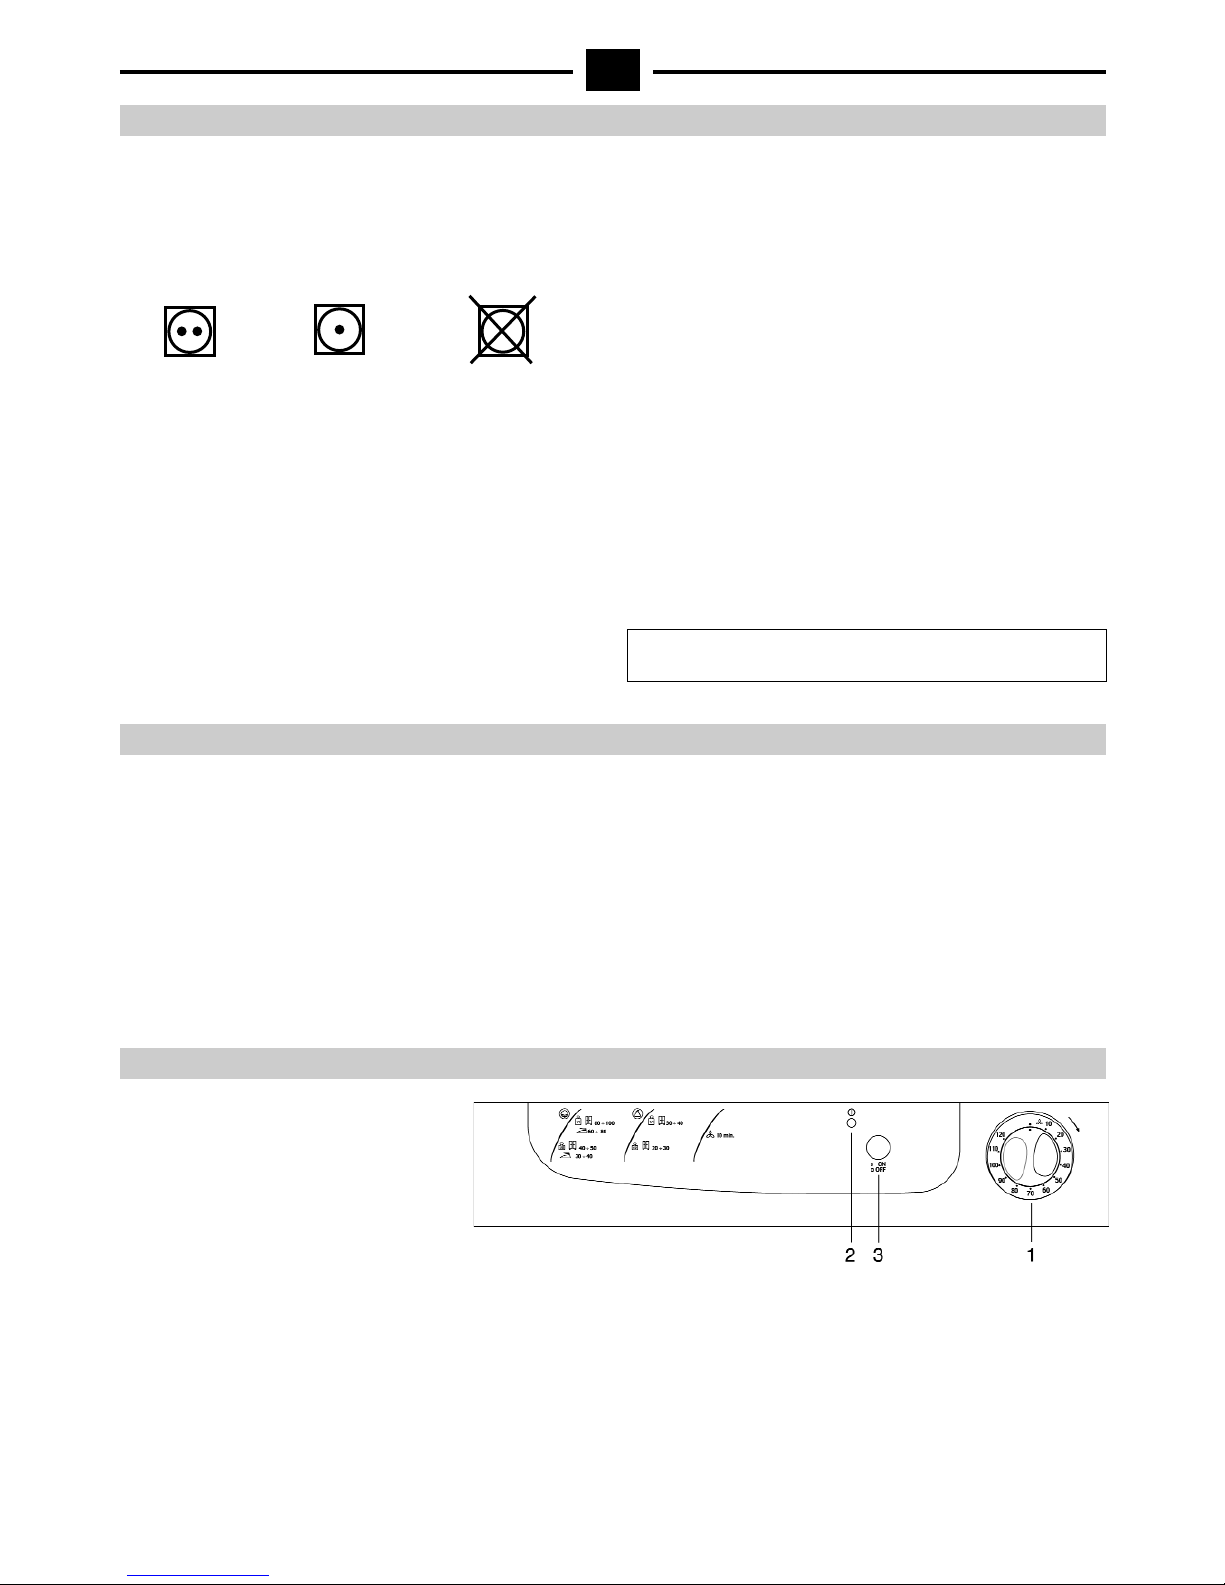
Mettere nell’apparecchio solo biancheria centrifugata.
Infatti, più la velocità di centrifuga della vostra lavatri-
ce è elevata, più il tempo di asciugatura sarà breve con
un conseguente risparmio di energia.
Il cestello di questa asciugabiancheria può contenere fino
a6kg di biancheria resistente (cotone, lino, biancheria in
spugna, tovaglie e lenzuola) o 3kg di biancheria delica-
ta (tessuti sintetici).
Tenere presente che per avere una buona asciugatura, il
peso di un carico composto da capi di biancheria di grandi
dimensioni (tovaglie, lenzuola, etc.) dovrà essere inferiore
a quello di un carico composto da capi di piccole dimen-
sioni.
Mettete i capi di piccole dimensioni in una federa asciutta:
l’asciugatura sarà più efficace.
Ricordate di chiudere tutte le chiusure lampo, di annodare
tutti i lacci e di abbottonare le federe.
Otterrete un’asciugatura più omogenea se eviterete di mi-
schiare capi di grandi dimensioni con dei capi di piccole di-
mensioni, anche se sono dello stesso tessuto. Cercate di
selezionare la biancheria in base alla dimensione, il tipo di
tessuto ed il grado di asciugatura desiderato.
Evitate di aggiungere dei capi umidi quando il programma
di asciugatura è già cominciato, altrimenti rischierete di ot-
tenere dei risultati non soddisfacenti.
ATTENZIONE
Evitate di introdurre nell’asciugabiancheria:
capi in pura lana (infeltriscono);
capi molto delicati come tende, collant e capi in seta;
capi in gomma o plastificati;
capi che sono stati in precedenza puliti con prodot-
ti infiammabili, ad es. prodotti per smacchiare.
verificare che non vi siano introdotti erroneamente
animali domestici o corpi estranei
Non mettete nell’asciugabiancheria biancheria troppo
bagnata.
4
CARICO DELLA BIANCHERIA
Introducete nell’asciugabiancheria solo biancheria cen
trifugata. Più la velocità di centrifuga della vostra lava-
trice è alta, più il tempo di asciugatura sarà breve. Non
è sufficiente strizzare la biancheria. Capi troppo bagna-
ti possono danneggiare l’apparecchio. L’asciugatura darà
risultati tanto migliori quanto più la velocità di centrifu-
ga sarà alta (800 giri al minuto o più). Una centrifuga a
500 giri/min. allungherà notevolmente i tempi di asciu-
gatura.
Centrifugate anche i capi di biancheria delicati. Evitate
di aggiungere capi umidi quando il programma di asciu-
gatura è già iniziato. Utilizzate sin dall’inizio la capacità
di carico massima: risparmierete così tempo ed energia.
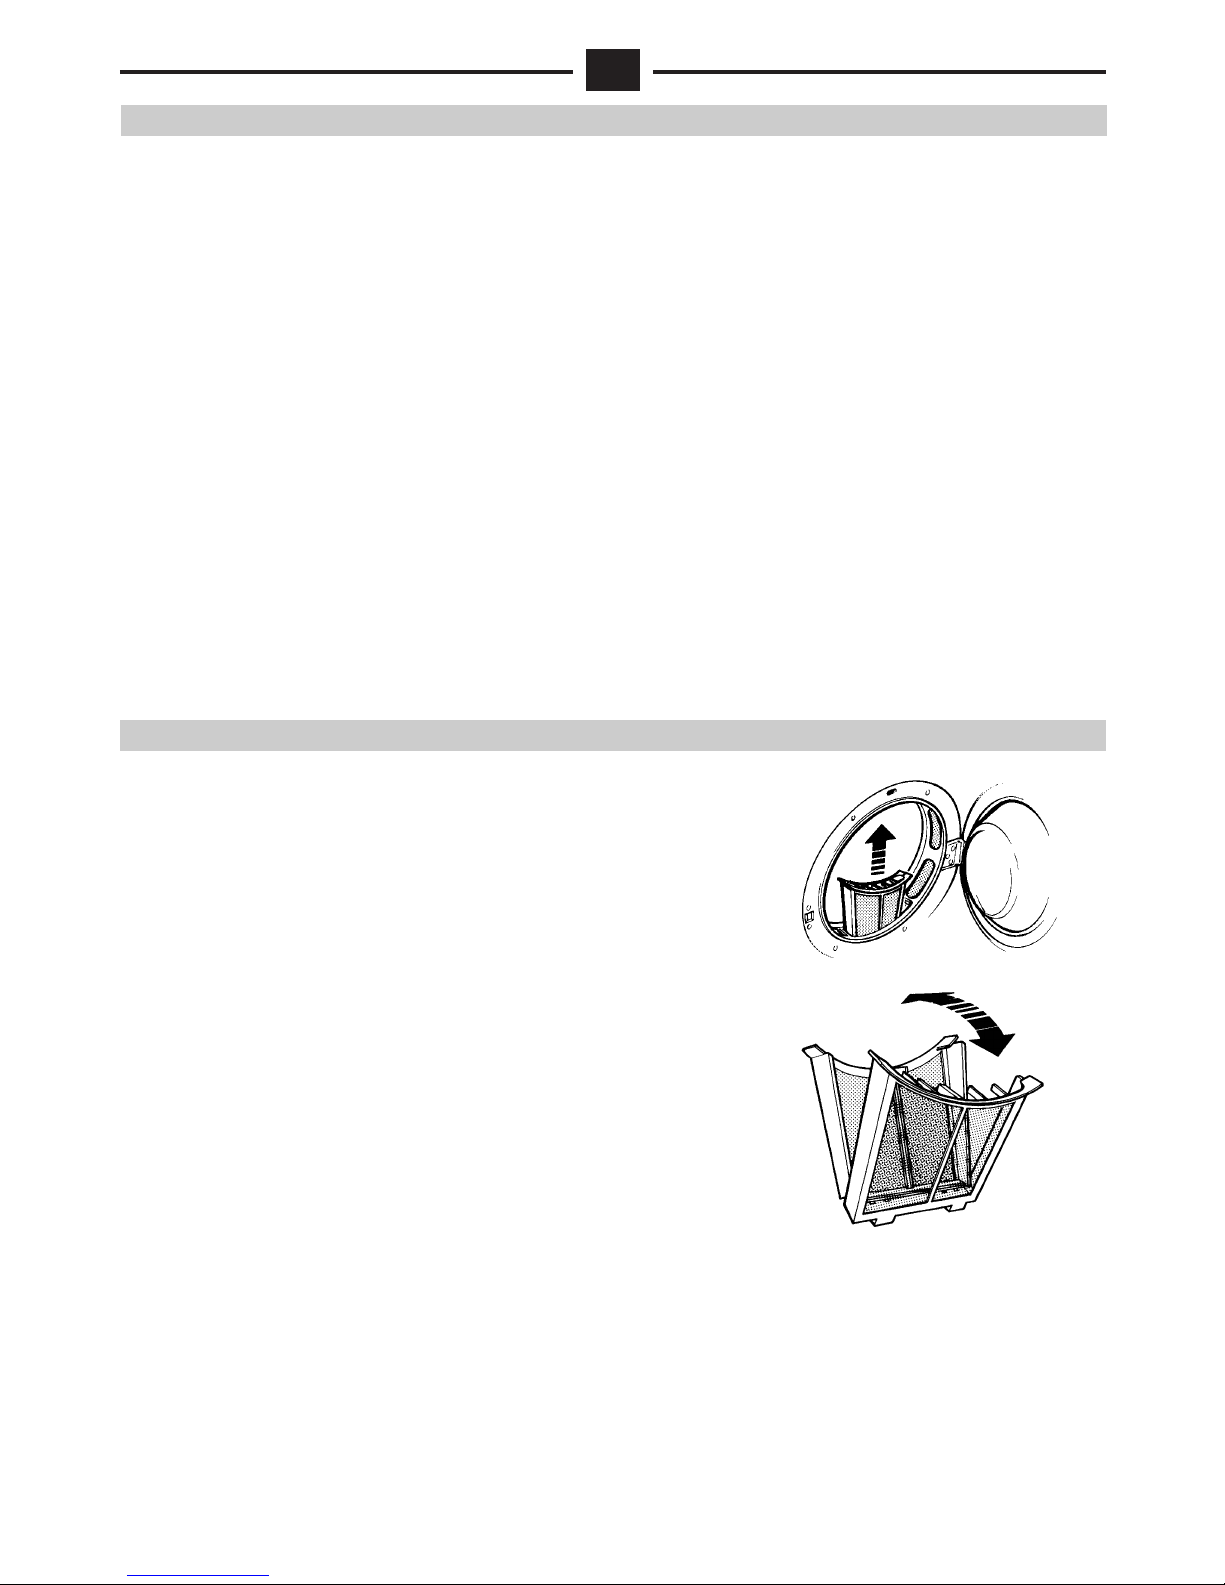
Pulite il filtro dopo ogni ciclo di asciugatura.
Cercate, nei limiti del possibile, di non utilizzare degli
ammorbidenti durante il lavaggio, infatti l’asciugabian-
cheria rende già la biancheria soffice.
Asciugate i capi interamente sintetici preferibilmente al-
l’aria aperta: si asciugano più velocemente, non si cari-
cano di elettricità statica ed inoltre risparmierete ener-
gia elettrica.
I
VI RICORDIAMO CHE L’ASCIUGABIANCHERIA DEVE
ESSERE UTILIZZATAESCLUSIVAMENTE PER
ASCIUGARE BIANCHERIA LAVATA CON ACQUA.
Asciugatura
normale
Asciugatura
delicata
L’asciugatura
nella asciugabiancheria
non è permessa
RISPARMIO DI ENERGIA

IMPORTANTE
La biancheria deve essere debitamente centrifugata pri
ma dell’asciugatura.
Il tempo di asciugatura e di conseguenza il consumo di
energia dipendono da:
– il tipo di biancheria;
– quantità di biancheria;
– velocità di centrifuga della vostra lavatrice;
– temperatura del locale in cui si trova l’asciugabian-
cheria.
Per la scelta dei programmi attenetevi scrupolosamen
te alle indicazioni fornite dai fabbricanti di biancheria, in
1. MANOPOLA TIMER
2. SPIA ALIMENTAZIONE
3. TASTO ON-OFF
MANOPOLA TIMER (1)
Permette di impostare il tempo di
asciugatura
(vedere la tabella per i tempi consigliati).
La manopola del TIMER deve essere sempre ruotata
in senso orario.
SPIA ALIMENTAZIONE (2)
La sua accensione segnala che l’asciugabiancgeria è in-
serita elettricamente.
TASTO ON-OFF (3)
Serve per avviare il ciclo desiderato
particolare nel caso di fibre sintetiche o, comunque, di
fibre che non sopportano temperature troppo elevate.
Dieci minuti prima della fine del programma interviene la
fase di ventilazione con aria fredda. Questa fase può an-
che essere utilizzata in altri casi oltre all’asciugatura, co-
me, ad esempio, quando si voglia eliminare un odore per-
sistente (ad es. prodotti antitarme).
COMANDI
I
DISPOSITIVI DI SICUREZZA
L’asciugabiancheria è provvista di due dispositivi di sicu-
rezza:
Una sicurezza elettrica che interrompe istantaneamen-
te la rotazione del cestello se aprite l’oblò durante il ci-
clo di asciugatura;
Una sicurezza termica che evita qualsiasi rischio di sur-
riscaldamento.
TEMPI DI ASCIUGATURA
5
TIPO DI BIANCHERIA CARICO GRADO DI ASCIUGATURA TEMPO DI ASCIUGATURA
COTONE
TESSUTI
RESISTENTI
PIENO CARICO 6KG
PIENO CARICO 3KG
– asciutto da riporre
– asciutto da stiro
80 ÷ 100 min
60 ÷ 80 min
40 ÷ 50 min
30 ÷ 40 min
– asciutto da riporre
– asciutto da stiro
MEZZO CARICO 3KG
MEZZO CARICO 1,5KG
TESSUTI
DELICATI
SINTETICI
E ACRILICI
– asciutto da riporre 30 ÷ 40 min
20 ÷ 30 min
– asciutto da riporre
10 min
FASE DI VENTILAZIONE CON ARIA FREDDA

6
I
Per aprire la porta afferratela per l'apposita maniglia e tira-
te verso l'esterno.
Prima di effettuare il ciclo di asciugatura:
1. Verificate che la spina sia collegata alla presa di corrente.
2. Controllate che il filtro sia nella sua sede.
3. Introducete la biancheria centrifugata nel cestello sen-
za ammassarla.
4. Verificare che non vi siano introdotti erroneamente cor-
pi estranei.
5 Chiudere la porta.
A questo punto potete impostare il tempo di asciugatura de-
siderato, procedendo nel seguente modo:
– Ruotate la manopola TIMER (1) in senso orario posi-
zionandola sul tempo di asciugatura desiderato.
– Premere il tasto ON/OFF (3) per avviare la macchina.
Il ciclo di asciugatura ha così inizio e la lampada spia di ten-
sione (nei modelli che ne sono provvisti) si accende. Quan-
do il tempo di asciugatura che voi avete impostato è tra-
scorso, interviene la fase di ventilazione con aria fredda.
Questa fase permette alla biancheria di raffreddarsi gra-
dualmente.
FUNZIONAMENTO
Nei modelli sprovvisti di fase antipiega la manopola si bloc-
ca sullo “STOP” al termine della fase di aria fredda.
Potete togliere la biancheria del cestello già alla fine della
fase di ventilazione con aria fredda . Prima di richiudere la
porta, fate ruotare il cestello per verificare che capi di pic-
cole dimensioni non siano rimasti all’interno.
Se la biancheria alla fine del ciclo di asciugatura è ancora
un po’ umida, impostate un tempo di asciugatura supple-
mentare.
Dopo ogni ciclo di asciugatura ricordatevi di pulire il
filtro a pozzetto.
CARROZZERIA
Per pulire la carrozzeria e il pannello di comandi non utilizzate mai pro-
dotti aggressivi o abrasivi, ma semplicemente un panno umido ed even-
tualmente del sapone.
FILTRO AUTOPULENTE
Il filtro di questa asciugabiancheria è costituita da due elementi: un ele-
mento fisso di forma anulare e l’altro estraibile a pozzetto.
Il filtro anulare è posizionato all’interno dell’apertura di carico ed è fis-
so, mentre il filtro a pozzetto si trova nella parte inferiore dell’apertura
di carico e può essere facilmente estratto tirandolo verso l’alto.
Le fibre che si raccolgono all’interno del filtro costituiscono un’usura
del tutto normale della biancheria: non si producono a causa di un mal-
funzionamento dell’asciugabiancheria!
Questo sistema autopulente costituisce un grande vantaggio, infatti, le
fibre che si raccolgono sulla rete del filtro anulare vengono dolcemen-
te rimosse dalle estremità della biancheria durante la sua rotazione al-
l’interno del cestello e sono poi aspirate dal filtro a pozzetto.
Così il filtro anulare, che ha una grande superficie per il passaggio del-
l’aria, resta sempre pulito durante il ciclo di asciugatura.
In questo modo si ha una portata d’aria costante durante tutto il ciclo
di asciugatura e, di conseguenza, una riduzione dei tempi di asciuga-
tura e del consumo di energia.
PULIZIA E MANUTENZIONE

La vostra asciugabiancheria non funziona corretta-
mente
Controllare se:
avete collegato bene la spina alla presa elettrica;
avete chiuso bene la porta;
è scattato l’automatico della vostra abitazione.
Il risultato dell’asciugabiancheria non è soddisfacente
Assicuratevi che:
abbiate pulito correttamente il filtro e lo abbiate ben ri-
posto nella sua sede;
non abbiate introdotto troppa biancheria nell’asciuga-
biancheria;
abbiate selezionato correttamente la biancheria e ab-
biate scelto il valore corretto del tempo di asciugatura
per la biancheria che intendete asciugare;
non abbiate prepremuto il tasto ON-OFF.
non abbiate messo l’apparecchio in un locale troppo fred-
do (temperatura inferiore a +10° C).
le bocche di aspirazione e di scarico dell’aria ed, even-
tualmente, il tubo flessibile, non siano ostruiti.
Ricordatevi che se durante il ciclo di asciugatura vie-
ne a mancare la corrente, una volta ripristinata la
stessa, riparte automaticamente.
Se aprite accidentalmente la porta, per ragioni di si-
curezza, l’apparecchio riparte soltanto se premete il
tasto ON/OFF.
I
7
COSA FARE SE...
Questa apparecchio é conforme alle seguenti Direttive Europee seguenti:
–
Antiradisturbo 89/336/CEE
–
Bassa tensione 73/23/CEE
– Marcatura CE 93/68/CEE
Dimensioni Larghezza 59,5 cm Capacità 6kg
Profondità 58,5 cm
Altezza 85 cm
CARATTERISTICHE TECNICHE
Se, nonostante tutti i controlli, l’asciugabiancheria non
funziona e l’inconveniente da voi rilevato continua ad esserci,
chiamate il Centro Assistenza autorizzato più vicino,
comunicando queste informazioni:
– il tipo di guasto
– la sigla del modello (Mod. ....................)
e il numero di serie (S/N .....................)
riportati sulla targhetta applicata nella parte posteriore
dell’asciugabiancheria.
Non ricorrete mai a tecnici non autorizzati e rifiutate sem-
pre l’installazione di pezzi di ricambio non originali.

This tumble dryer must be installed in a well aired room in order to make easier the exausting of the wet air produced by
the appliance during the drying cycle.
This aering can be carried out both opening a window or by means of a fan.
Depending on which model you have, the drier can be supplied with one or three
outlets (one on the back side and one on both lateral sides).
It is also possible to evacuate the air out of the room by means of a flexible venting hose supplied with the appliance.
The drier can be installed on the floor and leveled by means of four adjustable feet. You
can also stack the dryer on the top of a front loading washing machine (see WASHING
COLUMN).
CONNECTION TO THE OUTSIDE
If you want to evacuate the humid air out of
the room you have to fit a flexible venting
hose on the back side of the dryer.
The drawing shows the 2 mt. long flexible
hose with the fastening bracket and the
adapter available at request.
WASHING COLUMN
If you need room, your tumble dryer can be easily stacked on the top of a front loading
washing machine. For this purpose you need a stacking kit available as optional. After
you have put the dryer on the top of your washing machine, don’t forget to adjust the 4
feet. The drawing beside shows how to set the stacking kit.
SOME HINTS
To achieve the best drying results be sure that the tumble
dryer works in a room where the temperature is not lower
than 10° C.
Before carrying out the first drying cycle clean the inside
of the drum by means of a wet cloth so as to remove the
thin layer of dust that can form during the carriage and
storage.
INSTALLATION
8
GB
Vaccum cups Frame
WARNING
The tumble dryer must not be ever connected to a
chimney.
The room in which the tumble dryer is installed must be
free from dust and fluff.
Before connecting the tumble dryer be sure that:
1. the value of the voltage is equal to that one written on
the data-plate placed on the rear side of the dryer;
2. the domestic wiring system (including wall-socket, fuses,
interior wiring, electricity meters) and the plug are
adequate and suitable to carry the maximum load
demanded: the values of the rated input and of the
rated current are written on the data-plate;
3. the wall-socket and the plug fit without using any adaptor
or extention. If necessary, change the wall-socket with
a suitable-one.
4. The appliance must be properly earthed.This outlet must
be easily accessible after the installation of the dryer.
ELECTRICITY CONNECTION
If the supply card is damaged, it should be replacad
by a special cable available at the manufacturers or
at the technical service.
The manufacturer cannot be held responsible for
personal injury or damage caused if the elementary
safety practices and the advices herewith mentioned
are ignored.

Make sure that the laundry you are going to dry is suitable
for drying in a dryer. You will find information on this on the
laundry labels. The following symbols mean:
Only put spun laundry in the appliance. In fact, the
faster the spin speed of your washing machine, the
shorter the drying time, with consequent energy saving.
The drum of this dryer can contain up to 6kg of resistant
laundry (cotton, linen, towels, tablecloths and sheets) or
3kgof delicate laundry (synthetic fabrics).
Remember that for good drying the weight of a load made
up of large items of laundry (tablecloths, sheets, etc.) must
be less than that of a load made up of small items..
Put small items into a dry pillowcase: drying will be more
effective.
9
LAUNDRY LOAD
Remember to close all zips, knot all laces and button
pillowcases.
Drying will be more even if you do not mix large and small
items, even if they are of the same fabric. Try to select the
laundry on the basis of its size, type of fabric and the degree
of drying required.
Do not add damp items when the drying programme has
already started, otherwise results may not be satisfactory.
WARNING
Do not put in the dryer:
●pure-wool items (they will felt);
●very delicate items such as curtains, tights and silk;
●rubber or plasticised items;
●items which have previously been cleaned with
inflammable products, e.g. stain removers.
●Chech that no domestics animals foreign substances
have been accidentally includet in the load.
Do not put laundry which is too damp into the dryer.
●Only put spun laundry in the appliance. In fact, the faster
the spin speed of your washing machine, the shorter the
drying time. Wringing laundry is not enough. Clothes
which are too damp can damage your appliance. The
appliance will give better results at faster spinning speeds
(800 r.p.m. or more). A 500 r.p.m. spin considerably
increases drying times.
●Also spin delicate items. Do not add damp items when
the drying programme has already started. Use the
REMEMBER THAT THE DRYER MUST ONLY BE USED
TO DRY LAUNDRY WASHED WITH WATER.
Normal
drying
Delicate
drying
Do not use
in dryer
GB
ENERGY SAVING
maximum loading capacity from the beginning: this will
save time and energy.
●Clean the filter after every drying cycle.
●As far as possible try not to use fabric softeners during
the wash. In fact the dryer softens laundry.
●Completely synthetic items should be dried outside: they
will dry more quickly and will not become charged with
static electricity, and you will save electricity.
CONTROL PANEL
1. TIMER KNOB
2. POWER ON PILOT LIGHT
3. ON-OFF BUTTON
TIMER KNOB (1)
Sets the drying times
(see the table for recommended times).
The TIMER knob must always be turned clockwise.
POWER ON PILOT LIGHT (2)
When on it indicates that the dryer has been switched on.
ON-OFF BUTTON (3)
Used to start the cycle required.
SAFETY DEVICES
This tumble dryer is provided with two different safety
devices:
●an electrical safety device stops automatically the rotation
of the drum if you open the door during the drying cycle;
●a thermal safety device avoids any risk of overheating.

TYPE OF LAUNDRY LOAD DRYING DEGREE DRYING TIME
STRONG
FABRICS
COTTON
LINEN
FULL LOAD 6KG
FULL LOAD 3 KG
– Wardrobe dry
– Iron dry
80 ÷ 100 min
60 ÷ 80 min
40 ÷ 50 min
30 ÷ 40 min
– Wardrobe dry
– Iron dry
HALF LOAD 3KG
HALF LOAD 1,5KG
DELICATE
FABRICS
SYNTHETICS
AND ACRYLICS
– Wardrobe dry 30 ÷ 40 min
20 ÷ 30 min
– Wardrobe dry
10 min
COOL - AIRING PHASE
PROGRAMME TABLE
10
GB
IMPORTANT
●The laundry must be properly spun beforedrying.
●The drying time and consequently the energy
consumption depend on:
– the type of laundry;
– quantity of laundry;
– washing machine spin speed;
– temperature of the room housing the dryer.
●To select the programmes follow the indications given
by the laundry manufacturer carefully, particularly for
synthetic fibres or fibres which are damaged by too high
temperatures.
Ten minutes before the programme ends the ventilation with
cold air starts. This phase can also be used in other cases
as well as drying such as removing a persistent smell (e.g.
moth repellents).
FUNCTIONING
To open the door hold it by the handle and pull it outwards.
Before performing the drying cycle:
1. Make sure that the plug is in the socket.
2. Make sure that the filter is in place.
3. Put the spun laundry into the drum without pushing it
together.
4. Make sure that no foreign bodies have been put in by
mistake.
5. Close the door.
At this point you can set the drying time required as follows:
– Turn the TIMER knob (1) clockwise to the drying time
required.
– Press the ON/OFF button (3) to start the machine.
The drying cycle starts and the voltage pilot lamp (on the
models provided with it)lights on.
When the drying time you selected is elapsed, the cooling
phase begins (it lasts 10 min.), allowing the laundry to get
gradually cooler. At the end of the cooling phase the timer
knob stops on the STOP position.
You may take out the laundry from the drum at the end of
the cooling phase or after, during the anti-crease phase.
Before closing the loading door, turn the drum to check that
small items are not still inside.
If at the end of the drying cycle the laundry is still slightly
wet, set an additional drying time .
After each drying cycle don’t forget to clean the cup-
shaped filter.

11
CLEANING AND MAINTANANCE
CABINET
To clean the body and the control panel never use aggressive or abrasive products,
but just a damp cloth and if necessary soap.
SELF-CLEANING FILTER
The filter of this tumble dryer consists of two elements: a ring-shaped not removable
filter and a cup-shaped removable filter.
Inside the opening door you will find the ring-shaped filter placed around the porthole.
The cup-shaped filter is positioned in the lower part of the porthole and can be easily
removed and cleaned.
The fluff that deposits itself inside the filter represents a quite normal wear of the laundry
and not an inconvenience of the tumble dryer.
This kind of self-cleaning filter has really a big advantage:as a matter of fact the fluff
that deposit itself on the net of the cup-shaped filter is gently removed by the clothes
and sucked into the ring-shaped filter.
In this way the ring-shaped filter, that has a large surface for air passage, is always
clean during the drying cycle.
For this reason there is a constant air flow during the whole drying time with a
consequent lowering of drying times and, of course, an energy-saving.
GB
If your tumble dryer does not work correctly
Check if:
the plug is well connected to the socket.
the opening door is properly closed.
the fuse in the plug or in the house circuit fuse is not
blown.
If the drying results are not satisfactory:
Make sure that:
the filter is cleaned and rightly set in its seat.
there is not too much laundry inside the drum.
the clothes have been correctly sorted out and you have
choosen the right drying time according to the laundry
that must be dried.
the ON/OFF button has been pressed.
the appliance is not installed in a too cool room
(temperature must be not less than +10° C).
the air suctions, the air exhausts and the venting hose
are not blocked.
WHAT TO DO OF...
Remember that if there is a power cut during the drying
cycle, once the power has returned the cycle starts
again automatically.
If you open the door accidentally, for safety reasons
the appliance only starts again if you press the ON/OFF
button.
If, despite all these checks, the dryer does not work and the
fault continues, contact the nearest authorised After-Sales
Service, giving this information:
– the type of fault
– the model code (Model ……………)
and the series number (S/N ……………) given on the
plate at the back of the dryer.
Never use unauthorised engineers and always refuse the
installation of spare parts which are not original.
This appliance complis wiht the following EEC Directives::
– 89/336/CEE
– 73/23/CEE
– 93/68/CEE
Dimensions Width 59,5 cm Capacity 6kg
Depth 58,5 cm
Height 85 cm
TECHNICAL FEATURES

Der Wäschetrockner muß in einem gut belüfteten Raum aufgestellt werden, um die Entlüftung der während des
Gerätebetriebs entstehenden feuchten Luft zu erleichtern.
Diese Belüftung kann entweder durch einfaches Aufmachen eines Fensters oder durch einen Entlüfter erreicht werden.
Je nach ausgewähltem Modell verfügen die Wäschetrockner über eine oder drei Abluftöffnungen (hinten, rechts und
links).
Die feuchtwarme Luft kann auch mittels eines flexiblen Schlauches ins Freie geführt werden.
Der Wäschetrockner kann entweder, als Standgerät, auf den Boden aufgestellt und
durch die vier verstellbaren Schraubfüße perfekt horizontal ausgerichtet werden, oder
auf einen von vorn zu bedienenden Waschautomaten zu einer sogenannten Wasch-
Trockensäule aufgebaut werden.
ENTLÜFTUNG INS FREIE
Möchten Sie die Abluft aus der Öffnung
direkt ins Freie führen, müssen Sie einen
flexiblen Schlauch an der Rückseite des
Waschetrockners anschließen.
Auf Wunsch können wir Ihnen einen
flexiblen Schlauch von 2 m. mit Manschette.
als Zubehör liefern.
WASCHSÄULE
Dieser Wäschetrockner kann leicht auf einen Waschautomaten gestellt werden.
Hierfür ist eine Verbindungsgarnitur erforderlich. Diese ist beiI Ihrem Händler als Zubehör
erhältlich.
EMPFEHLUNGEN
Vermeiden Sie die Aufstellung in einem Raum, wo die
Temperatur niedriger als +10° C ist, dadurch würde die
Leistung des Trockners beeinträchtigt.
Vor der ersten Inbetriebnahme wischen Sie die Trommel
mit einem feuchten Lappen aus.
AUFSTELLUNG
12
D
ACHTUNG
Es ist unbedingt zu vermeiden, die Trocknerabluftleitung
an einen Schornstein od. Kamin anzuschliessen.
Die Umgebung des Trockners soll von Flusen
freigehalten werden. Es könnten sonst Staub- und
Wollreste ins Maschineninnere gesaugt werden.
ELEKTROANSCHLUSS
Bevor Sie den Trockner anschließen, achten Sie auf
folgendes:
1. Die Spannung muß der auf dem Geräteschild an der
Rückseite des Trockners angegebenen Spannung
entsprechen.
2. Stromzähler, Sicherungen bzw. LS-Automaten,
Versorgungskabel und Steckdose müssen so bemessen
sein, daß sie die maximal geforderte Leistung ertragen:
Die Stromstärke und–aufnahme sind auf dem
Geräteschild angegeben.
3. Stecker und Steckdose müssen ohne zusätzliche
Verwendung von Reduzier- oder Mehrfachsteckern und
sonstwelchen Adaptern und Verlängerungsschnüren
miteinander kompatibel sein. Falls erforderlich, lassen
Sie die Haussteckdose durch eine passende
austauschen
4. Nach dem Gesetz ist es obligatorisch, das Gerät an eine
geerdete Steckdose anzuschließen.
Die Steckdose muß
nach Aufstellung der Maschine leicht zugänglich sein.
Wenn die Zuleitung beschädigt ist, darf die Ersatzka-
bel oder der komplette spezielle Satz nur beim Her-
steller oder bei der zuständigen Service-Stelle bestel-
let werden.
DER HERSTELLER ÜBERNIMMT KEINERLEI HAFTUNG
FÜR PERSONEN UND SACHEN FÜR DURCH
UNSACHGEMÄSSEN ANSCHLUß ENTSTEHENDE
SCHÄDEN JEGLICHER ART.

Achten Sie darauf, daß die Wäsche, die Sie trocknen wollen,
für einen Trockner geeignet ist. Informationen finden Sie
auf dem Kleidungsetikett. Die folgenden Symbole bedeuten:
Vor dem Trocknen muß die Wäsche gut
ausgeschleudert sein. Je höher die Schleuderdrehzahl
Ihres Waschautomaten ist, desto kürzer wird die
Trockenzeit und desto niedriger der Energiebedarf.
Die Trommel dieses Wäschetrockners kann bis zu 6kg
festes Gewebe (Baumwolle,Leinen, Frottierwäsche, Tisch-
und Bettwäsche) oder bis zu 3kg empfindliches Gewebe
(Wäsche aus reinen Synthetics) fassen.
Das Gewicht einer aus großen Wäschestücken
(Tischdecken, Bettwäsche) bestehenden Füllmenge muß
niedriger sein als jenes, einer aus kleinen Wäschestücken
bestehenden.
Die kleinen Teile geben Sie am besten in einen trockenen
Kissenbezug.
Vergessen Sie nicht, alle Reißverschlüsse zu schließen,
13
WÄSCHE EINLEGEN
alle losen Bänder zu verknoten und die Kissenbezüge
zuzuknöpfen.
Sie kommen zu einer gleichmäßigeren Trocknung, wenn
Sie die Wäsche, die Sie aus dem Waschautomaten nehmen,
nach Textilarten, Größe und Trockengrad sortieren und
locker in die Trockentrommel legen.
Vermeiden Sie es, feuchte Wäschestücke nachzulegen,
wenn das Programm bereits angelaufen ist. Sie würden
damit zu ungewünschten Ergebnissen kommen.
ACHTUNG
Folgende Wäschestücke nicht in den Trockner geben:
●Reine Wolle (verfilzt);
●Sehr empfindliche Wäsche, wie Gardinen,
Feinstrümpfe und Seide;
●Gummi oder Kunststoff;
●Wäsche, die mit entzündbaren Produkten behandelt
wurde, z.B. mit Fleckenentferner;
●Kontrollieren Sie, daß nicht versehentlich Haustiere
oder andere Fremdkörper in der Maschine gelandet
sind.
Keine zu nasse Wäsche in den Wäschetrockner füllen.
Füllen Sie nur geschleuderte Wäsche ein. Je besser Ihre
Waschmaschine schleudert, um so kürzer ist der
Trockenvorgang. Es genügt nicht, die Wäsche einfach
auszuwringen. Zu nasse Wäschestücke können den
Trockner beschädigen. Die Ergebnisse beim Trocknen
sind um so besser, je höher die Schleudergeschwin-
digkeit ist (800 U/Minute oder mehr). Bei Wäsche, die
mit 500 U/Minute geschleudert wird, verlängert sich die
Trockenzeit erheblich.
●Auch Feinwäsche sollte vorher geschleudert werden.
Keine feuchten Wäschestücke nachträglich einfüllen,
DER WÄSCHETROCKNER IST NUR ZUM
TROCKNEN VON WÄSCHE,DIE MIT WASSER
GEWASCHEN WURDE, BESTIMMT.
normal
trocknen
pfegeleicht
trocknen
trocknen
im Wäschetrockner
ist nicht gestattet
D
ENERGIEEINSPARUNG
wenn das Programm bereits gestartet ist. Jedes Mal
gleich die volle Kapazität der Trommel ausnutzen: so
sparen Sie Zeit und Energie.
●Reinigen Sie den Filter nach jedem Trockenvorgang.
●Benutzen Sie möglichst keinen Weichspüler
beimWaschen, denn der Trockner macht die Wäsche
ebenfalls weich.
●Trocknen Sie vollständig synthetische Stoffe am Besten
an der Luft: so trocknen sie schneller, laden sich nicht
elektrostatisch auf und Sie sparen wiederum Energie.
PROGRAMM-WAHLTASTEN
1. ZEITSCHALTER
2. SPANNUNGSANZEIGELEUCHTE
3. EIN-AUS TASTE
ZEITSCHALTER (1)
Erlaubt es, die Trockenzeit einzustellen (sehen Sie auch
nachstehende Tabelle für die empfohlenen Trockenzeiten).
Der Zeitschaltergriff muß immer im Uhrzeigersinn
gedreht werden.
SPANNUNGSANZEIGELEUCHTE (2)
Ihr Aufleuchten zeigt an, daß der Wäschetrockner elektrisch
angeschlossen ist.
ON- OFF - TASTE (3)
Hiermit wird der Trockenvorgang in Betrieb gesetzt.
SICHERHEITSVORRICHTUNGEN
Dieser Wäschetrockner verfügt über zwei Sicherheitsvor-
richtungen:
– eine elektrische Sicherheitsvorrichtung, die das Gerät
automatisch abschaltet, sobald Sie die Tür während
des Betriebs öffnen;
– eine thermische Sicherheitsvorrichtung, die alle
Überheizungsgefahren vermeidet.

14
WÄSCHE FÜLLMENGE TROCKENGRAD TROCKENZEIT
FESTE
GEWEBE
BAUMWOLLE
LEINEN
VOLLE FÜLLMENGE 6KG
VOLLE FÜLLMENGE 3KG
– Schranktrocken
– Bügelfeucht
80 ÷ 100 Min
60 ÷ 80 Min
40 ÷ 50 Min
30 ÷ 40 Min
– Schranktrocken
– Bügelfeucht
HALBE FÜLLMENGE 3 KG
HALBE FÜLLMENGE 1,5KG
EMPFINDLICHE
GEWEBE
UND
ACRYLGEWEBE
– Schranktrocken 30 ÷ 40 Min
20 ÷ 30 Min
– Schranktrocken
10 Min
KALTBELÜFTUNGSPHASE
TROCKENZEITEN
D
WICHTIG
●Die Wäsche muss vor dem Trocknen richtig geschleudert
werden.
●Die Trockenzeiten und dementsprechend der
Energieverbrauch hängen ab von:
– Wäschesorte;
– Wäschemenge;
– Schleuderdrehzahl Ihrer Waschmaschine;
– Raumtemperatur, wo der Wäschetrockner steht.
●Bei der Wahl des Programms beachten Sie bitte genau
die Herstellerangaben in den Wäschestücken, besonders
bei synthetischem Gewebe bzw. bei Stoffen, die keine
hohen Temperaturen aushalten.
Zehn Minuten vor Programmende setzt die Lüftungsphase
ein (kalte Luft). Diese Phase kann auch zu anderen
Zwecken genutzt werden, wie etwa, um hartnäckige
Gerüche zu entfernen (z.B. Mottenschutzmittel).
BETRIEBSANWEISUNGEN
Die Tür zum Öffnen am entsprechenden Griff nach außen
ziehen.
Vor dem Trocknen:
1. Prüfen, dass der Stecker in der Steckdose steckt.
2. Kontrollieren, dass der Filter richtig sitzt.
3. Geschleuderte Wäsche in den Korb füllen, ohne zu
stopfen.
4. Prüfen, dass keine Fremdkörper aus Versehen eingefüllt
wurden.
5. Tür schließen.
Nun können Sie die gewünschte ZEIT einstellen.
Folgendermaßen vorgehen:
– ZEITSCHALTER (1) im Uhrzeigersinn drehen und die
gewünschte Trockenzeit einstellen.
– Taste OF/OFF (3) drücken, um die Maschine zu starten.
Das Programm startet, die Spannungsanzeigeleuchte
(soweit in diesem Modell vorgesehen) leuchtet auf.
Nach dem Ablauf der gewählten Trockenzeit beginnt die
Abkühlphase (ca. 10 Min.).
Nach dem Vorgang schaltet sich die Maschine automatisch
aus und der Zeitschalter bleibt auf „STOP“ stehen.
Bei den Maschinen ohne Knitterschutzphase bleibt der
Zeitschalter am Ende der Kaltluftphase auf „STOP“ stehen.
Nehmen Sie die Wäsche aus dem Trockner und überprüfen
Sie durch leichtes Drehen der Trommel, ob keine kleinen
Wäschestücke mehr im Gerät verblieben sind.
Bevor Sie das Bullauge (die Einfülltür) wieder schließen,
geben Sie dem Trockenkorb eine leichte Drehung, um sich
zu vergewissern, daß keine Kleinwäsche in der Maschine
verblieben ist.
Sollte die Wäsche noch zu feucht sein, stellen Sie die Zeituhr
auf eine kurze Nachtrockenzeit ein und starten die Maschine
neu.
Nach jedem Trocknungsvorgang muß der taschenför-
mige Filter gereinigt werden.

15
REINIGUNG UND WARTUNG
GEHÄUSE
Zum Reinigen des Gehäuses und des Bedienfelds niemals aggressive Mittel oder
Scheuerpulver verwenden, sondern einfach nur einen feuchten Lappen, ggf. mit etwas
Seife
.
SELBSTREINIGENDER FILTER
Der Filterdieses Trockners bestehtaus zwei Elementen: ein ringförmiges, festeingebautes
und ein taschenförmiges herausziehbares Element.
An der Innenseite der Einfülltür finden Sie den ringförmigen Filter, der in den Türrahmenfest
eingebaut ist, sowie den taschenförmigen Filter, der im unteren Teil des Türrahmens zu
finden ist und leicht nach oben herausgezogen werden kann.
Die Flusen, die Sie im Filtersieb finden werden, stammen von der normalen Abnutzung
der Wäsche und werden nicht etwa durch eine fehlerhafte Funktion des Trockners
hervorgerufen. Dieser Typ von selbstreinigendem Filter ist besonders vorteilhaft: während
des Trockenvorganges werden die im ringförmigen Filtersieb vorhandenen Flusen von
der zu trocknenden Wäsche schonend abgenommen und in den herausziehbaren Filter
eingesaugt.
Somit bleibt der ringförmige Filter, der eine große Oberfläche für den Durchgang der
Luft bietet, während des ganzen Trockenvorganges immer sauber. Dadurch erreicht
man einen konstanten Luftzustrom während der gesamten Trocknungszeit und
dementsprechend eine Verminderung der Trocknungszeiten sowie Energieeinsparung.
D
WENN IHR TROCKNER NICHT RICHTIG ANLÄUFT
überprüfen Sie, ob:
●der Stecker richtig eingesteckt ist;
●die Einfülltür richtig geschlossen ist;
●der Sicherheitsschalter Ihrer Wohnung eingeschaltet ist.
WENN DAS TROCKENERGEBNIS NICHT ZUFRIEDE-
NSTELLEND IST
Wir weisen Sie nochmals auf die GRUNDREGELN hin:
überprüfen Sie, ob:
●der Filter richtig gesäubert und an seinen Platz wieder
eingesetzt wurde;
●keine zu große Wäschemenge eingefüllt wurde;
●die Wäsche richtig sortiert wurde und für die zu
trocknende Wäsche die richtige Zeit eingestellt wurde;
●Ist die Taste ON/OFF gedrückt worden?
●das Gerät nicht in einem zu kalten Raum (mit weniger
als +10° C.) arbeitet;
●die Saug sowie die Abluftleitungbzw. der Abluftschlauch
verstopft sind.
WAS MACHEN, WENN ...
Bedenken Sie, dass der Trockenzyklus automatisch
wieder startet, wenn der Strom nach einem Netzausfall
wieder kommt.
Wenn Sie die Tür unabsichtlich öffnen, startet das Gerät
aus Sicherheitsgründen erst dann, wenn die Taste
EIN/AUS gedrückt wird.
Wenn der Wäschetrockner trotz dieser Kontrollen nicht
funktioniert und die von Ihnen festgestellte Störung nicht
behoben werden kann, wenden Sie sich unter Angabe
folgender Informationen an den nächstliegenden
autorisierten Kundendienst:
- Art der Störung
- Kennzeichnung des Modells (Mod. ....................)
- und Seriennummer (S/N .....................)
die auf der Rückseite des Wäschetrockners angegeben
sind.
Wenden Sie sich niemals an nicht autorisierte Techniker
und verweigern Sie den Einsatz von nicht originalen
Ersatzteilen.
Dieses Gerät erfüllt die folgenden EG-Richtlinen:
–89/336/EG
–73/23/EG
–93/68/EG
Maße Breite 59,5 cm Fassungsvermögen 6kg
Tiefe 58,5 cm
Höhe 85 cm
TECHNISCHE DATEN

Le sèche-linge doit être installé dans un local correctement aéré de façon à faciliter l’évacuation de l’air humide produit
par l’appareil pendant le cycle de séchage.
Cette aération peut être obtenue soit en ouvrant simplement une fenêtre soit par l’action d’un aérateur.
Suivant le modèle que vous avez choisi, le seche-linge peut etre doté d’une ou trois sorties d’air (une à l’arrière et une
de chaque coté).
Il est également possible d’évacuer l’air chaud-humide vers l’extérieur parmi d’un tuyau flexible.
Le sèche-linge peut être installé au sol et mis parfaitement au niveau grâce aux quatre pieds réglables, ou être placé au-
dessus d’une machine à laver à chargement frontal, en formant de cette façon la colonne
de lessive.
RACCORDEMENT VERS L’EXTERIEUR
Si vous désirez évacuer vers l’extérieur l’air
produit par le sèche-linge, vous devez
brancher un tuyau flexible du coté arrière
du sèche-linge.
Nous pouvons vous fournir en option un
tuyau flexible de 2 m. de long avec collier
de serrage:.
INSTALLATION EN COLONNE
Ce sèche-linge peut être facilement installé en colonne, c’est à dire placé sur un machine
à laver chargement frontal.
Pour cela est necessaire le cadre de superposition que nous vous pouvons pournir en
option.Au moment de l’instalation ne pa oublier
INSTALLATION
16
F
CONSEILS
Pour un meilleur rendement du sèche-linge évitez de
l’installer dans une pièce où la température ambiante
soit inférieure à + 10°C.
Avant d’éffectuer la première utilisation nettoyez l’intérieur
du tambour avec un chiffon humide de façon à enlever
la poussière qui pourrait s’y être déposée pendant le
transport.
ATTENTION
Le sèche-linge ne peut en aucun cas être raccordé à
une cheminée.
Autour du sèche-linge il ne doit pas y avoir de flocons
ou de duvets qui pourraient être aspirés.
BRANCHEMENT ELECTRIQUE
Avant de brancher le sèche-ligne à une prise électrique
vérifiez que:
1. la valeur de la tension d’alimentation et celle indiquée
sur la plaque signalétique placée sur la partie arrière du
sèche-linge soient les mêmes;
2. le compteur, les disjoncteur, la ligne électrique
d’alimentation et la prise soient capables de suppor-ter
la charge maximale demandée: les valeurs de
puissance et de courant absorbées sont indiquées
sur la plaque signalétique;
3. la prise de courant et la fiche soient compatibles entre
elles sans l’interposition de prises multiples, de
prolongateurs ou adaptateurs.
4. Si nécessaire, faites installer une prise conforme.La prise
doit être bien accessible après l’instalation du sèche-linge.
Si le cable d’alimentation est endomage, il doit être rem-
placè par un cable special disponible chez le fabricant
ou le service apres vente.
Le constructeur n’est en aucun cas responsable des
dommages subispar les personnes et par les objets, si
ces normes de sécutité élémentaires ne sont pas
respectées.

17
CHARGEMENT DU LINGE
Contrôlez que votre linge soit à même d’être séché dans
un sèche-linge.
A ce sujet, vous trouvez sur votre linge des différents
symboles qui signifient:
Vous ne devez introduire dans l’appareil que du linge
essoré. Plus la vitesse d’essorage de votre machine à
laver est élevée plus le temps de séchage sera bref et
plus la consommation d’énergie s’en trouvera réduite.
Le tambour de ce sèche-linge peut contenir jusqu’à 6kg
de linge résistant (coton, lin, linge en éponge, linge de table
et de literie) ou 3kg de linge délicat (textiles synthétiques).
Le poids d’une charge composée de grandes pièces doit
être inférieur à celui d’une charge composée de petites
pièces.
Placez les articles de petite taille dans une taie d’oreiller
sèche.
Fermez les fermeture-éclair, nouez les rubans et lacets,
boutonnez les taies d’oreillers.
Vous obtiendrez un séchage plus homogène si vous prenez
la précaution de démêler le linge que vous enlevez de votre
machine à laver, surtout les pièces de grande taille, et si
vous sélectionnez les articles suivant la dimension, le type
de tissu et le degré de séchage.
Evitez d’ajouter des articles humides lorsque le programme
de séchage est déjà commencé, de cette façon vous
risqueriez d’obtenir des résultats peu satisfaisants.
ATTENTION
N’introduisez pas dans le sèche-linge:
●des articles en pure laine (ils se feutrent);
●des articles trop délicats comme rideaux, collants,
articles de soie;
●des articles en matière caoutchoutée ou plastifiés;
●des articles ayant été précédemment nettoyés avec
des produits inflammables (détachants, etc...).
●Vérifier que n’y ont pas été introduits par erreur des
animaux domestiques ou de corps étrangers.
N’introduisez pas du linge mouillé.
NOUS VOUS RAPPELONS QUE LE SECHE-LINGE
DOIT ETRE EXCLUSIVEMENT UTILISE POUR
SECHER DU LINGE LAVE A L’EAU.
Sécage
autorisé
Sécage basse
temperature
seulement
Sécage
interdit
F
ECONOMIE D’ENERGIE
●N’introduisez dans le sèche-linge que du linge essoré.
Plus la vitesse d’essorage de votre machine à laver est
élevée plus le temps de séchage sera bref. Il ne suffit
pas de tordre le linge. Des pièces trop mouillées peuvent
endommager l’appareil. Vous obtiendrez des résultats
de séchage meilleurs avec du linge essoré à la vitesse
d’essorage la plus haute possible (800 t/mn ou plus).
Un essorage de 500 t/mn rallonge considérablement le
temps de séchage.
●Essorez aussi le linge délicat. Evitez d’ajouter des pièces
humides lorsque le programme de séchage est déjà
commencé. Utilisez dès le début la capacité de charge
maximale: vous épargnerez ainsi du temps et de
l’énergie.
●Nettoyez le filtre après chaque cycle de séchage.
●Evitez, dans la mésure du possible, d’employer des
assouplissants dans le lavage car le séchage dans le
sèche-linge lui-même rend le linge souple.
●Séchez les pièces entièrement synthétiques plutôt à l’air
libre. Elles sèchent très vite et vous économisez de
l’énergie. Dans le sèche-linge elles ne se chargent que
d’électricité statique.
BANDEAUS COMMANDES
1. BOUTON MINUTERIE
2. VOYANT ALIMENTATION
3. TOUCHE MARCHE/ARRET
BOUTON MINUTERIE (1)
Permet de programmer le temps de séchage
(voir le tableau des temps conseillés).
Le bouton de la MINUTERIE doit toujours être tourné
dans le sens des aiguilles d'une montre.
VOYANT ALIMENTATION (2)
Signale, lorsqu'il est allumé, que le sèche-linge est
électriquement connecté.
TOUCHE MARCHE/ARRET (3)
Sert à démarrer le cycle souhaité.
DISPOSITIFS DE SECURITE
Ce sèche-linge est pourvu de deux dispositifs de sécurité:
une sécurité électrique qui interrompt instantanément
la rotation du tambour si vous ouvrez le hublot pendant
le cycle;
une sécurité thermique qui évite tout risque de
surchauffage.

LINGE CHARGE DEGRE DE SECHAGE TEMP DE SECHAGE
TISSUS
RESISTANTS
COTON, LIN
PLEINE CHARGE 6KG
PLEINE CHARGE 3KG
– Sec, prêt à ranger
– Humide, prêt à repasser
80 ÷ 100 min
60 ÷ 80 min
40 ÷ 50 min
30 ÷ 40 min
DEMI-CHARGE 3KG
DEMI-CHARGE 1,5KG
TISSUS
DELICATS EN
NYLON ET
SYNTHÉTIQUES
EN GÉNÉRAL
– Sec, prêt à ranger 30 ÷ 40 min
20 ÷ 30 min
– Sec, prêt à ranger
10 min
PHASE DE VENTILATION D’AIR FROID
PROGRAMMES
18
F
– Sec, prêt à ranger
– Humide, prêt à repasser
IMPORTANT
●Le linge à sécher doit être dûment essoré au préalable.
●La durée du séchage et par conséquent la consom-
mation d’énergie dépendent de:
– type de linge;
– quantité de linge;
– vitesse d’essorage de votre machine à laver;
– température de la pièce.
Pour le choix des programmes respectez scrupuleuse-
ment les indications fournies par les fabriquants des
articles, surtout pour les fibres synthétiques ou autres
qui ne supportent pas des températures trop élevées.
Le laps de temps compris entre “10 minutes” et la fin du
programme consiste en une phase de ventilation d’air froid
(duree 10 minutes).Cette séquence de 10 mn d’air froid
peut être utilisée a une autre fin que celle du séchage,
comme par exemple l’élimination d’une odeur persistante
(ex. produits antimites).
FONCTIONEMENT
Pour ouvrir la porte, la prendre par la poignée et tirer vers
l’extérieur.
Avant d’effectuer le cycle de séchage:
1. Vérifier que la prise est branchée sur la prise de courant.
2. Contrôler que le filtre est dans son logement.
3. Introduire le linge essoré dans le tambour sans le tasser.
4. Vérifier si par erreur des corps étrangers n’ont pas été
introduits.
5. Fermer la porte.
A ce moment vous pouvez sélectionner le temps de séchage
souhaité, en procédant de la manière suivante:
- Positionner le bouton MINUTERIE (1) sur le temps de
séchage souhaité, en le faisant tourner dans le sens des
aiguilles d’une montre.
- Appuyer sur la touche ON/OFF (3) pour mettre en route
la machine.
Le cycle de séchage commence et la lampe témoin de
fonctionnement s’allume.
Lorsque le temps affiché est écoulé le cycle de ventilation
d’air froid commence.
Ce cycle permet au linge de se refroidir graduellement.
A la fin du cycle la manette de la minuterie s’arrête sur la
position “STOP”.
Récuperez votre linge et contrôlez en faisant tourner le
tambour qu’il n’y ait plus à l’intérieur d’articles de petite taille.
Vous pouvez récupérer votre linge même après la phase
de ventilation d’air froid.
Si le linge à la fin du cycle de séchage est encore un peu
humide affichez un temps de séchage supplémentaire.
Après chaque cycle de séchage il faut nettoyer le filtre
à puisard.

19
NETTOYAGE ET ENTRETIEN
CARROSSERIE
Pour nettoyer la carrosserie et le bandeau de commandes ne jamais utiliser de produits
agressifs ou abrasifs, mais simplement un chiffon humide et éventuellement du savon.
FILTRE AUTONETTOYANT
Le filtre de ce sèche-linge est formé de deux élements: un élément fixe de forme
annulaire et l’autre extractable en forme de puisard.
A l’intérieur de l’ouverture de chargement, vous trouverez le filtre annulaire qui est
placé tout autour du hublot, et le filtre a puisard qui se trouve dans la partie inférieure
du hublot et peut être facilement enlevé en le tirant vers le haut.
Les fibres qui s’amassent à l’intérieur du filtre représentent une usure tout à fait normale
du linge et non un inconvénient du sèche-linge.
Ce système autonettoyant constitue un grand avantage: les fibres, qui s’ammassent
sur la grille du filtre annulaire sont doucement enlevées par les bouts de linge que vous
séchez et elles sont aspirées dans le filtre à puisard
Ainsi le filtre annulaire, qui a une grande surface pour le passage de l’air, reste toujours
propre pendant tout le cycle de séchage.
Ce qui permet d’avoir un débit d’air constant pendant tout le cycle de séchage et
par conséquent une réduction des temps de séchage, et donc une économie d’énergie.
F
Si votre seche-linge ne fonctionne pas correctement
Contrôlez si:
●vous avez bien branché la prise;
●vous avez bien fermé la porte;
●les plombs de votre installation n’ont pas sauté.
Si le resultat du sechage n’est pas satisfaisant.
assurez-vous que:
●vous ayez bien nettoyé le filtre et que vous l’ayez bien
remis dans son logement;
●vous n’ayez pas introduit trop de linge dans l’appareil;
●vous ayez bien trié le linge et que vous avez affiché le
temps de séchage correct;
●le sèche-linge ne fonctionne pas dans une pièce trop
froide;
●les bouches d’aspiration et d’expulsion de l’air et
éventuellement le tuyau flexible ne soient pas obstrués.
Se rappeler que si durant le cycle de séchage une
coupure de courant se produit, lorsque celui-ci revient,
le cycle repart automatiquement.
QUE FAIRE SI...
Si vous ouvrez par inadvertance la porte, pour des
motifs de sécurité, l'appareil repart seulement après
avoir appuyé sur la touche MARCHE/ARRET.
Si, malgré tous ces contrôles, le sèche-linge ne fonctionne
pas et que la panne que vous avez détectée est toujours
là, contactez le Service Après-Vente autorisé le plus
proche, en communiquant ces informations:
●le type de panne;
●la sigle du modèle (Mod. ………….)
et le numéro de série (S/N ………….)
reportés sur la plaque signalétique appliquée à la partie
postérieure du sèche-linge.
Ne jamais recourir à des techniciens non autorisés et
toujours refuser le montage de pièces de rechange qui ne
sont pas d’origine.
Cet appareil est conforme aux Directives CEE suivantes:
–89/336/CEE
–73/23/CEE
–93/68/CEE
Dimensions Largeur 59,5 cm Capacitè 6kg
Profondeur 58,5 cm
Hauteur 85 cm
CARACTERISTIQUES TECNIQUES

La secadora debe ser instalada en un local correctamente ventilado a fin de facilitar la evacuación del aire húmedo
producido por el aparato durante el ciclo de secado.
Esta ventilación puede ser obtenida bien abriendo simplemente una ventana o por la acción de un ventilador.
Según el modelo que Usted haya elegido, la secadora puede estar dotada de una o tres salidas de aire (una en el fondo
y una por cada lado).
Es igualmente posible evacuar el aire húmedo hacía el exterior mediante un tubo flexible.
La secadora puede ser instalada perfectamente en el suelo gracias a las cuatro patas regulables, o ser colocada encima
de una lavadora de carga frontal, consiguiendo de este forma la columna de lavado.
CONEXION HACIA EL EXTERIOR
Si Usted desea evacuar hacia el exterior el
aire producido por la secadora deberá
empalmar un tubo flexible en la parte
posterior de la secadora.
Un tubo flexible de 2 mt. con abrazadera de
fijación, es proporcionado para ello.
INSTALACION EN COLUMNA
Esta secadora puede ser fácilmente
instalada en columna colocada sobre una lavadora de carga frontal.
Para esto es necesario el acesorio o soporte que nosotros disponemos
como una opcion. Durante la instalación, no se olvide de regular las patas.
INSTALACION
20
E
CONSEJOS
Para un mejor rendimiento de la secadora evite instalarla
en un lugar donde la temperatura ambiente sea inferior
a +10° C.
Antes de efectuar la primera utilización, limpie el interior
del tambor con la ayuda de un paño húmedo a fin de
eliminar el polvo que podría haberse depositado durante
el transporte.
ATENCION
La secadora no puede en ningún caso ser conectada a
una chimenea.
Alrededor de la secadora no debe haber pelusas que
puedan ser aspiradas.
CONEXIÓN
Antes de conectar la secadora a una toma eléctrica
asegurese que:
1. El valor de la tensión de alimentación y el indicado sobre
la placa de características situada sobre la parte
posterior de aparato deben ser los mismos.
2. El contador, el limitador, la línea de alimentación y la
clavija de corriente deben soportar la máxima carga: los
valores de la potencia y de la corriente absorbida están
indicadas sobre la placa de características.
3. La toma de corriente y la clavija deben adaptarse entre
ellas sin interposición de tomas múltiples y adaptadores
o alargadores.
4. La conexión de la secadora a una toma de tierra es
obligatoria según las normas.Ésta toma debe ser
facilmente accesible después de instalar el aparato.
Si el cable de alimentación ha sufrído algún daño, hay que
cambiarlo por un cable o un cojunto especial, que puede
conseguirse a través del fabricante o el sevicio asisten-
cia técnica.
El fabricante en ningùn caso se responsabiliza de los
daños sufridos por las personas o por los objetos, si estas
normas elementares de seguridad no son respetadas.

21
CARGA DE LA ROPA
Antes de secar la ropa, comprobar si esta puede ser secada
en una secadora. Usted debe encontrar sobre sus prendas
los diferentes símbolos que significan:
Usted no debe introducir en el aparato mas que ropa
centrifugada. Cuanta más elevada sea la velocidad de
centrifugado de su lavadora el tiempo de secado será
más breve y el consumo de energía se reducirá.
El tambor de esta secadora puede contener hasta 6Kg de
ropa resistente (algodón, lino) o 3Kg de ropa delicada
(textiles sintéticos).
El peso de una carga compuesta de grandes piezas debe
ser inferior a la de una carga compuesta de pequeñas
piezas.
Coloque los articulos de pequeño tamaño en una red de
secado.
Cierre las cremalleras, anude cintas y lazos, cierre las
fundas de las almohadas.
Usted obtendrá un secado homogeneo si tiene la precaución
de desenredar la ropa que saca de su lavadora, sobre todo
las piezas de gran tamaño y si selecciona los artículos
según tamaño, tipo de tejido y el grado de secado.
Evite añadir artículos húmedos cuando el programa de
secado ha empezado, porque de esta forma correrá el
riesgo de obtener resultados poco satisfactorios.
ATENCION
No introduzca en la secadora:
artículos de pura lana virgen (se apelmazan);
artículos demasiado delicados como cortinas;
artículos de seda;
artículos de material de caucho o plástico;
artículos que previamente se hayan limpiado con
productos inflamables (quitamanchas, etc).
controle que no hayan entrado en ella erróneamente
animales domésticos cuerpos extraños;
No introduzca ropa muy mojada.
LE RECORDAMOS QUE LA SECADORA DEBE SER
EXCLUSIVAMENTE UTILIZADA PARA SECAR ROPA
LAVADA EN AGUA.
Secar
a temperatura
normal
Secar a baja
temperatura
No secar
en secadora
E
AHORRO DE ENERGíA
No introduzca en la secadora ropa no centrifugada.
Cuando más elevada sea la velocidad de centrifugado
de su lavadora, más breve será el tiempo de secado.
No es suficiente retorcer la ropa. La ropa demasiado
mojada puede dañar el aparato. Usted obtendrá
resultados de secado mejores con ropa centrifugada a
la velocidad de centrifugado lo más alta posible (800
r.p.m. o más). Un centrifugado de 500 r.p.m. prolonga
sensiblemente el tiempo de secado.
Centrifugue también la ropa delicada. Evite introducir
artículos húmedos después de que haya comenzado el
programa de secado. Utilice desde el principio la
capacidad de carga máxima: Usted ahorrará así tiempo
y energía.
Limpie el filtro después de cada ciclo de secado.
Evite en la medida de lo posible, emplear suavizante en
el lavado, porque la misma secadora lo suaviza.
Seque las prendas totalmente sintéticas mejor al aire
libre. Se secan más rápido y economiza energia. En la
secadora estas prendas se cargan nada más que de
electricidad estatica.
1. MANDO TEMPORIZADOR
2. PILOTO ALIMENTACIÓN
3. TECLA ON-OFF
MANDO TEMPORIZADOR (1)
Permite programar el tiempo de secado
(véase la tabla para los tiempos aconsejados).
El mando del TEMPORIZADOR debe girarse siempre
en el sentido de las agujas del reloj.
PILOTO ALIMENTACIÓN (2)
Su encendido señala que la secadora recibe alimentación
eléctrica.
TECLA ON-OFF (3)
Sirve para poner en marcha el ciclo deseado.
DISPOSITIVOS DE SEGURIDAD
Esta secadora está equipada por dos dispositivos de
seguridad:
una seguridad eléctrica interna que corta instanta-
neamente la rotación del tambor si Usted abre la escotilla
durante el funcionamiento del aparato.
una seguridad térmica que evita todos los riesgos de
sobrecalentamiento.
PANEL DE MANDOS
Table of contents
Languages:
Other Aspes Dryer manuals
Popular Dryer manuals by other brands

Maytag
Maytag GBMDC 709T Quick reference guide

Candy
Candy GOC 580C Instruction book

Siemens
Siemens WT43W4G2 Installation and operating instructions

Alliance Laundry Systems
Alliance Laundry Systems Drying Tumbler Operation and programming manual

Candy
Candy CIC60 User instructions

STIEBEL ELTRON
STIEBEL ELTRON ULTRONIC 1 W Operation and installation manual