manuals.online logo
Brands
  1. Home
  2. •
  3. Brands
  4. •
  5. Associated
  6. •
  7. Motorized Toy Car
  8. •
  9. Associated RC10 User manual

Associated RC10 User manual

Other Associated Motorized Toy Car manuals

Associated TC7.2 User manual

Associated

Associated TC7.2 User manual

Associated B64 CLUB RACER User manual

Associated

Associated B64 CLUB RACER User manual

Popular Motorized Toy Car manuals by other brands

Reely Dune Fighter 3S operating instructions

Reely

Reely Dune Fighter 3S operating instructions

REVELL 1970 Chevelle SS 454 manual

REVELL

REVELL 1970 Chevelle SS 454 manual

Team Losi Micro Rally Car Operation guide

Team Losi

Team Losi Micro Rally Car Operation guide

Jamara Mercedes-AMG GLE 63 Instruction

Jamara

Jamara Mercedes-AMG GLE 63 Instruction

Eduard Humber Scout Car Mk.I exterior quick start guide

Eduard

Eduard Humber Scout Car Mk.I exterior quick start guide

Jamara VW T1 Bus Instruction

Jamara

Jamara VW T1 Bus Instruction

REVELL 68 CHEVY CHEVELLE SS 396 manual

REVELL

REVELL 68 CHEVY CHEVELLE SS 396 manual

Schumacher Pro Cat instruction manual

Schumacher

Schumacher Pro Cat instruction manual

Tamiya TT-01 TYPE E instruction manual

Tamiya

Tamiya TT-01 TYPE E instruction manual

Eduard Krupp Protze 6x4 1/48 quick start guide

Eduard

Eduard Krupp Protze 6x4 1/48 quick start guide

New Bright 61072UEP quick start guide

New Bright

New Bright 61072UEP quick start guide

Team Durango DEX410v5 manual

Team Durango

Team Durango DEX410v5 manual

Jamara Mercedes Actros Muldenkipper 2,4 GHz Instruction

Jamara

Jamara Mercedes Actros Muldenkipper 2,4 GHz Instruction

PLAYMOBIL 9536 manual

PLAYMOBIL

PLAYMOBIL 9536 manual

Atomic BZ3 instruction manual

Atomic

Atomic BZ3 instruction manual

Jamara McLaren Senna 2,4GHz instructions

Jamara

Jamara McLaren Senna 2,4GHz instructions

Aiyaplay 370-290V00 user manual

Aiyaplay

Aiyaplay 370-290V00 user manual

ZEROTRIBE Zetricks ZT1144 instruction manual

ZEROTRIBE

ZEROTRIBE Zetricks ZT1144 instruction manual

manuals.online logo
manuals.online logoBrands
  • About & Mission
  • Contact us
  • Privacy Policy
  • Terms and Conditions

Copyright 2025 Manuals.Online. All Rights Reserved.

#6004 RC10CC - Kit
2
:: Introduction:: Introduction
:: KIT Features:: KIT Features
:: Additional:: Additional
:: Other Helpful Items:: Other Helpful Items
Thank you for purchasing this Team Associated product. This assembly manual contains instructions and tips for building and
maintaining your new RC10CC Kit. Please take a moment to read through this manual to help familiarize yourself
with these steps.
We are continually changing and improving our designs; therefore, actual parts may appear slightly different than in the
illustrations. New parts will be noted on supplementary sheets located in the appropriate parts bags.
Check each bag for these sheets before you start to build.
Features in the RC10CC - Kit:
• Authentic replica of the RC10 Buggy Kit originally released in 1984
• Silver anodized 6061-T6 aluminum monocoque tub chassis
• Fully adjustable four wheel independent suspension
• Long travel, fluid filled Silver aluminum coil over shocks
• Low profile sealed six-gear transmission
• VariLok adjustable ball differential
• Exceptional ground clearance with low center of gravity
• Classic AE front and rear tires with modular racing wheels
• Clear ProTech body with driver figure and wing
• Fiberglass shock towers
• Oilite bushings throughout
• Fits 6-cell NiMh and 2S LiPo battery packs
Your new RC10CC Kit comes as a kit. There are some items you will
need to complete your kit (refer to website for suggestions):
• R/C two channel surface frequency radio system
• Electronic Speed Control (ESC) • R/C Electric Motor
• Steering Servo • Servo Horn (AE #89007)
• 2S, 7.4V Lipo stick battery or 7.2V NiMH battery
• Peak detection battery charger
• Retaining Ring Pliers
• Polycarbonate specific paint
• Pinion gear, size to be determined by type and wind of motor you use
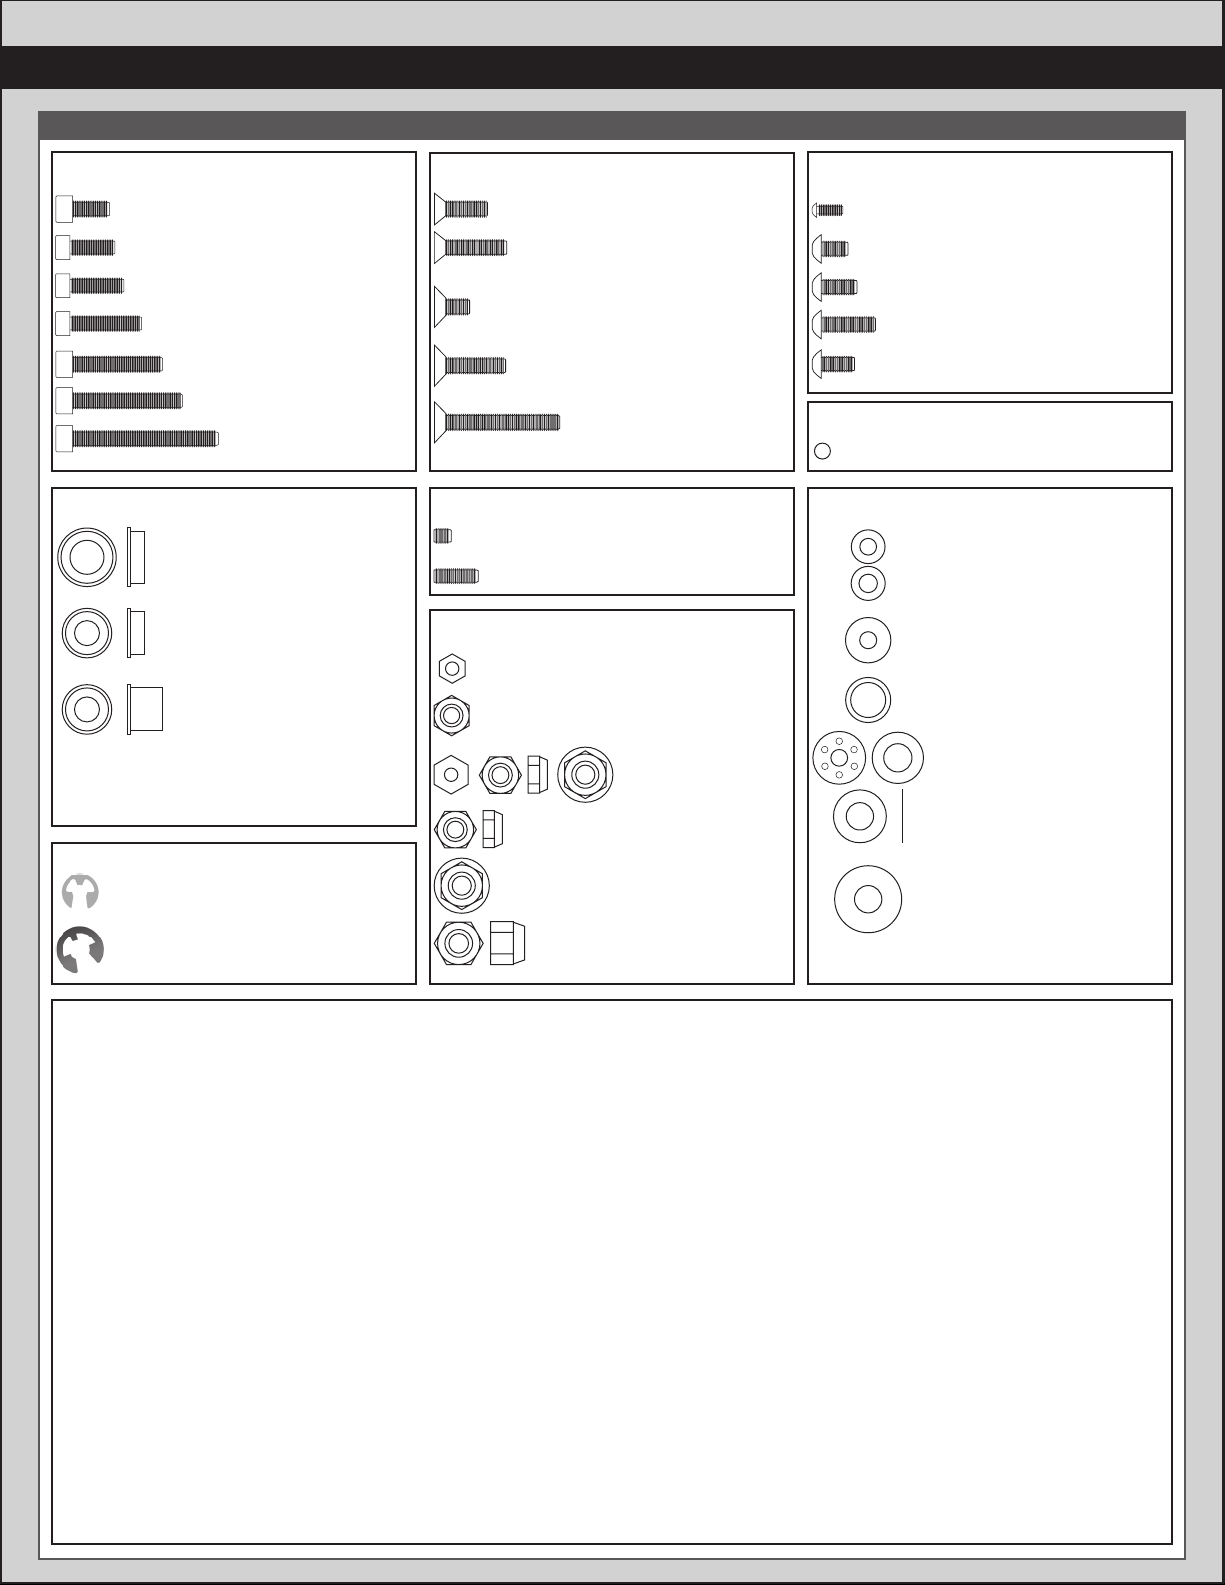
Tools included:
• Allen wrenches
(.035”, .050”, 1/16”, 3/32”)
• Shock building tool
• Silicone Shock Fluid (Refer to website for complete listings)
• Tire Adhesive (AE #1597) • Body Scissors (AE #1737) • Reamer / Hole Punch (AE #1499)
• Shock Pliers (AE #1681) • Green Slime shock lube (AE #1105) • Calipers or a Precision Ruler
• Wire Cutters / Hobby Knife • Needle Nose Pliers • Soldering Iron
Associated Electrics, Inc.
21062 Bake Parkway
Lake Forest, CA 92630
http://www.AssociatedElectrics.com • • http://www.instagram.com/teamassociatedrc/ • http://www.facebook.com/TeamAssociated/
Customer Service
Tel: 949.544.7500
Fax: 949.544.7501
3
:: Hardware - 1:1 Scale View:: Hardware - 1:1 Scale View
Notes:
0-80x3/16”
4-40x3/16”
4-40x1/4”
4-40x3/8”
3x6mm (31531)
Button Head (bhcs)
4-40x3/8”
4-40x1/2”
8-32x1/4” (6316)
8-32x1/2” (6316)
8-32x7/8” (6316)
Flat Head (fhcs)
4-40x1/4”
4-40x5/16”
4-40x3/8”
4-40x1/2”
4-40x5/8” (6926)
4-40x3/4”
4-40x1”
Cap Head (shcs)
Bushings
1/4 x 3/8 x 1/8 Flanged
3/16 x 5/16 x 1/8 Flanged
3/16 x 5/16 x 1/4 Flanged
1/8 Diff Balls
Diff Balls
4-40 Small Pattern
Plain Nut
4-40 Steel Locknut
4-40 Nuts
5-40 Diff Locknut
8-32 Nylon Nut, White
8-32 Steel Locknut
Nuts (lock/plain)
4-40x1/8”
4-40x5/16”
Set Screws
E-clip 1/8” (6299)
Bowed E-Clip
Clips
Dogbone spacer
.030 Nylon Spacer (4187)
#4 Washer
1/4” Axle Shim
Diff Thrust Washers
5mm x 9.5mm 0.17mm
#8 Aluminum Thick
Washer
Shims and Washers
4
:: Table of Contents:: Table of Contents
:: Notes:: Notes
This symbols indicates a
special note or instruction
in the manual.
There is a 1:1 hardware foldout page in the
front of the manual. To check the size of a part,
line up your hardare with the correct drawing
until you find the exact size.
1................... Cover
2................... Introduction
3....................1:1 Hardware “Fold Out”
4................... Table of Contents
5....................Nose Plate / Steering Build
(Bag A)
5 - 6............. Front Suspension Build
(Bag B)
7 - 10...........Transmission Build
(Bag C)
10 - 11.........Rear Bulkhead Build
(Bag D)
11 - 12.........Rear Suspension Build
(Bag E)
12 - 13........Turnbuckles Build
(Bag F)
13 - 15........Shocks Build
(Bag G)
16 ................Chassis Build
(Bag H)
16 - 18........Electronics Build
(Bag I)
18 - 20....... Wheels, Tires and Body Install
(Bag J)
21.................Notes
22................Back Cover
!
Associated Electrics, Inc.
21062 Bake Parkway
Lake Forest, CA 92630
http://www.AssociatedElectrics.com • • http://www.instagram.com/teamassociatedrc/ • http://www.facebook.com/TeamAssociated/
Customer Service
Tel: 949.544.7500
Fax: 949.544.7501
5
8/23
:::: Nose Plate /Nose Plate / Steering BuildSteering Build - Bag A- Bag A -- Step 2Step 2
:::: Front SuspensionFront Suspension BuildBuild - Bag B- Bag B --Step 1Step 1
:: Nose Plate / Steering Build - Bag A - Step 1:: Nose Plate / Steering Build - Bag A - Step 1
6316
8-32 x 7/8
steel
FHCS
6316
8-32 x 1/2
steel
FHCS
6311
RC10 front
nose plate,
Silver
6316
8-32 x 1/4
steel
FHCS
RC10 body
mounts,
Clear
6311
RC10
chassis,
Silver
#8 aluminum
washer (thick)
x2x2
x2x2
#8 aluminum
washer (thick)
8-32 nut,
steel
RC10
steering
assembly,
Clear
RC10 steering
assembly,
Clear
4-40 nut
x2x2
x2x2
Ballstud
.20 (silver)
Ballstud
.20 (silver)
RC10 front
caster blocks,
Clear,
30 degrees
(Left & Right)
x4x4
LEFT LEFT
Tighten 8-32 nuts
until snug &
bellcrank
rotates freely!
!
LEFT
6299
E-clip
(small)
RC10 steering
blocks,
Clear
(Left & Right)
Ballstud
.20 (silver)
RC10 front
stub axles
Press stub axles
into steering blocks.
Use a hard surface
to push down on!
!
Build left and right sides! Build left and right sides!
:::: Front SuspensionFront Suspension BuildBuild - Bag B- Bag B --Step 2Step 2
:::: Front SuspensionFront Suspension BuildBuild - Bag B- Bag B --Step 3Step 3
:::: Front SuspensionFront Suspension BuildBuild - Bag B- Bag B --Step 4Step 4
6
6316
8-32 x 1/2
steel
FHCS
RC10 front
arm mounts,
Clear
(Left & Right)
4-40 nut
#4 aluminum
washer
6299
E-clip
(small)
6299
E-clip
(small)
RC10 front
outer
hinge pins
RC10
king pins
RC10
front arms,
Clear
(Left & Right)
x2x2
x6x6
x2x2
x4x4
x2x2
x2x2
Ballstud
.20 (silver)
4-40 x 3/4
SHCS
4-40 x 1/2
SHCS
RC10 front
shock tower
x2x2
x2x2
x2x2
6299
E-clip
(small)
x2x2
RC10 front
inner hinge
pins
Build left and right sides!
7
:::: TransmissionTransmission BuildBuild - Bag C- Bag C --Step 1Step 1
:::: TransmissionTransmission BuildBuild - Bag C- Bag C --Step 2Step 2
:::: TransmissionTransmission BuildBuild - Bag C- Bag C --Step 3Step 3
Build 2
Key drive gear pin
into slot on spine
plate!
!
Drive gear
pivot pin
Drive gear
pivot
RC10 idler
gear pivot
Bowed
e-clip
Washer
5mmx 0.17mm
Oilite bushing
3/16x5/16x1/4
RC10
spine
plate
Drive gear
pivot nut
!
!
1
2
Curved side of
bowed E-Clip
should point
outwards!
NOTE: Install washer (1)
before bowed e-clip (2)
!
RC10 internal
retaining clip 4-40 x 3/16
BHCS
RC10 axle
drive gear
x2x2
Remove any burrs
if necessary with
hobby knife!
!
Snap internal
retaining clip
into groove
with internal
snap ring
pliers!
Racer’s Tip:
Use a small amount of
CA glue on idle pivot hole.
A little in-out
play is normal on
the outdrives
!
!
!
8
:::: TransmissionTransmission BuildBuild - Bag C- Bag C --Step 4Step 4
:::: TransmissionTransmission BuildBuild - Bag C- Bag C --Step 5
:::: Transmission BuildTransmission Build - Bag C- Bag C - Step 6- Step 6
Build 2
Bushing
x2x2
Carefully tighten
screws in
x- pattern!
!
6299
E-clip
(small)
0-80 x 3/16
BHCS
RC10 diff
bushing
RC10
bearing
adapter
Spur gear
81T, 48P
Diff drive
rings
RC10 diff
shaft and
pinion
RC10 diff
thrust bearing
RC10 diff
thrust washers
(small & large)
RC10 diff
pinion
RC10 diff
tube w/hub
Oilite bushing
1/4 x 3/8 x 1/8
Oilite
bushing
3/16x5/16x1/8
x4x4
x2x2
RC10 idler
gear
x8x8
1/8 diff
balls
#6588
black grease
#6636
silicone lube
Press bushing
in, make sure it is
flush with diff hub!
Use #6636
silicone lube on the
inside of diff pinion
Use just
enough black
grease to cover
the balls on the
thrust bearing!
Slip the gear onto the tube and tap the
assembly together using the handle
of a hammer or a plastic handle of a
screwdriver. Do not use a vise!
Apply silicone grease
into each hole of the spur
gear before inserting
diff balls.
Insert diff balls opposite
of stamped number on
spur gear. Make sure
they are evenly
covered in lube!
!
!
!
!
!
#6636
silicone lube
Make sure diff
rings sit flat on hub!
Caution:
Do not get any
grease on the back
side of the diff drive
rings or the diff hub.
!
!
9
:::: Transmission BuildTransmission Build - Bag C- Bag C - Step 7- Step 7
:::: Transmission BuildTransmission Build - Bag C- Bag C - Step 8- Step 8
:::: Transmission BuildTransmission Build - Bag C- Bag C - Step 9- Step 9
RC10 diff
outer hub
5-40
locknut
Press nut all the
way inside the
transmission
case.
!
4-40
plain nut
(small)
Diff drive
rings
RC10
transmission
case, Clear
(right)
6311
RC10 motor
plate, Silver
RC10 diff
spring
RC10
bearing
adapter,
Clear
Oilite bushing
3/16 x 5/16 x 1/8
6299
E-clip
(small)
RC10 felt
seal,
Clear
RC10
felt
x2x2
x2x2
RC10
transmission
case, Clear
(left)
Tighten locknut until spring is fully
compressed, then back out until lock nut is
flush with shaft end. Adjust as necessary.
!
Make sure diff
rings sit flat on hub!
Cutting a slot in the
bearing adapter
will make e-clip
installation easier!
!
!
1
2
Caution:
Do not get any grease
on the back side of the
diff drive rings or the
outer hub.
!
10
:::: Transmission BuildTransmission Build - Bag C- Bag C - Step 10- Step 10 :::: RearRear BulkheadBulkhead BuildBuild - Bag D- Bag D - Step 1- Step 1
:::: RearRear BulkheadBulkhead BuildBuild - Bag D- Bag D - Step 2- Step 2
:::: RearRear BulkheadBulkhead BuildBuild - Bag D- Bag D - Step 3- Step 3
4-40 x 1
SHCS
4-40 x 3/8
SHCS
4-40 nuts
6316
8-32 x 1/2
steel
FHCS
6316
8-32 x 1/2
steel
FHCS
4-40 x 5/8
SHCS
x3x3
x2x2
x2x2
x2x2
x4x4
Ballstud
.20 (silver)
4-40 x 5/16
SHCS
RC10 rear
bulkhead,
Clear
4-40 x 3/4
SHCS
x2x2
x2x2
x2x2
4-40 x 5/8
SHCS
x2x2
RC10 rear
shock tower