ASTi Telestra User manual

ASTi
Telestra Quick Start
User Guide
Document: DOC-01-TELS-UG-1
Telestra v1.4
Advanced Simulation Technology inc. 441-A Carlisle Drive, Herndon, Virginia, 20170 USA
Revision D (April 2001)

TABLE OF CONTENTS
Overview . . . . . . . . . . . . . . . . . . . . . . . . . . . . . . . . . . . . . . . . . . . . . . . . . . . . . . . . . . . . . . . . . . . . . . . 1
System Accounts . . . . . . . . . . . . . . . . . . . . . . . . . . . . . . . . . . . . . . . . . . . . . . . . . . . . . . . . . . . . . . . . 1
Preparing Telestra for Use . . . . . . . . . . . . . . . . . . . . . . . . . . . . . . . . . . . . . . . . . . . . . . . . . . . . . . . . 2
Starting and Stopping the Telestra System . . . . . . . . . . . . . . . . . . . . . . . . . . . . . . . . . . . . . . . . . . 4
Telestra Setup Procedure . . . . . . . . . . . . . . . . . . . . . . . . . . . . . . . . . . . . . . . . . . . . . . . . . . . . . . . . . 5
Telestra Configuration Utility . . . . . . . . . . . . . . . . . . . . . . . . . . . . . . . . . . . . . . . . . . . . . . . . . . . . . 5
Network Configuration . . . . . . . . . . . . . . . . . . . . . . . . . . . . . . . . . . . . . . . . . . . . . . . . . . . . . . . . . . 7
Installing a DMSO RTI (Non-U.S. Customers only) . . . . . . . . . . . . . . . . . . . . . . . . . . . . . . . . . . . . 8
Run the moveRTI.sh script (Non-U.S. only) . . . . . . . . . . . . . . . . . . . . . . . . . . . . . . . . . . . . . . . . . . 8
How to Run the Software . . . . . . . . . . . . . . . . . . . . . . . . . . . . . . . . . . . . . . . . . . . . . . . . . . . . . . . . . 9
Using the Remote Control Interface . . . . . . . . . . . . . . . . . . . . . . . . . . . . . . . . . . . . . . . . . . . . . . . 11
The Configuration File . . . . . . . . . . . . . . . . . . . . . . . . . . . . . . . . . . . . . . . . . . . . . . . . . . . . . . . . . . . 12
System File Structure . . . . . . . . . . . . . . . . . . . . . . . . . . . . . . . . . . . . . . . . . . . . . . . . . . . . . . . . . . . 14
The RTI Software . . . . . . . . . . . . . . . . . . . . . . . . . . . . . . . . . . . . . . . . . . . . . . . . . . . . . . . . . . . . . . . 16
DACS Operational Differences running HLA . . . . . . . . . . . . . . . . . . . . . . . . . . . . . . . . . . . . . . . . 17
System Utilities . . . . . . . . . . . . . . . . . . . . . . . . . . . . . . . . . . . . . . . . . . . . . . . . . . . . . . . . . . . . . . . . 19
Accessing a Floppy Disk . . . . . . . . . . . . . . . . . . . . . . . . . . . . . . . . . . . . . . . . . . . . . . . . . . . . . . . 19
Editing Text Files . . . . . . . . . . . . . . . . . . . . . . . . . . . . . . . . . . . . . . . . . . . . . . . . . . . . . . . . . . . . . 19
Updating the Telestra software . . . . . . . . . . . . . . . . . . . . . . . . . . . . . . . . . . . . . . . . . . . . . . . . . . . 20
Appendix A: Joining a Federation . . . . . . . . . . . . . . . . . . . . . . . . . . . . . . . . . . . . . . . . . . . . . . . . 21
Telestra System Set-Up . . . . . . . . . . . . . . . . . . . . . . . . . . . . . . . . . . . . . . . . . . . . . . . . . . . . . . . . 22
Setting Up the Federation . . . . . . . . . . . . . . . . . . . . . . . . . . . . . . . . . . . . . . . . . . . . . . . . . . . . . . 27
Appendix B: ASTi Radio SOM . . . . . . . . . . . . . . . . . . . . . . . . . . . . . . . . . . . . . . . . . . . . . . . . . . . . 30
Version 3.0 OMD File . . . . . . . . . . . . . . . . . . . . . . . . . . . . . . . . . . . . . . . . . . . . . . . . . . . . . . . . . . 30
Version 3.0 OMT File . . . . . . . . . . . . . . . . . . . . . . . . . . . . . . . . . . . . . . . . . . . . . . . . . . . . . . . . . . 46

ASTi Telestra User Guide (Version 1, Revision D)
Copyright © 1999-2001 Advanced Simulation Technology inc. 1
Overview
For domestic (U.S.) customers, Telestra comes with all required software pre-installed. This
includes the Telestra federate, the DMSO NG RTI, the rtiexec (to be used when testing Telestra
without another machine running the rtiexec), and certain support and debug facilities. For foreign
(non-U.S.) customers, the Telestra system is shipped without the DMSO RTI. Please refer to the
section entitled “Installing the DMSO RTI” for instructions and other information regarding this
topic. It is also important to note that significant information can also be determined from the
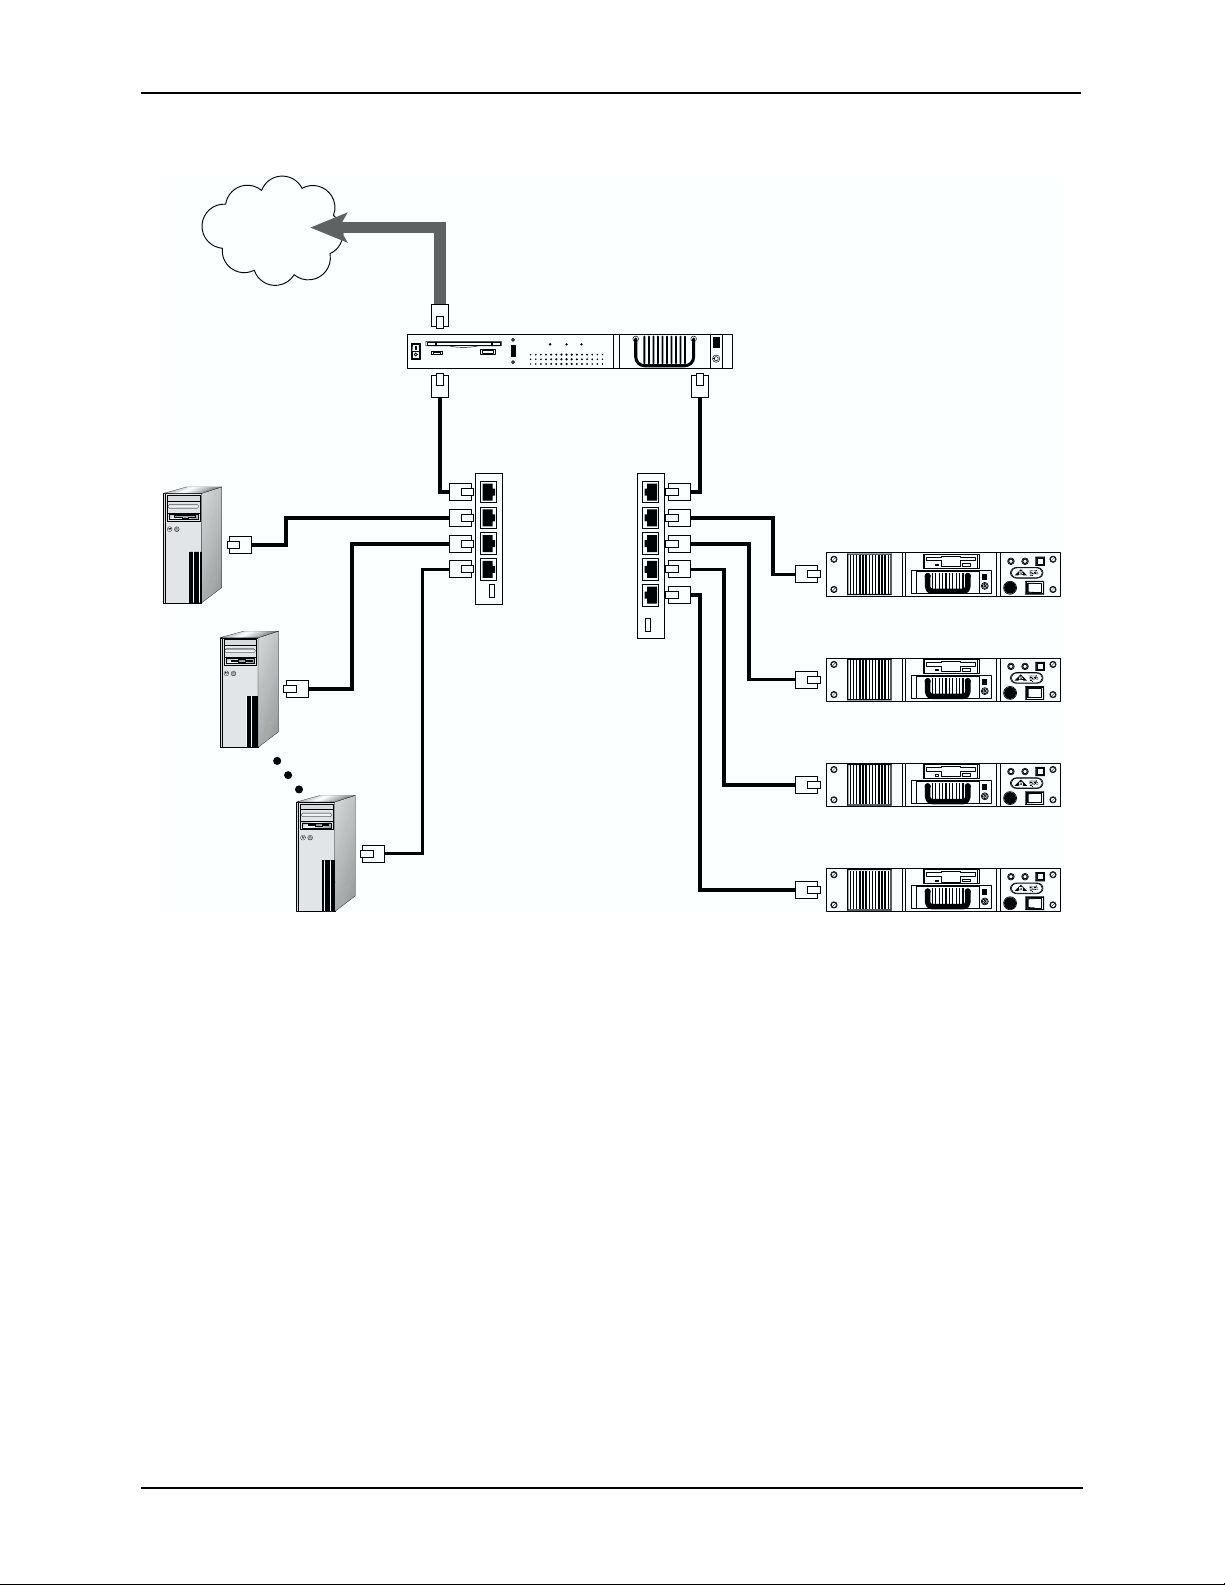
DACS node associated with the Telestra unit and hence this guide will reference both units as
appropriate.
This guide assumes the user has a basic understanding of the High Level Architecture (HLA), and
should be familiar with such terms as federate, federation, RTI, etc. It also assumes a basic famil-
iarity with UNIX, such as accounts, passwords, basic commands, etc. If you are familiar with
UNIX in general but not Linux in particular, there are some useful commands and tools specific to
Linux described at the end of this document.
This guide is intended to assist the user in initial start-up of the Telestra unit and provides an over-
view of the basic commands and facilities of the system.
Telestra documentation is also available on ASTi’s website http://www.asti-usa.com/hla.
System Accounts
The Telestra system is shipped with two accounts.The administration/super user account name is
“root” with a default password of “abcd1234”. This account is used for system maintenance, and
will be used to configure the system.
The second account is a normal user account. The account name is “hlauser” with a default pass-
word of “HLA!now!”. This account is used to run the Telestra federate.
To change the password of either account, log into the account and type:
passwd
and follow the directions printed on the screen.
DO NOT
lose the passwords, particularly the root
password. If the root password is lost, the system hard drive may need to be completely rebuilt!

ASTi Telestra User Guide (Version 1, Revision D)
Copyright © 1999-2001 Advanced Simulation Technology inc. 2
Preparing Telestra for Use
Standard networking hardware should be used when making connections to Telestra and the
DACS units (hubs, bridges, etc.). There are three ethernet interfaces on each Telestra system
(HLA, DACS, and Host) used for communicating with Telestra. The location of each interface
varies with chassis type. The figures below show the location of each interface.
Figure 1a. Ethernet Interfaces on a Telestra System without built-in CD-ROM
Figure 1b. Ethernet Interfaces on a Telestra System with built-in CD-ROM
Figure 2 (below )shows an example network topology for the Telestra system. Notice that an indi-
vidual Telestra system contains support for a maximum of four DACS boxes.
HLA Interface (on-board Ethernet)DACS Interface
Port A
Host Interface
Port B
Host Interface (on-board Ethernet) DACS Interface HLA Interface
Port B
Port A

ASTi Telestra User Guide (Version 1, Revision D)
Copyright © 1999-2001 Advanced Simulation Technology inc. 3
Figure 2: Example Network Topology for the Telestra System
Please note that in order to integrate Telestra into your network, certain configuration set-up pro-
cedures are required to set the IP address of the HLA Ethernet adapter and Host Interface adapter.
The second Ethernet adapter, used to connect to the DACS node, is pre-configured on shipment,
and should not be modified unless under ASTi instruction. Instructions for setting the IP address
and hostname of the Telestra system are given in the “Telestra Setup Procedure” section.
A mouse (3 button PS/2 - supplied), keyboard (supplied) and monitor (not supplied - available to
order separately) must be connected to the unit in order to configure it.
Once the system is configured, it can be run and shutdown remotely. Instructions for this are
described in the document Telestra Remote Control Interface User Guide.
HLA/RTI
Network
USB RESET POWER HDD
HLA Interface
(on-board Ethernet)
Host Interface
(dual Ethernet, B)
DACS Interface
(dual Ethernet, A)
Telestra System
DACS System 1
Host #1
Host #2
Host #
n
DACS System 2
DACS System 3
DACS System 4
Hub Hub

ASTi Telestra User Guide (Version 1, Revision D)
Copyright © 1999-2001 Advanced Simulation Technology inc. 4
Starting and Stopping the Telestra System
The Telestra system runs the Linux operating system and therefore must be started and more
importantly shutdown in the correct manner in order to maintain file system integrity. To start the
unit, apply power via the front mounted on/off switch. The unit will boot-up and run the Telestra
federate on the first console. To log into the system and edit files, you must switch to the second
console by pressing the ‘Alt-F2’ key combination. The normal user account is “hlauser” with
associated password “HLA!now!”. The root account is “root” and the password is “abcd1234”.
Note that these passwords may be changed by the user if required.
The Linux command “shutdown -h now” may be entered from a console screen to power down
the system. Wait until the screen display reads “Power down” before turning the power switch off.
It is also possible to shutdown and reboot the system via remote control over the network - see the
document Telestra Remote Control Interface User Guide for more details.

ASTi Telestra User Guide (Version 1, Revision D)
Copyright © 1999-2001 Advanced Simulation Technology inc. 5
Telestra Setup Procedure
Telestra Configuration Utility
The Telestra system ships with a console GUI configuration tool that supports configuring all net-
work interfaces, host access, terrain queries, tactical data links, and access to the federate remote
control interface. To start the configuration utility, login as root and run the command con-
figTelestra.pyc. Figure 3 shows the welcome screen for the Telestra Configuration Utility. The
remainder of this section will describe configuring general settings. For instructions on setting up
specific features such as tactical data links or terrain queries, please see the corresponding appli-
cation note at http://www.asti-usa.com/ for more details.
Figure 3: Telestra Configuration Utility Welcome Screen
When the configuration utility first starts, the welcome screens displays general information about
using the application. After selecting the OK button, the Main Menu screen shown in Figure 4
appears. This menu has four options, Network Settings, Host Access, Remote Control Interface,
and Quit. The Quit option causes the configuration utility to exit and prompts the user about sav-
ing configuration changes. Any changes to the system configuration will require a system reboot
in order for the changes to take affect. The Network Settings submenu allows configuration of eth-
ernet interfaces as well as general settings such as Hostname, Domain, and Nameserver. The Host
Access choice allows users to configure the additional features of the Telestra system (i.e. host
interface and tactical data links). Finally, the Remote Control Interface option allows users to
enable or disable access to the Remote Control Interface for the Telestra federate software.

ASTi Telestra User Guide (Version 1, Revision D)
Copyright © 1999-2001 Advanced Simulation Technology inc. 6
Figure 4: Telestra Configuration Utility Main Menu

ASTi Telestra User Guide (Version 1, Revision D)
Copyright © 1999-2001 Advanced Simulation Technology inc. 7
Network Configuration
Figure 5 shows the Network Settings Menu, where users configure network information for all
three ethernet interfaces. Under the General Settings menu, users specify the Hostname, Domain,
and Nameserver for the system. For each of the remaining interfaces, the Telestra Configuration
Utility contains options for the IP address, Netmask, and Gateway. The Telestra system ships with
default values for all three interfaces. Users will need to modify the settings for the HLA and Host
interfaces to match their specific network configurations. Note that the DACS interface does not
require configuration unless under direction from ASTi. Please see Appendix A for more informa-
tion on how to configure the HLA interface in order to join a federation.
Figure 5: Network Settings Menu

ASTi Telestra User Guide (Version 1, Revision D)
Copyright © 1999-2001 Advanced Simulation Technology inc. 8
Installing a DMSO RTI (Non-U.S. Customers only)
The Telestra system normally comes with some version of the DMSO RTI installed. However, due
to legal restrictions, it is difficult to export a system with the DMSO RTI installed. To accommo-
date our overseas customers, we have installed a script which makes it easy to install a DMSO
RTI on the Telestra system. Using this script, a system can be exported and the RTI can be down-
loaded and installed by the end customer.
To download the DMSO RTI, go to the DMSO web site at http://hla.dmso.mil and register with
the software distribution center. You will need the latest RTI compiled for Red Hat Linux 6.1.
Please refer to the table below for the RTI version required for your system.
DMSO distributes the RTI in the form of self extracting shell files, which have an extension
“.sh”.Take this downloaded file and copy it to the Telestra system. The easiest way to do this is via
ftp.
Then, log in as root and execute the command ‘sh <RTIFilename>’ in the directory where the
shell file was downloaded. This will unpack the RTI into the following subdirectories: <RTI-Ver-
sion>/<platform build type>. Upon successful completion, continue to the next section. If you
have any problems extracting the RTI, contact DMSO RTI Support via their website at http://help-
desk.dctd.saic.com .
NOTE
: ASTi can only guarantee that the system will work with an RTI that has been tested and
approved for use with the Telestra federate. Switching to an untested RTI may cause the system to
stop functioning.
Run the moveRTI.sh script (Non-U.S. only)
To complete the RTI installation, change directory (cd command) into the <RTI-Version>/<plat-
form build type> subdirectory. Then list the directory contents (ls command) to confirm the fol-
lowing subdirectories exist:
apps
bin
doc
etc
config
include
lib
Next, execute the ‘moveRTI.sh’ command to move the RTI components into their ASTi specific
locations.
To test if the RTI has been properly installed, log out and log in as hlauser. Then type “telestra -t”
at the prompt. If the last line printed reads “TEST OK”, then the installation was successful.
Telestra Version DMSO RTI Version
Telestra-1.1-1 RTI-NG-1.3v2
Telestra-1.2-1
Telestra-1.4-1
RTI-NG-1.3v3.1

ASTi Telestra User Guide (Version 1, Revision D)
Copyright © 1999-2001 Advanced Simulation Technology inc. 9
How to Run the Software
The software that is run on the Telestra box is an HLA federate. This software, when combined
with the DACS audio routing and processing node, implements a full radio simulation environ-
ment, based upon the data structures defined in the ASTi Radio SOM. In order to function, the
federate must join a federation.
In the normal mode of use, the rtiexec will be running on another computer system resident on the
HLA network. However, to allow local only testing or stand-alone tests to be performed, it is pos-
sible to run the rtiexec on the Telestra box. The rtiexec must be running somewhere in order for
the system to function. The rtiexec can be run by logging in as hlauser and typing rtiexec from
consoles 2 through 6 (see below).
From power on, the Telestra system will start the Telestra federate application automatically on
console 1. Linux allows access to multiple consoles, which are accessed by pressing “Alt-F1” for
console 1, “Alt-F2” for console 2, and so on up to “Alt-F6” for console 6. The Telestra system
automatically starts on console 1, consoles 2 through 6 should be used to administer files on the
system.
At boot up, the “telestra” script runs the Telestra federate, but in its default configuration does not
join a federation. In order to join a federation the “join” command must be used. A list of all pos-
sible commands may be seen by typing “help” at the command line.
At this point it is necessary to identify the significance of another file on the system: the configu-
ration file. Configuration files end in the “.cfg” extension and contain basic information, such as
the name of the federation to join and the name of .fed file to be used. The format of this file is
similar to the configuration file found on the DACS system; however, the commands used are
completely different. The Telestra federate will attempt to read in the file default.cfg for configu-
ration settings. If no configuration file named default.cfg exists on the system, then internal
default values are used that are coded into the Telestra software.
When the “join” command is used somehow we must tell the software which federation we would
like to join. We can use “join” with an argument to specify the federation name. If no argument is
supplied with “join” then the name from the configuration file is used. If no name is specified
there, the join command will fail. Two federates must use the same federation name to pass infor-
mation between them.
The “join” command may be used with an argument which overrides the default value. The argu-
ment supplied must be the name of the required federation and will be in the form “join
<federation_name>”. The system will then issue a series of messages, ending with either “JOIN
<federation_name> OK” or “JOIN <federation_name> FAIL”. If the system does not join suc-
cessfully, the most likely causes are:
• No rtiexec was running
• No federation name was specified
• The .fed file did not contain the names in the ASTi Radio SOM or was not found.
If “JOIN <federation_name> OK” is returned, the system is now running and can be interrogated
to determine the federate status and activity. This is achieved by simply pressing the Enter key. A

ASTi Telestra User Guide (Version 1, Revision D)
Copyright © 1999-2001 Advanced Simulation Technology inc. 10
status report is then generated on-screen that includes a “Life Counter” value. This counter is gen-
erated internally and increments at one second intervals (although it only reports when the Enter
key is pressed, and a new status report is displayed), and provides a confidence indicator that the
system is operational.
Other information reported includes the number of attribute updates for radio receivers (rx) and
radio transmitters (tx), the number of interactions (both rx and tx). The values in these fields are
useful when verifying the operation of the associated local DACS processor and for remote sites.
Attribute updates (such as radio power status, frequency, etc) are sent when there are changes in
the transmitter or receiver attributes. Interactions are audio packets. Both types are held as incre-
mental counters, and provide an indication to the system user of the amount of data processed.
Additionally, a current count value is displayed for the “Number of transmitters”, both for the
local DACS node(s), and identified remotely on the HLA network from the RTI. A count value is
also displayed for “Entities” identified as existing from the RTI. The Telestra federate does not
generate any entities itself - it just uses this information to attach radios to entities.
The information displayed as part of the status report may be supplemented using additional com-
mand line instructions. The “object” command lists the transmitter, receiver, and entity objects
that the federate has discovered. These are displayed for both local DACS objects and objects dis-
covered from the RTI. The name, object type, source of the object (local/RTI) and object handle
are displayed.
The “resign” command can be entered at any time in order to leave the current federation. To join
a different federation, it is not necessary to resign first: issuing a new join command will cause the
Telestra federate to resign from its current federation before attempting to join the new one. If the
Telestra federate is instructed to join a federation it is already joined to, it will resign and re-join
that federation.
In order to terminate the HLA federate application the “quit” command can by used at any time. If
joined, the Telestra federate will resign before exiting.
In summary:
• When the Telestra system powers up, the software attempts to read parameters in the
default.cfg file. From this, it gets values for the federation name, the federate name, the fed
file, and the conversion file (.conf). These values can be overridden by user commands send
directly to the telestra software.
• When the “join” command is issued, the .fed file and the .conf files are read. The telestra
federate joins the federation specified (either in the .cfg file or from a command-line input).
It reads in the .conf file, and attempts to get handles for all of the attribute names and object
names for the RTI.
• If it fails to get any of the handles, it will resign from the federation and return a “JOIN
<FEDERATION NAME> FAIL BAD_FED_FILE” message.If not, it will return a “JOIN
<Federation Name> OK” message, and begins sending and receiving information to and
from the RTI.
• At any time, it can receive a command to join another federation, resign, quit, shutdown, or
reboot.

ASTi Telestra User Guide (Version 1, Revision D)
Copyright © 1999-2001 Advanced Simulation Technology inc. 11
Using the Remote Control Interface
The commands discussed above are part of a complete set of commands that the Telestra federate
recognizes. These commands can either be issued from the console or through a TCP/IP connec-
tion with the Telestra Remote Control Interface. We suggest that you use the console interface
when first setting up and integrating the system. The next step is to set up the remote control inter-
face if you desire to integrate the Telestra unit into a broader simulator control architecture. Once
the remote control interface is in place, you can completely control the system from a remote
computer. You can even shutdown the system through the Remote Control Interface, eliminating
the need for a keyboard and monitor on the Telestra System.
For more information on the Telestra commands and the remote control interface, see the docu-
ment Telestra Remote Control Interface User Guide.

ASTi Telestra User Guide (Version 1, Revision D)
Copyright © 1999-2001 Advanced Simulation Technology inc. 12
The Configuration File
This file contains a list of parameters used to configure the Telestra federate when it is started.
Unless specified otherwise by a command line argument, the file “default.cfg” is used. The values
defined in the file are read when the application federate is started. Note that any text following a
semi-colon (;) is treated as a comment and ignored. This file may be edited using the ‘pico’ editor
(or perhaps those with a more self-flagilating persuasion may prefer the Unix standard ‘vi’ editor).
The following commands are available:
Federate_name = <Federate name>
This command allows the user to specify the federate name. Note this name must be unique
for a given federation. Each system will automatically select a unique name based upon the
local IP address unless an entry is made in this file. Typically, this does not need to be set.
Federation_name = <Federation name>
This defines the federation that is joined, either automatically upon start-up (see
Join_at_startup), or when a “join” command is used without an argument.
Fed_file = <Fed file name>
This defines the .fedfile that the system will use. On shipment the fed file will be
“ASTi_SOM.fed”, but will require updating once the customer fed file is created that includes
the ASTi Radio SOM.
Convert_table = <Data representation definitions file>
This file defines the data representations used by the Telestra Federate. The default file utilized
will be “convert.conf” unless an entry is made in this file. It may be necessary to modify the
data representations file, dependent on the specific FOM being used. To use a non-standard
data format please contact ASTi.
Join_at_startup = <Y or N>
This entry determines whether the federate will attempt to join the federation upon start-up.
The default value is N and therefore requires the user to perform a manual “join”. If this is set
to Y, and the Telestra federate is run before an rtiexec is started, the federate will be unable to
join, and may crash on some RTIs.
Control_Port = <port number>
Set the TCP/IP port number for the Remote Control Interface for the telestra software. When
given, commands are not taken from the console. Instead, a TCP/IP socket is opened and waits
for connections on the specified port number. Control of the federate is done through this port.
For more information, see Using The Telestra Remote Control Interface. The default value is
to use the console interface.
Debug_Host = <ON or OFF>
This is used to debug the TCP/IP connection that is set up with the Control_Port command.
For more information, see the document Using the Telestra Remote Control Interface. The
default value is OFF.

ASTi Telestra User Guide (Version 1, Revision D)
Copyright © 1999-2001 Advanced Simulation Technology inc. 13
Audio_Backchannel = <ON or OFF>
If this is set, the Telestra Federate sends the audio over the HLA physical network, but
bypasses the RTI. The Telestra federate will still create transmitter and receiver HLA objects.
This is intended for cases when the RTI is unable to keep up with the amount of audio traffic
being sent. In this mode the audio will not be seen on any of the standard HLA tools. The
default value is OFF.

ASTi Telestra User Guide (Version 1, Revision D)
Copyright © 1999-2001 Advanced Simulation Technology inc. 14
System File Structure
When you log onto the Telestra system as hlauser, your are positioned into the “hlauser” directory
(/home/hlauser/). This directory contains all the files that are needed to configure and run the
Telestra Federate. The following files are resident in this directory (or sub directory as indicated).
telestra
This file starts the Telestra federate. Use of the argument “-t” forces the system to run a system
confidence test. When simply used on the command line, this starts the application federate,
and uses the commands found in the configuration file.
example.cfg
This file is an example configuration file. It includes start-up configuration values for system
file names and values.
convert.conf
This file contains the ASTi data format representation definitions. Modification to some of the
names used within this file may be required, depending on the FOM being used for the sys-
tem. This should be only done under direction from ASTi.
ASTi_SOM.fed
This file is a .fed file that only contains the ASTi radio SOM. In normal system operation a
customer generated .fed file will exist in this directory, that will include the ASTi radio SOM.
It will be necessary for the configuration file to point to the correct .fed file.
RTI.rid
This file is part of the RTI configuration, and has been modified from the standard file sent
with the DMSO RTI to optimize the performance of the Telestra Federate. It should only be
modified under the direction of ASTi.
handle_1.val
This is a debug file generated upon execution of the “join” command. It includes the name of
the federation joined, time of joining, and a list of all the attributes and interactions published/
subscribed to and their handles.If the RTI cannot get handles for any of the attributes, classes,
or parameters that the telestra federate requests, it will resign from the federation, return a
“JOIN FAIL”, and print the offending name in this file. As long as the system is functioning,
this file can be safely ignored.
~/docs/ASTi_SOM.omt
~/docs/ASTi_SOM.omd
These files specify the ASTi SOM , and should be used to incorporate the ASTi SOM into the
customer’s FOM. This can be done with the OMDT tool, which is available from the DMSO
web site, or from another commercially available tool. The resultant .fed file will need to be
copied to the /home/hlauserdirectory and the configuration file updated.

ASTi Telestra User Guide (Version 1, Revision D)
Copyright © 1999-2001 Advanced Simulation Technology inc. 15
~/docs
Includes copies of user documentation. All documentation is in html format, and can be
viewed with any web browser.
~/bin
Contains scripts helpful for using and maintaining the system. Currently, there is only one for
customer use: hostemu. hostemu is used to debug the remote Control Interface, and is
described more fully in the document Telestra Remote Control Interface User Guide.

ASTi Telestra User Guide (Version 1, Revision D)
Copyright © 1999-2001 Advanced Simulation Technology inc. 16
The RTI Software
As stated previously the rtiexec application must be running somewhere on the network to which
Telestra is connected. However there may be cases where the system is down or some standalone
testing is required. In order to support this Telestra includes a local copy of rtiexec.
In order to run the RTI, a second console window should be opened. Log in as hlauser and enter
“rtiexec” to run the RTI. This rtiexec will service every system on the network.
To stop the RTI, type “Ctrl-C”.

ASTi Telestra User Guide (Version 1, Revision D)
Copyright © 1999-2001 Advanced Simulation Technology inc. 17
DACS Operational Differences running HLA
Note
: This guide is written with the assumption that the user is familiar with DACS operation, and
DIS Radios in the DACS.
The changes to the DACS Model Builder application are relatively straight forward in order to
allow it to function in HLA mode. Note that all previous functionality in non networked and DIS
operational modes are retained and are available in HLA mode.
For HLA operation the DACS system must be configured to run in HLA mode. This is done via a
command in the DACS configuration (“.cfg”) file. The required command line is:
hla = on
Note: It is important to note that the “default.cfg” on the DACS has a different functionality to the
“default.cfg” file used on the Telestra node.
When Model Builder is started with the “hla = on” command you will notice that the main menu
now includes an selection titled “hlA network”.
IMPORTANT
: Any configuration file commands that begin with “DIS” should be commented out
or removed.
Changes at the object level in Model Builder are restricted to the “Radio”, “Receiver” and “Trans-
mitter” objects in the “Signals” list and to “World Position” objects in the “Controls” list.
The changes to the “Radio”, “Receiver” and “Transmitter” objects are all common to each other.
The most obvious and fundamental change is that these objects are no longer identified using the
“Site/Host/Entity/Radio ID” numbers of DIS. The identification is now via a concatenation of the
World Position name used by the object to define it’s location, and the Radio object name. These
names are the user created names entered as part of the Model development (note that if the user
does not enter a name, the system will chose a default name for each object). Therefore assuming
we have a world position control object identified “Aircraft_Posn” and a radio object identified
“Cockpit_UHF1”, then the object name displayed (and created on the RTI) will be
“Aircraft_Posn.Cockpit_UHF1.rx”. (A radio object actually consists of two separate objects
which are created on the RTI. These are Transmitter objects, whose names the ASTi System ends
in ‘.tx’, and receiver objects, whose names will end in ‘.rx’).
Note that it is no longer necessary to manually set the Radio ID number to anything other than the
Model Builder supplied default, since this is not published or utilized outside of the DACS/
Telestra pair.
World Position objects have been changed to include the option of setting the Entity ID type to
“HLA”. This is achieved using the “Entity ID” field and incrementing through the options. On
selecting the “HLA” type, the line above changes from “Exercise No” to become “Federation
No”. Federation numbers 1-8 are reserved for RTI communication. The “Federation No” must be
set to “1” in the current implementation since Telestra only supports one Federation. Please see
the application note Using Telestra Backchannels for more information on assigning Federation
numbers. The other numbers displayed for the site, host and entity fields should be left at the
default values, since Model Builder defaults these to be unique, and they are not reported as part
of the HLA data.

ASTi Telestra User Guide (Version 1, Revision D)
Copyright © 1999-2001 Advanced Simulation Technology inc. 18
The “Entity” object used for entity attach now functions in a different way. It is now only neces-
sary to enter the HLA name of the required attach entity in the name field of the Entity object in
Model Builder. The system then interrogates the RTI and extracts the required position informa-
tion. It is no longer required to set-up site/host/entity numbers. The “Federation No” number must
be set to “1”. This will be changed in future versions to allow multiple federation support. A
method of dynamically attaching radios to an entity across the network will be added in an
upcoming release.
The network intercom object is currently represented as a Radio object on the HLA network.
Other manuals for Telestra
4
Table of contents
Other ASTi Recording Equipment manuals