manuals.online logo
Brands
  1. Home
  2. •
  3. Brands
  4. •
  5. Astral Pool
  6. •
  7. Water Pump
  8. •
  9. Astral Pool MICRO UP Series Installation manual

Astral Pool MICRO UP Series Installation manual

This manual suits for next models

1

Other Astral Pool Water Pump manuals

Astral Pool DMX Variable Pump S User manual

Astral Pool

Astral Pool DMX Variable Pump S User manual

Astral Pool eCombi EE2 User manual

Astral Pool

Astral Pool eCombi EE2 User manual

Astral Pool BX Series User manual

Astral Pool

Astral Pool BX Series User manual

Astral Pool AQUASPHERE VSP User manual

Astral Pool

Astral Pool AQUASPHERE VSP User manual

Astral Pool Colorado Manual

Astral Pool

Astral Pool Colorado Manual

Astral Pool A142C User manual

Astral Pool

Astral Pool A142C User manual

Astral Pool MAXI PLUS Installation manual

Astral Pool

Astral Pool MAXI PLUS Installation manual

Astral Pool 25462 Manual

Astral Pool

Astral Pool 25462 Manual

Astral Pool MICRO User manual

Astral Pool

Astral Pool MICRO User manual

Astral Pool CALA Manual

Astral Pool

Astral Pool CALA Manual

Astral Pool KIVU 63042 User manual

Astral Pool

Astral Pool KIVU 63042 User manual

Astral Pool MICRO-RX Installation manual

Astral Pool

Astral Pool MICRO-RX Installation manual

Astral Pool VICTORIA PLUS SILENT VS User manual

Astral Pool

Astral Pool VICTORIA PLUS SILENT VS User manual

Astral Pool OPTIMA PRO NEXT Series User manual

Astral Pool

Astral Pool OPTIMA PRO NEXT Series User manual

Astral Pool CONTROL BASIC PLUS User manual

Astral Pool

Astral Pool CONTROL BASIC PLUS User manual

Astral Pool VICTORIA PLUS SILENT User manual

Astral Pool

Astral Pool VICTORIA PLUS SILENT User manual

Astral Pool Viron XT 2 Series User manual

Astral Pool

Astral Pool Viron XT 2 Series User manual

Astral Pool EXACTUS Series Instructions for use

Astral Pool

Astral Pool EXACTUS Series Instructions for use

Astral Pool MICRO-PH Installation manual

Astral Pool

Astral Pool MICRO-PH Installation manual

Astral Pool COLUMBIA Instruction Manual

Astral Pool

Astral Pool COLUMBIA Instruction Manual

Popular Water Pump manuals by other brands

Watershed Innovations HYDRAPUMP SMART FLEX Instructional manual

Watershed Innovations

Watershed Innovations HYDRAPUMP SMART FLEX Instructional manual

Graco Modu-Flo AL-5M instructions

Graco

Graco Modu-Flo AL-5M instructions

Messner MultiSystem MPF 3000 operating instructions

Messner

Messner MultiSystem MPF 3000 operating instructions

Xylem Bell & Gossett WEHT0311M Installation, operation and maintenance instructions

Xylem

Xylem Bell & Gossett WEHT0311M Installation, operation and maintenance instructions

WilTec 50739 Operation manual

WilTec

WilTec 50739 Operation manual

Franklin Electric Little Giant 555702 HRK-360S instruction sheet

Franklin Electric

Franklin Electric Little Giant 555702 HRK-360S instruction sheet

Ingersoll-Rand PD02P Series Operator's manual

Ingersoll-Rand

Ingersoll-Rand PD02P Series Operator's manual

VS ZJ Series Operating	 instruction

VS

VS ZJ Series Operating instruction

Flotec FPZS50RP owner's manual

Flotec

Flotec FPZS50RP owner's manual

SKF Lincoln FlowMaster II User and maintenance instructions

SKF

SKF Lincoln FlowMaster II User and maintenance instructions

Xylem Lowara LSB Series Installation, operation and maintenance instructions

Xylem

Xylem Lowara LSB Series Installation, operation and maintenance instructions

Water Duro Pumps DCJ500 Operating & installation instructions

Water

Water Duro Pumps DCJ500 Operating & installation instructions

Action P490 Operating instructions & parts manual

Action

Action P490 Operating instructions & parts manual

Flo King Permacore Reusable Carbon Bag Disassembly. & Cleaning Instructions

Flo King

Flo King Permacore Reusable Carbon Bag Disassembly. & Cleaning Instructions

ARO ARO PD15P-X Operator's manual

ARO

ARO ARO PD15P-X Operator's manual

Pumptec 112V Series Operating instructions and parts manual

Pumptec

Pumptec 112V Series Operating instructions and parts manual

Virax 262070 user manual

Virax

Virax 262070 user manual

Neptun NPHW 5500 operating instructions

Neptun

Neptun NPHW 5500 operating instructions

manuals.online logo
manuals.online logoBrands
  • About & Mission
  • Contact us
  • Privacy Policy
  • Terms and Conditions

Copyright 2025 Manuals.Online. All Rights Reserved.

MANUEL DE RÉGLAGE FR
PROGRAMMING INSTRUCTIONS UK
MANUAL DE REGULATIÓN ES
PROGRAMMERINGSINSTRUCTIES NL
PROGRAMMIERHANDBUCH DE
MANUALE DI PROGRAMMAZIONE IT
MANUAL DE PROGRAMAÇÃO PO
_________________________MICRO UP
FLUIDRA COMMERCIAL FRANCE
Avenue Maurice Bellonte,
66000 Perpignan, France
Tél. +33 4 68 52 06 84
Fax. +33 4 68 52 48 45
Rev 0.1 Cod. 00.009.159 2
P
A
G
FR DESCRIPTION DE L'OPÉRATION UK DESCRIPTION OF OPERATION
ES DESCRIPCION DE LA OPERACION NL BESCHRIJVING VAND E WERKING
DE FUNKTIONSBESCHREIBUNG IT DESCRIZIONE DEL FUNZIONAMENTO
PO DESCRIÇÃO FUNCIONAL
FR Les pompes doseuses de la série “MICRO UP” peuvent mesurer le pH ou les mV au choix de l'utilisateur final.
La pompe configurée pour mesurer le pH peut doser à la fois le pH- (acide sulfurique) et le pH + (base).
La pompe configurée pour mesurer le mV peut doser le chlore.
UK The “MICRO UP” series dosing pumps can measure pH or mV at the choice of the end user.
The pump configured to measure the pH can dose both pH- (sulfuric acid) and pH + (base).
The pump configured to measure mV can dose chlorine.
ES Las bombas dosificadoras de la serie "MICRO UP" pueden medir pH o mV a elección del usuario final.
La bomba configurada para medir el pH puede dosificar tanto pH- (ácido sulfúrico) como pH + (base).
La bomba configurada para medir mV puede dosificar cloro.
NL De doseerpompen van de serie "MICRO UP" kunnen pH of mV meten, naar keuze van de eindgebruiker.
Als de pomp ingesteld is om pH te meten kan de pomp zowel pH- (zuur) als wel pH + (base) doseren.
Als de pomp ingesteld is om mV te meten kan chloor worden gedoseerd.
DE Die Dosierpumpen der Serie "MICRO UP" können nach Wahl des Endbenutzers den pH-Wert oder den mV-Wert
messen.
Die zur Messung des pH-Werts konfigurierte Pumpe kann sowohl pH- (Schwefelsäure) als auch pH + (Base) dosieren.
Die zur Messung von mV konfigurierte Pumpe kann Chlor dosieren.
IT Le pompe dosatrici serie “MICRO UP” possono misurare il pH oppure i mV a scelta dell’utilizzatore finale.
La pompa configurata per misurare il pH può dosare sia pH- (acido solforico) che pH+ (base).
La pompa configurata per misurare i mV può dosare cloro.
PO As bombas dosadoras da série "MICRO UP" podem medir o pH ou mV à escolha do usuário final.
A bomba configurada para medir o pH pode dosar pH- (ácido sulfúrico) e pH + (base).
A bomba configurada para medir mV pode dosar cloro.
FR DESCRIPTION DE L'AFFICHAGE UK DISPLAY DESCRIPTION
ES DESCRIPCIÓN DE LA PANTALLA NL BESCHRIJVING VAN HET BEELDSCHERM:
DE BESCHREIBUNG DER ANZEIGE IT DESCRIZIONE DEL DISPLAY
PO DESCRIÇÃO DO VISOR
FR La figure montre l’affichage de la pompe pH et de la pompe RX.
1. indique le type de dosage:
pH- = acide
pH + = base
2. indique si la pompe est en train de doser ou non:
si la goutte est présente = la pompe dose
si la goutte n'est pas présente = la pompe ne dose pas.
UK The figure shows the display of the pH pump and the RX pump.
1. indicates the type of dosage:
pH- = acid
pH + = base
2. indicates whether the pump is dosing or not:
if the drop is present = the pump is dosing
if the drop is not present = the pump is not dosing
Rev 0.1 Cod. 00.009.159 3
P
A
G
ES La figura muestra la pantalla de la bomba de pH y la bomba RX.
1. Indica el tipo de dosificación:
pH- = ácido
pH + = base
2. indica si la bomba está dosificando o no:
si la gota está presente = la bomba está dosificando
si la gota no está presente = la bomba no está dosificando
NL De afbeelding toont de pH en de RX pomp.
1. Geeft het type dosering aan:
pH- = zuur
pH+ = base
2. Geeft aan of de pomp doseert of niet:
als de druppel zichtbaar is = de pomp doseert
als de druppel niet zichtbaar is = de pomp doseert niet
DE Die nebenstehende Abbildung zeigt das Display der pH-Pumpe und der RX-Pumpe.
1. Gibt die Art der Dosierung an:
pH- = Säure
pH + = Base
2. zeigt an, ob die Pumpe dosiert oder nicht:
Wenn der Tropfen vorhanden ist = die Pumpe dosiert
Ist der Tropfen nicht vorhanden, dosiert die Pumpe nicht
IT In figura a lato il display della pompa pH e della pompa RX.
1. indica il tipo di dosaggio:
pH- = acido
pH+= base
2. indica se la pompa sta dosando oppure no:
se la goccia è presente = la pompa dosa
se la goccia non è presente = la pompa non dosa
PO A figura ao lado mostra a exibição da bomba de pH e da bomba RX.
1. indica o tipo de dosagem:
pH- = ácido
pH + = base
2. indica se a bomba está em dosagem ou não:
se a queda estiver presente = as doses da bomba
se a gota não estiver presente = a bomba não dosa
FR CHOIX DE MESURE UK CHOICE OF MEASURE
ES ELECCIÓN DE LA MEDIDA NL KEUZE VAN DE METING
DE GRÖSSENWAHL IT SCELTA DELLA MISURA
PO ESCOLHA DE TAMANHO
FR Appuyer pendant 3 secondes sur les boutons CAL et SET jusqu'à ce que la mesure en cours d'utilisation apparaisse à
l'écran. Appuyez brièvement sur le bouton SET pour le changer et l’autre mesure apparaîtra à l’écran.
Rev 0.1 Cod. 00.009.159 4
P
A
G
À ce stade, n'appuyez sur aucun bouton. La mesure sélectionnée sera automatiquement mémorisée et la pompe
commencera à fonctionner en conséquence. NB: le changement de mesure restaure les paramètres d'usine (pages 9 et
15).
UK Keep both CAL and SET buttons pressed for 3 seconds until the measure currently in use appears on the display.
Press the SET button briefly to change it and the other measurement will appear on the Display.
Once the desired value is selected do not press any button and wait. The selected measure will be automatically memorized
and the pump will start to work accordingly. NB: changing the measure restores the default parameters (pag.6 and 10).
ES Mantenga presionados los botones CAL y SET durante 3 segundos hasta que la medición actualmente en uso
aparezca en la pantalla. Presione el botón SET brevemente para cambiarlo y la otra medición aparecerá en la pantalla.
En este punto no presione ningún botón. La medición seleccionada se memorizará y la bomba comenzará a funcionar en
consecuencia. NB: el cambio de medición restaura los parámetros de fábrica (páginas 9 y 15).
NL Druk de knoppen CAL en SET tegelijkertijd in voor 3 seconden totdat de huidige instelling in beeld verschijnt. Druk kort
op de SET knop om deze te veranderen in de andere instelling. Als de juiste instelling is geselecteerd geen knoppen
indrukken. De geselecteerde instelling wordt opgeslagen en de pomp zal werken volgens deze instelling. NB: met de
verandering van instelling worden de fabrieksinstellingen weer ingesteld. (pag. 9 en 15).
DE Halten Sie die Tasten CAL und SET 3 Sekunden lang gedrückt, bis die aktuell verwendete Messung im Display
angezeigt wird. Drücken Sie kurz die SET-Taste, um die Einstellung zu ändern. Die andere Messung wird im Display
angezeigt.
Drücken Sie zu diesem Zeitpunkt noch keine Taste. Die gewählte Messung wird gespeichert und die Pumpe startet
entsprechend. HINWEIS: Im Messschritt werden die werkseitigen Parameter wiederhergestellt (Seiten 9 und 15).
IT Tenere premuti ambedue i tasti CAL e SET per 3 secondi finchè sul display non compare la misura attualmente in
uso. Premere brevemente il pulsante di SET per cambiarla e sul Display comparirà l’altra misura.
A questo punto non premere alcun pulsante. La misura scelta verrà memorizzata e la pompa inizierà a funzionare di
conseguenza. NB: nel passaggio di misura vengono ripristinati i parametri di fabbrica (pag.9 e 15).
PO Mantenha as teclas CAL e SET pressionadas por 3 segundos até que a medição atualmente em uso apareça no
mostrador. Pressione brevemente o botão SET para alterá-lo e as outras medições aparecerão no visor.
Neste ponto, não pressione nenhum botão. A medição escolhida será armazenada e a bomba começará a funcionar de
acordo. Nota: na etapa de medição, os parâmetros de fábrica são restaurados (páginas 9 e 15).
PH
FR PROGRAMMATION DE POINT DE CONSIGNE UK SETPOINT PROGRAMMING
ES PROGRAMACIÓN DEL PUNTO DE AJUSTE NL PROGRAMMERING VAN DE WENSWAARDE
DESETPOINT-PROGRAMMIERUNG IT PROGRAMMAZIONE DEL SETPOINT
PO PROGRAMAÇÃO SETPOINT
FR Appuyez sur le bouton SET pendant 3 secondes. Le message SP apparaît à l'écran, puis la valeur du point de
consigne précédemment définie (7,3 pH par défaut). En appuyant toujours plusieurs fois sur le bouton SET, sélectionnez la
valeur souhaitée entre 6,0 et 8,0, attendez sans appuyer sur aucun bouton pendant 5 secondes, la valeur sélectionnée sera
automatiquement mémorisée.
UK Push and hold the SET button for 3 seconds, on the display SP will appear and then the previously stored value of
Setpoint. Continue pushing the SET button to select the setpoint value in a range between 6,0 and 8,0. Once the desired
value selected, wait for 5 seconds without pushing any button and the value will automatically be stored.
Rev 0.1 Cod. 00.009.159 5
P
A
G
ES Oprima el botón SET por 3 segundos, en el display aparecerá SP y luego el valor memorizado previamente. Siempre
empujando el botón SET puede seleccionar el valor del Set-Point en un rango entre 6,0 y 8,0. Una vez que el valor esté
seleccionado, espere durante 5 segundos sin pulsar ningún botón, y el valor se memoriza automáticamente.
NL Houd de SET knop 3 seconden ingedrukt. Op het beeldscherm verschijnt SP en vervolgens de wenswaarde zoals
ingesteld (standaard 7,3 pH). Druk herhaaldelijk de SET knop in om de wenswaarde te selecteren in een range tussen 6,00
pH en 8,00 pH. Als de juiste wenswaarde is geselecteerd 5 seconden wachten om deze waarde op te slaan.
DE Halten Sie die SET-Taste 3 Sekunden lang gedrückt. Das Display zeigt SP und dann den zuvor eingestellten Sollwert
(Standardeinstellung 7.3pH) an. Wenn Sie die SET-Taste wiederholt drücken, wählen Sie den gewünschten Wert zwischen
6.0 und 8.0. Warten Sie 5 Sekunden lang, ohne eine Taste zu drücken. Der ausgewählte Wert wird automatisch
gespeichert.
IT Tenere premuto il pulsante di SET per 3 secondi, sul Display comparirà la scritta SP e successivamente il valore di
Setpoint precedentemente impostato (default 7.3pH). Sempre premendo ripetutamente il pulsante di SET selezionare il
valore desiderato compreso tra 6,0 e 8,0 attendere senza premere alcun pulsante per 5 secondi, il valore selezionato verrà
automaticamente memorizzato.
PO Pressione e segure o botão SET por 3 segundos, o visor exibirá SP e o valor do ponto de ajuste definido anteriormente
(padrão 7.3pH). Sempre pressionando o botão SET, selecione repetidamente o valor desejado entre 6,0 e 8,0, aguarde
sem pressionar nenhum botão por 5 segundos, o valor selecionado será automaticamente memorizado.
FR PROGRAMMATION DU TYPE DE DOSAGE UK PROGRAMMING OF THE DOSAGE TYPE
ES PROGRAMACIÓN DEL TIPO DE DOSIFICACIÓN NL PROGRAMMERING TYPE DOSERING
DE PROGRAMMIERUNG DES DOSIERTYPS IT PROGRAMMAZIONE DEL TIPO DI DOSAGGIO
PO PROGRAMAÇÃO DO TIPO DE DOSAGEM
FR Le dosage de la pompe par défaut est pH- (acide).
Si vous souhaitez modifier le dosage et passer à pH + (base), après avoir choisi la valeur du point de consigne comme
dans le paragraphe précédent, confirmez simplement la valeur du point de consigne avec la touche CAL et
changez le type de dosage (pH-; pH +) avec la touche SET. Une fois que le dosage souhaité a été défini, attendez 5
secondes sans appuyer sur aucune touche, la valeur sélectionnée sera automatiquement mémorisée.
UK The default pump dosage is pH- (acid).
If you want to change the dosage and go to pH + (base), after choosing the setpoint value as in the previous paragraph,
simply confirm the set point value with the CAL key and change the dosage type (pH-; pH +) with the SET button. Once the
desired dosage has been set, wait 5 seconds without pressing any key, the selected value will be automatically memorized.
ES La dosis predeterminada de la bomba es pH- (ácido).
Si desea cambiar la dosis e ir a pH + (base), después de elegir el valor de consigna como en el párrafo anterior,
simplemente confirme el valor de consigna con la tecla CAL y cambie el tipo de dosis (pH-; pH +) con la tecla SET. Una vez
que se haya configurado la dosis deseada, espere 5 segundos sin presionar ninguna tecla, el valor seleccionado se
memorizará automáticamente.
NL De standaard dosering is pH- (zuur).
Als deze ingesteld dient te worden op pH+ (base) verander dan na instelling van de wenswaarde zoals beschreven in
vorige paragraaf met de knop SET. Na selectie van de juiste instelling 5 seconden wachten. De ingestelde waarde wordt
automatisch opgeslagen.
DE Die Pumpendosierungsart ist der werkseitige pH-Wert (Säure).
Wenn Sie die Dosierung ändern und zu pH + (Basis) wechseln möchten, bestätigen Sie nach Auswahl des Sollwerts wie im
vorherigen Abschnitt einfach den Sollwert mit der Taste CAL und ändern Sie die Dosierungsart (pH-; pH) +) mit der SET-
Taste. Nachdem die gewünschte Dosierung eingestellt wurde, warten Sie 5 Sekunden, ohne eine Taste zu drücken. Der
ausgewählte Wert wird automatisch gespeichert.
Rev 0.1 Cod. 00.009.159 6
P
A
G
IT Il tipo di dosaggio della pompa è di fabbrica pH- (acido).
Se si desidera modificare il dosaggio e passare a pH + (base), dopo aver scelto il valore di setpoint come nel paragrafo
precedente, è sufficiente confermare il valore del set point con il tasto CAL e cambiare il tipo di dosaggio (pH-; pH +) con il
tasto SET. Una volta impostato il dosaggio desiderato, attendere 5 secondi senza premere alcun tasto, il valore selezionato
verrà automaticamente memorizzato.
PO O tipo de dosagem da bomba é o pH de fábrica (ácido).
Se você deseja alterar a dosagem e ir para pH + (base), após escolher o valor do ponto de ajuste como no parágrafo
anterior, basta confirmar o valor do ponto de ajuste com a tecla CAL e alterar o tipo de dosagem (pH-; pH +) com a tecla
SET. Uma vez definida a dosagem desejada, aguarde 5 segundos sem pressionar nenhuma tecla, o valor selecionado
será automaticamente memorizado.
FR ETALONNAGE UK CALIBRATION ES CALIBRATIÓN NL KALIBREREN
DE KALIBRIERUNG IT CALIBRAZIONE PO CALIBRAÇÃO
FR Attention,
pour permettre à la pompe de mémoriser la date d'étalonnage correcte, il est important de connecter la pompe à
un smartphone via l'application, puis de procéder à l'étalonnage.
La pompe nouvelle d’usine indique une date d’étalonnage fictif.
Si vous ne faites pas la connexion à la pompe à travers l'application, avant le calibrage, la pompe ne stocke pas
une date d'étalonnage correcte.
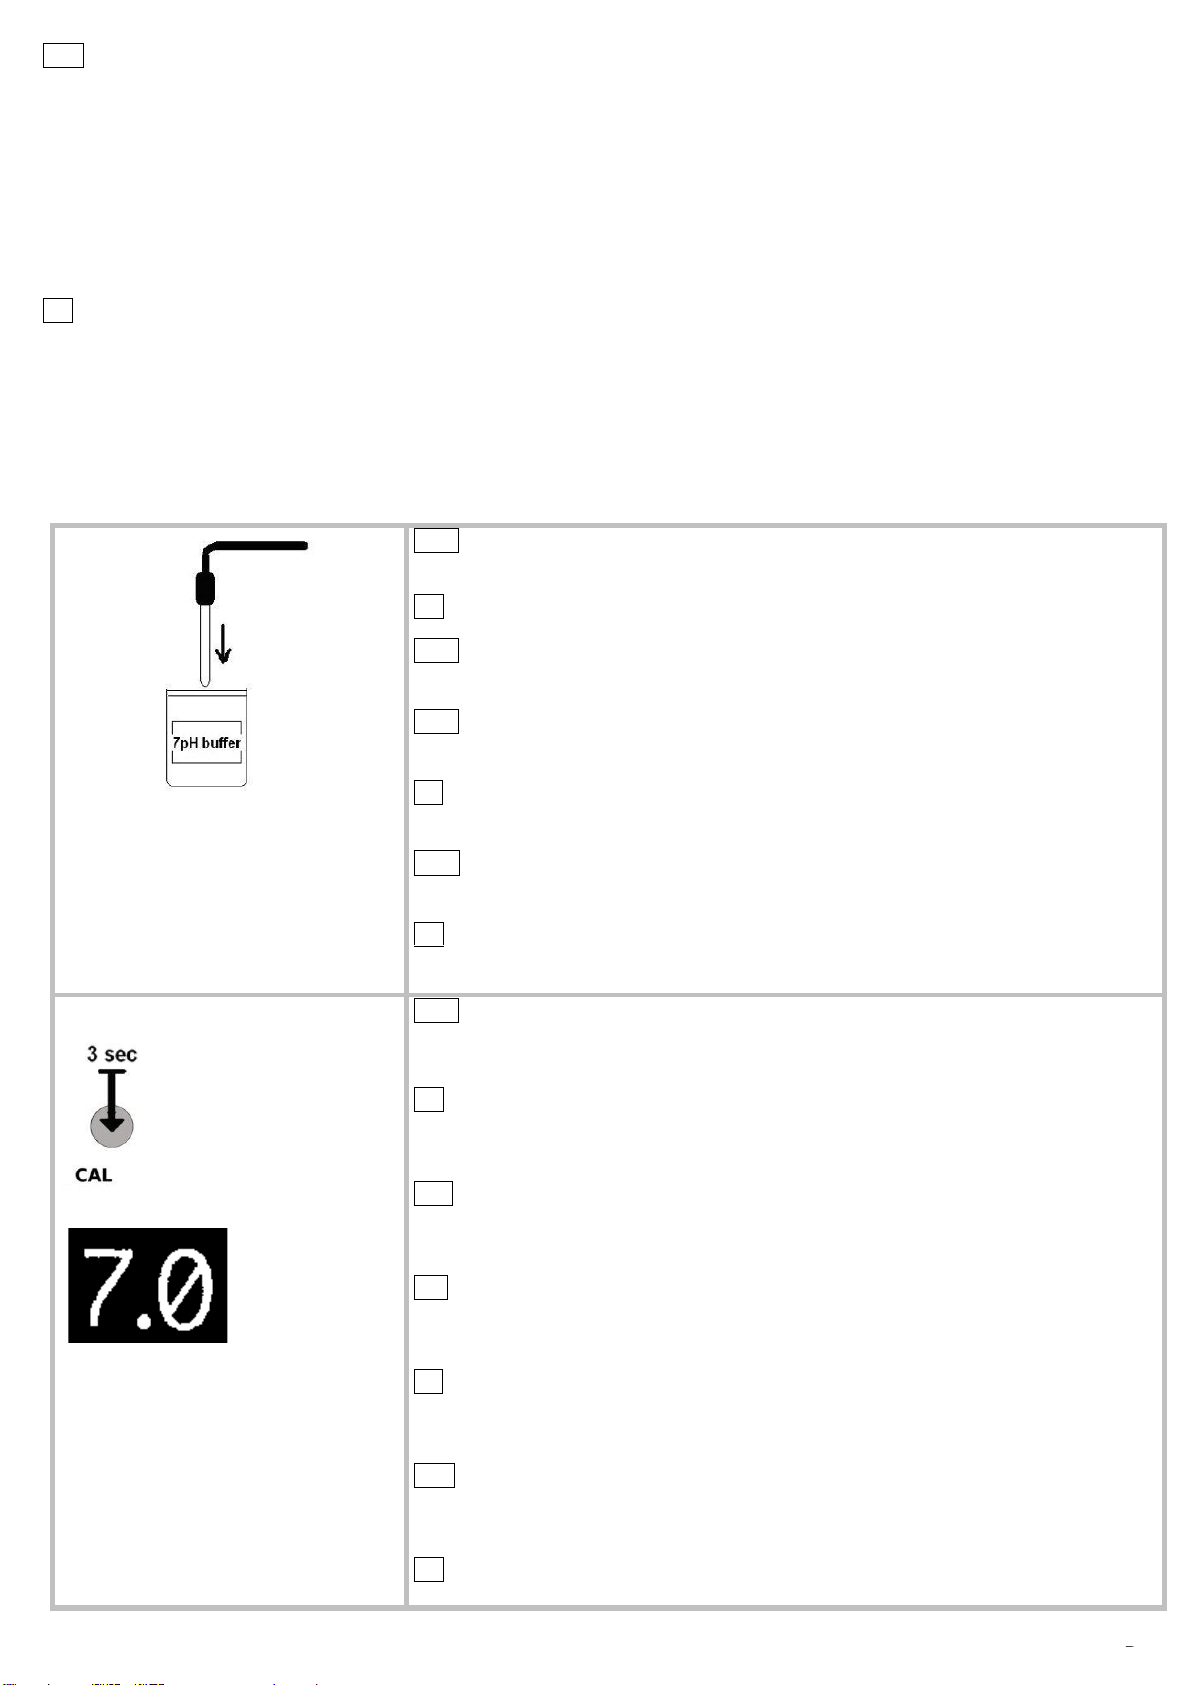
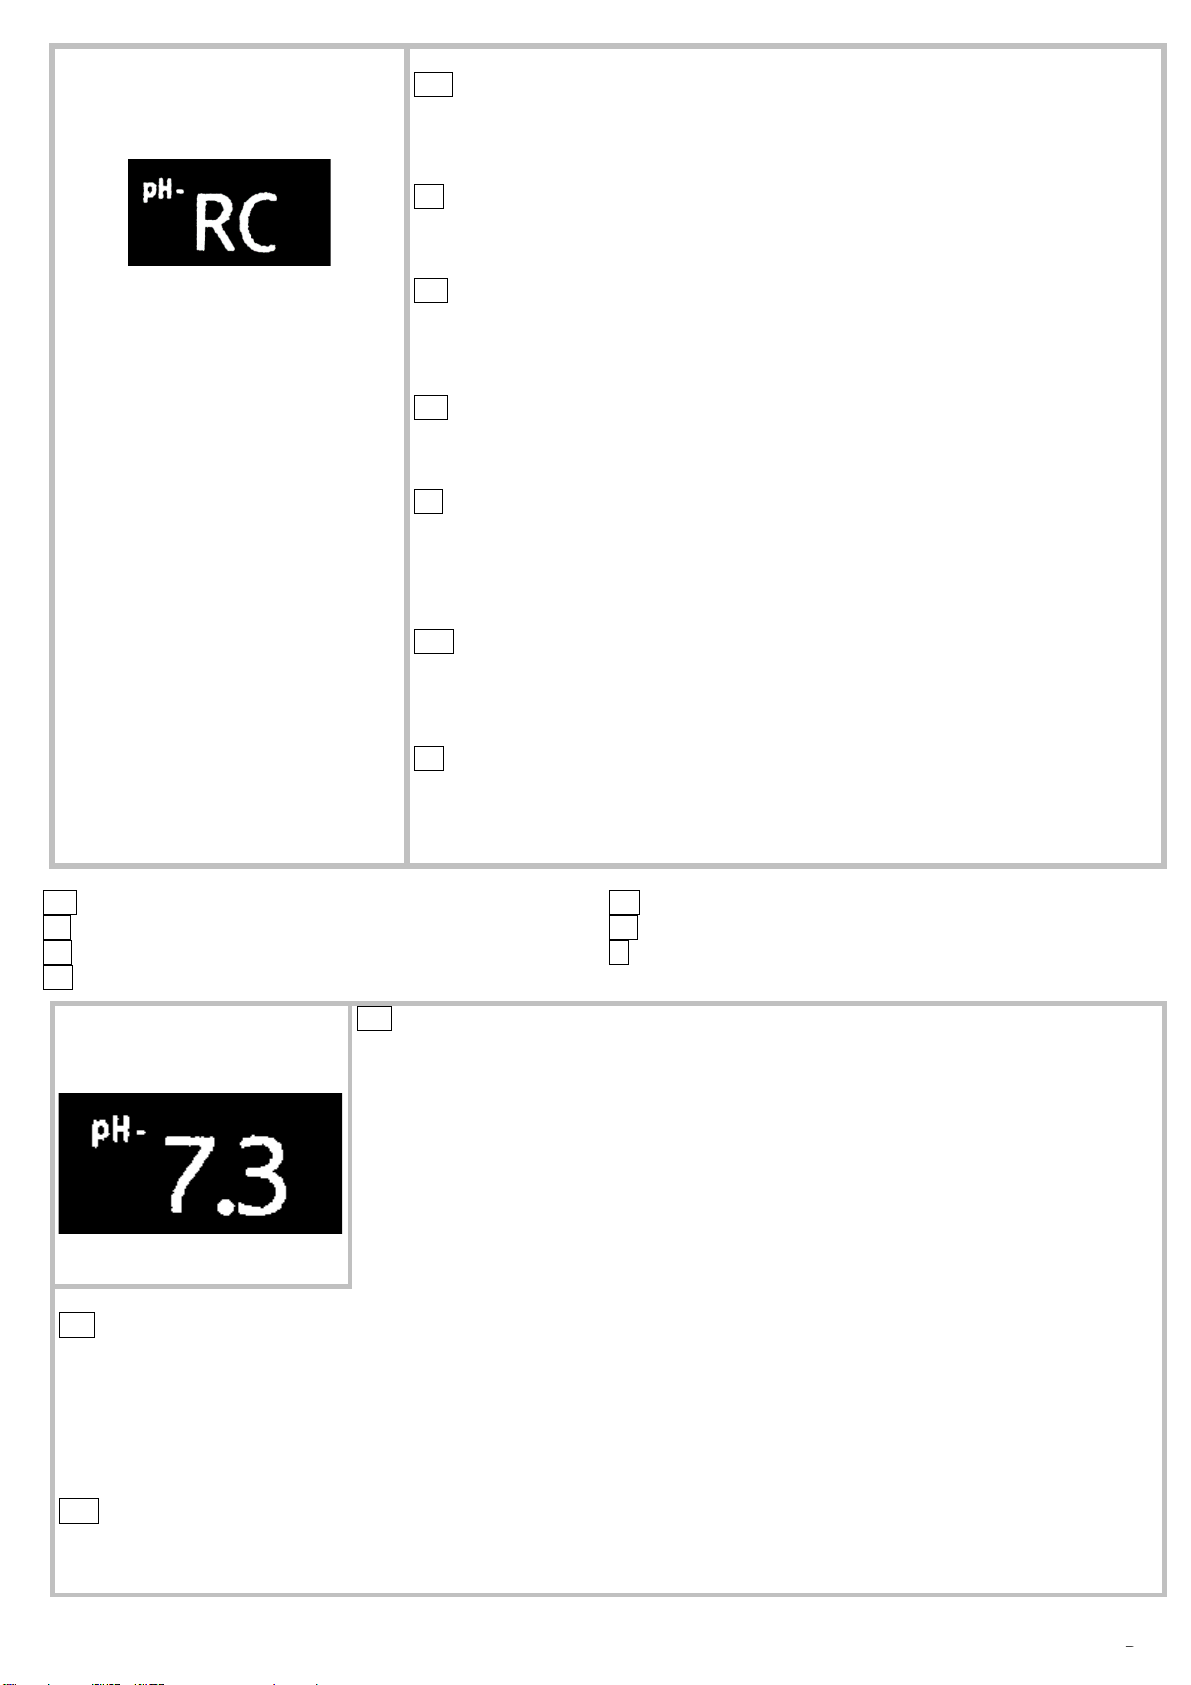
(1) La procédure d’étalonnage de l'électrode nécessite quelques minutes, pour une lecture très précise, il est très important
de suivre l'ordre des opérations indiquées ci-dessous.
(2) S’assurer que la solution tampon utilisée pour l’étalonnage correspond à la valeur indiquée et qu'elle ne soit pas polluée
ou périmée.
UK Attention,
to allow the pump to memorize the correct calibration date it is important to connect the pump with a smartphone
via the app and then proceed with the calibration.
When the pump is new, it shows a fictitious calibration date.
If you do not connect to the pump through the app, before calibrating, the pump will not store a correct calibration
date.
(1) the electrode calibration procedure may require several minutes, for a very accurate reading, it is important to follow the
operation sequence indicated here below.
(2) Be sure that the buffer solution used in calibration always matches the indicated value and that they're not soiled.
ES Atención,
para permitir que la bomba memorice la fecha de calibración correcta, es importante conectarla con un teléfono
inteligente a través de la aplicación y luego continuar con la calibración.
La bomba nueva de fábrica muestra una fecha de calibración ficticio.
Si no se conecta a la bomba a través de la aplicación, antes de calibrar, la bomba no almacenará una fecha de
calibración correcta.
(1) El procedimiento de la calibración del electrodo puede requerir algunos minutos, para una lectura muy exacta;
él es muy importante seguir la secuencia de la operación indicada aquí abajo.
(2) Ser seguro que la solución tapón usada en la calibración empareja siempre el valor indicado, y que no están
contaminados.
NL Attentie,
Om de pomp de juiste kalibratiedatum te laten weergeven is het belangrijk de pomp met de app te verbinden en
vervolgens de kalibratie uit te voeren. De kalibratiedatum van de nieuwe pomp is 2019. Als de pomp niet aan de
app wordt verbonden voor kalibratie zal de pomp niet de juiste kalibratiedatum opslaan.
(1) de procedure van het kalibreren van de sensor duurt enkele minuten. Om een maximale precisie te garanderen is het
noodzakelijk volgorde van de hierna volgende handelingen te handhaven.
(2) Verzeker u ervan dat de bufferoplossing overeenstemt met de aangegeven waarde en dat deze niet verontreinigd is.
DE Achtung,
Damit sich die Pumpe das richtige Kalibrierungsdatum merken kann, ist es wichtig, über die App eine Verbindung
mit einem Smartphone zur Pumpe herzustellen und anschließend mit der Kalibrierung fortzufahren.
Die neue Pumpe zeigt ein fiktives Kalibrierungsdatum an.
Wenn Sie vor dem Kalibrieren keine Verbindung zur Pumpe über die App herstellen, speichert die Pumpe kein
korrektes Kalibrierungsdatum.
(1) Die Sondenkalibrierung kann einige Minuten dauern, um die Ablesegenauigkeit zu erhöhen.
Beachten Sie unbedingt die unten angegebene Reihenfolge der Vorgänge.
(2) Stellen Sie sicher, dass die bei der Kalibrierung verwendete Pufferlösung immer dem angegebenen Wert entspricht und
nicht verschmutzt ist.
Rev 0.1 Cod. 00.009.159 7
P
A
G
ITAttenzione,
per permettere alla pompa di memorizzare la data di calibrazione corretta è importante collegarsi con uno
smartphone alla pompa attraverso la app e quindi procedere alla calibrazione.
La pompa da nuova riporta una data di calibrazione fittizia.
Se non si fa il collegamento alla pompa attraverso la app, prima di calibrare, la pompa non memorizzerà una data
di calibrazione corretta.
(1) la procedura di calibrazione della sonda può richiedere alcuni minuti, per una maggiore precisione di lettura;
è indispensabile rispettare la sequenza delle operazioni indicate qui di seguito.
(2) Assicurarsi che la soluzione tampone usata nella calibrazione corrisponda sempre al valore indicato e che non sia
inquinata.
PO Atenção,
para permitir que a bomba memorize a data de calibração correta, é importante conectar-se a um smartphone na
bomba por meio do aplicativo e prosseguir com a calibração.
A nova bomba mostra uma data de calibração fictícia.
Se você não se conectar à bomba por meio do aplicativo, antes de calibrar, a bomba não armazenará uma data de
calibração correta.
(1) o procedimento de calibração da sonda pode levar alguns minutos, para maior precisão de leitura;
é essencial respeitar a sequência de operações indicada abaixo.
(2) Verifique se a solução tampão usada na calibração corresponde sempre ao valor indicado e se não está poluída.
(1)
FR Insérer la sonde de pH dans la solution tampon au pH 7. Attendre quelques
secondes pour la stabilisation de la lecture.
UK Dip the probe in the pH7 buffer solution. Wait a few seconds before reading.
ES Insertar la sonda de pH en la solución a pH 7. Espere algunos segundos
por estabilización de la lectura.
NL Dompel de sensor in de buffervloeistof met pH 7. Wacht enkele seconden
alvorens te lezen.
DE Setzen Sie die pH-Sonde in die pH-7-Pufferlösung ein und warten Sie einige
Sekunden, bis sich der Messwert stabilisiert hat.
IT Inserire la sonda di pH nella soluzione tampone a pH 7. Attendere qualche
secondo la stabilizzazione della lettura.
PO Insira a sonda de pH na solução tampão de pH 7. Aguarde alguns segundos
para a leitura estabilizar.
(2)
FR Appuyer pendant 3 secondes sur le bouton CAL, la valeur 7.0 commencera à
clignoter sur le Display. L’étalonnage du pH 7.0 est automatique et il se termine
quand la valeur sur le Display redevient fixe
UK Push the CAL button for 3 seconds, the value 7.0 will start blinking on the
display. Calibration is done automatically and the display stops blinking when
finished.
ES Oprima el botón CAL para 3 segundos, su el Display el valor 7,0 comenzará a
parpadear, y una vez que la calibración de la sonda es hecha, dejará de parpadear
y se convierte en fijo.
NL Druk op de CAL knop voor 3 seconden. De waarde 7,0 begint te knipperen in
het scherm. De kalibratie is werkt automatisch en het beeldscherm stopt met
knipperen als deze is voltooid.
DE Drücken Sie die Cal-Taste für 3 Sekunden. Der Wert 7.0 beginnt im Display zu
blinken. Wenn die Sondenkalibrierung abgeschlossen ist, wird der Wert auf dem
Display festgelegt
IT Premere il tasto Cal per 3 secondi , sul Display il valore di 7.0 comincerà a
lampeggiare. Quando la calibrazione della sonda sarà terminata, il valore sul
Display diventerà fisso
PO Pressione a tecla Cal por 3 segundos, o valor 7.0 começará a piscar no visor.
Quando a calibração da sonda for concluída, o valor no visor ficará fixo
Rev 0.1 Cod. 00.009.159 8
P
A
G
(3)
FR Si à la fin de l’étalonnage le display affiche "rc", appuyer sur le bouton Cal
pour revenir à la lecture. Répéter la procédure d’étalonnage, si le message "rc"
réapparait, cela signifie que l'électrode n'est pas en bon état et qu’elle doit être
changé.
UK If at the end of calibration, the display shows the message “rc”, push the Cal
button to exit and return to reading. Repeat the procedure, if after the second try the
writing “rc” reappears, the probe is not working correctly and should be changed.
ES Si por la fin de la calibración el Display mostrará el valor "rc", oprima el botón
Cal para salir y regresar a la lectura. Repita el procedimiento de calibración, si
después de la segunda prueba el valor "rc" aparecerá de nuevo, sustituir la sonda
que no está funcionando bien.
NL Als aan het einde van de kalibratie het beeldscherm “rc” vertoont, de
procedure opnieuw starten. Als bij de tweede poging het beeldscherm wederom “rc”
vertoont, is de sensor defect en dient te worden vervangen.
DE Wenn am Ende der Kalibrierung das Wort "rc" angezeigt wird, drücken Sie die
Taste CAL, um die Kalibrierung zu beenden und zum Lesen zurückzukehren.
Wiederholen Sie den Kalibrierungsvorgang. Wenn nach dem zweiten Versuch
immer noch die Meldung "rc" angezeigt wird, tauschen Sie die Sonde aus, die sich
in einem schlechten Zustand befindet und ausgetauscht werden muss.
IT Se alla fine della calibrazione il display mostrerà la scritta “rc”, premere il
tasto CAL per uscire dalla calibrazione e tornare in lettura. Ripetere la procedura di
calibrazione e se dopo il secondo tentativo comparirà ancora la scritta “rc”,
cambiare la sonda che non è in buona salute e va sostituita.
PO Se, no final da calibração, o visor exibir a palavra "rc", pressione a tecla CAL
para sair da calibração e voltar à leitura. Repita o procedimento de calibração e se
a mensagem "rc" ainda aparecer após a segunda tentativa, troque a sonda que
não esteja em boas condições de saúde e precise ser substituída.
FR FONCTIONNEMENTS ET VISUALISATION UK FUNCTIONING AND VISUALIZATION
ES FUNCIONAMIENTOS Y VISUALIZACIONES NL FUNCTIES EN VISUALISATIE
DE BETRIEB UND ANZEIGEN IT FUNZIONAMENTI E VISUALIZZAZIONI
PO OPERAÇÕES E EXIBIÇÕES
FR Pendant le fonctionnement, la valeur de pH mesurée par la sonde sera visible sur le
Display.
Le fonctionnement de la pompe est proportionnel (débit variable en fonction de l’écart
entre le point de consigne et la lecture de la sonde). Le débit est régulé par une
alternance de temps de pause et de temps d’injection.
La valeur maximum de proportionnalité est fixée à une valeur d’un point de pH (1,0).
Exemple : Setpoint 7.3
La valeur mesurée est au-dessus de 8,3, la pompe fonctionne en continue.
La valeur mesurée est de 7.8, la pompe fonctionne pendant 75 secondes suivie d’une
pause de 75 secondes.
La valeur mesurée est de 7,3 la pompe s’arrête.
Le temps de travail minimum de la pompe est de 7.5 secondes.
UK During the functioning, the actual pH-value is visible on the display. The functioning of the pump is proportional, with
pause/work time. The maximum proportionality value will be factory set to a value of pH 1,0.
Example: Setpoint 7,3
Reading value higher than 8,3, the pump works continuously.
Reading value 7,8, the pump works for 75 seconds alternated to a 75 seconds pause.
Reading value 7,2, the pump stops working.
The minimal working time of the pump is 7.5 seconds.
ES Durante el funcionamiento, el valor de la lectura de pH será visible su el display, El funcionamiento de la bomba es
proporcional, con un tiempo de pausa y de trabajo. El valor máximo de la proporcionalidad fijado de fábrica por un valor de
pH 1,0.
Ejemplos de funcionamiento: Setpoint 7,3
Rev 0.1 Cod. 00.009.159 9
P
A
G
Lectura de valor superior a 8,3, la bomba trabaja en continuo.
Lectura de valor 7,8, la bomba funciona durante 75 segundos alterna a 75 segundos de pausa.
Lectura de valor 7,2, la bomba se para.
El tiempo de trabajo minimal de la bomba serà de 7.5 segundos.
NL Gedurende de werking is de actuele meetwaarde van de pH zichtbaar op het beeldscherm. De werking van de pomp
is proportioneel met pauze/werk-tijd. De fabrieksinstelling van de maximale proportionaliteitswaarde is 1,0 pH.
Voorbeeld: wenswaarde 7,3
Actuele metingswaarde boven 8,3, de pomp draait continu.
Actuele metingswaarde 7,8, de pomp draait gedurende 75 seconden afwisselend met 75 seconden pauze.
Actuele metingswaarde 7,2 de pomp schakelt uit.
De minimale draaitijd van de pomp is 7.5 seconden.
DE Während des Betriebs wird der abgelesene pH-Wert auf dem Display angezeigt. Der Betrieb der Pumpe ist proportional
mit Pausenzeiten. Der maximale Proportionalitätswert wird werksseitig auf einen pH-Wert von 1,0 eingestellt
Betriebsbeispiele: Sollwert bei 7,3; pH- (Säure-) Dosierung:
Wenn der Wert größer als 8,3 ist, läuft die Pumpe immer.
Wenn der Wert bei 7,8 abgelesen wird, läuft die Pumpe ca. 75 Sekunden lang im Wechsel mit einer Pause von 75
Sekunden.
Wenn der Wert 7.2 abgelesen wird, wird die Pumpe angehalten.
Die Mindestarbeitszeit der Pumpe beträgt 7,5 Sekunden.
ITDurante il funzionamento, Il valore di pH letto sarà visibile sul Display. Il funzionameto della pompa è proporzionale,
con tempi di pausa-lavoro. Il valore di proporzionalità massima sarà impostato di fabbrica pari a un valore di pH 1,0
Esempi di funzionamento: Setpoint a 7,3; dosaggio pH- (acido):
Valore di lettura superiore a 8,3, la pompa funziona sempre.
Valore di lettura a 7,8 la pompa funzionerà per 75 secondi circa alternata con 75 secondi di pausa.
Valore di lettura pari a 7,2, la pompa sarà ferma.
Il tempo di lavoro minimo della pompa sarà pari a 7.5 secondi.
PO Durante a operação, o valor do pH lido será visível no visor. O funcionamento da bomba é proporcional, com tempos
de pausa de trabalho. O valor máximo de proporcionalidade será definido na fábrica igual a um valor de pH de 1,0
Exemplos de operação: Setpoint em 7.3; Dosagem de pH- (ácido):
Lendo um valor maior que 8,3, a bomba sempre funciona.
Lendo o valor em 7.8, a bomba funcionará por cerca de 75 segundos, alternando com 75 segundos de pausa.
Lendo o valor 7.2, a bomba será parada.
O tempo mínimo de trabalho da bomba será de 7,5 segundos.
FR RÉGLAGE D’USINE UK DEFAULT SETTINGS
ES PARÁMETROS ESTÁNDAR NL STANDAARD INSTELLINGEN
DE STANDARDWERTE IT VALORI DI DEFAULT
PO VALORES PADRÃO
FR SETPOINT : Set = 7.3 pH
•PROPORTIONNALITÉ MAXIMAL :1,0 pH (non -
modifiable)
•PRÉDISPOSITION DOSAGE :
ACIDE SULFURIQUE H2SO4
UK SETPOINT: Set = 7.3 pH
•MAXIMUM PROPORTIONALITY: 1,0 pH
•PREARRANGEMENT FOR DOSING:
SULFURIC ACID H2SO4
ES SETPOINT: Set = 7.3 pH
•PROPORCIONALIDAD MÁXIMA: 1,0 pH
•DOSAJE: ACIDO SULFURICO H2SO4
NL WENSWAARDE: Set = 7.3 pH
•MAXIMALE PROPORTIONALITEIT: 1,0 pH
•DOSERING: ZWAVELZUUR H2SO4
DE SETPOINT: Set = 7,3 pH
•MAXIMALE PROPORTIONALITÄT: 1,0 pH
•DOSIERUNGSVORBEREITUNG:
SCHWEFELSÄURE H2SO4
IT SETPOINT: Set = 7.3 pH
•MASSIMA PROPORZIONALITÁ: 1,0 pH
•PREDISPOSIZIONE DOSAGGIO:
ACIDO SOLFORICO H2SO4
PO SETPOINT: Set = 7,3 pH
•PROPORCIONALIDADE MÁXIMA: 1,0 pH
•PREPARAÇÃO DA DOSAGEM:
ÁCIDO SULFÚRICO H2SO4
Rev 0.1 Cod. 00.009.159 10
P
A
G
FR Fonction alarme
La fonction alarme permet d'éviter un dosage continu alors que le réservoir de produit est vide ou d’éviter un surdosage suite
à un éventuel mauvais fonctionnement de la sonde. Si la mesure n'a pas atteint le point de consigne après une injection de
3 litres de produits, la pompe se mettra directement en pause et la LED rouge « ALARM » s'allumera pour signaler le
problème. Il est possible de débloquer l’alarme en appuyant sur le bouton SET pendant 3 secondes. Vérifier tout de même
le niveau du produit de dosage avant de redémarrer la pompe.
UK Alarm function
The alarm function avoids the pump dosing when the chemical product is finished or the overdosing after an eventual bad
functioning of the probe. If the measure does not reach the setpoint after 3 liters of chemicals dosing, the pump will go into
an Alarm mode. It will stop dosing, the display shows the message “AL” and a red led will light up as an alarm signal. It is
possible to unlock this protection pushing the button SET for 3 seconds. Verify anyway the level of product to dose before
restarting the pump.
ES Función de alarma
La bomba está configurado con una función de alarma, para evitar la continuación de la dosificación cuando el producto es
terminado, o la sobredosis de un evenctual mal funcionamiento de la sonda.
Si la medida no alcanza el punto de referencia después de 3 litros de productos químicos de dosificación, la bomba se van
en el modo de alarma. No se detendrá la dosificación, la bomba mostrará la lectura "AL" y el LED de alarma se iluminará.
Es posible desbloquear esta protección presionando el botón SET para 3 segundos.
Verificar el nivel de producto a la dosis antes de volver a arrancar la bomba.
NL Alarmfunctie
De alarmfunctie behoedt de pomp voor dosering als de te doseren vloeistof beëindigd is, en voorkomt overdosering bij een
verkeerd werkende sensor. Als na dosering van circa 2 liter vloeistof de wenswaarde niet is bereikt, zal de pomp in alarm
springen en stoppen met doseren. Het beeldscherm toont “AL” en het alarm led brandt. Het alarm is op te heffen door 3
seconden de knop SET in te drukken. Controleer hoe dan ook het niveau van de te doseren vloeistof alvorens de pomp op
te starten.
DE Alarmfunktion
Die Alarmfunktion wird verwendet, um eine Dosierung zu vermeiden, wenn das zu dosierende Produkt fertig ist, und um
eine Überdosierung aufgrund einer Fehlfunktion der Sonde zu vermeiden. Wird nach dem Dosieren von ca. 3 Litern
Produkt der Sollwert nie erreicht, geht die Pumpe in Alarm und stoppt die Dosierung. Das Display zeigt die Aufschrift "AL"
und die Alarm-LED leuchtet auf. Sie können diese Funktion entsperren, indem Sie die SET-Taste 3 Sekunden lang
drücken. Überprüfen Sie jedoch den Füllstand des zu dosierenden Produkts, bevor Sie die Pumpe erneut starten.
IT Funzione di Allarme
La funzione di allarme serve ad evitare il dosaggio quando il prodotto da dosare è finito ed il sovraddosaggio dovuto a mal
funzionamento della sonda. Se dopo aver dosato circa 3 litri di prodotto il setpoint non viene mai raggiunto, la pompa entra
in allarme e cessa di dosare. Il display mostra la scritta “AL” ed il led di allarme si illumina. È possibile sbloccare tale funzione
premendo il tasto SET per 3 secondi. Verificare comunque il livello del prodotto da dosare prima di riavviare lag pompa.
PO Função de alarme
A função de alarme é usada para evitar a dosagem quando o produto a ser dosado termina e a overdose devido ao mau
funcionamento da sonda. Se, após dosar cerca de 3 litros de produto, o ponto de ajuste nunca for alcançado, a bomba
entrará em alarme e interromperá a dosagem. O visor mostra a expressão "AL" e o LED do alarme acende. Você pode
desbloquear esta função pressionando o botão SET por 3 segundos. No entanto, verifique o nível do produto a ser dosado
antes de reiniciar a bomba.