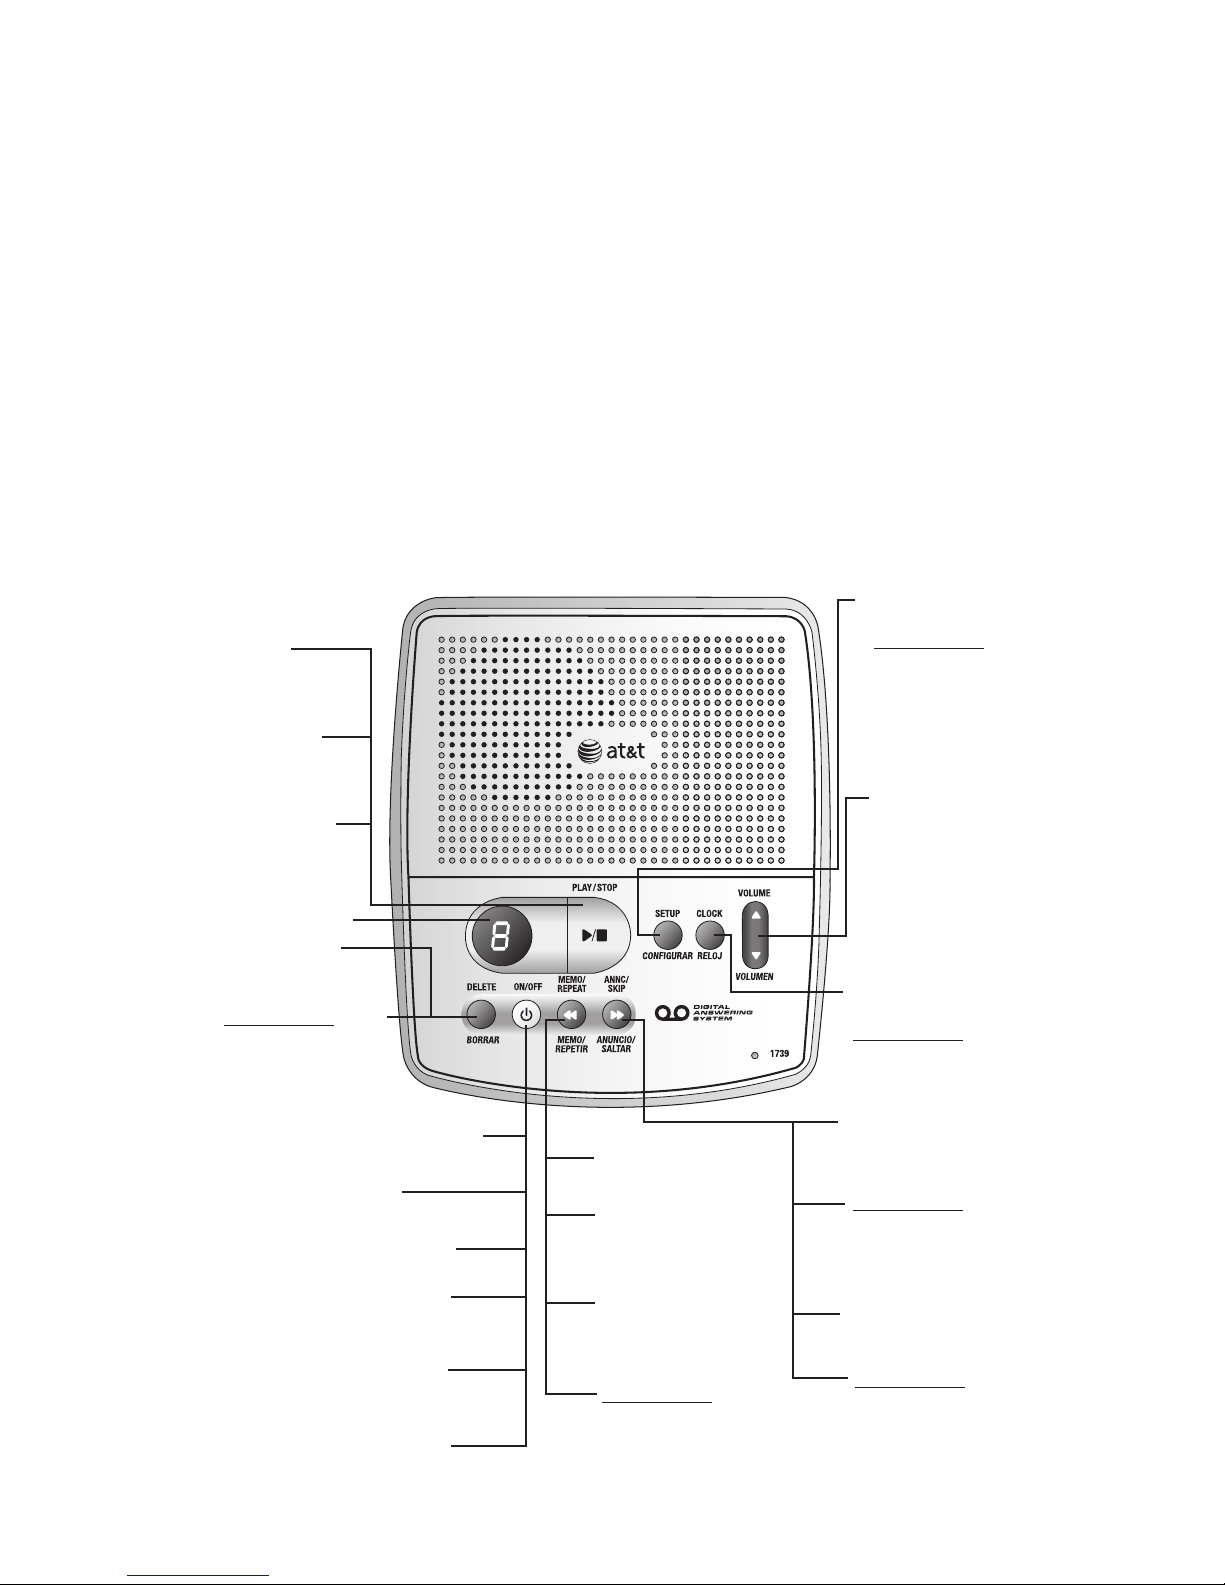
AT&T 1739 User manual

User’s manual
part 2
© 2007-2009 Advanced American Telephones. All rights reserved.
AT&T and the AT&T logo are trademarks of AT&T Intellectual Property licensed to
Advanced American Telephones, San Antonio, TX 78219.San Antonio, TX 78219.
Printed in China. Issue 9 AT&T 07/09
www.telephones.att.com
1739 Digital
answering system
This manual contains information about
this product’s installation and operation.
Please also read Part 1 - Important
product information
For customer service or product
information, visit our website at
www.telephones.att.com or call 1 (800)
222-3111. In Canada dial 1 (866) 288-4268.

1
Installation
Parts list
Telephone line cord
1739 answering system
Wallet card
Part 1 Important product information
Part 2 User’s manual
Power adapter
Before you install
Choose a location for the answering
system near a modular telephone jack
and a standard electrical outlet not
controlled by a wall switch.
•
•
•
•
•
•
Use only the power adapter sup-
plied with this product. To obtain
a replacement, visit our website
at www.telephones.att.com
or call 1 (800) 222-3111. In
Canada dial 1 (866) 288-
4268.
Turn system on/off
Before proceeding to feature setup,
press ON/OFF to turn the system
on. To turn the system off, press
ON/OFF again.
When the system is off, the
ON/OFF indicator light will be off
and the message window will be
blank.
NOTES:
1. If you do not want to connect this answering
system to a telephone, skip step 3.
2. Power adapter
Input: 120VAC, 60 Hz.
Output: 6VAC, 350 mA.
3. If the message window is blank, make sure the
power adapter is securely connected to both the
answering system and an electrical outlet not
controlled by a wall switch. Press ON/OFF to
make sure the system is on.
4. If you subscribe to high-speed Internet service
(digital subscriber line - DSL) through your
telephone line, you must install a DSL filter
between the telephone line cord and the
telephone wall jack (see the following page).
The filter prevents noise and caller ID problems
caused by DSL interference. Please contact your
DSL service provider for more information about
DSL filters.
2. Connect the
telephone line cord.
3. Connect a
telephone
(optional).
Standard electrical
outlet not controlled
by a wall switch
1. Connect the
power adapter.
Strain-relief tab
Modular
telephone
jack
If you have DSL high
speed Internet service, a
DSL filter (not included)
is required.

Feature setup
1. To enter the feature setup mode,
press and hold SETUP until the
system announces “Language is...”
2. Press SETUP repeatedly to hear each
feature.
3. When you hear the feature you want
to modify, press ANNC/SKIPANNC/SKIP or
MEMO/REPEAT to change the
setting.
4. Press PLAY/STOPPLAY/STOP to exit feature
setup. The new setting will be saved.
FEATURE SYSTEM
ANNOUNCEMENT
OPTIONS
Feature summary
LANGUAGE
RING SELECT
REMOTE
ACCESS CODE
“Language is...”
“Number of rings
is...”
“Remote access
code is...”
You may choose English or Espanol
for the language used by the system
when it announces voice prompts.
During setup, the message window
will display the current language
setting (Efor English or Sfor
Spanish).
•
•
Choose the number of rings before
the system answers a call. You can
set it between two and seven rings,
toll saver 2/4 or toll saver 4/6.
When the toll saver is set as 2/4,
the system answers after four rings if
there are no new messages, or after
two rings if there are new messages.
When the toll saver is set as 4/6, the
system answers after six rings if there
are no new messages, or after four
rings if there are new messages.
During setup, the message window
will display the number of rings (8
for toll saver 2/4, or 9for toll saver
4/6).
•
•
•
Change the remote access code to
any three-digit number between 500
and 999.
The remote access code is preset
to 500 and allows you to access
many features of this answering
system remotely from a touch tone
telephone.
The three digits of the remote access
code are set separately. The system
will prompt you to set the second
and third digits after setting the first
digit. See Feature setup above
•
•
•
Feature setup
When any feature is on, the message window displays .
When any feature is off, the message window displays .
-
-
2

Feature summary (continued)
ANNOUNCEMENT
MONITOR
(Please see NOTE
on the right.)
“Announcement
monitor is...”
Choose on to listen to the
announcement when the system
answers a call. Choose off to silence
your end of the call (The callers will
still hear the announcement).
NOTE: Volume must be set to an audible level
to use the announcement monitor.
•
NUMBER
ANNOUNCE
(Please see NOTES
on the right.)
“Number
announce is...”
When this feature is on, the system
will announce the incoming telephone
number between the second and third
rings.
NOTES:
1. When the number announce feature is on
and ring select is set for two rings, the unit will
answer after two rings to allow enough time for
the system to announce the caller’s telephone
number.
2. For this feature to work, you must subscribe
to the caller ID service from your local
telephone company. There may be a fee for this
service, and it may not be available in all areas.
•
STORE NUMBER
(Please see NOTE
on the right.)
“Store number
is...”
When this feature is on, the system
will announce the incoming telephone
number when it plays back a message.
NOTE: For this feature to work, you must
subscribe to the caller ID service from your
local telephone company. There may be a fee
for this service, and it may not be available in
all areas.
•
ACCEPT BLOCKED
CALLS
(Please see NOTES
on the right.)
“Accept blocked
calls is...”
Choose on to accept all calls. Choose
off to respond to blocked calls with
the pre-recorded announcement,
“We’re sorry, blocked calls to this
number cannot be accepted,” and
hang up without recording a message.
NOTES:
1. System only blocks calls that are marked
PRIVATE.
2. For this feature to work, you must subscribe
to the caller ID service from your local
telephone company. There may be a fee for this
service, and it may not be available in all areas.
•
AUDIBLE
MESSAGE ALERT
“Message alert
is...”
When this feature is on, the system
beeps every 15 seconds when there
are new messages.
•
Feature setup
FEATURE SYSTEM
ANNOUNCEMENT
OPTIONS
3

4
Operation
The system automatically saves all
incoming messages until you delete
them. You can store approximately
40 minutes of messages, memos and
announcements (up to a maximum
of 99 messages).
Before playing each message, the
system announces the day and time
the message was received. If Store
number is activated, the system also
announces the caller’s telephone
•
•
number (see Store number
under Feature setup on page 3).
After playing the last message,
the system announces “End of
messages.“
Messages cannot be deleted until
they have been reviewed; deleted
messages cannot be retrieved.
•
Listen to, save & delete messages
To operate the system, follow the instructions below.
Press to
listen to new
messages.
Press during
playback to stop
playback.
If there are no
new messages,
press to listen to
old messages.
Press to delete
the message that’s
playing.
Press and hold in idle
mode to delete all
messages if there are
no new messages.
Press to turn the system on or off.
Off when system is off.
On steadily when system is on
with no new message.
Flashes when memory is full.
(Delete messages to make room
for new messages)
Flashes when there are new
messages.
Press during time/day
announcement to repeat
previous message.
Press to repeat all or
part of a message.
Hold to play recorded
messages at half
speed when they are
played.
Press and hold in idle
mode to record memo.
Press to adjust
volume. System
beeps three times
at highest or
lowest setting.
Press to listen to
the current setup.
Press and hold
to start the setup
process.
Press to listen to
the current time.
Press and hold to
setup the clock.
Press and hold in
idle mode to record
announcement.
Press to skip all or
part of a message.
Press and hold to
play twice as fast
when listening to
recorded messages.
Press to play back
announcement.
Message window
Flashes during Feature setup
process.

5
Operation
announcement: “Hello. Please leave a
message after the tone.”
1. Press and hold ANNC/SKIPANNC/SKIP.
When the system beeps, speak
towards the microphone at the lower
right corner of the answering system,
from about nine inches away. While
recording,
-
flashes in the message
window and ON/OFF blinks.
2. To stop recording, release
ANNC/SKIPANNC/SKIP. The system
automatically plays back the
outgoing announcement.
To review the outgoing
announcement, press ANNC/SKIPANNC/SKIP.
To erase the outgoing announcement
and return to the pre-recorded
announcement, press DELETE while the
announcement is playing. Caller can
skip the outgoing announcement by
pressing #.
Record a memo
A memo can be up to three minutes
and will be stored as an incoming
message.
1. Press and hold MEMO/REPEATMEMO/REPEAT.
When the system beeps, speak
toward the microphone at the lower
right corner of the answering system.
2. To stop recording, release
MEMO/REPEATMEMO/REPEAT.
3. To play memo, press
PLAY/STOPPLAY/STOP.
Answer calls
When the system answers a call,
the caller hears the outgoing
announcement followed by a beep.
After the beep, the system begins
recording the caller’s message. A
caller can leave a message of up to
three minutes. If the message is longer
than three minutes, or if the caller is
silent for more than seven consecutive
seconds, or if the system runs out of
memory, the system beeps once and
hangs up. Callers can skip the outgoing
announcement by pressing #.
Call screening/intercept
Turn on the answering system and set
the volume control so you can hear
the caller’s message. If the number
announce feature is on, the caller’s
telephone number will be announced.
NOTE: If you listen to messages or change
feature settings, the volume will
automatically adjust to an audible level. It
will be necessary to reset the volume to the
lowest setting.
If you decide to speak with the caller,
lift the handset of any telephone on
the same line.
After you set the time once, the system
will always be set automatically with
incoming caller ID information. The
time will be set automatically only
if you subscribe to caller ID service
provided by your local telephone
company.
Set the clock
You must set the clock so that the
system announces the correct day and
time of any incoming messages. Press
PLAY/STOPPLAY/STOP to hear the current
setting and to exit at anytime while
setting the clock.
Press and hold CLOCK until the
message window displays C, and
the default day is announced.
To change the day setting, press
MEMO/REPEATMEMO/REPEAT or
ANNC/SKIPANNC/SKIP until the correct
day is announced.
Press CLOCK. The current hour
setting is announced. The correct
day setting is saved.
To change the hour setting, press
MEMO/REPEATMEMO/REPEAT or
ANNC/SKIPANNC/SKIP until the correct
hour is announced.
Press CLOCK. The current minute
setting is announced. The correct
hour setting is saved.
To change the minute setting,
press MEMO/REPEATMEMO/REPEAT or
ANNC/SKIPANNC/SKIP until the correct
minute is announced.
Press CLOCK. The current year
setting is announced. The correct
minute setting is saved.
To change the year setting, press
MEMO/REPEATMEMO/REPEAT or
ANNC/SKIPANNC/SKIP until the correct
year is announced.
Press CLOCK. The new day, time
and year are saved. The correct
year setting is saved.
To check the clock, press CLOCK.
NOTE: In the event of a power failure, see
the instructions on the bottom of the unit
to reset the clock. If the clock is not set,
before playing messages, the system will
announce “Time and day not set“ each
time.
Record your announcement
Before using this answering system,
you should record the outgoing
announcement (up to three minutes
long) that callers will hear when the
system answers a call. If you choose
not to record an announcement, the
system answers with a pre-recorded
1.
2.
3.
4.
5.
6.
7.
8.
9.
Auto reset of answering system clock

6
Operation
If you want the system to answer a
call when you are playing a message,
press PLAY/STOPPLAY/STOP to end
message playback.
Play messages - Press
PLAY/STOPPLAY/STOP. If there are new
messages, they will be played. If
there are no new messages, the old
messages will be played. If there are
no messages in memory, the system
announces “No messages.“
Play message at half speed - Press
and hold MEMO/REPEAT while
the message is playing.
Play message twice as fast - Press
and hold ANNC/SKIPANNC/SKIP while the
message is playing.
Repeat previous message - Press
MEMO/REPEAT while message
is playing, continue this process to
listen to other previous messages.
NOTE: If there is only one message
recorded in the system, the message will
be played again after MEMO/REPEATMEMO/REPEAT
is pressed.
Skip to next message - Press
ANNC/SKIPANNC/SKIP.
Stop message playback - Press
PLAY/STOPPLAY/STOP.
Save messages
The system automatically saves all
incoming messages if you do not
delete them. The system can save
approximately 40 minutes of messages,
including the outgoing announcement,
for a total of up to 99 messages. When
the memory is full, some messages
must be deleted before new messages
can be recorded.
Memory monitor
To determine the system’s remaining
recording time:
1. If the system is on, press
ON/OFF to turn the system off.
2. Press ON/OFF again to turn the
system on. The system announces
the remaining recording time in
minutes (If less than five minutes
remain, the system announces
“The machine is on. Less than five
minutes to record.“)
The system stops recording and you
can answer calls. If the system does
not disconnect immediately, press and
release the telephone switch hook.
Caller ID number announce
NOTE: You must subscribe to the caller ID
service from your local telephone company
for this feature. There may be a fee for this
service, and it may not be available in all
areas.
This system can announce the
telephone number of a caller between
the second and third ring (See Feature
setup and Feature summary on pages
2-3 to turn this feature on).
Store number
When this feature is on, the system will
announce the caller’s number before
playing back a message.
Accept blocked calls
When this feature is turned off, the
system will respond to blocked calls
(from callers who have chosen to
block their numbers from identification)
with the pre-recorded announcement,
“We’re sorry, blocked calls to this
number cannot be accepted.“ The
system then hangs up without
recording any incoming messages.
When this feature is turned on, it will
answer and record messages from any
callers.
Message window
The message window displays the total
number of messages recorded. If there
are more than nine messages recorded,
the message window displays the first
digit, second digit and dash alternately.
If the message window displays F, then
the memory is full and some messages
must be deleted before new messages
can be recorded.
Listen to incoming messages
When the system plays incoming
messages, the message window
displays the number of the message
playing. Before playing each message,
the system announces the day and
time the message was received. If the
clock was not set when the message
was recorded, or there was a power
failure after it was set, the system will
announce “Time and day not set” after
the time and day. After playing the last
message, the system announces “End
of messages.“

7
Operation
If there are unreviewed messages, the
system will play an error tone and will
not delete any messages.
Delete selected messages - Press
DELETE while the desired message is
being played. The system will delete the
message and play the next message.
If you want to replay a message before
deleting it, press MEMO/REPEAT.
When the system reaches the end of
the last message, those messages
that have not been deleted will be
renumbered and the message window
will then display the total number of
messages remaining in memory.
When the memory is full, or when
99 messages have been recorded, F
flashes in the message window. You
will then need to delete messages
to make room for new ones. When
the memory is full, the system will
answer calls after 10 rings, announce
“Memory is full“ and then will beep
twice without playing the outgoing
announcement. Enter your remote
access code and delete some or all
messages.
Delete messages
Delete messages - press and hold
DELETE in idle mode. The system
announces “Messages deleted” and
permanently deletes all messages.
The message window displays 0.
Memory is full
Message window displays
DISPLAY FUNCTION
CClock needs to be reset or the system is in clock
setting mode.
-
Flashing - System is recording an announcement or
a memo.
Steady - Announcement is playing
- OR -
system is recording a message
- OR -
remote access is in progress.
0Rotating - Deleting.
FFlashing - Memory is full.
8
9
Toll saver is set to 2/4.
Toll saver is set to 4/6.
Feature is on.
ELanguage is set to English.
SLanguage is set to Spanish.
0-7 Volume level appears when volume is adjusted.
0-98 Number of messages (when system is idle).
-
Feature is off.
-
2-7 Number of rings before the system answers a call.

8
Remote operation
your code, wait for the announcement
to end or press #to stop the
announcement, then re-enter the
code.
3. To use a remote access command
(below), press 5during message
playback and wait for the two-beep
signal.
4. Enter a remote access command.
You can access many features remotely
from a touch tone telephone.
1. Dial your telephone number.
2. When the system answers, enter
your three-digit remote access code
during or after the announcement.
The system announces the number of
messages, then begins playing back
the messages. If the announcement
continues to play after you have entered
Connect with the answering system
Feature summary
FUNCTION: COMMAND:
VOICE HELP MENU Press 5.
After the two beeps, wait four seconds for the
system to automatically play back all messages, or
press 1.
PLAY NEW MESSAGES Press 2.
Press 4while the message is playing.
Press 5while the message is playing.
Press 6while the message is playing.
Hang up.
Press 3while the message is playing.
After listening to all messages and the system has
beeped twice, press 3twice.
Press *7, after the beep. Record the announcement,
and press 5to stop. The system will then play back
the announcement.
Press 7.
Press #, and speak after the beep. Press 5to exit.
PLAY ALL MESSAGES
Press *8. Follow the prompts to set day, time, and
year.
Press *0.
When the system is off, it answers after 10 rings,
and announces “The machine is off.“ The system
beeps twice. You can leave a message by pressing
#, hang up to exit, or turn the system on by either:
1. Press *0, the system announces “The machine is
on, XX minutes to record,“ then beeps twice. The
system is now turned on.
-OR-
2. Enter your three-digit remote access code, press
5during the message playback, then press 0.
Press 9.
REPEAT A MESSAGE
STOP NEW PLAYBACK
SKIP A MESSAGE
SAVE MESSAGE
DELETE MESSAGE
DELETE ALL MESSAGES
RECORD ANNOUNCEMENT
REVIEW ANNOUNCEMENT
RECORD MEMO
SET THE CLOCK
TURN SYSTEM OFF
TURN SYSTEM ON
REVIEW SETTINGS

9
Remote operation
In case of difficulty
If you have difficulty operating this answering system, try the suggestions below.
For Customer Service, to purchase accessories or to obtain replacement parts,
visit our website at www.telephones.att.com or call 1 (800) 222-3111.
In Canada dial 1 (866) 288-4268. Please retain your receipt as your proof
of purchase.
The system can accept messages of up to three
minutes.
If a caller leaves a long message, part of it might
be lost when the system disconnects the call
after three minutes.
If the memory is full when recording a message,
the system stops and disconnects the call.
•
•
•
If the toll saver feature is on, the number of
rings changes from four to two, or six to four,
when there are new messages waiting.
In some cases, the system might be affected by
the ringing system used by the local telephone
company.
If the system’s memory is full or the system is
off, the system answers after 10 rings.
If the system is in feature setup mode and a call
comes in, it will not answer the call until you
press PLAY/STOPPLAY/STOP or the setup timeout
has elapsed.
•
•
•
•
Messages are
incomplete.
System does not
answer after correct
number rings.
When the memory is full, some saved messages
must be deleted before new messages can be
recorded.
•System will not record
messages.
Incoming messages
are not heard during
recording.
Press VOLUME until the desired volume
is reached.
•
Answering system operation
Feature summary (continued)
FUNCTION: COMMAND:
Press *9. The system announces “The machine will
now hang up,“ and disconnects the call.
END REMOTE ACCESS
CALL
NOTE: If no commands are entered for 15 seconds the system will announce “The machine will
now hang up” and disconnect.

10
Make sure you are calling from a touch tone
telephone. When dialing a number, there should
be audible tones. If there are clicks instead, the
telephone is not a touch tone telephone.
The answering system may not detect the
remote access code while the announcement is
playing. Try entering the code again when the
announcement is over.
There may be noise interference on the
telephone line. Press the dial buttons firmly.
Make sure the remote access code is entered
correctly.
You might be calling from a telephone which
sends tones too short for the answering system
to detect.
If there are many messages recorded, the
system may take longer than usual to respond.
•
•
•
•
•
•
If the system is disconnected from the AC
power, it will not operate. The announcement
and messages are retained in memory during a
power failure, but it will be necessary to reset
the clock. See the instructions at the bottom of
the answering machine.
If the system announces, “Time and day not
set“ after announcing the time and day, it
may be necessary to reset the clock. See the
instructions at the bottom of the unit.
•
•
System does not
respond to remote
command.
Power failure recovery.
If there are too many messages recorded, the
system may take longer than usual to respond.
•System takes longer
than usual to respond.
Message window is
blank.
Answering system operation
In case of difficulty
Make sure the power cord is securely
connected to both the answering system and
an electrical outlet not controlled by a
wall switch.
Press ON/OFF to turn on the system.
•
•

11
General product care
To keep the answering system working and looking good, follow these guidelines:
Avoid putting it near heating appliances and devices which generate
electrical noise (motors, fluorescent lights, etc.)
DO NOT expose it to direct sunlight or moisture.
Avoid dropping the answering system and/or other rough treatment.
Clean with a soft cloth.
Never use a strong cleaning agent or abrasive powder because this will
damage the finish.
Retain the original packaging in case it is necessary to ship it at a
later date.
•
•
•
•
•
•
Other manuals for 1739
3
Table of contents
Other AT&T Answering Machine manuals