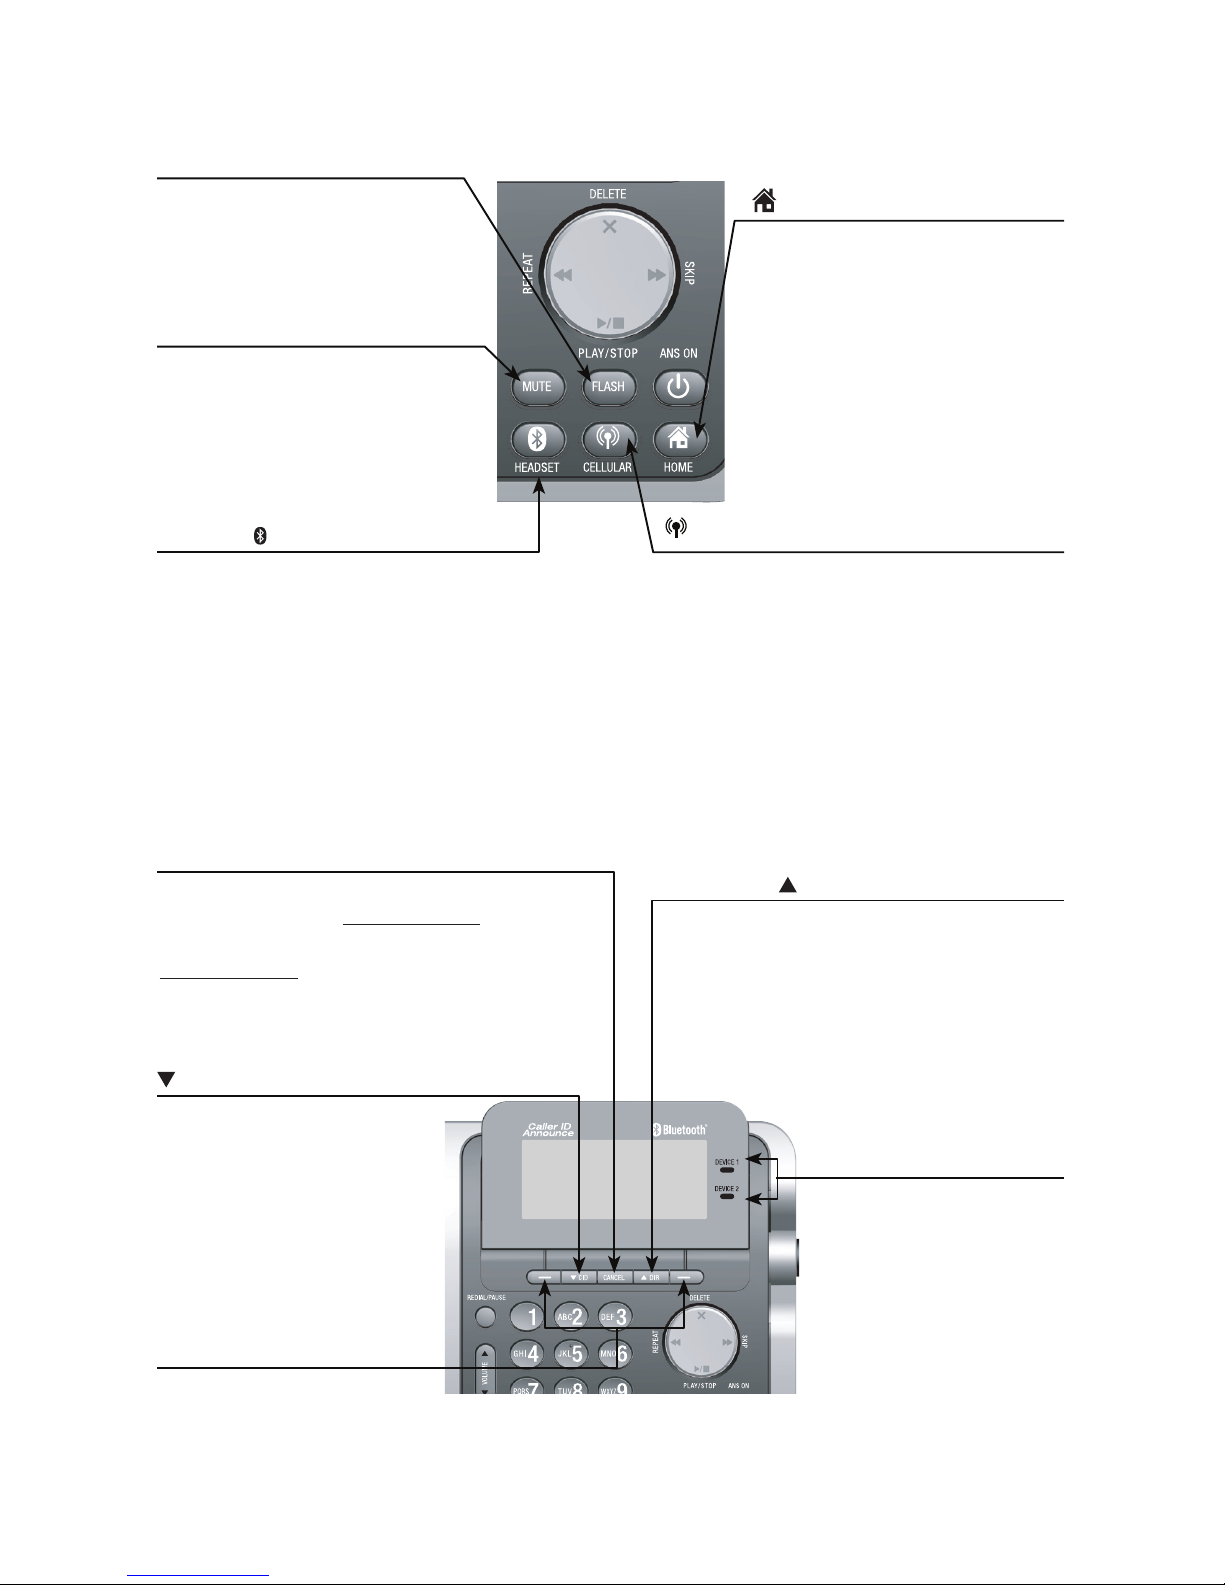
AT&T TL96271 User manual

Quick start guide
TL96271/TL96371/TL96471
DECT 6.0 cordless telephone/
answering system with
BLUETOOTH®wireless technology

1
Install the telephone base close to a telephone jack and a power outlet not
controlled by a wall switch. The telephone base should be placed on a flat
surface. For optimum range and better reception, place the telephone base in
a central and open location.
You may hear interference if your cellular phone is too close to the
telephone base during a CELLULAR call. Make sure that your Bluetooth
enabled cellular phone is within 15 feet of the telephone base in order to
maintain a clear and consistent connection between your Bluetooth cell
phone, telephone base and cell tower.
If you subscribe to high-speed Internet service (DSL - digital subscriber line)
through your telephone line(s), you must install a DSL filter between each
telephone line cord and telephone wall jack (page 2). The filter prevents
noise and caller ID problems caused by DSL interference. Please contact your
DSL service provider for more information about DSL filters.
Your product may be shipped with a protective sticker covering the handset
or telephone base display - remove it before use.
For customer service or product information, visit our website at
www.telephones.att.com or call 1 (800) 222-3111. In Canada, dial
1 (866) 288-4268.
Avoid placing the telephone base too close to:
Communication devices such as television sets, VCRs, or other cordless
telephones.
Excessive heat sources.
Noise sources such as a window with traffic outside, motors, microwave
ovens, refrigerators, or fluorescent lighting.
Excessive dust sources such as a workshop or garage.
Excessive moisture.
Extremely low temperature.
Mechanical vibration or shock such as on top of a washing machine or
work bench.
•
•
•
•
•
•
•
You must install and charge
the handset battery before
using the handset.
See page 4 for easy
instructions.
Installation

2
Telephone base installation
Install the telephone base and charger as shown below.
Plug one end of the
telephone line cord into
a telephone jack or a DSL
filter.
If you have DSL high-speed
Internet service, a DSL filter
(not included) is required.
Telephone line cord
Route the telephone line
cord through this slot.
Plug the other end of the
telephone line cord into
the telephone jack on the
back of the telephone base.
Plug the small end of the
telephone base power adapter
into the power adapter jack on
the back of the telephone base.
Raise the antenna.
Plug the large end of
the power adapter into a
power outlet not controlled
by a wall switch.
Route the power adapter cord
through this slot.

3
IMPORTANT INFORMATION:
Use only the power adapter(s) provided with this product. To obtain a replacement, visit our
website at www.telephones.att.com or call 1 (800) 222-3111. In
Canada, dial 1 (866) 288-4268.
The power adapters are intended to be correctly oriented in a vertical or floor mount
position. The prongs are not designed to hold the plug in place if it is plugged into a ceiling,
under-the-table or cabinet outlet.
1.
2.
Plug the power adapter into an electrical outlet not
controlled by a wall switch.
Charger installation
Install the charger as shown below.

4
Battery installation and charging
Install the battery as shown below.
IMPORTANT INFORMATION:
Use only the supplied rechargeable battery or replacement battery (model BT166342).
To order, visit our website at www.telephones.att.com or call
1 (800) 222-3111. In Canada, dial 1 (866) 288-4268.
If you do not use the handset for a long time, disconnect and remove the battery to prevent
possible leakage.
•
•
To replace the battery, press the tab and slide the
battery compartment cover downwards. Lift out the old
battery and disconnect it from the handset. Follow the
instructions above to install and charge the new battery.
CHARGE light Step 3
Charge the handset by placing it face up
in the telephone base or charger. The
CHARGE light is on when charging.
After you install your telephone or
power returns following a power outage,
the telephone base and handsets will
prompt you to set the date and time.
For instructions, see Set date and time
on page 13. To skip setting the date and
time, press OFF/CANCEL or BACK .
Step 1
Plug the battery connector securely
into the socket inside the handset
battery compartment, matching the
color-coded label. Insert the supplied
battery with the label THIS SIDE UP
facing up as indicated.
Step 2
Align the cover flat against the
battery compartment, then slide it
upwards until it clicks into place.
SET DATE
--/--/--
MM/DD/YY
BACK SET
SET TIME
--:-- --
BACK SET

5
Quick reference guide - telephone base
VOLUME
Press to adjust the volume during
message playback.
Press to adjust the volume during a
call.
When the phone is not in use, press
to adjust the telephone base ringer
volume for all lines.
/SKIP
During message playback, press
to skip to the next message.
TONE
Press to switch to tone dialing
temporarily during a call if you have
pulse service.
/REPEAT
Press to repeat a message or press
twice to play the previous message.
/ANS ON
Press to turn the answering system
on or off.
/PLAY/STOP
Press to play messages.
Press to stop message playback.
REDIAL/PAUSE
Press repeatedly to view the last 10
numbers dialed.
While entering numbers, press and hold
to insert a dialing pause.
/HANDSET LOCATOR
Press the button to page
all system handsets.
PTT
Press to display the PTT menu to begin
a PTT call.
Press and hold to begin a one-to-group
broadcast when the handset is not in use.
1
While reviewing a caller ID history
entry, press repeatedly to add or
remove 1in front of the telephone
number before dialing or saving it in a
directory.
DELETE/X
Press to delete the message currently playing.
When the phone is not in use, press twice to
delete all previously reviewed messages.
While entering names or numbers, press to
delete a digit or a character.
While reviewing the redial list, directory or
caller ID history, press to delete an individual
entry.
While predialing, press to delete a digit.

6
Quick reference guide - telephone base
FLASH
During a call, press to answer
an incoming call when you
receive a call waiting alert.
HEADSET
Press to transfer a call from the
telephone base to a connected
Bluetooth headset.
Press to use a connected Bluetooth
headset.
Press to end a call while you are using
the Bluetooth headset.
CELLULAR
Press to make or answer a cell call.
During a cell call, press to answer an
incoming call when you hear a call
waiting alert.
Flashes quickly when there is an
incoming cell call.
Flashes slowly when a cell call is on hold.
HOME (Speakerphone)
Press to make or answer a
home call.
Flashes quickly when there is an
incoming home call.
Flashes slowly when a home
call is on hold.
MUTE
During a call, press to mute the
microphone.
While the telephone base is
ringing, press to silence the
ringer temporarily.
CANCEL
While in a menu, press to exit without
making changes or press and hold to
return to idle mode.
Press and hold while the telephone
is not in use to erase the displayed
messages (XX Missed calls and
Download fail).
DEVICE 1/DEVICE 2 lights
On when the telephone
base is paired and
connected with a
Bluetooth device.
Flash alternately while
pairing a Bluetooth device.
CID
Press to scroll down while in
a menu.
Press to review the caller ID
log when the telephone is
not in use.
While entering names or
numbers, press to move the
cursor to the left.
DIR
Press to scroll up while in a
menu.
Press to show directory
entries when the telephone is
not in use.
While entering names or
numbers, press to move the
cursor to the right.
Softkeys (2)
Press to select the menu item
displayed above the key.

7
Quick reference guide - telephone base
Main menu
The selected menu item is highlighted.
Using menus
Press MENU in idle mode (when the telephone is not in use) to enter the
main menu.
Use CID or DIR to scroll through menu items.
Press SELECT to select or save the highlighted item.
-OR-
Press CANCEL to cancel an operation, back up to the previous menu, or
exit the menu display.
-OR-
Press and hold CANCEL to return to idle mode.
NOTE: If no key is pressed, the telephone base automatically returns to idle mode after
30 seconds.
1.
2.
3.
Feature menu
Play messages
Answering sys
Directory
Caller ID log
Intercom
Bluetooth
Ringers
Set date/time
Settings
Website
Menu

8
CHARGE light
On when the handset is charging in the
telephone base or charger.
Softkeys (2)
Press to select a menu item displayed above
the key.
While in a menu, press to select an item or
save an entry or setting.
CELLULAR
Press to make or answer a cell call.
During a cell call, press to answer an
incoming call when you hear a call waiting
alert.
Flashes quickly when there is an incoming
cell call.
Flashes slowly when a cell call is on hold.
HOME/FLASH
Press to make or answer a home call.
During a home call, press to answer an
incoming call when you hear a call waiting
alert.
Flashes quickly when there is an incoming
home call.
Flashes slowly when a home call is on hold.
1
While reviewing a caller ID history entry,
press repeatedly to add or remove 1in front
of the telephone number before dialing or
saving it in a directory.
TONE
Press to switch to tone dialing temporarily
during a call if you have pulse service.
Press to toggle the name order when saving a
caller ID log entry into directory.
/SPEAKER
Press to make or answer a home or cell call
using the speakerphone.
Press to turn on the handset speakerphone.
Press again to resume normal handset use.
REDIAL/PAUSE
Press repeatedly to view the last 10 numbers
dialed.
While entering numbers, press and hold to
insert a dialing pause.
Quick reference guide - handset

9
DIR /VOLUME
Press to scroll up while in menus.
During a call or message playback, press to
increase the listening volume.
Press to show directory entries when the
telephone is not in use.
While entering names or numbers in the
directory, press to move the cursor to the left.
MUTE/DELETE
During a call, press to mute the microphone.
While predialing, press to delete digits.
While reviewing the redial list, directory or
caller ID history, press to delete an individual
entry.
While entering or editing a directory entry, press
to erase a digit or character.
While the handset is ringing, press to silence the
ringer temporarily.
During message or announcement playback,
press to delete a message or announcement.
OFF/CANCEL
While using menus, press to cancel an operation,
back up to the previous menu, or exit the menu
display.
Press and hold to return to idle mode.
During a call, press to hang up.
Press and hold while the telephone is not in use
to erase all the Missed calls or Download fail
messages.
While the handset is ringing, press to silence the
ringer temporarily.
CID /VOLUME
Press to scroll down while in menus.
During a call or message playback, press to
decrease the listening volume.
Press to show the caller ID history when the
telephone is not in use.
While entering names or numbers in the
directory, press to move the cursor to the right.
# (pound key)
Press repeatedly to display other dialing options
when reviewing a caller ID history entry.
EQ
During an outside call, intercom call, message
or announcement playback, press to change the
quality of the audio to best suit your hearing.
Quick reference guide - handset

10
Quick reference guide - handset
Menu
Feature menu
Play messages
Answering sys
Directory
Caller ID log
Intercom
Ringers
Set date/time
Settings
Website
Main menu
The selected menu item is
highlighted.
PUSH TO TALK
Press to display the PTT menu to begin a
PTT call.
Press and hold to begin a one-to-group
broadcast when the handset is not in use.
Using menus
Press MENU in idle mode (when the
telephone is not in use) to enter the
main menu.
Use CID or DIR to scroll through
menu items.
Press SELECT to select or save the
highlighted item.
-OR-
Press OFF/CANCEL to cancel an
operation, back up to the previous menu,
or exit the menu display.
-OR-
Press and hold OFF/CANCEL to
return to idle mode.
NOTE: If no key is pressed, the handset
automatically returns to idle mode after
30 seconds.
1.
2.
3.

11
Installation options
Your telephone base is ready for tabletop use. If you want to mount your
telephone on a wall, follow the steps below to connect the telephone
base with a standard dual-stud telephone wall mounting plate. You may
need a professional to install the mounting plate.
Tabletop to wall mount installation
Unplug the power adapter from the power outlet. Unplug the telephone
line cord from the wall jack (or DSL filter).
Press down on the tabs of the wall mount bracket as indicated to detach it
from tabletop orientation.
Swivel the wall mount bracket down to wall mount position and push it
into the telephone base until it clicks into place.
Plug the telephone line cord (or DSL filter) into the wall jack. Plug the
power adapter into a power outlet not controlled by a wall switch. Align
the holes on the back of the telephone base with the wall mounting plate.
Slide the telephone base down until it locks securely. Bundle the
telephone line cord and power adapter cord neatly with twist ties.
1.
2.
3.
4.
5.
1 2 3
4 5

12
Installation options
Wall mount to tabletop installation
To change the telephone base from the wall mount position to tabletop
position, follow the steps below.
If the telephone line cord and power adapter cord are bundled, untie
them first.
Push the telephone base up to remove it from wall. Unplug the telephone
line cord (or DSL filter) from the wall. Unplug the power adapter from the
power outlet.
Gently pull the wall mount bracket to unlock it from wall mount orientation.
Swivel the wall mount bracket up to tabletop position and push it into the
telephone base until it clicks into place.
1.
2.
3.
4.

13
Handset and telephone base settings
Set date and time
To set the date and time manually:
Press MENU in idle mode to enter the main menu.
Press CID or DIR on the handset, or press CID or
DIR on the telephone base to highlight Set date/time,
then press SELECT .
Press CID or DIR on the handset, or press CID or
DIR on the telephone base to select the month, then
press SET ., or enter the two-digit number (01-12) using
the dialing keys (0-9).
Press
CID or DIR on the handset, or press CID or
DIR
on the telephone base
to select the day,
then press
SET .
, or enter the two-digit number (01-31) using the
dialing keys (0-9)
.
Press CID or DIR on the handset, or press CID or
DIR on the telephone base to select the year, then
press SET, or enter the two-digit number (00-99) using
the dialing keys (0-9), then press SET .
Press CID or DIR on the handset, or press CID or
DIR on the telephone base to select the hour, then
press SET ., or enter the two-digit number (01-12) using
the dialing keys (0-9).
Press CID or DIR on the handset, or press CID or
DIR on the telephone base to select the minute, then
press SET ., or enter the two-digit number (00-59) using
the dialing keys (0-9).
Press CID or DIR on the handset, or press CID or
DIR
on the telephone base to highlight AM or PM, or
press 2for AM
or 7for PM. Press SET to save. You hear
a confirmation tone.
NOTE: If the date and time are not set when a message is recorded, the system announces,
“Time and day not set,” before each message plays.
1.
2.
3.
4.
5.
6.
7.
8.
Caller ID log
Intercom
Ringers
Set date/time
BACK SELECT
SET DATE
09/30/10
MM/DD/YY
BACK SET
SET TIME
05:41 PM
BACK SET
Intercom
Bluetooth
Ringers
Set date/time
BACK SELECT
SET DATE
Active devices
01/01/11
MM/DD/YY
BACK SET
SET TIME
Active devices
06:08 PM
BACK SET

14
Handset and telephone base settings
Caller ID announce
By default, the caller ID announce feature is programmed On.
To change the setting:
Press MENU on the handset or telephone base in idle
mode to enter the main menu.
Press CID or DIR on the handset, or press CID or
DIR on the telephone base to highlight Settings, then
press SELECT .
Press CID or DIR on the handset, or press CID or
DIR on the telephone base to highlight Caller ID Annc,
then press SELECT .
If you are changing the setting on the telephone base,
skip to Step 5.
-OR-
On the handset, press CID or DIR to highlight
Handset or Base, then press SELECT .
Press CID or DIR on the handset, or press CID or
DIR on the telephone base to choose On or Off, then
press SET to save. You hear a confirmation tone.
NOTES:
See your user’s manual for complete instructions on using all
features of this telephone.
Pronunciation of names may vary with this feature. Not all
names may be pronounced correctly.
1.
2.
3.
4.
5.
•
•
SETTINGS
Key tone
Dial mode
Caller ID Annc
BACK SELECT
CALLER ID ANNC
On
Off
BACK SET
CALLER ID ANNC
Handset
Base
BACK SELECT
SETTINGS
Key tone
Dial mode
Caller ID Annc
BACK SELECT
CALLER ID ANNC
On
Off
BACK SET

15
Introducing Bluetooth
Your new AT&T TL96271/TL96371/TL96471 telephone system with
Bluetooth wireless technology has the following features:
Pair up to four Bluetooth enabled devices (cell phones or headsets) with
the telephone base.
Connect a maximum of two cell phones to make and receive cell calls.
Only one cell phone can be active on a call at a time.
Connect a Bluetooth enabled headset for making and receiving home calls.
Conference any combination of cell and home calls.
Make and receive calls using your cell phone service with your telephone
base or system handsets.
IMPORTANT INFORMATION
After plugging in the telephone base, wait at least 20 seconds before
connecting a Bluetooth device. The screen shows Bluetooth system busy
if you try to connect too soon.
Refer to the user's manual of your Bluetooth enabled cell phone or
headset for more information about how that device uses Bluetooth
connectivity.
Bluetooth wireless technology operates within a short range (up to 30
feet) from the telephone base. Keep connected cell phones and headsets
within this range.
If your cell phone has poor reception in your home, the TL96271/
TL96371/TL96471 cannot improve the reception. However, if there is
a location in your house with better reception, you can leave your cell
phone at that location while you use the TL96271/TL96371/TL96471
cell line. For optimal performance, the cell phone must be within 15 feet
of the telephone base.
Charge your cell phone while it is connected to the telephone base.
Your cell phone's battery discharges faster while it is connected to the
telephone base via Bluetooth wireless technology.
Monitor your cell phone's usage because minutes may be deducted from
your cellular plan for the duration of all cell calls, depending on the terms
of your plan.
The Bluetooth® word mark and logos are owned by Bluetooth SIG, Inc. and any use of such marks by
Advanced American Telephones and its parent, VTech Holdings Limited, is under license. VTech Holdings
Limited is a member of Bluetooth SIG, Inc. Other trademarks and trade names are those of their
respective owners.
•
•
•
•
•
•
•
•
•
•
•

16
Bluetooth setup
Bluetooth wireless technology operates within a short range (up to 30 feet).
When you pair a Bluetooth cell phone or Bluetooth headset to the telephone
base, keep the device within 15 feet of the telephone base for optimal
performance.
Add a cell phone
To pair and connect a cell phone:
Press MENU on the telephone base in idle mode to
enter the main menu.
Press CID or DIR to highlight Bluetooth, then
press SELECT .
Press SELECT to choose Add device.
Press CID or DIR to highlight Add cellular, then
press SELECT . The screen displays Please wait...
followed by 1. If cell is connected to BT device,
please disconnect it.
Press NEXT. The screen displays 2. Place cell phone
next to base.
Press NEXT to turn on the telephone base
discoverable mode. The screen displays Set cell to
search base: AT&T DECT 6.0 discoverable PIN: 0000.
Promptly turn on the Bluetooth feature of your cell
phone and search for or add new devices.
Your cell phone may require a passcode. In this case
the handset screen displays Check cellular. ENTER
PASS CODE. Enter the cell phone passcode into the
handset and press SET to save.
Enter the PIN of the telephone base (the default PIN
is 0000) into your cell phone to continue the pairing
process. The handset displays Adding Cell Phone A to
device list...
When a device is successfully connected, the
telephone base displays Cell Phone A is added and
connected to base. You hear a confirmation tone.
The corresponding status icon ( 1or 2) displays.
The corresponding device light on the telephone base
(DEVICE 1 or DEVICE 2) turns on.
If you have trouble pairing your cell phone, it may not be compatible with
your TL96271/TL96371/TL96471. Check the Bluetooth compatibility list
at www.telephones.att.com.
NOTES:
The pairing process may take up to one minute. If the pairing process fails, try again.
The steps for the pairing process may vary for different cell phones. If this happens,
follow the prompts on your cell phone and your TL96271/TL96371/TL96471 to
complete the pairing process.
Refer to the user’s manual of your cell phone on how to search for or add a new
Bluetooth device.
1.
2.
3.
4.
5.
6.
7.
8.
9.
•
•
•
BLUETOOTH
Add device
Device list
Download dir
BACK SELECT
Directory
Caller ID log
Intercom
Bluetooth
BACK SELECT
ADD DEVICE
Add cellular
Add headset
BACK SELECT
Set cell to
search base:
AT&T DECT 6.0
discoverable
PIN:0000
Adding
Cell Phone A
to device
list...
Cell Phone A
is added
and connected
to base.

17
Bluetooth setup
Add a headset
To pair and connect a headset:
Press MENU on the telephone base in idle mode to
enter the main menu.
Press CID or DIR to highlight Bluetooth, then
press SELECT .
Press SELECT to choose Add device.
Press CID or DIR to highlight Add headset, then
press SELECT . The screen displays Please wait...
followed by If headset is connected to cell, please
disconnect it.
Press NEXT . The screen displays Pls set headset to
discoverable mode. Set your headset to discoverable
mode (refer to the user’s manual of your headset),
then press NEXT .
All devices that are connected to the telephone
base are temporarily disconnected.
The screen displays Searching for Bluetooth headsets...
When the screen displays the found devices, press
CID or DIR to highlight your headset and then
press SELECT .
Enter the PIN of your headset. The PIN for most
Bluetooth devices is 0000 (refer to the user’s manual
of your headset). Then press NEXT .
The screen will display Adding Headset A to device
list... when the base is connecting to your headset.
When a device is successfully connected, the handset
displays Headset A is added and connected to base
and the corresponding status icon ( 1or 2). You
hear a confirmation tone. The corresponding light on
the telephone base (DEVICE 1 or DEVICE 2) turns on.
If you have trouble pairing your headset, it may not
be compatible with your TL96271/TL96371/TL96471.
Check the Bluetooth compatibility list at
www.telephones.att.com.
NOTE: The pairing process may take up to one minute. If the pairing
process fails, try again.
1.
2.
3.
4.
5.
•
6.
7.
8.
9.
10.
BLUETOOTH
Add device
Device list
Download dir
BACK SELECT
Directory
Caller ID log
Intercom
Bluetooth
BACK SELECT
Pls set headset
to discoverable
mode
BACK NEXT
DEVICE LIST
Add cellular
Add headset
BACK SELECT
Searching for
Bluetooth
headsets...
FOUND DEVICES
Headset A
Headset B
BACK SELECT
ADD HEADSET
ENTER PIN
Active devices
____
BACK NEXT
Adding
Headset A
to device
list...
Headset A
is added
and connected
to base.

18
Bluetooth setup
Download directory
Before downloading a directory, make sure the cell phone is paired, active,
and connected to your TL96271/TL96371/TL96471.
Place your cell phone next to the telephone base when you download a
cell phone directory to your TL96271/TL96371/TL96471.
To download a cell phone directory:
Press MENU on the telephone base in idle mode.
Press CID
or DIR
to highlight Bluetooth, then
press SELECT .
Press Press CID
or DIR
to highlight Download dir,
then press SELECT .
Press CID
or DIR
to highlight a desired device when
necessary, then press SELECT .
Press CID
or DIR
to highlight one of the
following options:
Phone memory - download all contacts stored in
your phone memory.
SIM card only - download all contacts stored in your
SIM card.
Phone and SIM - download all contacts stored in
both your phone memory and SIM card.
Press SELECT . During the download, the telephone
base displays the progress. All handsets display
Downloading dir.
Your cell phone may require a passcode. In this
case the screen displays Check cellular. ENTER
PASS CODE. Enter the cell phone passcode into the
handset and press SET to save.
When the downloading process is complete, the telephone
base displays Download complete XXXX entries saved.
Press OK to return to the Bluetooth menu.
1.
2.
3.
4.
5.
•
•
•
•
6.
Directory
Caller ID log
Intercom
Bluetooth
BACK SELECT
BLUETOOTH
Add device
Device list
Download dir
BACK SELECT
DOWNLOAD DIR
D1:Cell Phone A
D2:Cell Phone B
BACK SELECT
Cell Phone A
Downloading
entry #0001
STOP
DOWNLOAD FROM
Phone memory
SIM card only
Phone and SIM
BACK SELECT
Download ended
XXXX
entries saved
BACK OK

19
Make, answer and end a call
Make, answer or end a home call
Using a handset:
To make a home call:
Press HOME/FLASH or /SPEAKER, then enter the telephone number.
To predial a home call:
Enter the telephone number, then press HOME/FLASH or /SPEAKER.
To answer a home call:
Press HOME/FLASH or /SPEAKER.
To end a home call:
Press OFF/CANCEL, or put the handset in the telephone base or charger.
Using the telephone base:
To make a home call:
Press HOME on the telephone base, then enter the telephone number.
To predial a home call:
Enter the telephone number, then press HEADSET or HOME.
To answer a home call:
Press HEADSET or HOME.
To end a call a home call:
Press HOME.
Using a Bluetooth headset:
Keep the device within 15 feet of the telephone base for optimal
performance. Please see the user’s manual of your Bluetooth headset for
more information.
To answer a home call using a Bluetooth headset:
Press HEADSET on the telephone base or the call key on your headset.
To end a home call:
Press HEADSET or the call key on your headset.
To transfer a call from the telephone base to a Bluetooth headset:
Press HEADSET , then press SELECT or HEADSET again to choose the
headset. The telephone base displays Transferring audio to Headset A.
To transfer a call from the Bluetooth headset back to the handset:
Press HOME.
•
•
•
•
•
•
•
•
•
•
•
•
This manual suits for next models
2
Table of contents
Other AT&T Cordless Telephone manuals