Ateis PPM-IT5 User manual

FAIATEIS INTERNATIONAL
PPM-IT5 manual
Professionnal IP Paging console

FOR YOUR SAFETY
Please follow the instructions in this chapter to get the optimum results from these units.
EXCLUSION OF RESPONSIBILITY
Manufacturer, importer, or dealer shall not be liable for any incidental damages including
personal injury or any other damages caused by improper use or operation of the PPM-IT5.
INTERFERENCE
Like all computing devices, the PPM-IT5 uses high frequency digital circuitry that may cause
interference on radio or television equipment placed close to the unit. The best solution for
problems like this is to relocate the affected parts.
CAUTION
•Do not expose the PPM-IT5 to extreme temperatures, direct sunlight, humidity, or
dust.
•Keep away water or other liquids from the PPM-IT5.
•Connect the power cord only to an AC outlet of the type stated in this Owner's Manual
or as marked on the unit.
•When disconnecting the power cord from an AC outlet always grab the plug. Never
pull the cord.
•Turn off the unit immediately, remove the power cord from the AC outlet and consult
your ATEÏS dealer in any of the following circumstances:
•Smoke, odour, or noise getting out of the unit.
•Foreign objects or liquids get inside the PPM-IT5.
•The unit has been dropped or the shell is damaged.
•Do not drop or insert metallic objects or flammable materials into the unit.
•Do not remove the PPM-IT5 s cover. Contact your ATEÏS dealer if internal inspection,
maintenance, or repair is necessary.
•Do not try to make any modifications to the PPM-IT5.
•To prevent the unit from falling down and causing personal injury and/or property
damage, avoid installing or mounting the unit in unstable locations.
•Operate the PPM-IT5 in an environment with a free-air temperature of between 0 °C
and 40 °C (32 °F and 104 °F).
•Turn off all audio equipment when making any connections to the PPM-IT5, and
make sure to use adequate cables.
•Do not use benzene, thinner, or chemicals to clean the PPM-IT5. Use only a soft, dry
cloth.
•If the PPM-IT5 is moved from a cold place (e.g. overnight in a car) to a warmer
environment, condensation may form inside the unit, which may affect performance.
Allow the PPM-IT5 to acclimatize before use.

CONTENTS
FOR YOUR SAFETY ..................................................................................................................... 2
ATEIS INTRODUCTION ............................................................................................................... 4
WELCOME .................................................................................................................................. 4
PRESENTATION ....................................................................................................................... 4
PRODUCTS ............................................................................................................................ 4
DEVELOPMENT .................................................................................................................... 4
ATEÏS Field of applications ...................................................................................................... 4
CONTACTS ................................................................................................................................ 5
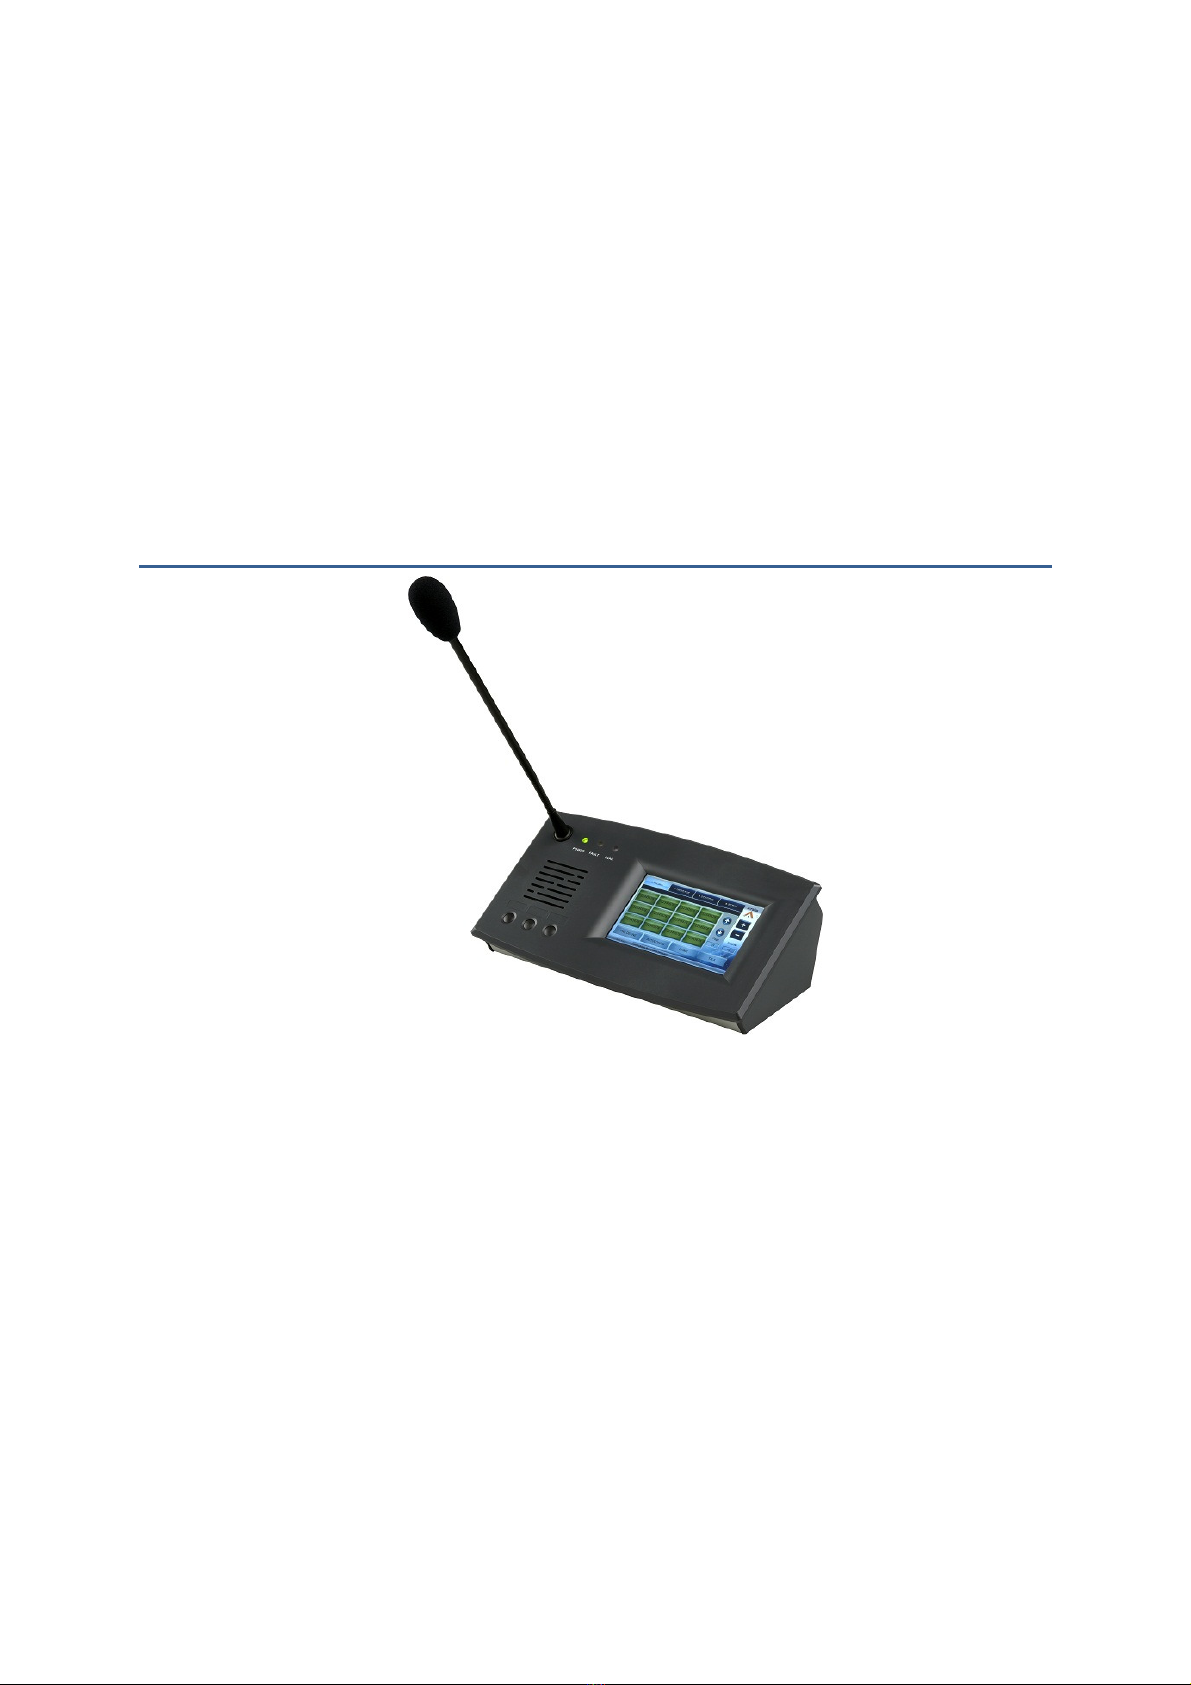
MACHINE ........................................................................................................................................ 6
INSTALLATION .............................................................................................................................. 7
Control ......................................................................................................................................... 7
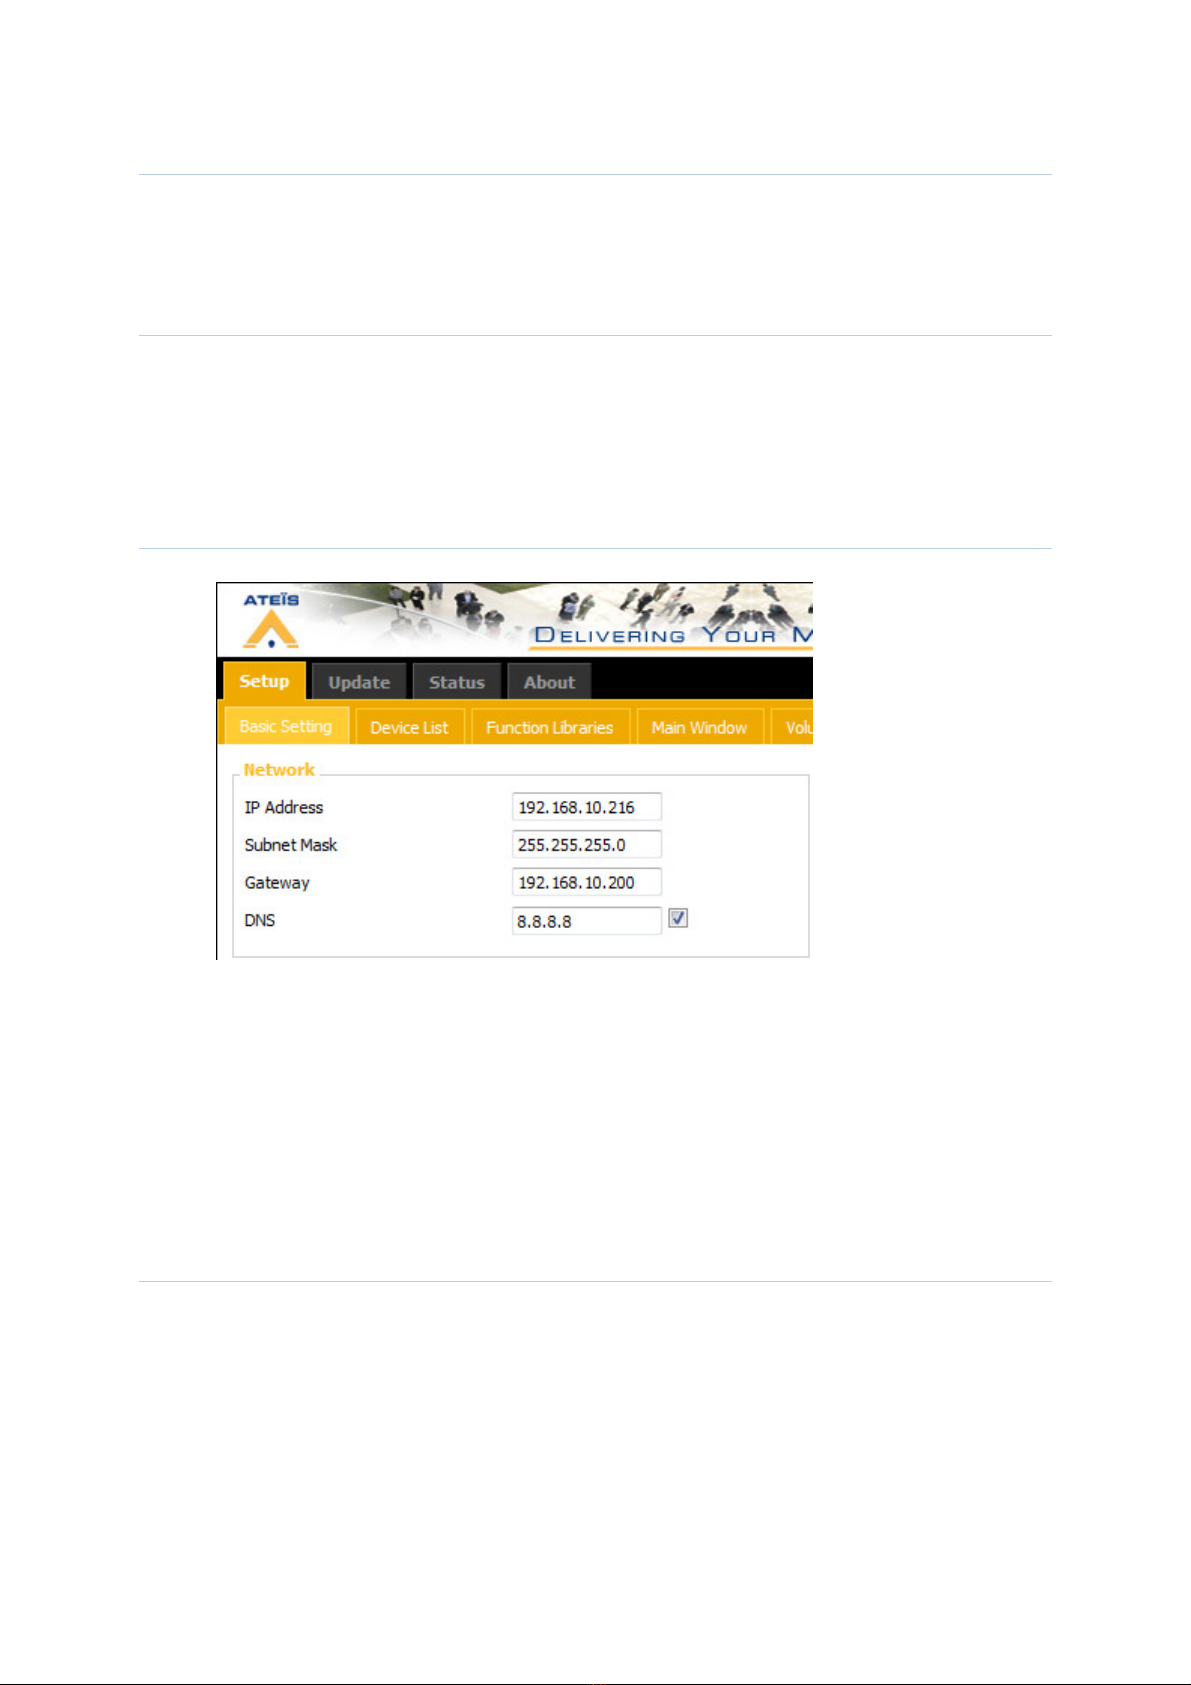
Configuration ............................................................................................................................... 7
Firmware Update ...................................................................................................................... 10
SOFTWARE .................................................................................................................................. 10
Address book ............................................................................................................................ 10
Function Libraries ..................................................................................................................... 11
How to use the function libraries ............................................................................................ 11
Audio format .............................................................................................................................. 23
Touchscreen ................................................................................................................................. 23
Main ............................................................................................................................................ 23
HOW TO ........................................................................................................................................ 23
Know its IP address ................................................................................................................. 23
Add a prerecorded message into the PPM-IT5 ................................................................... 23
Change the chime .................................................................................................................... 24
Set up the time.......................................................................................................................... 24
Start an event with the scheduler .......................................................................................... 24
Control an ECS with the PPM-IT5 ......................................................................................... 24
Use the PPM-IT5 with UAPG2 ............................................................................................... 24
On the UAP side: ..................................................................................................................... 24
On the PPM-IT5 side ............................................................................................................... 26

ATEIS INTRODUCTION
WELCOME
Thank you for choosing ATEÏS PPM-IT5. We hope you will enjoy using this exciting piece of
technology as much as we enjoy developing and building it.
This manual can be updated at any time without prior notice in order to keep this manual up
to date.
In case of errors in this manual or not clear process description, feel free to submit us
mistakes, suggestions or questions by sending an email: info@ateis-europe.com subject:
PPM-IT5 manual corrections.
This document intends to be a complete manual and we hope that this Help file will provide
you all information or answers needed. However if you have any questions, feel free to
contact us.
PRESENTATION
ATEÏS is a leading supplier of high-quality PA/VA audio equipment with distributors and
subsidiaries in 23 countries throughout Europe, States, Middle East and Asia. Since 1981 we
are manufacturing reliable and high quality loudspeakers, amplifiers, security matrices and
other audio components. Our products are manufactured to IS0 9001 standards and, when
possible, meet local requirements.
With more than twenty years of experience, ATEÏS has quickly established itself as a leading
manufacturer of Public Address, Voice Alarm systems and counter intercoms. The constant
growth of market share in Europe provides confirmation of the quality of ATEÏS’s commercial
and technical approach.
PRODUCTS
The company now offers a full range of sound equipment: microphones, preamplifiers, digital
processors, digital audio matrixes, loud-speaker monitoring systems, amplifiers, IP terminals,
etc. ATEÏS designs and manufactures leading products in the voice alarm systems market
which have been certified EN60849 compliant by the TÜV.
DEVELOPMENT
Thanks to a development team that includes thirty engineers, and to constant investment, we
are able to respond quickly to the demands of our various markets with specific solutions and
cutting edge technology. We have distributors in more than fifteen countries in Europe and
the Middle East, with whom we have carried out major projects. In choosing ATEÏS, you are
guaranteed a trustworthy partner that can be counted on for the long term.
ATEÏS Field of applications
ATEÏS's audio systems have been installed into following markets:
- Railways / Subways
- Airports
- High raise buildings
- Hotels
- Restaurants / Shopping center and Malls
- Theme parks

- Places of worship
- Stadia
- Museums
- Industrial buildings
- Industrial plants
- Commercial buildings
CONTACTS
INTERNATIONAL
ATEÏS Europe bv
Sydneystraat 42, 3047BP ROTTERDAM - NETHERLANDS
Phone: +31 (0)10 2088690
Fax: +31 (0)10 2088699
Web: http://www.ateis-international.com
Ateïs International S.A.
Chemin du Dévent, 1024 Ecublens -Switzerland
Phone: +41 (0)21 881 25 10
Fax: +41 (0)21 881 25 09
Web: http://www.ateis-international.com/
Mail: info@ateis-international.com
Ateïs Middle East
Building SEA, room 324, DAFZA, DUBAÏ, United Arab Emirats
Phone: +971 4609 1325/24
Fax: +971 4609 1326
Web, contact: http://www.ateis-international.com/
Ateïs France
34, avenue de l’Europe, Z.A Font Ratel, CLAIX, FRANCE
Phone: +33 (0) 4 76 99 26 30
Fax: +33 (0) 4 76 99 26 31
Web, contact: http://www.ateis-france.fr/
Ateïs Germany
Industriestrasse 8, D-63801 Kleinostheim, Deutschland
Phone: +49(0)60 27 97 98 85
Fax: +49(0)60 27 97 98 80
Web: http://www.ateis-germany.de/
Mail: service@ateis-germany.com
Ateïs UK
Fountain Court, 2 Victoria Square, Victoria Street, St. Albans,
Hertfordshire, AL1 3TF, UK
phone: + 44 (0) 8456 521 511
Fax: + 44 (0) 8456 522 527
Web, contact: http://www.ateis.co.uk/
Ateïs China, 亚提斯(中国)技术服务中心
地址:上海市闵行区吴宝路255号力国大厦610室
电话:021-54495191/92
传真 021-54495193
Web, contact: http://www.ateis.com.cn

The PPMIT5 IP paging console is a man-machine interface which allows call-paging,
messages broadcasting. Its back-lit touch screen is designed for simple and user-friendly
operating. The 3 hardware keys can be freely assigned by software. The PPMIT5 Media
console is a versatile device that fits well in a commercial shopping center as for an industrial
environment where paging over IP-networking brings flexibility and easy access.
All paging parameters needed for site operating can be programmed: zones assigned to the
different buttons, name of zones, group of zones, messages triggering or event control. A
total of 168 keys over 12 pages allow zone or group of zones selections. The prerecorded
messages and the chime are stored into the PPMIT5 IP paging console.
All the settings are done through web pages with your favourite web browser. Thanks to
powerful echo cancellation, the PPMIT5 delivers clear sound for full duplex talk.
PPM-IT5 belongs to the TERRACOM range, the new ATEÏS Audio over IP solution.
MACHINE
•1 5” TFT full colour paging console
•1 Ethernet interface including POE (Power Over Ethernet) for full duplex
network connection in 10/100Mbps.
•24 VDC power supply.
•Power, Fault & Evac LED.
•3 key-buttons
•1 RJ9 for optional telephone headset
•2 mini-jack plugs for optional headset

INSTALLATION
POWER CONNECTION:
The power connection can be done by :
•an external 24V power supply.
•the Power over Ethernet technology which allows to pass electrical power safely,
along with data, on Ethernet cabling. You will need a Power over Ethernet switch.
If you have several devices on the same POE switch, check if the switch will be
able to deliver enough power to each unit. With a properly sized switch, you can
reach 100m distance with POE.
Control
Depending on your needs, there are several ways of configuring and controlling the PPM-
IT5. Embedded web server enables you to modify the settings of the PPM-IT5.
TERRA-SERVER, our intuitive and powerful audio distribution software, handles the
announcement, the music, the zoning, the paging, the scheduler & the priorities.
Configuration
Each Terracom unit comes loaded with a default configuration. Follow steps 1 to 8 for
connecting to the embedded web server that enables you to modify the settings.
Assign IP address to PC
Each Terracom device is shipped from the factory with a default IP address of
192.168.100.1
Then, your PC must have an IP address like 192.168.100.x (x is a value between 2 &
254).
If your device is not coming with the default IP address, please refer to the chapter:
“How to knows its IP address”

Power connection
Thanks to the Power over Ethernet (POE) 48V technology, your TERRACOM device
can be powered through the Cat-5 cable. For that you will need a POE switch.
Otherwise, your Terracom device can be powered by an external DC-JACK 24V-
0,25A power supply. The front panel “POWER” LED will now remain green.
Network connection
Use a straight Cat-5 cable to link your PC network card to the device. Open your
favourite web browser (we recommend Mozilla Firefox) and type the default IP
address into the address bar. You will be asked for a login. The default settings are:
login: admin / password: admin.
You can now visualize the web pages of the PPM-IT5.
The default login/password is: admin/admin
Assign IP address to the PPM-IT5
You can now change the IP address of your device: Setup ->Basic Setting ->Network
N.B:You don’t need to set up the Gateway if all the devices are in the same LAN (local
area network).
You don’t need to set up the DNS if the PPM-IT5 is not synchronised with an external
NTP server.
Reboot.
Notice that you might have to change again the IP settings of your PC network card
to be in the same network mask as the new IP address of your TERRACOM.
To avoid conflict issues that occur when connecting multiple TERRACOM devices
with the same IP number, be sure to only connect one TERRACOM device at a time
to the Ethernet switch when assigning IP addresses.
SIP server settings
If you use a SIP server
Enter the IP address of your SIP server and the (SIP & RTP) ports you will use.

If you create a direct link without SIP and the target device is in the same LAN
than your device:
Even if you are not using a SIP server, the TERRACOM devices will use a SIP
connection (transparent for you). Then select Terranet for the Firewall Traversal
Mode and set up the same SIP port value for each TERRACOM device. Configure
also the RTP port. You can leave the WAN IP blank.
If you create a direct link without SIP and the target device is NOT in the same LAN than your
device,
you might need a NAT Traversal. Then select the Terra net:
Enter the (SIP & RTP) ports you will use.
the WAN IP address is detected automatically, then you can leave it blank.
Address book
Add now in the address book of the TERRACOM device, the list of devices you want
to be able to call.
Setup ->Device List ->Add New Device…
In the URI, write name_device@XXX.XXX.XXX.XXX:YYYY
•For a call with a SIP server: XXX.XXX.XXX.XXX = the SIP server IP address
•For a direct call: XXX.XXX.XXX.XXX= the IP address of the device you want
to call.
•For a local output: XXX.XXX.XXX.XXX=127.0.0.1
YYYY= the SIP port number you have entered in the SIP settings.
Touch panel GUI
On the touchscreen you want to have the list of the devices you want to call.
You can link to a button:
•a Terracom device
•a group of Terracom devices
•a command

Create a group : Function Libraries
You can create a group of devices in the function libraries window.
Setup ->Function libaries ->Paging group…
This group can be linked to a button on the touchscreen.
Firmware Update
Ateis provides regularly new firmwares, then please check on our webpages if there
is any new firmware for the PPM-IT5.
To update the firmware, open your favourite web browser (we recommend Mozilla
Firefox).Type this IP address into the address bar. You will be asked for a login. The
default settings are: login: admin / password: admin. You can now visualize the web
pages of the TERRACOM. Go to the page Update/Firmware.
Open the browser and select the new firmware. Press update. Do not disconnect the
power supply or the POE cat-5 cable during the update.
N.B.: We recommend after a firmware update to reset the cache of your web browser.
SOFTWARE
Address book
When you want to call someone with your phone, you enter the phone number or select
someone in your phonebook. It is the same philosophy with a TERRACOM device: you can
enter the IP address & port of the device you want to call or you can use the address book.

Once you are connected with your web browser on the TERRACOM device, the device
will show you all the TERRACOM devices on the network. You just need to press on “Add”
and give a name to the device. If you want to add an “offline” device or a “third party” device,
you need to know its IP address.
You might need also to add the device itself, if you want to play messages or to have
actions locally. In this case, you should give it the IP address: 127.0.0.1:5600.
Function Libraries
On the PPM-IT5, you can create different kind of events.
Device Group
This function is used to create a group of device. It will be used by the scheduler to trigger
prerecorded messages into this group.
Command (String)
This function is used to control a 3
rd
party device with a PPM-IT5.
Logic out (Old)
This command is used to trigger one logic out of another device and change the status of
logic out(hight<->low).
Macro
A macro is another page on the touchscreen to manage key buttons.
Paging group
This function is used to create a group of devices that you can use to page in once. On
the touchscreen you will have one button representing the group.
Locked button
With this function, you set logic out to high and to low. The difference with “Logic out”
function is that if you set the logic out to high, you have then to change the logic out to low, if
you want the logic out to go back to low.
Third party Controls
This function is to declare a list of commands that a 3
rd
party device could trigger. This
function allows a third party device to control the PPM-IT5.
External Variable
This really interesting function is used if you want to show on the PPM-IT5 touchscreen
the status of a non-Terracom device.
How to use the function libraries

Macro
- Go in the page : Setup 1 -> function libraries -> Macro.
- Create a new macro: Add / give a name to the macro.
You can add commands to the macro. This means that you will start these commands
when you select a macro… Really rare to use it.
- Now we will add to the macro, the difference keys: Setups 1 -> Main window -> Page
In page, you should see your list of Macro.
You can add the different keys per Macro
Device Group
First create the group, used by the scheduler:
Then, go in the scheduler page: Setup2 ->Scheduler
If you select command: play Message, you will be able to choose your device group.

Command (String)
This function is used to send an ASCII command to a 3
rd
party device.
Write in the string combo, the ASCII command you will sent to the 3
rd
party device.
2 different modes:
- Time interval: number of time you will repeat the string and at what interval
- Time Out: When the IT5 will send commands to the 3
rd
party device, the device needs
to respond(+Ans) within the set time(+Time Out ?? ms), or repeat sending, send the
number of times(+Repeat) until the end.
Logic out (Old)
To modify the remote device logic out, you must first select the remote device (to be in
the list, the device must be added first in the device list window), the channel (which logic
output) and the value:

MODE_ZERO means that the logic output will be set to zero
MODE_ONE means that the logic output will be set to
MODE_TOGGLE means that the logic output will be set to
one if it was on zero.
MODE_PULSE means that
MODE_REVERSE means that the logic output will be set to
Locked button
With this function,
you set logic out
function is that if you set the logic out to high, you have then to change the logic out to low, if
you want the logic out to go back to low.
Third party Controls
First on the Basic setting page, choose the network port for the communication
In the function Libaries page, select third party controls.
Add third party control function
MODE_ZERO means that the logic output will be set to zero
MODE_ONE means that the logic output will be set to
one
MODE_TOGGLE means that the logic output will be set to
zero if it was on one, and to
MODE_PULSE means that
on the logic output, the device will send several pulses
MODE_REVERSE means that the logic output will be set to
?
you set logic out
to high and
to low. The difference with “Logic out”
function is that if you set the logic out to high, you have then to change the logic out to low, if
you want the logic out to go back to low.
First on the Basic setting page, choose the network port for the communication
In the function Libaries page, select third party controls.
Add third party control function
:
zero if it was on one, and to
on the logic output, the device will send several pulses
to low. The difference with “Logic out”
function is that if you set the logic out to high, you have then to change the logic out to low, if
First on the Basic setting page, choose the network port for the communication
:

Function:
Call:call one de
vice or call devices one by one several dev
Paging:
paging to device.(one or more)
Message:
playing message to device..(one or more)
Monitor:monitor a device.
Hang Up:
Close the session (Call, paging, Message, Monitor).
Logic out:
control local logic out or remote logic out by sending udp packet.
Add call function
for example
And hang up function:
vice or call devices one by one several dev
ices.
paging to device.(one or more)
playing message to device..(one or more)
Close the session (Call, paging, Message, Monitor).
control local logic out or remote logic out by sending udp packet.
for example
:
control local logic out or remote logic out by sending udp packet.

We use this program “UDP Test Tool ” to test
string type=> cmd=3rd ______, under line is function's name.
External Variable
IT5 can display the status of a non
※
AMP mean
amplifier device, not terra com
We use this program “UDP Test Tool ” to test
:
string type=> cmd=3rd ______, under line is function's name.
IT5 can display the status of a non
-Ateis device.
amplifier device, not terra com
-AMP device

External variable
There are two ways
to know the device status:
•
one is to trigger command string manually(ask manually),
•
another way is: the IT5 asks the device automatically (once 4 s
automatically), then wait device reply.
●Ask manually
Step 1
Add external variable: that is the other side device reply the string to IT5. For
example I set 1 and 0.
IT5
selected
to know the device status:
one is to trigger command string manually(ask manually),
another way is: the IT5 asks the device automatically (once 4 s
automatically), then wait device reply.
Add external variable: that is the other side device reply the string to IT5. For
Other device
F r example: AMP
n/ ff
Z ne
selected
External variable=>Other
device send string (3rd party
c ntr l f r example) t IT5 via
ethernet, than IT5 sh w the AMP
n/ ff status n its screen.
Variable name
Reply string
4 sec nds t ask the device status,
the device will reply string
another way is: the IT5 asks the device automatically (once 4 s
econds)(ask
Add external variable: that is the other side device reply the string to IT5. For
Back
4 sec nds t ask the device status,

Step 2
Add the command string, set for trigger “ask manual
ly” button to other device
Send c mmand string device's IP
and p rt inf
It will send a string 1000ms
interval, and send a t tal f six times.
1
Add the external
variable
Press add butt n, will add test
variable
ly” button to other device
Send c mmand string device's IP
Add the external
Press add butt n, will add test

Step 3
Add locked button: for display the status of other device
Step 4
Main window setting: The button of IT5 screen
Add locked button: for display the status of other device
Main window setting: The button of IT5 screen
Add the test variable
This butt n is f r ask ther
device
This butt n is display the answer f the device status
3
This butt n is f r ask ther
This butt n is display the answer f the device status

Step 5
This UDP software is LAB test software and mean the other device
document(AMP-amplifier)
When in IT5 screen trigger "ask asp status" button, the UDP software will be received
and you need to press manually “send “ reply 0 or 1.
When reply is 1, "AMP ON / OFF" button of IT5 screen will sink state.
IT5's IP and c mmand string use p rt 8000.
This p rt f r c mmand string and fixed.
This UDP software is LAB test software and mean the other device
When in IT5 screen trigger "ask asp status" button, the UDP software will be received
and you need to press manually “send “ reply 0 or 1.
When reply is 1, "AMP ON / OFF" button of IT5 screen will sink state.
IT5's IP and c mmand string use p rt 8000.
This p rt f r c mmand string and fixed.
setting
This UDP software is LAB test software and mean the other device
above
When in IT5 screen trigger "ask asp status" button, the UDP software will be received
When reply is 1, "AMP ON / OFF" button of IT5 screen will sink state.
This is in step 2
setting
Table of contents