© Copyright 2012 ATEN®International Co., Ltd.
ATEN and the ATEN logo are trademarks of ATEN International Co., Ltd. All rights reserved.
All other trademarks are the property of their respective owners.
This product is RoHS compliant.
Part No. PAPE-1223-710G Printing Date: 05/2012
VM0808H 8 x 8 HDMI Matrix Switch Quick Start Guide
Guide de démarrage rapide du commutateur matriciel HDMI 8 x 8 VM0808H
VM0808H 8x8-HDMI-Matrix-Switch Kurzanleitung
VM0808H Conmutador HDMI de matriz 8x8 Guía rápida
Requirements
Source Devices
•HDMI Type A output connector(s)
Note: A DVI/HDMI adapter is required when connecting a DVI source
device.
Display Devices
•Display Devices or receivers with an HDMI Type A input connector
Cables
•1 HDMI cable for each source device you will be connecting.
•1 HDMI cable for each display device you will be connecting.
Note: No cables are included in this package. We strongly recommend
that you purchase high-quality cables of appropriate length since
this will affect the quality of the audio and video display. Contact
your dealer to purchase the correct cable sets.
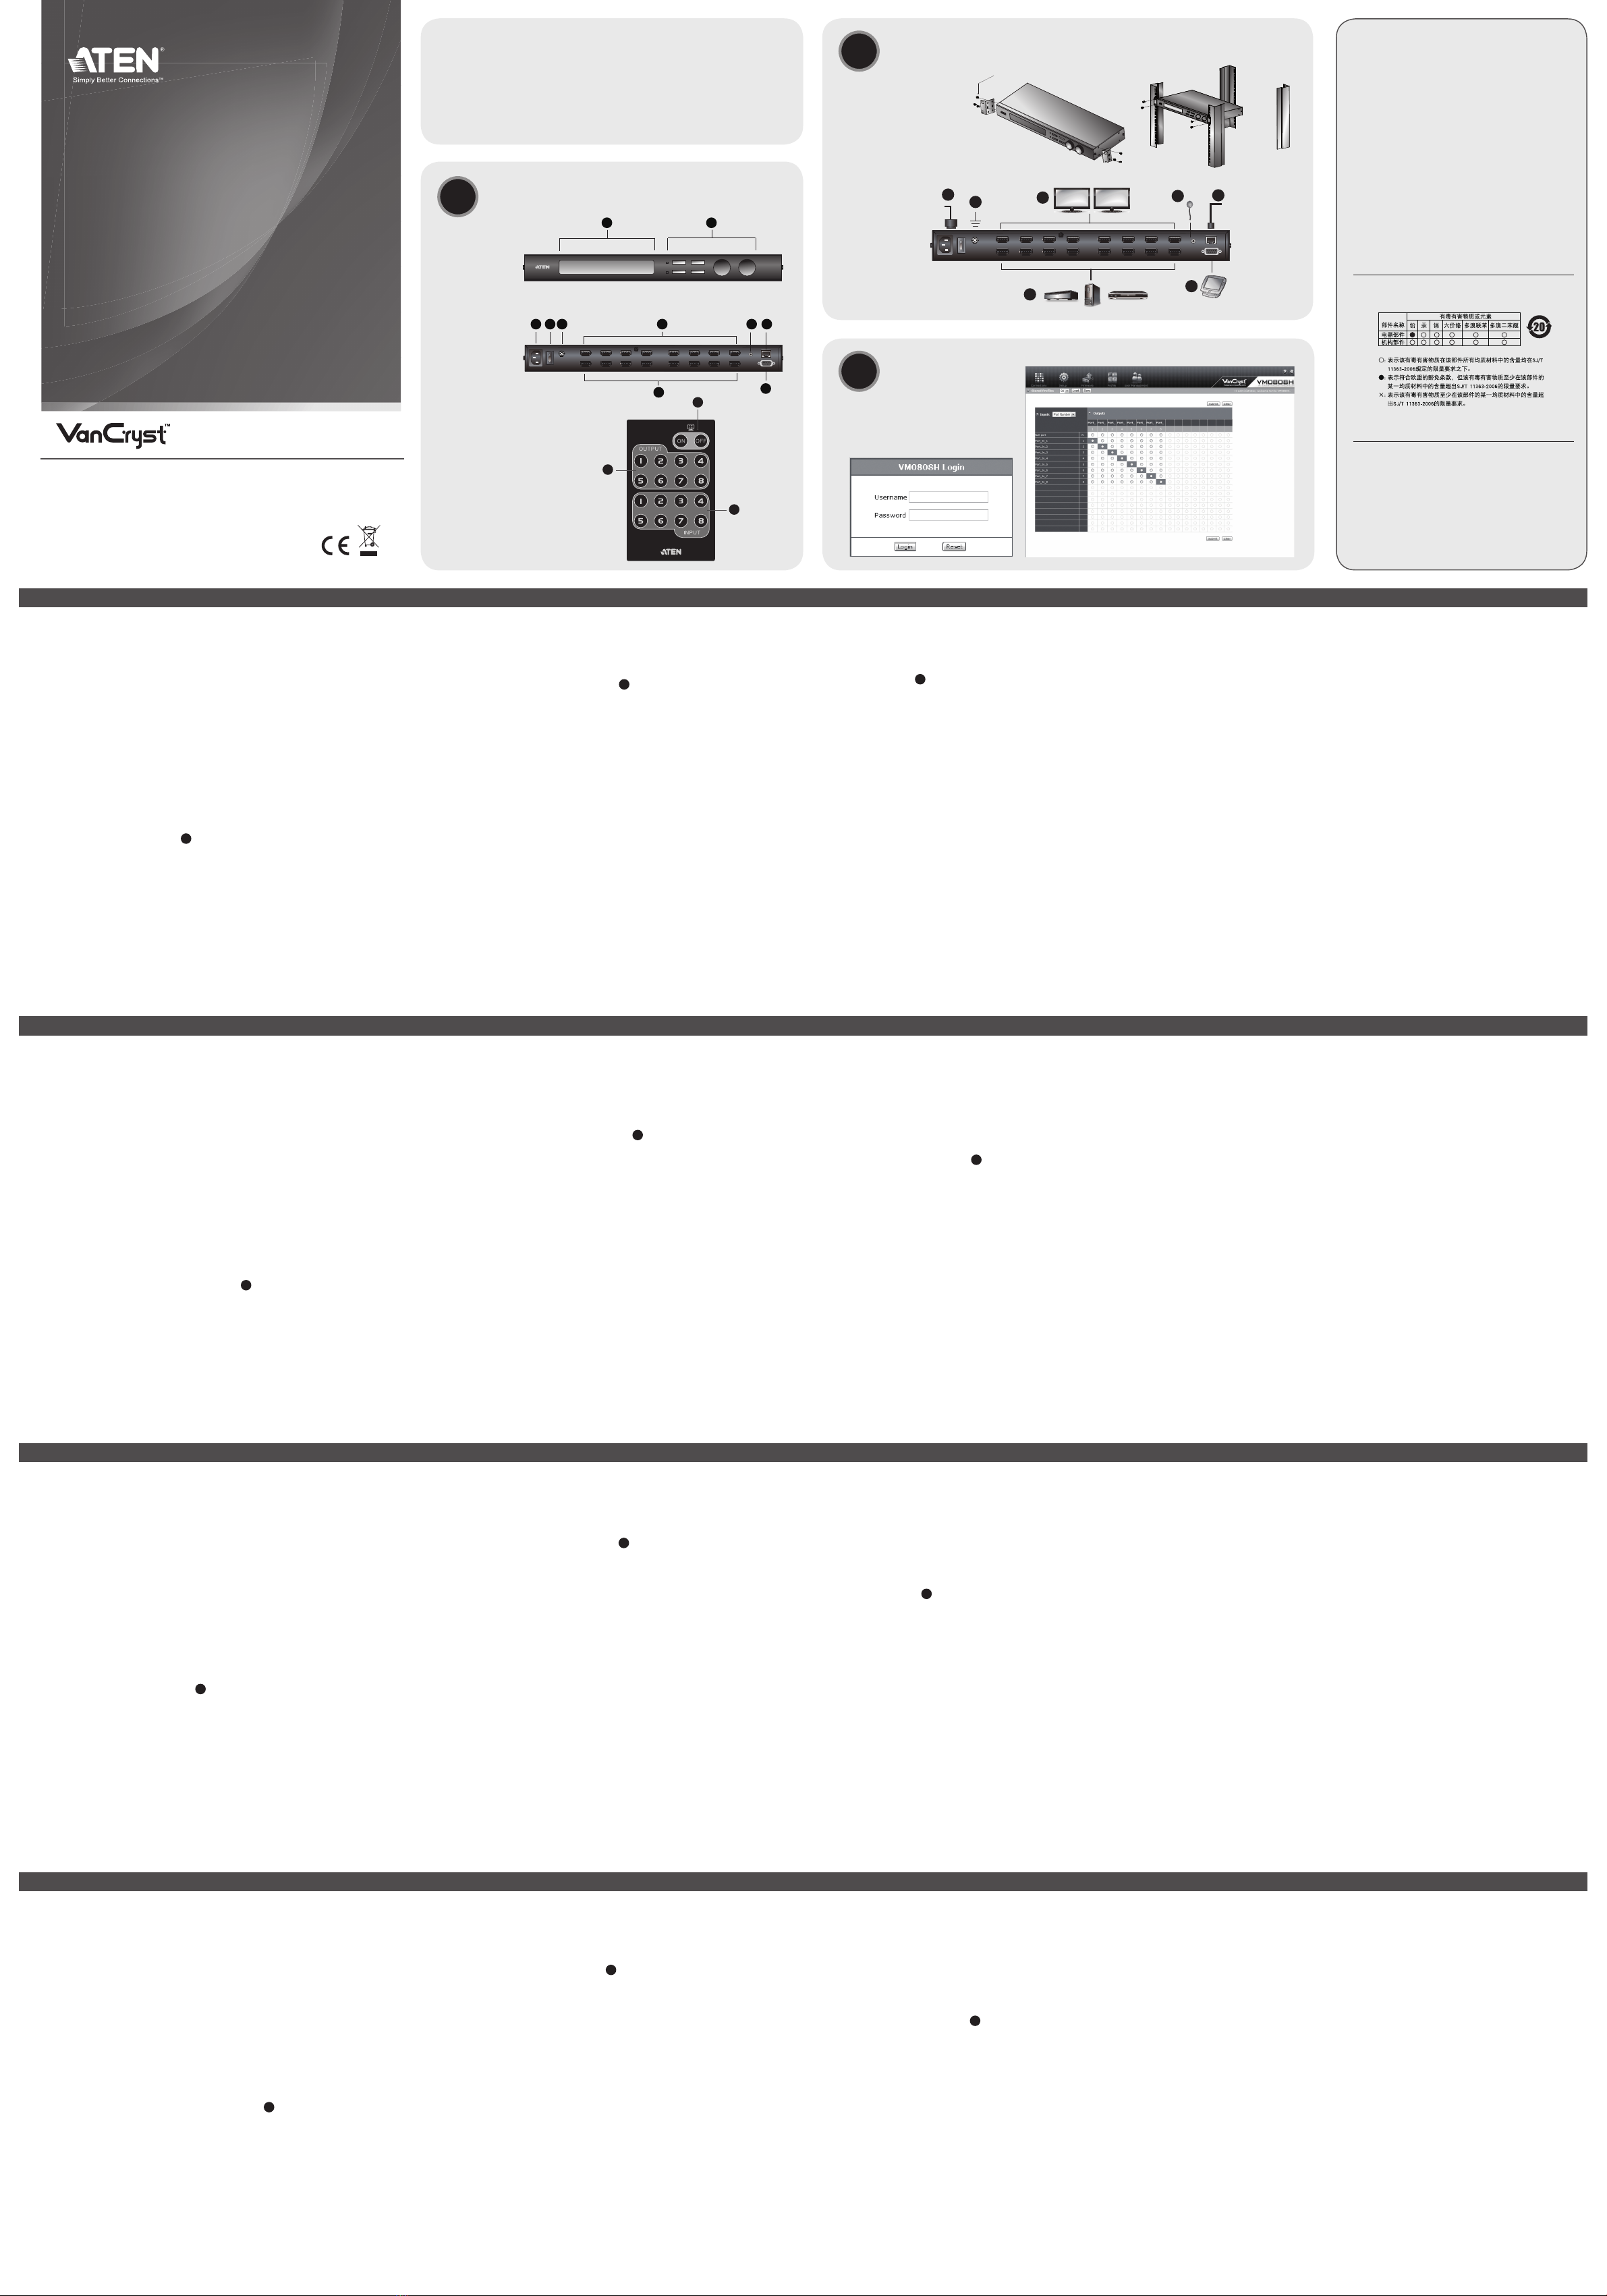
Hardware Review
A
Front View
1. LCD Display
2. Front Panel Tuner Dials & Pushbuttons
Rear View
1. Power Socket
2. Power Switch
3. Grounding Terminal
4. Ethernet Port
5. HDMI Input Ports
6. HDMI Output Ports
7. External IR Receiver Port
8. RS-232 Serial Port
Configuration minimale
Périphériques sources
•Connecteur(s) de sortie HDMI de type A
Remarque : Un adaptateur DVI/HDMI est nécessaire lors de la connexion
à un périphérique source DVI.
Périphériques d'affichage
•Périphériques d’affichage ou récepteurs équipés d’un connecteur d’entrée
HDMI de type A
Câbles
•1 câble HDMI pour chaque périphérique source à installer.
•1 câble HDMI pour chaque périphérique d’affichage à installer.
Remarque : aucun câble n’est fourni avec le produit. Il est vivement
conseillé d'acheter des câbles de haute qualité d'une
longueur appropriée afin d'éviter que la qualité audio et vidéo
n'en soit affectée. Contactez votre distributeur pour vous
procurer les jeux de câbles corrects.
Description de l’appareil
A
Vue avant
1. Écran LCD
2. Molettes et boutons-poussoirs de réglage du panneau avant
Vue arrière
1. Prise d'alimentation
2. Interrupteur
3. Prise de terre
4. Port Ethernet
5. Ports d’entrée HDMI
6. Ports de sortie HDMI
7. Port du récepteur infrarouge externe
Voraussetzungen
Signalquellen
•HDMI Typ A-Ausgang bzw. -Ausgänge
Hinweis: Zum Anschluss einer DVI-Signalquelle ist ein DVI/HDMI-Adapter
erforderlich.
Anzeigegeräte
•Anzeigegeräte oder Receiver mit HDMI-Typ-A-Eingang
Kabel
•1 HDMI-Kabel für jede zu installierende Signalquelle
•1 HDMI-Kabel für jedes zu installierende Anzeigegerät
Hinweis: Im Lieferumfang sind keine Kabel enthalten. Wir empfehlen
Ihnen, nur hochwertige Kabel geeigneter Länge zu kaufen,
da diese Auswirkungen auf die Ton- und Bildqualität haben.
Wenden Sie sich dazu an Ihren Fachhändler.
Hardwareübersicht
A
Vorderseitige Ansicht
1. LCD-Display
2. Vorderseitige Regler und Drucktasten
Rückseitige Ansicht
1. Netzeingangsbuchse
2. Netzschalter
3. Erdungsanschluss
4. Ethernet-Port
5. HDMI-Eingänge
6. HDMI-Ausgänge
7. Port für externen Infrarot-Empfänger
8. Serieller RS-232-Port
Requisitos
Dispositivos fuente
•Conector(es) de salida HDMI de tipo A
Nota: La conexión a una fuente DVI requiere un adaptador DVI/HDMI.
Pantallas
•Dispositivos de visualización o receptores con entrada HDMI de tipo A
Cables
•1 cable HDMI para cada dispositivo fuente que desee instalar
•1 cable HDMI para cada dispositivo de visualización que desee instalar
Nota: Los cables no vienen incluidos en el paquete. Le recomendamos
que compre cables de alta calidad y de una longitud adecuada,
dado que el cable tiene una influencia significativa sobre la calidad
de imagen. Póngase en contacto con su distribuidor para adquirir
los juegos de cables apropiados.
Presentación del hardware
A
Vista frontal
1. Pantalla LCD
2. Diales de ajuste y pulsadores en el panel frontal
Vista posterior
1. Entrada de alimentación
2. Interruptor de alimentación
3. Toma de tierra
4. Puerto Ethernet
5. Puertos de entrada HDMI
6. Puertos de salida HDMI
7. Puerto para receptor de infrarrojos externo
8. Puerto serie RS-232
IR Remote Control
1. Power ON/OFF
2. Output Pushbuttons 1–8
3. Input Pushbuttons 1–8
Hardware Installation
B
Rack Mounting
The VM0808H can be mounted in a 19” (1U) system rack. For the most
convenient front panel pushbutton configuration and operation at the local
site, mount the unit at the front of the rack, as follows:
1. Use the M3 x 8 Phillips head hex screws supplied with the Rack Mount
Kit to screw the rack mounting brackets onto the front of the unit.
2. Position the unit in the front of the rack and align the holes in the
mounting brackets with the holes in the rack.
3. Screw the mounting brackets to the rack.
Cable Connection
Installation of the VM0808H is simply a matter of connecting the appropriate
cables. Refer to the installation diagrams (the numbers in the diagrams
correspond to the steps), and do the following:
1. If using the Remote Operation features, plug a Cat 5e cable from the LAN
into the VM0808H’s Ethernet port.
2. If you are using the serial control function, use an appropriate RS-232
serial cable to connect the computer or serial controller to the VM0808H’s
female RS-232 port.
3. Use a grounding wire to ground the unit by connecting one end of the
wire to the grounding terminal, and the other end of the wire to a suitable
grounded object.
Note: Do not omit this step. Proper grounding helps to prevent damage
to the unit from surges or static electricity.
4. Connect up to 8 HDMI video sources to the HDMI Input ports
5. Connect up to 8 HDMI display devices to the HDMI Output ports
8. Port série RS-232
Télécommande infrarouge
1. Marche/Arrêt (ON/OFF)
2. Boutons-poussoirs des sorties 1 à 8
3. Boutons-poussoirs des entrées 1 à 8
Installation du matériel
B
Montage sur bâti
Le VM0808H peut être monté sur un bâti de 19" (1U). Pour une
configuration et une facilité d’utilisation optimales des boutons-poussoirs du
panneau avant, installez l’unité à l’avant du bâti en procédant comme suit :
1. Utilisez les 8 vis cruciformes à têtes hexagonales M3 fournies avec le kit
de montage sur bâti pour visser les supports de montage sur bâti sur la
face avant de l’appareil.
2. Placez l’appareil sur la face avant du bâti et alignez les trous se trouvant
dans les supports de montage avec les trous situés dans le bâti.
3. Vissez les supports de fixation sur le bâti.
Branchement des câbles
L’installation du VM0808H se résume simplement à connecter les câbles
appropriés. Reportez-vous aux diagrammes d’installation (les numéros sur
les diagrammes correspondent aux étapes) et procédez comme suit :
1. Si vous utilisez les fonctionnalités de contrôle à distance, branchez
un câble de catégorie 5e entre le réseau local et le port Ethernet du
VM0808H.
2. Si vous utilisez la fonction de contrôle sériel, utilisez un câble série RS-
232 approprié pour connecter l'ordinateur ou le contrôleur série au port
RS-232 femelle du VM0808H.
3. Pour mettre l’unité à la terre, reliez une extrémité du câble à la borne de
terre et l'autre extrémité à un objet correctement mis à la terre.
Remarque : ne sautez pas cette étape. Une mise à la terre correcte
protège l'appareil de l'électricité statique et des surtensions.
Infrarot-Fernbedienung
1. Strom EIN/AUS
2. Wahltasten für Ausgänge 1-8
3. Wahltasten für Eingänge 1-8
Hardware installieren
B
Rack-Montage
Der VM0808H kann in einen 19"-Schrank (1U) eingebaut werden. Um die
lokale Bedienung und Konfiguration über die vorderseitigen Drucktasten
möglichst bequem zu gestalten, sollten Sie das Gerät auf der Vorderseite
des Schranks wie folgt einbauen:
1. Verwenden Sie die mitgelieferten M3 x 8-Kreuzschlitzschrauben, um die
beiden Halterungen an der Vorderseite des Gerätes zu befestigen.
2. Setzen Sie das Gerät von vorne in das Rack ein. Richten Sie dabei die
Löcher in den Halterungen mit denen des Racks aus.
3. Verschrauben Sie die Halterungen am Rack.
Kabelverbindung
Die Installation des VM0808H ist mit ein paar wenigen Kabelanschlüssen
erledigt. Siehe die Installationsdiagramme (die Zahlen in den Diagrammen
entsprechen der Reihenfolge), und gehen Sie folgendermaßen vor:
1. Wenn Sie die Fernbedienungsfunktion nutzen möchten, schließen Sie
ein Kat. 5e-Kabel an den Ethernet-Anschluss des VM0808H und an das
lokale Netzwerk an.
2. Um die serielle Steuerungsfunktion zu verwenden, verbinden Sie den
Computer bzw. die serielle Steuereinheit mit der RS-232-Buchse am
VM0808H. Verwenden Sie dazu ein geeignetes RS-232-Kabel.
3. Erden Sie die Einheit mithilfe eines Erdleiters. Verbinden Sie dazu das
eine Ende des Leiters mit der Erdungsschelle und das andere Ende mit
einem geerdeten Gegenstand.
Hinweis: Überspringen Sie diesen Schritt keinesfalls. Eine
ordnungsgemäße Erdung schützt das Gerät vor
Spannungsspitzen und statischer Elektrizität.
Mando a distancia por infrarrojos
1. Encendido / Apagado
2. Pulsadores de salidas 1 a 8
3. Pulsadores de entradas 1 a 8
Instalar el hardware
B
Montaje en rack
Puede montar el VM0808H en un rack de 19" (1U). Para poder manipular
fácilmente los pulsadores del panel frontal a fin de configurar y manejar el
equipo localmente, instálelo en la parte frontal del rack como se describe a
continuación:
1. Utilice los tornillos de estrella M3 x 8 incluidos para atornillar las
escuadras a cada lado del panel frontal de la unidad.
2. Coloque la unidad en la parte delantera del rack y alinee los agujeros en
las escuadras con los agujeros del rack.
3. Atornille las escuadras al rack.
Conexión de cables
La instalación del VM0808H es tan sencilla como conectar unos cables.
Véanse los diagramas de instalación (los números en los diagramas
equivalen a los números de los pasos a seguir) y proceda como se indica a
continuación:
1. Si desea controlar el equipo a distancia, conecte el cable de Cat. 5e de la
red local al puerto Ethernet del VM0808H.
2. Si desea controlar el equipo a través del puerto serie, conecte la
computadora o una controladora serie RS-232 al puerto RS-232 hembra
del VM0808H. Para ello, emplee un cable serie apropiado.
3. Emplee un conductor de tierra para poner la unidad a masa. Para ello,
conecte un extremo del conductor al terminal de tierra del equipo y el
otro extremo a un objeto ya puesto a tierra.
Nota: no omita este paso. Una conexión correcta a tierra protege a la
unidad de la electricidad estática y de las subidas de tensión.
6. Connect the IR Receiver into the External IR Receiver Input Port
7. Plug the power cord supplied with the package into the VM0808H’s 3-
prong AC socket, and then into an AC power source.
8. Power on the VM0808H and all devices in the installation.
Operation
C
The VM0808H can be configured and operated locally via the front panel
pushbuttons, IR Remote Control, or remotely over a standard TCP/IP
connection via graphical user interface (GUI) using a web browser, and
using an RS-232 serial controller.
Front Panel Operation
Basic Navigation
The VM0808H’s front panel display operation is easy and convenient.
Please note the following front panel button and dial operations:
•Use the MENU pushbutton to access the Menu page options: Set IP Port,
Set Serial Port, Operation Mode, Security Mode, and Save/Load Profile.
•Use the PROFILE pushbutton to switch between the connection profiles
which have been added to the Profile Selection list
•Use the ESC pushbutton to go back a level, return to the Main page, or
exit.
•Use the ENTER or Tuner Dial pushbuttons to select options and confirm
operations.
•Use the Tuner IN and OUT dials to cycle forwards or backwards through
the menus or options.
Remote Control Operation
The remote control allows you to change the Output port status for each
display using the IR remote control device included with your VM0808H.
You can use the remote control to: change the Input source of any Output
display port, power on/off any individual Output display, or power on/off all
Output displays simultaneously.
4. Connectez jusqu’à 8 sources vidéo HDMI aux ports d’entrée HDMI
5. Connectez jusqu’à 8 périphériques d’affichage HDMI aux ports de sortie
HDMI
6. Connectez le récepteur infrarouge au port d’entrée pour récepteur
infrarouge externe
7. Reliez le câble d'alimentation fourni à la prise CA à 3 broches du
VM0808H, puis à une prise de courant CA.
8. Allumez le VM0808H ainsi que tous les périphériques de l’installation.
Fonctionnement
C
Le VM0808H peut être configuré et commandé localement par les boutons-
poussoirs du panneau avant, par la télécommande à infrarouge ou à
distance par le biais d'une connexion TCP/IP standard et de l’interface
utilisateur graphique en utilisant un navigateur Internet, et en utilisant un
contrôleur série RS-232.
Utilisation du panneau avant
Navigation de base
L'utilisation du panneau avant du VM0808H est simple et pratique. Veuillez
prendre note des opérations suivantes, réalisées en utilisant les boutons-
poussoirs et les molettes du panneau avant :
•Utilisez le bouton MENU pour accéder aux options de la page Menu :
Régler IP et port, Régler port série, Mode de fonctionnement, Mode de
sécurité, Enregistrer/charger profil.
•Utilisez le bouton-poussoir PROFILE pour basculer entre les différents
profils de connexion qui ont été ajoutés à la liste de sélection des profils
•Utilisez le bouton ESC pour revenir en arrière d’un niveau, revenir à la
page principale ou quitter.
•Utilisez le bouton ENTER ou les molettes de réglage pour sélectionner
les options et confirmer les opérations.
•Utilisez les molettes de réglage IN et OUT (entrée et sortie) pour vous
déplacer vers l’avant ou vers l’arrière parmi les menus ou les options.
4. Verbinden Sie bis zu 8 HDMI-Signalquellen mit den HDMI-Eingängen am
Gerät.
5. Verbinden Sie bis zu 8 HDMI-Anzeigegeräte mit den HDMI-Ausgängen
am Gerät.
6. Schließen Sie den Infrarot-Empfänger an die Infrarotbuchse an.
7. Verbinden Sie das mitgelieferte Netzkabel mit der Netzeingangsbuchse
am VM0808H und dem Stromnetz.
8. Schalten Sie den VM0808H sowie alle zur Installation gehörigen Geräte
ein.
Bedienung
C
Der VM0808H kann auf lokaler Ebene über die vorderseitigen
Drucktasten, über die Infrarot-Fernbedienung, von der Gegenstelle
über eine herkömmliche TCP/IP-Verbindung mithilfe einer grafischen
Benutzerschnittstelle im Web-Browser oder über eine serielle RS-232-
Steuereinheit bedient und konfiguriert werden.
Bedienung über das vorderseitige Bedienfeld
Einfache Navigation
Die Bedienung des VM0808H über das vorderseitige Display ist bequem
und einfach. Die Drucktasten und Regler funktionieren folgendermaßen:
•Drücken Sie die MENU-Drucktaste, um zwischen den verschiedenen
Menüoptionen umzuschalten: IP und Port festlegen, Seriellen Port
festlegen, Betriebsart, Sicherheit und Profil speichern/laden.
•Betätigen Sie die Drucktaste PROFILE, um zwischen den verschiedenen
in die Liste „Profilauswahl“ hinzugefügten Verbindungsprofilen
umzuschalten.
•Drücken Sie die Taste ESC, um eine Menüebene nach oben oder ins
Hauptmenü zu gelangen bzw. das Menü komplett zu schließen.
•Drücken Sie die Taste ENTER oder drehen Sie die Regler, um eine Option
auszuwählen oder eine Funktion zu bestätigen.
•Drehen Sie die Regler Tuner IN und OUT, um vor- bzw. rückwärts durch
die Menüs und Optionen zu blättern.
4. Conecte hasta 8 fuentes de señal HDMI a los puertos de entrada HDMI.
5. Conecte hasta 8 dispositivos de visualización HDMI a los puertos de
salida HDMI.
6. Conecte el receptor de infrarrojos al puerto para el receptor de infrarrojos
externo.
7. Conecte el cable de alimentación incluido a la entrada de alimentación
del VM0808H y luego a una toma eléctrica.
8. Encienda el VM0808H y todos los dispositivos que pertenecen a la
instalación.
Funcionamiento
C
El VM0808H se puede configurar y controlar localmente con los botones
del panel frontal y de forma remota a través del mando a distancia por
infrarrojos, de una conexión TCP/IP y una interfaz gráfica en su navegador
Web e incluso con una controladora serie RS-232.
Manejo desde el panel frontal
Navegación en general
El manejo del VM0808H desde el panel frontal es fácil y confortable. Tenga
en cuenta el siguiente procedimiento de control con los botones y diales del
panel frontal:
•Pulse el botón MENU para acceder a las opciones del menú: Establecer
IP y puerto, Establecer puerto serie, Funcionamiento, Seguridad y
Guardar/cargar perfil.
•Emplee el botón PROFILE para alternar entre los perfiles de conexión
añadidos a la lista “Seleccionar perfil”.
•Pulse el botón ESC para retroceder un nivel, regresar a la página principal
o salir.
•Pulse el botón ENTER o los diales de ajuste para seleccionar una opción
o confirmar un comando.
•Emplee los botones Tuner IN y OUT para avanzar o retroceder
cíclicamente por los menús o las opciones disponibles.
Before using the remote control feature you must first plug the IR External
Receiver into the rear of the VM0808H and place the receiver where the IR
signal can be reached.
Remote Operation
The VM0808H supports three levels of remote users with various
operational privileges, and up to 32 users can log into the GUI at one time.
Logging In
To access the Browser GUI, type the VM0808H’s IP address into the
address bar of any browser. If a Security Alert dialog box appears, accept
the certificate - it can be trusted. The welcome screen appears.
•The VM0808H’s default IP address is http://192.168.0.60.
•The default username and password are: administrator/password.
Note: The VM0808H username supports lower case letters only.
Connections Page
The VM0808H’s GUI main page is the Connections page. This displays all
active connections for control and configuration.
Fonctionnement de la télécommande
La télécommande infrarouge fournie avec votre VM0808H vous permet de
modifier le statut de port de sortie pour chaque périphérique d’affichage.
Vous pouvez utiliser la télécommande pour : changer la source d’entrée de
n’importe quel port d’affichage de sortie, allumer/éteindre individuellement
n’importe quel périphérique d’affichage de sortie, ou allumer/éteindre tous
les périphériques d’affichage de sortie simultanément.
Avant d’utiliser la télécommande, vous devez d’abord brancher le récepteur
infrarouge externe à l’arrière du VM0808H, et placer le récepteur à un
endroit où le signal infrarouge pourra l’atteindre.
Contrôle à distance
Le VM0808H admet trois niveaux d’utilisateurs distants bénéficiant de
privilèges d’utilisation différents et jusqu’à 32 utilisateurs peuvent se
connecter à l’interface utilisateur graphique en même temps.
Connexion
Pour accéder à l'interface utilisateur graphique dans un navigateur,
saisissez l'adresse IP du VM0808H dans la barre d'adresse de n'importe
quel navigateur. Si une boîte de dialogue d’alerte de sécurité apparaît,
acceptez le certificat : vous pouvez vous y fier. L’écran d’accueil apparaît :
•L'adresse IP par défaut du VM0808H est http://192.168.0.60.
•Le nom d’utilisateur et le mot de passe par défaut sont : administrator/
password.
Remarque : Le nom d’utilisateur du VM0808H ne peut contenir que des
minuscules.
Page Connexions
La page principale de l’interface utilisateur graphique du VM0808H est la
page Connexions. Elle présente toutes les connexions actives pouvant être
contrôlées et configurées.
Entfernte Bedienung
Dank der Fernbedienung können Sie die Signalausgabe der einzelnen
Anzeigegeräte steuern. Die Infrarot-Fernbedienung gehört bereits zum
Lieferumfang Ihres VM0808H.
Mit der Fernbedienung können Sie: das Signal einer Eingangsquelle auf
einen beliebigen Signalausgang (Port) legen, einzelne Anzeigegeräte ein-
und ausschalten oder alle Anzeigegeräte gleichzeitig ein- und ausschalten.
Bevor Sie die Fernbedienung einsetzen können, schließen Sie zuerst den
externen Infrarot-Empfänger auf der Rückseite des VM0808H an und stellen
diesen so auf, dass er das Infrarotsignal empfangen kann.
Bedienung von der Gegenstelle
Der VM0808H unterstützt drei Benutzerebenen für Anwender, die die
Verbindung von der Gegenstelle aus herstellen. Jede Benutzerebene besitzt
dabei unterschiedliche Zugriffsrechte. Es können sich maximal 32 Benutzer
gleichzeitig am Gerät anmelden.
Anmelden
Um die Benutzeroberfläche für den Web-Browser aufzurufen, geben Sie
die IP-Adresse des VM0808H in die Adressleiste eines beliebigen Web-
Browsers ein. Falls ein Sicherheitshinweis erscheint, akzeptieren Sie das
Zertifikat – es ist vertraulich. Daraufhin erscheint der Begrüßungsbildschirm
•Die voreingestellte IP-Adresse des VM0808H lautet http://192.168.0.60
•Der voreingestellte Benutzername und das voreingestellte Kennwort
lauten: administrator/password.
Hinweis: Der Benutzername des VM0808H darf nur Kleinbuchstaben
enthalten.
Seite „Verbindungen“
Die Hauptseite der VM0808H-Benutzeroberfläche ist die Seite
„Verbindungen“. Hier werden alle derzeit aktiven Verbindungen angezeigt
und können konfiguriert werden.
Manejo con el mando a distancia
Con el mando a distancia puede modificar el estado de los puertos de
salida para cada pantalla conectada. El mando a distancia viene incluido en
el paquete del VM0808H.
El mando a distancia se puede emplear para: cambiar la fuente de señal
asignada a cada puerto de salida, encender o apagar cualquier pantalla de
salida o encender/apagar todas las pantallas conectadas a la vez.
Antes de poder utilizar el mando a distancia tiene que conectar el receptor
por infrarrojos externo en el panel posterior del VM0808H y colocar el
receptor de manera que pueda recibir libremente las señales infrarrojas.
Manejo remoto
El VM0808H admite tres niveles de usuarios remotos con diferentes
privilegios de control. Hasta 32 usuarios simultáneos pueden iniciar una
sesión.
Iniciar la sesión
Para abrir la interfaz del usuario para navegador, escriba la dirección IP del
VM0808H en la barra de dirección de cualquier navegador Web. En caso
de que aparezca un cuadro de diálogo "Advertencia de seguridad", acepte
el certificado. Aparecerá la pantalla de bienvenida.
•La dirección IP predeterminada del VM0808H es http://192.168.0.60
•El nombre de usuario y la contraseña predeterminados son: administrator/
password.
Nota: El nombre de usuario del VM0808H debe contener letras
minúsculas solamente.
Página de conexiones
La página principal de la interfaz del usuario del VM0808H es la página de
conexiones. Aquí se muestran todas las conexiones activas para su control
y configuración.
B
C
Package Contents
1 VM0808H 8x8 HDMI Matrix Switch
1 Power Cord
1 IR Remote Control
1 IR Receiver
1 Mounting Kit
1 User Instructions
The following contains information that relates to China:
Online Registration
International:
http://support.aten.com
North America:
http://www.aten-usa.com/product_
registration
Technical Phone Support
International:
886-2-86926959
North America:
1-888-999-ATEN Ext: 4988
United Kingdom:
44-8-4481-58923
All information, documentation, and specifications contained
in this media are subject to change without prior notification
by the manufacturer. Please visit our website to find the
most up to date version.
Front View
Rack Mounting
Cable Connection
IR Remote Control
Logging In
Connections Page
Rear View
Hardware Installation
Operation
8 x 8 HDMI Matrix Switch
Quick Start Guide
VM0808H