ATEN CN-6000 User manual

User Manual
CN-6000
2004-10-29

Warning!
This is a class A product. In a domestic environment this
product may cause radio interference in which case the user
may be required to take adequate measures.
Thisequipmenthasbeentestedandfoundtocomplywiththe
limits for a Class A digital device, pursuant to Part 15 of the
FCC Rules. These limits are designed to provide reasonable
protection against harmful interference when the equipment
is operated in a commercial environment. This equipment
generates, uses and can radiate radio frequency energy and,
if not installed and used in accordance with the instruction
manual, may cause harmful interference to radio communi-
cations. Operation of this equipment in a residential area is
likelytocauseharmfulinterferenceinwhichcasetheuser will
be required to correct the interference at his own expense.
2004-10-29

Packing List
The complete CN-6000 package consists of:
M1 CN-6000 KVM on the NetControl Unit
M1 CS Custom KVM Cable Set
M1 Power Adapter
M1 Rack Mount Kit
M1SoftwareCD
1
M1 User Manual2
M1 Quick Start Guide
Check to make sure that all the components are present and that nothing was
damaged in shipping. If you encounter a problem, contact your dealer.
1An AP version of the CN-6000 software is located on the software CD.
2User Manuals in PDF format for both this version and the AP version of the
CN-6000 are located on the software CD.
Read this manual thoroughly and follow the installation and operation
procedures carefully to prevent any damage to the unit, and/or any of the
devices connected to it.
© Copyright 2003-2004 ATEN®International Co., Ltd.
Manual Part No. PAPE-0227-200
Printed in Taiwan 10/2004
All brand names and trademarks are the registered property of their respective owners.
2004-10-29
CN-6000 User Manual
iii

Contents
1. Introduction
Overview . . . . . . . . . . . . . . . . . . . . . . . . . . . . . . . . . 1
Features . . . . . . . . . . . . . . . . . . . . . . . . . . . . . . . . . . 3
System Requirements . . . . . . . . . . . . . . . . . . . . . . . . . . 4
2. Hardware Setup
Front View . . . . . . . . . . . . . . . . . . . . . . . . . . . . . . . . 5
Rear View . . . . . . . . . . . . . . . . . . . . . . . . . . . . . . . . 6
Installation . . . . . . . . . . . . . . . . . . . . . . . . . . . . . . . . 7
3. Getting Started
Logging In . . . . . . . . . . . . . . . . . . . . . . . . . . . . . . . . 9
Screen Elements . . . . . . . . . . . . . . . . . . . . . . . . . . . . 11
4. Administration
Introduction . . . . . . . . . . . . . . . . . . . . . . . . . . . . . . . 13
General . . . . . . . . . . . . . . . . . . . . . . . . . . . . . . . . . 14
Network . . . . . . . . . . . . . . . . . . . . . . . . . . . . . . . . 15
Access Port . . . . . . . . . . . . . . . . . . . . . . . . . . . . . 15
IP Address . . . . . . . . . . . . . . . . . . . . . . . . . . . . . 16
Log Server: . . . . . . . . . . . . . . . . . . . . . . . . . . . . . 16
Security . . . . . . . . . . . . . . . . . . . . . . . . . . . . . . . . . 17
Filtering . . . . . . . . . . . . . . . . . . . . . . . . . . . . . . 18
User Manager . . . . . . . . . . . . . . . . . . . . . . . . . . . . . . 20
Customization . . . . . . . . . . . . . . . . . . . . . . . . . . . . . 22
Firmware . . . . . . . . . . . . . . . . . . . . . . . . . . . . . . . . 23
5. The Windows Client
Starting Up . . . . . . . . . . . . . . . . . . . . . . . . . . . . . . . 25
Operation . . . . . . . . . . . . . . . . . . . . . . . . . . . . . . . . 27
OSD Control Panel . . . . . . . . . . . . . . . . . . . . . . . . 27
Keystrokes . . . . . . . . . . . . . . . . . . . . . . . . . . . . . 28
Mouse Synchronization . . . . . . . . . . . . . . . . . . . . . . 28
Hotkeys . . . . . . . . . . . . . . . . . . . . . . . . . . . . . . 30
Configuring the Hotkeys . . . . . . . . . . . . . . . . . . . . . . 32
Video Adjustment . . . . . . . . . . . . . . . . . . . . . . . . . 32
2004-10-29
CN-6000 User Manual
iv

6. The Java Client
Introduction . . . . . . . . . . . . . . . . . . . . . . . . . . . . . . . 35
Operation . . . . . . . . . . . . . . . . . . . . . . . . . . . . . . . . 36
The Toolbar . . . . . . . . . . . . . . . . . . . . . . . . . . . . 37
7. The Log File
The Log File Screen . . . . . . . . . . . . . . . . . . . . . . . . . . 39
Appendix
Specifications . . . . . . . . . . . . . . . . . . . . . . . . . . . . . . 41
Rack Mounting . . . . . . . . . . . . . . . . . . . . . . . . . . . . . 42
IP Address Determination . . . . . . . . . . . . . . . . . . . . . . . 43
Administrator Login Failure . . . . . . . . . . . . . . . . . . . . . . 46
Troubleshooting . . . . . . . . . . . . . . . . . . . . . . . . . . . . 47
General Operation . . . . . . . . . . . . . . . . . . . . . . . . . 47
The Windows Client . . . . . . . . . . . . . . . . . . . . . . . . 47
Sun Systems . . . . . . . . . . . . . . . . . . . . . . . . . . . . 48
The Java Client . . . . . . . . . . . . . . . . . . . . . . . . . . . 49
The Log Server . . . . . . . . . . . . . . . . . . . . . . . . . . . 49
Limited Warranty . . . . . . . . . . . . . . . . . . . . . . . . . 50
2004-10-29
CN-6000 User Manual
v

About This Manual
This User Manual is provided to help you get the most from your CN-6000
system. It covers all aspects of installation, configuration and operation. An
overview of the information found in the manual is provided below.
Overview
Chapter 1, Introduction, introduces you to the CN-6000 System. Its
purpose, features and benefits are described.
Chapter 2, Hardware Setup, presents the front and back panel components,
and explains how to connect the CN-6000 to your server or KVM switch and
the Internet.
Chapter 3, Getting Started, describes how to log into the CN-6000, and the
screen elements that appear on the opening page.
Chapter 4, The Administrator Utility, explains how to connect to the
CN-6000 as an administrator; and how to configure the CN-6000 for operation.
Chapter 5, The Windows Client, explains how to run the Windows Client
Software; how to connect to the CN-6000 and how to remotely control the
connected server (or servers via a KVM switch).
Chapter 6, The Java Client, explains how to run the Java Client Software;
how to connect to the CN-6000 and how to remotely control the connected
server (or servers via a KVM switch).
Chapter 7, The Log File, describes how to use the log file utility to view all
the events that take place on the CN-6000.
An Appendix provides specifications and other technical information
regarding the CN-6000.
2004-10-29
CN-6000 User Manual
vi

Conventions
This manual uses the following conventions:
Courier Indicates text that you should key in.
[ ] Indicates keys you should press. For example, [Enter] means to
press the Enter key. If keys need to be chorded, they appear
together in the same bracket with a plus sign between them:
[Ctrl+Alt].
1. Numbered lists represent procedures with sequential steps.
MBullet lists provide information, but do not involve sequential
steps.
> Indicates selecting an option on a menu. For example, Start > Run
means to open the Start menu, and then select Run.
Indicates critical information.
2004-10-29
CN-6000 User Manual
vii

Notes:
2004-10-29
CN-6000 User Manual
viii

Chapter 1.
Introduction
Overview
The CN-6000 is a control unit that allows operators to monitor and access their
computers from remote locations using a standard Internet browser. The
CN-6000 connects to the Internet, an Intranet, LAN, or WAN using industry
standard Category 5 cable, then uses KVM cable to connect to a local KVM
switch or server.
Because the CN-6000 uses TCP/IP for its communications protocol, the server
or KVM switch it is connected to can be accessed from any computer on the
Net - whether that computer is located down the hall, down the street, or
half-way around the world.
Operators at remote locations connect to the CN-6000 via its IP address. Once
a connection has been established and authorization granted, the remote
computer can exchange keyboard, video and mouse signals with the server (or
servers on a KVM switch installation), just as if they were physically present
and working on the equipment directly.
KVM Switch
2004-10-29
1

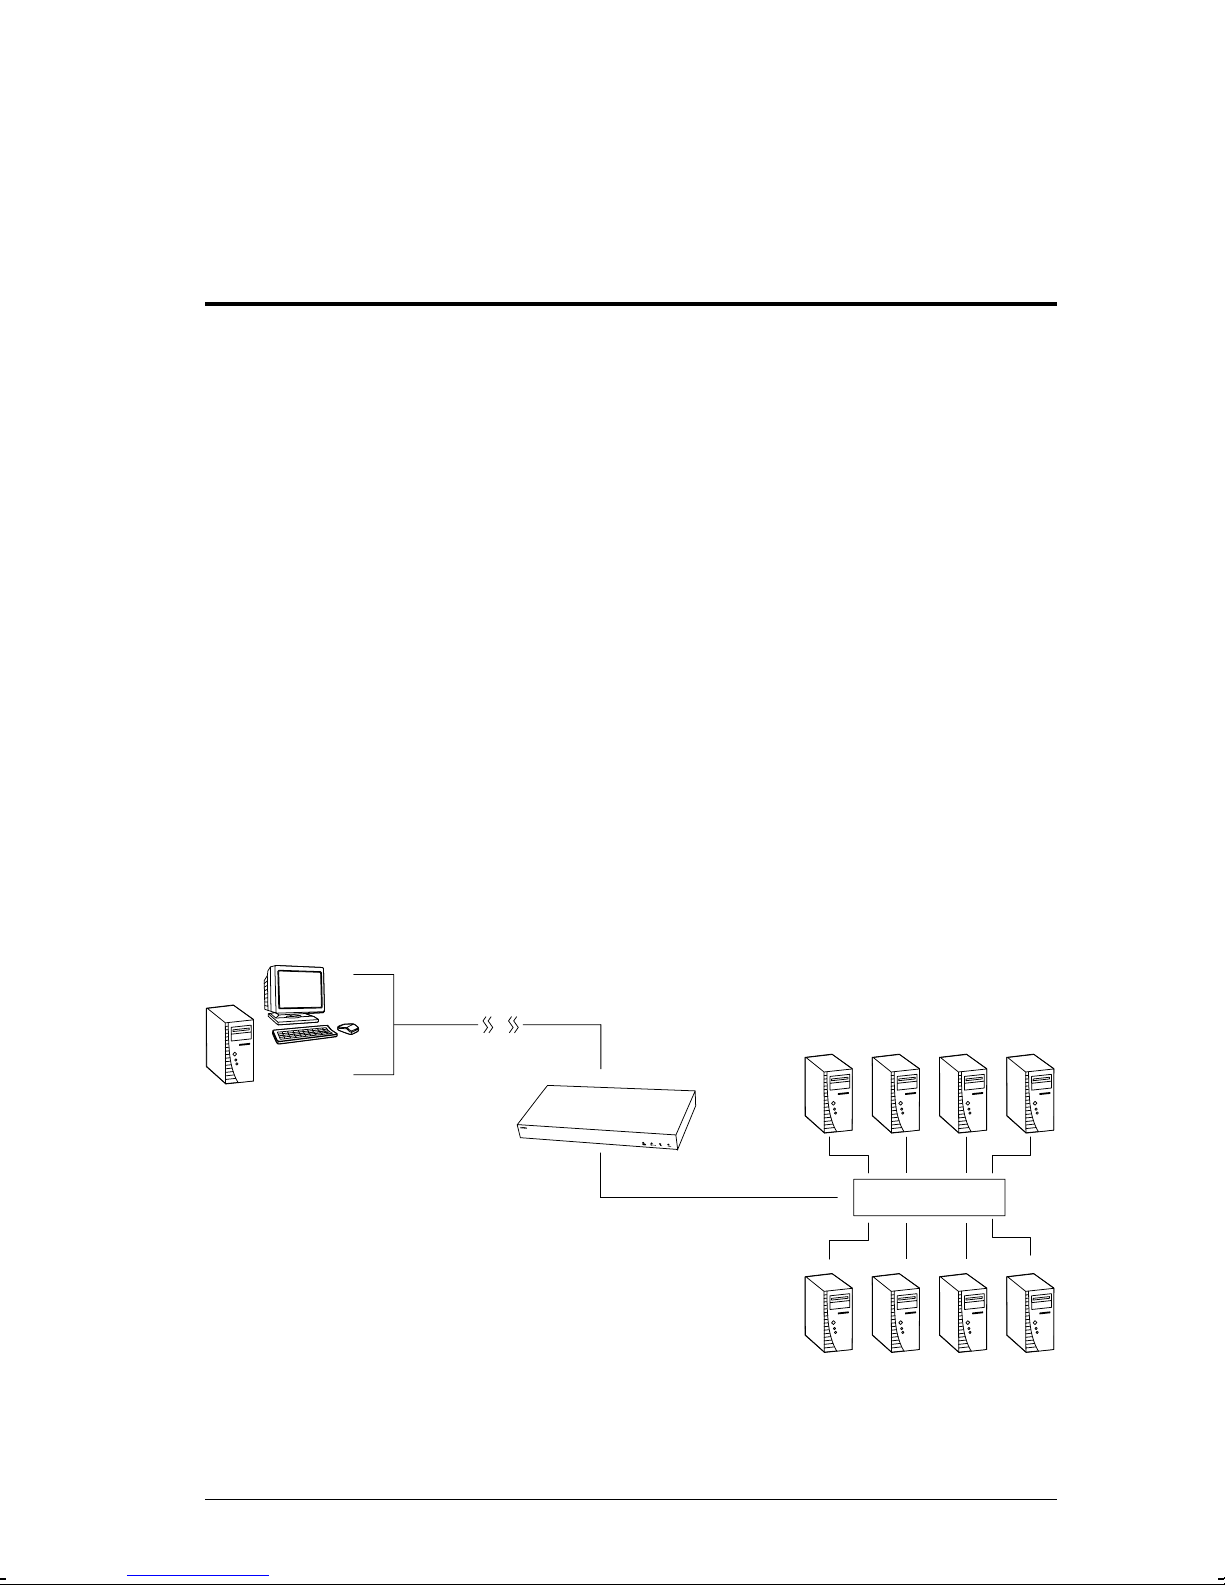
With its advanced security features, the CN-6000 is the fastest, most reliable,
most cost effective way to remotely access and manage widely distributed
multiple computer installations.
The Administrator and Client software included with the CN-6000 make it easy
to install, maintain, and operate. System administrators can handle a multitude
of tasks with ease - from installing and running GUI applications, to BIOS
level troubleshooting, routine monitoring, concurrent maintenance, system
administration, rebooting and even pre-booting functions.
The Administrator Utility is used to configure the system; limit access from
remote computers; manage users; and maintain the system with firmware and
software module updates.
Both a Windows GUI Client and a Java Client are provided for IP connection
and login from anywhere on the net. Inclusion of a Java-based client ensures
that the CN-6000 is platform independent, and is able to work with all
operating systems.
The client software allows access to, and control of, the connected servers.
Once an operator successfully connects and logs in, his screen displays what is
running on the remote unit attached to the CN-6000 (a KVM OSD display, a
server’s desktop, or a running program, for example) and he can control it from
his console just as if he were there.
The Log Server records all the events that take place on selected CN-6000 units
for the administrator to analyze.
Your CN-6000 investment is protected by a Firmware Upgrade Utility. You
can stay current with the latest functionality improvements by downloading
firmware update files from our website as they become available, and then
using the utility to quickly and conveniently perform the upgrade.
2004-10-29
CN-6000 User Manual
2

Features
MRemote access of KVM switches or servers via LAN, WAN, or the Internet;
control your installation from down the hall, down the street, or half-way
around the world
MSupports 10Base-T, 100Base-T, TCP/IP, HTTP
MAdvanced security features include password protection and advanced
encryption technologies
MHigh video resolution: up to 1280 x 1024 @ 75Hz; 1600 x 1200 @ 60Hz
MWindows GUI and Java-based client software; Java client works with all
operating systems
MUpgradeable firmware via RJ45 Ethernet connection
MSupports creation of up to 64 user accounts
2004-10-29
Introduction
3

System Requirements
MFor best results we recommend that the computers used to access the
CN-6000 control unit have at least a P III 1 GHz processor, and that the
screen resolution is set to 1024 x 768.
MBrowsers must support 128 bit data encryption.
MFor best results we recommend that the internet connection speed be at least
128 kbps.
MFor the Windows Client, you must have DirectX 7.0 or higher installed.
MFor the Java Client, you must have Sun’s Java 2 (1.4 or higher).
MFor the Log Server, you must have the Microsoft Jet OLEDB 4.0 or higher
driver installed.
MOnly non-interlaced video signals at the following resolutions and refresh
rates are supported:
Resolution Refresh Rates
640 x 480 60, 70, 75, 85, 90, 100, 120
720 x 400 70, 75
800 x 600 56, 60, 70, 75, 85, 90, 100, 120
1024 x 768 60, 70, 75, 85, 90, 100
1152 x 864 60, 70, 75, 85
1280 x 1024 60, 70, 75
1600 x 1200 60
2004-10-29
CN-6000 User Manual
4

Chapter 2.
Hardware Setup
Front View
1. Reset / Firmware
Upgrade Switch Pressing and holding this switch in while powering ON the
CN-6000 returns it to the factory default firmware level.
After the CN-6000 has been powered ON, pressing and
holding this switch in for more that two seconds performs a
system reset.
Note: This switch is recessed and must be pushed with a thin
object - such as the end of a paper clip, or a ballpoint pen.
2. Data Speed LED The LED lights GREEN to indicate 10 Mbps data
transmission speed.
The LED lights ORANGE to indicate 100 Mbps data
transmission speed.
3. Link LED Flashes GREEN to indicate that a Client program is
accessing the device.
4. Power LED Lights ORANGE when the CN-6000 is powered up and
ready to operate.
1234
2004-10-29
5

Rear View
1. KVM Port The KVM cable (supplied with this package) that links the
CN-6000 to your KVM switch or server plugs in here.
2. Local Console
Section The CN-6000 can be accessed via a local console as well
as over the Net. The cables for the local console (keyboard,
monitor, and mouse) plug in here. Each port is color coded
and marked with an appropriate icon to indicate itself.
3. RJ-45 Port The cable that connects the CN-6000 to the Internet server
plugs in here.
4. RS-232 Port The RS-232 port is made available for use with a Power
over the NETremote power management module.
Contact your dealer for details.
5. Power Jack The power adapter cable plugs in here.
1
3
2
45
2004-10-29
CN-6000 User Manual
6

Installation
To install the CN-6000, refer to the diagram below (the diagram numbers
correspond to the numbered steps), and do the following:
1. Plug the local administrator’s keyboard, mouse, and monitor into the unit’s
Console Ports.
2. Use the KVM cable provided with this package to connect the CN-6000’s
KVM Port, to the Keyboard, Video and Mouse ports of the server or KVM
switch that you are installing.
3. Plug the LAN or WAN cable into the CN-6000’s RJ-45 socket.
4. Power up your server or KVM installation.
5. Plug the power adapter cable into the CN-6000’s power jack, then plug the
power adapter into an AC power source.
1. Make sure that power to any devices you will be connecting up have
been turned off. You must unplug the power cords of any computers
that have the Keyboard Power On function.
2. Make sure that all devices on the installation are properly grounded.
1
5
3
KVM Switch
2
4
2004-10-29
Hardware Setup
7

Notes:
2004-10-29
CN-6000 User Manual
8

Chapter 3.
Getting Started
Logging In
CN-6000 is Internet browser based. To begin:
1. Open your browser and specify the IP address of the CN-6000 you want to
access in the browser’s URL location bar.
Note: 1. Get the IP address from the CN-6000 administrator.
2. If you are the administrator, and are logging in for the first time,
the various ways to determine the CN-6000’s IP address are
described in the Appendix on p. 43.
2. A Security Alert dialog box appears. Accept the certificate. The CN-6000
login page appears:
2004-10-29
9

3. Provide a valid Username and Password (set by the CN-6000
administrator), then Click Login to continue.
Note: 1. If you are the administrator, and are logging in for the first time,
use the default Username: administrator; and the default
Password: password. For security purposes, we strongly
recommend you remove these and give yourself a unique
Username and Password (see User Manager, p. 20).
2. If you supplied an invalid login, the authentication routine will
return this message: Invalid Username or Password. Please try
again. If you see this message, log in again being careful with the
Username and Password.
2004-10-29
CN-6000 User Manual
10

Screen Elements
The icons arranged horizontally across the top of the page are linked to the
administration utilities, which are used to configure the CN-6000. Your ability
to make configuration changes depends on the permissions associated with
your login information (see User Managment, p. 20). Use of the administrative
functions is discussed in Chapter 4.
The icons arranged vertically down the left side of the page are used to operate
the CN-6000. Their purpose is discussed in the table below:
Icon Purpose
Saves the changes you make in the administration dialog boxes
(see the Administration chapter), but does not implement the
changes. The changes only go into effect when you enable Reset
on exit (see p. 22 for details) and log out.
Allows users to connect to the CN-6000 using Windows software,
and to remotely control the connected server (or servers via a
KVM switch).
For platform independence, the Java client allows users that have
Java installed to connect to the CN-6000 and to remotely control
the connected server (or servers via a KVM switch).
If a Power over the NETmodule is connected to your
installation, clicking this icon will bring up its interface.
All the events that take place on the CN-6000 are recorded in a
log file (see Network p. 15 for details). Clicking this icon displays
the contents of the log file.
Click this icon to log out and end your CN-6000 session.
Note: It is important to log out when you end your session.
Otherwise, you must wait until the timout setting has expired
before the CN-6000 can be accessed again. (See Time out
control under the Customization dialog box, p. 22.)
2004-10-29
Getting Started
11

Notes:
2004-10-29
CN-6000 User Manual
12
Other manuals for CN-6000
4
Table of contents
Other ATEN Matrix Switcher manuals

ATEN
ATEN VM0808HA User manual

ATEN
ATEN VM0808T User manual

ATEN
ATEN VanCryst VP3520 User manual

ATEN
ATEN VanCryst VP3520 User manual

ATEN
ATEN VM3404H User manual

ATEN
ATEN VanCryst VM0404H User manual

ATEN
ATEN VM0404HB User manual

ATEN
ATEN VM0404 User manual

ATEN
ATEN VM1616T User manual

ATEN
ATEN VM5404H User manual

ATEN
ATEN VM1600 User manual

ATEN
ATEN VanCryst VM3200 User manual

ATEN
ATEN VP1420 User manual

ATEN
ATEN VM0808 User manual

ATEN
ATEN IOGear GWHDMS52 User manual

ATEN
ATEN VM3250 User manual

ATEN
ATEN VM0808H User manual

ATEN
ATEN VM6404HB User manual

ATEN
ATEN VanCryst VM0404H User manual

ATEN
ATEN VM1600 User manual