©2020 Atlas Sound LP. The Atlas “Circle A”, Soundolier, and Atlas Sound are trademarks of Atlas Sound L.P. IED is a Registered Trademark of Innovative Electronic Designs LLC. All rights reserved.
All other Trademarks are property of their respective owners. No endorsement is implied. Due to continual product development, specifications are subject to change without notice. ATS006279 RevA 10/20
AtlasIED.com
TELEPHONE: (800) 876-3333
SUPPORT@ATLASIED.COM
1601 JACK MCKAY BLVD.
ENNIS, TEXAS 75119 U.S.A.
Quick Start guide
DPA Amplifier Series
DPA Configurations
DPA amplifiers include a unique set of features and configurations. All DPA amplifiers are configured from the factory (out of the box) to operate
as 70V commercial power amplifiers. See default configurations for models below. Ethernet connectivity is not required for “default” operation of
a DPA amplifier. However, to change configurations and take full advantage of the DSP settings such as, EQ, High & Low-Cut filters, level control /
assignment and limiter settings, the DPA Control Panel must be accessed via the local network. External software is not required to operate the DPA
amplifier. The software is embedded in the amplifier as a WEB browser accessed GUI Control Panel.
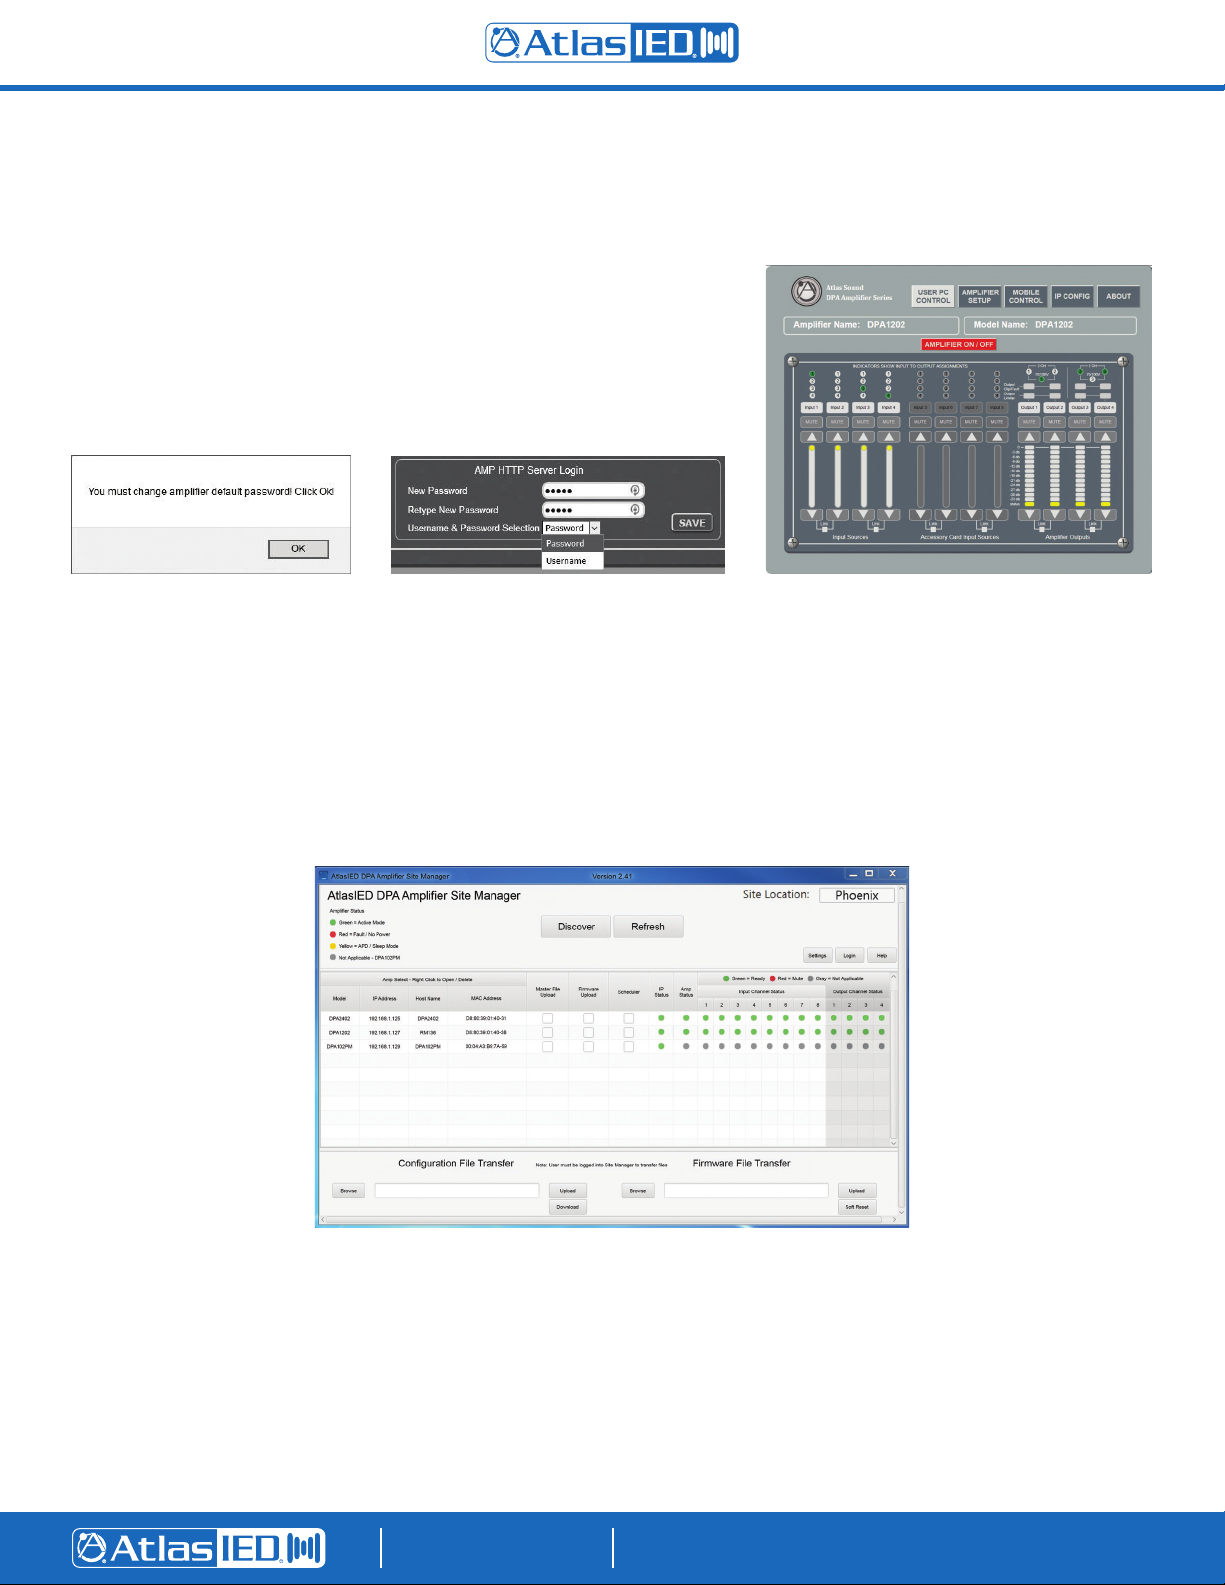
Accessing the DPA GUI Control Panel
The DPA amplifier GUI is accessible through your web browser. If the device IP address is known you may enter it in the address bar of your browser.
Example: http://10.0.0.123. If you are connected to a single DPA amplifier you may be able to locate the device by typing its model name into your
browser address bar. Additionally, you may download and install the AtlasIED DPA Site Manager application which can automatically locate connected
DPA amplifiers & provides additional management functions.
To access the DPA onboard control panel using the DPA model number on a Windows computer:
1. Connect the DPA amplifier to a router using a standard Ethernet cable. Make sure the router is in DHCP mode, the usual default mode.
2. Connect your computer to the same router via an Ethernet cable or Wi-Fi.
3. Open a Web browser. AtlasIED suggests using Google Chrome or Mozilla Firefox. Note: In some cases, your browser may direct you to a search
engine when you enter the DPA amplifier model number.
4. In the Web browser address bar, enter the amplifier’s model number and hit enter. Example: http://DPA602. It is not case sensitive, but the full
exact name is required.
Note: If your browser fails to open the DPA User PC Control Page, we suggest using the Site Manager Software.
5. If the DPA Amplifier’s IP address is already known, enter the IP address into the Web Browser to access the DPA GUI.
Example: http://192.168.1.110
Amplifier
Channel
Outputs Fuse
T4A L 250VAC
DPA602
Digital Power Amplifier
120/220-240V~50/60Hz 4A
1
Signal
Level
Channel
Limit/
Protect
4/8 Ω
Operating Mode
70/100V
Mono
2 3 4
Ch. 1/2 3/4
010 010 010 010
1 +1 –2 +2 –3 +3 –4 +4 –
CH 1 CH 2 CH 3 CH 4
70V/100V 70V/100V
DPA Amplifier
Accessory Card Slot
Class 3 Wiring
Ethernet Input
DSP and Amp
Configuration Interface
Web Browser Access
+10V C2
Control Ports
(See Manual)
C1 C3
C4
GND Input [1]
Input 1 & 3
70V / 100V
[4] Input[2] [3] G+
– –
G+
G+
– –
G+
Note: Amplifier Output Load Configuration Is Set VIA DSP GUI
Note: Amplifier Output
Load 4Ω/8Ω/70V/100V
Configuration Is
Set Using the Web
Browser GUI
For DPA Configuration Instructions
Visit www.AtlasIED.com/DPA
AtlasIED Digital IP Configuration
To Reset IP Configuration to Factory Default Settings:
• Disconnect the Power From the Device
• Wait 60 Seconds
• Connect PowerTo the Device
• Press and Hold Front Panel Power Switch Until LED Blinks 5Times Quickly
• IP Configuration is Reset to Factory Default Settings
• Factory Settings DHCP Enabled
• For Direct Connection to Amp: Refer to Installation Guide
CAUTION: For continued protection
against risk of fire, replace only with
same type fuse and rating.
ATTENTION: Utiliser un fusible de
rechange de meme type et calibre.
FUSE RATING: T4A L 250VAC
120/220-240V~50/60Hz 4A
Note: Out of the Box, the DPA Amplifier is Configured
as a 2 Channel Amplifier in 70 Volt Mode.
For Optimum Performance AtlasIED Recommends:
FAP Series In-Ceiling Speakers
SM Series Surface Mount Speakers
AP Series Paging Horns
Atlas Power Sequencers and Conditioners
500 Series Equipment Racks
LAR150 Rack LoadingTool
1601 Jack McKay Blvd. • Ennis,TX 75119
800.876.3333 • AtlasIED.com
WARNING: SHOCK HAZARD - DO NOT OPEN
AVIS: RISQUE DE CHOC ELÉCTRIQUE - NE PAS OUVRIR
WARNING:TO REDUCETHE RISK OF FIRE OR ELECTRIC SHOCK
DO NOT EXPOSETHIS EQUIPMENT TO RAIN OR MOISTURE
AVIS: NE PAS EXPOSER CE MATÉRIEL À LA PLUIE OU L’HUMIDITE
AFIN DE REDUIRE LE RISQUE D’INFLAMMATION OU DE CHOC ELÉCTRIQUE
DPA602 (300x2) - Silk Screen
ATS004680 RevI 4/16
1 Color: White
DPA404
Digital Power Amplifier
1
Signal
Level
Channel
Limit/
Protect
4/8Ω
70/100V
2 3 4
Ch. 1/2 3/4
010 010 010 010
Amplifier
Channel
Outputs
Class 3 Wiring
1 +1 –2 +2 –3 +3 –4 +4 –
CH 1 CH 2 CH 3 CH 4
DPA Amplifier
Accessory Card Slot
Ethernet
DSP and Amp
Configuration Interface
Web Browser Access
Input [1] [4] Input[2] [3] G+
– –
G+
G+
– –
G+
For DPA Configuration Instructions
Visit www.AtlasIED.com/DPA
+10V C2
Control Ports
(See Manual)
C1 C3
C4
GND
Factory Reset Instructions
To reset IP configuration to factory default settings:
• Disconnect the power from the device
• Wait 60 seconds
• Connect power to the device
• Press and hold front panel power switch until LED blinks 5 times quickly
• IP configuration is reset to factory default settings
• Factory settings DHCP enabled
• For direct connection to amp refer to installation guide
1601 Jack McKay Blvd. • Ennis,TX 75119
800.876.3333 • AtlasIED.com
WARNING: SHOCK HAZARD - DO NOT OPEN
AVIS: RISQUE DE CHOC ELÉCTRIQUE - NE PAS OUVRIR
WARNING:TO REDUCETHE RISK OF FIRE OR ELECTRIC SHOCK
DO NOT EXPOSETHIS EQUIPMENT TO RAIN OR MOISTURE
AVIS: NE PAS EXPOSER CE MATÉRIEL À LA PLUIE OU L’HUMIDITE
AFIN DE REDUIRE LE RISQUE D’INFLAMMATION OU DE CHOC ELÉCTRIQUE
Operating Mode
-
70V/100V
SPEAKERS
70V/100V
SPEAKERS
4 or 8 Ohm
SPEAKERS
4 or 8 Ohm
SPEAKERS
+-+-
+-+-+-+-
INPUTS
+-
+-
+-
+
CH 1 CH 2 CH 3 CH 4
1+ 1- 2+ 2- 3+ 3- 4+ 4-
CH 1 CH 2 CH 3 CH 4
1+ 1- 2+ 2- 3+ 3- 4+ 4-
CH 1 CH 2 CH 3 CH 4
1+ 1- 2+ 2- 3+ 3- 4+ 4-
Input (1) Input (4)(2) (3)
G+
-G+
-G+
-G+
-
CH 1 CH 2 CH 3 CH 4
INPUTS
Input (1) Input (4)(2) (3)
G+
-G+
-G+
-G+
-
CH 1 CH 2 CH 3 CH 4
INPUTS
Input (1) Input (4)(2) (3)
G+
-G+
-G+
-G+
-
CH 1 CH 2 CH 3 CH 4
+-
+
-
+
-+
-+
-
+
-
+
-+
-+
-
+-
OUTPUT CHANNEL CONFIGURATIONS - SET IN GUI
CONTROL PORT SETTINGS FOR REMOTE LEVEL Logging on to the DPA GUI Page
Note: Factory Default Out of Box Configuration is 4 Channel 70V/100V Mode
4 CHANNEL 70V/100V CONFIGURATION
OUTPUTS
SET IN GUI
SET IN GUI
DPA CONFIGURED IN 4 CHANNEL 4 or 8 Ohm MODE DPA SPLIT CONFIGURATION EXAMPLE
CH 1&2 4/8 Ohm, CH 3&4 70V/100V
OUTPUTS OUTPUTS
Factory Default
Note: Factory Default
The Control Ports are set
as follows: C1, C2, C3, and
C4, control CH1, CH2, CH3,
and CH4 respectively.
4 Individual 10K Linear Pots
can be used or, a single Pot
can be used as a Master.
WPD-VC10K
REMOTE LEVEL CONTROL ON CHANNEL 1, 2, 3 & 4
(FACTORY DEFAULT)
+10V C2
10VDC
P1
P3
P2
10K Ohm
LINEAR
TAPER
GND
RETURN
C1
P1
P2
P3
C3 GND
C4
Remote
Level #2
Remote
Level #3
Remote
Level #4
• Visit AtlasIED.com/SoftwareLibrary and download the “DPA Amplifier
Discovery Software” and the Installation Guide. Follow the guide.
• The DPA is shipped with IP set to DHCP
• Connect the DPA to the router, and the computer to the same router or LAN
• Open a web browser (Google Chrome or Mozilla Firefox)
• In the address bar type: http://dpa404 (or DPA model being used) and press Enter
• The DPA GUI web page will launch
• Use Network Settings to configure the DPA
• Once the IP address is obtained, enter the IP address in the address bar
DPA Discovery Software
Manual Method
For Unbalanced
Line Tie Low to G
WPD-VC10K
Note: Amplifier output load configuration is set via DSP GUI
CAUTION: For continued protection
against risk of fire, replace only with
same type fuse and rating.
ATTENTION: Utiliser un fusible de
rechange de meme type et calibre.
FUSE RATING:
DPA404 -T4A L 250VAC
110-120V/220-240V~50/60Hz 4A
DPA804 -T8A L 250VAC
110-120V/220-240V~50/60Hz 8A
Note: Out of the box, the DPA Amplifier
is configured in 70 Volt mode.
Certified to IEC 62368-1
Fuse
T4A L 250V
110-120V/220-240V~50/60Hz 4A
DPA404 (100x4) - Silk Screen
ATS004680 RevC 8/20
1 Color: White
Alternate configurations set in GUI:
• 4 channel, 4 or 8 Ohm
• 1 channel 70V / 100V and 2 channel 4 or 8 Ohm
• Also see top of amplifier for diagrams
DPA-602, 1202, 2402
Out of box Default = 2 CH 70V / 100V
Alternate configurations set in GUI:
• 4 channel, 4 or 8 Ohm
• 2 channel 70V / 100V and 2 channel 4 or 8 Ohm
• Also see top of amplifier for diagrams
DPA-404, 804
Out of box Default = 4 CH 70V / 100V