Atmos MISSION2 User manual
User Manual
© 2022 ATMOS Co., Ltd.. All rights reserved

MISSION2 User Manual
Table of Contents
1. Getting Started 3
1.1 Diving Safety 3
1.2 What's in the Box? 3
1.3 Removing / Replacing the Strap 4
1.4 Basic Operation 4
1.4.1 Button Functions: 4
1.4.2 Power On/Off 5
1.4.3 Charging 5
1.5 Pairing your Smartphone 5
1.6 Smart Notification 6
1.7 Firmware Update 7
1.8 Change & Customize Watch Face 7
1.8.1 Change Watch Face 7
1.8.2 Customize Watch Face with Photos 8
2. Widgets 8
2.1 Heart Rate Measurement 8
2.2 Sleep Monitoring 9
2.3 Steps & Calories 10
2.4 Outdoor 11
2.4.1 Sunrise & Sunset Time 11
2.4.2 Altitude Calibration 11
2.4.3 Compass 11
2.5 Tides 12
2.6 Weather 12
2.7 Stopwatch 13
2.8 Alarm Clock 13
3. Dive Mode 13
3.1 Water Auto-on 13
3.2 No Fly Time and Surface Interval 14
3.3 Scuba Mode 14
3.3.1 Scuba Preparation (Ready) Screen and Operation 14
3.3.2 Scuba Settings 15
3.3.3 Scuba Screen Layout and Alarms 16
3.3.4 Scuba Log 21
3.3.5 Dive Plan 22
3.3.6 Altitude 22
3.4 Freedive Mode 22
3.4.1 Freedive Preparation (Ready) Screen and Operation 22
3.4.2 Freedive Settings 23
3.4.3 Freedive Screen Layout and Alarms 24
3.5 Gauge Mode 26
3.5.1 Gauge Preparation (Ready) Screen and Operation 26
3.5.2 Gauge Settings 26
3.5.3 Gauge Screen Layout and Alarms 27
4. GPS 28
4.1 Dive GPS 28
4.1.1 Water Entry and Exit Records 28
4.1.2 Dive Site 29
4.2 Sport GPS 29
5. Activities 30
5.1 Running Mode 30
5.1.1 Run Preparation (Ready) Screen and Operation 30
5.1.2 Running Terminology: 31
5.1.3 Running Settings 31
5.1.4 Running Screen Layout and Alarms 32
5.2 Cycling (Bike) Mode 33
5.2.1 Cycling Preparation (Ready) Screen and Operation 33
5.2.2 Cycling Terminology: 34
5.2.3 Cycling Settings 35
5.2.4 Cycling Screen Layout and Alarms 36
1

MISSION2 User Manual
5.3 Swimming Mode 37
5.3.1 Swim Preparation Screen (Ready) and Operation 37
5.3.2 Swimming Terminology: 38
5.3.3 Swimming Settings 39
5.3.4 Swimming Screen Layout and Alarms 39
5.3.5 Inaccurate Information 40
5.4 Ski / Board 41
5.4.1 Ski / Board Preparation (Ready) Screen and Operation
41
5.4.2 Ski / Board Terminology: 41
5.4.3 Ski / Board Settings 41
5.4.4 Ski / Board Screen Layout and Alarms 42
6. Storage and Maintenance 44
7. Warranty Policy 44
8. Servicing 45
9. MISSION2 SPECS 45
10. CONTACT 47
2

MISSION2 User Manual
1. Getting Started
1.1 Diving Safety
●To ensure safe and proper use, please read the user
manual before using the MISSION2.
●This manual is based on use of the default settings of
the MISSION2.
●Do not use the MISSION2 as your only diving instrument.
A separate depth gauge should be standard equipment
for every diver and is highly recommended. All divers
should conduct detailed Pre-Dive Safety Checks to
include emergency planning, in case of any equipment
failure during your dive. Firmware updates will be
published on the ATMOS support site as they become
available. Check for updates before your dives.
●Diving involves risk. Only trained divers should use the
MISSION2. Dive computers are not a substitute for
training and good judgment. Do not use the MISSION2
on any dive beyond your certification and experience
level. Diving with an incorrect assessment of your ability
and physical condition can result in injury or even death.
●The MISSION2 is designed for recreational diving only.
Do not use the MISSION2 for commercial diving
applications.
●Divers should never ascend faster than 10m/min
(33ft/min). Ascending at a faster rate will negatively
impact your decompression physiology.
●Please follow the decompression stops advised by
MISSION2. Violation of these stops will increase the risk
of decompression sickness, which may lead to serious
injury or death.
●The MISSION2 is a precision instrument. Please take
care to protect your computer from damaging shocks or
chemical exposure. Store your MISSION2 out of direct
sunlight and avoid exposure to excessive heat. Never
leave the computer in a vehicle exposed to the sun.
●Do not wear your MISSION2 in hot springs, hot tubs, or
saunas.
●To avoid damage to buttons or sensors do not use high
pressure sprays. If the computer is excessively dirty,
soak it in fresh water and gently wipe away dirt. Do not
use detergents or solvents of any kind.
●Please use the Screen Guard included in the package.
Replacement screen guards may be purchased from an
authorized dealer.
●Do not share dive computers. Sharing should be
avoided as it may cause divers to misjudge dive
information and cause serious injury.
1.2 What's in the Box?
✲MISSION2 with Silicone Wrist Strap
✲Charging Cable
✲Screen Scratch Guard (2 pcs)
✲Watch Strap Pins (2 pcs)
✲Warranty Card
3

MISSION2 User Manual
1.3 Removing / Replacing the Strap
In addition to the included long wrist straps, shorter straps are
available for purchase through ATMOS and authorized ATMOS
dealers.
Remove the Strap:
1) Push the strap spring clip to the compressed position.
2) Lift out the strap.
3) Release the strap spring clip.
Install a Strap:
1) Insert the strap pin opposite the spring clip into the strap
mount hole.
2) Push the strap spring clip to the compressed position
and align the strap pin with the strap mount hole.
3) Release the strap spring clip.
4) Confirm the strap is securely locked in place and that
the spring clip has returned to its locked position.
1.4 Basic Operation
1.4.1 Button Functions:
Button functions may vary based on the type of button
press used. E.g., a quick press (“press”) versus a 3 second
press and hold (“hold”). Function may also vary based on
menu level.
Button A (press): Up / View Smart Notifications
Button A (hold): Toggle Bluetooth connection: On/Off
Button B (press): Activity Menu / Confirm
Button C (press): Down / Scroll Enabled Widgets
Button C (hold): Access Stopwatch
Button D (press): Return / MISSION2 SETTINGS Menu
Button E (press): Turn Backlight On/Off
Button E (hold): Power Off
4

MISSION2 User Manual
1.4.2 Power On/Off
Power On:
1) Press and hold button E for 2-3 seconds or connect the
MISSION2 to the charging cable.
Power Off:
1) While in Watch mode, press and hold button E for 2-3
seconds.
1.4.3 Charging
Under normal use, it takes approximately 2 hours to fully
charge the MISSION2. The screen will display 100% when
complete. If the battery is left uncharged for an extended
period (e.g, several weeks), the charging process may take
longer.
●Important:Please use a power adapter with safety
certification rated voltage of DC 5V/2A. Do not use
connectors or fast chargers that exceed the rated
voltage: DC 5V/2A. Use of such items may negatively
affect the lifespan of the battery or cause overheating.
●Make sure the charging points are clean and dry before
charging. Moisture and dirt can seriously affect
charging efficiency and may cause damage.
●Ensure the charging cable is properly connected when
charging. If the charging position is not aligned
correctly, it may result in an improper connection and
cause the watch to overheat.
●The lithium battery in the MISSION2 can be damaged if
it is fully discharged. The MISSION2 has an internal
protection mechanism which will disconnect the battery
before it is fully discharged. However, a small amount of
discharging will still occur over time. If it is left unused for
a long time without regular charging, the lithium battery
may become fully discharged and have a shorter
lifespan. To avoid battery damage,completely power
off the device when it is not in use. Fully charge the
battery at least every two months to maintain battery
health.
1.5 Pairing your Smartphone
Use the ATMOS App to sync the dive and activities log and
other watch data.
Device Compatibility: Some devices may not be compatible:
Currently known to have compatibility issues: Huawei/ Oppo/
Vivo/ Xiaomi
Download ATMOS App:
iOS:
https://Apple.co/31ouXTE
5

MISSION2 User Manual
Android:
http://bit.ly/2WAfdNL
Note: App version may vary depending on your mobile phone
and software version.
Pair Your Device
1) MISSION2:
a) Go to SETTINGS → CONNECT → CONNECT APP.
b) Select IOS or ANDROID as applicable and
change the setting to ON if necessary.
2) Mobile Phone / ATMOS APP
a) Ensure mobile phone BlueTooth connections are
enabled.
b) Open the ATMOS App. Create a new user
account if first time use.
c) Select Profile → Add device → Pair a new device.
d) Select the MISSION2 from the list of detected
devices. Enter the 5-digit Pin code shown on the
MISSION2 to complete the connection.
Note: If your device will not connect after pairing, please
restart the phone and mission2, then go through the
unpair steps and then pair again.
Quick Tip: The All Devices pairing screen can also be
accessed through the device icon located in the upper
left corner of the ATMOS APP Summary screen.
Unpair Your Device
1) MISSION2:
a) Go to SETTINGS →CONNECT → UNPAIR and
select: YES
2) ATMOS APP:
a) From the All Devices screen, swipe left on the
MISSION2 to Forget Device. Alternatively, select
the device and then select the Forget Device icon
at the bottom of the screen.
3) Mobile Phone:
a) Access Bluetooth devices → Select the MISSION2
→ Forget the device
Quick Tip: A long press of button A when in Watch
mode will toggle the BlueTooth connection on/off.
1.6 Smart Notification
The Smart Notification feature allows the MISSION2 to display
Short Message System (SMS) messages and phone calls
received on the paired smartphone (iOS 10 or higher, Android).
6

MISSION2 User Manual
Enable Notifications:
1) Go to SETTINGS → CONNECT → NOTIFICATION.
2) Select the type of notifications to be received (All / Call
Only)
View Notifications Received:
1) While on Watch mode, press button A to view
notifications.
2) Press buttons A or C to scroll up or down through
existing notifications.
3) Press button B to select a message.
Note: All notifications are cleared after a watch restart.
1.7 Firmware Update
ATMOS regularly releases new firmware including new
features, bug fixes, and other improvements. To take
advantage of these items, please keep the firmware of your
MISSION2 updated. Firmware updates require a USB
connection to a PC or Mac.
Check Firmware Version:
1) Go to SETTINGS → SYSTEM → ABOUT. The Model,
Serial Number, and Firmware version will be displayed
Update Firmware
1) Using a PC/MAC, go to the ATMOS website:
https://www.atmos.App/ and download the latest
MISSION2 firmware (Support > Firmware Update).
2) Place the MISSION2 into firmware update mode: Go to
SETTINGS → UPDATE.
3) Connect the MISSION2 to the PC/Mac using the USB
charging cable. The MISSION2 should be detected as a
new USB drive.
4) Open the downloaded firmware zip file and drag (or
copy) the firmware update .
bin file
into the FIRMWARE
folder of the MISSION2.
5) After the .bin file has been copied to the FIRMWARE
folder, disconnect the MISSION2 charging cable. The
MISSION2 will automatically start the update process.
Please let the process complete before once again
using the MISSION2.
1.8 Change & Customize Watch Face
The MISSION2 offers a variety of custom watch face options
including Classic Analog, Digital, and more!
1.8.1 Change Watch Face
Change Watch Face via MISSION2
1) Go to SETTINGS → WATCH FACE.
2) Press button A or C to scroll up or down through the
available watch face styles.
7
MISSION2 User Manual
3) Press button B to select the desired face.
Change Watch Face via the ATMOS App
1) While paired with the MISSION2, go to the All Devices
screen in the ATMOS App and select the MISSION2.
2) Select Watch Face from the list of Your Device options,
select the desired watch face style.
3) Select
Set as Current
.
1.8.2 Customize Watch Face with Photos
1) Using the ATMOS App (while paired with the MISSION2),
go to the All Devices screen and select the MISSION2.
2) Select Watch Face from the list of Your Device options.
3) Select one of the Photo watch face styles (e.g, Photo
Classic Analog, Photo Classic Digital).
4) In the Background Photo section, select Select Photo.
5) Browse to and select the desired personal photo. The
MISSION2 will automatically downsize the image if
necessary.
2. Widgets
The MISSION2 offers a variety of Sports and Health-related
Widgets!
●Heart Rate Measurement
○Displays current heart rate and trend
●Sleep Monitoring
○Displays data on sleep quality
●Steps & Calories
○Displays data on steps taken and calories burned
●Outdoor
○Displays a compass face as well as Sunrise &
Sunset times and Altitude information
●Tide
○Displays tide information (local or custom
location)
●Weather
○Displays local weather data
●Last Dive
○Displays data on the last dive
●Activity
○Displays information on activity time
Enable a Widget:
1) Go to SETTINGS → WIDGET →
Select the desired Widget
→ ON.
View Widget Information:
1) While on the main Watch screen, press button C to scroll
through enabled Widgets.
Note: some widgets such as Tides and Weather require a
connection to the ATMOS App in order to update.
2.1 Heart Rate Measurement
The MISSION2’s optical heart rate sensor measures the heart rate
using the LED optical sensor on the device. The sensor detects
changes in blood vessel blood flow corresponding to heart pulses.
Use of the heart rate function may impact battery life.
8

MISSION2 User Manual
Note: The MISSION2 is not a medical grade device. The heart
rate data should not be used as a reference for medical
diagnosis.
Enable Heart Rate:
1) Go to SETTINGS → WIDGET → HEART RATE: ON.
Check Heart Rate:
1) While on the Watch main screen, press button C to scroll
to the Heart Rate widget information.
✻To ensure heart rate accuracy, the MISSION2 should be
worn snuggly and should not be worn on the wrist joint
to avoid uneven reflection of the sensor’s light beam.
✻When using the heart rate widget, wearing the watch
over objects such as long-sleeved clothing or winter
clothing is not recommended.
✻The heart rate may vary greatly due to light wavelength
absorption underwater, which in turn affects the optical
detection. Consequently, the function is disabled by
default during dive or swimming activities. It can be
enabled under those modes’ SETTINGS.
Causes of abnormal heart rate readings:
●The heart rate sensor should be kept clean.
●Avoid applying sunscreen or skin lotion in the area of the
watch as these may result in an uneven reflection of
light.
●Arm hair, tattoos or skin tone, arm movement,
subcutaneous blood flow, etc. may all affect heart rate
measurements.
●Cold weather may cause lower blood circulation and
impact readings. Keeping hands and feet warm will
improve the occurrence of the heart rate.
●Individuals with poor blood circulation may receive
inconsistent readings.
●Avoid scratching or otherwise damaging the heart rate
sensor on the back of the MISSION2
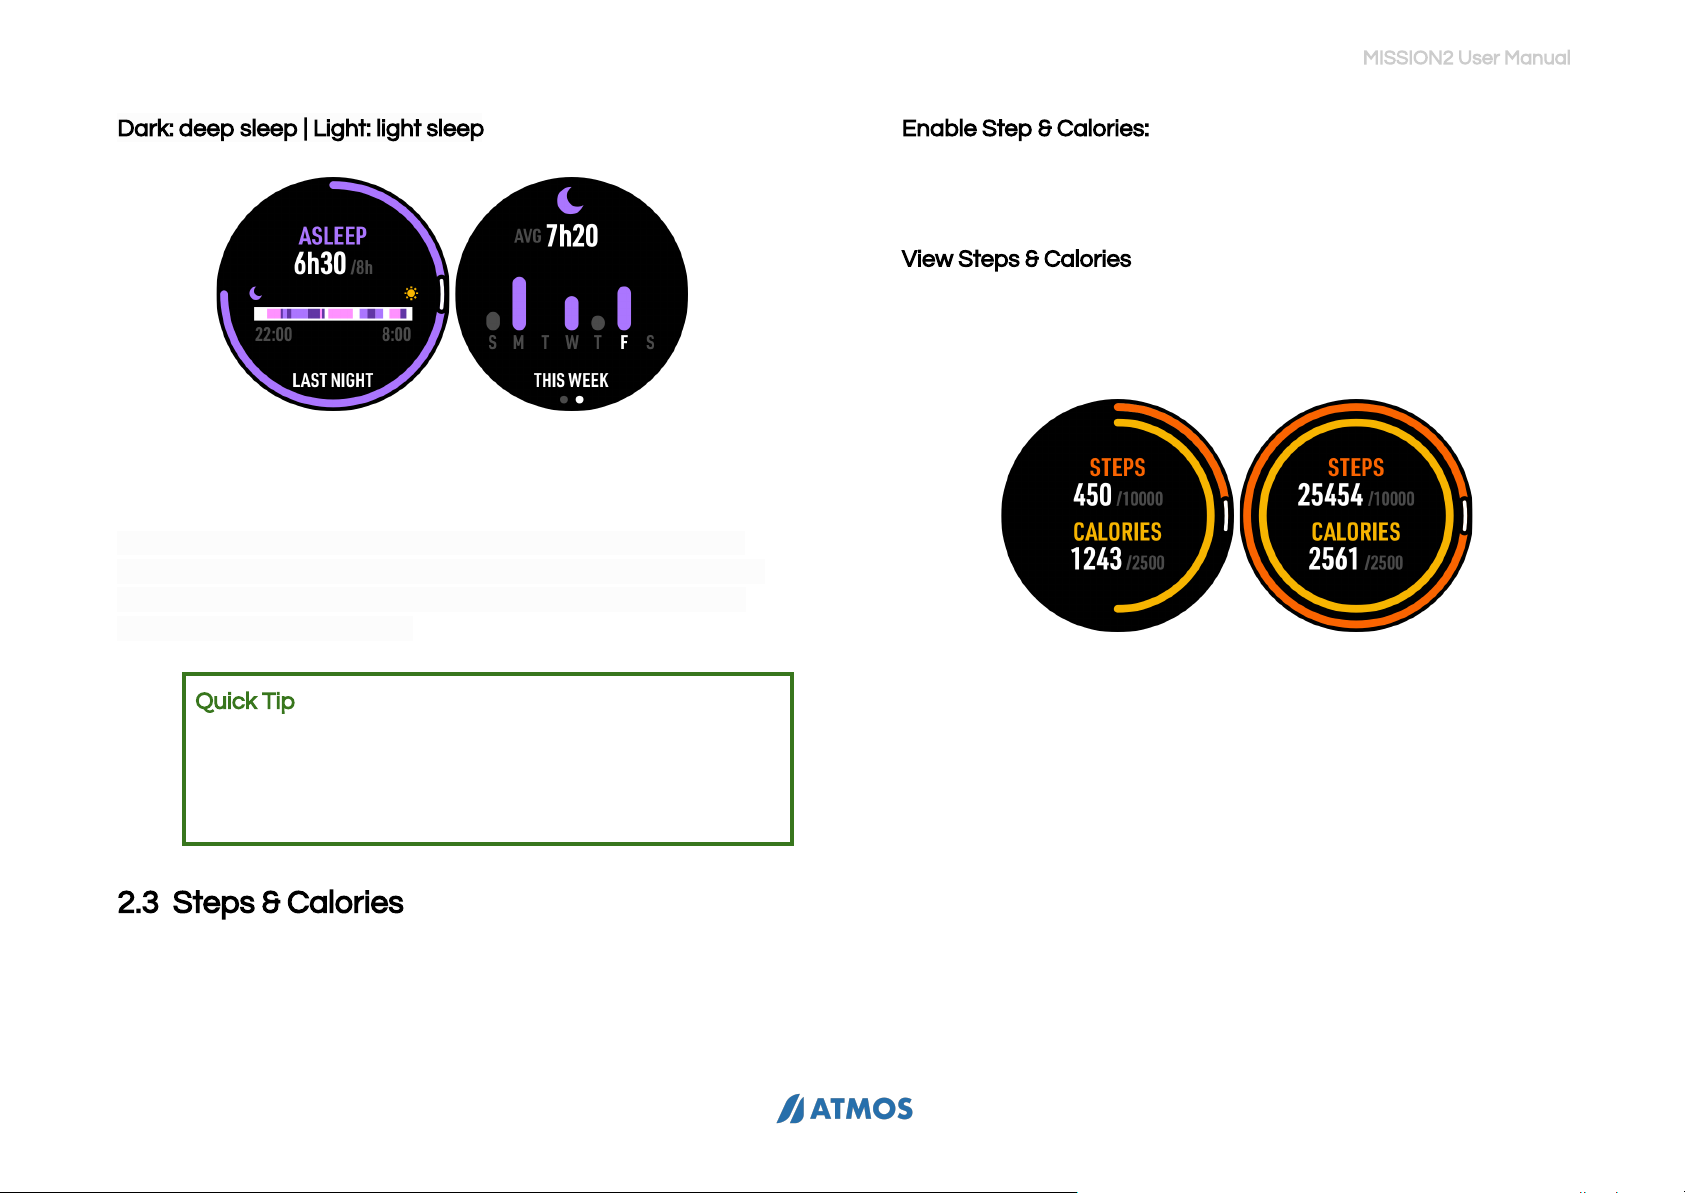
2.2 Sleep Monitoring
The sleep monitoring widget should only be used for night time
sleep. Naps and other short-term sleep cannot be monitored
accurately.
Enable Sleep Monitoring Widget:
1) Go to SETTINGS → WIDGET→ SLEEP: ON
2) Set the desired Sleep Start and End period.
View Sleep Monitoring:
1) While on the Watch main screen, press button C to scroll
to the Sleep Monitoring widget.
2) While on the Sleep Monitoring screen, press button B to
view weekly sleep data.
9
MISSION2 User Manual
Dark: deep sleep | Light: light sleep
The outer band denotes actual sleep time relative to targeted.
If the targeted sleep is obtained, the circle will be complete.
Note: the MISSION2 sleep monitoring algorithm is based on
device movement during the set sleep interval. If the device is
not worn during the set period, the lack of movement will be
assumed to be “sleep” time.
Quick Tip: To help ensure the best quality of sleep
overnight, it is recommended that the Backlight Wrist
Activation be temporarily disabled. Otherwise,
movement may cause the backlight light to come on
and disturb sleep.
2.3 Steps & Calories
The MISSION2 will count your daily steps and calculate calories
burned.
Enable Step & Calories:
1) Go to SETTINGS → WIDGET → STEP & CAL: ON
2) Enter the targeted number of Steps and Calories..
View Steps & Calories:
1) While on the Watch screen, press button C to scroll to
the Step and Calories widget.
In the figure above, the orange outer circle is the step
counter, and the yellow inner circle represents calories
burned.
The increase in steps and calorie consumption will
gradually form a circle. When your set target values are
reached, it will be a complete circle.
2) While on the Step & Cal screen, press button B to display
the weekly calories and steps averages. The target
value will be displayed on the middle line.
10
MISSION2 User Manual
Note: Abnormal step counts may be caused by vibrations or
regular/repetitive arm movements while walking.
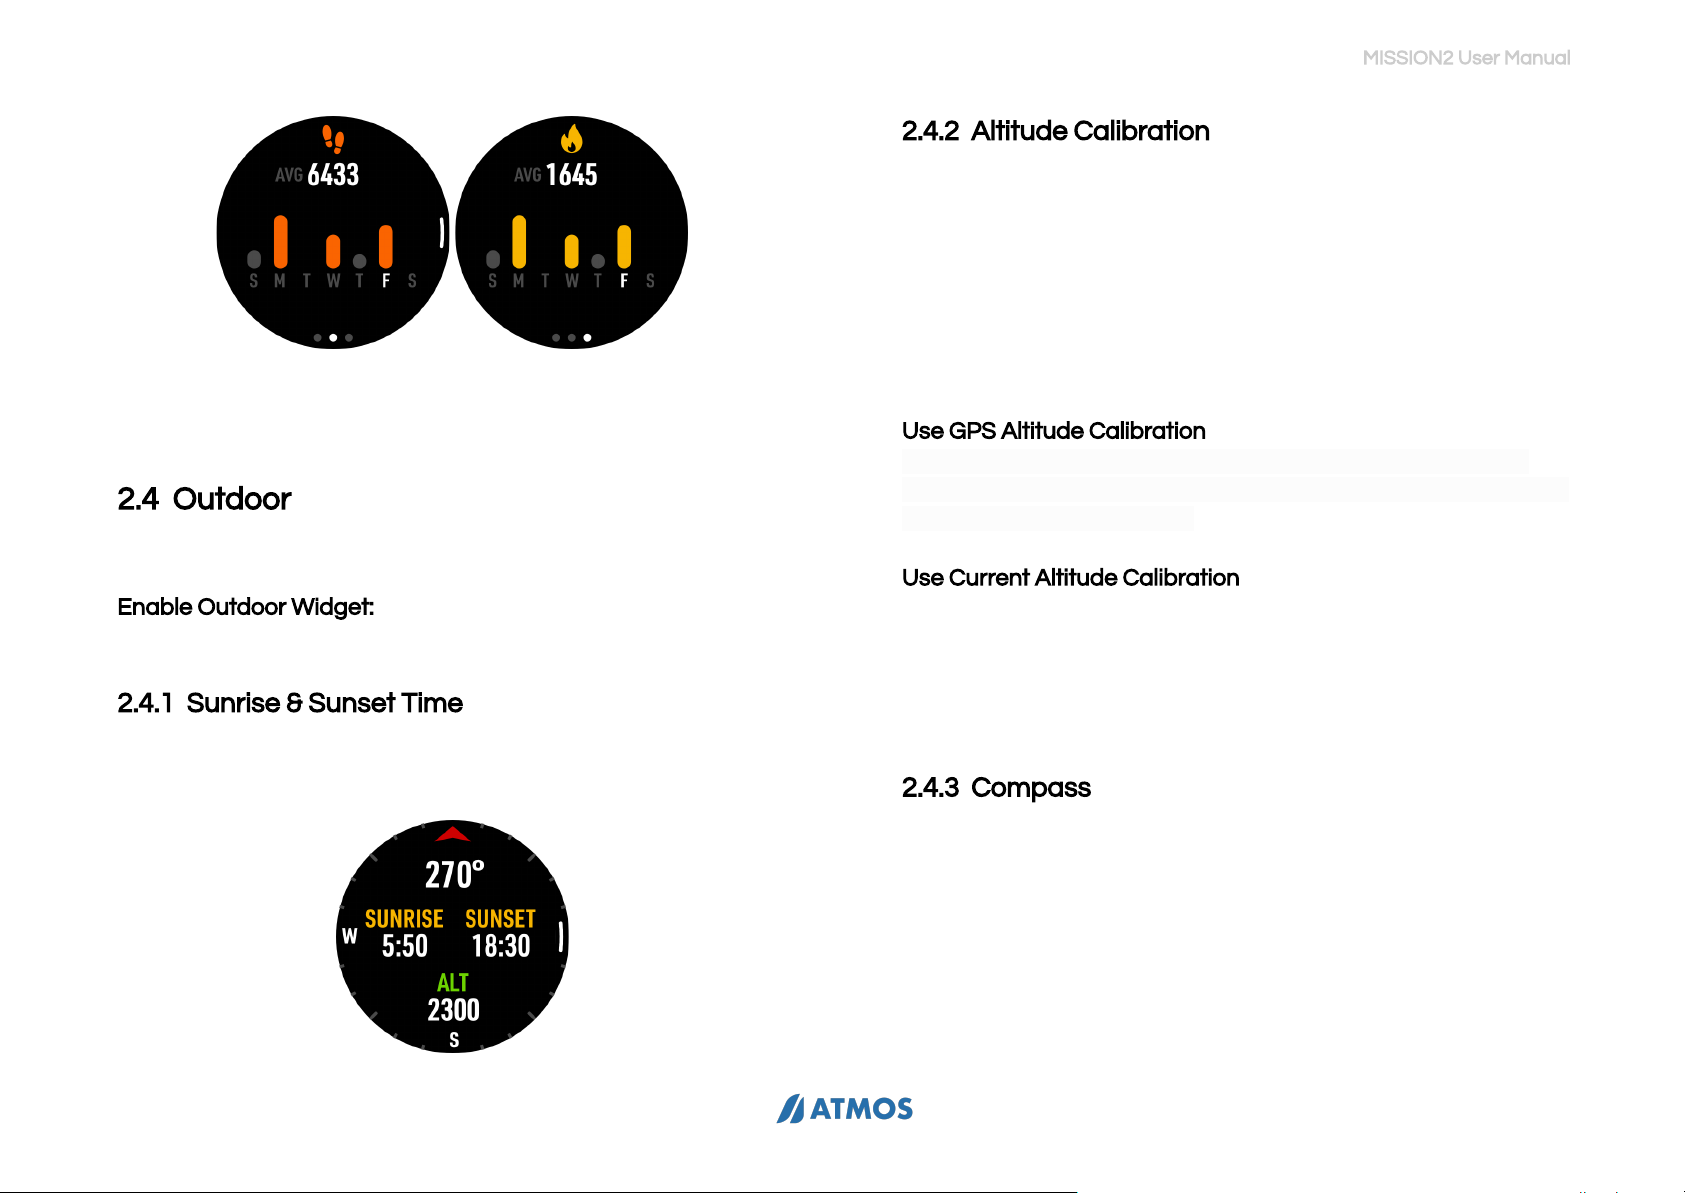
2.4 Outdoor
The MISSION2’s Outdoor Widget will display sunrise and
sunset times, altitude, as well as provide compass functionality.
Enable Outdoor Widget:
1) Go to SETTINGS → WIDGET → OUTDOOR: ON
2.4.1 Sunrise & Sunset Time
The sunrise and sunset times will only be displayed if GPS
signals are successfully acquired.
2.4.2 Altitude Calibration
Changes in weather such as high and low pressure areas will
affect the reading of altitude and air pressure. When the
weather changes frequently, it is recommended that the
correct altitude reference value be set if known. If the weather
is stable, no reference value setting is required.
While on the Outdoor widget screen, press button B to display
the altitude calibration options.
Use GPS Altitude Calibration
Altitude data will be received during GPS positioning. When
there is a large altitude deviation or offset, use this option to set
the GPS calibrated altitude.
Use Current Altitude Calibration
When there is a large altitude deviation or offset, input the
known altitude of the location, such as the altitude displayed at
a trailhead, as the reference value to calibrate the current
altitude.
2.4.3 Compass
The MISSION2’s compass is magnetically oriented and is
subject to interference from nearby electric fields, magnets,
and metal objects. Please avoid wearing another computer,
compass, or metal objects next to the MISSION2. Calibration is
recommended before every dive to ensure the best
experience.
11

MISSION2 User Manual
Compass Calibration
When a compass calibration is necessary, the MISSION2 will
automatically display an infinity “∞” pattern. Move the device
in the same pattern to calibrate the compass. Once calibration
is complete, the compass bearing and “OK” will be displayed.
2.5 Tides
Tidal information is provided for general reference only. The actual
tide levels may be significantly affected by local weather conditions
including atmospheric pressure, wind direction, and rain. Users
should assess local conditions and use prudent judgment on each
dive. Diving with an incorrect assessment of your ability and local
conditions can result in injury or even death.
Enable Tides Widget:
1) Mobile Phone / ATMOS APP:
a) Ensure the mobile phone’s GPS is turned on and
that the ATMOS App has permissions to obtain
location information.
b) Open the ATMOS App and connect to the
MISSION2.
c) On the App’s Your Device screen, select Tides
d) Use the current location acquired through the
mobile phone GPS, or add a new location (+).
2) MISSION2:
a) Go to SETTINGS → WIDGET → TIDES: ON
b) From the Watch screen, press button C to scroll
to the Tides widget.
2.6 Weather
Weather information of the current location can be obtained
when MISSION2 is connected to the ATMOS App.
Enable / View Weather Widget:
1) MISSION2:
a) Go to SETTINGS → WIDGET → WEATHER: ON
b) From the Watch screen, press button C to scroll
to the weather widget. Note: weather data will not
12

MISSION2 User Manual
appear until the device has been paired and
synced with the ATMOS App.
2) Mobile Device / ATMOS App:
a) Ensure the mobile phone has GPS turned on and
that the ATMOS App is allowed to obtain location
information.
b) Open the ATMOS App and pair the MISSION2.
c) On the App’s Your Device screen, select the
Weather icon to sync weather information to the
MISSION2.
2.7 Stopwatch
While in Watch mode, press and hold button C for 2-3 seconds.
Press button A: Start
Press button B: Mark lap/current time (4 sets can be displayed)
Press button A: Stop
Press button A (when stopped): Reset
Press and hold button D for 2 seconds: Exit
2.8 Alarm Clock
The MISSION2 provides three setable of clock alarms.
1) Go to SETTINGS → ALARM
2) Set the desired alarm time(s)
3. Dive Mode
3.1 Water Auto-on
The MISSION2’s Dive Mode Auto-on feature will automatically
start the dive activity and change the display to the default
dive mode screen. Note: Auto-on is based on a change in
pressure at the initial descent and not simply submersion in
water. Even though Auto-on may be enabled, it is always a best
practice to confirm dive settings prior to each descent and that
the dive activity starts appropriately.
The default dive mode for auto-on is Scuba. The default mode
can be changed in the MISSION2’s SETTINGS. The set default
is shown by the icon at the bottom of the screen in Watch
mode. When the default dive mode is set to OFF or when the
dive mode icon display has been disabled in Watch Face
settings (ATMOS App), no icon will be shown on the screen.
13

MISSION2 User Manual
3.2 No Fly Time and Surface Interval
Upper-left: No fly time icon (red airplane icon with diagonal
slash). This icon displays for 24hrs from the last dive end. When
Freediving, the No fly time icon will be displayed when freedives
are over 40m.
Because of residual nitrogen in the body, general dive
guidance recommends waiting 24 hours from the last dive
before flying or otherwise ascending to altitudes above 300m /
1,000ft. The MISSION2 utilizes this guidance. However, your
actual dive profiles (e.g., single dive vs. repetitive dives, shallow
vs. deep) may affect the interval actually needed. Please
consult medical resources if flying in under 24 hours or if an
extensive amount of diving has been performed in a short
period.
Upper-right: Surface Interval (SI) icon.
The Surface Interval counter starts from the moment your dive
ends.
3.3 Scuba Mode
3.3.1 Scuba Preparation (Ready) Screen and
Operation
1) From the main Watch screen, enter the activity Ready
mode by pressing button B and then selecting the
activity type.
The GPS icon will blink until the GPS position has been
acquired. After the signal is acquired, the icon will turn
green. Depending on the location and amount of
obstructions, a signal lock may take several seconds.
2) Press button C to enter the dive mode SETTINGS. As a
best practice, it is recommended that all critical dive
settings such as Air Mix, PPo2, and Conservatism be
verified before each dive. Wrist HR (Heart Rate) is
disabled by default in water-related modes. However, it
can be enabled prior to the activity start.
3) Press button B button to start the activity.
14

MISSION2 User Manual
3.3.2 Scuba Settings
While on the activity Ready screen, press button C to enter the
mode SETTINGS.
WARNING!
Do not change any settings unless you understand the impact
of those changes. Changes to items such as PPo2 and
Conservatism Gradient Factor (GF) will affect decompression
calculations and can impact your safety. Always check the
Air/Nitrox percentage and MOD before each dive. Incorrect
settings may increase the risk of central nervous system (CNS)
O2 toxicity. Do not exceed MOD!
Adjustable Functions:
Dive Plan
The Dive Plan function is used to estimate the
no-decompression limit (NDL) for diving at the
planned depth for a specific time in the future
See 3.2.5 Dive Plan
Alarm (Dive)
Time Alarm: Time Alarm display notifies the
diver when the set dive time has been reached.
(1 set)
Depth Alarm: Depth Alarm notifies the diver
when the set depth has been reached.
(1 set)
SPG Alarm
SPG Alarm provides alarm reminders to check
the SPG air pressure after set amount(s) of time
have elapsed. (10 sets)
PPo2
Oxygen Partial Pressure: Adjustable between
1.2 - 1.6. (default: 1.4). This setting affects
Maximum Operation Depth (MOD).
Conservatism
HIGH (GF 35/75)
MEDIUM (GF 40/85)
LOW (GF 45/95)
CUSTOM (Adjustable GF - default 40/85)
Note: The CUSTOM function is for experienced
divers who have a sound understanding of
gradient factors.
Dive Site
See 4.1.2 Dive Site
Safety Stop
On/Off.
Set the desired Safety Time amount of time
(default - 3Min)
SI (Surface
Interval)
Reminder
On/Off.
Set Surface Interval time reminder.
After returning to the surface, a notification will
be sent when the set amount of Surface
Interval time has been reached
Water Type
Depth pressure correction based on
Freshwater / Seawater.
The density of salt water is about 3% higher
than that of fresh water. For the same pressure
value, the depth of fresh water will be
approximately 3 ft deeper.
Air / Nitrox
Setting
AIR / NITROX.
AIR: 21%
15
MISSION2 User Manual
NITROX - adjustable 22-40%.
Tank Volume
Set the dive tank volume and initial pressure
(bar/psi). At the dive conclusion, a prompt to
enter residual pressure will appear.
Entered values are used to determine the
Surface Air Consumption (SAC) rate.
Note: volume and beginning/ending pressures
may also be entered after the dive using the
ATMOS App.
Wrist HR /
Optical Heart
Rate
The heart rate function is disabled by default
for diving modes, but can be enabled
according to personal needs.
Backlight
Adjust the backlight status (Always On),
brightness level and wrist activation.
Reset
Nitrogen
Reset the residual nitrogen accumulated by
the computer to zero.
Warning: Do not reset this setting unless you
fully understand the corresponding effects on
NDL and DECO requirements!
Reset Setting
Restore activity mode settings to factory
defaults
3.3.3 Scuba Screen Layout and Alarms
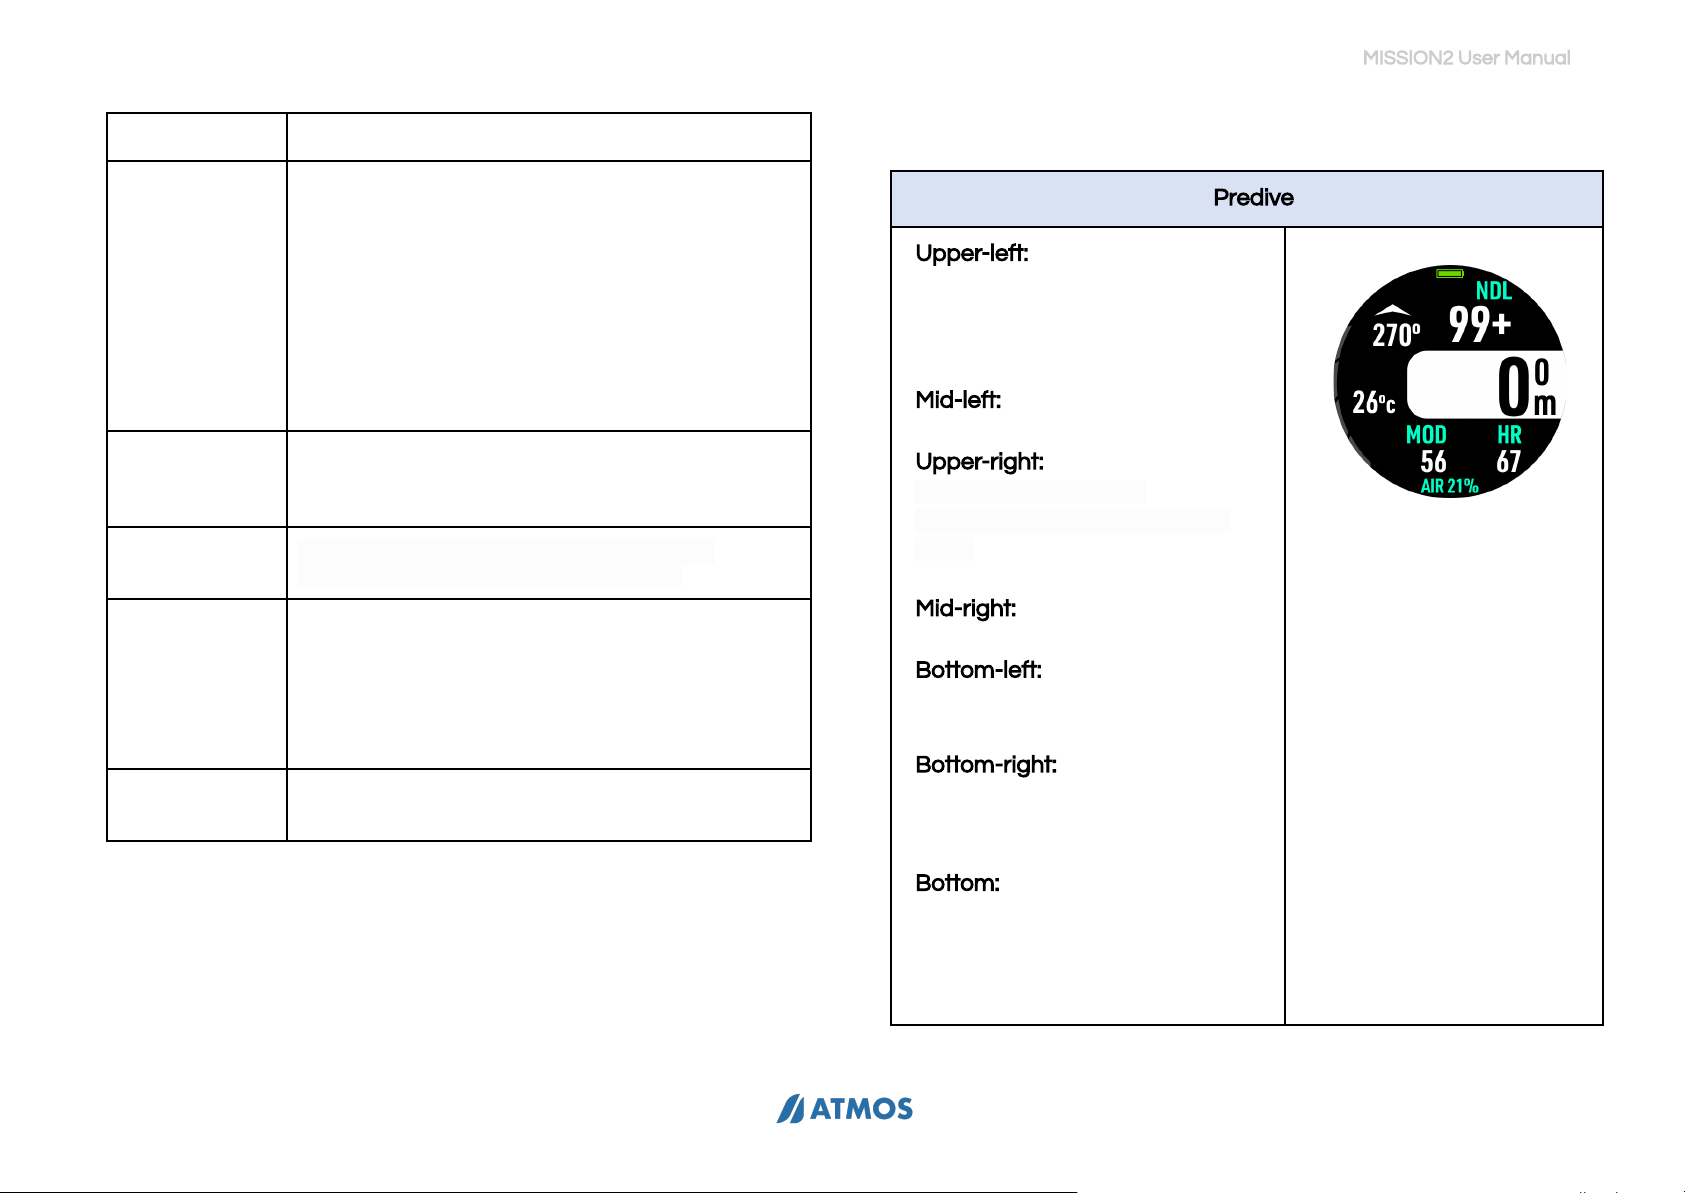
Predive
Upper-left: Compass heading
(the infinity symbol will be
displayed when the compass
needs to be calibrated)
Mid-left: Water temperature
Upper-right: NDL (No
Decompression Limit)
(99+ will be displayed if NDL is
greater than 99 minutes)
Mid-right: Current depth
Bottom-left: MOD - (Maximum
Operation Depth)
Bottom-right: Heart Rate (HR) *if
enabled; disabled by default in
dive modes
Bottom: Air Mix.
21% = AIR / 22-40% = NITROX
16
MISSION2 User Manual
During the Dive
Upper-left: Compass heading
Left: Ascent rate bar (m/ft)
Left: Water temperature
Upper-right: NDL (No
Decompression Limit)
Mid-right: Current depth
Bottom: Dive time
Note: Pressing button C will scroll
through the following fields:
●Maximum depth
●Average depth
●TTS
●Heart Rate (if enabled)
Bottom: Air Mix
21% = AIR / 22-40% = NITROX
Button E: Backlight On/Off.
Mark Compass Heading
During the dive, press button B to
access the mark heading screen.
Press button B to mark the
heading.
Press button A to unmark the
heading.
View Compass Heading
A marked heading will be shown
on screen as a green pointer
arrow.
Press button A to toggle to/from
the dive navigation view.
Fast Ascent
17

MISSION2 User Manual
When the ascent speed exceeds
13m/min (approx. 42ft/min), the
ascent rate bar will turn red. If the
rate continues for over 5 seconds,
the MISSION2 will notify the diver
with a “SLOW DOWN” fast
ascent alarm.
Time Alarm
TIME ALARM notifies the diver
when the user-set Dive Time has
been reached.
Depth Alarm
DEPTH ALARM notifies the diver
when the user-set dive maximum
depth has been reached.
Battery Low
BATTERY LOW notifies the diver
when the MISSION2’s remaining
battery life is below 15%.
18
MISSION2 User Manual
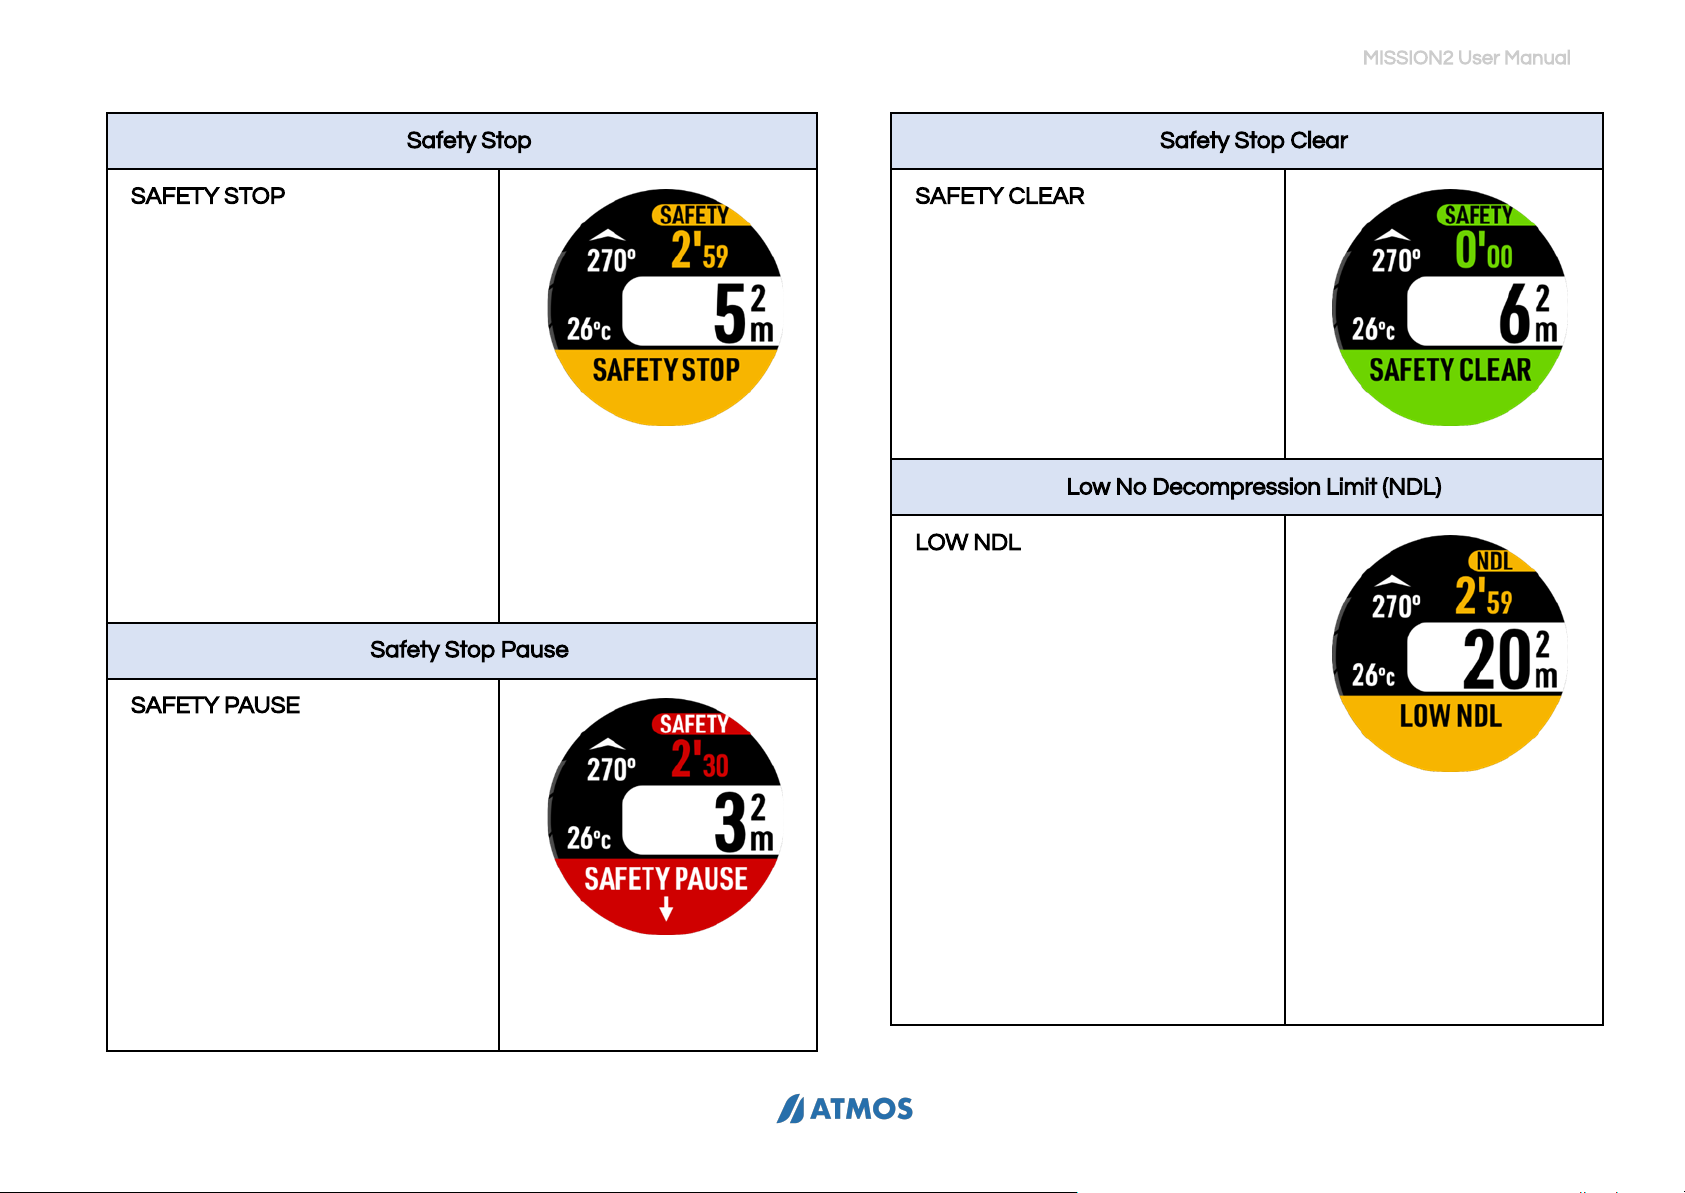
Safety Stop
SAFETY STOP notifies the diver
that the Safety Stop depth has
been reached. The default 3
minute Safety Stop begins once
the diver has ascended to 6m
(approx. 20ft). The Safety Stop
countdown continues if the depth
stays between between 3-7
meters (approx.10-23 feet).
The Safety Stop alarm can be
switched on and off, and can be
set according to personal needs
and dive plans.
Safety Stop Pause
SAFETY PAUSE notifies the diver
that the depth is outside of the
Safety Stop range (3-7 meters).
The Safety Stop countdown will
continue once the Safety Stop
depth range is once again
obtained.
The Safety Stop will be
reset
if the
diver subsequently descends to
12m (approx. 40ft).
Safety Stop Clear
SAFETY CLEAR notifies the diver
when the safety stop is
completed.
Low No Decompression Limit (NDL)
LOW NDL notifies the diver that
the remaining NDL time is less
than 3 minutes.
19
Other manuals for MISSION2
1
Table of contents
Other Atmos Watch manuals


