Atmos MISSION2 User manual

1. Start using MISSION2
1.1 Diving Safety
●Please read the user manual before using MISSION2 to ensure safe and proper use.
●The manual is based on the default settings of MISSION2.
●All dive gear will fail. It is not a question of whether it will fail, but when it will fail.
There may also be bugs in the firmware. Do not use MISSION2 as your only diving
instrument. You should have a detailed diving plan before each dive.
●Diving involves risk. Only trained divers should use the MISSION2. Dive computers
are not a substitute for training. Do not use the MISSION2 on any dive beyond your
certification level. Diving with an incorrect assessment of your ability and physical
condition can result in injury or even death.
●MISSION2 is designed for recreational diving. Do not use MISSION2 for commercial
diving applications.
●It is assumed that the diver's ascent rate is 10m/min(33ft/min). Ascending
significantly faster than this will impact decompression calculations.
●Please follow the decompression stops advised by MISSION2. Violation will increase
the risk of decompression sickness, which may lead to serious injury or death.
●The MISSION2 is a precision instrument. Take care to protect your computer from
damaging shocks or chemical exposure. Store your MISSION2 out of direct sunlight
and avoid exposure to excessive heat or leaving it in a vehicle exposed to the sun.
●Do not wear your MISSION2 in hot spring pools or saunas.
●After each day of diving, rinse the MISSION2 thoroughly with fresh water. Do not use
high-pressure sprays to avoid damage to buttons or sensors. If the device is covered
with dirt, soak it in fresh water. Do not use any solvents or detergents.
●Please use the Screen Guard included in the package. Replacement screen guards
may be purchased from an authorized dealer.
●The dive computer is a personal device. Sharing shall be avoided as it may cause
divers to misjudge diving information and cause serious injury.
1.2 What's in the box?
* MISSION2
* Charging Cable
* Scratch Guard*2
* Silicone strap
* Quick Start Guide
* Warranty card
1.3 Removing/replacing the strap
In addition to the originally provided long straps, MISSION2 has short straps available for
purchase. If you need to adjust the length of the strap, you can replace strap according to
the following instructions.
Change watch strap:
When removing the strap, push the strap spring clip to the right, lift it up to take out the
strap, and release the strap spring clip. To replace a new strap, simply follow the opposite
steps.
* The strap is a consumable item and when it must be replaced with a new strap, you can
make a purchase through the dealer or directly at ATMOS.
1.4 Using MISSION2 for the first time
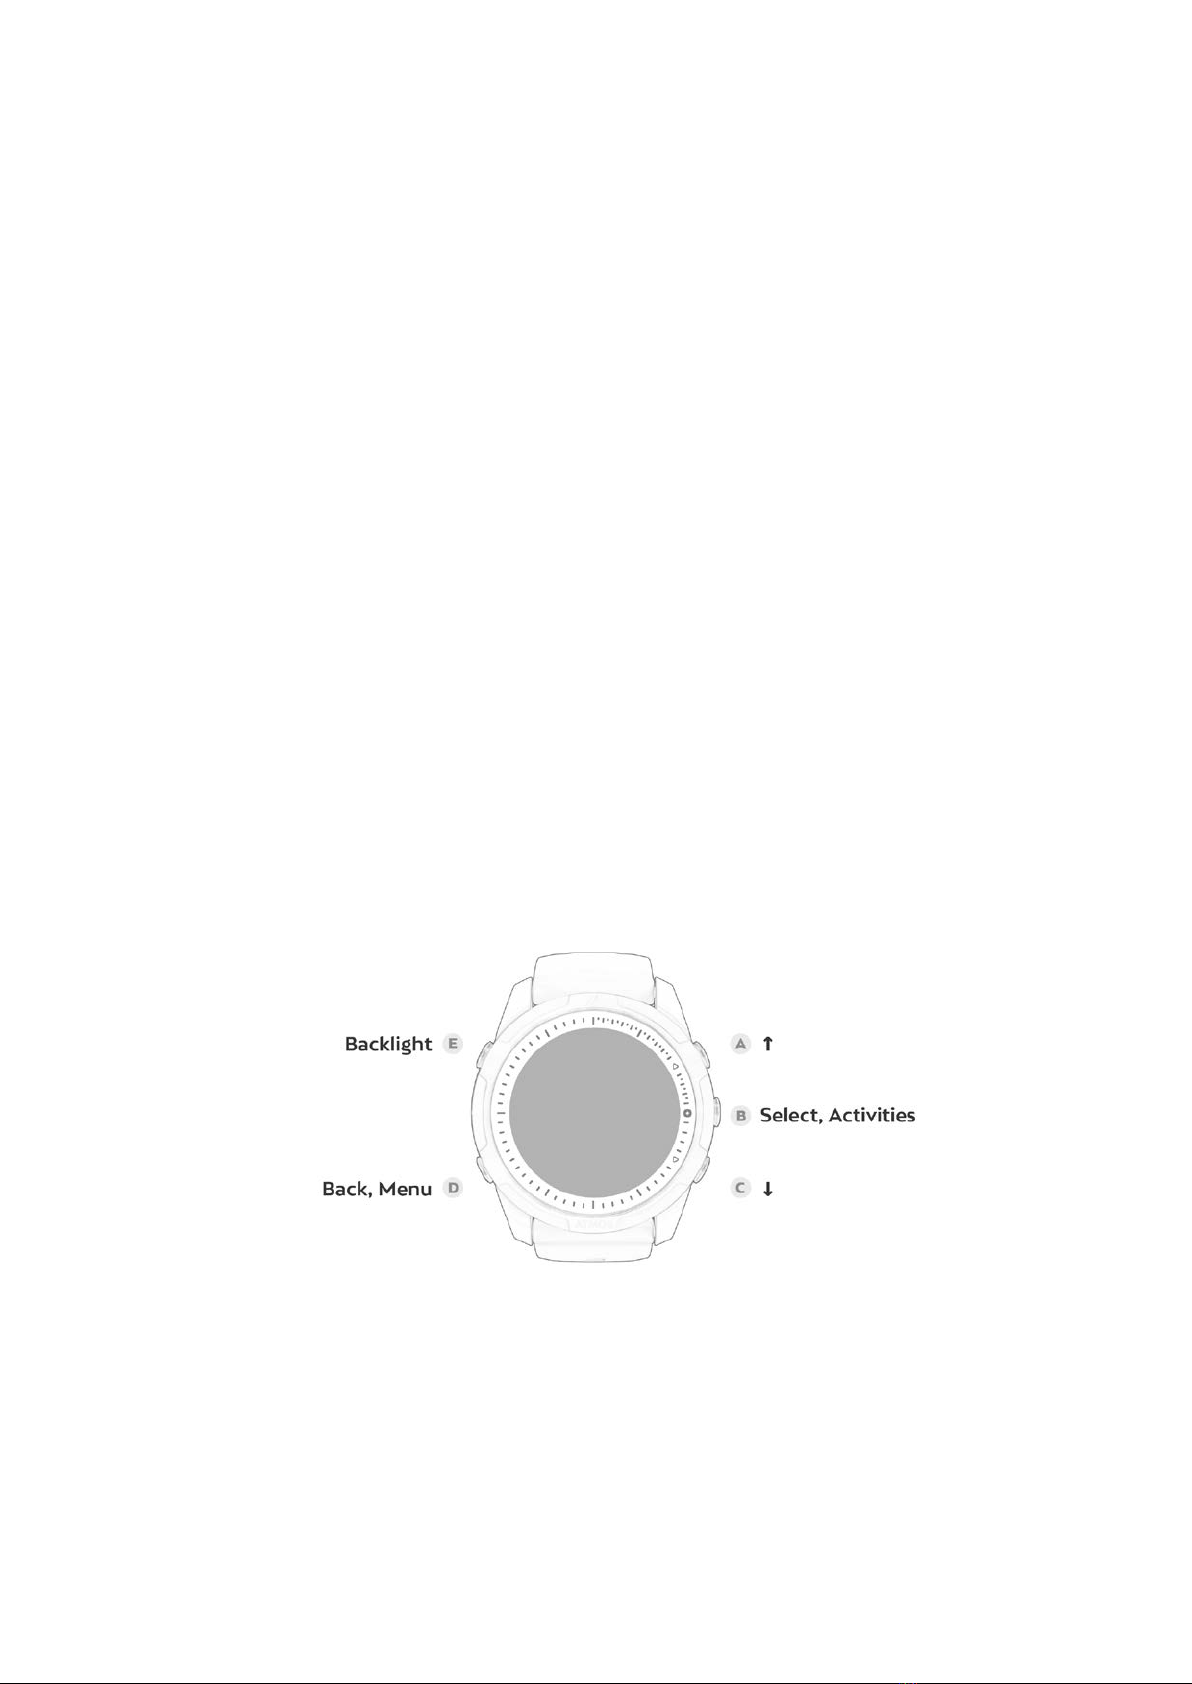
1.4.1 Button Function:
Press button A: Up/ Smart Notification Hold button A: Quick mobile phone Bluetooth On/Off
Press button B: Menu and Confirm
Press button C: Down/ Widget Hold button C: Stopwatch
Press button D: Return/ Setting
Press button E: Turning backlight On/Off Hold button E: Power Off

1.4.2 Power On/Off
Power On: Press and hold backlight button E for 3 seconds, or connect MISSION2 to the
charging cable.
Power Off: Press and hold button E for 3 seconds while in watch mode.
1.4.3 Charge & Save Battery
Please make sure the charging points are clean and dry. Moisture and dirt can seriously
affect charging efficiency and may cause damage. Please use a power adapter with safety
certification (rated voltage: DC 5V/2A)
※Do not use connectors or fast chargers that exceed the rated voltage: DC 5V/2A. It will
affect the lifespan of the battery.
Please ensure the charging cable is properly connected when charging. If the charging position is not
aligned, it may result in an improper connection and cause the watch to overheat. It takes 2 hours to
full charge, and the screen will display 100%.
※The lithium battery in MISSION2 can be damaged if not fully discharged. MISSION2 has an
internal protection mechanism which will disconnection the battery before it is fully
discharged. However, a small amount of discharge will still occur. If it is left unused for a
long time without charging, the lithium battery will likely to be fully discharged or have a
shorter lifespan.
To avoid battery damage, please do the following:
※Please power off when not in use, and fully charge it every two months to maintain
battery health
※If it is powered off for too long, the first charge will take 2-3 hours to preserve the
battery,
※Avoid direct sunlight or left in vehicles exposed to sunlight.
1.5 App pairing and unpairing
Using the ATMOS App to sync the dive and activities log and other status
Download ATMOS App:

iOS:
https://apple.co/31ouXTE
Android:
http://bit.ly/2WAfdNL
※App version may vary slightly depending on your mobile phone and software version
1. After logging in to the app, go to “Add device” to start pairing.
※Enable Bluetooth on your mobile phone. Android users may need to authorize the
connection to the device.
2. MISSION2 MENU → SETTING → SMART CONNECT → CONNECT TO MOBILE PHONE: (iOS
& Android) ON
3. In the App: Select your MISSION2. Enter the 5 Pin code shown on MISSION2 to complete
the connection.
※Long press button A on the main screen to switch the Bluetooth on and off
Unpair
1. MISSION2: SETTING → SMART CONNECT → UNPAIR: YES
2. ATMOS App: Select, or swipe left to delete the paired MISSION2.
3. Your mobile phone: Bluetooth → Forget the device
1.6 Smart Notification
Smart Notification allows MISSION2 to display SMS messages and phone calls received on
the paired smartphone. (iOS 10 or higher, Android)

To use the mobile phone notification function, go to MISSION2:
Settings → Connect to mobile phone → Message notification → All messages.
Press the button A on the main screen to view the notification and press button A or C to
scroll up and down. All notifications will be cleared after a restart.
※If “Call Only” is selected, the MISSION2 only displays call notifications.
1.7 Firmware Update
ATMOS regularly releases new firmware including new features, bug fixes and
improvements. Keep the firmware of your MISSION2 updated.
Checking the firmware: Settings > System > About. The Model, SN, and FW will be displayed
Updating Firmware
Download PC tool:
1. MISSION2: Setting > Firmware update - the firmware update screen will appear
2. Connect MISSION2 with the PC via USB charging cable, and the FIRMWARE folder will
appear.
3. Go to ATMOS official website: https://www.atmos.app/ to download the latest firmware
4. Double-click to open the zip file, and copy the files in the folder directly to the FIRMWARE
folder
5. When the files are transferred, disconnect the charging cable and MISSION2 will
automatically start updating.
1.8 Change & Customize Watch Face
MISSION2 offers a variety of watch faces in addition to the default Classic Analog.

1.8.1 Change Watch Face
Change via mobile APP
After pairing MISSION2 to the ATMOS App, go to the Watch Face option of Your Device and
select the desired Watch Face
Change via MISSION2
Settings Menu > Watch Face> Press button A or C to scroll, and press button B to select the
desired Watch Face.
1.8.2 Customize surfaces with photos
After pairing the ATMOS App with MISSION2, go to Your Device > Watch Face > Photo,
select your desired photo from the album as your Watch Face
2. Widget
* Most widgets can be enabled in Settings > Widget
* Press button C on the main screen to view widgets
2.1 Heart rate measurement
※The wrist optical heart rate sensor measures the heart rate with the LED optical sensor
on the device. The blood flow per unit area in the blood vessel will change with the heart
pulse, and the light sensor will obtain the change of the user's heart rate based on the
change of the blood.
Enable Heart Rate: Settings > Widget > Heart Rate: On
Checking the heart rate: after enabling the widget, press button C on the main screen to
scroll to the information page.
※To ensure accuracy, MISSION2 should be worn correctly and should not be worn on the
wrist joints.
※When exercising or in daily use, MISSION2 should be snugly worn on the skin of the wrist
to avoid uneven reflection of the light beam. Objects such as long-sleeved clothing or
winter clothing shall also be avoided.

※The heart rate function is disabled by default during dive or swimming.
※The heart rate may vary greatly due to light wavelength absorption underwater, which in
turn affects the optical detection.
Causes of abnormal heart rate:
●Avoid applying sunscreen or skin lotion, which will result in uneven reflection of light,
and keep the wearing area clean.
●Arm hair, tattoos or skin tone, arm movement, subcutaneous blood flow, etc. may all
affect heart rate measurements.
●In the cold weather or people with cold hands and feet have poor blood circulation,
which affects blood flow and results in heart rate abnormally. Keeping hands and
feet warm will improve the accuracy of heart rate.
●Please avoid scratches or damage to the heart rate sensor on the back of MISSION2
●The heart rate sensor should be kept clean.
Note:
※MISSION2 is not a medical device, so the heart rate data should not be used as a
reference for medical use or medical diagnosis.
※When the heart rate function is enabled, it is less energy efficient.
2.2 Sleep Monitoring
※The sleep monitoring function is currently only used for sleep monitoring at night, and
cannot be monitored for naps and short-term sleep.
* Enable sleep monitoring: Settings > Widget> Sleep Monitoring: On
* Viewing sleep: enable widgets and sleep monitoring, press button C on the main screen
to scroll to the information page.
* If the target sleep time is reached, the outer circle will be a complete circle
* On the sleep screen, press button B to view the weekly record.
※Note: If MISSION2 is placed on the table during the sleep, it will also be determined as
sleeping.
Dark: deep sleep | Light: light sleep

2.3 Steps & Calories
MISSION2 will count your daily steps and calories
* Enable Step & Calories: Settings > Widget > Step & Calories: ON
* Checking the step count & calories: after enabling the widget, press button C key on the
main screen to scroll to the information page
The orange outer circle is the step counter, and the yellow inner circle represents calories
* The increase in steps and calorie consumption will gradually form a circle. When the set
target value is reached, it will be a complete circle.
* Press button B again on the steps and calories screen to enter individual step and calories
information page. MISSION2 will display the weekly calories and steps average with the
target value in the middle line.
※The pedometer sensor will not display the number of steps you have taken immediately.
MISSION2 will update on the display after a short delay.
※Factors of abnormal step counting: Any vibrations or arm movements associated with
walking, as well as repetitive and regular movements, may affect the step count.
Target value in the step counter and calories
Settings > Widget > Step & Calories Enter steps and calories.
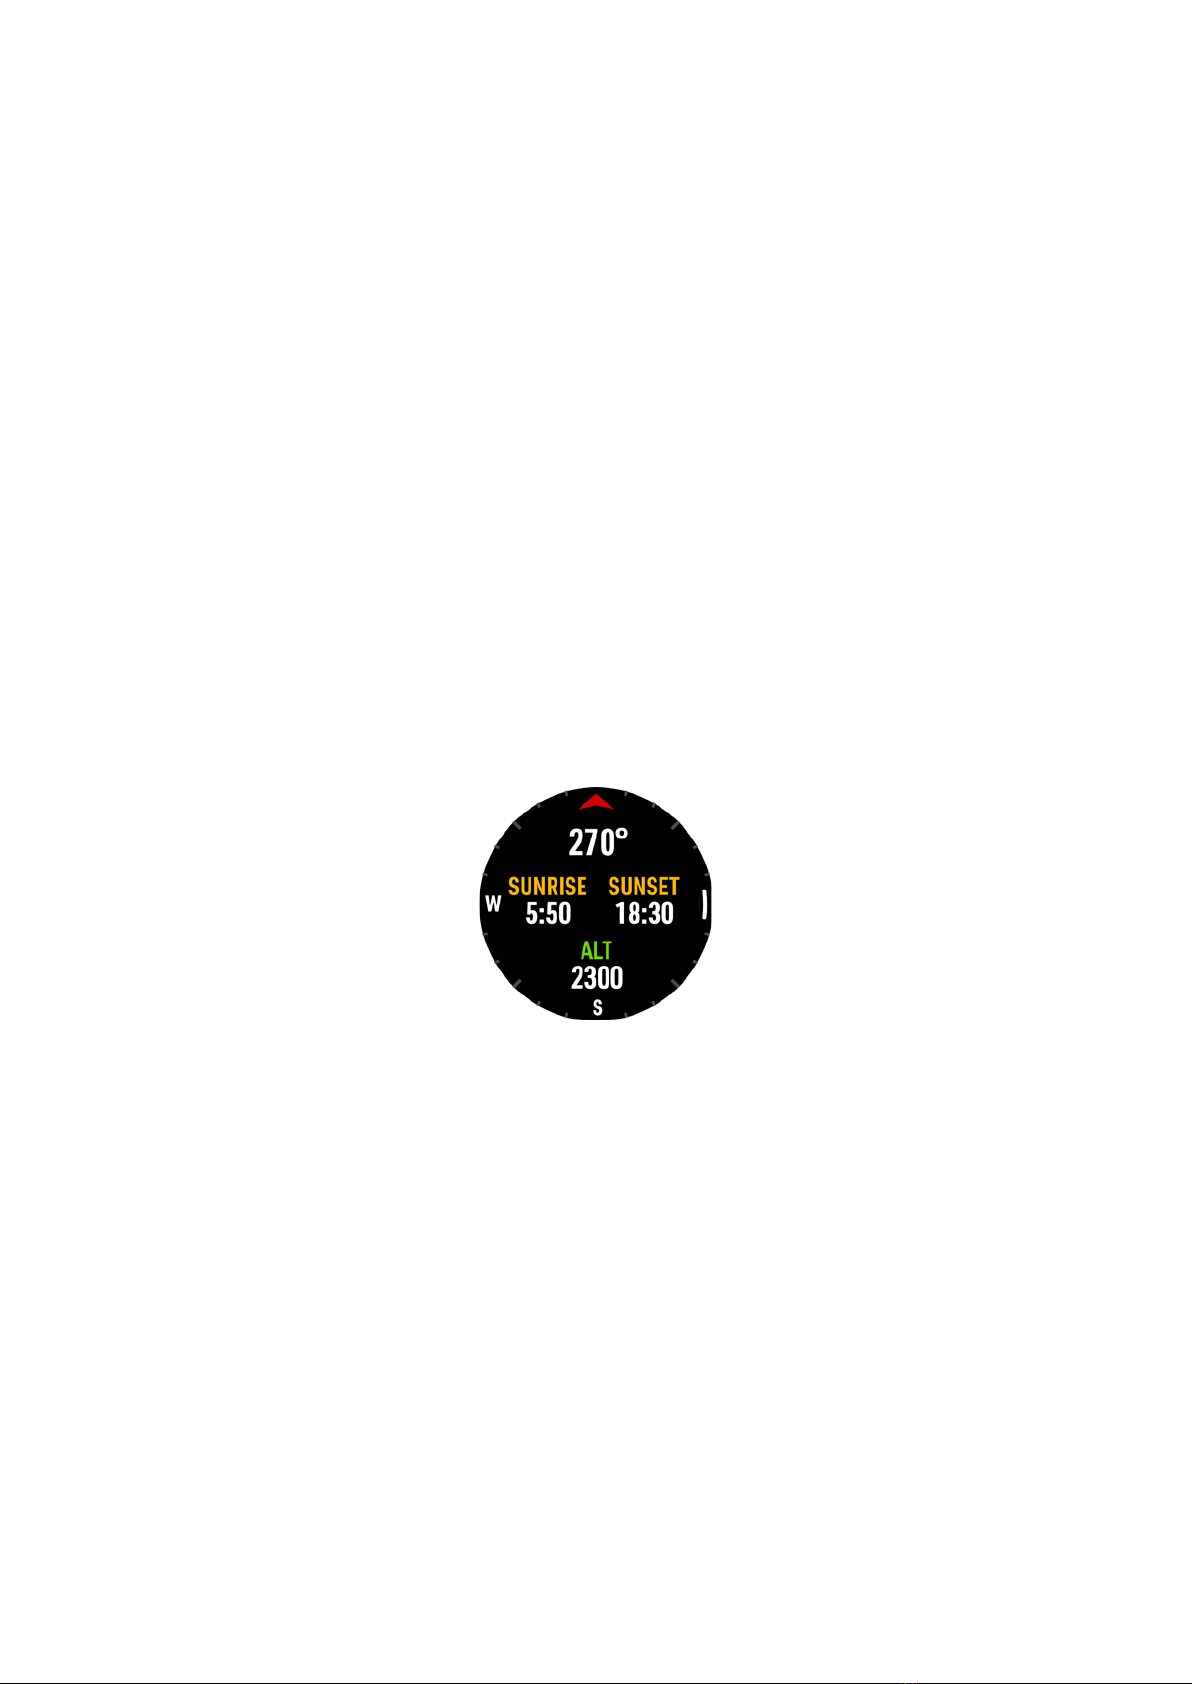
2.4 Outdoor
MISSION2 will display sunrise and sunset times, altitude, and air pressure at current location
with a graphic compass
* Enable Outdoor: Settings > Widget > Outdoor: On
2.4.1 Sunrise & Sunset time
Show sunrise and sunset information at current location
The sunrise and sunset time will only be displayed after the GPS positioning is successful.
The time will not be displayed if the GPS positioning is not completed.
2.4.2 Altitude Calibration
Press button B in the sunrise and sunset screen to enter ALT altitude, the screen will display
the altitude value and the change in altitude curve.
The change of weather will affect the reading of altitude and air pressure, such as low
pressure of typhoon, high pressure of cold air mass. When the weather changes frequently,
it is recommended to set the correct altitude reference value. If the weather is stable, no
reference value setting is required.
Using GPS Calibration

There will be altitude data during GPS positioning. When there is a large altitude deviation
or offset, this option is to use the GPS altitude to calibrate the current altitude.
Enter current altitude
When there is a large height deviation or offset, input the correct height of the location,
such as the height displayed at the trailhead, as the height reference value to calibrate the
current height.
2.4.3 Compass
※Calibration is recommended before every dive and outdoor activities to ensure the
best experience.
※The compass is magnetically oriented and will be disturbed if it is too close to electric
fields, magnets, and metal objects. The electronic compass is small and subject to
interference. Please avoid wearing another computer, compass or metal objects next to
the MISSION2. Calibration is recommended before every dive to ensure the best
experience.
Compass Calibration
※Select compass option, follow the instructions, move MISSION2 in an “∞” pattern. The
bearing and OK will be displayed until the compass calibration is complete.
2.5 Tides
Tide information can be obtained after MISSION2 is connected to the App
* Enable Tides: MISSION2 Settings > Widget > Tides: ON

※Take note! The actual tide level may be affected by the weather conditions, including
atmospheric pressure, wind direction, rain, etc. Anyone using this function must make a safe
judgment based on the current situation, so special attention should be paid when referring to
the above information. Diving with an incorrect assessment of your ability and physical
condition can result in injury or even death. Thus, the tidal information is for reference only!
Steps:
1. Open the APP and pair the watch with the APP
2. Please ensure the mobile phone has GPS turned on, and allow ATMOS App to obtain
location information.
3. ATMOS App > Tides
4. Acquire the current location through the mobile phone GPS, or select the location via the
search function
5. Please check MISSION2 Widget if tidal information is displayed
Tidal Encyclopedia
The phenomenon of rising sea level is called flood; the falling sea level is called ebb. When
changing from high tide to low tide, when the water level reaches the relative highest, it is
called high water; when changing from low tide to high tide, when the water level reaches
the relative minimum, it is called low water.
-There are three types of tides, namely semidiurnal tides with two high and low tides a day,
diurnal tides with only one high and low tide a day, and mixed tides in between.
2.6 Weather
Weather information of the current location can be obtained when MISSION2 is connected
to the App.
* Enable Weather: MISSION2 Settings > Widget > Weather: ON
Steps:
Step 1 - Open the APP and pair the watch with the APP
Step 2 - Please ensure the mobile phone has GPS turned on, and allow ATMOS App to obtain
location information.
Step 3 - Go to the weather widget, the weather data will be obtained and displayed
1. Open the APP and pair the watch with the APP
2. Please ensure the mobile phone has GPS turned on, and allow ATMOS App to obtain
location information.
3. ATMOS App > Weather widget, obtain and display the weather data
4. Please check MISSION2 Widget if weather information is displayed
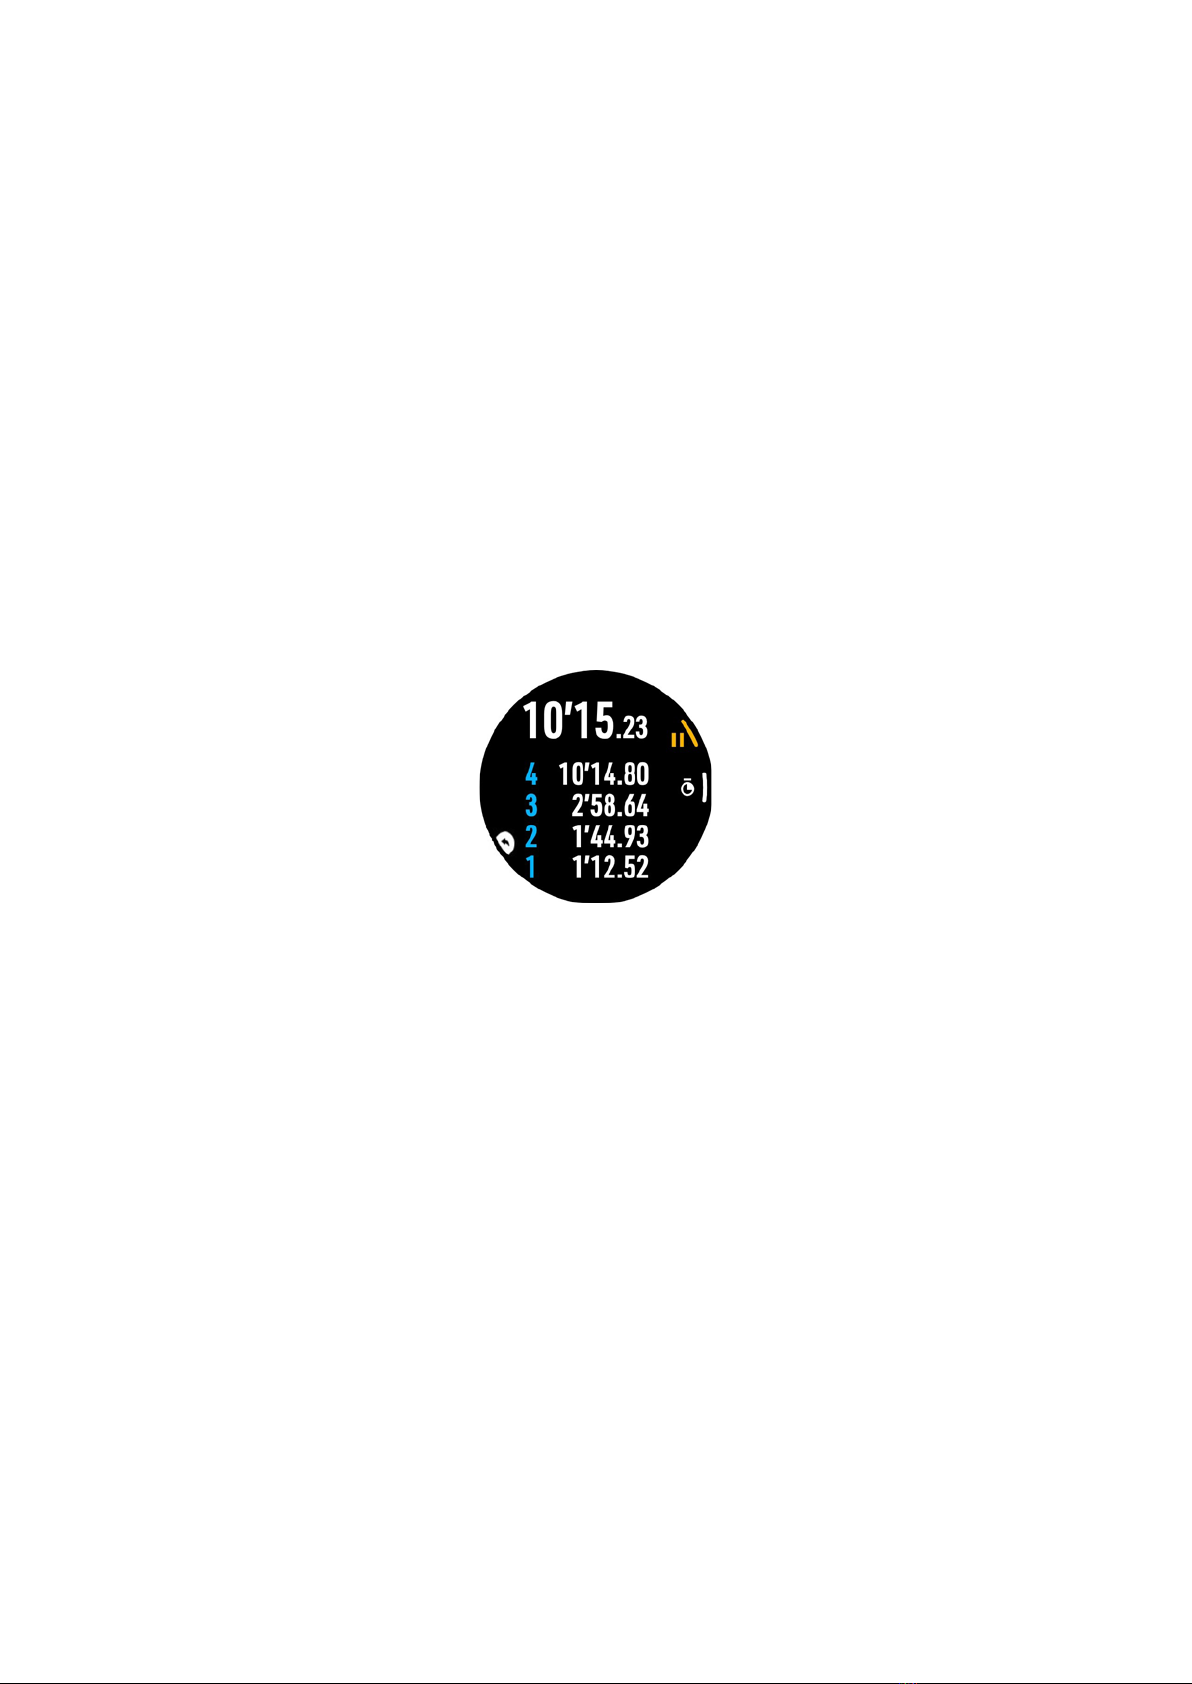
2.7 Stopwatch
Press and Hold button C for 2 seconds while in watch mode.
Press button A: Start
Press button B: Mark current time (4 set can be displayed)
Press button A: Stop
Press button A when stopped: Reset
Press and Hold button D for 2 seconds: Exit
2.8 Alarm Clock
MISSION2 provides three alarm clock settings
1. Go to Setting, select the alarm clock
2. Set the hours and minutes (12-hour clock will require choosing AM or PM)
3. Select Once, Weekday, Daily
4. Select vibration, sound, or both for Reminder

3. Dive Mode
3.1.1 Water Auto-on
※Do not rely on the water auto-on function. It is important to check all settings of the
dive computer prior to descent on each dive.
The MISSION2 default dive mode of auto-on is Scuba Mode. The default dive mode may be
changed in SETTING. MISSION2 will display the selected dive mode when you enter water.
※The default dive mode can be set to "Off" - when it is off, MISSION2 will not
automatically turn on dive mode, and no icon will appear at the bottom of the time
screen.
3.1.2 No Fly Time and Surface Interval
Due to residual nitrogen in the body after diving, please wait until the No Fly time icon
disappears before flying or ascending to altitudes above 300m/1,000ft.
Upper-left: No fly time Icon. Displays for 24hrs starting from the moment you exit the water
following the last dive. (Icon will be displayed when freedived over 40m)
Upper-right: Surface interval (S.I.) icon. Counter starts from the moment you exit the water
following your last dive.

3.2 Scuba Mode
3.2.1 Scuba Preparation Screen and Operation
* The GPS will start blinking and positioning. It will stop blinking and display a green light
once the positioning is complete.
* The heart rate function is disabled by default during dive
* Press button C to enter the Advanced setting.
* Press button B button to start diving
3.2.2 Scuba Setting
Press button C in Scuba preparation screen to enter the Advanced Settings.
※Do not change any setting until you understand the effects
Adjustable Function:
Dive Plan
※Dive plan is used to estimate the no-decompression limit for
diving at the planned depth at a specified time in the future
See 3.2.5 Dive Plan
Dive Alarm
Time Alarm: Time Alarm display notifies the diver when the Dive Time
has been reached.
(1 set)
Depth Alarm: Depth Alarm notifies the diver when the maximum
depth has been reached.
(1 set)
SPG Alarm
SPG Alarm notifies the pressure when the set dive time has been
reached.
(10 sets)
PPo2
Adjustable between 1.2 - 1.6, this setting is related to the MOD
(Maximum Operation Depth).

Conservatism
Conservatism: HIGH (GF 35/75)
Conservatism: MEDIUM (GF 40/85)
Conservatism: LOW (GF 45/95)
Conservatism: CUSTOM
! ! ! Adjusting GF (Gradient Factor) will affect decompression
calculations. For more detail, please refer to Erik Baker's (Clearing up
the Confusion About Deep Stops)
Dive Site
See 4.1.2 Dive Site
Safety Stop
Ascend to 6 meters, start a 3-minute safety stop, and the countdown
interval is 3-7 meters
Set the ON/OFF and adjust the stop time.
Surface Internal
Reminder
After returning to the surface for a surface interval, a notification for
dive will be sent when the set surface interval has been reached
Freshwater/Seawate
r
Depth correction based on Freshwater/Seawater The density of salt
water is about 3% higher than that of fresh water, and the depth of
fresh water will be deeper under the same pressure value
Air/Nitrox Setting
While in Scuba Mode, Press button B to enter Advanced settings.
Then scroll to the Air Mix (21-40%) and PPO2 (1.2-1.6) settings.
! ! ! Always check the oxygen percentage, and MOD before each
dive. Do not exceed to prevent central nervous system (CNS) O2
toxicity.
Tank Volume
Set the tank volume for diving, and enter the residual pressure to
obtain the SAC after the dive to be displayed in the ATMOS App
Optical heart rate
The heart rate function is disabled by default during diving, and can be
enabled according to personal needs
Backlight
Adjust the backlight constant brightness, brightness level and
backlight on wrist raise
Reset Nitrogen
Reset the residual nitrogen accumulated by the computer to zero.
! ! ! Do not change any setting until you understand the effects of
NDL and DECO on diving after the nitrogen reset.
Factory Reset
Restore settings to factory defaults
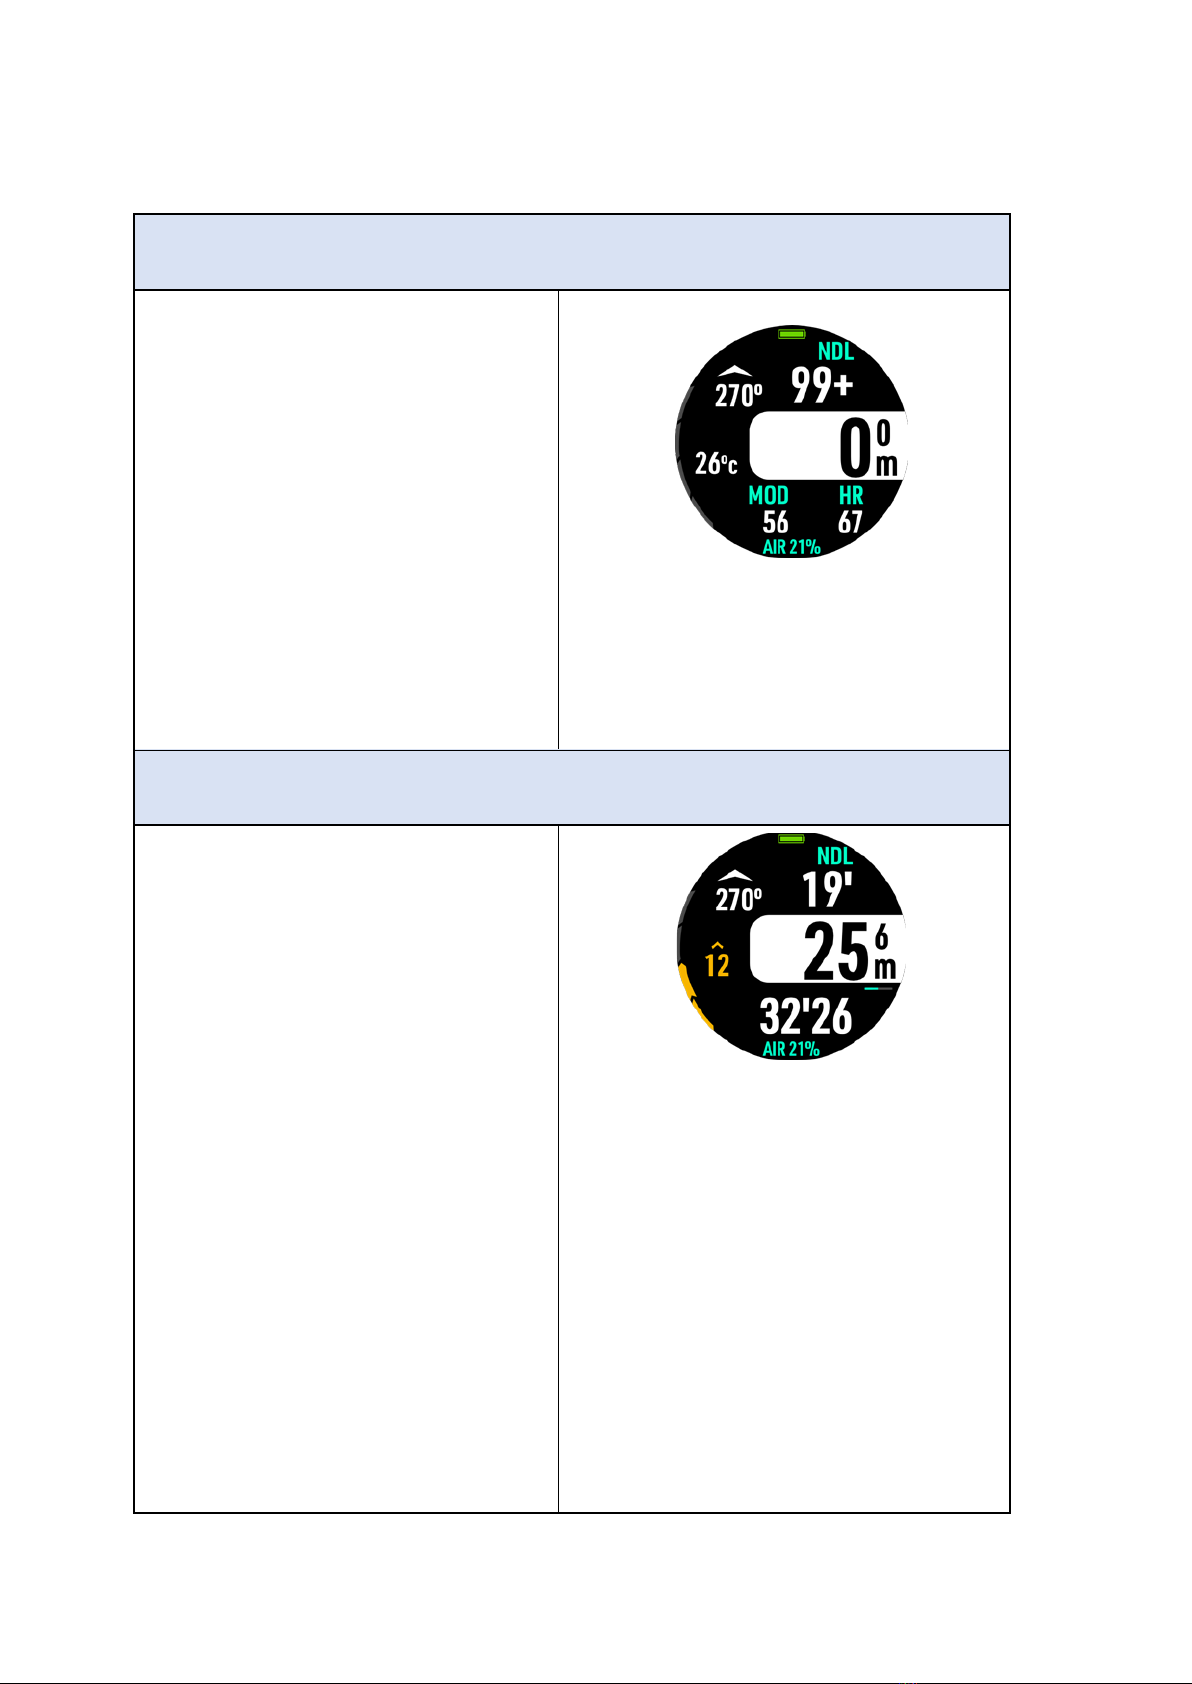
3.2.3 Scuba Screen Layout and Alarms
Predive
Upper-left: Compass heading (Infinity
will be displayed when the compass
shall be calibrated)
Mid-left: Water temperature
Upper-right: NDL (No Decompression
Limit)
(- - will be displayed if NDL is greater
than 99+)
Mid-right: Current depth
Bottom-right: MOD - (Maximum
Operation Depth)&HR
Bottom-right: 21% = AIR / 22-40% =
NITROX
During the dive
Upper-left: Compass heading
Left: Ascent rate bar (m/min)Left:
Water temperature
Upper-right: NDL (No Decompression
Limit)
Mid-right: Current depth
Bottom-right: Dive time
※Press button C to scroll and view
maximum depth/average depth/ TTS &
surface time/ heart rate
※Press button E: Turns the backlight
On/Off.
TTS (Time to surface) represents the
time to ascent plus the time for
decompression stops before you can
surface (Safety stop time is not
included)

Mark Compass Heading
Hold button B to enter the Mark
Compass Heading in preparation screen
or during dive.
* Use button B to mark heading
* Use button A to unmark heading
View Compass Heading
Hold button A to enter the Compass
Heading in preparation screen or during
dive.
Hold button B to enter the Mark
Compass Heading
* Use button B to mark heading
* Use button A to unmark heading
Fast Ascent
When the ascent speed exceeds
13m/min, the ascent rate bar will turn
red, and MISSION2 will notify with a
"Fast Ascent Alarm". if it continues for 5
seconds.
Time Alarm

Time Alarm display notifies the diver
when the Dive Time has been reached.
Depth Alarm
Depth Alarm notifies the diver every
minute when the maximum depth has
been reached.
Battery Low
Battery Low Notifies the diver when
battery power is low.
Safety Stop
The safety stop can be switched on and
off, and can be set according to
personal needs and dive plans. The
default is ON.

Safety Stop Pause
The depth of the safety stop is 3-7
meters, beyond which the countdown
will stop and a "Safety Stop Pause"
reminder will appear.
Safety Stop Clear
Safety Clear notifies the diver when the
safety stop is completed.
NDL below 3mins
LOW NDL notifies the diver every
minute when the remaining NDL time is
less than 3 mins.
Decompression Stop

After the NDL is up, it will enter the
decompression state, and MISSION2
will notify the user with a
"decompression stop need" reminder.
The NDL indicator will be replaced by
"Deco Stop", notifying the stop depth
(6m) and decompression stop time (3
min).
! ! ! Please ascend slowly to the depth
for a decompression stop
.
! ! ! As ascending is decompression, it is
possible to end decompression before
reaching the depth for a decompression
stop
Missed Stop
Missed Stop alarm appears when the
diver has ascended above the Deco
Stop ceiling depth.
! ! ! Please decent below the Deco Stop
depth to continue decompression.
Maximum Operation Depth
Immediately ascend to a safe depth
when seeing the MOD Alarm.
Other manuals for MISSION2
1
Table of contents
Other Atmos Watch manuals


