atmosphere 10-1076 User manual

Air Purifier
Owner’s
Manual
This product may be covered by one or more of
the following U.S. patents and or patents pending:
D503,972; D538,418; 7,316,732


1
Contents
Important Safety Instructions . . . . . . . . . . . . . . . . . . . . . . . . . . . . . . . . . . . . . . . . . . . . . .2
Features. . . . . . . . . . . . . . . . . . . . . . . . . . . . . . . . . . . . . . . . . . . . . . . . . . . . . . . . . . . . .3
Installation and Set-up . . . . . . . . . . . . . . . . . . . . . . . . . . . . . . . . . . . . . . . . . . . . . . . . . .4
Choosing the Location . . . . . . . . . . . . . . . . . . . . . . . . . . . . . . . . . . . . . . . . . . . . . .4
Preparing the Filters for Operation . . . . . . . . . . . . . . . . . . . . . . . . . . . . . . . . . . . . . .4
Removing the Filters. . . . . . . . . . . . . . . . . . . . . . . . . . . . . . . . . . . . . . . . . . . . . . . .4
Installing the Filters . . . . . . . . . . . . . . . . . . . . . . . . . . . . . . . . . . . . . . . . . . . . . . . .5
Operating Instructions . . . . . . . . . . . . . . . . . . . . . . . . . . . . . . . . . . . . . . . . . . . . . . . . . . .7
Getting Power . . . . . . . . . . . . . . . . . . . . . . . . . . . . . . . . . . . . . . . . . . . . . . . . . . . .7
Operating Modes . . . . . . . . . . . . . . . . . . . . . . . . . . . . . . . . . . . . . . . . . . . . . . . . . .7
Control Panel. . . . . . . . . . . . . . . . . . . . . . . . . . . . . . . . . . . . . . . . . . . . . . . . . . . . .8
TIMER Button. . . . . . . . . . . . . . . . . . . . . . . . . . . . . . . . . . . . . . . . . . . . . . . .8
SPEED Button . . . . . . . . . . . . . . . . . . . . . . . . . . . . . . . . . . . . . . . . . . . . . . .8
TURBO Button . . . . . . . . . . . . . . . . . . . . . . . . . . . . . . . . . . . . . . . . . . . . . . .8
AUTO Button . . . . . . . . . . . . . . . . . . . . . . . . . . . . . . . . . . . . . . . . . . . . . . . .8
POWER Button . . . . . . . . . . . . . . . . . . . . . . . . . . . . . . . . . . . . . . . . . . . . . . .8
Particle Sensor Display . . . . . . . . . . . . . . . . . . . . . . . . . . . . . . . . . . . . . . . .10
Filter Monitors . . . . . . . . . . . . . . . . . . . . . . . . . . . . . . . . . . . . . . . . . . . . . .10
Clean Air Delivery Rate . . . . . . . . . . . . . . . . . . . . . . . . . . . . . . . . . . . . . . . . . . . . .11
Filter Life . . . . . . . . . . . . . . . . . . . . . . . . . . . . . . . . . . . . . . . . . . . . . . . . . . . . . .11
Using the Remote Control . . . . . . . . . . . . . . . . . . . . . . . . . . . . . . . . . . . . . . . . . . .12
Maintenance. . . . . . . . . . . . . . . . . . . . . . . . . . . . . . . . . . . . . . . . . . . . . . . . . . . . . . . . .12
Cleaning the Pre-filter. . . . . . . . . . . . . . . . . . . . . . . . . . . . . . . . . . . . . . . . . . . . . .12
Replacing the Odor Filter . . . . . . . . . . . . . . . . . . . . . . . . . . . . . . . . . . . . . . . . . . .14
Replacing the HEPA Filter. . . . . . . . . . . . . . . . . . . . . . . . . . . . . . . . . . . . . . . . . . .16
Replacing Remote Control Battery . . . . . . . . . . . . . . . . . . . . . . . . . . . . . . . . . . . . .18
Troubleshooting . . . . . . . . . . . . . . . . . . . . . . . . . . . . . . . . . . . . . . . . . . . . . . . . . . . . . .18
Specifications. . . . . . . . . . . . . . . . . . . . . . . . . . . . . . . . . . . . . . . . . . . . . . . . . . . . . . . .19
Warranty . . . . . . . . . . . . . . . . . . . . . . . . . . . . . . . . . . . . . . . . . . . . . . . . . . . . . . . . . . .20
Satisfaction Guarantee . . . . . . . . . . . . . . . . . . . . . . . . . . . . . . . . . . . . . . . . . . . . . . . . .21

2
Important Safety Instructions
Read all instructions before using the ATMOSPHERE™ Air Purifier.
WARNING: When using an electrical appliance, basic safety precautions should always be followed to
reduce the risk of fire, electric shock, and/or injury to persons, including the following:
1. Always disconnect from power source before cleaning or performing maintenance, such as filter
replacement.
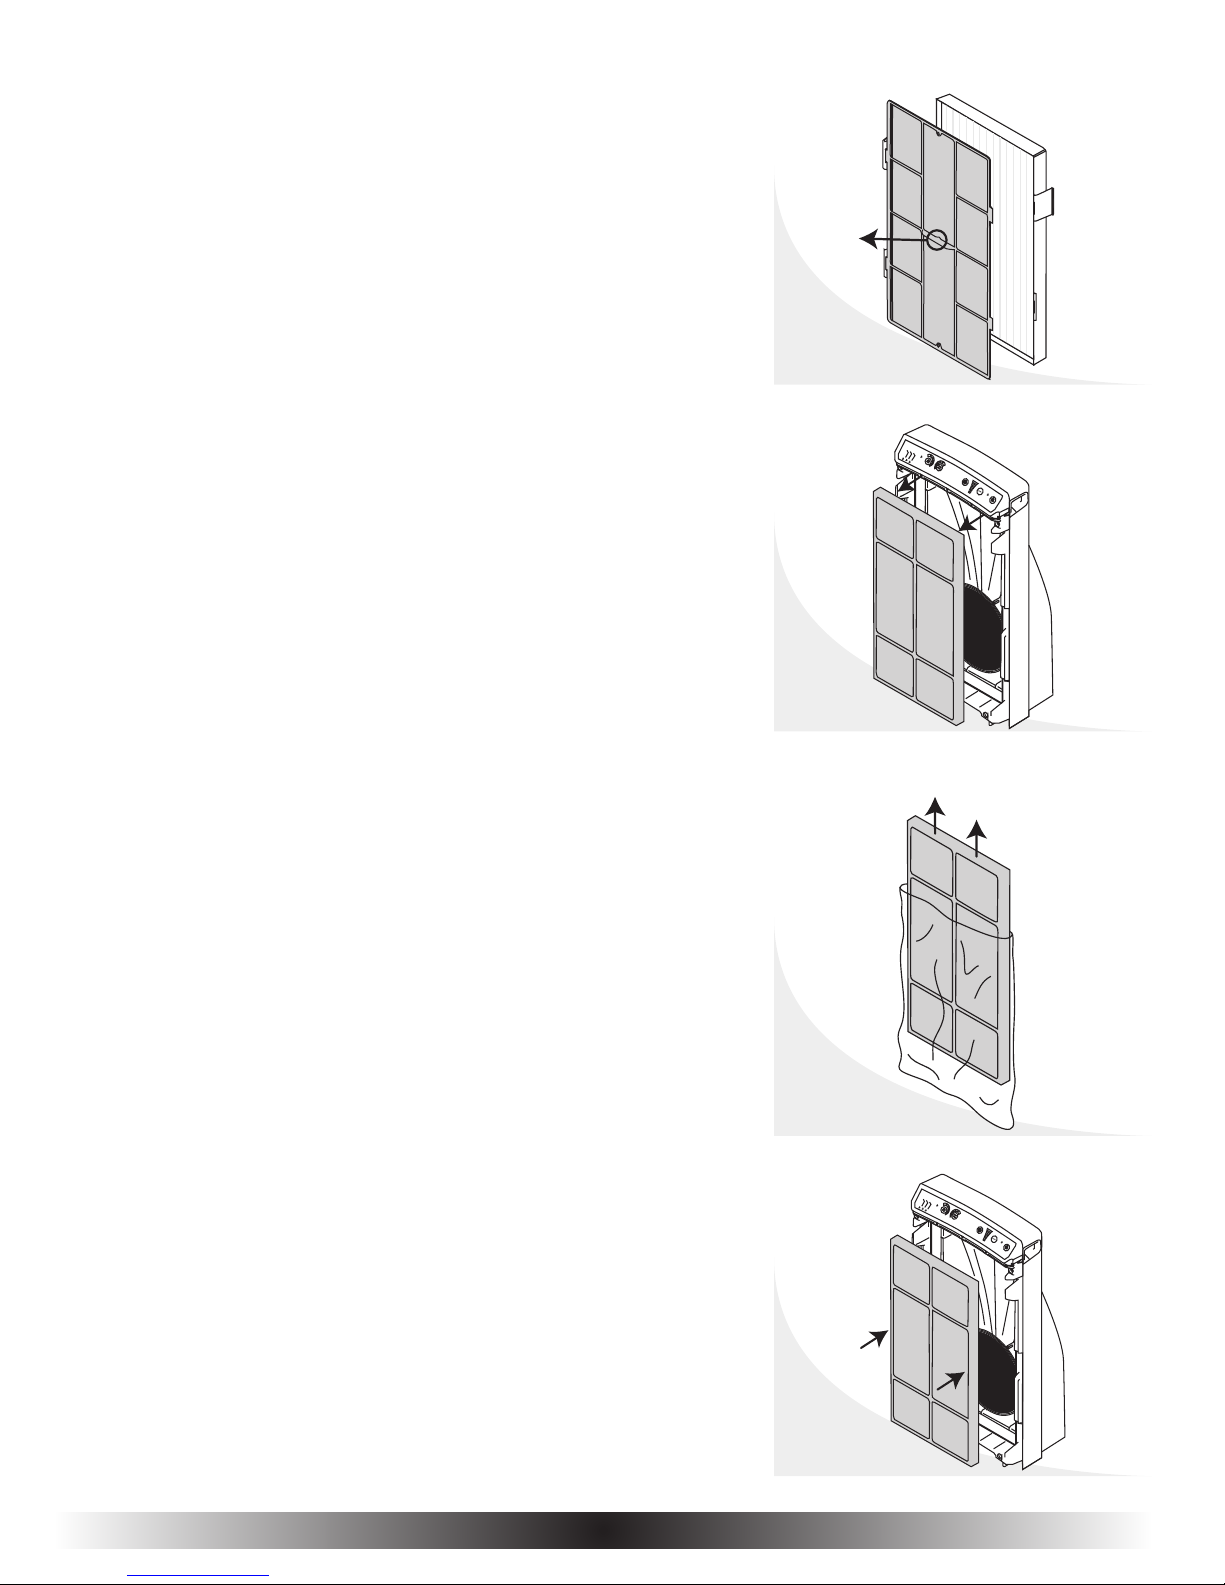
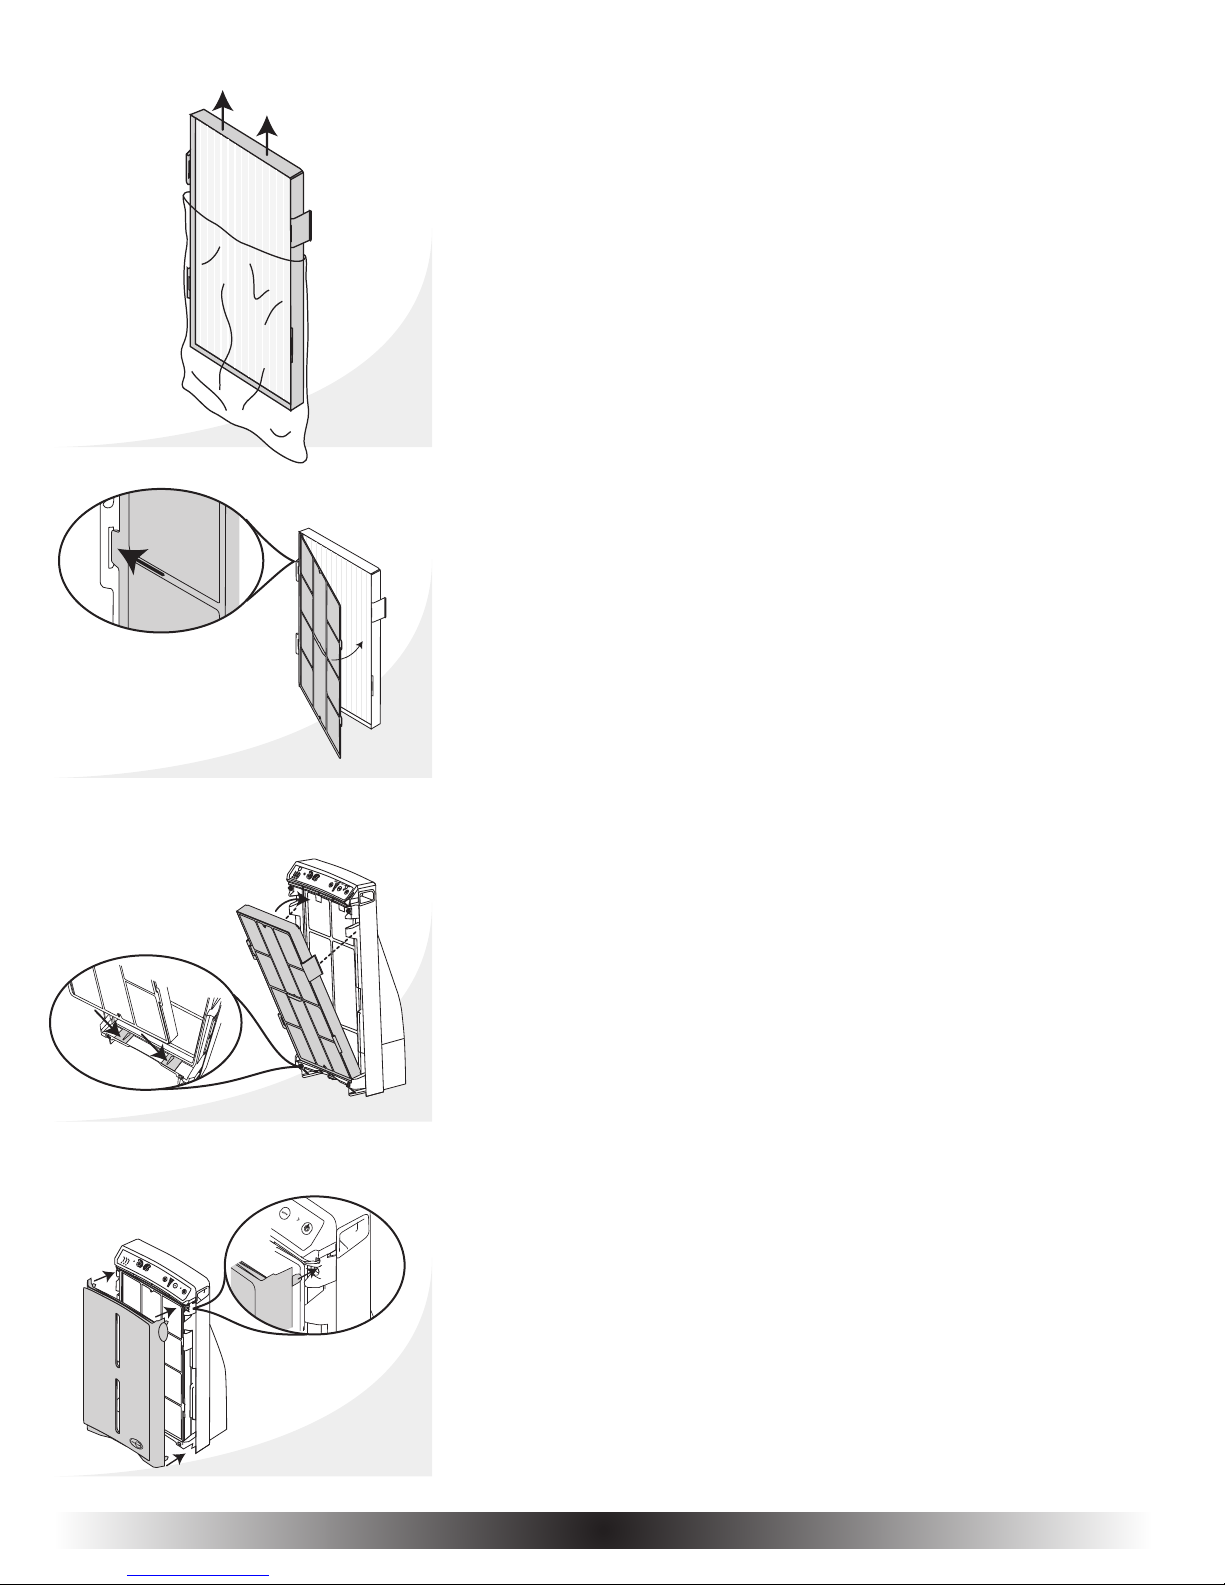
2. You must remove the front cover and the filters, remove the filters from the bags and reinstall the filters
before operating the Air Purifier.
3. Do not open the housing. Internal parts are not to be serviced by the user. Repairs should be done
by authorized service personnel only.
4. Do not allow liquids or any objects to be put into openings. Keep openings free of excessive dust,
lint, hair or anything that may reduce the air flow.
5. Do not expose to rain or use in a wet area; for example, near a bathtub or a kitchen sink.
6. Do not unplug by pulling on the cord. To unplug, grasp the plug and pull gently.
7. Do not operate with a damaged cord or plug. If the cord or plug is damaged, it must be replaced
by the manufacturer or its service agent or a similarly qualified person to avoid a hazard.
8. Do not cut, damage, or modify the cord. Do not place the cord underneath or between heavy
objects and always keep the cord away from heated surfaces.
9. If the Air Purifier is not working properly or has been dropped or damaged, contact Customer Support.
10. Do not clean the Air Purifier using solvents or chemicals. Do not spray aerosols on the ATMOSPHERE
Air Purifier.
11. Young children should be supervised to ensure that they do not play with the appliance.
Notes
1. The ATMOSPHERE Air Purifier is not intended for use where oil particles are in the air, such as
factories, or where continuous tobacco smoking is present, such as bars. Use in these environments
could result in poor performance and shorten the filter life.
2. The Air Purifier is shipped with the HEPA and odor filters in protective bags to prolong the filters’
effectiveness. You must remove the front cover, remove the filters from the bags and reinstall them
before operating the Air Purifier.
3. CARBON DUST MAY BE GENERATED DUE TO SHIPPING AND HANDLING. WHEN DISPOSING OF THE ODOR
FILTER PACKAGING, BE CAREFUL NOT TO LET THE DUST ESCAPE OR ALLOW THE PACKAGING TO BRUSH
AGAINST ANY CLOTHING, FURNITURE, OR CARPET.
4. To avoid blocking air flow, do not place items on the Air Purifier or too close to its front cover.
5. Avoid placing the Air Purifier in front of heating vents.
READ AND SAVE THESE INSTRUCTIONS
CustomerSupport:IntheUnitedStates,call1-800-253-6500weekdaysbetween8:00a.m.-12Mid.and
Sat.8:30a.m.-5:00p.m.InCanada,call1-800-265-5470weekdaysbetween8:00a.m.-12Mid.andSat.
8:30 a.m. - 5:00 p.m. Information can also be accessed via the Internet at: www.amwayglobal.com

3
Features
Air Filtration Process (Fig. 1)
Air enters through the front cover (A) on the Air Purifier. The pre-filter (B) removes
large, lint-like particles. The second filter (C) provides true HEPA filtration,
effectively removing particles as small as 0.009 micron in size. The Odor filter (D)
reduces objectionable smells, such as tobacco, pet, and cooking odors. Filtered air
is discharged upward through the grill in the back of the housing (E).
Performance Features
• Effectively removes particles as small as 0.009 micron in size.
• Effectively reduces unpleasant odors, such as from cigarette smoke, cooking,
and pets.
• CADR certified by the U.S. Association of Home Appliance Manufacturers (AHAM)
for the reduction of airborne tobacco smoke, dust, and pollen at air flow volumes
up to 250 cubic feet per minute (7.1 m3/min).
• Rated for use in a single room up to 390 square feet in size (36m2).
• Reduces airborne bacteria, mold, viruses, fungi, asbestos, dust mites and their
by-products, and radon decay products.
• High energy efficiency with low power consumption. Meets or exceeds U.S. EPA’s
ENERGY STAR®standards for energy efficiency.
The ATMOSPHERE™ Air Purifier is the first air
purifier certified asthma & allergy friendly™
by the Asthma and Allergy Foundation of America
and the Asthma Society of Canada in conjunction
with Allergy Standards LTD. Products carrying the
asthma & allergy friendly™ Certification Mark
have been scientifically tested and proven more
suitable for people with asthma and related
allergic sensitivities.
Operating Features
• Air purifier has four operating modes – two continuous
and two timed – to let you choose the precise operation
you need.
• Auto Mode uses a built-in Particle Sensor that sets
fan speed based on concentration of smoke, dust,
and pollen particles in the room.
• Timer has 12-, 8-, 4-, 2-, and ½-hour settings.
• Fan has five speeds: 1 (low) through 5 (turbo).
• 30-minute turbo burst can be activated by press-
ing a single button.
• Built-in monitors indicate when each filter needs
cleaning or replacing.
• Convenient, slim-profile remote control included.
Fig. 1

4
Installation and Set-up
Choosing the Location
Your Air Purifier can be placed directly against a wall. The housing design
ensures proper clearance between the Air Purifier and the wall to allow full
circulation of purified air. The Air Purifier can also be placed in the center of a
room, or in a corner, with no change in effectiveness.
For maximum effectiveness, use the Air Purifier in a room that’s 390 ft2(36 m2)
or less. For larger rooms, multiple Air Purifiers should be used.
Important: Do not locate the Air Purifier in front of a heating vent. Also, make sure the location
you select will allow the cord to easily reach a wall outlet. The cord is 10 feet (3.05
meters) long.
Preparing the Filters for Operation
The ATMOSPHERE™ Air Purifier uses three filters–pre-filter, HEPA filter, and
odor filter. The HEPA and odor filters are shipped in plastic bags to minimize
the spread of carbon dust. Prior to using the Air Purifier, the plastic bags must be
removed and the filters properly re-installed.
Removing the Filters
1. To access the filters remove the front cover from the Air Purifier using the
finger tabs located on each side of the Air Purifier–near the top (Fig. 2).
Steady the Air Purifier by first placing your thumbs on the outside edges of
the front display label. Remove the front cover by gently pulling on the tabs
with your fingers. Then, pull off the bottom of the cover.
2. The Pre-filter is attached to the outside of the HEPA Filter. Remove the
combined Pre- and HEPA Filters by squeezing the two tabs located on either
side of the HEPA filter frame (near the top) until they unlatch (Fig. 3a).
3. Swing the filters out and away from the housing (Fig. 3).
Fig. 3
Fig. 3a
Fig. 2

5
4. Pull on the center tab to remove the Pre-filter from the HEPA filter (Fig. 4).
5. Remove the Odor Filter by pulling straight out (Fig. 5).
Installing the Filters
1. Remove the odor filter from its plastic bag (Fig. 6).
Note: Carbon dust from the odor filter may stick to the bag during shipping. When handling
the odor filter and its packaging, be very careful that carbon dust does not stain
your clothes, furniture, or carpet.
2. Carefully replace the filter all the way back inside the Air Purifier (Fig. 7).
Fig. 4
Fig. 6
Fig. 5
Fig. 7

6
3. Remove the HEPA filter from its plastic bag (Fig. 8).
4. Reattach the Pre-filter by sliding the left two tabs into the slots in the frame
of the HEPA Filter (Fig. 9a).
5. Slide the right two tabs into the slots in the frame of the HEPA filter (Fig. 9).
6. With the pre-filter facing out, reinstall the combined filter assembly by first
placing the bottom of the frame into the slots at the bottom of the housing
(Fig. 10a).
7. Swing the filters in place making sure the two tabs on the frame fit into the
slots on each side of the housing (Fig. 10).
8. Reattach the front cover by aligning the four black pegs on the back of the
cover with the four corresponding holes on the housing (Fig 11).
9. Starting with the top two, push the four black pegs into the holes (Fig. 11a).
Fig. 8
Fig. 9
Fig. 9a
Fig. 10a
Fig. 10
Fig. 11
Fig. 11a

7
Operating Instructions
Getting Power
Unwrap the power cord and insert the plug into a wall outlet. Wrap any excess
cord around the cord spool on the bottom of the Air Purifier. The cord spool also
has molded clamps to route the cord as needed (Fig. 12).
The Operating Modes
Your Air Purifier has four modes of operation, controlled by five buttons on the
control panel. Two modes provide continuous operation, and two provide timed
periods of operation. The four modes are described in Operating Modes table; the
functions of the five buttons are summarized in Control Panel Functions table.
OPERATING MODES TABLE
NOTE: For maximum air cleaning effectiveness, continuous operation is recommended.
A timed operation is selected when you want the Air Purifier to operate for a
set amount of time at a specified speed.
Fig. 12
CONTINUOUS OPERATION
MANUAL
Mode
Provides continuous operation until you turn Air Purifier off
or change to another mode. Fan speed remains the same
until you change it manually.
AUTO
Mode
Provides continuous operation until you turn Air Purifier off
or change to another mode. Fan speed automatically changes
in response to input from the Particle Sensor: the dirtier the
air, the higher the fan speed.
TIMER
Mode
Operates for a specified time period, which you select, at a
fan speed you select. At the end of the selected time (from
½ – 12 hours), Air Purifier turns off.
TURBO
Mode
Provides a burst of cleaning power. Air Purifier operates
at highest speed (turbo) for 30 minutes, then turns off or
returns to the previous mode and speed.
TIMED OPERATION

8
Control Panel
The five control buttons on your Air Purifier control panel (Fig. 13) enable you
to select the desired mode of operation and to manually change fan speed and
timer setting. The result of a button-press depends in part on whether the Air
Purifier is already operating, as well as, the mode it is currently in. A complete
summary of functions and responses as each button is pressed are listed in
Control Panel Functions table.
Control Panel Button Functions
Button Functions: When you press any of the control panel buttons, the Air
Purifier will beep to let you know that an action was taken. When the POWER,
AUTO, or TURBO buttons are activated, they also light up; for the SPEED and
TIMER functions, their setting-level displays light up instead.
1. Timer: Programs the Air Purifier to operate for a pre-determined time ranging
from ½ hour to 12 hours. Repeated pressing of the TIMER button while
the Air Purifier is operating changes the timer setting, one step at a time,
to the next setting in the sequence: ½ hr., 2 hrs., 4 hrs., 8 hrs., 12 hrs.,
OFF, ½ hr…. The timer setting you select is shown by the number of lighted
indicators in the timer display. While the timer is operating, the number
of lighted indicators decreases to reflect the time remaining before the Air
Purifier shuts off.
2. Speed: Selects one of the five operating speeds of the Air Purifier. Repeated
pressing of the SPEED button while Air Purifier is operating changes the fan
speed, one step at a time, to the next speed in sequence (1, 2, 3, 4, 5, 1…).
The fan speed at which the Air Purifier is operating is shown by the number
of lighted indicators in the speed display.
3. Turbo: Provides a burst of cleaning power. Air purifier operates at highest
speed (setting 5) for 30 minutes, then turns off or returns to the previous
mode and speed.
4. Auto: Provides continuous operation until you turn the Air Purifier off or
change to another mode. Fan speed automatically changes in response to
input from the Particle Sensor: the dirtier the air, the faster the fan runs.
5. Power: Turns the Air Purifier on and off.
Fig. 13

9
Control Panel Functions
Mode Prior to
Button Press
RESULTS FROM PRESSING EACH BUTTON
TIMER
Button SPEED
Button TURBO
Button AUTO
Button POWER
Button
Air purifier
Off No effect. No effect.
Air Purifier turns on
in TURBO Mode;
fan speed at 5.
After 30 minutes,
Air Purifier turns
itself off.
Air Purifier turns
on in AUTO
Mode; fan speed
is adjusted by
input from Particle
Sensor.
Turns Air Purifier
on in MANUAL
Mode; fan speed
at last manual
setting.
MANUAL
Mode
Changes to TIMER
Mode;
fan speed at
current setting.
After 30 minutes,
Air Purifier turns
itself off.
Fan speed
changes to next
speed in sequence
(1, 2, 3, 4, 5,
1…); no change
in Mode.
Changes to TURBO
Mode; fan speed
at 5. After 30
minutes, reverts to
MANUAL Mode at
previous fan speed.
Changes to
AUTO Mode; fan
speed stays at
current setting
until adjusted by
input from Particle
Sensor.
Turns Air
Purifier off.
AUTO
Mode
Changes to TIMER
Mode with time
set at ½ hour;
fan speed stays
at current setting.
When time is up,
Air Purifier turns
itself off.
Changes to
MANUAL Mode;
fan speed changes
to next speed in
sequence (1, 2, 3,
4, 5, 1…)
Changes to
TURBO Mode (fan
speed 5); after 30
minutes, returns
to AUTO Mode at
previous fan speed.
Changes to
MANUAL Mode;
fan speed stays at
current setting.
Turns Air
Purifier off.
TIMER Mode
- some or all
of the set time
remaining
Changes from
present time
remaining to next
higher time in
sequence (2, 4,
8, 12 hours*);
Air Purifier turns
itself off after the
new time duration
expires.
Fan speed
changes to next
speed in sequence
(1, 2, 3, 4, 5,
1…); no change
in Mode or time
remaining.
Changes to
TURBO Mode (fan
speed 5); after 30
minutes, reverts
to TIMER Mode at
previous fan speed
with ½-hour less
time remaining.
Air Purifier turns
on in AUTO
Mode; fan speed
is adjusted by
input from Particle
Sensor.
Turns Air
Purifier off.
TURBO
Mode
Changes to TIMER
Mode with fan
speed at 5 and
time duration at
next higher time
in sequence (2
hours). When time
is up, Air Purifier
turns itself off.
Changes to
MANUAL Mode;
fan speed changes
to lowest setting.
Changes back
to all settings in
effect before you
started TURBO
Mode.
Changes to AUTO
Mode; fan speed
stays at current
setting (5) until
adjusted by input
from Particle
Sensor.
Turns Air Purifier
off.
*If TIMER button is pressed when indicator shows 12 hours remaining, all five indicator lights go off and Air Purifier changes to MANUAL Mode.

10
Particle Sensor Display
The Particle Sensor is active whenever the Air Purifier is running. It provides
a display of how clean or dirty the air in the room environment is at any point
in time. The Particle Sensor filter is located inside the left handle on the side
of the purifier (Fig. 14a).
When the air is very dirty, all five bars are red; as the air is cleaned by the Air
Purifier, the display changes to four red bars, then to three yellow, two yellow,
and finally – when the air is clean – one green (Fig. 14b).
Knowing how clean the air in the room is helps you make an appropriate
selection when setting the fan speed manually. Otherwise, you can select
AUTO Mode by pressing the AUTO button, and let the Particle Sensor control
fan speed.
Filter Monitors
The ATMOSPHERE™ Air Purifier automatically monitors the condition of
all three of its filters, and alerts you when they need replacing (or cleaning
in the case of the Pre-filter). The monitors calculate filter life based on a
combination of operating hours, speed of operation, and levels of smoke,
dust, and pollen.
The status of each filter is indicated by the color of the filter icon showing on
the control panel (Fig. 15). Icons A, B, and C represent the Pre, HEPA, and
Odor filters respectively.
A summary of what each color represents for each filter can be seen in
Understanding the Filter Monitor Icon Colors table.
ABC
Fig. 14a
Fig. 14b
Fig. 14
Fig. 15
Understanding the Filter Monitor Icon Colors
NOTE: Whenever a filter monitor shows Amber or Red, the Air Purifier beeps three times each time you press a control button as an
added reminder that a filter needs attention.
NOTE: The HEPA and odor filter two week duration between the amber and red colored icons is a true two week period regardless
of operating conditions.
Color Which Filters Status Duration
Green All 3 Filters Condition satisfactory Until color changes
Amber HEPA & Odor Should be replaced soon About 2 weeks
Red Pre-filter Needs cleaning Until you clean the Pre-filter
and reset
Red HEPA & Odor Replace immediately Until replace the HEPA or
Odor filter and reset

11
Clean Air Delivery Rate (CADR)
Fan Settings table shows the volume of treated air delivered per minute by the
ATMOSPHERE™ Air Purifier at each fan setting.
Fan Settings
Fan Setting CADR
1 50 cfm (1.4 m3/min)
2 100 cfm (2.8 m3/min)
3 150 cfm (4.2 m3/min)
4 200 cfm (5.7 m3/min)
5 (TURBO) 250 cfm (7.1 m3/min)
CADR = Volume of treated air delivered per minute
cfm = cubic feet per minute
m3/min = cubic meters per minute
Filter Life
Cleaning the Pre-Filter
The pre-filter is located directly behind the front cover. How often you need to
clean the pre-filter is based on the speed and the number of hours that the unit
is operated. Depending on use, the pre-filter will need to be cleaned every 2 - 12
months. The pre- filter monitor on the front control panel will flash to indicate
when cleaning is needed. It is recommended to clean the particle sensor filter
each time you clean the pre-filter.
NOTE: The pre-filter should be cleaned every 12 months regardless of speed or hours of use.
Replacing the HEPA Filter
The HEPA filter is attached to the pre-filter. The HEPA filter life is based on a
combination of three different operating conditions: the hours of operation per
day, the speed of operation, and the dust sensor readings. The HEPA filter life will
range from 3 months to 5 years depending on these conditions. For example: the
HEPA filter life on a unit operated 24 hours a day on speed two with a dust sensor
reading of 2 bars will be approximately 9 months. The HEPA filter monitor on the
front control panel will indicate when the filter should be replaced.
NOTE: The HEPA filter should be replaced at least every five years regardless of use conditions.
Replacing the Odor Filter
The odor filter is located behind the HEPA filter. The odor filter will last from
four to twelve months depending on how many hours and at what speed the
ATMOSPHERE Air Purifier is used. For example: the odor filter life on a unit
operated 24 hours a day on speed two will be approximately 10 months. The
odor filter monitor on the front control panel will indicate when the filter should
be replaced.
NOTE: The odor filter should be replaced at least once a year regardless of speed or hours
of use.

12
Filter Monitor Reset
Always be sure to reset the filter monitor after cleaning the pre-filter or replacing
either the Odor or HEPA filters. Press and hold the appropriate reset button
(located on the left side of the front display panel) with a pointed object for
about 3 seconds until the system beeps to confirm reset. The monitor will begin
to blink when you press the button.
Using the Remote Control
The Remote Control has a lithium battery (type CR2032) already installed. To
usetheRemote,simply point it towardtheAirPurifier and press thedesiredbutton
(A – Power, B – Auto, C – Turbo, D – Speed, E – Timer) (Fig 16).
NOTE: The buttons on the remote control have the same effect as those on the control panel.
For convenience the Remote Control can be stored in the slot on the back of
the Air Purifier (Fig. 17).
Maintenance
Your ATMOSPHERE™ Air Purifier should be cleaned and maintained regularly
for optimum performance.
As Needed
Wipe the housing exterior with a damp cloth and dry. If very dirty, use a mild de-
tergent, such as L.O.C.™ Multi-Purpose Cleaner. Do not use cleaners containing
ammonia, alcohol, or paint thinner. These cleaners will damage the surface.
Cleaning the Pre-filter and Particle Sensor Filter
1. Turn power off and unplug the Air Purifier.
2. Remove the front cover from the Air Purifier using the finger tabs located on
each side of the Air Purifier – near the top (Fig. 18). Steady the Air Purifier
by first placing your thumbs on the outside edges of the control panel.
Remove the front cover by gently pulling on the tabs with your fingers. Then,
pull off the bottom of the cover.
3. Pull on the center tab to remove the Pre-filter from the HEPA filter (Fig. 19).
NOTE: Pull tab gently to minimize spread of accumulated dust.
Fig. 16
Fig. 18
Fig. 17
Fig. 19
A
B
C
D
E

13
4. Remove accumulated dust from the Pre-filter with a vacuum cleaner. If the
filter is very dirty, rinse with warm tap water. Dry thoroughly before returning
to Air Purifier.
5. Reattach the Pre-filter by sliding the left two tabs into the slots in the frame
of the HEPA Filter (Fig. 20a).
6. Slide the right two tabs into the slots in the frame of the HEPA filter
(Fig. 20).
7. Reattach the front cover by aligning the four black pegs on the back of the
cover with the four corresponding holes on the housing (Fig. 21).
8. Starting with the top two, push the four black pegs into the holes (Fig. 21a).
9. To keep the Particle Sensor functioning properly, clean the Particle Sensor
filter each time you clean the Pre-filter.
10. Remove the filter by pulling straight out on the tab (Fig. 22a).
11. Remove any accumulated dust with a vacuum cleaner.
12. If the filter is very dirty, rinse with warm tap water. Dry thoroughly before
returning to Air Purifier.
13. Reinsert the particle sensor filter into the left handle making sure the filter
is positioned properly (seated against the stops).
14. Plug-in Air Purifier and turn-on power.
15. Reset the Pre-filter monitor using the tip of a ballpoint pen or the end of a
paper clip (Fig. 23). Press and hold the Pre-filter reset button until it beeps.
The Pre-filter monitor light color will change from red to green.
Fig. 20
Fig. 20a
Fig. 23
Fig. 22
Fig. 21
Fig. 21a
Fig. 22a

14
Replacing the Odor Filter
1. Turn power off and unplug the Air Purifier.
2. Remove the front cover from the Air Purifier using the finger tabs located on
each side of the Air Purifier – near the top (Fig. 24). Steady the Air Purifier
by first placing your thumbs on the outside edges of the control panel.
Remove the front cover by gently pulling on the tabs with your fingers. Then,
pull off the bottom of the cover.
3. The Pre-filter is attached to the outside of the HEPA filter. Remove the
combined Pre- and HEPA filters by squeezing both tabs on either side of the
HEPA frame (near the top) until they unlatch (Fig. 25a).
4. Swing the filters out and down away from the housing. Set the combined
filters aside (Fig. 25).
5. Pull the tabs on the old Odor filter to remove and discard (Fig. 26).
NOTE: Make sure you don’t let any carbon particles stain your clothing, furniture, or carpet.
6. Remove the new Odor filter from its plastic bag (Fig. 27).
NOTE: When disposing of the bag, handle gently to be sure any carbon dust remains inside.
7. Carefully place it all the way to the back inside the Air Purifier (Fig. 28).
Fig. 24
Fig. 26
Fig. 25
Fig. 25a
Fig. 28
Fig. 27

15
8. With the pre-filter facing out, reinstall the combined filter assembly by first
placing the bottom of the frame into the slots at the bottom of the housing
(Fig. 29a).
9. Swing the filters in place making sure the two tabs on the frame fit into the
slots on each side of the housing (Fig. 29).
10. Reattach the front cover by aligning the four black pegs on the back of the
cover with the four corresponding holes on the housing (Fig. 30).
11. Starting with the top two, push the four black pegs into the holes (Fig. 30a).
12. Plug-in Air Purifier and turn-on power.
13. Reset the odor filter monitor using the tip of a ballpoint pen or the end of
a paper clip (Fig. 31). Press and hold the odor filter reset button until it
beeps. The odor filter replacement light will turn from red to green.
Fig. 29
Fig. 29a
Fig. 30a
Fig. 30
Fig. 31

16
Replacing the HEPA Filter
1. Turn power off and unplug the Air Purifier.
2. Remove the front cover from the Air Purifier using the finger tabs located on
each side of the Air Purifier – near the top (Fig. 32). Steady the Air Purifier
by first placing your thumbs on the outside edges of the control panel.
Remove the front cover by gently pulling on the tabs with your fingers. Then,
pull off the bottom of the cover.
3. The Pre-filter attaches to the outside of the HEPA filter. Remove the
combined Pre- and HEPA filters by squeezing both tabs on either side of
the HEPA frame (near the top) until they unlatch (Fig. 33a).
4. Swing the filters out and down away from the housing (Fig. 33).
5. Pull the tab on the center of the pre-filter to separate it from the old HEPA
filter (Fig.34). Discard the old HEPA filter.
NOTE: Vacuum off the Pre-filter before attaching it to a new HEPA filter even if the Pre-
filter monitor light is green.
6. Remove the new HEPA filter from the bag (Fig. 35).
Fig. 32
Fig. 33
Fig. 33a
Fig. 35
Fig. 34

17
7. Slide the left two tabs into the slots in the frame of the new HEPA filter
(Fig. 36a).
8. Reattach the pre-filter by sliding the right two tabs into the slots in the
frame of the new HEPA Filter (Fig. 36).
9. With the pre-filter facing out, reinstall the combined filter assembly by first
placing the bottom of the frame into the slots at the bottom of the housing
(Fig. 37a).
10. Swing the filters in place making sure the two tabs on the frame fit into the
slots on each side of the housing (Fig. 37).
11. Reattach the front cover by aligning the four black pegs on the back of the
cover with the four corresponding holes on the housing (Fig. 38).
12. Starting with the top two, push the four black pegs into the holes (Fig. 38a).
13. Plug-in Air Purifier and turn-on power.
14. Reset the HEPA filter monitor using the tip of a ballpoint pen or the end
of a paper clip (Fig. 39). Press and hold the HEPA filter reset button until
it beeps. The HEPA filter replacement light will turn from red to green.
15. Reset the pre-filter monitor (Fig. 40).
Fig. 36a
Fig. 36
Fig. 37
Fig. 37a
Fig. 38
Fig. 38a
Fig. 39
Fig. 40

18
Replacing the Remote Control Battery
1. Slide tab on the bottom of the remote (Fig. 41).
2. While tab is down, pull battery sleeve out (Fig. 42). Remove old battery.
3. Place a new lithium battery (type CR2032) in the battery holder with the
smaller-diameter section facing down.
4. Snap the battery sleeve back into the remote (Fig. 43).
NOTE: If the sleeve will not go in the battery was installed upside down. Flip the battery
over and snap the battery sleeve closed.
Fig. 41
Fig. 42
Fig. 43
Troubleshooting
Condition Solution
The operation light is on, but air does
not come out of the Air Purifier.
Check whether the shipping bags have been removed from the filters inside the Air Purifier. (See
INSTALLATION AND SETUP, page 4.) Also, build-up of dirt and/or hair on the pre-filter might be
the cause. In this case, clean the pre-filter (See CLEANING THE PRE-FILTER, page 12).
The volume of air coming out of the Air
Purifier is high enough, but it doesn’t
seem to be removing any dust or odors
from the room.
Check to be sure both the odor filter and HEPA filter are installed inside the Air Purifier. (See
INSTALLING THE FILTERS, page 5).
After the HEPA filter was replaced,
the light is still blinking and the Air
Purifier beeps three times every time I
press a button.
Reset the HEPA filter monitor, using a ball point pen or the end of a paper clip. Press and hold its
RESET button until it beeps.
The TURBO button was pressed
mistakenly, or the timer was set for the
wrong length of time.
You can stop Turbo Mode by pressing the TURBO button once. You can disengage the timer by
pressing the TIMER button repeatedly until all the timer lights are off.
Another solution is to turn the Air Purifier off, then on again. The Air Purifier restarts in Continuous
operation mode, with the same fan setting from before the unwanted buttons were pushed.
Other manuals for 10-1076
1
Table of contents
Languages:
Other atmosphere Air Cleaner manuals