Atomos Connect-AC S2H User manual

Atomos Connect
Connect S2H & H2S User Guide
Congratulations on purchasing your Connect
converter and Test Pattern Generator. You
are now the proud owner of an extremely
compact and versatile converter that can
run standalone for up to 10 hours from the
battery supplied – no AC cables required!
Of course, as is our custom at Atomos, we
have included a comprehensive selection
of accessories, including a 9V AC power
adaptor, AC battery charger and a 12V DC
travel adaptor too.
The built-in Test Pattern Generator has
multiple patterns, in both SD and HD, the
latter including 1080p50 and 60 – true 3G
modes. The modes are indicated by coloured
LEDs, which are explained in this QuickStart
Guide. Learn the colour sequences, learn
the modes for fast and easy operation.
www.atomos.com | Sales: sales@atomos.com | Support: support@atomos.com

Atomos Connect. User Manual V1.0 2
CONNECT H2S
HDMI>HD-SDI
(Part No. ATOMH2S001)
Connect H2S
9V AC Adaptor
12V DC Travel Adaptor
NP Series Battery
AC Battery Charger
CONNECT S2H
HD-SDI>HDMI
(Part No. ATOMS2H001)
Connect S2H
9V AC Adaptor
12V DC Travel Adaptor
NP Series Battery
AC Battery Charger
NOTE:
This User Guide pertains to both Connect units. Each Connect box contains 1 converter only.
What’s in the box
HDMI IN
2 x HD-SDI OUT/TPG OUT LOOP OUT/TPG OUT HD-SDI IN
HDMI OUT/TPG OUT

Atomos Connect. User Manual V1.0 3
1. POWER/BATTERY
2. MODE
3. USB port (Firmware updates only)
4. HDMI port (H2S in / S2H out)
5. LED DISPLAY
6. SDI CONNECTOR
7. BATTERY TOP
8. BATTERY SHOE
LED INDICATOR OVERVIEW
There are 4 modes of operation indicated
by LEDs.
MODE LED COLOUR
CONVERTER MODE (ext. bat.)
(int. bat)
TPG MODE
PRECISE BATTERY LEVEL
FLASHLIGHT MODE
LED LABELS
PDR Pulldown Removal
TPG Test Pattern Generator
Rx Conversion Input Status
TPG> (TEST PATTERN MODE)
M Mode
P/I Progressive/Interlaced
R Rate
S Scan
Unit description
1 23
4 5
6
7 8

Atomos Connect. User Manual V1.0 4
Getting started
CHARGING BATTERIES
We recommend that you charge new
batteries before using them.
To charge the external battery supplied,
place onto the supplied charger and charge
until the light turns from RED to GREEN.
To charge the internal battery, place the
supplied AC mains adaptor OR an external
battery on to the Connect. Full internal
battery charge is indicated by 4 BLUE LEDs
after pressing the PWR/BAT button.
NOTE: The battery level indicated by
pressing the PWR/BAT button will always
be the current active battery. If an external
battery or AC mains power supply is
attached, the external battery/AC mains
level will be indicated when PWR/BAT is
pressed. If no external battery is present,
the internal battery level will be indicated
when PWR/BAT is pressed.
POWER UP
Turn on by pressing the PWR/BAT button and
the unit will power up ready for operation.
Turn off by pressing & holding PWR/BAT
button for more than 3 seconds.
NOTE: Connect Converters utilise the
aluminium side panels to dissipate heat.
Do not be alarmed if the sides of the
product are warm or hot to touch, this is
deliberate and normal heat dissipation
operation.

Atomos Connect. User Manual V1.0 5
Power management
EXTERNAL & INTERNAL BATTERIES
The Connect converter has an internal
battery (240mAh) that will last up to 1 hour
in normal Converter mode. Also included,
and recommended for normal operation,
is an NP-570 (2600mAh) Sony-compatible
battery and an AC (110-240v) mains power
adaptor. The following describes the power
management indicators displayed on the
Connect while using the internal, external
and AC power supplies.
BASIC BATTERY INDICATOR
This indicates which power source is in use
(internal or external) and when power has
been reduced to critical levels. This is a basic
indicator that can be used to instantly check
which battery is in use and if a replacement
battery is required.
External battery or AC power indication
A BLUE LED indicates the use of an
external battery. This will flash BLUE when
the external battery is low.
NOTE: The internal battery will charge when
an external battery or AC mains adaptor is
attached to the Connect.
Internal battery level indication
GREEN indicates the internal battery is in use
This will go to solid RED when under 50%
power remaining.
When the internal battery is critically low, the
LED will show flashing RED.
EXTERNAL INTERNAL
EXTERNAL BATTERY
EXTERNAL BATTERY LOW
NOW USING INTERNAL BATTERY
INTERNAL BATTERY
INTERNAL BATTERY LOW <50%
CRITICAL > CHANGE BATTERY

Atomos Connect. User Manual V1.0 6
DETAILED BATTERY LEVEL
INDICATION
In order to more accurately check the level
of the battery currently in use (internal or
external), press the PWR/BAT button while
in any mode.
The status level will be indicated for a few
seconds and then return to the previous
mode of operation.
BATTERY LEVEL INDICATOR
Full
7/8
6/8
5/8
4/8
3/8
2/8
1/8
Empty
NOTE: The internal battery will recharge
whenever an external battery or AC mains
adaptor is connected.
CONTINUOUS POWER
A portable device without a power supply
is useless, but that will never happen with
Connect converters.
With flexible battery and power options,
you’re covered for any eventuality – even
an unexpected power loss. A built-in
battery ensures that the show goes on if
all else fails.
Multiple, stackable external batteries can
be swapped without powering down, and
any Connect battery configuration acts as
a backup to AC power, at the same time as
being charged from it.
POWERING OTHER DEVICES
You can attach to, and power, Atomos Ninja,
Ninja-2 and Samurai field recorders.
Power management

Atomos Connect. User Manual V1.0 7
Operation
MODES OF OPERATION
The Connect converter has two modes of
operation: Converter and Test Pattern
Generator (TPG). To switch between them,
press and hold the MODE button for more
than 2 seconds. A mode change will be
indicated by the TPG LED illuminating GREEN
for TPG Mode and the Rx LED illuminating
RED or GREEN for Converter Mode.
NOTE: Connect S2H converts SDI to HDMI
and Connect H2S converts HDMI to SDI
when in Converter Mode.
Converter Mode
The Rx LED indicates when an input signal
has been locked and is being converted. See
the Pull-Down Removal (PDR) section for PDR
during conversion. Connect supports 16, 20 &
24-bit audio in all modes of conversion.
A GREEN Rx LED indicates a locked
video signal is being converted.
A RED Rx signal indicates searching
for a signal for conversion.
Supported formats
Connect S2H: HD-SDI>HDMI
1080p60
1080p59.94
1080p50
1080i60
1080i59.94
1080i50
1080p30
1080p29.97
1080p25
1080p24
1080p23.98
Connect H2S: HDMI>HD-SDI
1080p60
1080p59.94
1080p50
1080i60
1080i59.94
1080i50
1080p30
1080p29.97
1080p25
1080p24
1080p23.98
1080psf30
1080psf29.97
1080psf25
1080psf24
1080psf23.98
720p60
720p59.94
720p50
486i59.94
480i59.94
576i50
1080psf30
1080psf29.97
1080psf25
1080psf24
1080psf23.98
720p60
720p59.94
720p50
486i59.94
480i59.94
576i50

Atomos Connect. User Manual V1.0 8
Operation
Pulldown Removal (PDR)
Many video cameras, although recording
internally in 23.98p, 24p, 25p, 29.97p & 30p
output the video signal over SDI or HDMI
in interlaced (psf). The internal recording
format is converted to an interlaced (psf)
format in order to be compatible with more
monitors and displays. This process is called
applying Pulldown (Telecine) to the video
stream. The Connect converter can remove
this Pulldown (reverse Telecine) from the
incoming signal and convert the interlaced
formats back to their original form 23.98p,
24p, 25p, 29.97p and 30p.
When the Connect is in Converter Mode
and locked (Rx) to an interlaced signal
(1080i) that has had Pulldown applied, the
Pulldown (PDR) function can be used.
2:2 Pulldown Removal Operation
To activate the 2:2 pulldown function, press
the MODE button once. The PDR LED will
turn BLUE.
The unit will then convert as follows:
INPUT OUTPUT
23.98psf > 23.98p
24psf > 24p
25psf > 25p
29.psf > 29.97p
30psf > 30p
3:2 Pulldown Removal Operation
To activate the 3:2 pulldown function press
the MODE button a second time. The PDR
LED will flash GREEN, indicating it is
searching for a 24p sequence to lock to.
3:2 Pulldown converts signals containing
23.98/24p video inside a 59.94/60i stream
respectively.
IMPORTANT! 3:2 Pullldown removal must be
calculated from a moving sequence of video.
To aid obtaining 3:2 Pulldown lock, move the
camera or wave your hand in front it.
3:2 Pulldown Lock
3:2 Pulldown Lock is indicated by a solid
GREEN LED. When illuminated GREEN, the
original 23.98/24p sequence will be output,
the unit is converting 59.94/60i back to the
original 23.98/24p source.
INPUT OUTPUT
59.94i > 23.98p
60i > 24p
NOTE: If the input signal is not interlaced,
the PDR function is disabled.
Pressing the MODE button a third time turns
off the pulldown.

Atomos Connect. User Manual V1.0 9
Operation
Test Pattern Generation Mode
A major part of video engineering is signal
testing and verification. The Connect is
also a convenient portable test solution for
these tasks. With four built-in test patterns
and SD, HD as well as 3G video modes
supported, you can test your equipment in
a cost effective, professional way. When in
Test Pattern Generation (TPG) Mode, both
the video mode and the test pattern output
can be changed.
Using TPG
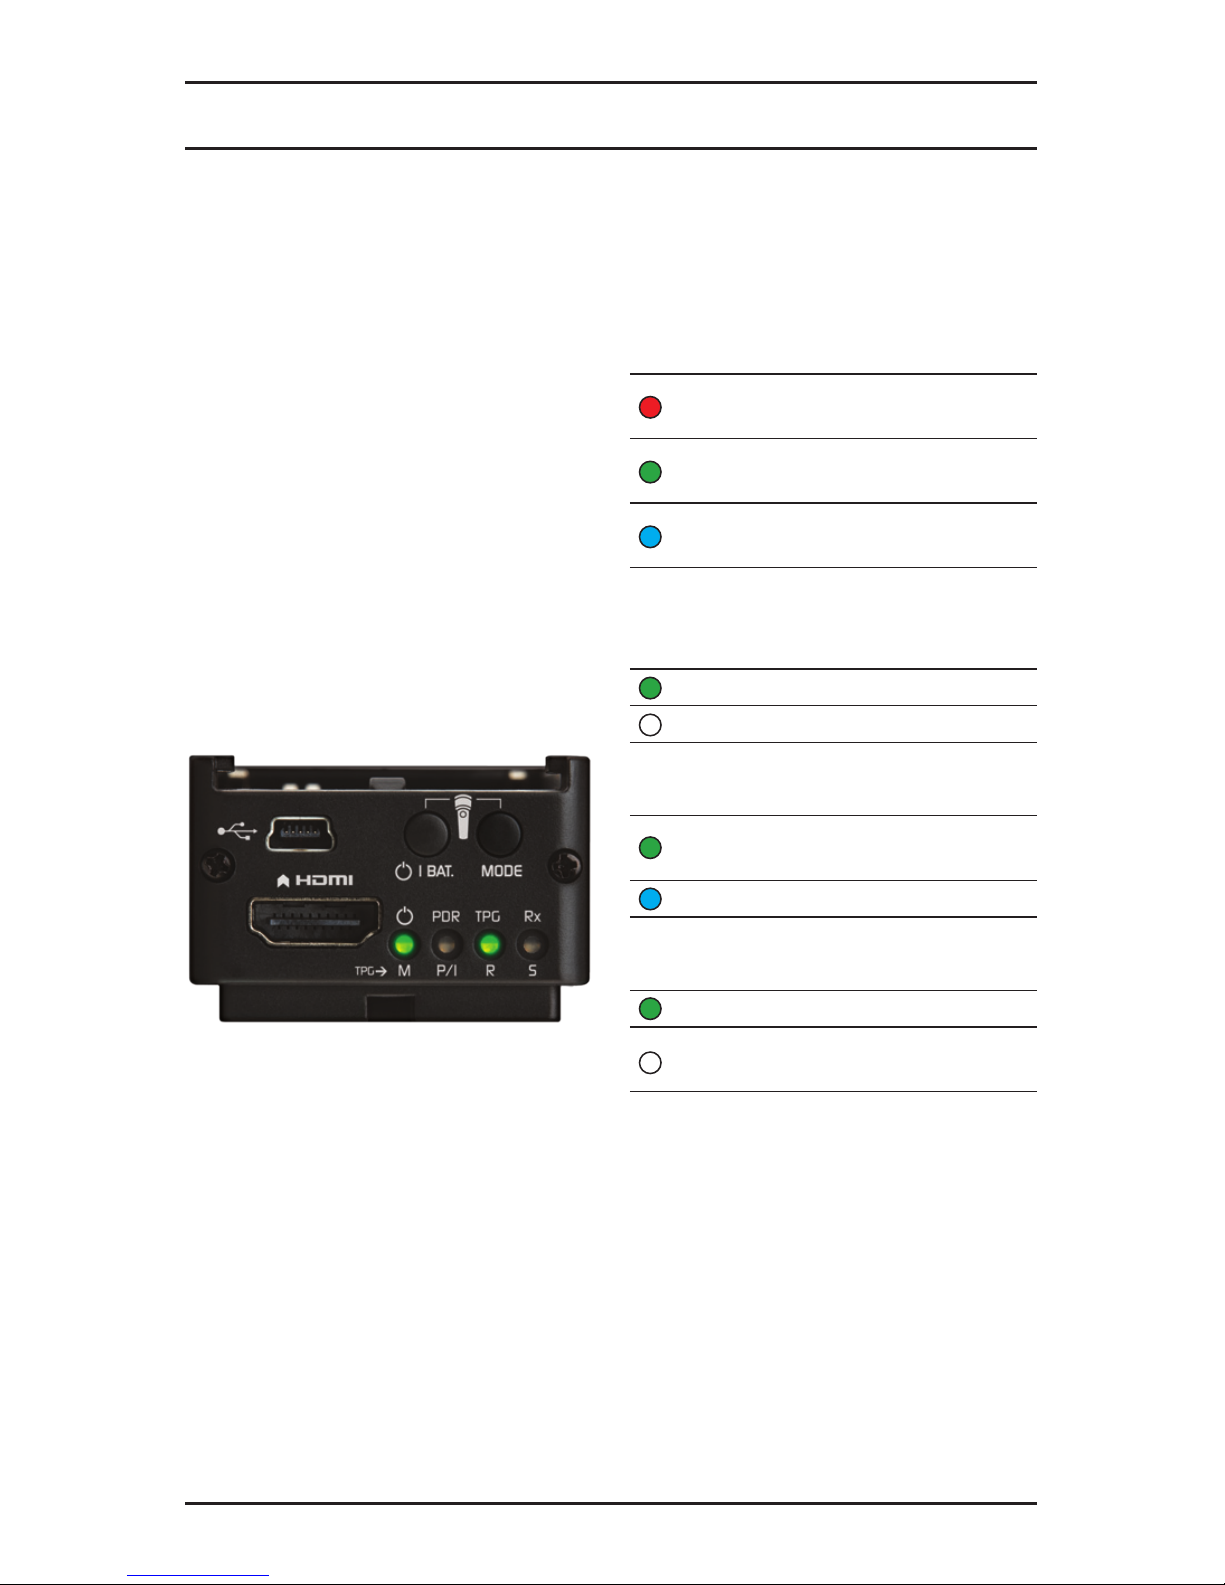
TPG Mode is entered by pressing and
holding the MODE button for more than 2
seconds.
This mode will be indicated by a GREEN LED
on the TPG indicator.
This is the TPG Home state. To return to
Converter Mode, press the MODE button
again for more than 2 seconds.
TPG Mode ON (Home)
After TPG Mode has been activated,
pressing the MODE button at any time will
utilise all four LEDs to indicate the current
video output mode, as per the following
indicators.
NOTE: The TPG video mode indication will
last for 4 seconds before returning to TPG
Home page.
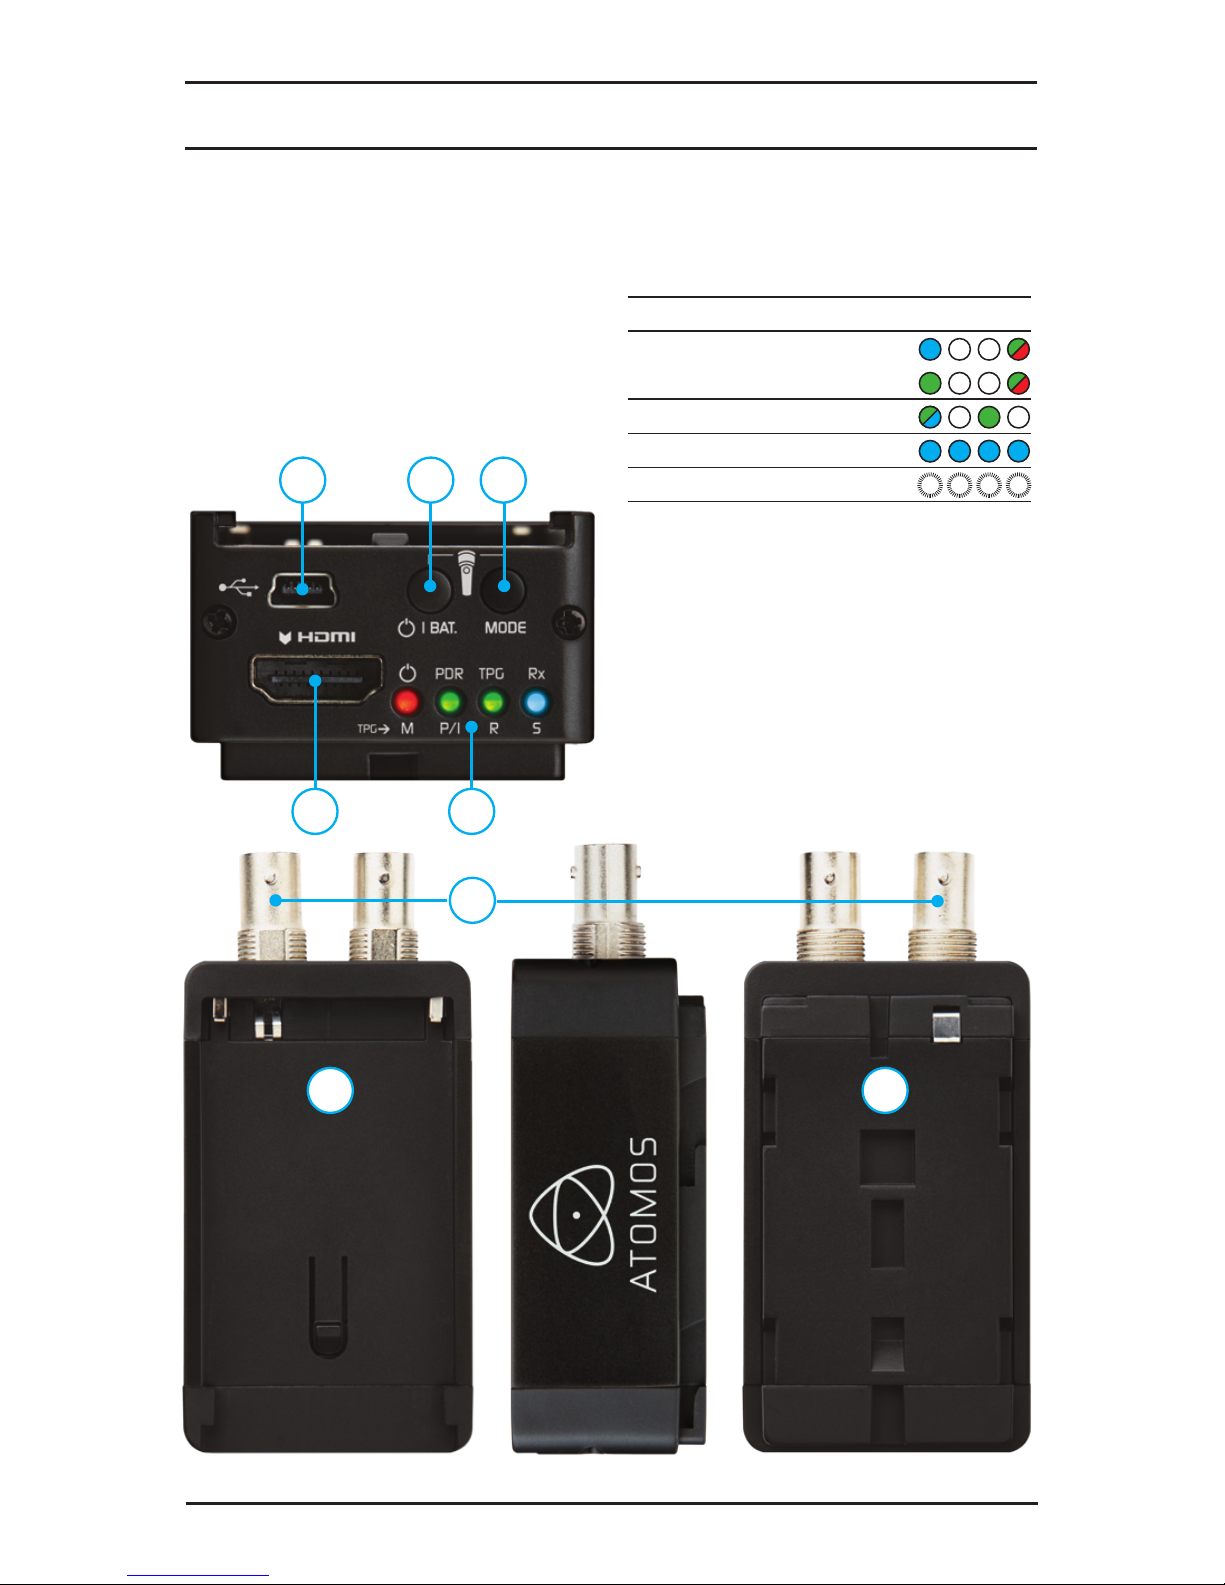
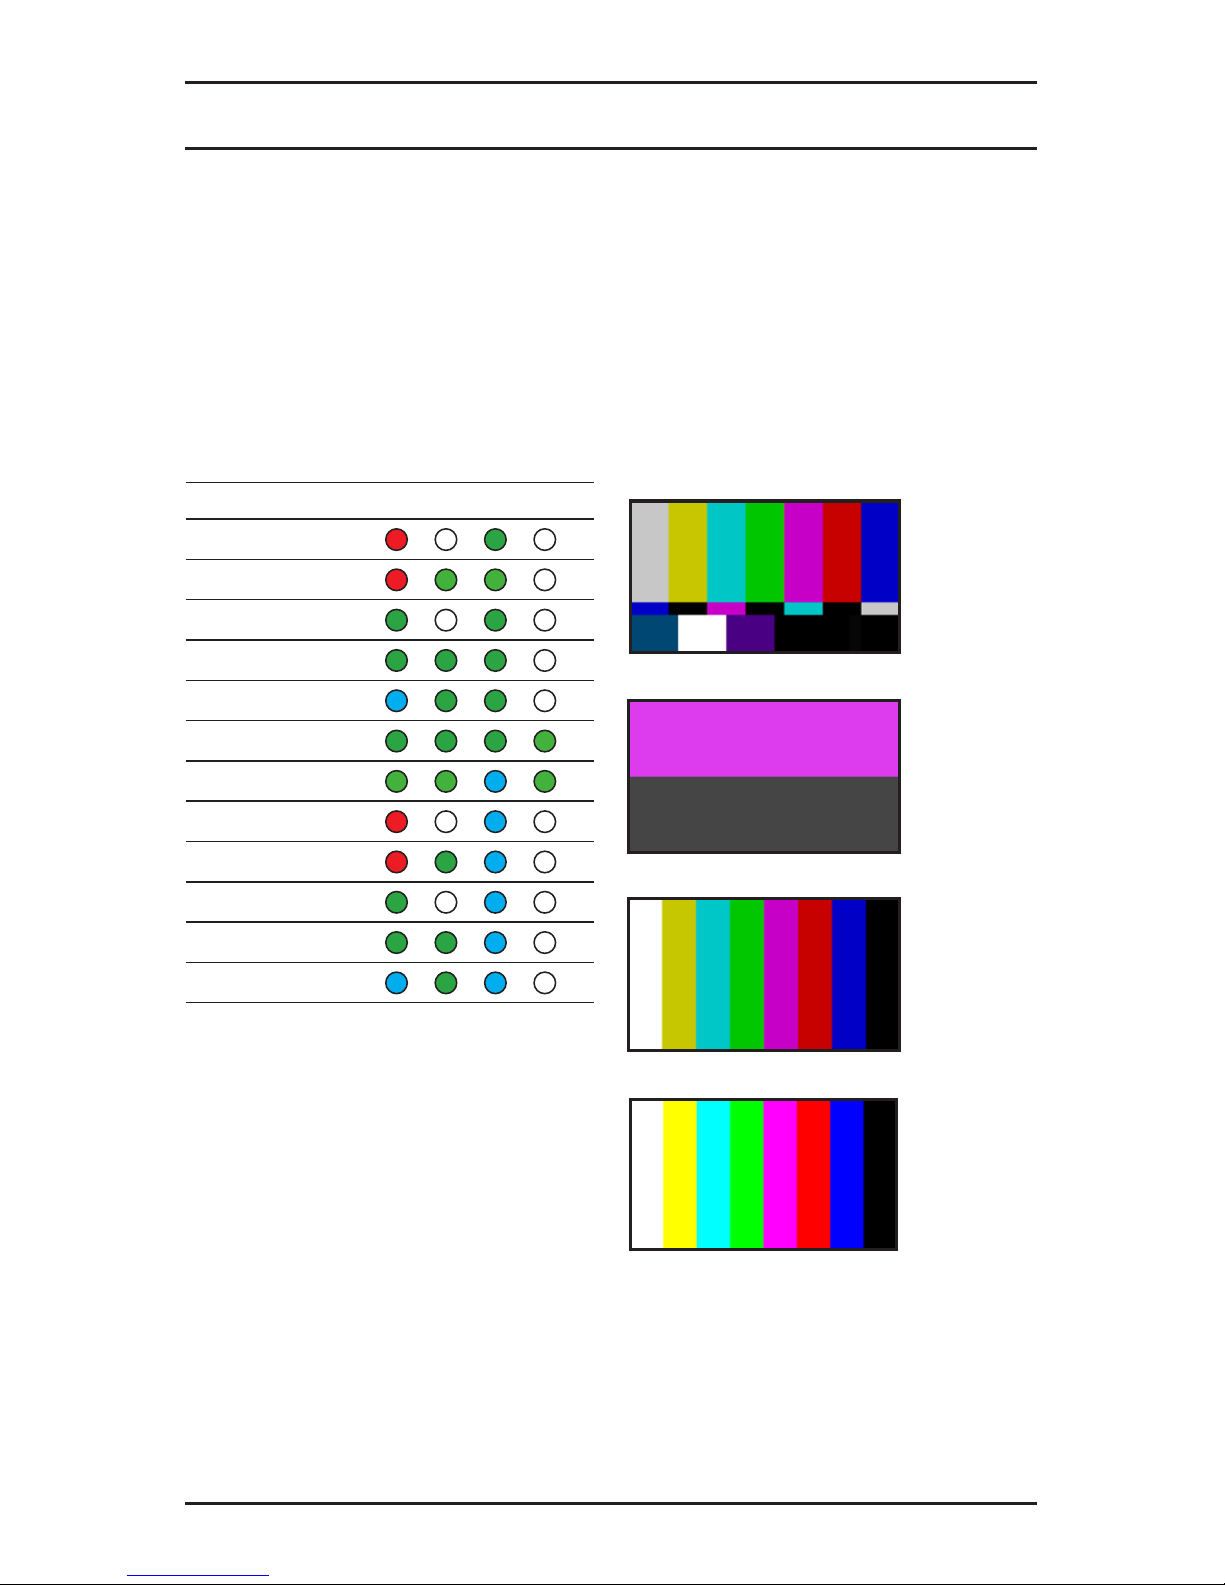
TPG Video Mode Indication
The TPG colour code indicators for the
TPG video modes are M, PI, R and S. These
correspond to the following video formats:
MODE – indicates video resolution
RED = under 1080 Resolution –
(486i59.94, 576i50, 720p59.94, 720p50)
GREEN = Standard 1920x1080 formats
(23.98p, 24p, 25p, 29.97p, i50, i59.94)
BLUE = 3G 1920x1080 formats
(p50, p59.94)
P/I – indicates Progressive or Interlaced
video formats
GREEN = Progressive
No Light = Interlaced
RATE – indicates the video clock rate/region
GREEN = NTSC frame rates (23.98,
29.97, 59.94 Hz)
BLUE = PAL Frame Rates (24, 25, 50 Hz)
SCAN – indicates scan rates
GREEN = film scan rates (23.98, 24 Hz)
No Light = television rates (29.97, 59.94,
25, 50 Hz)
NOTE:
Connect H2S outputs TPG on both SDI
outputs.
Connect S2H outputs on both the HDMI and
the LOOP OUT SDI outputs TPG.

Atomos Connect. User Manual V1.0 10
Operation
Changing the TPG Video Mode
While the Connect is indicating the TPG
video mode (as above), the video output
mode can be changed by pressing the MODE
button a second time.
Each subsequent press of the MODE button
while in this state will cause the Connect to
scroll through video modes in the following
order.
TPG MODE P/I RATE SCAN
NTSC
720 59
1080i 59
p29
p59
p23
p24
PAL
720 50
1080i 50
p25
p50
NOTE: You must first enter the TPG Video
Indication mode in order to change the
current TPG video output format.
Changing the Test Pattern Output
While the Connect is indicating the TPG
video mode, the type of test pattern
output can be changed by pressing the
PWR/BAT button.
Each subsequent press of the PWR/BAT
button while in this state will cause the
Connect to scroll through the 4 test patterns
available in the following order:
1. SMPTE Colour Bars 75%
2. SDI EQ/PLL Pathological
3. Colour Bars 75%
4. Colour Bars 100%
NOTE: To change the test pattern in use, you
must first be in TPG Mode, have activated
the TPG Video Format Indicator and while in
this mode press the PWR/BAT button.
To return back to Converter Mode, press
and hold the MODE button for more
than 2 seconds.

Atomos Connect. User Manual V1.0 11
Technical specifications
Time Code Pass-Through
Connect converters are designed to convert
everything from one standard to another,
this includes timecode (TC) and record
start/stop trigger flags (S/S). SDI TC will
be converted to HDMI TC on S2H and HDMI
TC will be converted to SDI TC on H2S. This
allows perfect translation of all parts of the
video standards between HDMI and SDI.
Connect converters support Sony, Canon,
Panasonic, JVC, Arri and RED SDI TC and
S/S. In HDMI they support Canon and Sony
TC and Canon’s S/S, currently the only HDMI
TC and S/S protocols available.
Flashlight function
The Connect also has a handy flashlight
function that will illuminate all LEDs WHITE.
To activate the flashlight, press
both the MODE & PWR/BAT button
at the same time. This mode
can be activated in any mode of
operation.
To turn the flashlight off, press
either button, MODE or PWR/BAT.
Firmware updating
The firmware of the Connect series
converters can be updated via the USB mini
port. Detailed instructions on how to update
your converter can be found at:
www.atomos.com/support
Operation
Dimensions 45.0mm (w) x 76.5mm (l) x 30.0mm (h)
Power Consumption 2W while converting
Batteries (NP Series, 7.4V - 16.8V) • Internal up to 1 hour • 2600mAh - 10hrs (included) • 5200mAh - 20hrs (optional)
• 7800mAh - 30hrs (optional) • AC Power Supply 100-240V (included) • DTap Adaptor
(optional)
Continuous Power (Patent Pending) Connect acts as a battery, feeding continuous power into your Ninja, Samurai, or
another Connect.
Built-in 3:2 and 2:2 Pulldown Removal • 25PsF (50i)>25P • 30PsF (60i) >30P • 24p (3:2-60i) >24P
Test Pattern Generator SMPTE 75%, Colour Bars 75 & 100%, SDI EQ/PLL Pathological, Audio Tone 1kHz
@ -20dBfs
USB Interface Firmware Update Interface ONLY
Video Input H2S: HDMI x 1 S2H: 3G/HD/SD-SDI x 1
Video Out H2S: 3G/HD/SD-SDI x 2 S2H: 3G/HD/SD-SDI x 1 and HDMI x 1
Audio (In/Out) Embedded Audio 2ch, 24, 20 or 16-bit
Timecode SDI: Sony, Canon, Panasonic, Arri, RED
HDMI: Sony, Canon Timecode, Canon Start/Stop
Supported Formats (In/Out) 1080p60, 1080p59.94, 1080p50, 1080i60, 1080i59.94, 1080i50, 1080p30,
1080p29.97,1080p25, 1080p24, 1080p23.98, 1080psf30, 1080psf29.97, 1080psf25,
1080psf24,1080psf23.98, 720p60, 720p59.94, 720p50, 486i59.94, 480i59.94, 576i50
All specifications are subject to change without notice.
Connect H2S/S2H

Warranty & Conditions
Notice
Copyright © 2012 Atomos Global Pty Ltd (referred
to as ‘Atomos’). All rights reserved. All information
in this document is subject to change without
notice. No part of the document may be reproduced
or transmitted in any form, or by any means,
electronic or mechanical, including photocopying or
recording, without the express written permission
of Atomos. A reference to Atomos includes its
related entities, subsidiaries and parent company.
Trademarks
CONNECT H2S / CONNECT S2H / ATOMOS are
registered trademarks of Atomos Pty Ltd. All other
trademarks are the property of their respective
holders.
International Hardware Limited Warranty
(1 Year Standard/2 Years If Registered)
Atomos warrants that:
• the main product will be free from defects in
materials and workmanship for a period of
1 year from the date of purchase or 2 years
upon completion of product registration at
www.atomos.com
• the battery and battery charger will be free
from defects in materials and workmanship for
a period of 6 months from the date of purchase
regardless of registration.
This warranty is exclusively for the benefit of
the original purchaser and is not assignable or
transferable.
If during the warranty period the product is shown
to be defective Atomos may at its option:
a) replace the goods or supply equivalent ones;
b) repair the goods;
c) pay the cost of replacing the goods or of
acquiring equivalent ones;
d) pay the cost of having the goods repaired;
The customer must notify Atomos of any defect in
the goods in writing prior to the expiry of the
warranty periods set out above. The customer will be
solely responsible for returning the goods to Atomos
or its authorized distributor. Upon acceptance of a
warranty claim by Atomos, where Atomos repairs
or replaces the goods, it will be responsible for
reasonable shipping costs incurred in sending the
goods to the Customer, provided that customer
is located in a country in which Atomos has an
authorized distributor or repair centre or agent.
Warranty Exclusions
This warranty applies only to defects in workmanship
and does not cover defects caused by:
• Failure to comply with the current operating
instructions issued by Atomos
• Neglect
• Improper or negligent acts or omissions
• Unauthorised repairs or attempted repairs
• Tampering with, or modification of the goods
• Connection to incompatible equipment or power
sources
• Exposure to water or weather
• Exposure to magnetic fields or corrosive liquids
or substances
EXCEPT AS STATED IN THIS WARRANTY, ATOMOS,
ITS VENDORS, AGENTS, RESELLERS AND DISTRIBUTORS
DISCLAIM IN THEIR ENTIRETY ALL OTHER WARRANTIES,
EXPRESS OR IMPLIED, INCLUDING WITHOUT LIMITATION
ALL WARRANTIES OF MERCHANTABILITY OR FITNESS FOR A
PARTICULAR PURPOSE. THE REMEDIES OUTLINED IN THIS
WARRANTY ARE THE EXCLUSIVE REMEDY A CUSTOMER HAS
ARISING FROM DEFECTIVE GOODS WHICH ARE SUBJECT TO
THE WARRANTY. ATOMOS DOES NOT WARRANT THAT THE
GOODS WILL OPERATE IN A MANNER WHICH IS ERROR FREE,
OR UNINTERRUPTED.
Register your Connect Converter now
to receive an upgraded 2 Year Warranty,
plus free updates and video tutorials > Register at atomos.com/support
© ATOMOS Global Pty. Ltd. trading as ATOMOS under license October 2012. All trademarks are the property of their respective owners.
www.atomos.com | Sales: sales@atomos.com | Support: support@atomos.com
DEALER / DISTRIBUTOR
This manual suits for next models
1
Table of contents
Other Atomos Media Converter manuals
Popular Media Converter manuals by other brands

Crestron
Crestron DM-RMC-SCALER-C quick guide

Absolute Process Instruments
Absolute Process Instruments DuoPak APD 2067 manual

Eastern Electric
Eastern Electric MiniMax Supreme owner's manual

Siemens
Siemens SINAMICS G110M operating instructions

Kramer
Kramer DigiTOOLS VM-2HDMI user manual

CYP
CYP CP-262H Operation manual