Atronic JCM UBA-10-SS User manual

www.atronic.com
Rev. 1.0
March 2006
Bill Acceptor
JCM®UBA-10-SS
for use in Atronic e-motion™
and Harmony™ gaming machines

2
March 2006
Bill Acceptor - JCM UBA-10-SS
Bill Acceptor
JCM UBA-10-SS
Rev. 1.0
Rel. March 2006
© 2006 Atronic. All rights reserved.
RELEASE INFO

3
March 2006
Bill Acceptor - JCM UBA-10-SS
1 2 3
5
6
8
7
9
10
4
11
12
13
Bill Acceptor - JCM UBA-10-SS
Introduction
This manual aims to provide information for operating
and maintaining a JCM®UBA-10-SS bill acceptor that
is installed in an Atronic e-motion™ or Atronic
Harmony™ gaming machine.
Components
1 Acceptor Unit
2 Upper Guide Access Lever
3 Front Bezel
4 USB Connector
5 DIP Switch Block
6 Diagnostic LEDs
7 Front Bezel Connector
8 Front Access Door
9 Transport Unit Release Lever
10 Cash Box
11 Frame
12 Centering Guide Release Port
13 Interface Connector
INTRODUCTION

4
March 2006
Bill Acceptor - JCM UBA-10-SS
Technical Data
Key Features
• Automatic Bill Centering
• Proven Anti-pullback Technology
• USB Connector
• Durable Plastic Cash Box
(with window to check last bill)
• Excellent Acceptance Rate
Power Requirements:
DC 12V (+/- 5%),
Standby 220mA, Operating 1.6A
Cash Box Capacity:
500 notes or more.
Processing Speed:
Approximately 5 sec. from bill insertion to completion
of stacking.
Bill Types Accepted:
Width: 62 - 85mm
Length: 120 -165mm
(up to 170mm with WBA steel cash box)
Environment:
Operating: 5° to 50°C, Storage: -20° to +60°C
Humidity: 30% - 85% RH (non condensing)
Avoid direct sunlight contact. Indoor use only.
Weight:
Approximately 4.0 kg (8.81 lb).
TECHNICAL DATA

5
March 2006
Bill Acceptor - JCM UBA-10-SS
Retrieving Bills
1. Unlock the hopper drawer and slide it to the
left.
2. Pull the handle to release the cashbox from the
frame. There is no release lever.
3. Unlock both locks at the cashbox (if installed).
4. Retrieve bills.
5. Lock and re-install cashbox.
Remove the Transport Unit
If the acceptor is mounted to the machine cabinet,
it is necessary to pull out the transport unit in
order to clear a bill jam or for preventive
maintenance.
1. Press down the transport unit release lever and
pull out the transport unit.
2. When re-installing make sure that the transport
unit is properly seated all the way into the frame
and the latches are fully engaged.
3. Clear bill acceptor error message on screen with
the audit key.
OPERATING
Transport Unit Release Lever

6
March 2006
Bill Acceptor - JCM UBA-10-SS
Clearing Bill Jam
Procedure for Transfer Unit
1. Press down the transport unit release lever and
pull out the transport unit.
2. Open the transport unit by pulling on the upper
guide access lever.
3. Remove the jammed bill.
4. Close and re-install the transfer unit.
5. Clear bill acceptor error message on screen with
the audit key.
Procedure for Cashbox Entrance
1. Take out the cashbox.
2. Remove the jammed bill.
3. Re-install the cashbox.
OPERATING
7
March 2006
Bill Acceptor - JCM UBA-10-SS
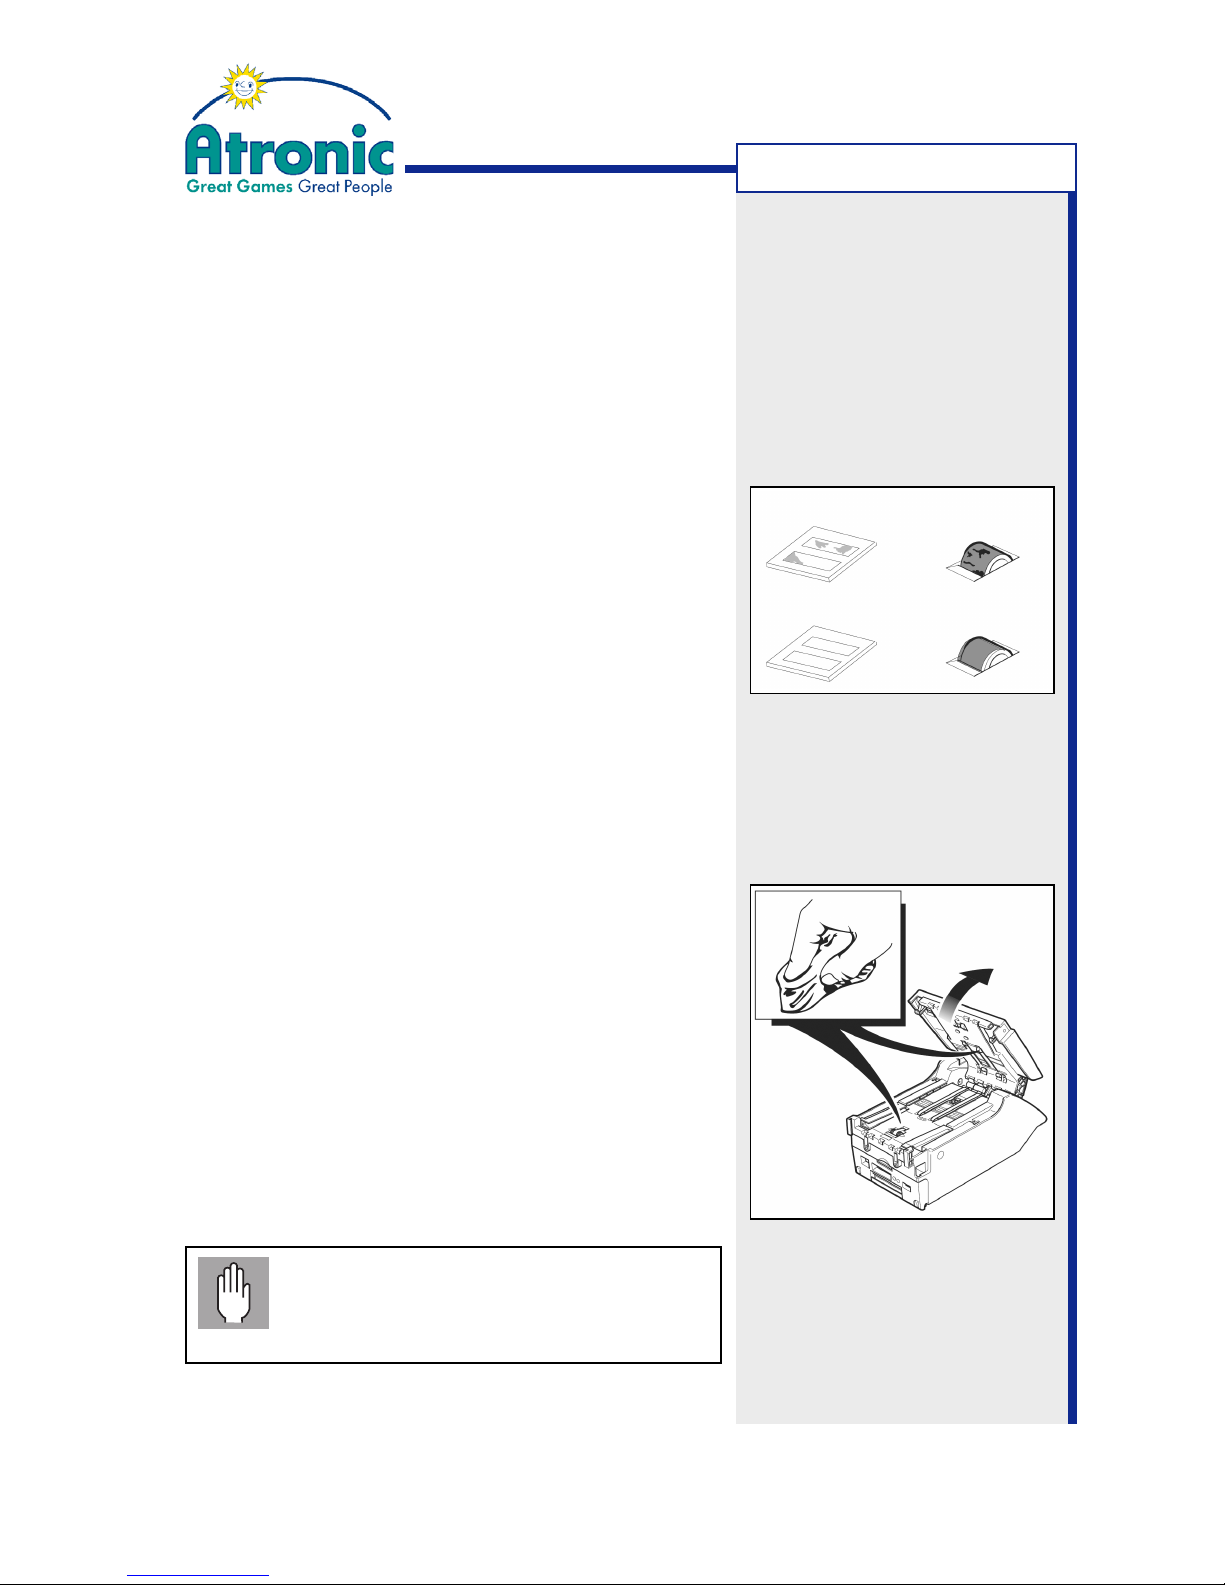
Inspecting and Cleaning
When to Inspect and Clean
Inspecting and cleaning the UBA unit are tasks you
should perform during routine preventive
maintenance.
Procedure to Inspect
• Press down the transport unit release lever and
pull out the transport unit.
• Access the bill path by opening the transport unit.
• Make a visual check to see if any debris or liquid
have collected in the bill path.
• Check the belts (also in the transfer and stacker
units) to see if they are frayed, slick or worn.
If so, replace them.
• Check the sensor lenses to see if they have be-
come dirty, clouded or scratched.
If so, replace scratched or clouded lenses.
• Inspect if lenses are set flush with the bill path. If
not, open and press lenses back into position.
Procedure to Clean
• If possible, use compressed air for blowing debris
from the bill path and the cashbox.
• Use a lint-free cloth and a mild liquid detergent
mixed with water, such as dish detergent, or just
water.
• Ensure that the cloth is not liquid-saturated.
• Wipe the bill path, lenses and rollers.
• Wipe the belts lightly as you rotate them by hand.
• After wiping, inspect lenses to ensure that none
have been moved out of position.
• Allow drying before closing the acceptor and trans-
port assembly.
OPERATING
dirty lenses dirty roller
after cleaning after cleaning
Note:
Never use dry abrasive type cleaners,
alcohol or any kind of solvent for cleaning
the acceptor. These products can damage
lenses and belts!
8
March 2006
Bill Acceptor - JCM UBA-10-SS
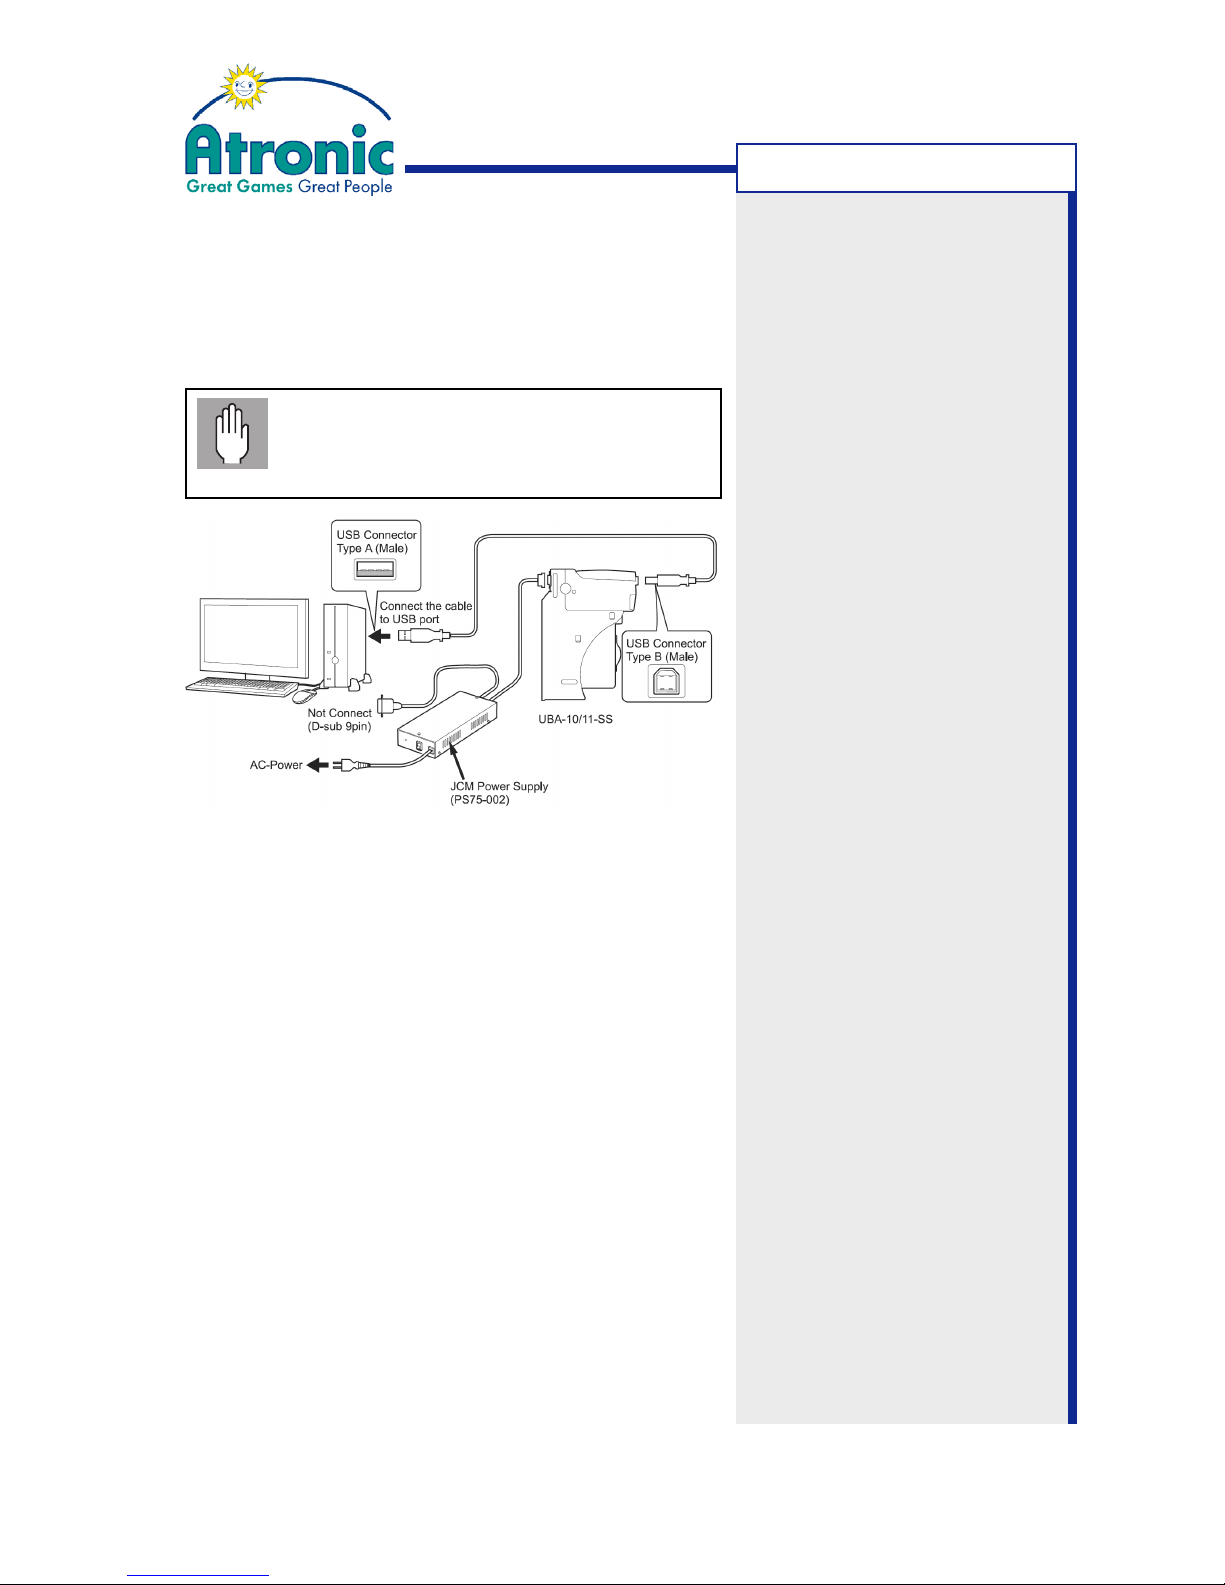
Software Download
Follow this procedure to download software to the
UBA unit. The acceptor can remain connected to the
host machine serving as a power supply.
Make sure to download only UBA files
approved by Atronic. Download of a file with
different currency than previously installed
will require a host machine RAM reset.*
1. Install the UBA Downloader application (V1.11 or
later) to your PC.
2. Check DIP switch setting. All DIP switches have to
be in OFF position.
If not, power down the host machine, then set the
DIP switches and power up the machine.
3. Connect an USB cable from PC to the UBA unit.
4. Start the UBA Downloader application.
5. Click on the BROWSE button and select an UBA
software file to be downloaded to the UBA flash
memory. Make sure to download only files approved
by Atronic.
6. Click the DOWNLOAD button to start the soft-
ware download. Do not interrupt the download pro-
gress.
7. When the download has completed, click on the OK
button and close the downloader application.
8. Power down the host machine and unplug the USB
cable.
9. Power up the host machine for re-initialization.
or host machine
SOFTWARE DOWNLOAD
*Note:
If the host machine detects
that the currency version of
the bill acceptor software has
changed, the machine will lock
and inhibits all plays. A host
machine RAM reset is
necessary to initialize this new
bill acceptor software.
If only the minor version within
a currency version has
changed, a powercycle is
necessary to initialize this new
bill acceptor software.
For example:
Changing from US Dollar to
Euro will require a RAM reset.
Changing from Euro version
1.26-07 to Euro version 1.27-
08 will require a powercycle.
Note:
Always stick a label to the
acceptor that indicates the
downloaded software version.
9
March 2006
Bill Acceptor - JCM UBA-10-SS
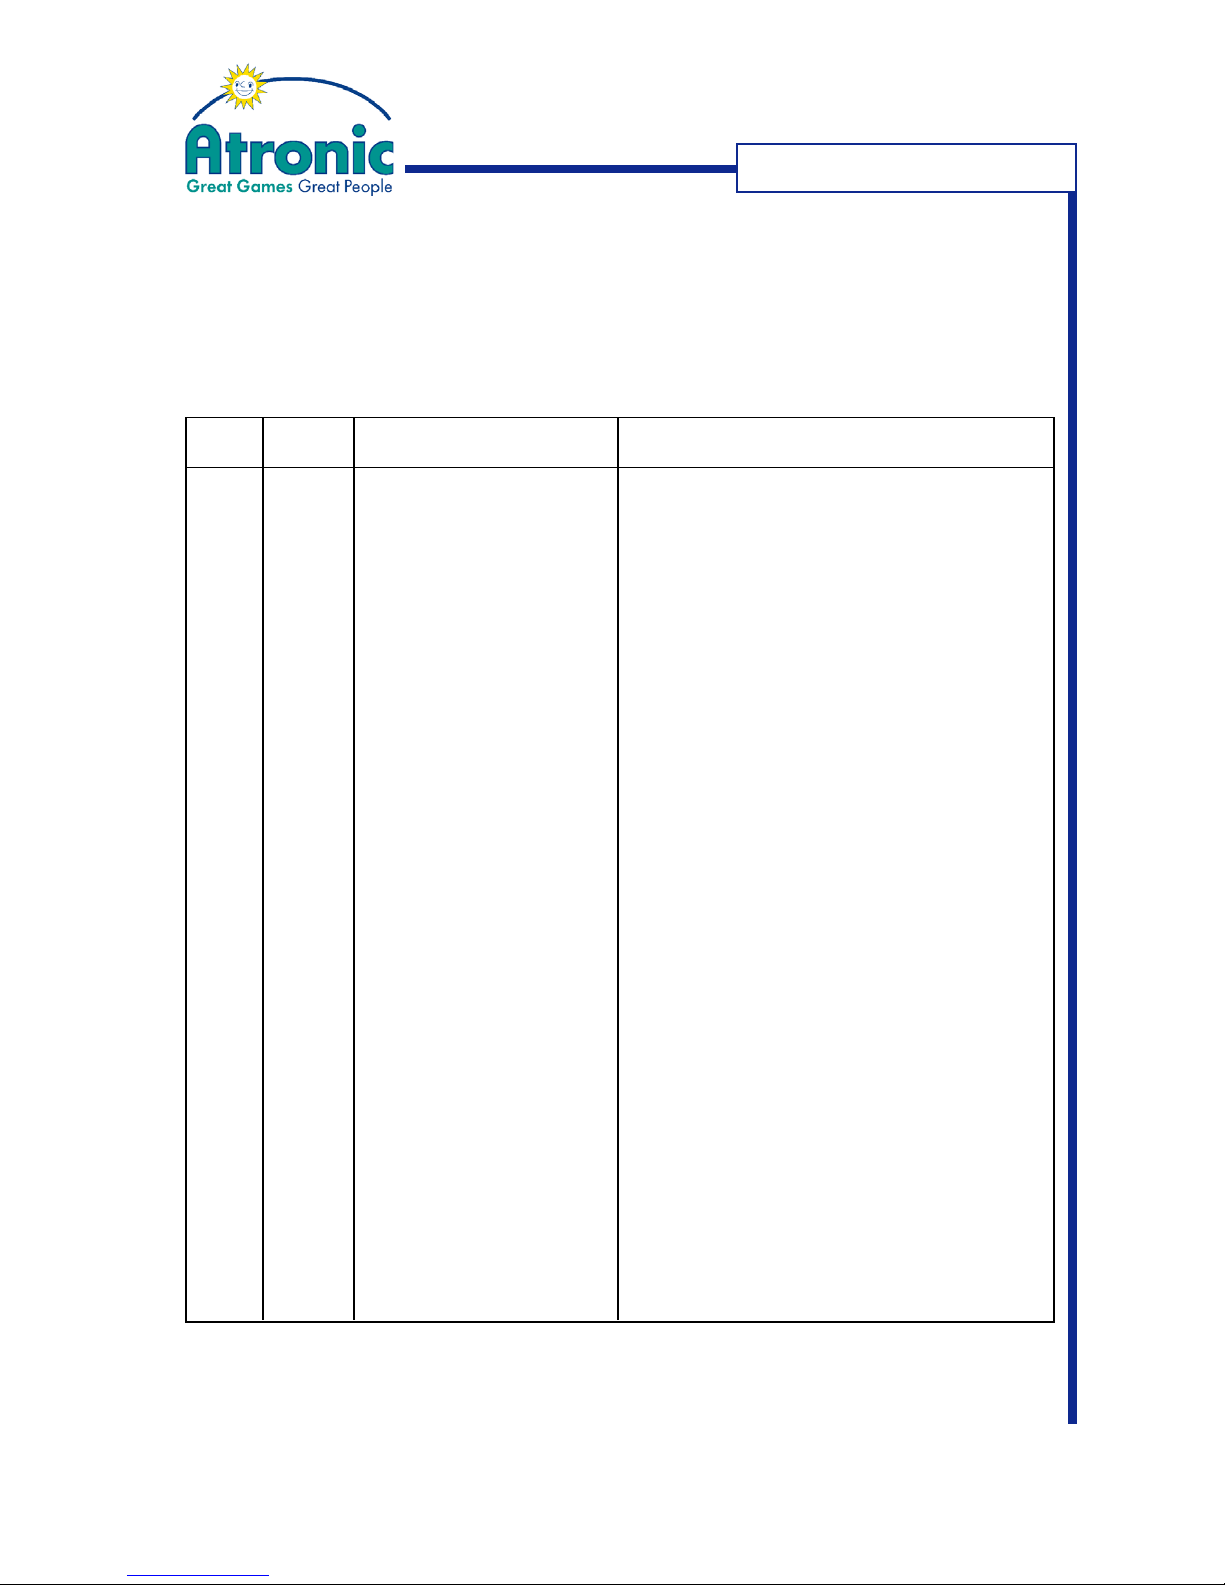
LED Diagnostic Codes / Malfunction
In case of a malfunction the two diagnostic LEDs at front of the acceptor show an
error code. Each LED (green and red) can be ON, OFF or blinking.
Malfunction Codes
Red LED
1x
2x
3x
4x
1x
2x
3x
4x
5x
6x
9x
10x
12x
13x
14x
Error
Boot ROM error.
Incorrect or no content in
external ROM.
Internal ROM error.
External ROM error.
Stacker full.
Stacker pusher mechanism fault
/ Transport jam (1).
Transport jam (2)
Stacker encoder signal fault
/ Acceptor jam.
Transport motor speed error.
Transport motor error.
PB unit error.
Stacker error.
Cheated.
Centering mechanism solenoid
error.
Centering mechanism error.
Causes and Solutions
Change the CPU board.
Change the CPU board.
Change the CPU board.
Change the CPU board.
Check stacker encoder board and change as required.
- Check stacker motor and change as required.
- Check stacker encoder board and change as required.
- Check exit sensor board and change as required.
Check exit sensor board and change as required.
- Check stacker encoder sensor for dirt and scratches.
- Change the lower sensor board.
Transport motor encoder sensor does not detect. Change
transport motor or CPU board.
Transport motor encoder sensor does not detect. Change
transport motor or CPU board.
Check PB home sensor and lower sensor board.
Check cashbox sensor board.
Check solenoid and upper sensor board.
Check centering mechanism home sensor and CPU board.
Green LED
ON
ON
ON
ON
OFF
OFF
OFF
OFF
OFF
OFF
OFF
OFF
OFF
OFF
OFF
TROUBLESHOOTING
Note: Please refer to original JCM®manuals for hardware testing procedures.

10
March 2006
Bill Acceptor - JCM UBA-10-SS
LED Diagnostic Codes / Reject
In case of a bill rejection the two diagnostic LEDs at front of the acceptor show an
error code. Each LED (green and red) can be ON, OFF or blinking.
Reject Codes
Red LED
OFF
OFF
OFF
OFF
OFF
OFF
OFF
OFF
OFF
OFF
OFF
OFF
Error
Slant insertion.
Magnetic sensor pattern error.
Paper detected inside acceptor at
standby.
Optical sensor error 1.
Bill feed error.
Bill identification error.
Optical sensor error 2.
Optical sensor error 3.
Inhibited bill.
Bill lenght error.
Optical sensor error 4.
Optical sensor error 5.
Causes and Solutions
Insert the bill straight.
- Check lenses for dirt or scratches.
- Check upper sensor board.
- Remove paper and clean the lenses.
- Check upper and lower sensor board.
- Remove paper and clean the lenses.
- Check upper and lower sensor board.
- Check lenses for dirt or scratches.
- Check upper sensor board.
- Remove paper and clean the lenses.
- Check upper and lower sensor board.
- Remove paper and clean the lenses.
- Check upper and lower sensor board.
- Remove paper and clean the lenses.
- Check upper and lower sensor board.
Set the DIP switches properly.
Check and clean all belts and rollers. Change if necessary.
- Remove paper and clean the lenses.
- Check upper and lower sensor board.
- Remove paper and clean the lenses.
- Check upper and lower sensor board.
Green LED
1x
2x
3x
4x
5x
6x
7x
8x
9x
13x
14x
15x
TROUBLESHOOTING
Note: Please refer to original JCM®manuals for hardware testing procedures.
Table of contents
Other Atronic Bank Note Validator manuals

Popular Bank Note Validator manuals by other brands


CashCode
CashCode AMZ-154 installation instructions

Global Payment Technologies
Global Payment Technologies SA-4 installation guide

PRO Intellect Technology
PRO Intellect Technology PRO-1500 LCD Series user manual

RAYLASE
RAYLASE SUPERSCAN II manual

Clas Ohlson
Clas Ohlson MD188GS instruction manual

Innovative
Innovative BV50 Operation manual


