ATTO Technology FibreConnect 1600 User manual

ATTO FibreConnect™ Fibre Channel Switch
Getting Started Guide
1600
16Gb Fibre Channel Switch
8300
8Gb Fibre Channel Switch

ATTO Technology, Inc.
155 CrossPoint Parkway
Amherst, New York 14068 USA
www.attotech.com
Tel (716) 691-1999
Fax (716) 691-9353
Technical support: Monday -- Friday, 8am-6pm EST
© 2012 ATTO Technology, Inc. All rights reserved. All brand or product names are trademarks of their respective
holders. No part of this manual may be reproduced in any form or by any means without the express written
permission of ATTO Technology, Inc.
09/2012
.......................................................................................................................................................
PRMA-0403-000

Contents
1.0 Installation ......................................................................................................1
Hardware Installation
Connecting to the Switch
Logging into Web Tools
Connecting devices
Included Tools
2.0 Zoning .............................................................................................................5
3.0 Update Firmware ............................................................................................6
4.0 Saving Configurations ...................................................................................8

1
1.0 Installation
Use the following instructions for installation of the FibreConnect 1600 (16Gb/s) or 8300 (8Gb/s) Switch.
Unpack the box; verify contents
• The FibreConnect Switch
• Power Cord (FibreConnect 1600 - optional
second cord)
• Rack mount kit - “L” brackets (8300),
Fixed rails (1600)
• SFP modules
• Serial cable
• USB to serial adapter and Driver CD
• Documentation CD*
• DCFM Pro (Data Center Fabric Manager)™ CD*
*If you are receiving an ATTO FibreConnect Switch for evaluation, the box may not contain the
Documentation CD and/or the the DCFM Pro CD. To access all revelant documents of the Documentation
CD, please visit: www.attotech.com/downloads.html.To download
DCFM Pro
please visit:
www.brocadeconnect.com/public/DCFMEval
Hardware Installation
1 Install the FibreConnect into a standard rack
(with included rack mount kit) or place it on a
desktop.
2 Connect the power cord to the FibreConnect
1600 or 8300 switch and plug in the power
source. (FibreConnect 1600 - Optional second
power source)
3 Connect the serial cable from the FibreConnect
to your computers serial port. If your machine
does not have a serial port, please use the
included USB to serial adapter.
4 Connect an RJ45 Ethernet cable to the device
then plug into a switch, within your network, on
the same subnet as the computer you will use
to configure the switch.

2 ATTO Technology Inc. FibreConnect Getting Started Guide
Connecting to the Switch
Mac OS X
1 Begin by connecting the included USB to serial
adapter to an available USB port on your Mac.
2 Connect the included serial cable from the
adapter to the FC1600 or FC8300 serial port
3 Insert the included USB Serial Adapter CD into
your optical drive.
4 Locate the driver and copy the dmg file to the
desktop:
a. On the CD : /Driver/Mac/iMac 10.1 &
10.4or later/PL2303_1.2.1r2.dmg
b. Or find the latest driver on-line:
http://plugable.com/drivers/prolific/
c. Detailed installation instructions can be
found here:
http://plugable.com/category/product/pl230
3-db9/
5 Double click the dmg file to install the driver.
6 Reboot your machine.
7 Then use the Terminal program in OS X and
connect to the switch console:
a. Open Terminal (/Applications/Utilities)
b. Type screen /dev/tty.usbserial 9600
c. Hit enter
d. Hit enter again – You should see the Fabric
OS console login prompt.
e. Login to the device with the default
username admin and password password
8 You are now logged into the switch, proceed to
Logging into Web Tools
on page 3
Windows XP and Windows Server 2003
1 Connect the included serial cable from the
FC1600 or FC8300 to the serial port on your
PC. Use the included USB to serial adapter, if
necessary.
2 Using a terminal emulation program on the
setup computer to connect to the device using
an application such as the native
HyperTerminal.
3 Open HyperTerminal by going to Start -> Run
-> type hypertrm.exe and hit enter.
4 Create a new connection with the following
COM port properties:
Bits per second: 9600
Parity: None
Stop bits: 1
Flow control: None
5 Login to the switch from HyperTerminal with
username: admin and password: password
6 You are now logged into the switch, proceed to
Logging into Web Tools
on page 3
Windows Vista/7/8/Server 2008/2012
1 Connect the included serial cable from the
FC1600 or FC8300 to the serial port on your
PC. Use the included USB to serial adapter, if
neccessary.
2 Using a terminal program on the setup
computer, connect to the switch using an
application such as the shareware application
TeraTerm.
• Download, unzip, and install TeraTerm Pro
(shareware).
• Open TeraTerm.
• Under setup select Serial Port.
• Create a new serial connection to the COM
serial port using the following settings:
Bits per second: 9600
Parity: None
Stop bits: 1
Flow control: None
3 Enter the default username: admin and
password: password at the login prompt.
4 You are now logged into the switch, proceed to
Logging into Web Tools
on page 3

3
Linux (Red Hat and SUSE)
1 Connect the included serial cable from the
FC1600 or FC8300 to the serial port on your
machine. Use the included USB to serial
adapter, if neccessary.
2 Using Terminal, connect to the device by
completing the following:
a. Open Terminal.
b. Type screen /dev/ttyS0 9600
c. Press enter.
d. Login to the device with username: admin
and password: password
3 You are now logged into the switch, proceed to
logging into Web Tools.
Logging into Web Tools
Note
Should you choose to use a different
terminal application, use the following COM
port settings:
• Bits per second: 9600
• Parity: None
• Stop bits: 1
• Flow control: None
1 Now discover the IP address of the
FibreConnect Switch in the Terminal
application:
a. Type ipaddrshow
b. Hit enter
2 You may now connect to Web Tools (GUI)
which allows you to log into the switch and
begin configuring the device. Do this by
completing the following:
a. Open a browser
Note
Internet Explorer in Windows works without
exception. Skip to (
g)
in this section.
Safari and Firefox are supported – follow the
instructions below to use Safari or Firefox on
Mac or Windows.
Google Chrome is not currently supported.
b. Type the IP address, obtained in step 9, into
the address bar example:
http://192.168.100.43/
c. Hit enter
d. The URL will change to
http://192.168.100.43/ switchExplorer.html
e. Change the URL to the following :
http://192.168.100.43/switchExplorer_insta
lled.html
f. This will download the java tool. You will be
prompted to open with Java.
g. This will load the java based web tools GUI
and prompt you for a username and
password:
Default username: admin
Default password: password
h. You will then be presented with the Web
Tools Screen

4 ATTO Technology Inc. FibreConnect Getting Started Guide
Connecting devices
1 Remove any optical protector plugs from the
SFP transceivers that you intend to use.
2 Position and insert each SFP transceiver until it
is firmly seated in the opening of the switch.
Close the locking latch.
3 Make the physical connections to your host and
storage devices.
4 Finished - You have successfully completed
initial configuration of your ATTO FibreConnect
switch and can continue onto setup and zoning.
Included Tools
Web Tools
Web tools is a GUI (Graphical User Interface) which
allows you to configure, manage and monitor the
switch from your web browser. It enables you to see
devices, manage zoning, port aliases, switch health,
and other administrative functions.
System Requirements
:
Microsoft Windows XP/Vista/7/8/2003/2008/2012
Red Hat Linux 4.x and later
Mac OS 10.4.x - later
SUSE Linux 10.x and later
Browser Requirements
:
Internet Explorer
™
7.x+
Mozilla Firefox
™
3.x+
OS X Safari
Java
™
Plug-in 1.4.2+ on Windows and Linux
DCFM Pro (Data Center Fabric Manager)
DCFM Pro is an advanced desktop application that
allows you to manage the FibreConnect switch and
access advanced functionality.
Supported Operating Systems
:
Microsoft Windows XP/Vista/7/8/2003/2008/2012
Red Hat Linux 4.x and later
SUSE Linux 10.x and later
VMware ESX Server
™
3 and later (Guest OS
supported: Same as those listed above.)
Note
DCFM Pro is not supported in Mac OS X;
please refer to the Web Tools section.
Some of the advanced features supported, using
DCFM Pro, are as follows:
• Fabric summary reporting
• Print zone database summary
• Viewing zone configuration
• Device accessibility matrix

5
2.0 Zoning
Zoning is the partioning of a Fibre Channel fabric into smaller subsets to restrict device access and simplify
management. Zoning can be used to seperate devices or segregate bandwidth across the fabric. The following
is a basic overview of how to configure zoning. For more information please refer to Chapter 9: Administrative
Advanced Zoning, in the Fabric OS Administrator’s Guide, that can be found on the documentation CD.
1 Connect an FC initiator or target into an open
port on the FibreConnect Switch.
2 Use the link indicator on the switch port to verify
that the connection is good.
3 Login to the WebTools GUI interface using the
Ethernet connection on the switch.
You will need Java enabled on your browser.
4 Check the FibreConnect Switch Port.
a. On the visual depiction of the switch, click
on the port where you plugged in the FC
connector.
b. The Port Administration Services screen
should pop up.
You will need to enable the pop-up in your
browser.
c. Verify that the Port Status is Online. Note
the port number.
d. Close the Port Administration Services
screen.
5 Find the WWN of your new device.
a. Navigate back to the front GUI page.
b. Select Zone Admin, an icon on the top left
of the screen.
c. Expand the Ports & Attaching Devices
under the Member Selection List.
d. Expand the appropriate port number. Note
the attached WWN.
6 Create a new alias for this device.
a. Click New Alias button.
b. Follow the menu instructions and name the
device.
7 Add the appropriate WWN to the alias.
a. Select your new device name from the
Name drop down menu.
b. Expand the WWNs under Member
Selection List.
c. Highlight the appropriate WWN.
d. Select Add Member.
8 Add the alias to the appropriate zone.
a. Select the Zone tab.
b. Select the appropriate zone from the Name
drop down menu.
c. Select the appropriate alias from the
Member Selection List.
d. Click Add Member.
9 Ensure that the zone is in Zone Config in the
Zone Config tab.
10 Save your changes by selecting
ZoningActions -> Enable Config
11 Log back in to the server to verify. It should now
see the storage devices.

6 ATTO Technology Inc. FibreConnect Getting Started Guide
3.0 Update Firmware
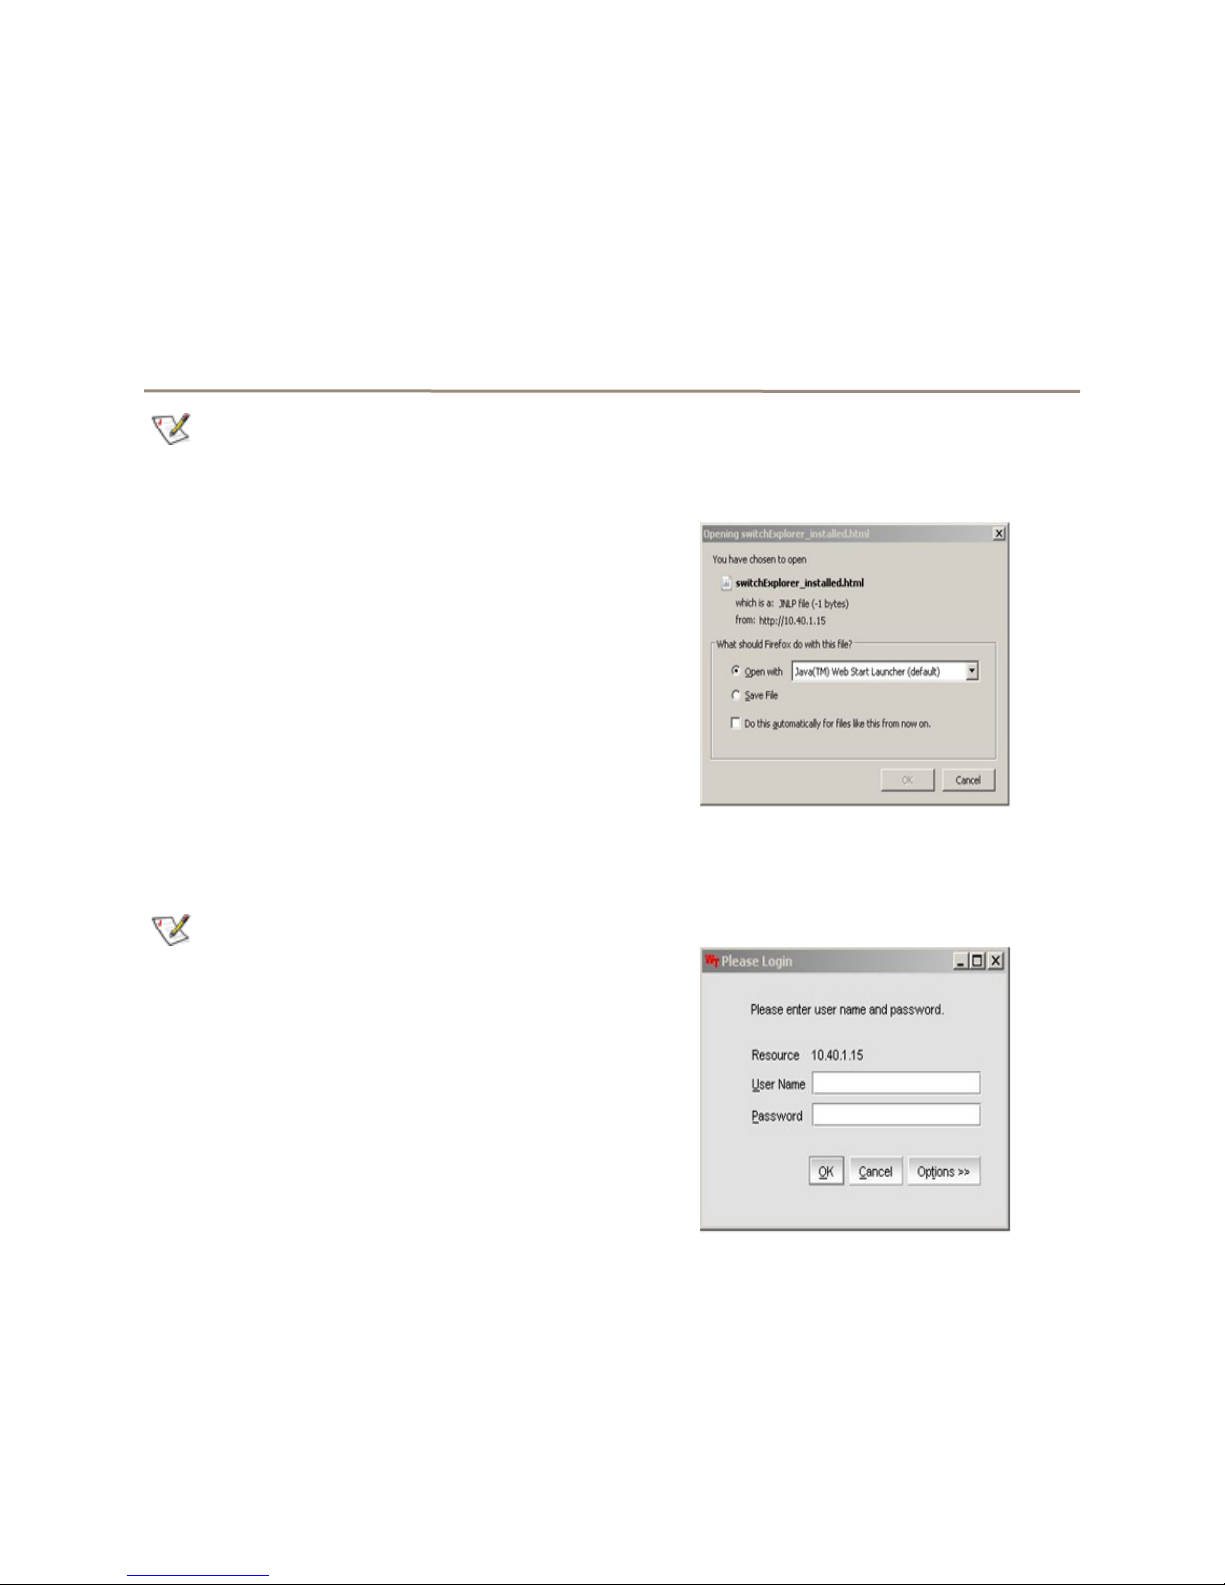
Your FibreConnect 1600 or 8300 requires the use of an FTP or SCP to upgrade your firmware.
Setting up an FTP Server
The following instructions apply for setting up an FTP
Server and Upgrading Firmware on Windows/Mac OS
X/Linux Operating Systems.
1 Setup and install an FTP server either using
native functionality in
Windows/Mac OS X/Linux, or utilize a freeware
application such as FtpGoServer.
Note
Java will need to be installed for FtpGoServer
to run.
FtpGoServer is a simple, fast and very small (10K)
Java FTP server that can be used on your PC, Mac or
Linux machine to allow remote FTP access to a
selected part of a computer's file system. Download
and install the application.
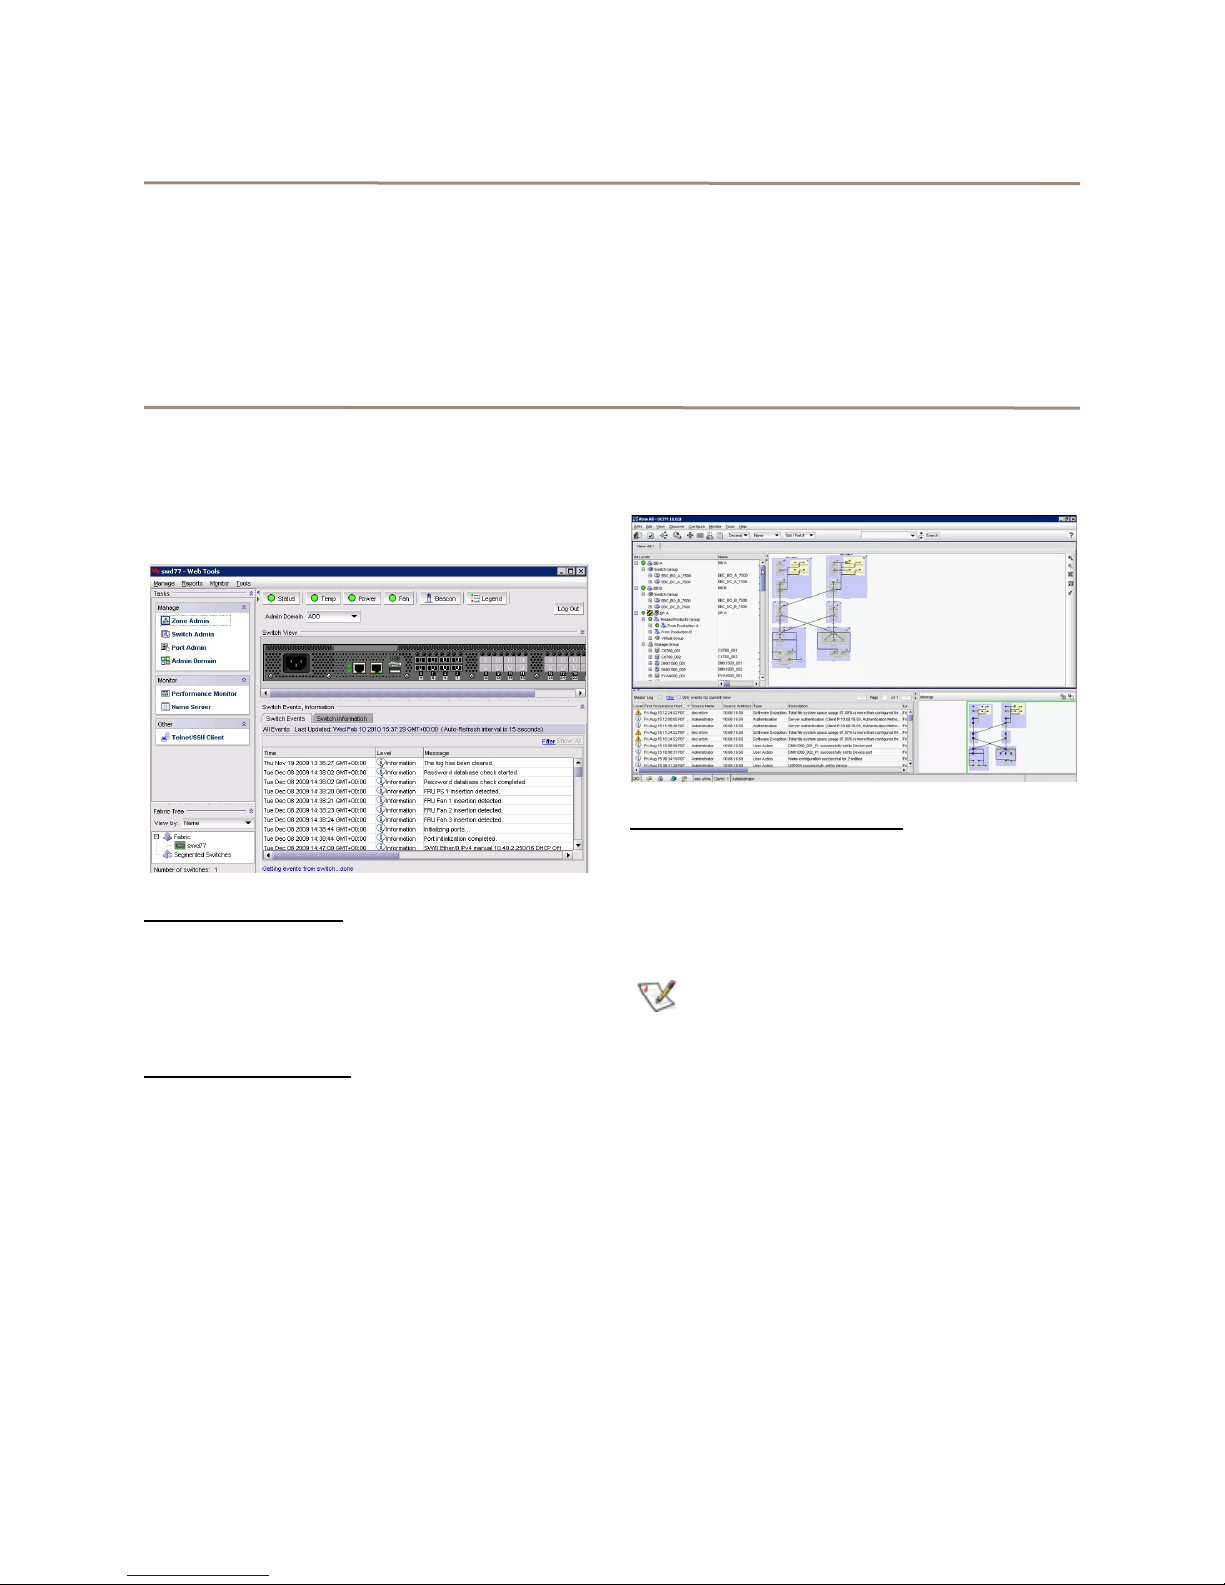
Upgrading Firmware via Command Line
Interface/Telnet (Recommended)
Use the following procedure to upgrade your ATTO
FibreConnect 1600 or 8300 to the latest firmware
through a Telnet/Command Line Interface (CLI).
Note
ATTO recommends that before upgrading the
switch firmware, a copy of the switch
configuration file should be saved to the FTP
server using the configupload command.
Refer to Section 5.0 of this guide for
instructions on how to do this.
1 Create a directory for the firmware files and
download the firmware from the hp website into
a UNIX or Windows machine as explained
above in FTP setup.
2 Verify the FTP service is running on a
Windows, Mac, or Linux machine.
3 Telnet to the switch through the terminal
application you used in the above steps to
initially find the IP of the switch.
4 At the login prompt, type admin
5 Type the password.
6 At the prompt type firmwareDownload
7 Follow the on-screen prompts, as shown below:
• Server Name or IP Address:
192.168.xxx.xxx (Enter the IP address of the
FTP server that contains the firmware file
you received from ATTO Support.)
• User Name: (access to the FTP root)
• File Name: /v6.x.x/ (the location of the
unzipped firmware folder)
• Password: xxxx (password to access FTP
server)
• FirmwareDownload has started.
• Start to install packages......
The firmware files begin to download.
This takes approximately 5 to 10 minutes.
Upon completion of a successful download, you will
see the following prompts:
• Verification SUCCEEDED
• FirmwareDownload has completed
successfully.
• Connection to host lost.
8 The switch is now running firmware v6.x.x
9 Re-telnet to the switch, and type
firmwareshow
You should see the following example:
swd77:admin> firmwareshow
Appl Primary/Secondary Versions
------------------------------------------
FOS v6.x.x
v6.x.x

7
Upgrading Firmware via Web Tools
Note
ATTO recommends that before upgrading the
switch firmware, a copy of the switch
configuration file should be saved to the FTP
server using the configupload command.
Refer to Section 5.0 of this guide for
instructions on how to do this.
1 Verify the FTP service is running on a local
network machine with proper access privilege.
2 From a web browser, access the FibreConnect
web tools GUI by typing in the switch IP
address and logging in.
3SelectSwitch Admin in the upper left corner of
web tools.
4 Select the Firmware Download tab.
5 Enter the following information:
• Host Name or IP (Enter the IP address of
the FTP server that contains the firmware file
you received from ATTO Support.)
• User Name (access to the FTP root)
• Password (no password is required if
username anonymous is used)
• Protocol Type (FTP)
• Specify Firmware Path (this is the actual
folder location of the unzipped firmware
directory)
6 Click Download.
CAUTIONCAUTION
The process will take roughly 15 minutes.
The ATTO FibreConnect Switch has two
partitions of non-volatile storage areas, a
primary and a secondary, to store two
firmware images. Firmware download
always loads the new image into the
secondary partition and swaps the
secondary partition to be the primary. It
then reboots the CP and activates the new
image. In this way, the switch will continue
to operate during a firmware download.
The LEDs on the switch may turn off but
the switch will continue to pass data during
the firmware download. Configuration,
including zoning, will not be affected by the
upgrade.

8 ATTO Technology Inc. FibreConnect Getting Started Guide
4.0 Saving Configurations
The FibreConnect allows you to create a backup of your switches configuration, as well as the ability to restore a
previous configuration.
ConfigUpload/Download allows you to save/load:
• Zoning configurations
• SNMP attributes
• Domain IDs
• Switch names
• Network IDs
ConfigUpload into the switch.
1TypeconfigUpload and then press enter.
2 Specify protocol (most likely ftp)
3 Enter username (to access ftp)
4 Specify path to file and name for file.
5 Specify what you are backing up.
6 Enter password (of ftp access)
7 Press enter. The process will be very quick.
Commands shown here:
swd77:admin> configUpload
Protocol (scp, ftp, local) [ftp]: ftp
Server Name or IP Address [host]: 192.168.xxx.xxx
User Name [user]: xxxx
Path/Filename [<home dir>/config.txt]:
/folder/filename.txt
Section (all|chassis|switch [all]): all
Password: xxxx
configUpload complete: All selected config parameters
are uploaded
swd77:admin>
ConfigDownload (restore)
1 Telnet into the switch.
2TypeconfigDownload and then press enter.
3 Specify protocol (most likely ftp)
4 Enter username (to access ftp)
5 Specify path to file and name of file.
6 Read and agree to caution statement.
7 Press Yand then enter.
Commands shown here:
swd77:admin> configDownload
Protocol (scp, ftp, local) [ftp]: ftp
Server Name or IP Address [host]: 192.168.xxx.xxx
Path/Filename [<home dir>/config.txt]:
/folder/filename.txt
CAUTIONCAUTION
This command is used to download a
backed-up configuration for a specific
switch. If using a file from a different
switch, this file's configuration settings will
override any current switch settings.
Downloading a configuration file, which
was uploaded from a different type of
switch, may cause this switch to fail. A
switch reboot might be required for some
parameter changes to take effect.
configDownload operation may take several minutes to
complete for large files.
Do you want to continue [y/n]:
This manual suits for next models
1
Table of contents
Other ATTO Technology Switch manuals
Popular Switch manuals by other brands

LEGRAND
LEGRAND Plexo 0 698 76L manual

Fujitsu
Fujitsu SERVIS EX FS-1004EX user manual

Ubiquiti
Ubiquiti EdgeSwitch ES-16-XG quick start guide

ASTEK
ASTEK A54812-SW-01 Read me

Phoenix Contact
Phoenix Contact FL SWITCH 2206-2FX ST Installation notes for electricians

Silicon Graphics
Silicon Graphics Fibre Channel Hub owner's guide

AeroAudio
AeroAudio MOS QUATRO IP manual

Globalmediapro
Globalmediapro TPA016AH quick start guide

ZyXEL Communications
ZyXEL Communications BPS-120 Support notes

TRENDnet
TRENDnet TEG-S224TXA - 26PORT Gigabit Copper Switch 24-10/100... user guide

Extron electronics
Extron electronics MPS 409 user guide

Gembird
Gembird UHB-U3P1U2P3P-01 user manual