ATV aDrums EXS-1 User manual

User’s Manual
EN
EXS-1

2
Welcome.
• Please see “4 Important Notice” (p.29) before using EXS-1.
• The description contents on xD3 may vary depending on the rmware version. Please check the latest rmware / updated
information on the ATV website.
• Illustrations and pictures shown in this manual are for instructional purposes only, and may appear somewhat dierent from
the actual specications.
• The company and product names in this manual are the trademarks or registered trademarks of their respective
companies.
Contents
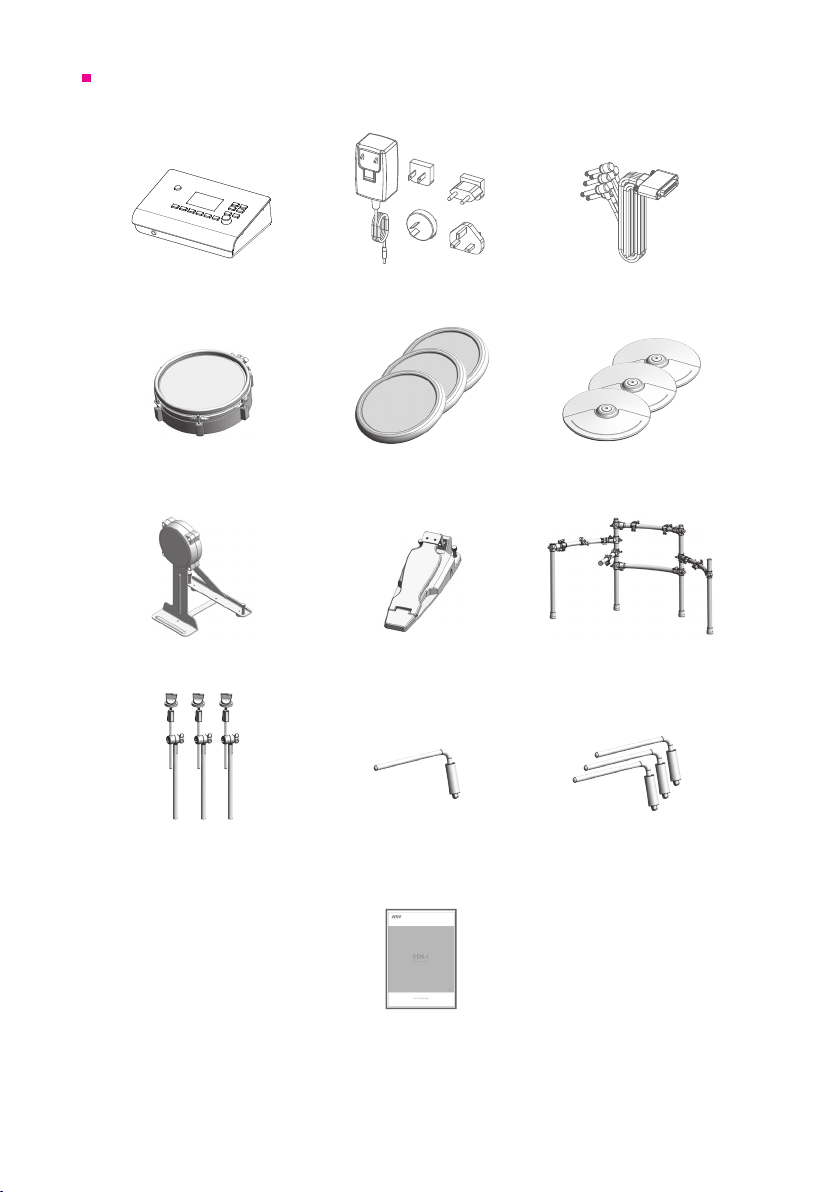
Package Contents . . . . . . . . . . . . . . . . . . . . . . . . . . . . . . . . . . . . . . . . . . . . . . . . . . . . . . . . . 3
1 Setup . . . . . . . . . . . . . . . . . . . . . . . . . . . . . . . . . . . . . . . . . . . . . . . . . . . . . . . . . . . . . . . . . 4
Assembly Guide . . . . . . . . . . . . . . . . . . . . . . . . . . . . . . . . . . . . . . . . . . . . . . . . . . . . . . . . . . . 4
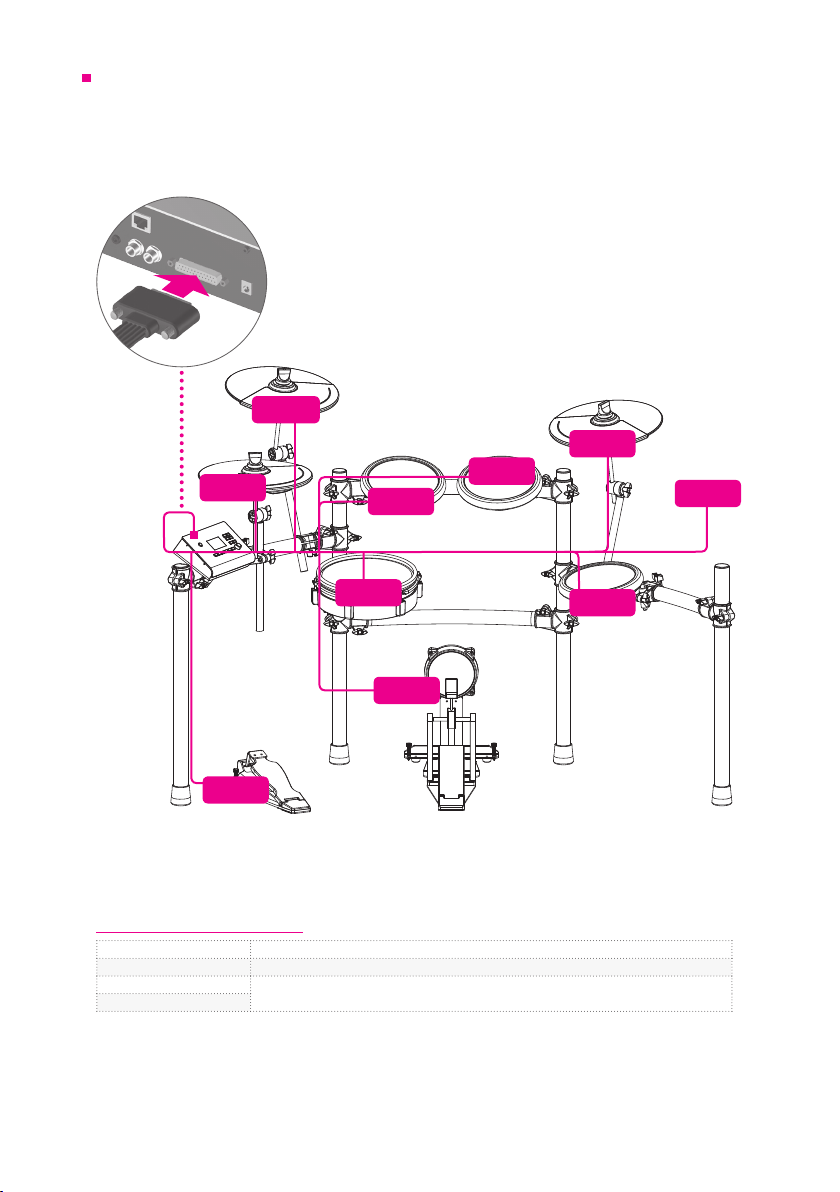
Connecting the Pads . . . . . . . . . . . . . . . . . . . . . . . . . . . . . . . . . . . . . . . . . . . . . . . . . . . . . . . 7
Top Panel . . . . . . . . . . . . . . . . . . . . . . . . . . . . . . . . . . . . . . . . . . . . . . . . . . . . . . . . . . . . . . . . 8
Connections on the Rear Panel . . . . . . . . . . . . . . . . . . . . . . . . . . . . . . . . . . . . . . . . . . . . . . . 9
Power On / O . . . . . . . . . . . . . . . . . . . . . . . . . . . . . . . . . . . . . . . . . . . . . . . . . . . . . . . . . . . 10
2 Performing . . . . . . . . . . . . . . . . . . . . . . . . . . . . . . . . . . . . . . . . . . . . . . . . . . . . . . . . . . . . 11
Home Screen . . . . . . . . . . . . . . . . . . . . . . . . . . . . . . . . . . . . . . . . . . . . . . . . . . . . . . . . . . . . 11
Performing . . . . . . . . . . . . . . . . . . . . . . . . . . . . . . . . . . . . . . . . . . . . . . . . . . . . . . . . . . . . . . 11
Changing the Drum Kit . . . . . . . . . . . . . . . . . . . . . . . . . . . . . . . . . . . . . . . . . . . . . . . . . . . . . 11
Song Playback . . . . . . . . . . . . . . . . . . . . . . . . . . . . . . . . . . . . . . . . . . . . . . . . . . . . . . . . . . . 12
Using the Metronome . . . . . . . . . . . . . . . . . . . . . . . . . . . . . . . . . . . . . . . . . . . . . . . . . . . . . . 13
Using the Visualizer. . . . . . . . . . . . . . . . . . . . . . . . . . . . . . . . . . . . . . . . . . . . . . . . . . . . . . . . 13
3 Menu Functions and Settings . . . . . . . . . . . . . . . . . . . . . . . . . . . . . . . . . . . . . . . . . . . . 14
SONG . . . . . . . . . . . . . . . . . . . . . . . . . . . . . . . . . . . . . . . . . . . . . . . . . . . . . . . . . . . . . . . . . 15
METRONOME . . . . . . . . . . . . . . . . . . . . . . . . . . . . . . . . . . . . . . . . . . . . . . . . . . . . . . . . . . . 18
RECORDING . . . . . . . . . . . . . . . . . . . . . . . . . . . . . . . . . . . . . . . . . . . . . . . . . . . . . . . . . . . . 19
INST LEVEL (Adjusting the volume of each pad) . . . . . . . . . . . . . . . . . . . . . . . . . . . . . . . . . . 20
SETUP . . . . . . . . . . . . . . . . . . . . . . . . . . . . . . . . . . . . . . . . . . . . . . . . . . . . . . . . . . . . . . . . . 21
4 Important Notice . . . . . . . . . . . . . . . . . . . . . . . . . . . . . . . . . . . . . . . . . . . . . . . . . . . . . . . 29
Important Safety Information. . . . . . . . . . . . . . . . . . . . . . . . . . . . . . . . . . . . . . . . . . . . . . . . . 29
Important Information about Use . . . . . . . . . . . . . . . . . . . . . . . . . . . . . . . . . . . . . . . . . . . . . 30
Specications . . . . . . . . . . . . . . . . . . . . . . . . . . . . . . . . . . . . . . . . . . . . . . . . . . . . . . . . . . . . 30
Support . . . . . . . . . . . . . . . . . . . . . . . . . . . . . . . . . . . . . . . . . . . . . . . . . . . . . . . . . . . . . . . . 30

3
Package Contents
This product includes the following items.
xD3 Drum Module Multi-trigger Cable
Cymbal Arms (x3) Snare Pad Rod Tom Pad Rods (x3)
User’s Manual (This booklet)Tuning Key
Cable Tie
SD Memory Card
Kick Pad
Snare Pad Tom Pads (x3) Cymbal Pads (x3)
Hi-hat Controller Drum Stand
AC Adapter & plugs

4
1 Setup
Assembly Guide
1 Attaching cymbal arms
as shown below
2 Attaching the snare pad
1
2
Tighten it using the tuning key included
in the package

5
1 Setup
3 Attaching the tom pads
4 Attaching the cymbal pads
1
2
1
2

6
1 Setup
5 Attaching the xD3 drum module
6 Arranging the kick pad and hi-hat controller as shown below
*Kick pedal is not included.
*If the kick pad is not stable after attaching the kick pedal, loosen the thumbscrew on the back of the kick pad
and adjust it to be stable.
*Please be careful not to scratch the oor with the anchor bolts from the kick pad and hi-hat controller.
*After assembling, please check if the knobs of each part is rmly tightened.

7
1 Setup
Connecting the Pads
Connect the multi-trigger cable of the xD3 drum module to each pad.
Check the corresponding labels written on the plugs of the multi-trigger cable and connect it as
shown below.
Drumming Techniques
Snare drum Head shot, Rim-shot, Side-stick (p.12)
Hi-hat Bow, Edge, Opening-Closing, Foot Close, Foot Splash
Crash cymbals Bow, Edge
Ride cymbals
T3
SN
T1
T2
RD
CR
HH
CTL
K
BEL
*
*BEL plug is not used. Please x it to the stand
without removing the cap.

8
1 Setup
担当
生産図
葉数: 1 / 1
図面番号:
名称:
色調:
設計:承認:
1
2
3
4
5
6
発行:ATV株式会社
eD3 TOP PANEL
HR08-****
改定履歴
Mori
2017.3.27
承認日付
公差:±0.3
Gray (C0M0Y0K50)
担当
生産図
葉数: 1 / 1
図面番号:
名称:
色調:
設計:承認:
1
2
3
4
5
6
発行:ATV株式会社
eD3 TOP PANEL
HR08-****
改定履歴
Mori
2017.3.27
承認日付
公差:±0.3
Gray (C0M0Y0K50)
Power Button
Long-press this button to
turn the power on/o.
Top Panel
Value Knob
Use to change and
select dierent settings
and items.
PHONES
Audio jack for headphones.
[ENTER/MENU] Button
Use to determine / select
parameters and values.
On the home screen,
“Menu” is displayed.
.
Drum Kit Buttons [1]—[5]
[1]—[5] Use to select registered
drum kits.
Pressing [1] button will lead you to
Home Screen.
[
VOLUMESONG
HOME
HOME
TRACK
CLICK
HOME
HOME
CLICK
CLICK
CLICK
HOME
HOME
MENU
VARIATION
SONG
1 2 3 4 5
ENTER
MENU
–––––––––––––––––––––––––– DRUM KIT ––––––––––––––––––––––––––
1 2 3 4 5
ENTER
LIST
HOME
MENU
] (BACK) Button
Return to the previous screen.
[LIST] Button
Pressing the button
displays the drum kit
list and enables you to
select a kit.
VOLUME [+][–] Buttons
Use to adjust the headphone
and output volume.
SONG [ ] (PLAY/STOP) Button
Use to start and stop the song.
SD memory card is necessary for the song
playbacks.
Only the buttons being operated light up.
Metronome [
VOLUMESONG
HOME
HOME
TRACK
CLICK
HOME
HOME
CLICK
CLICK
CLICK
HOME
HOME
MENU
VARIATION
SONG
1 2 3 4 5
ENTER
MENU
–––––––––––––––––––––––––– DRUM KIT ––––––––––––––––––––––––––
1 2 3 4 5
ENTER
LIST
HOME
MENU
] Button
Use to turn on / o the
built-in metronome.
About the Function Buttons
Other than "Home" screen, the drum kit
buttons [2] [3] [4] [5] are used to select
corresponding items and functions on
the screen.
For example, corresponding functions
of the screen on the right are:
[2] Button = DELETE
[4] Button = HELP
[5] Button = LOAD
Buttons for which there is no
corresponding item are unlit.
VOLUMESONG
HOME
HOME
TRACK
CLICK
HOME
HOME
CLICK
CLICK
CLICK
HOME
HOME
MENU
VARIATION
SONG
1 2 3 4 5
ENTER
MENU
–––––––––––––––––––––––––– DRUM KIT ––––––––––––––––––––––––––
1 2 3 4 5
ENTER
LIST
HOME
MENU

9
1 Setup
担当
生産図
葉数: 1 / 1
図面番号:
名称:
色調:
設計:承認:
1
2
3
4
5
6
発行:ATV株式会社
eD3 BOTTOM CASE
HR08-****
改定履歴
Mori
2017.3.27
承認日付
公差:±0.3
Gray (C0M0Y0K50)
Connections on the Rear Panel
CRASH 2
Enables to connect
additional cymbal pads
to expand drum kit.
MIDI OUT
Connect MIDI devices
and send MIDI signals.
USB
The xD3 can be connected to a
Mac or Windows PC, allowing MIDI
messages to be transmitted and
received. Use a USB 2.0 cable.
OUTPUT
Use to output audio signal
and connect to a powered
speaker or mixer.
SD CARD
Insert the package-included SD card.
The SD card contains song data.
You can also add other songs. (p.17)
You can back-up xD3 drum module data
and import sound data, as well. It supports
SD / SDHC cards up to 32 GB.
DC IN
Connect the included
AC adapter here.
AUDIO IN
Use to input audio from an external
sound source like a music player.
You can also play along with the xD3
audio and listen.
Output from OUTPUT and
PHONES.
MULTI TRIGGER IN
Connection port for the multi-trigger
cable, which enables input of the
trigger signals from the pads.
About the AC adapter
The AC adapter can be used worldwide.
Attach the included plug that is suitable for the type of outlet in your
country.
* You must use only the included AC adapter and plug.

10
1 Setup
Power On / O
Turning the power on
1 Lower the volume of the connected amp or speakers.
2 Long-press the power button of the xD3.
The power turns on.
Turning the power o
1 Lower the volume of the connected amp or speakers.
2 Long-press the power button of the xD3.
The power turns o.
All settings are saved.
*Disconnecting the AC adapter without turning o the power will cause malfunctions. You must turn o the
power by pressing the power button.
Turning the power o automatically (auto power-o)
If the xD3 has not been played or operated for 30 minutes, it automatically turns o the power in
order to conserve electricity. You can disable this function. For details, refer to p.21.
Connecting Audio Equipment
In order to use xD3 drum module, the following (commercially available items) is required.
• Headphones, powered speakers, etc.
• You can play along with a song by connecting your computer / tablet headphone
to the AUDIO IN jack.
AUDIO IN
USB
SD CARD
DC IN
21
AUX
ATV LINK
MULTI TRIGGER
TRIGGER INPUT
R OUTPUT L
L R
Stereo phone
Mono phone
Stereo mini

11
2 Performing
Home Screen
This screen is displayed after turning on the power in the home screen.
If you press the [1] (HOME) button from any screen, you will return
to the Home Screen.
Home Screen will be displayed when playing the drums.
VOLUMESONG
HOME
HOME
TRACK
CLICK
HOME
HOME
CLICK
CLICK
CLICK
HOME
HOME
MENU
VARIATION
SONG
1 2 3 4 5
ENTER
MENU
–––––––––––––––––––––––––– DRUM KIT ––––––––––––––––––––––––––
1
2 3 4 5
ENTER
LIST
HOME
MENU
What is Drum Kit?
The synthesizer patch assigned to each pad is called "drum kit". Changing the type of drum kit to
jazz or rock also switches the sound of each pad to the sound suitable for that genre.
Performing
1 When you hit the pad, it resounds.
The sound changes naturally according to the strength of hitting.
2 Use VOLUME [+][–] to adjust the volume.
*Please adjust to an accurate volume. If the volume is too low,
it may cause you to exert unnecessary force to hit, possibly
injuring your hands and arms. Also, if the volume is too loud, it
may cause inconvenience and burden to your ears and there is
a danger of causing hearing loss or the like. Please be careful
especially when playing the drums around young children. You
can limit the maximum volume. (p.21)
Changing the Drum Kit
1 Press one of drum kit buttons [1]—[5].
VOLUMESONG
HOME
HOME
TRACK
CLICK
HOME
HOME
CLICK
CLICK
CLICK
HOME
HOME
MENU
VARIATION
SONG
1 2 3 4 5
ENTER
MENU
–––––––––––––––––––––––––– DRUM KIT ––––––––––––––––––––––––––
1 2 3 4 5
ENTER
LIST
HOME
MENU
The drum kit saved for each button is loaded.
*It takes several seconds to load the drum kit.
2 When the drum kit name is displayed,
you can start playing.
Drum Kit Number
Song Number
Song Playback Icon
Drum Kit Name
Song Name
Metronome Tempo
Visualizer (p.13)
Visually displays the
dynamics and timing of the
shots.

12
2 Performing
Selecting a drum kit from the list
You can select a drum kit other than drum kit buttons [1]—[5].
1 Press the [LIST] button.
The list of drum kits will be displayed.
2 Select the drum kit with the value knob.
3 Press the [ENTER] button.
The selected drum kit will be loaded.
Playing the side stick technique
You can play the side stick technique with a snare drum.
1 Press the [LIST] button.
The list of drum kits is displayed.
2 Press [5] (SIDE STICK) to set it to "ON".
If you do not want it to produce a sound, set it to "OFF".
3 Press the [
VOLUMESONG
HOME
HOME
TRACK
CLICK
HOME
HOME
CLICK
CLICK
CLICK
HOME
HOME
MENU
VARIATION
SONG
1 2 3 4 5
ENTER
MENU
–––––––––––––––––––––––––– DRUM KIT ––––––––––––––––––––––––––
1 2 3 4 5
ENTER
LIST
HOME
MENU
] button to return to the home screen.
Song Playback
*To play a song, you need to insert the provided SD card.
1 Press the SONG [ ] button.
The song will be played.
2 Turn the value knob to select your favorite song.
The song name will be displayed.
3 Press the SONG [ ] button again to stop.
• If you press the metronome in advance, you can play it alongside with a song.
• You can play wav le songs. (p.17)
• Use the song screen (p.15) to adjust the volume and other functions of the song.
*You can not change the tempo of the song.

13
2 Performing
Using the Metronome
1 Press the [
VOLUMESONG
HOME
HOME
TRACK
CLICK
HOME
HOME
CLICK
CLICK
CLICK
HOME
HOME
MENU
VARIATION
SONG
1 2 3 4 5
ENTER
MENU
–––––––––––––––––––––––––– DRUM KIT ––––––––––––––––––––––––––
1 2 3 4 5
ENTER
LIST
HOME
MENU
] button.
The metronome will play.
2 Use the value knob to adjust the tempo.
3 Press the [
VOLUMESONG
HOME
HOME
TRACK
CLICK
HOME
HOME
CLICK
CLICK
CLICK
HOME
HOME
MENU
VARIATION
SONG
1 2 3 4 5
ENTER
MENU
–––––––––––––––––––––––––– DRUM KIT ––––––––––––––––––––––––––
1 2 3 4 5
ENTER
LIST
HOME
MENU
] button again to stop.
Using the Visualizer
The visualizer visually displays the dynamics and timing of shots.
When metronome is turned o
Shot strength is displayed as a bar graph. The last shot
is displayed on the far right, and the previous shot moves
to the left. Here, you can visually check the strength of
hitting.
When metronome is turned on
The pointer scrolls according to the tempo, and the timing
and strength of the shot are displayed in a bar graph.
Because the bar graphs are displayed real-time, you can
visually check the timing and the variation of the strength
of hitting by continuously hitting the same rhythm according to the metronome.
Clear display by pressing the [
VOLUMESONG
HOME
HOME
TRACK
CLICK
HOME
HOME
CLICK
CLICK
CLICK
HOME
HOME
MENU
VARIATION
SONG
1 2 3 4 5
ENTER
MENU
–––––––––––––––––––––––––– DRUM KIT ––––––––––––––––––––––––––
1 2 3 4 5
ENTER
LIST
HOME
MENU
] button.
Latest shot
Bar LinePointer Beat
Modifying the drum kit buttons’ registration
You can modify the drum kit you want to load with the drum kit buttons [1]—[5].
1 Press the [LIST] button.
The drum kit list is displayed.
2 Select and load the drum kit you want to register.
3 Hold down the drum kit button (one of the [1]—[5] buttons you want to register) for 2
seconds.
A message will be displayed when the registration is completed.

14
3 Menu Functions and Settings
Other functions and settings of xD3 are accessible from the menu.
1 Press the [ENTER/MENU] button from the Home Screen.
The menu will be displayed.
2 Turn the value knob to select the item and conrm with the [ENTER] button.
SONG Use to set the song playback, volume, and marker settings. p.15
METRONOME Use to make detailed settings for the metronome. p.18
RECORD Use to record drum performance. p.19
INST LEVEL Use to adjust the volume for each pad of each drum kit. p.20
SETUP Overall setting for the xD3 drum module. p.21
3 Press the [
VOLUMESONG
HOME
HOME
TRACK
CLICK
HOME
HOME
CLICK
CLICK
CLICK
HOME
HOME
MENU
VARIATION
SONG
1 2 3 4 5
ENTER
MENU
–––––––––––––––––––––––––– DRUM KIT ––––––––––––––––––––––––––
1 2 3 4 5
ENTER
LIST
HOME
MENU
] button or the [1] (HOME) button to return.

15
3 Menu Functions and Settings
SONG
On the song screen, you can select a song and play it, adjust the volume for each song,
and set the marker.
Song Number /
Name
When stopped
Song Playback
Position
Song Volume Clear Marker
Playing Time
Loop Icon
Loop Setting Help Screen Display
When playing
Marker
Marker Setting
Playing Time
10 seconds
Skip backward
(Previous) / Skip
forward (Next)
Selecting a song and play / stop
1 Turn the value knob to select a song.
*You can not select a song while operating the volume or marker.
2 Press the SONG [ ] button to play / stop.
During playback, you can skip 10-second backward / 10-second forward by pressing the [3] and
[4] buttons.
Adjusting the volume of the song
1 Press the [2] (VOLUME) button and turn the value
knob to adjust the volume.
2 Press the [2] (VOLUME) button again.
Loop setting
When you turn on the loop, songs will be played repeatedly.
1 While stopped, press the [3] (LOOP) button to turn the loop on / o.
When you turn on the loop, a loop icon will be displayed.

16
3 Menu Functions and Settings
Markers
You can set up to 9 markers at any position in the song
and jump to the specied marker.
Adding Markers
1 Play the song.
2 Press the [5] (MARKER) button and use the value knob to select "ADD".
3 Press the [ENTER] button at the playtime you want to add a marker.
After that, a marker has been added.
Marker Jump
1 Use the value knob to select the marker number and press the [ENTER] button.
To jump to the beginning of the song, select "TOP".
Clear Marker
1 While the song is stopped, press the [5] (MARKER) button.
2 Select the marker you want to delete and press the [ENTER] button.
*Settings for volume, loop, and markers are stored for each song.
*You can not change the tempo of the song.

17
3 Menu Functions and Settings
Playing audio le (wav)
You can put your wav le in the SD card and play it as a song.
Supported Format
File Type Windows Wave (RIFF)
Filename Extension wav, WAV
Sampling Frequency 48 kHz
Bit Depth 16 bits
File Size Up to 2 GB
Set-up
Copy the wav le to the SD card root folder.
*You can put up to 100 wav les.
*“wav” les that are put in folders are not recognized.
*It does not support le names with 2-byte characters.
Playback
Select the wav le following the instructions from “Selecting a song and play / stop” (p.15) and
play it.
SD Card
My Song 1.wav
My Song 2.wav
My Song 3.wav

18
3 Menu Functions and Settings
METRONOME
On the metronome screen, you can set metronome's tempo and beat, volume, sound, and so on.
Tap Tempo
Help Screen
1 Turn the value knob to select the item you want to set.
Tempo Tempo
Beat Beat
Note Musical Note (note value of the beat)
Sound Sound
Level Volume Level
Start w/CR1
When you hit the CRASH 1 cymbal, the metronome will sound only for one or
two measure/s. By hitting CRASH 1 regularly, you can check if it is keeping the
time beat.
1. Set it to "MEAS 1" or "MEAS 2".
2. Press the [
VOLUMESONG
HOME
HOME
TRACK
CLICK
HOME
HOME
CLICK
CLICK
CLICK
HOME
HOME
MENU
VARIATION
SONG
1 2 3 4 5
ENTER
MENU
–––––––––––––––––––––––––– DRUM KIT ––––––––––––––––––––––––––
1 2 3 4 5
ENTER
LIST
HOME
MENU
] button. CR ashes on the screen.
3. Hit the CRASH 1 cymbal. The metronome plays between every 1 or 2
measures.
4 Press the [ENTER] button and change the value with the value knob.
5 Press the [ENTER] button to conrm the value.
Tap tempo
You can set the tempo by pressing the TAP button several times. It is useful to play the
metronome alongside with the songs that have unknown tempo.
1 Press the [5] (TAP) button according to the beat.
The tempo is set.

19
3 Menu Functions and Settings
RECORDING
You can record a drum performance and listen objectively. You can also record while playing
a song.
Record
Play / Stop
Exit
Recording
1 Start playing drums or press the SONG [ ] button to play the song.
The recording will start.
*When recording alongside with the metronome, turn on the metronome in advance.
2 Press the [4] ( ) button to stop recording.
Playback
3 Press the [4] ( ) button.
The playback will start.
4 Press the [4] ( ) button to stop playback.
5 To record again, press the [5] (REC) button and repeat from Step 1.
*The previous recorded data will be deleted.
6 To end recording, press [2] (EXIT).
You will return to the home screen.
*When you turn o xD3 drum module, the recording data are erased.
*You can not play songs after the recording starts.
*You can not play the metronome after the recording starts.
*You can not change the tempo of the metronome after the recording starts.

20
3 Menu Functions and Settings
INST LEVEL (Adjusting the volume of each pad)
You can adjust the volume of each pad for each kit.
1 Hit the pad with the volume you want to change.
2 Use the value knob to change the volume.
3 Repeat steps 1 and 2.
*It is stored for each kit.
Table of contents
Other ATV Drum manuals