ATV aDrums EXS-3 User manual

User’s Manual
EN
JA
EXS-5
EXS-3

2
Welcome.
• Please see “4 Important Notice” (p.41) before using EXS-3/5.
• The described functions of the xD3 module may vary depending on the rmware version. Please check ATV’s website for
the latest rmware and updated information.
• Illustrations and pictures shown in this manual are for instructional purposes only, and may appear somewhat dierent from
the actual specications.
• The company and product names in this manual are the trademarks or registered trademarks of their respective
companies.

3
Contents
Setup (EXS-5)............................................................. 4
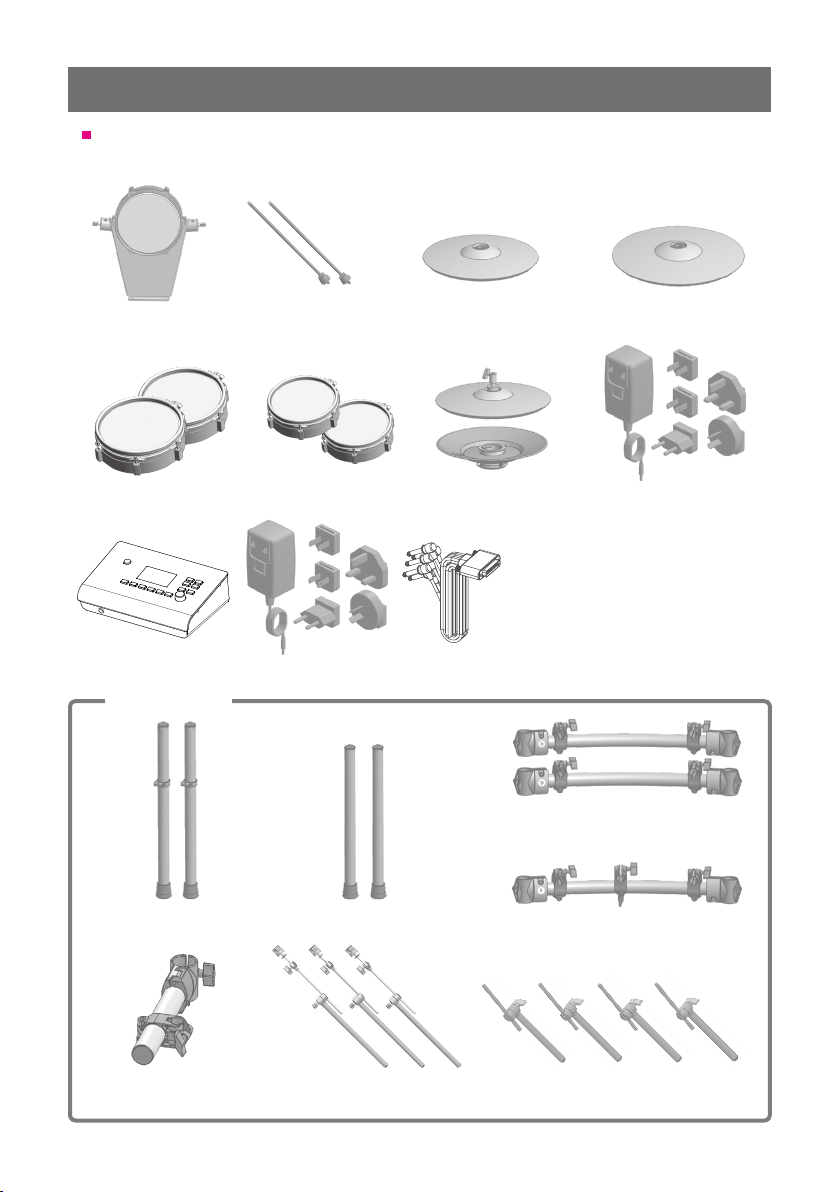
Package Contents ......................................................... 4
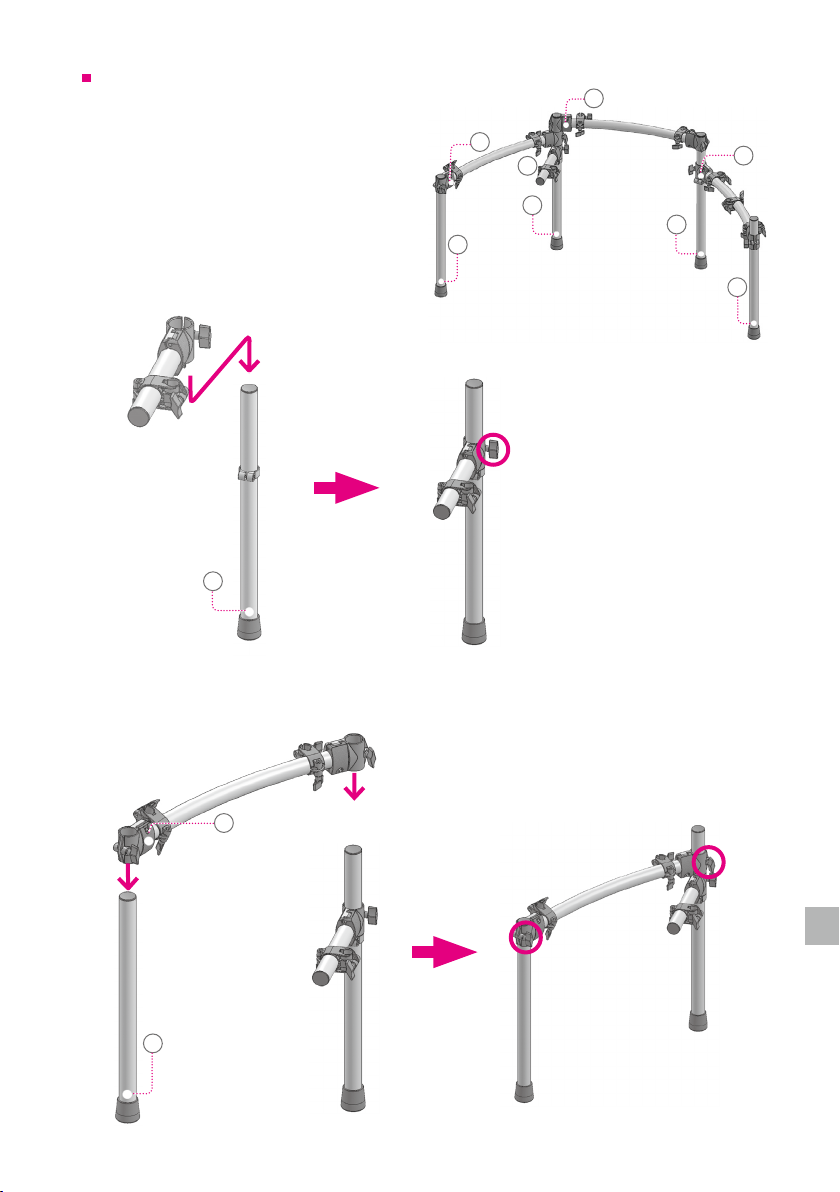
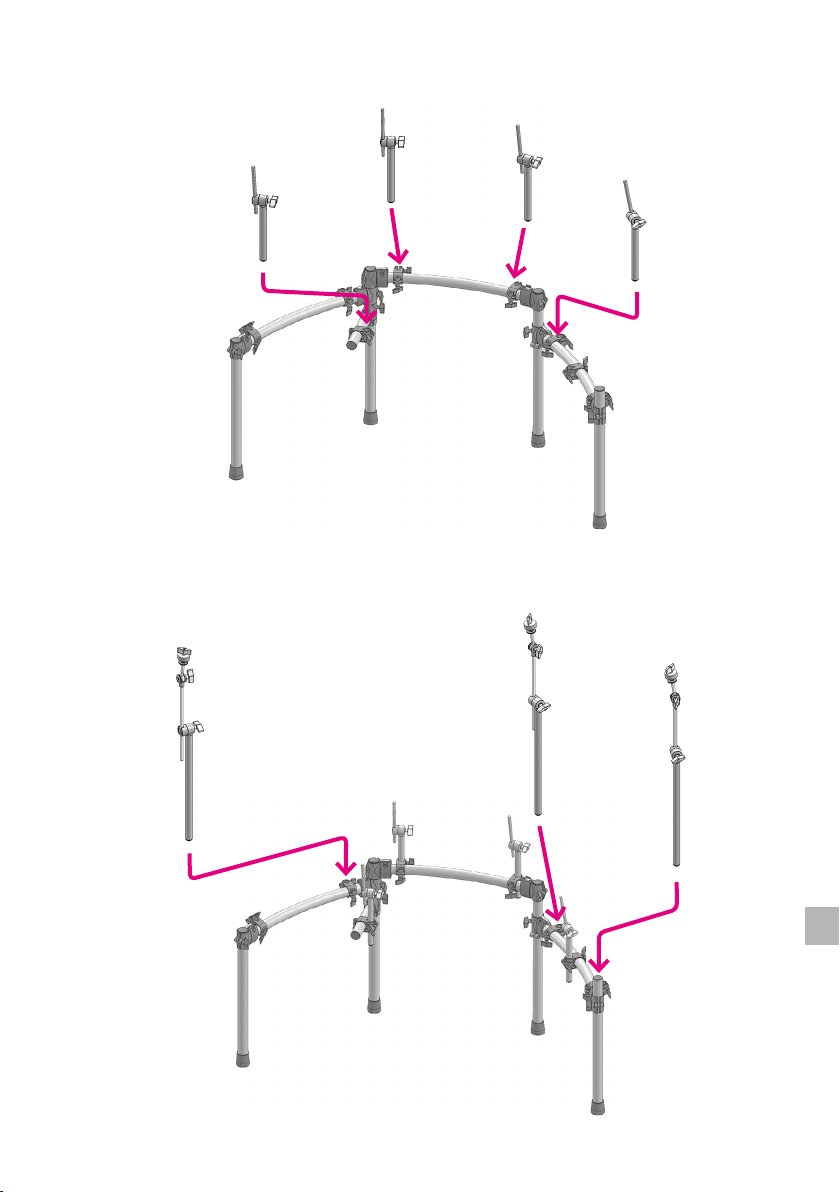
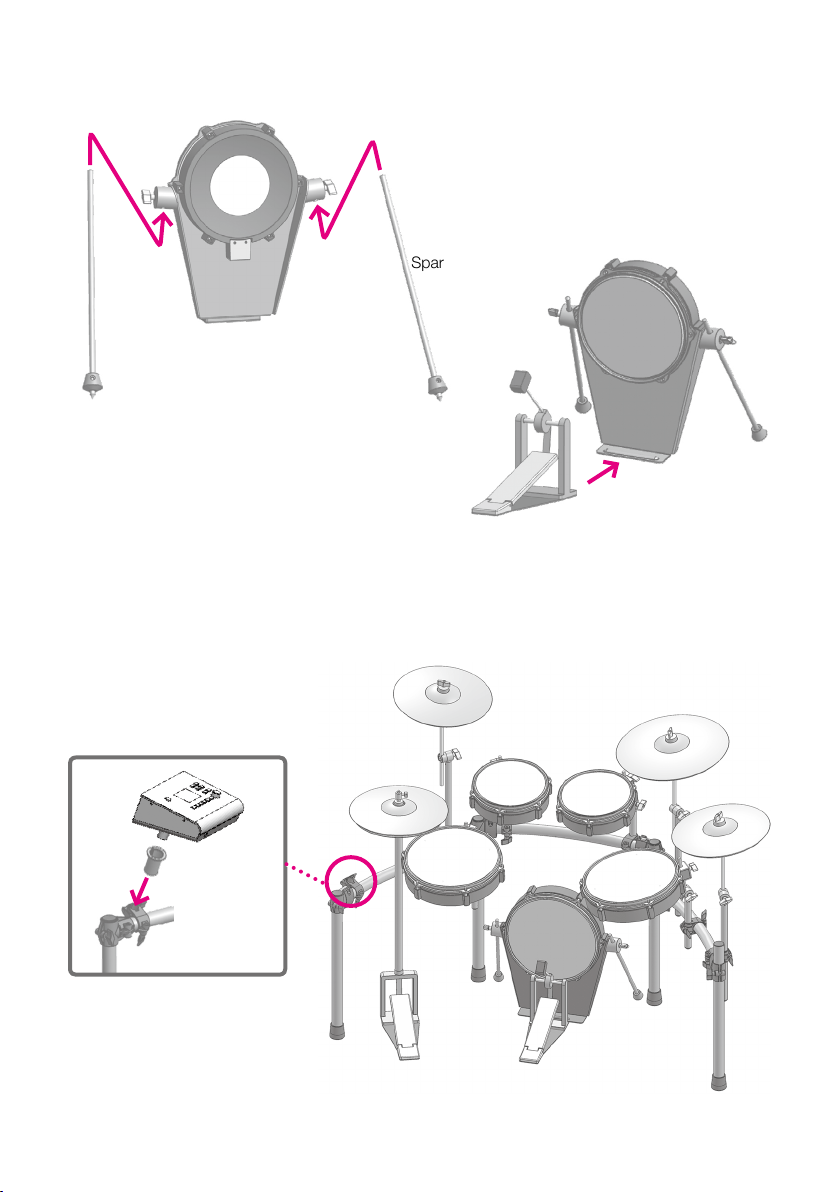
Assembly Guide ........................................................... 5
Connecting the Pads ...................................................... 11
Setup (EXS-3)............................................................ 12
Package Contents ........................................................ 12
Assembly Guide .......................................................... 13
Connecting the Pads ...................................................... 19
1 XD3 Drum Sound Instrument ............................................ 20
Top Panel ............................................................... 20
Connections on the Rear Panel .............................................. 21
Power On/O ............................................................ 22
2 Performing............................................................ 23
Home Screen ............................................................ 23
Performing .............................................................. 23
Changing the Drum Kit ..................................................... 24
Song Playback ........................................................... 24
Using the Metronome ...................................................... 25
Using the Visualizer........................................................ 25
3 Menu Functions and Settings............................................ 26
SONG ................................................................. 27
METRONOME ........................................................... 30
RECORDING ............................................................ 31
INST LEVEL (Adjusting the volume of each pad) .................................. 32
SETUP................................................................. 33
4 Important Notice ...................................................... 41
Important Safety Information................................................. 41
Important Information about Use ............................................. 42
Specications ............................................................ 42
Support ................................................................ 42

4
Package Contents
This product includes the following items.
xD3 drum sound
instrument Multi-trigger cable
Drum arms x4
User manual (this booklet)
Drum key
Cable tie
SD memory card
Kick Pad
Snare and Tom Pads
Crash Cymbal Pads
x2
Tube A x2 Tube B x2
Tube D x2
Tube E
Tube C
Ride Cymbal Pad
Hi-hat pad
Spars for Kick Pad
x2
AC adapter
AC adapter for hi-hat pad
Drum Rack
Cymbal arms x3
Tom Pads x2
Setup (EXS-5)
Trigger cable
14” 16”
13” 10”

5
Setup (EXS-5)
Assembly Guide
Connect tubes A to E as the gure right shows.
*A corresponding label (A to E) is attached to
each tube.
1 Insert tube A into the tube C clamp
2 Insert tube A and tube B into the clamps at the ends of tube D
Tube A
Tube A
Stand L
*Securely tighten
the clamp bolts
*Securely tighten the clamp bolt
Tube B
Tube D
Tube C
D
B
A
C
A
B
D
E
D
A
B

6
Setup (EXS-5)
3 Insert tube A and tube B into the clamps at the ends of tube E
*Securely tighten
the clamp bolts
Stand L
Tube A
Tube B
70mm
Stand R
Stand R
4 Attach tube D clamps to stands L and R
Tube D
Tube E
D
E
B
A

7
Setup (EXS-5)
5 Attach the drum arms
*Securely tighten all bolts
6 Attach the cymbal arms
*Securely tighten all bolts

8
Setup (EXS-5)
7 Attach the snare and oor tom pads
8 Attach the tom pads *Adjust the tension of the pad head using the included
tuning key.
*Securely tighten all bolts
13”
*Securely tighten all bolts
10”

9
Setup (EXS-5)
9 Attach the cymbal pads
10 Attach the hi-hat cymbal
1
2
14” crash cymbal
16” ride cymbal
Hi-hat stand
2--3cm
1
3
2
4
5
6
*A hi-hat stand is not included
*This AC adaptor can be used
worldwide. Please connect the
adaptor to a plug attachment (several
types included) that is correct for the
country of use.
AC adapter for hi-hat cymbal
14” crash
cymbal

10
Setup (EXS-5)
Spar
11 Attach the spars to the kick drum pad
12 Attach the xD3 drum sound instrument
12
3
*Tighten the knobs
*A kick pedal is not included.
*The tip of the spar can adjusted so it protrudes from the
rubber stopper.
*Note that the spikes can damage oors.
*Note that the spikes can damage your body.
*After completing the assembly verify that all the
bolts are securely tightened.

11
Setup (EXS-5)
Connecting the pads
First connect the multi-trigger cable to the xD3 drum sound instrument and then to each pad.
Check the labels on the jack plugs of the multi-trigger cable and connect them to the
corresponding pads as shown below.
Fix the cable onto the stand using the cable tie included after the completion of the connection.
RDCUP
(BEL)
CR
T3
SN
T1 T2
K
CRASH 2
*Use the extra trigger cable included
in the package to connect the xD3 to
CRASH 2.
CTL
HH

12
Setup(EXS-3)
Package Contents
This product includes the following items.
xD3 drum sound
instrument Multi-trigger cable
Drum arms x4
User manual (this booklet)
Drum key
Cable tie
SD memory card
Kick Pad
Tom Pads x3Snare Pad
Crash Cymbal Pad
Tube A x2 Tube B x2
Tube D
Tube E
Tube F
Tube C
Ride Cymbal Pad
Hi-hat pad
Spars for Kick Pad
x2
AC adapter
AC adapter for hi-hat pad
Drum Rack
Cymbal arms x2

13
Setup(EXS-3)
Assembly Guide
Connect tubes A to F as the gure right shows.
*A corresponding label (A to F) is attached to
each tube.
1 Insert tube A into the tube C clamp
2 Insert tube A and tube B into the clamps at the ends of tube D
Tube A
Tube A
Stand L
*Securely tighten the
clamp bolts
*Securely tighten the clamp bolt
Tube B
Tube D
Tube C
D
D
B
C
A
B
E
F
A

14
Setup(EXS-3)
3 Insert tube A and tube B into the clamps at the ends of tube F
*Securely tighten the
clamp bolts
Stand L
Tube A
Tube B
70mm
Stand R
Stand R
4 Attach tube E clamps to stands L and R
Tube E
Tube F
E
F

15
Setup(EXS-3)
5 Attach the drum arms
1
2
*Adjust the tension of the pad head using the included tuning key.
*Securely tighten all bolts
6 Attach the cymbal arms

16
Setup(EXS-3)
7 Attach the snare and oor tom
8 Attach the cymbal pads
1
2
*Adjust the tension of the head using the tuning key
included in the package.
1
2
2
*Securely tighten all bolts
Crash cymbal
Ride cymbal
1

17
Setup(EXS-3)
Hi-hat stand
2--3cm
Spar
9 Attach the hi-hat cymbal
10 Attach the spars to the kick drum pad
1
3
2
4
5
6
*A hi-hat stand is not included.
*This AC adaptor can be used
worldwide. Please connect the
adaptor to a plug attachment (several
types included) that is correct for the
country of use.
12
3
*Tighten the knobs
*A kick pedal is not included.
*The tip of the spar can adjusted so it protrudes from the rubber
stopper.
*Note that the spikes can damage oors.
*Note that the spikes can damage your body.
AC adapter for hi-hat cymbal

18
Setup(EXS-3)
*After completing the assembly verify that all the bolts are securely tightened.
11 Attach the xD3 drum sound instrument

19
Connecting the pads
First connect the multi-trigger cable to the xD3 drum sound instrument and then to each pad.
Check the labels on the jack plugs of the multi-trigger cable and connect them to the
corresponding pads as shown below.
Fix the cable onto the stand using the cable tie included after the completion of the connection.
SN
T1 T2
K
RDCUP
(BEL)
CR
CTL
HH
T3

20
担当
生産図
葉数: 1 / 1
図面番号:
名称:
色調:
設計:承認:
1
2
3
4
5
6
発行:ATV株式会社
eD3 TOP PANEL
HR08-****
改定履歴
Mori
2017.3.27
承認日付
公差:±0.3
Gray (C0M0Y0K50)
担当
生産図
葉数: 1 / 1
図面番号:
名称:
色調:
設計:承認:
1
2
3
4
5
6
発行:ATV株式会社
eD3 TOP PANEL
HR08-****
改定履歴
Mori
2017.3.27
承認日付
公差:±0.3
Gray (C0M0Y0K50)
Power Button
Long-press this button to
turn the power on/o.
1 xD3 Drum Sound Instrument
Top Panel
Value Knob
Use to change and select
dierent settings and menu
items.
PHONES
Audio jack for headphones.
[ENTER/MENU] Button
Use to determine / select
parameters and values.
On the home screen,
“Menu” is displayed.
Drum Kit Buttons[1]--[5]
[1]—[5] Use to select registered
drum kits.
Pressing button [1] will return you to
the Home screen.
[
VOLUMESONG
HOME
HOME
TRACK
CLICK
HOME
HOME
CLICK
CLICK
CLICK
HOME
HOME
MENU
VARIATION
SONG
1 2 3 4 5
ENTER
MENU
–––––––––––––––––––––––––– DRUM KIT ––––––––––––––––––––––––––
1 2 3 4 5
ENTER
LIST
HOME
MENU
](BACK)Button
Return to the previous screen.
[LIST]Button
Pressing the button
displays the drum kit
list and enables you to
select a kit.
VOLUME [+][–]Buttons
Use to adjust the
headphone and output volume.
SONG [ ](PLAY/STOP)Button
Use to start and stop the song.
An SD memory card is necessary
for song playback.
Only the buttons being operated light up.
Metronome[
VOLUMESONG
HOME
HOME
TRACK
CLICK
HOME
HOME
CLICK
CLICK
CLICK
HOME
HOME
MENU
VARIATION
SONG
1 2 3 4 5
ENTER
MENU
–––––––––––––––––––––––––– DRUM KIT ––––––––––––––––––––––––––
1 2 3 4 5
ENTER
LIST
HOME
MENU
]Button
Use to turn on / o the
built-in metronome.
VOLUMESONG
HOME
HOME
TRACK
CLICK
HOME
HOME
CLICK
CLICK
CLICK
HOME
HOME
MENU
VARIATION
SONG
1 2 3 4 5
ENTER
MENU
–––––––––––––––––––––––––– DRUM KIT ––––––––––––––––––––––––––
1 2 3 4 5
ENTER
LIST
HOME
MENU
Buttons for which there are no
corresponding menu items are unlit. .
About the Function Buttons
Other than the "Home" screen, the
drum kit buttons [2] [3] [4] [5] are used
to select corresponding menu items
and functions displayed on the screen.
For example, on the screen shown on
the right, the corresponding functions
are:
[2] Button = DELETE
[4] Button = HELP
[5] Button = LOAD
Other manuals for aDrums EXS-3
1
This manual suits for next models
1
Table of contents
Other ATV Drum manuals