Atwood MHR212 Owner's manual

LITERATURE NUMBER 297-333472
Roof Rack for
Recreational Vehicle
Model # MHR212
This Roof Rack design has been verified to the
guidelines stated in this document for use on recreation
vehicles.
●Installation ●Operation ●Maintenance
Effective 01/16/2014
SERVICE CALLS & QUESTIONS
Location and phone numbers of qualified Service
Centers can be found at our website
http://www.atwoodmobile.com or call 866-869-3118 to
locate a Service Center.
WARNING
MAY CAUSE PERSONAL INJURY OR DEATH
For your safety and protection, it is important that this
installation manual is read and understood before
installation or use. Failure to properly install the unit or
attempting to modify it in any way can be extremely
hazardous and may result in property damage and
personal injury and will void the warranty.
CAUTION
MAY CAUSE PERSONAL INJURY OR PROPERTY
DAMAGE
Incorrect or improper installation may cause
personal injury and/or property damage.
GENERAL INFORMATION
Package Contents:
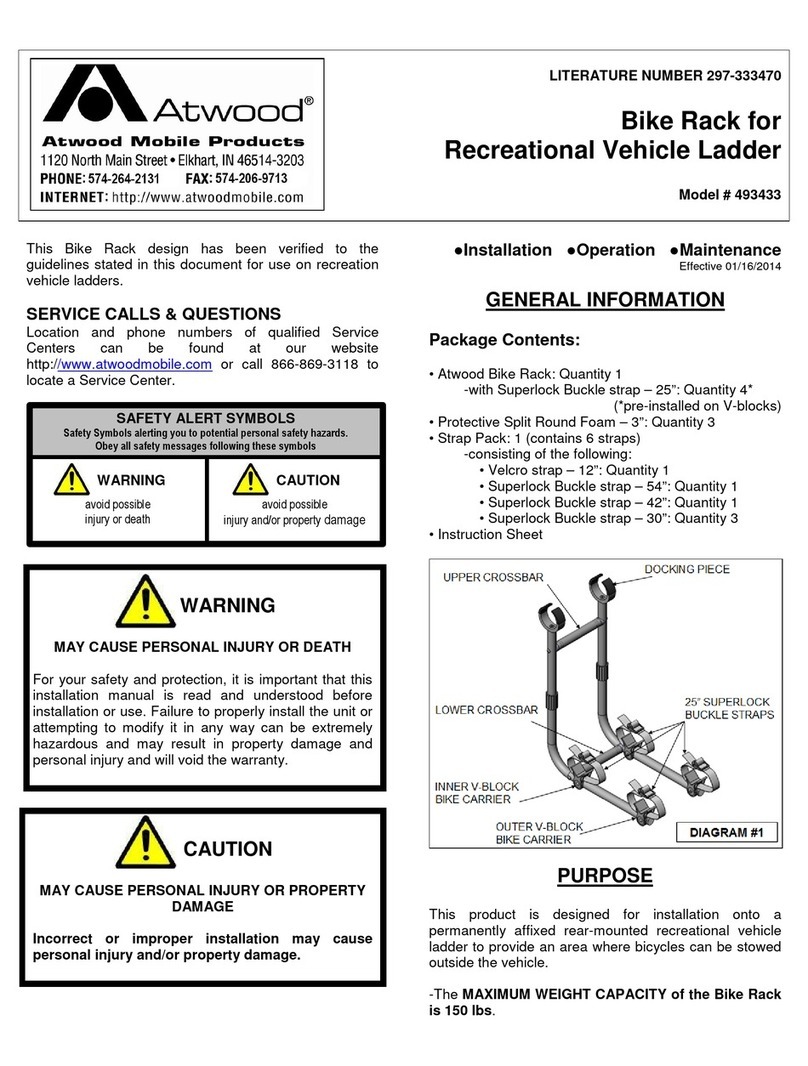
• Side Rails with Insert: Quantity 2
• Center Rail with Insert: Quantity 1
• Center Rail: Quantity 1
• 4” Stanchion: Quantity 7
• #8 x 3/4” Screw: Quantity 3
• Instruction Sheet: Quantity 1
Tools Required:
• Tape Measure
• Phillips-tip screwdriver (Screw gun recommended)
• Hacksaw or tube cutter (if alterations are required)
• File (if alterations are required)
PURPOSE
This product is designed for installation onto the roof of
an RV. It provides additional structure, converting the
applied area into a storage alternative, expanding the
vehicle’s storage capacity.
-The MAXIMUM WEIGHT CAPACITY will be
determined by the design of the roof surface and
related substructure and will vary based on vehicle
design and manufacturer. Consult the RV
manufacturer for this guideline.
SAFETY ALERT SYMBOLS
Safety Symbols alerting you to potential personal safety hazards.
Obey all safety messages following these symbols
WARNING
avoid possible
injury or death
CAUTION
avoid possible
injury and/or property
damage

Before you begin…
CAUTION
MAY CAUSE PERSONAL INJURY OR PROPERTY
DAMAGE
It is the responsibility of the installer to inspect the RV
roof to determine its condition and its rated capacity
will allow the use of this Roof Rack. Consult with the
RV manufacturer or qualified technician to determine if
your RV’s roof is fit for use with this Roof Rack.
-The vehicle roof surface and substructure should be in
good condition with no dented, cracked or rusted parts.
-The Roof Rack is intended to be used to secure and
contain stationary objects within the roof load limits. It is
not designed to withstand excessive force in any
direction.
-The Roof Rack may be used to carry objects that do not
fit conveniently inside the vehicle’s other storage
compartments.
-The Roof Rack is intended to be mounted on a
relatively flat portion of the roof. Most RV roofs remain
relatively flat all the way up to the edge of the roof, but
for roofs that have “radius” edges use caution to ensure
the rack is not mounted into the radius.
-Familiarize yourself with the rack components. The
rack tubing construction consists of tubing with two
different diameters. The smaller diameter is slid inside
the larger diameter tube and held in place by a formed
feature of the tube or by a rivet. The smaller diameter
tube is used to junction two pieces of larger diameter
tube together and is referred to as an insert.
INSTALLATION
How to mount the Roof Rack to your RV roof.
WARNING
MAY CAUSE PERSONAL INJURY OR DEATH
The Roof Rack is intended to be a permanent fixture.
The Roof Rack should only be installed when the
vehicle is parked on level ground.
1. Out of the carton, the rack has a footprint of 95-1/2”
wide by 49-1/2” deep. These dimensions include the
tube length of the rack in both directions and an
additional length to accommodate the stanchion feet,
which account for an additional 3/4” to the total depth
and an additional 1-1/2” to the total width. It is
recommended to measure your roof area to determine
applicable area. Rack dimension alterations may be
done on an alternate surface (i.e. ground) if accurate
measurements have been obtained of the roof “working
area” and required rack dimensions have been
determined.
2. Altering the depth: If the depth of the Roof Rack
needs to be altered because of a smaller working area,
you will need to reduce the length of the side rails
accordingly. All cuts should be performed on the straight
portion of the tube never on the radius portion. Remove
the end caps from the side rails and lay the first side rail
flat. Using the depth dimension of the “working area”,
subtract the stanchion adjustment of 3/4”. Use this
number as your tube depth measurement and measure
down the side of the side rail from the radius end and
make a mark along the straight section. Use a hacksaw
or tube cutter to cut the tube at the mark. Use a file when
complete to remove burrs and sharp edges from the cut
edges. Replace the end cap and repeat with the other
side rail, only instead of measuring align the cut rail on

top of the second rail to align, mark and cut the second
rail. File the cut edges and replace the end cap on the
second side rail.
3. Altering the width: If the width of the Roof Rack needs
to be altered because of a smaller working area, you will
need to reduce the length of both center rails evenly and
accordingly. For the center rail with insert, the cut
should be performed on the non-insert end of the tube.
Using the width dimension of the “working area”,
subtract the stanchion and side rail width adjustment of
14-1/2” (7-1/4” from each side); this number as your total
tube width measurement. Divide the total tube width in
half; this number is your center rail length. Measure
down the side of the center rail and make a mark on the
tube at the center rail length. Use a hacksaw or tube
cutter to cut the tube at the mark. Use a file when
complete to remove burrs and sharp edges from the cut
edges. Replace the end cap and repeat with the other
side rail, only instead of measuring align the cut rail on
top of the second rail to align, mark and cut the second
rail. File the cut edges on the second side rail.
4. Perform a dry fit on the roof prior to fastening the rack
to the roof. Assemble all of the components in the
manner shown in the product picture. Slide the center
rail insert into the other center rail. Notice that the
stanchions have an open side and should be oriented so
all side openings face the center of the rack. Slide 3
stanchions onto the center rails and slide 2 stanchions
onto each of the side rails. Slide each side rail insert
respectively into an open end of the center rail
assembly. Place the assembled rack into the desired
location and check overall fit. If the fit is not correct,
remove rack and adjust the component lengths as
necessary.
Once desired fit is acquired, begin fastening rails
together. Identify the center rail section that was not
riveted to the insert and, with both sections firmly
pressed against one another, drive (1) #8 x ¾ screw
through both the rail tube and insert tube, securing both
sections together. Stanchions may be slid along the
tube out of the way until sections are secured and
replaced later. Note: The (3) center rail stanchions are
not intended to slide around the bent tube that makes up
the side rails and therefore need to be placed onto the
center rail before securing the side rails. Continue to
secure the side rails to each end of the complete center
rail by driving (1) #8 x ¾ screw through both the rail tube
and insert tube at each end. Once complete, replace
stanchions and place into desired location on roof.
5. Once the assembled rack has been placed in the
desired location, begin fastening with the stanchion in
the center of the center rail. This stanchion should line

up over the tube seam where both pieces of the center
rail are joined. Once secured, fasten the other 2 center
rail stanchions not more than 3” from the end of the
center rail, but the same distance, on both sides; like the
center stanchion, the end stanchions may also be used
to cover the tube seam between the side rails and the
center rail.
6. Once the center rail is secured, it can still slide side-
to-side until the side rails are secured. Align the side rail
stanchions along the straight portion of the side rail. It is
recommended to place one near the free end and one
near the radius corner. With the center rail properly
aligned, fasten the side rail stanchions to the roof.
Repeat the side rail location and fastening procedure for
the second rail.
CAUTION
MAY CAUSE PERSONAL INJURY OR PROPERTY
DAMAGE
Failure to properly secure the Roof Rack to the vehicle
may cause damage or injury. Always verify that the
Roof Rack is securely fastened to the vehicle when
installed prior to use and before operating vehicle.
Consult with the RV manufacturer or qualified
technician to determine if you RV’s roof is fit for use
with this Roof Rack. Never move the vehicle without
verifying Roof Rack is securely fastened to the vehicle.
OPERATION
CAUTION
MAY CAUSE PERSONAL INJURY OR PROPERTY
DAMAGE
Failure to properly secure the item(s) to the Roof Rack
may cause damage or injury. Always verify that
item(s) placed in the Roof Rack are securely fastened
to the Roof Rack.
CAUTION
MAY CAUSE PERSONAL INJURY OR PROPERTY
DAMAGE
Over-tightening tie-downs to the Roof Rack frame may
cause damage to the Roof Rack and/or item(s) being
stowed in the Roof Rack.
When you stow items on a Roof Rack, the primary
objective is to make sure the items are secure and you
can drive your vehicle safely.
Analyze the size of what you're putting on your Roof
Rack. Measure the rack and compare measurements
with the items you intend to place on the roof to
determine fit. Best practice is to minimize roof storage
when other accommodating storage locations outside of
the vehicle are available, and when convenient avoid
placing anything on the roof that you can store inside the
vehicle.
Once “roof items” have been determined, begin loading
into the rack area. When placing items on the Roof
Rack, try to get the biggest and heaviest items on first as
it will save space in other areas if smaller items have to
be relocated. Keep in mind how each item is to be
secured as you are loading so if you cannot secure any
more items, you will only need to remove the last item.
You will need tie-down material (bungee cords, straps,
rope, etc.) to hold equipment or items atop your Roof
Rack.
Secure one end of a tie-down under one of the Roof
Rack side bars. Throw the loose end of the tie-down
over the items you are securing. Pull the tie-down tight
over the items and latch the tie-down under the side bar
on the other side. Use multiple tie-downs to secure the
items tightly in one direction.

Secure one end of a tie-down either under one of the
Roof Rack side bars or the Roof Rack rear bar. Bring
the loose end of the tie-down around the items towards
the open end of the rack. Pull the tie-down tight around
the items and latch the tie-down either under one of the
Roof Rack side bars or the Roof Rack rear bar. Use
multiple tie-downs to secure the items tightly within the
rack and to make sure the items are doubly secure.
Always make sure that whatever is attached to your
Roof Rack is secured before going onto the open road.
MAINTENANCE
The Roof Rack is made from durable materials and is
intended for outdoor use. However, minor maintenance
may be required periodically.
The Roof Rack may be cleaned with warm soapy water.
Be sure to thoroughly rinse with clean water to retain
finish. May be towel or air-dried.
Check to make sure all fasteners are tight before and
after each use, and replace any missing fasteners before
use. Do not use Roof Rack if any fasteners are
damaged, broken or missing.
Periodically inspect the Roof Rack tubing and/or
stanchions for any damage, cracks or broken pieces.
Replace the Roof Rack if damaged, cracked or broken.
Do not use Roof Rack if any components are damaged,
broken or missing.
The Roof Rack is intended to be a permanent fixture.
When vehicle is in storage or parked for extended
periods, the Roof Rack should be covered as minimizing
the Roof Rack components’ exposure to the elements or
other hazards will prolong the life of the Roof Rack and
its components.
ATWOOD MOBILE PRODUCTS LLC
LIMITED WARRANTY
Atwood Mobile Products LLC warrants to the original retail customer of products
manufactured by Atwood Mobile Products LLC and subject to the below
mentioned conditions, that this product will be free of defects in material and
workmanship for the below specified period of time from the original date of
purchase or manufacture. For the remainder of this document Atwood Mobile
Products LLC will be referred to as Atwood. Atwood’s liability hereunder is limited
to the replacement of the product, repair of the product, or replacement of the
product with a reconditioned product at the discretion of the manufacturer. This
warranty is not transferable and is intended for original purchaser only. This
warranty is void if the product has been damaged by accident, unreasonable use,
neglect, tampering, or other causes not arising from defects in material or
workmanship. The warranty extends to the original owner of the product and is
subject to the following conditions.
1) Atwood will repair or replace any part defective in material or
workmanship, after inspection by Atwood. This warranty includes labor
charges per Atwood’s Flat Rate Schedule as required to remove and
replace the part. Service calls to customer’s location and diagnostic time
are not considered part of these charges and, therefore may be the
responsibility of the owner.
2) In the event of a warranty claim, service may be performed at any
approved OEM dealer location
3) Parts being replaced must be shipped to Atwood “Prepaid” in first class
saleable condition and identified with a return goods number, unless other
arrangements have been made. Credit for shipping costs will be included
with the warranty claim. The defective parts become the property of
Atwood and must be returned to Atwood.
4) Returned goods – Goods may not be returned without our consent.
Requests for returns should be made within 10 days from receipt of our
invoice. If the parts being returned are not defective, Atwood reserves the
right to apply a 20% restocking fee. We cannot accept material which has
been custom fabricated or modified from its original design.
5) This warranty applies only if the product is installed, repaired, maintained
and operated according to the installation/service instructions. Any
deviations from these recommended specifications must be approved in
writing by Atwood.
6) The warranty period on replacement parts is the unused portion of the
original warranty period.
7) Damage or failure resulting from misuse (including failure to seek proper
repair service), misapplication or alterations is the owner’s responsibility.
8) Atwood does not assume responsibility for any loss of use, loss of time,
inconvenience, expense for gasoline, telephone, travel lodging, loss or
damage to personal property, or revenues. Some states do not allow the
exclusion or limitation of incidental or consequential damages, so the
above limitations or exclusions may not apply to you.
9) Any implied warranties are limited to the product’s warranty period. Some
states do not allow limitations on how long an implied warranty lasts, so
the above limitation may not apply to you. This warranty gives you
specific legal rights and you may also have other rights, which vary from
state to state.
10) Replacement parts purchased outside of the original warranty carry a 90-
day warranty.
11) Any action to enforce this warranty shall not be commenced more than 3
months after the expiration of this warranty.
12) THIS WARRANTY IS EXCLUSIVE AND IS IN LIEU OF ANY AND ALL
OTHER WARRANTIES, EXPRESSED OR IMPLIED, INCLUDING
WITHOUT LIMITATION THE IMPLIED WARRANTY OF
MERCHANTABILITY AND FITNESS FOR PURPOSE.
Product Specifications for products listed below are designed for use for their
specific application. Any other use, unless authorized in writing by the Atwood
Engineering Department, voids this warranty. Original date of purchase of unit
refers to the date the consumer purchases the vehicle from a dealer. Date of
manufacture refers to the date the item was produced by Atwood Mobile
Products.
Racks – Two (2) years from original date of purchase of unit.
1) This limited warranty is valid only when the product is applied, installed,
maintained and operated in accordance with this Atwood Installation,
Maintenance and Operating Manual. Any deviation from these
recommended specifications must be approved in writing by Atwood.
2) Any implied warranties are limited to the duration of this limited warranty
as stated above. Atwood does not assume responsibility for
consequential damage or loss, including loss of vehicle, loss of time,
inconvenience, expense for gasoline, telephone, travel, lodging, loss or
damage to personal properties, or loss of revenues. Atwood’s maximum
liability shall not exceed the cost of the goods. Some states do not allow
limitations on how long an implied warranty lasts or limitations on
consequential damages, so the above limitations may not apply to you.
This limited warranty gives you specific legal rights which may vary from
state to state.
Table of contents
Other Atwood Automobile Accessories manuals