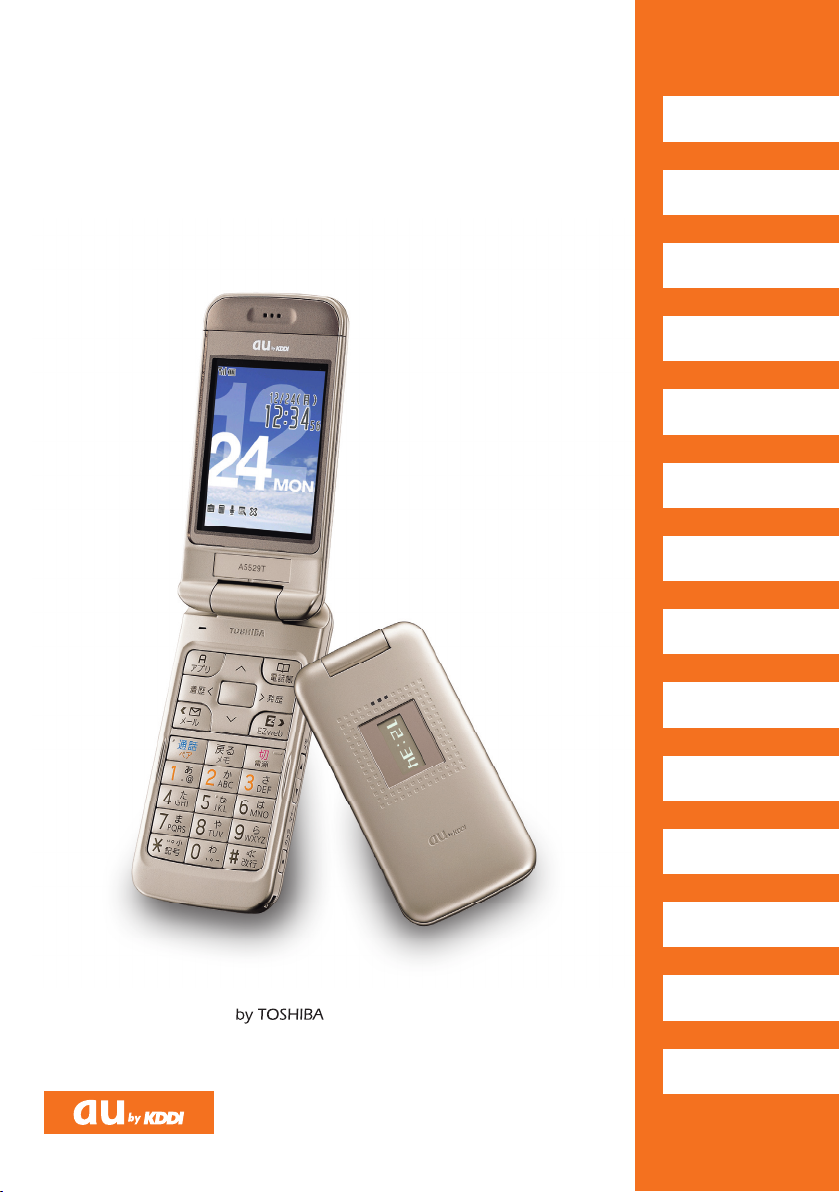
Au by Kiddi Toshiba A5529T Installation guide
"ASIC
-ANUAL
!4
#ONTENTS
'ETTING2EADY
-AKINGAND
!NSWERING#ALLS
#HARACTER)NPUT
0HONE"OOK
0AIR&UNCTION
-AIL
#AMERA
%:WEB
%:.AVI
,IMIT-ODE
3IMPLE-ODE
2EMOTE#TRL,OCK
4ROUBLESHOOTING
/THERS
)NDEX

Thank you for purchasing the A5529T. Before using your A5529T, be sure to
read the A5529T Basic Manual (this PDF manual) to ensure correct usage.
After you have finished reading this manual, store this PDF manual and the
printed manuals in safe places so you can retrieve them whenever you need
them.
The A5529T comes with the Basic Manual and Instruction Manual.
●For learning the basics:
Read the A5529T Basic Manual (this manual).
●For learning details on using each function:
Read the supplied A5529T Instruction Manual.
The following manual is also available on the au homepage.
・ Keyword searchable au Online Manual
(http://www.au.kddi.com/manual/index.html)
You can also access the au Online Manual from EZweb.
<EZweb Access>M⇒EZweb ⇒au one Top
⇒
auお客さまサポート
(au Customer Support)
⇒
調べる
(Search)
⇒
オンラインマニュアル
(Online Manual)
Introduction
Printed Manuals for the A5529T (Japanese)
・The typeface and shape/color of fonts used for characters in the sample screens in
this manual may differ from those used for characters in actual screens, or some
characters may be omitted.
Note
Note
Note
1
Cell Phone Etiquette
■The cell phone always emits weak radio waves when power is on.
■Use the cell phone in an enjoyable and safe manner without forgetting to
be considerate of others around you.
Etiquette for Cell Phone Use
●4HEUSEOFCELLPHONESISNOT
ALLOWEDINSOMEPLACES
・ÊÌÊÕÃiÊÌiÊViÊ«iÊ
ÜiÊÞÕÊ>ÀiÊ`ÀÛ}°Ê}Ê
ÃÊÃÊLÌÊ`>}iÀÕÃÊ>`Ê
«ÀLÌi`ÊLÞÊ>Ü°
・1Ã}Ê>ÊViÊ«iÊÊ>Ê
>ÀVÀ>vÌÊÃÊ«ÀLÌi`ÊLÞÊ>Ü°Ê
iÊÃÕÀiÊÌÊÌÕÀÊÌiÊViÊ«iÊ
vv°
●2ADIOWAVESFROMCELLPHONES
MAYINTERFEREWITHMEDICAL
ELECTRICALEQUIPMENT
・-iÊ«i«iÊVÃiÊÌÊÞÕÊÊ
LÕÃÞÊ«>ViÃÊÃÕVÊ>ÃÊVÀÜ`i`Ê
ÌÀ>ÃÊ>ÞÊLiÊÕÃ}Ê>Ê«>Vi
>iÀ°Ê/ÕÀÊÌiÊViÊ«iÊvvÊ
ÊÃÕVÊ«>Við
・L`iÊLÞÊÌiÊÀÕiÃÊvÊëÌ>ÃÊ
>`ÊÌiÀÊi`V>ÊÃÌÌÕÌÃÊ
ÜiÀiÊÌÊÃÊvÀL``iÊÌÊÕÃiÊÀÊ
V>ÀÀÞÊViÊ«ið
●"ECONSIDERATEOFWHEREYOU
USETHECELLPHONEANDHOW
LOUDLYYOUTALK
・ÊÌÊ>iÊV>ÃÊvÀÊVi>Ã]Ê
Ìi>ÌiÀÃ]ÊÕÃiÕÃ]ÊLÀ>ÀiÃ]Ê
>`ÊÌiÀÊÃ>ÀÊ«>ViðÊ/ÕÀÊ
«ÜiÀÊvvÊÀÊÌÕÀÊÊ>iÀÊ
`iÊÌÊ«ÀiÛiÌÊÌiÀÃÊ>ÀÕ`Ê
ÞÕÊvÀÊLi}ÊVÛiiVi`Ê
LÞÊÀ}ÊÌiÃÊvÀÊV}Ê
V>ÃÊÀÊ>°
・ÊÌÊÕÃiÊÌiÊViÊ«iÊÊ
«>ViÃÊÜiÀiÊÞÕÊÜÊLiÊÊ
ÌiÊÜ>ÞÊvÊÌiÀð
・ÛiÊÌÊ>Ài>ÃÊÜiÀiÊÞÕÊÜÊ
ÌÊVÛiiViÊÌiÀÃÊÊ
ÌÀ>ÃÊÀÊÊÌiÊLLið
・/>iÊV>ÀiÊÌÊ>Û`ÊÌ>}ÊÊ>Ê
Õ`ÊÛVi°
・"LÌ>ÊÌiÊ«iÀÃÃÊvÊÌiÀÊ
«i«iÊLivÀiÊÞÕÊÌ>iÊÌiÀÊ
«ÌÃÊÜÌÊÌiÊViÊ«i¿ÃÊ
V>iÀ>°
・ÊÌÊÕÃiÊÌiÊViÊ«i¿ÃÊ
V>iÀ>ÊvÀÊÀiVÀ`}ÊvÀ>ÌÊ
ÊLÃÌÀiÃÊ>`ÊÌiÀÊ
V>ÌÃÊÜiÀiÊÌ>}Ê«ÌÃÊ
ÃÊÌÊ«iÀÌÌi`°
×
OFF
×
×
-ANNER
MODE

2
Cell Phone Features
,IMIT-ODE
9OUCANLIMITINCOMING
ANDOUTGOINGCALLSAND
CMAIL
3IMPLE-ODE
0AGE
0AIR&UNCTION
9OUCANACCESSTHE
CONTACTDETAILSOFA
PARTNEREASILYTO
MAKEACALLOR
SENDMAIL
9OUCANREMOTELY
LOCKTHE!4TO
PREVENTOTHERPEOPLE
FROMUSINGTHE
CELLPHONE
9OUCANEMAILTO
OTHERCELLPHONES
ORTOA0#
%:.AVI
0ROVIDESUSEFULPOSITIONAL
INFORMATIONSERVICES
INCLUDING%:.AVI7ALK
%VACUATE.AVIAND
3ECURITY.AVI
%:WEB
9OUCANDOWNLOAD
#HAKU5TA¤AND
ACCESSSITES
-AIL
2EMOTE#TRL,OCK
0AGE
0AGE
0AGE
0AGE
0AGE
9OUCANTAKEPHOTOS
ANDMOVIECLIPS
ANDTHENSEND
THEMEASILY
BYEMAIL
#AMERA
9OUCANMAKEOPERATION
EVENSIMPLERBYRESTRICTING
USETOONLYFREQUENTLY
USEDFUNCTIONS
0AGE
0AGE
Cell Phone Basics
⇒For information about other functions, see page 101.

3
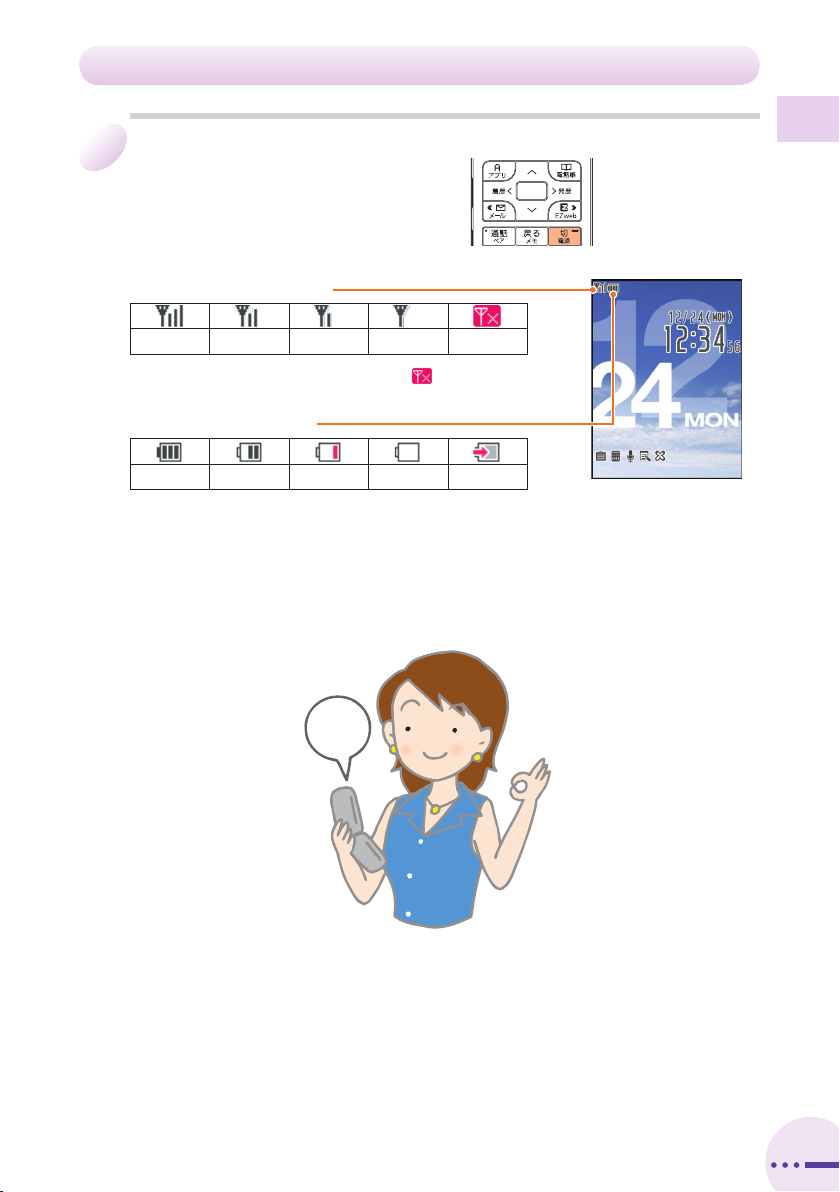
Checking the Power, Signal Strength, and Battery Level
0AGE
0AGE
0AGE
0AGE
0AGE
ON!ON!
.ORMALLYYOUSHOULDLEAVETHECELLPHONETURNEDON
`Ê`Ü2vÀÊ>ÌÊi>ÃÌÊ
iÊÃiV`°
)FASIGNALISNOTBEINGRECEIVEDYOUCANNOTTALKONTHECELLPHONE
%VENINSERVICEAREASTHEREARESOMEPLACESWHERE
ITISDIFFICULTTORECEIVEASIGNAL
0AYATTENTIONTOTHEBATTERYLEVEL
ÊÊÊÊÊÊÊ`V>ÌiÃÊÌiÊL>ÌÌiÀÞÊ
iÛi°
7HENTHEBATTERYLEVELISLOWTHECELLPHONEMAY
NOTFUNCTIONPROPERLY
4OMAKEANDRECEIVECALLSYOUNEEDTOTURNON
POWER
ÊÊÊÊÊÊÊÊ`V>ÌiÃÊÌiÊÃ}>Ê
ÃÌÀi}Ì°
-ANNER-ODE
9OUCANUSEMANNERMODETOTURN
OFFTHEINCOMINGCALLRINGTONEAND
OTHERTONESSOASNOTTO
INCONVENIENCEOTHERPEOPLE
7iÊÌiÊÃÌ>`LÞÊ
ÃVÀiiÊÃÊ`ë>Þi`]Ê
`Ê`ÜÊ
3
ÊvÀÊ
>ÌÊi>ÃÌÊiÊÃiV`°
6OICE-EMO
7HENYOUCANNOTANSWERCALLS
THECELLPHONECANPLAYAN
ANSWERINGMESSAGE*APANESE
ANDRECORDMEMOS
7iÊÌiÊÃÌ>`LÞÊ
ÃVÀiiÊÃÊ`ë>Þi`]Ê
`Ê`Ü1vÀÊ
>ÌÊi>ÃÌÊiÊÃiV`°
)CANTANSWER
*APANESE
Manner Mode and Voice Memo

4
Do not use the cell phone while driving!
$RIVE-ODE
)N$RIVE-ODEA*APANESEMESSAGEMEANING)gMDRIVINGNOWSO)CANgT
ANSWERYOURCALLISPLAYEDWHENACALLISRECEIVEDTELLINGTHECALLERTO
LEAVEAMESSAGEONTHEVOICEMEMO
(OLDINGACELLPHONETALKINGONACELLPHONELOOKINGATACELLPHONE
DISPLAYTOSENDMAILORPERFORMSOMEOTHEROPERATIONWHILEDRIVINGIS
AGAINSTTHELAWIN*APAN
2EVISED4RAFFIC#ONTROL,AWEFFECTIVE.OVEMBER
4URNOFFYOURCELLPHONEORPUTITIN
$RIVE-ODEWHILEDRIVING
×Ê}Ê>ÌÊ>ÊÊ
>ÊViÊ«iÊ`ë>Þ°
7iÊÌiÊÃÌ>`LÞÊÃVÀiiÊÃÊ
`ë>Þi`]Ê«ÀiÃÃ3]ÊÕÃi(ÌÊ
ÃiiVÌÊÊÊÊÊÊ$RIVE-ODE]Ê>`ÊÌiÊ
«ÀiÃÃ5!-iiVÌ®°
×Ê`}Ê>ÊViÊ«iÊÊ
ÞÕÀÊ>`ÊvÀÊÌ>}°
)gMDRIVING
*APANESE

5
Spam and One-ring Calls
)FYOURECEIVESPAM
)FYOUUSETHEMAILFILTERFUNCTIONYOUCANSETONLYSPECIFICMAILTONOTBE
RECEIVEDANDREJECTSPOOFMAIL
/iÊvÜ}Ê>ÊvÌiÀÃÊ>ÀiÊ>Û>>LiÊvÀÊ
ÀiiVÌ}Êë>\
・>Ê`ë>Þi`ÊÜÌÊ未承諾広告※Ê
1ÃVÌi`Ê`ÛiÀÌÃiiÌ®ÊV>ÌÊLiÊ
ÀiViÛi`
・-«iVvi`Ê>ÊV>ÌÊLiÊÀiViÛi`Ê
・-«vÊi>ÊV>ÌÊLiÊÀiViÛi`
)FYOURECEIVEACALLFROMANUNKNOWNPHONENUMBER
Ê
ÊÌiÊV}ÊÃÌÀÞÊ
`V>ÌiÃÊÌ>ÌÊÌiÀiÊÜ>ÃÊ
>ÊV>ÊÜVÊÀ>}ÊÌÀiiÊ
ÃiV`ÃÊ}ÊÀÊÃÀÌiÀ°
$ANGER
)TMAYBEANATTEMPTTOGETYOUTORETURNACALLTOASERVICEWITHVERYHIGH
CHARGES
)NCOMINGCALL
8888
0AGE
0AGE

6
Disaster Message Board Service
!BOUT$ISASTER-ESSAGE"OARD
7HENABIGSCALEDISASTEROCCURSYOUCANREGISTERYOURSAFETY
INFORMATIONTHROUGH%:WEB4HEREGISTEREDSAFETYINFORMATIONCANBE
REFERREDFROMANYWHEREIN*APANTHROUGH%:WEBOR)NTERNET
2EGISTERING
THESAFETY
INFORMATION
2EFERRING
THESAFETY
INFORMATION
●7iÊ>ÊL}ÊÃV>iÊ`Ã>ÃÌiÀÊVVÕÀÃ]ÊvÀÊ>ÕÊ
«i]ÊÞÕÊV>ÊÀi}ÃÌiÀÊÞÕÀÊÃ>viÌÞÊvÀ>ÌÊ
ÃÕVÊ>ÃÊÞÕÀÊV`ÌÊÀÊViÌÃÊÌÊÌiÊ災
害用伝言板ÊÃ>ÃÌiÀÊiÃÃ>}iÊ>À`®ÊVÀi>Ìi`Ê
ÊÌiÊ<ÜiL°
●vÌiÀÊÌiÊÀi}ÃÌÀ>ÌÊvÊÞÕÀÊÃ>viÌÞÊ
vÀ>Ì]ÊÞÕÊV>ÊÌvÞÊLÞÊi>ÊÞÕÀÊ
v>ÞÊÀÊ>VµÕ>Ì>ViÃÊÞÕÊ>ÛiÊ«ÀiÛÕÃÞÊ
`iÃ}>Ìi`ÊÌ>ÌÊÞÕÊÀi}ÃÌiÀi`ÊÞÕÀÊÃ>viÌÞÊ
vÀ>ÌÊÊÌiÊ災害用伝言板ÊÃ>ÃÌiÀÊ
iÃÃ>}iÊ>À`®°
●9ÕÊV>ÊÀiviÀÊÌÊÌiÊÃ>viÌÞÊvÀ>ÌÊvÊÌiÊ
«iÀÃÊÜÊÞÕÊÜ>ÌÊÌÊÜÊÌiÊ
vÀ>ÌÊvÊLÞÊiÌiÀ}ÊÌiÊ«iÊÕLiÀÊ
vÊÌiÊ«iÀÃÊvÀÊ<ÜiLÊÀÊÌiÀiÌ°I
IÊ7iÊÞÕÊÀiviÀÊÌÊÌiÊÃ>viÌÞÊvÀ>ÌÊvÀÊ
ÌiÀÊV>ÀÀiÀÿÊViÊ«i]Ê*-ÊÀÊ*]ÊÞÕÊV>Ê
ÀiviÀÊÌÊÌÊvÀʸÌÌ«\ÉÉ`i}°iâÜiL°i°«É¸°
!CCESS
Ê⇒%:WEB⇒AUONE4OPÊ⇒
Ã>ÃÌiÀÊiÃÃ>}iÊ>À`®
ÌÌ«\ÉÉ`i}°iâÜiL°i°«É
災害用伝言板

7
災害用伝言板
伝言板トップ
〜サービス提供中〜
安否情報の登録・確認が
できます。
登録(ご利用可能地域の
方のみ登録可能です)
確認
削除
安否お知らせメール設定
サービス概要
ご利用地域情報
お問合せ
災害対策への取り組み
災害関連情報
English
登録
災害用伝言板
〜登録〜
被災状況
無事です。
被害があります。
自宅に居ます。
避難所に居ます。
コメント見て
コメント入力(
100
文字
まで)
※登録内容確認画面にて
、お客様の携帯電話番号
および登録日時が表示さ
れます。
伝言板トップへ
検索する
災害用伝言板
〜確認〜
安否情報を確認したい相
手の電話番号を入力して
下さい。
090XXXXXXXX
他事業者提供の災害用伝
言板は以下からご確認下
さい。
<ドコモ>
iモード災害用伝言板
<ソフトバンク>
災害用伝言板
<ウィルコム>
災害用伝言板
伝言板トップへ
検索する
4OPDISPLAYOF
THE$ISASTER
-ESSAGE"OARD
登録FORREGISTRATION
確認FOR
REFERENCE
3AFETYINFORMATION
REFERENCEDISPLAY
3AFETYINFORMATION
REGISTRATIONDISPLAY
・The maximum preservation period of the registered information is 72
hours.
・The maximum available number of each registration is 10. When the
number of registration exceeds 10, old information will be overwritten in
order of registration.
・The demonstration of this service can be referred to anytime by pressing
M⇒EZweb ⇒au one Top ⇒
auお客さまサポート
(au Customer
Support) ⇒
調べる
(Search) ⇒
災害用伝言板(デモ版)
(Disaster Message
Board (Demo Version)).
・To view the Disaster Message Board in English, select English on the top
display of the Disaster Message Board.

Contents
88
Contents
Introduction
Cell Phone Etiquette 1
Etiquette for Cell Phone Use ………………………………………………………………… 1
Cell Phone Basics 2
Cell Phone Features…………………………………………………………………………… 2
Manner Mode and Voice Memo ……………………………………………………………… 3
Checking the Power, Signal Strength, and Battery Level…………………………………… 3
Do not use the cell phone while driving!……………………………………………………… 4
Spam and One-ring Calls……………………………………………………………………… 5
Disaster Message Board Service …………………………………………………………… 6
Contents 8
Getting Ready 10
Checking the Contents of the Box ……………………………………………………………10
Names of Parts …………………………………………………………………………………11
Learning the Basics ……………………………………………………………………………12
Charging the Battery Pack ……………………………………………………………………14
Turning On the Power …………………………………………………………………………15
Viewing the Display ……………………………………………………………………………16
Configuring Initial Settings ……………………………………………………………………18
Switching the Display Language to English …………………………………………………20
Checking Your Phone Number and E-mail Address…………………………………………21
Initializing E-mail and EZweb …………………………………………………………………22
Security Code and Passwords…………………………………………………………………23
Using Menus ……………………………………………………………………………………24
Changing Your E-mail Address…………………………………………………………………26
Using Extra Large Characters…………………………………………………………………28
Making and Answering Calls 29
Making a Call ……………………………………………………………………………………29
Making an International Call……………………………………………………………………29
Answering a Call…………………………………………………………………………………30
Redialing (Outgoing History/Incoming History)………………………………………………31
One-ring Calls……………………………………………………………………………………32
Adjusting the Earpiece Volume during a Call…………………………………………………33
Turning On Manner Mode………………………………………………………………………33
Changing the Incoming Ring Tone ……………………………………………………………34
Adjusting the Incoming Ring Tone Volume……………………………………………………36
Turning On Voice Memo ………………………………………………………………………38
Playing a Voice Memo …………………………………………………………………………39
Character Input 40
Character Entry Modes…………………………………………………………………………40
Entering Single-byte Alphanumeric Characters ……………………………………………40
Entering E-mail Addresses ……………………………………………………………………42
Entering Pictograms ……………………………………………………………………………44
Phone Book 45
Saving a Phone Book Entry……………………………………………………………………45
Dialing from the Phone Book …………………………………………………………………47
Editing Phone Book Entries……………………………………………………………………48
Saving a Phone Number from the Incoming or Outgoing History…………………………49

Contents
99
Pair Function 50
Registering a Pair Partner………………………………………………………………………50
Making a Call to a Pair Partner ………………………………………………………………51
Sending a Mail to a Pair Partner………………………………………………………………52
Mail 53
Using E-mail ……………………………………………………………………………………53
Creating and Sending E-mail Messages ……………………………………………………54
Reading Received E-mail Messages…………………………………………………………56
Reading an E-mail Message with an Attached Photo or Movie……………………………58
Replying to Received E-mail Messages………………………………………………………59
Rejecting Spam …………………………………………………………………………………60
Using C-mail ……………………………………………………………………………………61
Creating and Sending C-mail Messages ……………………………………………………62
Reading Received C-mail Messages…………………………………………………………63
Camera 64
Camera Image Features ………………………………………………………………………64
Photo Shooting Tips ……………………………………………………………………………65
About Photo Modes ……………………………………………………………………………65
Taking a Photo …………………………………………………………………………………66
Viewing Photos …………………………………………………………………………………67
EZweb 68
Accessing Sites …………………………………………………………………………………69
Bookmarking Frequently Accessed Pages……………………………………………………71
Viewing Bookmarked Pages……………………………………………………………………72
Checking Charges………………………………………………………………………………73
Downloading Chaku-Uta®………………………………………………………………………74
EZ Navi 76
Limit Mode 78
Registering Permitted Members ………………………………………………………………78
Limiting Calls and C-mail ………………………………………………………………………80
Setting Use Limits ………………………………………………………………………………82
Turning Limit Mode On and Off ………………………………………………………………84
Simple Mode 85
Entering Simple Mode …………………………………………………………………………85
Exiting Simple Mode……………………………………………………………………………86
Viewing the Display in Simple Mode …………………………………………………………87
Viewing the Simple Menu………………………………………………………………………88
Saving a Phone Book Entry Using Simple Mode……………………………………………90
Creating and Sending E-mail/C-mail Messages in Simple Mode …………………………92
Taking Photos in Simple Mode…………………………………………………………………94
Viewing Photos in Simple Mode ………………………………………………………………95
●In Case You Lose Your A5529T ……………………………………………………………… 96
Setting Conditions for Enabling the Remote Ctrl Lock………………………………………96
Remotely Enabling the Remote Ctrl Lock on Your A5529T…………………………………98
Enabling the Remote Ctrl Lock with the Security Lock Service……………………………98
●Troubleshooting………………………………………………………………………………… 99
●Other Functions…………………………………………………………………………………101
Using the Megavolume Buzzer …………………………………………………………… 101
●Index………………………………………………………………………………………………103
Getting Ready
10
Getting Ready
10
Checking the Contents of the Box
The box contains the cell phone and accessories.
・Cell phone
・Battery pack ・Desktop holder
・Basic Manual (Japanese)
!4
目次/準備
通話
文字入力
アドレス帳
ペア機能
メール
カメラ
EZweb
EZナビ
制限モード
かんたんモード
遠隔ロック/
困ったときは?
その他機能
English(英語)/
(中国語)
索引
・Instruction Manual (Japanese)
!4
EZナビ
目次
ご利用いただく前に
基本機能
メール
カメラ
データフォルダ
EZweb
microSDカード
EZアプリ
付録/索引
クイックガイド
かんたんモード
各種設定
便利な機能
auのネットワークサービス
・An AC adapter and microSD™ memory card are not included. Purchase a common
AC adapter 01 and a commercially available microSD™ memory card separately.
Note
Note
Note
・Warranty (Japanese)
・Safety Precautions (Japanese)
11
Names of Parts
%ARPIECE
$ISPLAY
7ARP
FUNCTIONKEY
%:APPSKEY
3OFTKEY
-AILKEY
#ALLKEY
0AIRKEY
+EYPAD
KEY
KEY
"ACKKEY
-EMOKEY
0HONEBOOKKEY
3OFTKEY
%:KEY
%NDKEY
0OWERKEY
-ICROPHONE
From the Front
From the Side
From the Back
-EMORYCARDSLOT
#AMERAKEY
3IDEKEY &LATTYPE
EARPHONEJACK
%XTERNALPOWER
TERMINAL
3IDEKEY
(ANDSTRAPEYELET
)NFRAREDPORT
3PEAKER
#AMERALENS
-ACROFOCUSSWITCH
"ATTERY#OVER
3UBDISPLAY
#HARGEINDICATOR
)NCOMING,%$
#HARGINGTERMINALS
"UILTINANTENNA
Getting Ready
11

Getting Ready
12
〜
!
:ë>ÞÊiÃÌ«Ê
iÕ
:
>iÊ>`Ê>ÃÜiÀÊ
V>ÃÆÊÕÃiÊÌiÊ*>ÀÊ
vÕVÌ
:6ViÊiÊ
ÃiÌÌ}ÉV>ViÆÊ
V>À>VÌiÀÊ`iiÌiÆÊ
«iÀ>ÌÊV>Vi
:V}ÊÃÌÀÞ
:<>««ÃÊÃÌ>ÀÌÕ«
:É>
:ë>ÞÊ>ÕViÀÊ
iÕ
:ë>ÞÊ<ÊÊiÕ
:
*ÜiÀÊÉvvÆÊi`Ê
V>ÉVÕV>ÌÆ
V>ViÊ«iÀ>Ì
:*iÊÕLiÀÊ>`Ê
V>À>VÌiÀÊ«ÕÌ
:"ÕÌ}}ÊÃÌÀÞ
:*iÊ
:>iÀ> :>iÀÊ`i
:6ViÊi
12
Key Assignments
Learning the Basics
・To lock the side keys to prevent unintentional side key (N, V, U)
operations while your phone is closed, hold down [for at least one second when
the standby screen is displayed. To unlock the side keys, hold down [for at least
one second.
・If you lose track of where you are or if you make a mistake, press Rto return to
the previous screen. Return to the standby screen by pressing S.
・While is displayed on the standby screen, hold down Qfor at least one
second to acquire service more quickly when returning to a service area.
・You can sound the Megavolume Buzzer by holding down #for at least one
second when the standby screen is displayed.
See page 101 for information on the Megavolume Buzzer setting.
Note
Note
Note
Side Key Assignments

Getting Ready
1313
Warp Function Key
Use the up, down, left, and right parts of the key to select items and to move
the cursor. Press the center of the key to confirm a selected item.
gG/fFSelects items, and moves the cursor up, down,
left and right.
{[Confirms the selected item or starts the selected
operation.
Soft Keys
When indications such as the following are displayed at the bottom of the
display, you can press the corresponding soft keys to perform the indicated
operations. The soft key indications vary depending on the screen.
Soft key 1
jJPerforms the operation indicated at the bottom
left of the screen.
Center key
{[Performs the operation indicated at the bottom
center of the screen.
Soft key 2
kKPerforms the operation indicated at the bottom
right of the screen.
Option Menus
An Option menu for performing various related operations will open if you
press Kwhen is displayed in a screen for configuring function
settings, entering characters, or performing other operations.
About Displaying Alert Window
If the alert window is displayed on the standby screen,
you can temporarily hide the alert window and display the
Launcher menu by pressing Sand then [.
To redisplay the temporarily hidden alert window, press
Sagain when the standby screen is displayed.
K(Option)
K(Close)
Alert window

Getting Ready
14
The battery pack is not fully charged at the time of
purchase.
Be sure to charge the battery pack before using
the cell phone for the first time.
・An AC adapter is not included. Purchase a common AC adapter 01 separately.
Charging the Battery Pack
>À}iÊ`V>ÌÀ
{
iÃÌ«Ê`iÀ
Î
Ó
£ääÊ6ÊÊ
«ÜiÀÊÕÌiÌ
*ÜiÀÊ«Õ}
Ê
Ê>`>«ÌiÀÊä£
*ÜiÀÊ
ÌiÀ>
iVÌÀ
£
Connect the common AC adapter 01 to the desktop holder.
・Check the shape of the connector for the common AC adapter 01 and then plug it
straight into the power terminal of the desktop holder.
1
・Hold the desktop holder while removing the Cell phone.
・You can also charge the battery pack by connecting the common AC adapter 01
directly to the External power terminal.
Note
Note
Note
Turn the common AC adapter 01's power plug 90 degrees
and connect it to a 100 V AC power outlet.
2
While the Cell phone is closed with the battery pack attached,
insert it into the desktop holder as shown in the figure.
3
Confirm that the charge indicator lights.
・Charging: The charge indicator lights.
・Charging finished: The charge indicator goes out.
If you charge the A5529T battery pack while the phone is turned on, it beeps when
charging starts or ends.
4
Getting Ready
15
Hold down Sfor at least
one second.
Check the signal strength.
Strong Medium Weak
Very weak
Out of range
・You cannot receive or make calls if is displayed.
Check the battery level.
Full Low Very low
(requires charging)
Empty
Charging
Turning Off the Power
Hold down Sfor at least one second.
Standby screen
Turning On the Power
ON!
ON!
1

Getting Ready
1616
Indicators allow you to check whether you have new mail, the current
settings of functions, and other information.
Display
Indicator
Description
①Indicates signal strength.
②Indicates battery level.
③
Indicates that EZweb is in use.
Indicates a call is in progress.
Indicates that EZapps is in use.
④Indicates an unanswered call.
⑤Indicates received or unread e-mail/
c-mail.
⑥−Indicates that the Remote Ctrl Lock is
enabled.
⑦−Indicates the current date and time.
⑧Indicates that the manner mode is
turned on.
⑨Indicates that the voice memo or manner
mode is turned on.
⑩Indicates the side keys are locked.
⑪Indicates a microSD™ memory card
(commercially available) is inserted.
⑫−User menu
⑬−Desktop menu
Viewing the Display
①
⑧⑨⑩ ⑪
②③ ④
⑥
⑦
⑫
⑤
⑬
⑫
B

Getting Ready
1717
・The date and time are set automatically.
・The layout and content of screens in this manual are only for the purpose of
explanation and contain some indicators that cannot appear at the same time.
・The standby screens shown in this manual have the default koyomi wallpaper setting
specified.
Note
Note
Note
Sub-display
① ② ③ ④ ⑥
⑦
Indicator
Description
①Indicates signal strength.
②Indicates that the manner mode is
turned on.
③Indicates the voice recorder is
recording.
④Indicates the side keys are locked.
⑤Indicates an alert window.
⑥Indicates battery level.
⑦−Indicates the current date and time.
⑤

Getting Ready
18
When the standby screen is
displayed, press [.
18
Configuring Initial Settings
Press 1
今すぐ設定する
(Set Now).
2
Initial screen
1
UseGto select
はい
(Yes)
and then press
[(決定[Select]).
4
Use Gto select
設定しない
(Do Not Set)
and then press
[(決定[Select]).
5
Enter the Lock No., press
[(OK), and then press
[(決定[Select]).
・The Lock No. is set to “1234” at the time of purchase.
3
Table of contents
Other Au by Kiddi Cell Phone manuals

Au by Kiddi
Au by Kiddi E09F Installation guide

Au by Kiddi
Au by Kiddi A5526K Specification sheet

Au by Kiddi
Au by Kiddi E IS01 PT Installation guide

Au by Kiddi
Au by Kiddi Assembly instructions Installation guide

Au by Kiddi
Au by Kiddi Medias Br IS11n by NEC Installation guide

Au by Kiddi
Au by Kiddi IS11CA Specification sheet


