AUDAX 19-1 User manual

Audax Body Worn Video System
Chest Camera - User Guide
1. System Components
The system is supplied complete with the following:
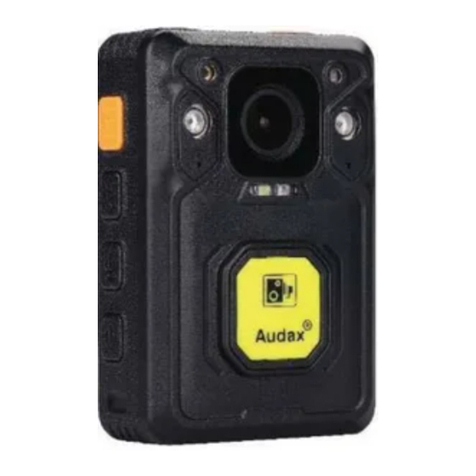
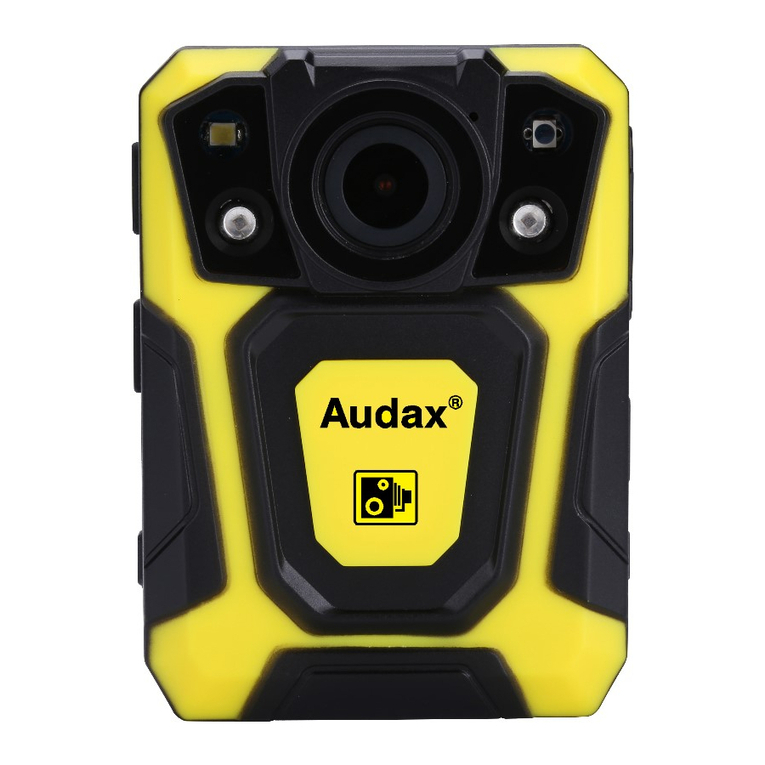
A. Chest Camera (including Screen)
B. Internal (non-removable) 32Gb Solid State memory
C. Universal metal clip with 360° rotation
D. USB 2.0 cable
E. Wall Socket USB Charger
2. System Features
•Full HD video recording
•Solid State memory
•Still image capture
•Audio
•IR (Auto or Manual)
•GPS
•140° Wide Angle Lens
•Secure, password protected files
•IP67
V.20200313

3. NOTES / WARNINGS
Charging Battery –Prior to first use of the system, charge the battery for a minimum
of four hours. When the battery is fully charged, the Blue “POWER” LED on the top
of the device will turn OFF. Please note that your camera may arrive already fully
charged, so don't be surprised if, the first time you try to charge it, the blue “charging”
light does not come on.
Changing Settings –We recommend that all recorded video / image files are backed
up before changing any system settings. Failure to do so may cause recorded
footage/files to be deleted.
Internal Memory –Gaining or attempting to gain physical access to the Internal
Memory will invalidate the system Warranty.
Cables –Only ever use the supplied chargers and cables. Using other “similar”
cables may invalidate the system Warranty.
Password Protection –The Chest Camera device has two different Passwords set:
a. The “Settings” Menu has the initial password set as 000000 (Please see Section
6, para i for details of how to set Passwords).
The software will not allow access to settings and downloading without using this
password. Audax recommend that this Password is re-set and safely recorded at
the earliest opportunity.
b. The “Replay” Menu has the password set as 000001 and this can also be changed.
This allows that you can give this password to the user so that they can view recorded
footage (if you require). However, they will NOT be able to access other areas
(settings / downloading) with this password.
IMPORTANT NOTE: If, after setting, your password is lost then the device will
have to be returned to be re-set. In that event, a fee will be chargeable and any
footage held on the unit might be erased as part of the re-setting process.
Screen Protectors –The Chest Camera device may be dispatched with a protective
film covering the camera lens (front) and viewing screen (back).
Please ensure that the film is peeled off before using.

4. Views
Top
a. Power –RED LED shows the device is charging
b. Work –GREEN LED shows the device is ON (when
Recording, this LED will show RED)
Front
a. Top left –White light filter
Top right –IR Sensor
Centre –Camera lens
Bottom Left/Right –IR Illuminators -
b. Record (Video) button
c. Still image button
Left
d. USB connection
e. Audio only button
f. Manual IR button
Right
a. Video Record button
b. Camera (still image) button
c. Power “on / off” button
Rear
a. 360° detachable clip
b. Display Screen
c. (1) “Menu” / “OK” button
d. (2) “Up” button
e. (3) “Down”button
f. (4) “Back” / “Replay” button
1 2 3 4

5. General System Operation (please refer to buttons listed above)
a. Power On/ Off
1. Press the POWER ON / OFF button for 1 second; the camera will be turned on and enter
the standby mode (the device will vibrate).
IMPORTANT NOTE: Please also see section 6 para r regarding the “LCD auto off”
function and para s regarding the “Auto off” function.
When the device is ON, pressing the POWER button for 1 second will turn the device OFF
b. Video-recording
1. Once turned on, the device will automatically enter the camera preview mode and a live
picture will be shown on the display screen. Press the RECORD button to commence
recording; the device will vibrate and the GREEN “work” LED on the top will change to RED.
A RED circle will also show on the display screen.
2. Press the RECORD button again to stop recording; the device will vibrate and the “work”
RED LED will return to GREEN. At this point, recording will stop and the video will be
saved.
3. If recording is required in “low light” conditions, press the IR button (unless IR “Auto” has
been previously selected). The IR illuminators will be turned on and the device will enter
the night shooting mode.
IMPORTANT NOTE: Video recorded when IR has been selected will be in black and
white only.
c. Still Images
1. Once turned on, the device will automatically enter the camera preview mode. Press the
PHOTO button to take still images.
2. As already mentioned in b.3. above; if photos are to be taken in “low light” conditions, turn
on the IR illuminators (unless IR “Auto” has been previously selected).
IMPORTANT NOTE: Still images taken when IR has been selected will be in black and
white only.
3. When recording Video, thePHOTO button can be pressed to capture the picture recorded
at that time.
d. Audio recording
1. Once turned on, the camera will automatically enter the camera preview mode. Press
the AUDIO button to record audio ONLY. The device will vibrate and the “work” LED on
the top will change to AMBER.
2. Press the AUDIO button again to end audio recording, and the audio file will be
automatically saved.

e. Video Playback
The device has been designed and manufactured with a one-touch playback button and
quick playback button.
When in the “standby” state, press the PLAYBACK button to enter the playback menu.
IMPORTANT NOTE: Playback of video, still images and audio only recordings are only
available once the correct 6 digit alpha/numeric Password has been entered.
1. When in the “playback” state, press “OK” to select the Video playback option and press
the UP or DOWN button to select the video you want to play.
2. Press the OK button to play the video file. Pressing the OK button while the file is playing,
will pause playback. Press OK again to continue.
f. Still Image playback
1. When in the “playback” state, select the Photo playback option and press the UP or
DOWN button to select the image you want to view.
2. Press the OK button to view the picture. Pressing the UP/DOWN buttons will cycle
photos.
3. When choosing the slideshow mode to view pictures, they will be played in cycle under
the slideshow mode.
g. Audio Playback
1. When in the “playback” state, select the audio play back option and press the UP or
DOWN button to select the audio file you want to hear.
2. Press the OK button to play the audio.

6. Parameter Settings
Press the MENU button to go to the “SETUP” screen in order to change parameter settings.
a. Resolution
Select RESOLUTION (will be highlighted in RED) and select OK. This gives you the
option to change the resolution settings.
There are seven options to select from:
2560 x 1080 –30 fps 2304 x 1296 –30 fps
1920 x 1080 –30 fps 1280 x 720 –60 fps
1280 x 720 –30 fps 848 x 480 –60 fps
848 x 480 –30 fps
Press “Up” or “Down” to select the required resolution and press “OK” to confirm. Press
“Back” to return to standby.
b. Video quality
Select VIDEO QUALITY (will be highlighted in RED) and select OK. This gives you the
option to change the video quality (bitrate) in the following settings:
There are three options to select from: High, Medium and Low. This gives different
settings dependent on the Resolution set.
2560 x 1080 –30 18.0Mbps High 15.0Mbps Medium 12.0Mbps Low
2304 x 1296 –30 18.0Mbps High 15.0Mbps Medium 12.0Mbps Low
1920 x 1080 –30 12.0Mbps High 10.0Mbps Medium 8.0Mbps Low
1280 x 720 –60 12.0Mbps High 9.0Mbps Medium 6.0Mbps Low
1280 x 720 –30 8.0Mbps High 6.0Mbps Medium 4.0Mbps Low
848 x 480 –60 8.0Mbps High 6.0Mbps Medium 4.0Mbps Low
848 x 480 –30 5.0Mbps High 4.0Mbps Medium 3.0Mbps Low
Press “Up” or “Down” to select the required setting and press “OK” to confirm. Press
“Back” to return to standby.

c. Video Duration
Select VIDEO DURATION (will be highlighted in RED) and select OK. This gives you the
option to change the video file duration times.
There are four time intervals to select from:
5 / 10 / 15 / 30 minutes
Press “Up” or “Down” to select the required resolution and press “OK” to confirm. Press
“Back” to return to standby.
d. Photo Size
Select PHOTO SIZE (will be highlighted in RED) and select OK. This gives you the option
to change the photo resolution sizes.
There are six resolutions to select from:
3 / 5 / 8 / 12 / 16 / 33 / 36 Megapixels
Press “Up” or “Down” to select the required resolution and press “OK” to confirm. Press
“Back” to return to standby.
e. Capture
Select CAPTURE (will be highlighted in RED) and select OK. This gives you the option to
change the continuous photo shooting in a sequence.
There are six options to select from:
Off –no continuous photo shooting (a single photo will be captured)
5 –Five photos taken with one press of the Capture button
10 –Ten photos taken with one press of the Capture button
15 –Fifteen photos taken with one press of the Capture button
20 –Twenty photos taken with one press of the Capture button
25 –Twenty Five photos taken with one press of the Capture button
Press “Up” or “Down” to select the required option and press “OK” to confirm. Press
“Back” to return to standby.

f. Volume
Select VOLUME (will be highlighted in RED) and select OK. This gives you the option to
change the volume of the audio on the device.
IMPORTANT NOTE: This setting has NO effect on the sensitivity of the audio
recording Microphone e.g. even if this is set to OFF, audio will still be recorded.
There are four options to select from: High / Medium / Low / Off
Press “Up” or “Down” to select the required option and press “OK” to confirm. Press
“Back” to return to standby.
g. ID
Select ID (will be highlighted in RED) and select OK. This gives you the option to set the
ID number of the device and/or user.
The “Up” or “Down”buttons can now be used to select 0 to 9 or A to Z. Press “OK” to
select and confirm each setting.
Once the final Letter / Number has been selected, you will automatically be returned to the
settings menu
The first 00000 are for the User ID if used (the X7 cannot be changed)
The second 000000 are for the Unit ID if used
Press “Back” to return to standby.
h. Date / Time
Select DATE/TIME (will be highlighted in RED) and select OK. This gives you the option
to set the date and time.
Press “Left”or “Right” to select the required position (year, month, day) and press “OK”.
The “Up” or “Down”buttons can now be used to select the correct Date. Follow the same
process for the Time. Press “OK” to confirm each setting.
Press “Back” to return to standby.

i. Password
Select PASSWORD (will be highlighted in RED) and select OK. This gives you the option
to change the password. The DEFAULT Password is set as 000000.
IMPORTANT NOTE: When changing Passwords, the current Password MUST be
entered first.
You will be returned to the Password menu –select “OK” to commence setting the new
password.
Press “Up” or “Down”to select the required setting (0 to 9 or A to Z) and press “OK” to
confirm each setting.
Press “Back” to return to standby.
j. PB-Password
Select PB-PASSWORD (will be highlighted in RED) and select OK. This gives you the
option to change the “Replay” password. The DEFAULT Password is set as 000001.
IMPORTANT NOTE: When changing Passwords, the current Password MUST be
entered first.
You will be returned to the Password menu –select “OK” to commence setting the new
password.
Press “Up” or “Down”to select the required setting (0 to 9 or A to Z) and press “OK” to
confirm each setting.
Press “Back” to return to standby.

k. Pre Event Recording
Select PRE_RECORDING (will be highlighted in RED) and select OK. This gives you the
option to select Pre-Event Recording.
There are two options to select from:
Off –No pre-event recording
On –the camera will pre-record for up to 25 seconds prior to the pressing of the
“Record” button (the actual pre-record time will depend on the resolution set e.g.
1080p –30fps resolution will give 25 seconds, lower resolutions will give more time
but higher resolutions will give less time).
Press “Up” or “Down” to select the required option and press “OK” to confirm.
Press “Back” to return to standby.
l. Post Event Recording
Select POST_RECORDING (will be highlighted in RED) and select OK. This gives you
the option to select Post Event Recording.
There are six options to select from:
Off –No post event recording
10, 20, 30, 60 or 300 seconds –The camera will record for the selected duration
AFTER stopping recording.
Press “Up” or “Down” to select the required option and press “OK” to confirm.
Press “Back” to return to standby.
IMPORTANT NOTE: When POST_RECORDING has been set, the device will continue
to record, after the “stop recording” button has been pressed, until the time period
(e.g. 20 seconds) has been reached.

m. Beep Sound
Select BEEP SOUND (will be highlighted in RED) and select OK. This gives you the
option to enable or disable the audible sound on the device.
There are two options to select from: On or Off
Press “Up” or “Down” to select the required option and press “OK” to confirm.
Press “Back” to return to standby.
n. Microphone
Select MICROPHONE (will be highlighted in RED) and select OK. This gives you the
option to mute or unmute the microphone.
NOTE: We would always recommend that the Microphone is set to Unmute
There are two options to select from: Mute or Unmute
Press “Up” or “Down” to select the required option and press “OK” to confirm.
Press “Back” to return to standby.
o. Light Sensitivity
Select LIGHT-SENSITIVE (will be highlighted in RED) and select OK. This option gives a
clearer picture in dark conditions when IR is used.
There are three options to select from: Low, Medium or High
IMPORTANT NOTE: This option only has any value when the Infrared Switch (O) is
set to “Auto”
Press “Up” or “Down” to select the required option and press “OK” to confirm.
Press “Back” to return to standby.

p. Infrared Switch
Select INFRARED SWITCH (will be highlighted in RED) and select OK. This gives you
the option to select the use of the IR Illuminators.
There are two options to select from: Manual / Auto
Press “Up” or “Down” to select the required option and press “OK” to confirm.
Press “Back” to return to standby.
q. LCD brightness
Select LCD BRIGHTNESS (will be highlighted in RED) and select OK. This gives you the
option to select the brightness of the screen.
There are three options to select from: High / Medium / Low
Press “Up” or “Down” to select the required option and press “OK” to confirm.
Press “Back” to return to standby.
r. LCD Auto Off
Select LCD AUTO OFF (will be highlighted in RED) and select OK. This gives you the
option to power off the LCD Screen after a certain period of time (unless any other
operation is selected). NOTE: Having the LCD Screen on continuously will use more
battery power.
There are four options to select from:
Off –the camera will NOT automatically be turned off
30 secs –the LCD Screen will turn off after 30 seconds
1 min –the LCD Screen will turn off after 1 minute
3 mins –the LCD Screen will turn off after 3 minutes
5 mins –the LCD Screen will turn off after 5 minutes
Press “Up” or “Down” to select the required option and press “OK” to confirm.
Press “Back” to return to standby.

s. Auto Off
Select AUTO OFF (will be highlighted in RED) and select OK. This gives you the option
to completely power off the camera off after a certain period (unless any other operation is
selected). NOTE: this is different to the “LCD Auto off” settings given in Q above.
There are four options to select from:
Off –the camera will NOT automatically be turned off
This is the RECOMMENDED SETTING for all users
3 –the camera will be turned off after 3 minutes
5 –the camera will be turned off after 5 minutes
10 –the camera will be turned off after 10 minutes
Press “Up” or “Down” to select the required option and press “OK” to confirm.
Press “Back” to return to standby.
t. Loop Recording
Select LOOP RECORDING (will be highlighted in RED) and select OK. This gives you
the option to either overwrite old video files stored on the camera or to have the camera
stop recording when the 32Gb of Memory is full.
There are two options to select from:
Off –disables the Recycle (overwriting) function
On –enables the Recycle (overwriting) function
Press “Up” or “Down” to select the required option and press “OK” to confirm.
Press “Back” to return to standby.

u. Time Zone
Select TIME ZONE (will be highlighted in RED) and select OK. This option is used to
adjust the local time zone when GPS is effective (see below for GPS).
Press “Up” or “Down” to select the required option and press “OK” to confirm.
Press “Back” to return to standby.
v. GPS
Select GPS (will be highlighted in RED) and select OK. This gives you the option to
enable the GPS function.
There are two options to select from:
Off –disables GPS function
On –enables GPS function
Press “Up” or “Down” to select the required option and press “OK” to confirm.
Press “Back” to return to standby.
w. Default setting
Select DEFAULT SETTING (will be highlighted in RED) and select OK. This will give you
the option to return the Camera back to its original default (factory) settings.
IMPORTANT NOTE: Resetting the camera DOES NOT delete any recorded footage.
Select the √ icon to reset settings or select the x to cancel
Press “Up” or “Down” to select the required option and press “OK” to confirm.
Press “Back” to return to standby.

x. Language
Select LANGUAGE (will be highlighted in RED) and select OK. This shows the current
Language set on the device.
There are three options to select from: English, French or Vietnamese
Press “Up” or “Down” to select the required option and press “OK” to confirm.
Press “Back” to return to standby.
y. Firmware Version
This shows the current Firmware Version on the device.
If new firmware updates are released, these can be emailed to you along with the
instructions for installation.
NOTE: There is no option to alter this setting.
Press “Back” to return to standby.
z. Vehicle
This turns on the Vehicle mode for automatic start/stop recording from vehicle ignition.
There are two options to select from: On and Off
Press “Up” or “Down” to select the required option and press “OK” to confirm.
Press “Back” to return to standby.
NOTE: The use of the Vehicle mode will generally depend on the age of the vehicle itself
and whether the USB point / 12v socket remains powered even when the vehicle ignition is
turned off. The assumption for using this setting is that the ports DO NOT remain
powered when the vehicle ignition is turned Off.

7. Computer Connection Instructions
NOTES:
a. Only ever use the supplied USB cable when connecting the device to a Computer.
b. No additional Drivers or Software are supplied for this device. The camera will work on
Operating Systems such as Windows XP / 7 / 8 / 10 and any drivers needed should
automatically be installed by Windows.
1. Connect the supplied USB Cable to the device and Computer
2. Turn on the device
3. Enter the correct Password (the computer will not detect the device until the password
has been entered).
4. The device will show “Connected to PC” on the rear screen, and the device will appear
as an external “Removable Disk” as per the diagram below:
5. All video, still images and audio files will appear in the DCIM folder. The LOG folder
contains a basic “admin trail” of the device use. The MISC folder is not used and may not
show.
6. Click to open one of the recordings and this will immediately start playing the recording in
a movie application (e.g. VLC Media Player / Windows Media Player).
VLC Media Player is recommended for video files recorded on the Camera –a free
download for this player can be found at: http://www.videolan.org/vlc/). Still images are
stored as JPEG files and can be opened using media such as Windows Photo Viewer etc.
7. Removing the USB cable from the device, when connected to a PC, will automatically
turn the device off.

Warranty
This product is warranted product against defects in material or workmanship for 1 year from date of purchase.
This limited warranty shall not apply to any product or item subjected to misuse, including static discharge or over charge,
failure by user to follow User Guide instructions, product modification, ordinary wear and tear, negligence or improper
use/operation.
This limited warranty is also voided if the DVR is found to have an altered or tampered with serial number or if access or
attempted access to the internal memory is suspected.
Full details of our Terms and Conditions can be found on our website www.audaxuk.com.
This Product is exclusively distributed Worldwide by Audax Global Solutions Ltd and all claims, questions and contact
should be with Audax in the first instance
© Audax Global Solutions Ltd 2020
This document is not to be reproduced in part or in whole without the prior permission of Audax Global Solutions Ltd
Audax Global Solutions Ltd
Plymouth, Devon PL1 3JY
T: +44 (0)1752 264950
E: info@audaxuk.com
W: www.audaxuk.com
Table of contents
Other AUDAX Digital Camera manuals
