Audibax Monster Beam 7R User manual
27
Monster Beam 7R
Please read the manual before using the product
Por favor, lea el manual antes de usar el producto
USER´S
MANUAL
MANUAL
DE USUARIO
Monster Beam 7R
Notes / Notas

1 26
Monster Beam 7R USER´S
MANUAL
MANUAL
DE USUARIO
Warnings:
This product is suitable for professional use only, and for safety, it cannot be applied to other
uses or purposes. Upon receipt of this equipment, please check the packaging for any
damage during transit. In case of any damage, do not use the equipment, contact the
dealer or manufacturer immediately.
This product is only suitable for indoor use. IP20 protection level. The lamp must be kept dry,
avoid exposure to humidity, overheating or environments with high dust or dirt content. Do
not let the lamp come into contact with water or any other liquid. Caution should be
exercised when handling this product regarding the heat it produces, and prevent possible
fire, ultraviolet radiation, electric shock, explosion, or lamp fragmentation, which may cause
fatal injury. Please read the instructions carefully before turning on or installing the
equipment.
Follow safety guidelines and procedures, pay attention to warning signs on specifications
and equipment.
Please do not use the "factory default" option unless necessary, as all configuration
information will be lost and the device will need to be reset.
Inspection
In order to use this product safely and properly, please read the manual before use, and
follow the instructions strictly to preserve the safety of personnel and avoid damage to the
equipment.
Please treat the equipment carefully, check for possible damage during transportation, and
check that you have received the following list of items:
Beam Moving Head: 1
User Manual: 1
Power cord: 1
Brackets: 2
Facility
1. Make sure there are no flammable objects around, around 1.5 meters away from the
installed equipment.
2. Before installing it, make sure that the available power voltage is compatible with that of
the equipment.
3. Check that the ventilation, fans, and slots are not obstructed.
4. The equipment must be firmly located and secured.
5. For safety reasons, the equipment must be grounded.
25 2
Monster Beam 7R USER´S
MANUAL
MANUAL
DE USUARIO
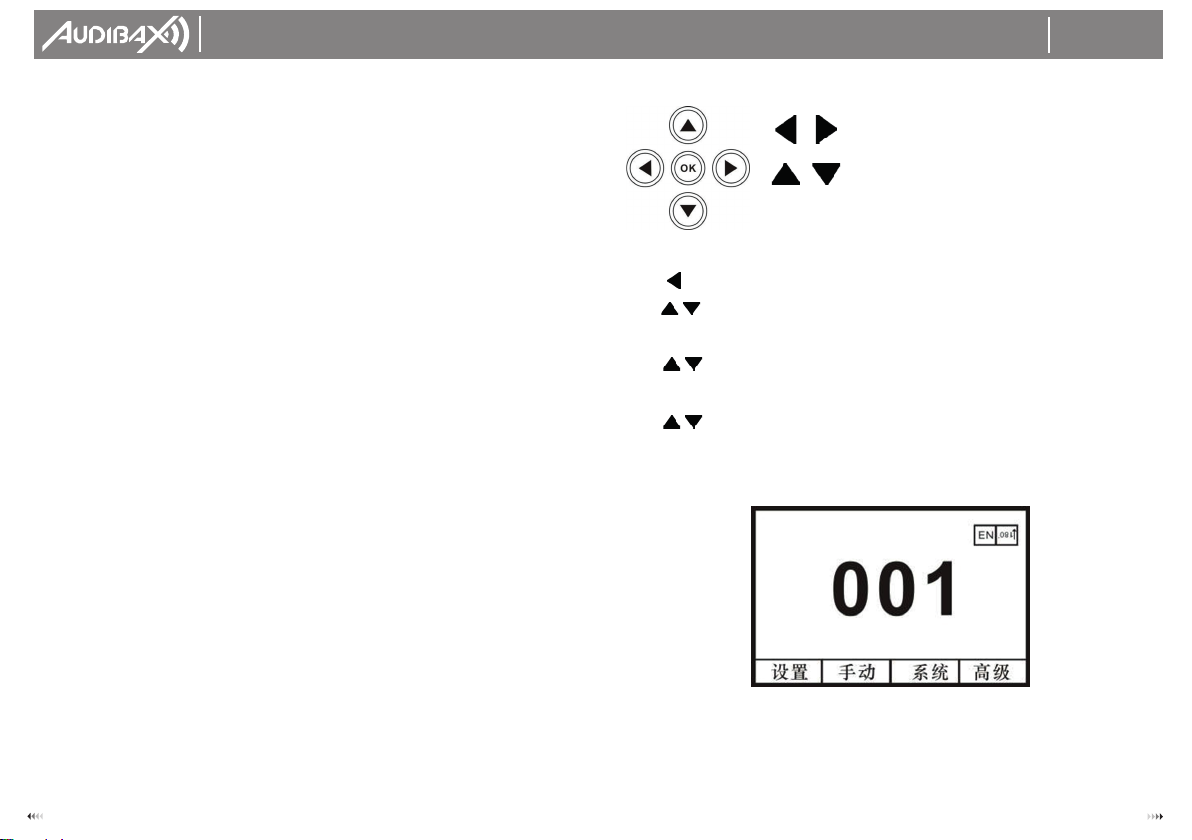
Using the buttons
How to modify the DMX address:
1. Use once or several times to return to the main menu.
2. Use until you choose the "Setting" option.
3. Press the "OK" button to modify the "Setting" option.
4. Use to reach the "DMX address" option.
5. Press “OK” button to enter “DMX address” option.
6.Use to modify the DMX address.
7. Press the "OK" button to exit DMX editing mode.
Technical specifications
- The two buttons on the top right are used to choose the language and screen rotation.
- There are 4 buttons at the bottom of the screen: Settings, Information, Manual control button,
Advanced.
Similar functions
To return to the previous option
Button:
To select, edit
“OK” button:
Operation function,Go to edit,Exit edit mode
Mantenimiento
Las partes ópticas deben ser limpiadas con sumo cuidado. No utilice solventes abrasivos
dado a que dañará los plásticos y recubrimiento de los lentes.
1. Luego de apagar el equipo, déjelo enfriar completamente, luego proceda a abrir la
carcasa.
2. Utilizando un soplador o una aspiradora, elimine el polvo y objetos extraños, proceda con
cuidad.
3. Utilice papel neutro o un trapo de algodón limpio, humedecido con agua destilada, para
quitar las partículas pequeñas. Tenga cuidado de no rayar las superficies delicadas. Utilice
primero aire a presión.
4. Utilice papel tissue neutro humedecido con alcohol para remover restos de polvo o
residuos. También puede utilizar limpiador de vidrios, pero debe remover los residuos con
agua destilada, con movimiento circulares desde el centro. Luego limpie con un trapo de
algodón suave. 5.Utilizando un pincel suave, papel de algodón, limpiadores de aire, o un
secador de pelo, puede quitar la suciedad de los ventiladores. Tenga en cuenta que la
excesiva suciedad, causada por un uso anormal, puede anular la garantía.
Declaración
El producto se entrega en óptimo funcionamiento y con embalaje completo. El usuario final
de este producto debe seguir y cumplir las instrucciones y advertencias. Cualquier daño o
mal funcionamiento causado por mal uso o incumplimiento de estas instrucciones, no estará
cubierto por la garantía de reparación del fabricante o el distribuidor.

3 24
Monster Beam 7R USER´S
MANUAL
MANUAL
DE USUARIO
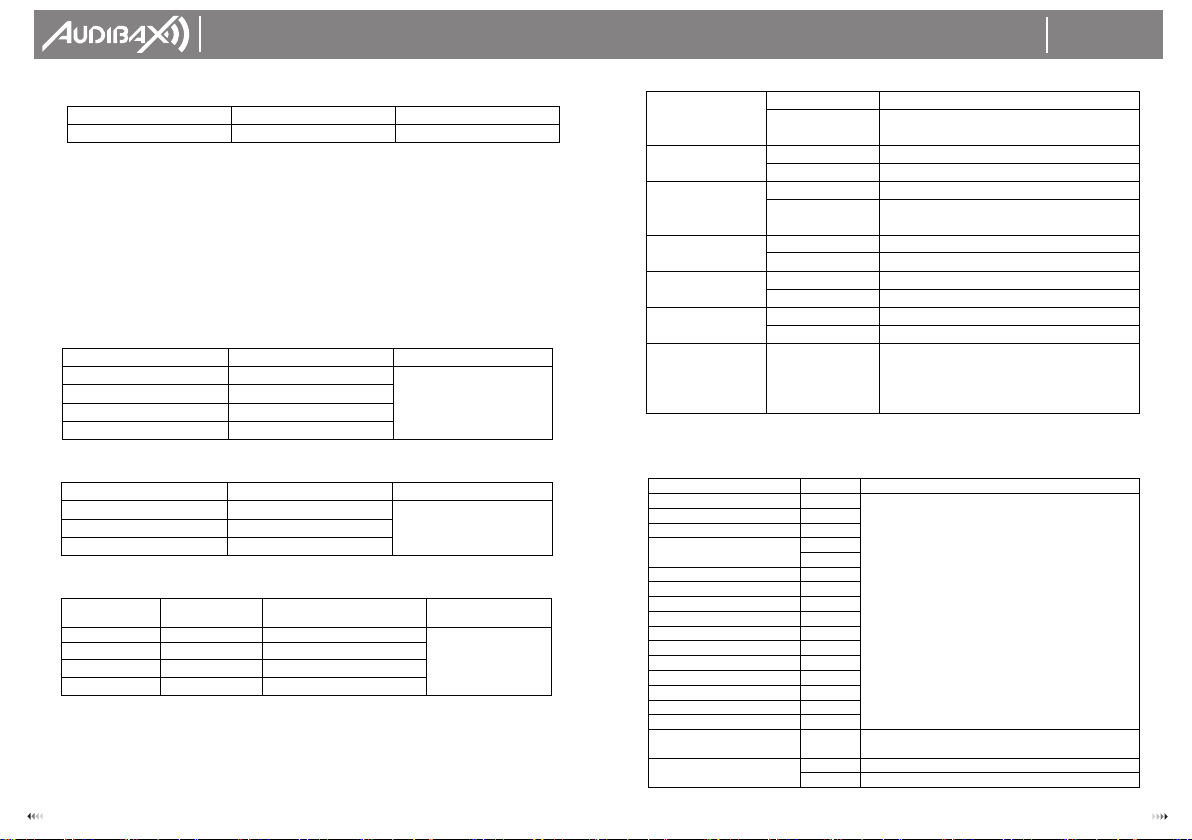
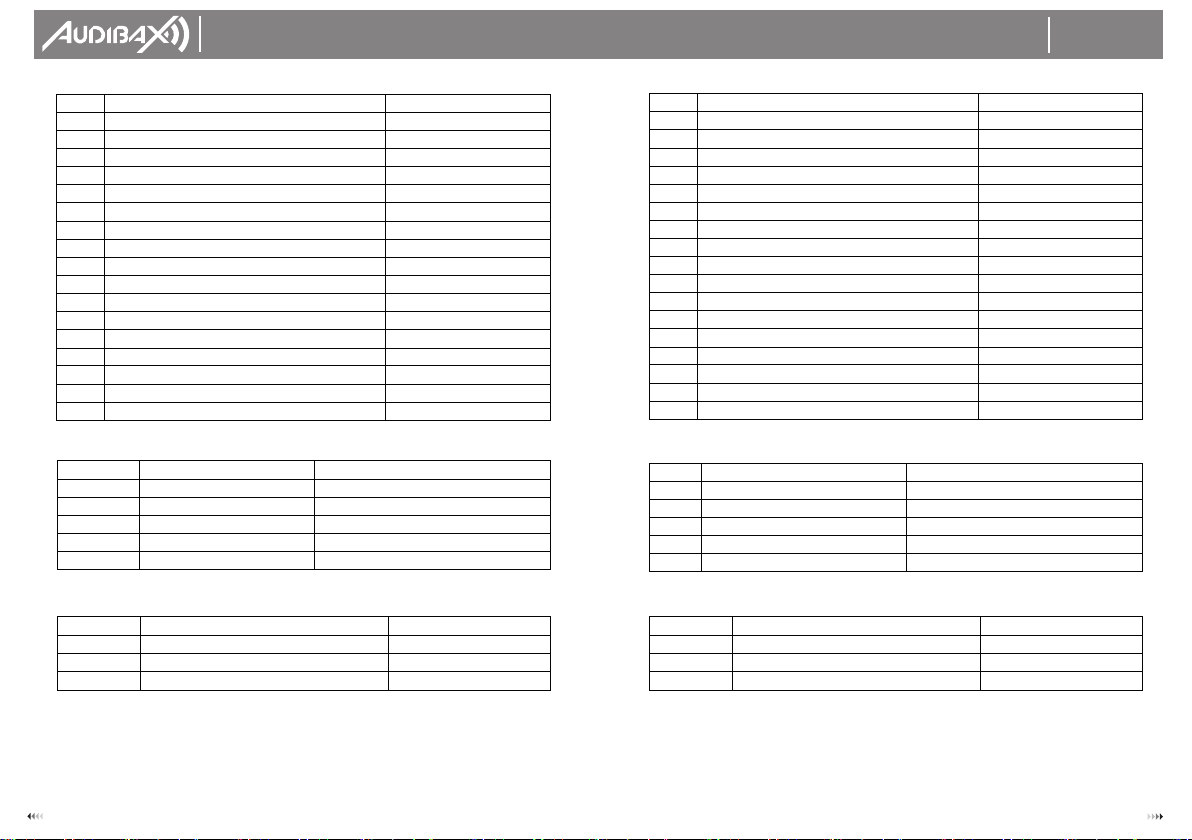
Configuration button (Settings): Pantalla táctil
Mod
Parámetro
Monster Bean 7R
Potencia
Alimentación
100-240V/50-60HZ
Consumo
400W
Fuente de Luz
Lampara
230W
Temperaturade
Color
8000K
Vida útil
2000 horas
Color/Patron
Color
14 colores + blank
Gobo
17 gobos fijos + blank
Prisma
Rotativo de 8 facetas, dos direcciones
Lente
Lentes de alta precisión, con Zoom
Foco
Ajuste Lineal
Dimmer
0-100% dimmer lineal
Angulo de escaneo
PAN
540°
TILT
270°
Operación
Modos
Auto / Sound/ DMX / Master-slave
DMX
16/20CH
Seguridad y Empaque
Entorno Interior: 0°C-40°C
Funciones
Reseteo / encendido y apagado de lampara puede serrealizado
por el controlador ;Protección de
sobre temperatura
;
Protección de sobre corriente
;
excelente ventilación y
enfriamiento por ventiladores verticales.;Indicación de horas de
uso;Analizador de
fallas incorporado, mensajes de error
Dimensiones
480*405*550MM
N.W./G.W. 21/22.6KG
Accesorios Cable de alimentación: x1
Soportes: x2
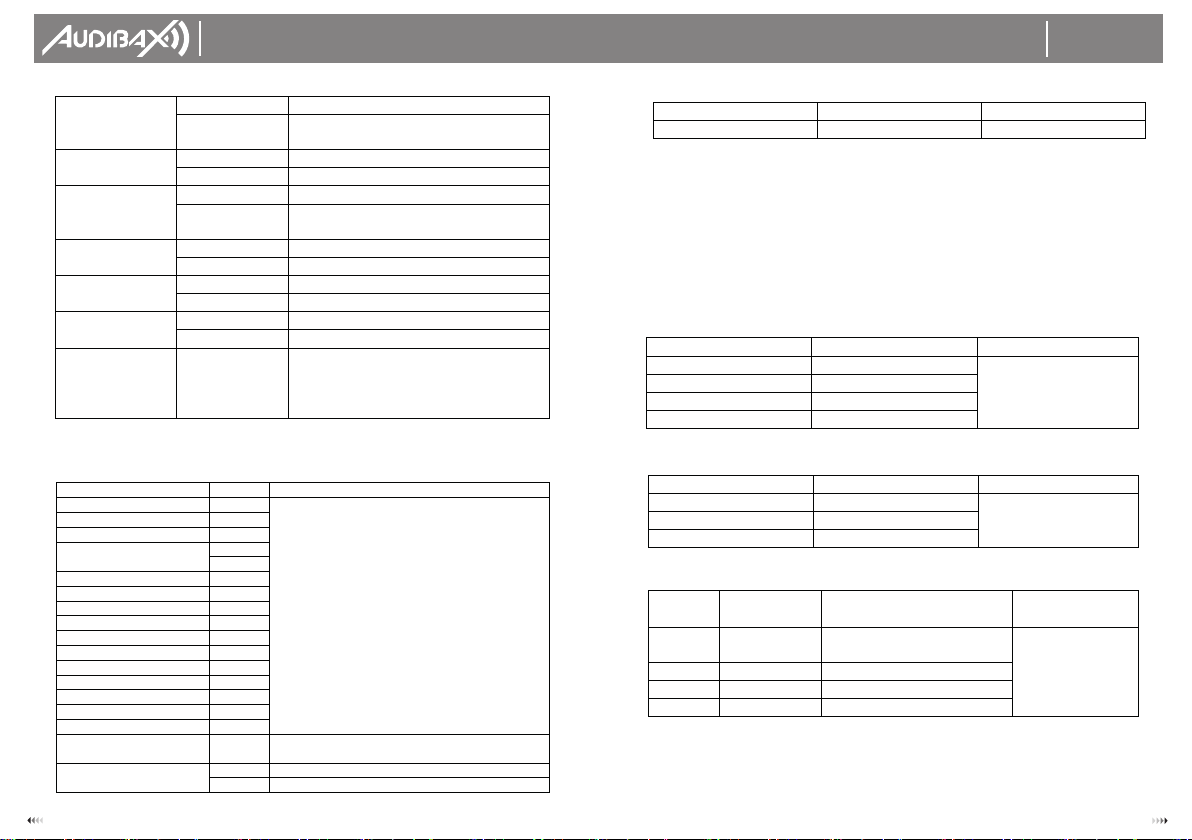
Option
Description
Running mode
(mode functioning)
DMX
Status (Slave): Receives signal from a
DMX controller or master
Auto1/2/3/4
Status (master):Automatically run and
send DMX signal to slaves
Note:If the lamp has been turned off
before, it will not turn on
automatically. Turn on the lamp first,
and then go to automatic state.
up to 8
before painting
to0
Forward vertical8
Forward sleep8
Random
AudioRhythmic
DMX address
1~512
Press “OK” to go to editing mode. Then
press the desired button to change the
value from 1 to 512. Press “OK” to exit
edit mode.
Channel mode
(Channels)
Standard 16CH From Ch-17 to Ch-20 Invalids
Extended 20CH From Ch-17 to Ch-20 Valid
X inverse
Off
On
Y inverse
Off
On
23 4
Monster Beam 7R USER´S
MANUAL
MANUAL
DE USUARIO
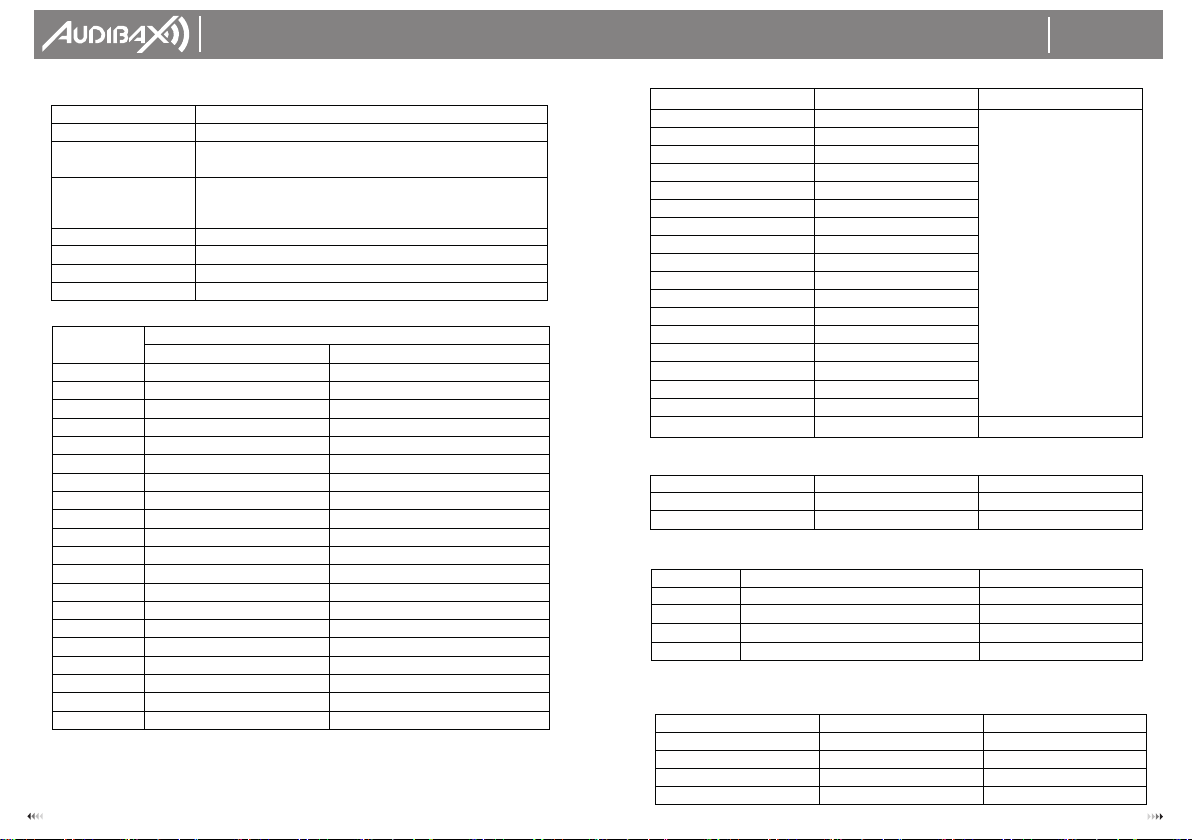
Hand control button:
This function is for lamp control. It has no function on DMX.
XY invert
Off
On Interchanges the X & Y functions (includes
fine adjustment)
XY-decoder
On
Position correction by encoder
Off
no correction
No DMX Signal
Maintain
works by default
Clear to Zero Resets Motor-stops operation
save screen
On
Screen turns off after 5 mins
Off
screen stays on
Auto on
Off
light goes out
On
Light turns on automatically
linear change of
colors
On
Activate gradual color change
Off
Disable gradual change
Default values
Press the “OK” button, a confirmation
dialog will appear.
Press “OK” again to restore the default
values.
Option
Description
Color wheel
0~255
Press "OK" to enter edit mode. Then choose the
required channel option, and you can modify it
from 0 to 255.
……
0~255
Shutter- Estrobo
0~255
Dimmer
0~255
0~255
gobo speed
0~255
Prism
0~255
prism rotation
0~255
prism focus
0~255
Atomization
0~255
Focus
0~255
X axis
0~255
X-axis-Fine adjustment
0~255
Axis y
0~255
Y-axis-Fine adjustment
0~255
Macro function
0~255
Reset
Press “OK” to confirm, and “OK” to reset the
motor.
Lamp control
On
Turn on the lamp
Off
Turn off the lamp
Pan– canal 10
Pan Fino– canal 11
Tilt– canal 12
Tilt Fino– canal 13
Función Macro – canal 14
Puede elegir el patron, modo opoeración repetir, autopropulsado 1- 4
Reset– canal 15
Control de Lampara – canal 16
Canal extendido de velocidad
Cambio de Gobo Estático - canal 4
…… ……
0
Dimmer 0%
Bit
Efecto
Observaciones
128-255
Reset Completo
Reset se activa cuando
está en rango sin uso
durante 5 segundos.
77-127
Reset de Pan/Tilt
26-76
Reset de efectos
0-25
Rango sin uso
Bit
Efecto
Observaciones
101-255
Lamp Encendida
La lampara se enciende
cuando está en rango sin
uso durante 5 segundos.
10-100
Lamp Apagada
0-9
Rango sin uso
Canal
Canal
Velocidad
Funcion del canal
Observaciones
17
Pan-Tilt
Pan-Tilt-(Pan fino-Tiltfino)
255 Lento
…… ……
0 Rápido
18
Color
Rueda de color
19
Haz
Dimmer-Prisma-Frost
20
Gobo
Gobo estático
5 22
Monster Beam 7R USER´S
MANUAL
MANUAL
DE USUARIO
Inserción de prisma - canal 5
Interfaz de sistema
Rotación de prisma - canal 6
Efectos - canal 7(Sin Uso)
Frost – canal 8
90 Rotación rápida
85
Gobo 17
El número es siempre
múltiplo de 15.
80
Gobo 16
75
Gobo 15
70
Gobo 14
65
Gobo 13
60
Gobo 12
55
Gobo 11
50
Gobo 10
45
Gobo 9
40
Gobo 8
35
Gobo 7
30
Gobo 6
25
Gobo 5
20
Gobo 4
15
Gobo 3
10
Gobo 2
5
Gobo 1
0
Blanco (Blank)
Valor
Efecto
Obs
128-255
Con Prisma
0-127
Sin Prisma
Valor
Efecto
Obs
191-255
Vibración de prisma
130-190
Rotación a derecha
64-129
Rotación a Izquierda
0-63
Ajuste de ángulo
Valor
Efecto
Obs
128-255 Con Frost
0-127 Sin Frost
……
……
0
Dimmer 0%
Option
Description
Software version
Show version
DMX channel
value monitoring
Shows the DMX value on the screen
System errorrecords
If the red “ERR” indicator lights up, it means that there is an
error. Go to the sub-menu to see the error. Then press “OK”
to delete the log
4Total service time
error.
Present servicetime
Accumulated operating time
Total bright bubble time
current running time
The bright bubble time
Total time of the lamps
Channel
Channel Scheme
16
20
1
color wheel
color wheel
2
Stopped/Strobe
Stopped/Strobe
3
Dimmer
Dimmer
4
Gobo change
Gobo change
5
prism insertion
prism insertion
6
prism rotation
prism rotation
7
motion effects
motion effects
8
Frost
Frost
9
Focus
Focus
10
Bread
Bread
11
thin bread
thin bread
12
Tilt
Tilt
13
Fine Tilt
Fine Tilt
14
Macro function
Macro function
15
reset
reset
16
Lamp Control
Lamp Control
17
Pan Tilt Time
18
Color Time
19
Dimmer Time – Prisma-Frost
20
Gobo Time

21 6
Monster Beam 7R USER´S
MANUAL
MANUAL
DE USUARIO
Color Wheel – Channel 1
Valor
Efecto
Observaciones
255
Gobo 17 Shake, Rapido
5 figuras corresponden apatrones
……
……
251
Gobo 17 Shake, Lento
250
Gobo 16 Shake, Rapido
……
……
246
Gobo 16 Shake, Lento
……
……
180
Gobo 2 Shake, Rapido
……
……
176
Gobo 2Shake, Lento
175
Gobo 1 Shake, Rapido
……
……
171
Gobo 1 Shake, Slow Speed
170
Rotación rápida
……
……
135
Rotación lenta
130-134
Detenido
129
Rotación lenta
……
……
Value
Effect
Obs
255 Quick Rotation
The color control value is a
multiple of 5.
The color ratio can be adjusted
using the intermediate values
(1,2,3,4)
……
……
150 slow rotation
145
Red + White
140 Red
135
Light Yellow + Red
130
Light yellow
125
Light brown + Light yellow
120
Light brown
115
Turquoise + Light Brown
110
Turquoise
105
Fluorescent + Turquoise
100
Fluorescent
95
Dark Yellow + Fluorescent
90
Dark yellow
7 20
Monster Beam 7R USER´S
MANUAL
MANUAL
DE USUARIO
Stop/Strobe–channel 2
Dimmer-channel 3
Value
Effect
Obs
255
100%
……
……
0
0%
Detenido/Estrobo–canal 2
Dimmer-canal 3
85
Marrón + Amarillo Oscuro
80
Marrón
75
Violeta claro + Marrón
70
Violeta claro
65
Oro + Violeta claro
60
Oro
55
Azul + Oro
50
Azul
45
Azul + Verde
40
Verde
35
Rosa + Verde
30
Rosa
25
Amarillo + Rosa
20
Amarillo
15
Rojo + Amarillo
10
Rojo
5
Blanco + rojo
0
Blanco
Valor
Efecto
Obs
252-255
Luz Abierta
Controlado por elcanal del dimmer
213-251
Estrobo Aleatorio (con velocidad)
208-212
Luz Abierta
Controlado por el canal del dimmer
4-207
Estrobo (con velocidad)
0-3
Luz Cerrada
Valor
Efecto
Obs
255
100%
……
……
0
0%
85 Brown + Dark Yellow
80 Brown
75
Light purple + Brown
70
light violet
65
Gold + Light Violet
60
Prayed
55
Blue + Gold
50
Blue
45
Blue + Green
40
Green
35
Pink + Green
30
Pink
25
Yellow + Pink
20
Yellow
15
Red + Yellow
10
Red
5
white + red
0
White
Value
Effect
Obs
252-255
open light
Controlled by dimmer channel
213-251
Random Strobe (with speed)
208-212
open light
Controlled by dimmer channel
4-207
Strobe (with speed)
0-3
light closed

19 8
Monster Beam 7R USER´S
MANUAL
MANUAL
DE USUARIO
Rueda de Color – Canal 1
Valor
Efecto
Observaciones
255
Rotación Rápida
El valor de control del color es
múltiplo de 5.
La proporción del color se puede
ajustar usando los valores
intermedios(1,2,3,4)
……
……
150
Rotación Lenta
145
Rojo + Blanco
140
Rojo
135
Amarillo Claro + Rojo
130
Amarillo Claro
125
Marrón claro + Amarillo claro
120
marrón claro
115
Turquesa + Marrón claro
110
Turquesa
105
Fluorescente + Turquesa
100
Fluorescente
95
Amarillo Oscuro + Fluorescente
90
Amarillo Oscuro
Value
Effect
Obs
255
Gobo 17 Shake, Fast
5 figures correspond to patterns
……
……
251
Gobo 17 Shake, Slow
250
Gobo 16 Shake, Fast
……
……
246
Gobo 16 Shake, Slow
……
……
180
Gobo 2 Shake, Fast
……
……
176
Gobo 2Shake, Slow
175
Gobo 1 Shake, Fast
……
……
171
Gobo 1 Shake, Slow Speed
170
fast rotation
……
……
135
slow rotation
130-134
Stopped
129
slow rotation
……
……

9 18
Monster Beam 7R USER´S
MANUAL
MANUAL
DE USUARIO
Prism Insertion - Channel 5
System interface
Prism rotation - Channel 6
Effects - channel 7(Not Used)
Frost – channel 8
Cambio de Gobo Estático - canal 4
Opción
Descripción
Software versión
Muestra la versión
DMX channel
value monitoring Muestra el valor DMX en pantalla
System error
records
Si el indicador rojo “ERR” se enciende, quiere decirque hay un
error. Vaya al submenú para ver el error. Luego presione “OK”
para borrar el log de
error.
4Total service
time Tiempo de funcionamiento acumulado
Present service
time
Tiempo actual de funcionamiento
Total bright
bubble time
Tiempo total de las lámparas
The bright
bubble time
Tiempo total de la lampara instalada
Canal
Esquema de Canales
16
20
1
Rueda de Color
Rueda de Color
2
Detenido/Estrobo
Detenido/Estrobo
3
Dimmer
Dimmer
4
Cambio de Gobo
Cambio de Gobo
5
Inserción de prisma
Inserción de prisma
6
Rotación de prisma
Rotación de prisma
7
Efectos de movimiento
Efectos de movimiento
8
Frost
Frost
9
Foco
Foco
10
Pan
Pan
11
Pan Fino
Pan Fino
12
Tilt
Tilt
13
Tilt Fino
Tilt Fino
14
Funcion Macro
Funcion Macro
15
Reset
Reset
16
Control de Lampara
Control de Lampara
17
Tiempo de Pan-Tilt
18
Tiempo de Color
19
Tiempo del Dimmer
–Prisma-Frost
20
Tiempo del Gobo
90 Fast rotation
85
Gobo 17
The number is always a
multiple of 15.
80
Gobo 16
75
Gobo 15
70
Gobo 14
65
Gobo 13
60
Gobo 12
55
Gobo 11
50
Gobo 10
45
Gobo 9
40
Gobo 8
35
Gobo 7
30
Gobo 6
25
Gobo 5
20
Gobo 4
15
Gobo 3
10
Gobo 2
5
Gobo 1
0
Blank
Value
Effect
Obs
128-255
With prism
0-127
No prism
Value
Effect
Obs
191-255
Prism vibration
130-190
Right rotation
64-129
Left Rotation
0-63
Angle adjustment
Value
Effect
Obs
128-255
Con Frost
0-127
Sin Frost
17 10
Monster Beam 7R USER´S
MANUAL
MANUAL
DE USUARIO
Boton de configuración (Settings):
Pan– channel 10
Pan Fine – channel 11
Tilt – channel 12
Tilt Fine – channel 13
Macro function – channel 14
You can choose the pattern, repeat operation mode, self-propelled 1-4
Reset– channel 15
Lamp Control – channel 16
Speed extended channel
Static Gobo change - channel 4
…… ……
0
Dimmer 0%
Botón de control manual:
Esta función es para el control de la lampara. No tiene función en DMX.
XY invertir
Off
On Intercambia las funciones X & Y
(incluye ajuste fino)
XY decoder
On
Corrección de posición por encoder
Off
Sin Corrección
Sin Señal DMX
Maintain
Funciona por default
Clear to Zero Resetea Motor-detiene
funcionamiento
Salva pantalla
On
La pantalla se apaga tras 5 mins
Off
La pantalla queda encendida
Auto on
Off
Luz se apaga
On
Luz se enciende automaticamente
Cambio lineal
de colores
On
Activa cambio gradual de color
Off
Desactiva cambio gradual
Valores por
defecto
Presione el boton “OK” apareceráun
dialogo de confirmación.
Presione nuevamente “OK” para
restarurar los valores por defecto.
Opción
Descripción
Rueda de colores
0~255
Presione "OK" para ingresar al modo edicion.
Luego elija la opcion de canal requerida, y
puede modificarla de 0 a 255.
……
0~255
Shutter- Estrobo
0~255
Dimmer
0~255
0~255
Velocidad del gobo
0~255
Prisma
0~255
Rotacion de prisma
0~255
Foco del prisma
0~255
Atomización
0~255
Foco
0~255
Eje-X
0~255
Eje-X-Ajuste fino
0~255
Eje-Y
0~255
Eje-Y-Ajuste fino
0~255
Funcion Macro
0~255
Reset
Presione “OK” para confirmar, y “OK”para
resetear el motor.
Control de lampara
On
Enciende la lampara
Off
Apaga la lampara
Bit
Effect
Observations
128-255
Full reset
Reset is triggered when
in idle range for 5
seconds.
77-127
Pan/Tilt Reset
26-76
effects reset
0-25
unused range
Bit
Effect
Observations
101-255
lamp on
Lamp turns on when in
idle range for 5 seconds.
10-100
lamp off
0-9
unused range
Channel Channel
Speed
Channel function Observations
17 Pan-Tilt Pan-Tilt-(Fine Pan-Fine Tilt) 255 Slow
…… ……
0 Fast
18
Color
Color wheel
19
Haz
Dimmer-Prism-Frost
20
Gobo
Static gobo

11 16
Monster Beam 7R USER´S
MANUAL
MANUAL
DE USUARIO
Boton de configuración (Settings):Touch screen
Opción
Descripcion
Running mode
Estado (esclavo): Recibe señal
(modo
DMX
desde un controlador DMX o
funcionamiento)
maestro
Auto1/2/3/4 Estado (maestro):Funciona
Hasta 8
automaticamente y envía la
Before painting señal DMX hacia los esclavos
to0
Nota
:
Si la lampara se ha
Adelante vertical8
Adelante sleep8
Aleatorio
AudioRitmico
apagado antes, no encenderá
automaticamente. Encienda
primero la lampara y luego vayaal
estado automático.
DMX address
(dirección DMX)
1~512
Presione “OK” para ir al modo edición.
Luego presione el botondeseado para
cambiar el valor
1 a 512. Presione “OK” parasalir
del modo edición.
Channel mode
(Canales)
Estandard 16CH Desde Ch-17 al Ch-20 Invalidos
Extendido 20CH Desde Ch-17 al Ch-20 Validos
X inverse
(invertir X)
Off
On
Y inverse
Off
On
Mod
Parameter
Monster Bean 7R
Power
Supply
100-240V/50-60HZ
Consumption
400W
Light source
Lamp
230W
Color
Temperature
8000K
Useful life
2000 hours
Color/Pattern
Color
14 colors + blank
Gobo
17 fixed gobos + blank
Prism
8-facet rotary, two directions
Lens
High precision zoom lenses
Focus
Linear Fit
Dimmer
0-100% linear dimmer
Scan angle
PAN
540°
TILT
270°
Operation
Modes
Auto / Sound/ DMX / Master-slave
DMX
16/20CH
Safety and Packaging
Environment
Indoor: 0°C-40°C
Functions
Lamp reset/turn on and off can be done by the controller
;
Over
temperature protection ;Over current protection ;Excellent
ventilation and cooling by vertical fans.
built-in faults, error messages
Dimensions
480*405*550MM
N.W./G.W.
21/22.6KG
Accessories Power cord: x1
Brackets: x2

15 12
Monster Beam 7R USER´S
MANUAL
MANUAL
DE USUARIO
Boton de configuración (Settings): Maintenance
The optical parts must be cleaned very carefully. Do not use abrasive solvents as they will
damage the plastics and lens coatings.
1. After turning off the equipment, let it cool down completely, then proceed to open the
casing.
2. Using a blower or vacuum, remove dust and foreign objects, proceed carefully.
3. Use neutral paper or a clean cotton cloth moistened with distilled water to remove small
particles. Take care not to scratch delicate surfaces. Use compressed air first.
4. Use neutral tissue paper moistened with alcohol to remove traces of dust or residue. You
can also use glass cleaner, but you must remove the residue with distilled water, in a circular
motion from the center. Then wipe with a soft cotton cloth.
5.Using a soft brush, cotton paper, air cleaners, or a hair dryer, you can remove dirt from the
fans. Please note that excessive dirt, caused by abnormal use, may void the warranty.
Declaration
The product is delivered in optimal operation and with complete packaging. The end user of
this product must follow and comply with the instructions and warnings. Any damage or
malfunction caused by misuse or failure to follow these instructions will not be covered by the
manufacturer's or dealer's repair warranty.
Como modificar la dirección DMX:
1. Use una o varias veces para volver al menú principal.
2. Use hasta elegir la opción "Setting".
3. Presione el boton "OK" para modificar la opción "Setting".
4. Use para llegar a la opción "DMX address".
5.Presione el boton "OK" para entrar a la opcion "DMX address".
6.Use para modificar la dirección DMX.
7.Presione el boton "OK" para salir del modo edicion de DMX.
Especificaciones Técnicas
- Los dos botones de arriba a la derecha sirven para elegir el idioma y rotación de pantalla.
- Hay 4 botones en la parte inferior de la pantalla: Configuración, Información, Boton de
control manual, Avanzado.
Funciones similares
Para volver a la opción anterior
Boton:
Para seleccionar,editar
Boton “OK”:
Función de operación,Ir a ediciónt,salir de modo edición.

Advertencias:
Este producto es apto solamente para uso profesional, y por seguridad, no puede aplicarse
a otros usos o propósitos. AL recibir este equipo, por favor controle el envoltorio por si ha
sufrido algún daño durante el transporte. En caso de existir algún daño, no utilice el equipo,
póngase en contacto con el distribuidor o el fabricante de inmediato.
Este producto solo es apto para su uso en interiores. Nivel de protección IP20. La lámpara
debe mantenerse seca, evitar su exposición a la humedad, sobrecalentamiento o
ambientes con alto contenido de polvo o suciedad. Evite que la lámpara entre en
contacto con el agua o cualquier otro líquido. Se debe tener precaución al manipular este
producto respecto al calor que produce, y prevenir posibles incendios, radiación
ultravioleta, choque eléctrico, explosión o fragmentación de la lámpara, lo cual puede
causar daños fatales. Lea cuidadosamente las instrucciones antes de encender o instalar el
equipo.
Siga las indicaciones y procedimientos de seguridad, preste atención a los signos de
advertencia en las especificaciones y el equipo.
Por favor, no utilice la opción " factory default" , a menos que sea necesario, ya que toda la
información de configuración se perderá y el equipo deberá resetearse.
Inspección
A fin de utilizar este producto en forma segura y apropiada, favor de leer el manual antes
de utilizarlo, y siga las instrucciones en forma estricta para preservar la seguridad del
personal y evitar daños al equipo.
Trate cuidadosamente el equipo, revise la posibilidad de que haya sufrido daños durante el
transporte, y revise que haya recibido la siguiente lista de items:
Cabezal móvil beam: 1
Manual del usuario: 1
Cable de alimentación: 1
Soportes: 2
Instalación
1. Asegúrese de que no haya objetos inflamables alrededor, alrededor de 1.5 metros de
distancia de instalado el equipo.
2. Antes de instalarlo, asegúrese que el voltage de alimentación disponible sea compatible
con el del equipo.
3. Revise que la ventilación, ventiladores, y ranuras no estén obstruidas.
4. El equipo debe ser ubicado y asegurado con firmeza.
5. Por razones de seguridad, el equipo debe ser conectado a tierra.
13 14
Monster Beam 7R USER´S
MANUAL
MANUAL
DE USUARIO
Monster Beam 7R
Other manuals for Monster Beam 7R
1
Other Audibax Lighting Equipment manuals


