Audient iD44 User manual

AUDIO INTERFACE
audient.com
User Manual V1.0
iD44

32
iD44 delivers the audio performance of
a large format console in a compact and
elegant desktop package.
iD44 provides four world-class Audient
console mic pres, class leading converter
technology, console style monitor
control, JFET D.I and the revolutionary
ScrollControl
.
With its versatile feature set and intuitive
layout, iD44 will become the hub of your
studio in no time.
Features include:
• 4-in, 8-out high performance
AD/DA converters
• 4 x Class-A Audient Console Mic
Preamplifiers & 2 x discrete JFET
instrument inputs.
• 2 x Independant Class-AB
Headphones outputs
• Full Monitor Control Functionality
(software controlled)
• iD Scroll Control Mode
• 2 x ADAT inputs and 2 x ADAT outputs
for up to 16 channels of Digital I/O
• Word Clock output
• USB2.0 class compliant connectivity
with integrated Low Latency DSP
mixer
Box Contents 1
iD44 Overview 2
Safety Information 3
Declaration of Conformities 5
Installation: 6
Installation on Mac 6
Installation on Windows 8
iD App & Firmware Update 10
Hardware Features: 11
Microphone & Line Inputs 12
Instrument Inputs 13
Send and Returns 13
Digital Inputs and Outputs 14
Loudspeaker Outputs 19
Headphone Outputs 19
Monitor Control 21
Metering 23
Kensington Lock 23
Software Features 24
Input Channel Types 25
Channel Features 26
Master Section Features 28
System Panel Features 31
The Routing Matrix 33
Setting up Talkback 34
Saving/Loading presets 35
Menu/TaskBar Icons 36
Standalone Mode 37
Firmware Update 37
Keyboard Shortcuts 39
Daw Setup 28
Pro Tools Setup 41
Logic Pro X Setup 42
Cubase/Nuendo Setup 44
Ableton Live Setup 46
Troubleshooting & FAQ 47
Specifications 50
Dimensions 51
Warranty & Contact 52
Service 53
Glossary 54
Thank you for purchasing
this Audient product!
Welcome and Thank You Contents

54
In your iD44 packaging you should find
the following items:
• iD44
• 12VDC PSU with regional adapters
• USB Type C Cable
• USB Type C to Type A Cable
• Quick Start Guide
Please visit:
www.audient.com/products/iD44
to download the latest iD software
(mixer application and drivers),
supporting documentation (including
this manual) and brochures for our
product range.
The 12VDC power supply comes
with interchangeable UK, EU, US and
Australian socket adapters and will work
across a broad range of line voltages
making iD44 globally portable.
We hope that you enjoy using iD44!
48V Phantom
Power
Main
Meters
USB Status
LED
Channel 1-4 Gain
Controls
0 - 60dB
Dim
iD Button
Encoder
Assignable
Function
Buttons
Headphone
Volume
Controls
12V DC
Power USB
Digital
Inputs
Line Outputs 1-4
Word Clock Output
Signal and
Peak Indicators
-10dB Pad
100Hz High-
Pass Filter Cut
Talkback
Mic/Line Inputs
1-4
Ch2 Insert Send Ch1 Insert Send
Ch2 Insert
Return
Ch1 Insert
Return
iD44 Overview
Box Contents and Setup

76
! WARNING !
TO REDUCE RISK OF FIRE OR ELECTRIC SHOCK, DO NOT EXPOSE THIS
APPARATUS TO RAIN OR MOISTURE.
NO USER SERVICEABLE PARTS INSIDE.
PLEASE REFER SERVICING TO QUALIFIED SERVICE PERSONNEL.
Important Safety Instructions
Please read all of these instructions and save them for later reference before connecting
the DC power adapter to the mains and powering up iD44.
To prevent electrical shock and fire hazard follow all instructions on the 12VDC power
supply. iD44 itself does not operate with any high voltage mains supply inside the unit
but appropriate safety measures should still be adhered to regarding the AC/DC supply.
Please ensure you only use the supplied iD44 power supply. We cannot recommend
the useage of third party power supplies. In the event of a power supply failure do not
open the 12VDC supply. If required, please contact Audient support so that a suitable
repacment can be sourced.
audient.com/support
iD44 utilises an external switch-mode power supply that is very quiet and rated at 2A.
This switch-mode design will accept any A.C line voltage from 90v to 264v @ 47-63Hz.
Therefore the unit will work anywhere in the world but please ensure your A.C mains line
voltage is within this specification.
Consult a qualified technician if you suspect diculties. Do not attempt to tamper
with the power supply or mains voltages - HAZARDOUS TO HEALTH. Ensure that the
appropriate international pin adapter is fitted to the power supply before insertion into
the mains socket.
Important Safety Instructions
1. Read these instructions
2. Keep these instructions
3. Heed all warnings
4. Follow all instructions
5. Do not use this equipment near water
6. Clean only with dry cloth
7. Do not install near any heat sources such as radiators, heat registers, stoves, or
other equipment (including amplifiers) that produce heat
8. Do not defeat the safety purpose of the polarized or grounding-type plug. A
polaized plug has two blades with one wider than the other. A grounding type
plug has two blades and a third grounding prong. The wide blade or the third
prong are provided for your safety. If the provided plug does not fit into your
outlet, cosult an electrician for replacement of the obsolete outlet
9. Protect power cords from being walked on or pinched particularly at plugs,
convenience receptacles, and the point where they exit from the equipment
Only use attachments/accessories specified by the manufacturer
10. Unplug this equipment during lightning storms or when unused for long periods
of time
11. Refer all servicing to qualified service personnel. Servicing is required when the
equipment has been damaged in any way, such as power supply cord or plug
is damaged, liquid has been spilled or objects have fallen into the equipment,
the equipment has been exposed to rain or moisture, does not operate normally,
or has been dropped
12. For products that are a mains powered device: The equipment shall not be
exposed to dripping or splashing and no objects filled with liquids (such as
vases) shall be placed on the equipment.
13. Under the influence of electrostatic phenomenon, the product may
malfunction and require the user to power cycle the unit.
Safety Information Safety Information

98
We, Audient Ltd, Aspect House, Herriard, Hampshire, RG25 2PN, UK,
01256 381944, declare under our sole responsibility that the product iD44
complies with Part 15 of FCC Rules.
Operation is subject to the following two conditions:
1. This device may not cause harmful interference,
2. This device must accept any interference received,
including interference that may cause undesired operation
Audient Ltd has conformed where applicable, to the European Union’s Directive
2002/95/EC on Restrictions of Hazardous Substances (RoHS) as well as the fol-
lowing sections of California law which refer to RoHS, namely sections 25214.10,
25214.10.2, and 58012, Health and Safety Code; Section 42475.2, Public Resources
We, Audient Ltd, declare that the product, the iD44, to which this declaration
relates, is in material conformity with the appropriate CE standards and directives
for an audio product designed for consumer use.
12V DC
Power USB Connection
FCC Part 15B
This apparatus has been tested and found to comply with the limits of a class-A digital
device, pursuant to Part 15B of the FCC Rules. These limits are designed to provide
reasonable protection against harmful interference in a residential installation. This
equipment generates, uses and can radiate radio frequency energy and, if not
installed and used in accordance with the instructions, may cause harmful interfer-
ence to radio communications. If this equipment does cause harmful interference to
radio or television reception, which can be determined by turning the equipment o
and on, the user is encouraged to try to correct the interference by one or more of the
following measures:
1. Re-orient or relocate the receiving antenna
2. Increase the separation between the equipment and receiver
3. Connect the equipment into an outlet on a dierent circuit from that
to which the receiver is connected
4. Consult the dealer or an experienced radio/TV technician for help
System Requirements
• MacOS: 10.7.5 (Lion) or later
• Mac: Intel CPU, 1GB RAM Minimum
1. Download the Latest iD Software
Head to our website for the latest version
of our iD Mixer:
Open the downloaded .dmg file. Now,
drag the downloaded app into your
application folder to install it.
2. Connect iD44
Using the USB cable provided, connect
iD44 to your computer’s USB port.
audient.com/products /downloads/iD44
Declaration of Conformities MacOS Installation

10 11
Tip
Right click on the iD icon in the Dock
and select Keep in Dock to have quick
access to the iD mixer app at all times.
Menu/Task Bar Icons
On MacOS, the iD icon appears in the
menu bar in the top right hand corner of
the screen. This gives you quick access
to various functions of the iD44.
Show Mixer
If the mixer window has been hidden,
this will bring it back to the forefront.
Quit
Fully closes the iD mixer application.
About iD
Displays information regarding
the current version of the iD mixer
application.
Visit iD Knoweldge Base
Opens a browser windows for the
Audient Helpdesk with helpful articles
and FAQ’s.
3. Status LED
Once connected to your computer and
powered on, the green status LED on iD44
will illuminate.
If at any time the status LED turns o
during normal operation please check
all connections and if further problems
develop please contact Audient support.
4. Double Checking Connectivity
To ensure iD44 has been detected by your
computer and correct clocking sources
are set-up, navigate to:
Macintosh HD > Applications >
System Preferences
Check that iD44 is set as your audio
device. It’s recommended to disable
system sounds.
It’s also worth checking Audio MIDI Setup
(found in Mac HD > Applications >
Utilities).
Window > Show Audio Window
Here you should see iD44 report with 20
inputs and 24 outputs. The clock source
is configured in the iD app. See page 23
for more details.
Check for Updates
The iD app will check with the Audient
update server for any available firmware
updates for iD44.
MacOS Installation MacOS Installation

1312
Windows System Requirements:
• Windows 7 or later (32 and 64 bit)
• Intel Core 2 @ 1.6 GHz, or AMD
equivalent
• 1 GB RAM Minimum
1. Download the latest iD44 Software
Head to our website for the latest version
of our iD Windows Installer:
audient.com/products/downloads/iD44
2. Connect iD44
Using the USB cable provided, connect
iD44 to your computer’s USB port and
connect the iD44’s power supply.
3. Run iD Mixer Setup
Double click on the installer to run the
iD mixer setup and follow the on-screen
instructions.
4. Reboot PC
Reboot your PC to make sure that the
drivers have been installed.
4. Check Connectivity
The status LED will become solidly lit
as soon as iD44 has achieved stable
communication and should remain
solidly lit during operation of the unit
until power down.
To double check the connection, go to
PC sound settings by following:
PC Settings > Control Panel > Hardware
and Sound > Sound
Here you can see whether iD44 is
visible to the PC and you can make it
the computers default sound device by
pressing ‘Set Default’.
iD Icon
Once installed, the iD icon can be found
in the Windows system tray (it may be in
the hidden icons area):
• Double-click to open iD44 mixer
window when iD44 is connected
• Right-click to quit or change sample
rate and buer size.
For mixing, a buer size of 256 should be
perfect. For tracking, experiement with
lower buer size values.
How powerful your computer is, and
how processor hungry your project
is, will aect how low you can get the
buer size settings before you get audio
instability.
Windows Installation Windows Installation

1514
Launch the iD Mixer Application
Launch the iD mixer application
by finding it in the following folder:
Macintosh HD > Applications > iD
Start > All Programs > Audient > iD
For more information on the mixer
application feature set, please refer to
page 17 of this manual onwards.
Check for Firmware Updates
If your computer is connected to the
internet, the iD app will check for firmware
updates whenever a unit is connected. If
there is a firmware update available then
the iD app will notify you.
You can manual check for updates by
going to the Help menu and selecting
‘Check for Updates’. It will notify you if
you’re on the latest version of firmware.
Firmware Update
When there is a firmware update, you can
select ‘From audient.com’ to download
the latest version automatically (or select
‘From file’ to install a local firmware file).
The latest version number will be
retrieved from our servers and will be
displayed (as shown above). Press next
to continue with the firmware update.
Press ‘update’ to install it. Once complete
reboot iD44 using the power switch to
apply it.
Mixer App & Firmware Update Hardware Features
Hardware Features

1716
Microphone Preamplifiers
& Line Inputs
iD44 features four classic Audient
microphone preamplifiers. These
preamps are based on designs from
Audient’s classic consoles and are the
same that are used across our entire
product range.
The design features discrete Class-A
circuitry providing exceedingly low
distortion and noise performance. From
a sonic point of view, iD44 is fast, open
and detailed.
NeutrikTM XLR/TRS Jack combi-
connectors provide microphone and
line inputs. The line inputs are padded
through the microphone preamplfiiers.
The four microphone preamplifiers
feature:
• 60 dB of clean gain
• 48V (±4V) phantom power rated at
14mA/channel
• >2.8kΩ input impedance which
provides a punchy tone from any
microphone transducer type
• Signal and Clip Indicators
• -10dB Pad
• 100Hz High Pass Filter to remove
unwanted rumble
Channels 1 and 2 also include an
Insert Send and Return allowing for
the use of outboard equipment while
tracking.
Instrument Input
iD44 employs 2 discrete Class-A JFET
instrument (D.I) inputs on channels one
and two which are easily accessible on
the front of the unit.
The JFET circuitry adds a tiny bit of colour
and warmth to the signal, making it sound
great on guitars and basses.
Plugging in a TS (tip-sleeve unbalanced)
jack will override the mic signal for that
channel and turn it into a fully fledged,
fantastic sounding instrument input with
access to the Pad and High Pass Filters.
Balanced Insert Send and Returns
On Chennels 1 and 2, the iD44 features a
dedicated insert to allow you to connect
outboard gear to your recording chain;
Just like the work flow you would find on
an Audient console!
The two channels feature an impedance
balanced send and an electronically
balanaced return, all before the AD
convertors.
Insert your favourite EQ and compressor
into the insert and with the super clean
audient pre-amps, you can build vocal
chains that will rival the best out there!
Insert Normalling
The Insert send and return jacks are half
normalled meaning you don’t need to
patch the two together when not in use.
The internal signal chain is only broken
when a jack is plugged into the return.
Plugging a jack into the Insert send will
split the signal which can be useful for
parallel processing.
Hardware Features Hardware Features

18 19
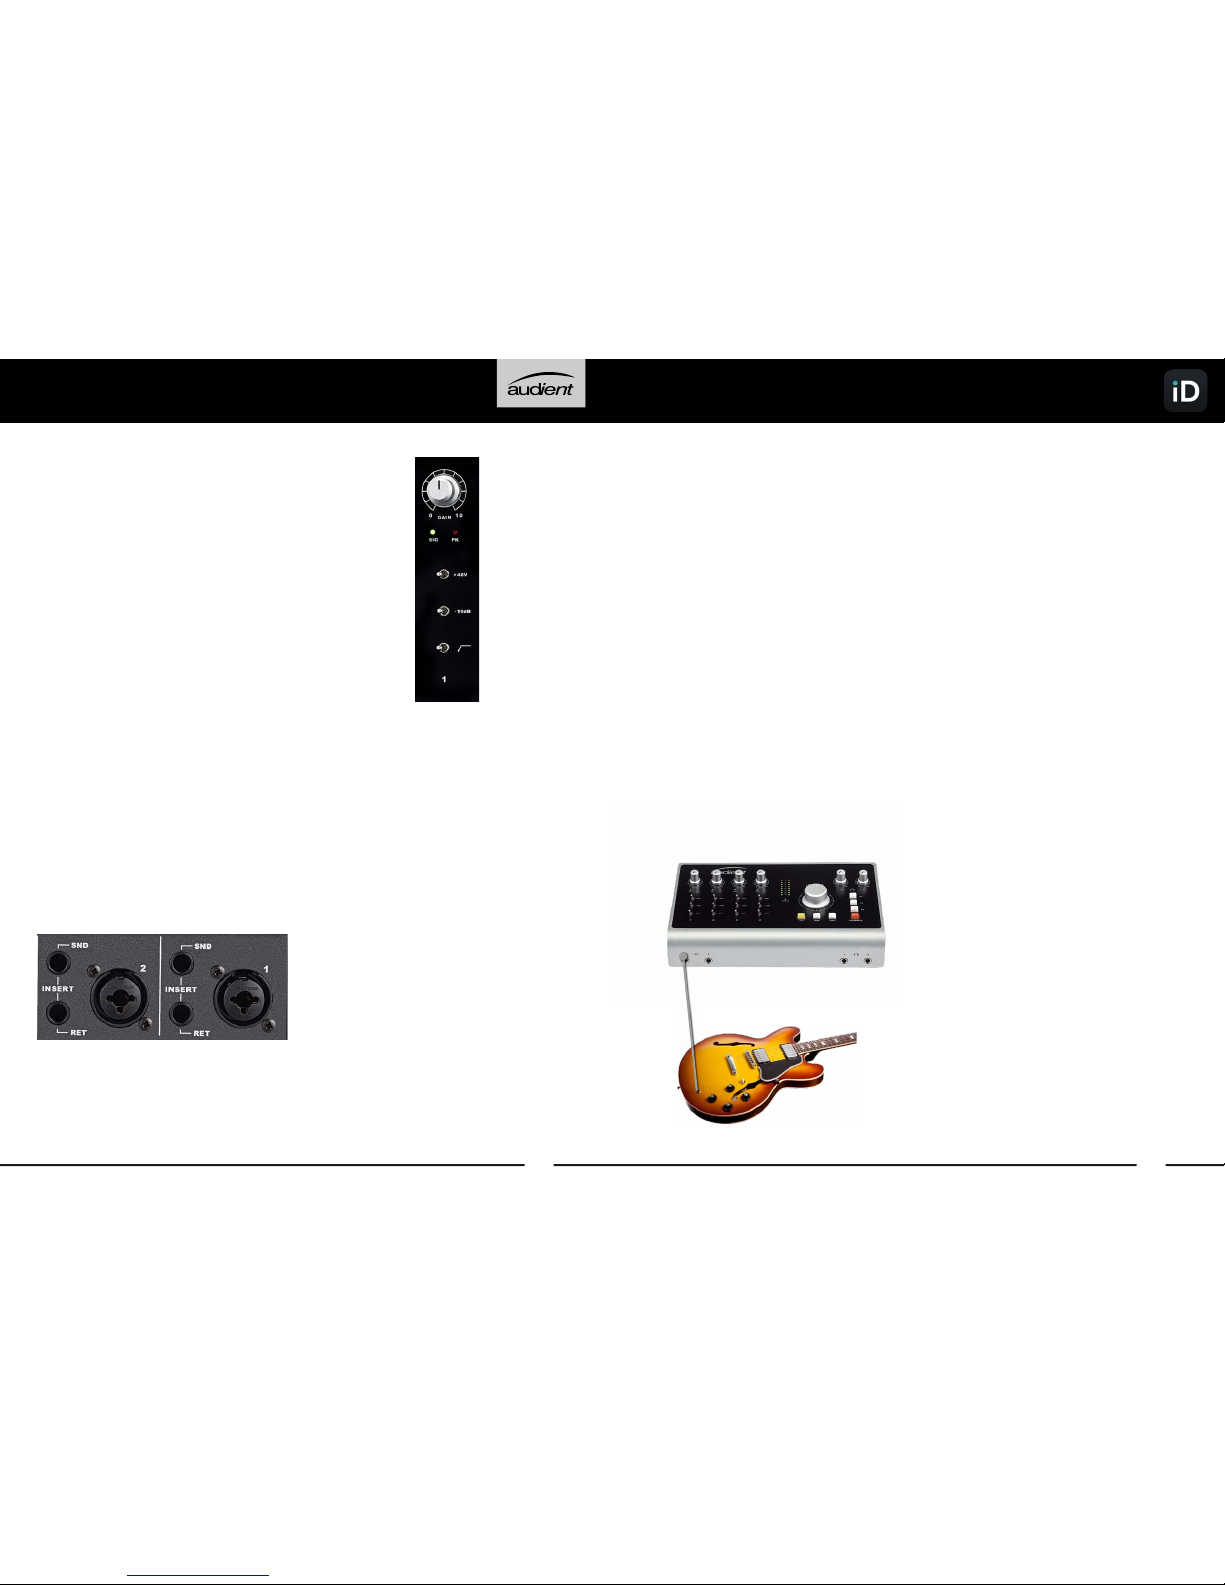
Direct Access to ADC
The Insert return connection on the iD44
is a electronically balanced input stage
that directly drives the analog to digital
convertor for that channel.
As such, this is a great place to input
signals directly to the ADC, bypassing
the pre-amplifiers and minimising any
colouration of the signal.
This makes it useful to patch in external
microphone pre-amplifiers without
adding additonal colouration or noise. It
is also handy for using the iD44’s outputs
to drive external eects before returning
them into your DAW using the insert
returns.
Please note; the digital calibration level
of the iD44’s ADC is 0dBFS = +18dBu.
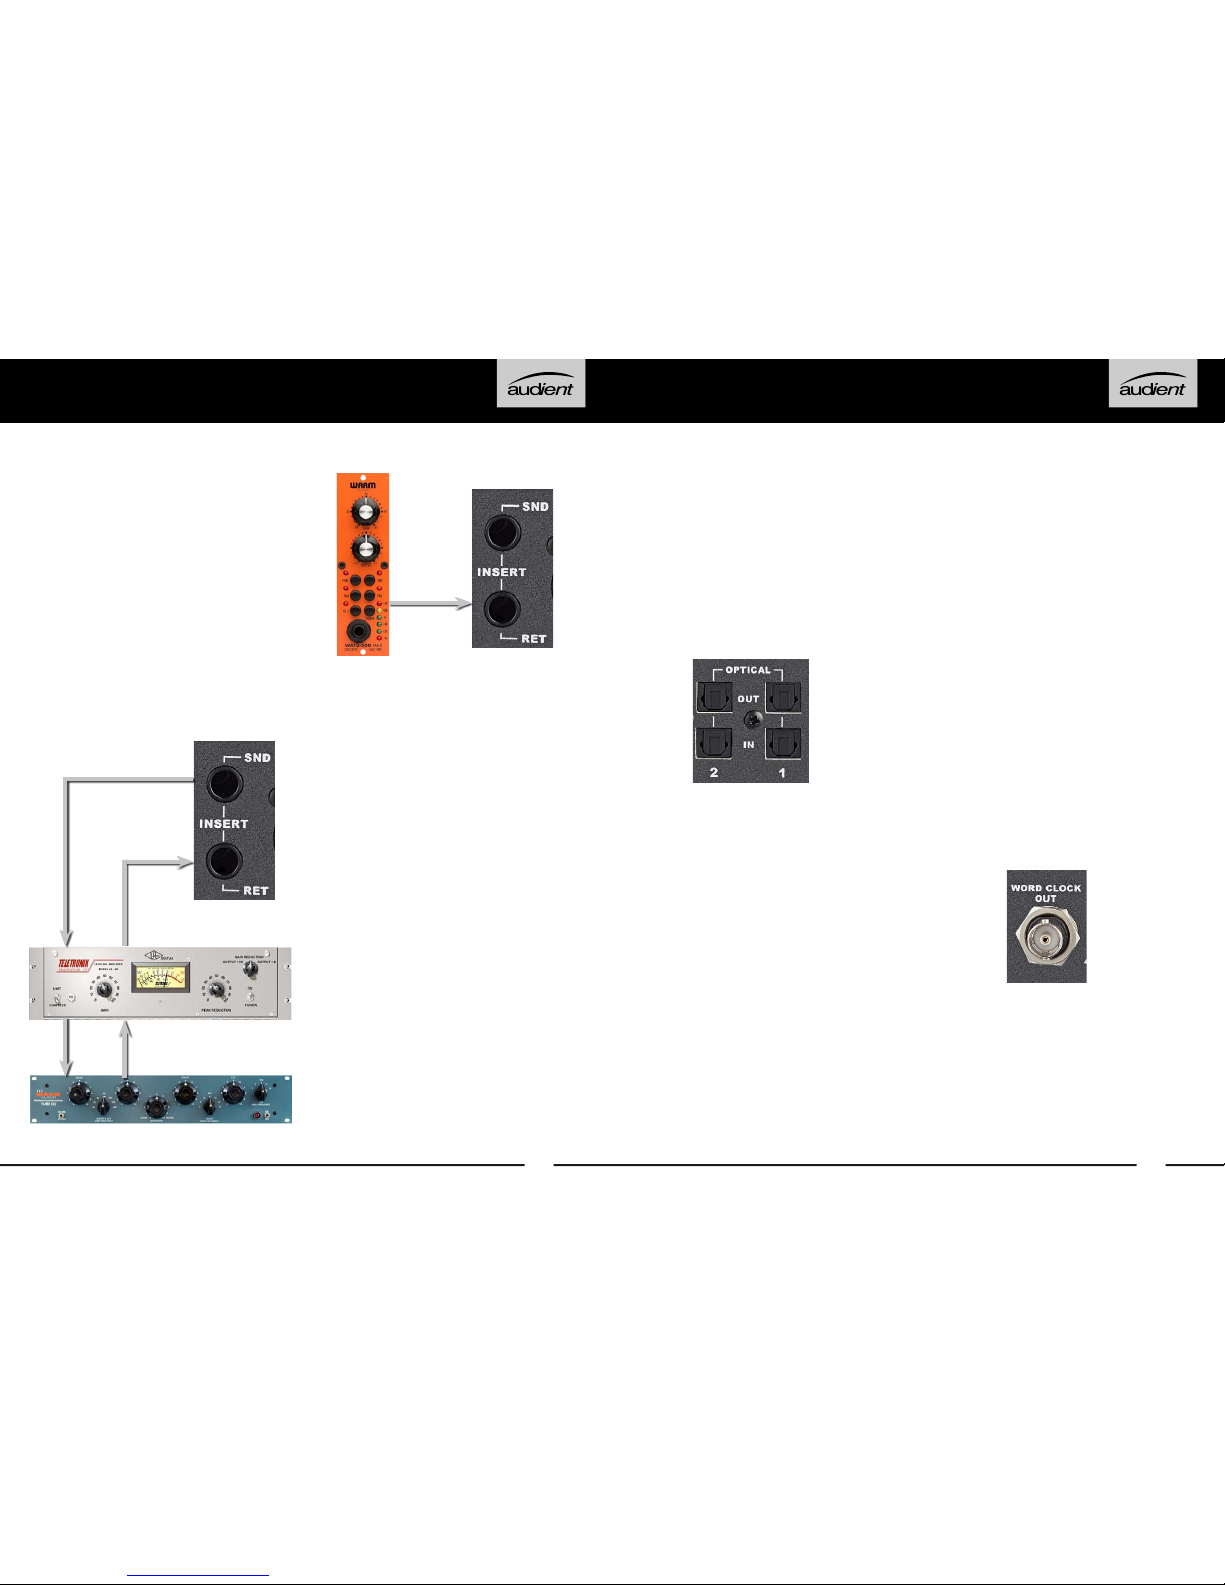
Patching Inserts
To incorporate your favourite
processing before conversion,
simply patch the iD44 insert send
into the first piece of gear in your
processing chain. Then take the
output of the last device in the chain
and patch this into the iD44 insert
return.
When using 88.2kHz and 96kHz as a
sample rate, you only have access to 8
channels of digital input and 8 channels
of digital output (due to the ADAT
protocol).
Word Clock Output
The iD44 also includes a BNC Word
Clock output which allows you clock
multiple digital devices to the iD44’s
master clock and keep everything in
sync.
The Word Clock output will send a clock
signal at the same sample rate (44.1, 48,
88.2 or 96kHz) that the iD44 is operating
at. This will occur regardless of wheter
the iD44 is being clocked internally or
externally.
Clocking Configurations
When connecting external digital
devices to the iD44, its important to
ensure that all devices are syncronised.
Digital Inputs and Outputs
iD44 features two optical inputs and
two optical outputs. These can be
set to operate using optical stereo S/
PDIF or 8-channel ADAT using the iD
mixer application. All i/o will operate at
up to 96kHz, with ADAT dropping to 4
channels at sample rates of 88.2kHz or
higher.
Running in S/PDIF mode, the optical i/o
provides the option to integrate external
digital outboard, allowing upto 4 channels
of audio in and out of the iD44 at sample
rates up to 96KHz.
Running in ADAT mode, the optical i/o
provides a great way to expand to 20
inputs for recording via an external mic
preamp such as the Audient ASP800.
The ADAT outputs could also be
connected to headphone distribution
systems such as a HearbackTM HUB
or to an 8-channel DAC for summing
purposes.
Hardware Features Hardware Features

20 21
iD44 with Single BNC Connection
Optical TOSlink Cable BNC Word Clock Cable
iD44 with Daisychained BNC connection
BNC T Connector
75 Ohm Terminiated
75 Ohm Terminiated
To ensure this, one device in the setup
must be set as the master clock. The
other devices will then use the master
clocks signal to stay in sync. There can
only ever be one master clock present in
a chain.
The master clock signal can be sent
either via an Optical cable embedded
into the digital signal data, or through
a BNC clock line cable. Please bear in
mind that the clock will only travel in one
direction through these conenctions,
from a devices output to a devices input.
Choosing a Master Clock
In a digital setup, there can be a number
of options when determinging which
device should be your master clock.
Quite often the best device to set as the
master is the one that is connected to
the computer (where possible) such
as an audio interface. This way, when
you open a project in a DAW, the audio
interface should change to match the
project sample rate, and therefore
change the sample rate of all the slave
devices. However this depends on the
devices being used.
iD44 as the Master Clock
With the iD44 set as the Master Clock
the other devices in the chain can be
clocked by either the Optical Port or the
BNC word clock output. When clocking
just one device, clocking via the optical
port would be the simpliest option,
simply connect the TOSlink cable up to
the iD44’s optical output and to the other
digital devices input.
Then set the other device to Slave o the
iD44’s clock.
If you are using multiple devices then it
is reccomended to use the BNC word
clock output and then use T-connectors
to Daisy Chain the Devices together.
It is important to note that the final
device in the chain should have its BNC
connector terminated with 75 Ohms to
stop reflections of the clock signal. This
should be an switchable option on most
devices.
Hardware Features Hardware Features

22 23
iD44 clocked via the Optical Port
Neutrik
Neutrik
Neutrik
Neutrik
D.I 1
D.I 2
AUTO
SENSE
INPUT
SELECT
+ 60dB
ADC
AUTO
SENSE
INPUT
SELECT + 60dB
ADC
INSERT
INSERT
DIRECT
MONITOR
PATH
(SOFTWARE
CONTROLLED)
ADC
+ 60dB ADC
+ 60dB
CH1
CH2
CH3
CH4
OPTICAL
IN 1
OPTICAL
IN 2
Microphone Input
XLR Combi Female
Pin 1: Chassis Ground Pin
Pin 2:Hot (+ve)
Pin 3: Cold (-ve)
Input Impedance: >3k ohm
Maximum Input Level: +22 dBu
Line Input
1/4” TRS Combi Jack
Tip: Hot (+ve)
Ring: Cold (-ve)
Sleeve: Chassis Ground
Input Impedance: >10k ohm
Maximum Input Level: +32dBu
DI Input
1/4” TS Jack
Tip: Hot (+ve)
Sleeve: Ground
Input Impedance: >1Meg ohm
Insert Sends
1/4” TRS Jack
Tip: Hot (+ve)
Ring: Cold (-ve)
Sleeve: Chassis Ground
Output Impedance: >100 ohm
Maximum Output Level: +22
dBu
Insert Return
1/4” TRS Jack
Tip: Hot (+ve)
Ring: Cold (-ve)
Sleeve: Chassis Ground
Input Impedance: >10k ohm
Maximum Input Level: +18 dBu
Digital Reference: 0dBFS = +18dBU
Optical Inputs
TOSLink Optical Connector
ADAT: 8 channels @ 48kHz
ADAT SMUX: 4 channels @ 96kHz
S/PDIF: 2 Channels @ All sample
rates
Input Specs
Class A Mic Preamplifer, Inserts, A/D converters and
Optical Input Block Diagram
USB
OUT
iD44 as the Slave
The iD44 can also act as the slave to
an external master clock via it’s optical
inputs. The BNC connector is an output
only.
In this case, you would simply connect
the optical output of a device to the
iD44’s optical input. Then, in the iD mixer
application, select the optical input you
wish to be used as the clock source.
You would also need to set the inputs to
either ADAT or S/PDIF depending on the
specification of the external device.
More advanced clocking setups for the
iD44 can be found at
audient.com/support/iD44.
Hardware Features Hardware Features

2524
Line Outputs
iD44 has four line outputs, these can be
used for connecting monitors on the back
panel in the form of balanced TRS jack
connectors. The outputs are impedance
balanced using the same topology as our
flagship console, the ASP8024.
The outputs are fed from high quality
DACs (Digital to Analogue Convertors)
sending clean, linear audio to your
speakers, perfect for critical listening.
You can use these outputs for more
than just speakers. If you want to use
hardware outboard equipment, you
can send out up to four mono, or two
stereo signals from these outputs, This is
configured in the iD mixer software.
In order to keep your audio noise free,
we would reccomend against the use of
unbalanced (TS, RCA.. etc) cables on the
line outputs.
Headphone Output
iD44 features a two high current
headphone amplifiers which are fed by
seperate DAC’s and can be accessed
from the headphone jack on the front of
the unit.
These can be used instead of or
alongside speakers to get an idea how
your mix translates to headphones, or to
provide artist headphone mixes
The headphone outputs can
comfortably drive a wide range of
headphone impedances meaning that
you will get great sounding audio no
matter what model of headphones you
have.
Monitor Control
iD44 provides all of the excellent
monitor control functionality as found
on our consoles.
As such, it is possible to control main and
alternative loudspeaker volumes with
a perfectly matched stereo volume
control on the main unit.
Accompanied by this monitor volume
knob are permanently assigned
hardware DIM & CUT switches. The level
of DIM and ALT. loudspeaker trim can be
adjusted in the iD mixer application.
Alongside these functions, three user
programmable ‘F’ keys provide access
to several useful monitoring features.
Monitor Control Features
• Volume control (perfectly matched)
• Alt. loudspeaker with programmable
level (assignable to an ‘F’ key)
• DIM with programmable level
• CUT
• Mono Sum (assignable to an ‘F’ key)
• Polarity reverse (assignable to an ‘F’
key)
By using polarity reverse and mono sum
it is possible to listen in sum or dierence
(mid or side) modes. This provides an
excellent way to check mono
compatibility and to also learn spatial
tricks from your favourite reference
material.
Hardware Features Hardware Features

2726
iD Button
The iD button switches iD44 into
ScrollControl mode, allowing the
encoder to be used as a scrollwheel
for the computer. This gives you the
ability to control plugin parameters and
anything else that is scrollable. This
works well for adding automation or
setting parameters in a hands-on way.
To use ScrollControl
,
hover your mouse
over whatever you want to control and
rotate the encoder.
ScrollControl may act slightly dierent
on dierent plugins or DAWs depending
on how they have been programmed
to work with scrolling. If you find it is too
sensitive or not sensitive enough, you
can try adjust your computer scrolling
speed.
Talkback
The iD44 can take a talkback signal from
a variety of places. You can assign one
of the 4 analogue or 16 digital inputs as
your talkback channel. When tallback
is activated, signal from that channel is
sent through one of the Cue mixes to the
artist(s).
You can source the talkback audio
from another audio device connected
to your computer such as the built-in
microphone. This allows you to free up
an input channel on your iD44 that would
otherwise be taken up, great for big
sessions.
Details on how to set this up can be
found in the ‘Software’ section of this
manual.
Hardware Metering
The 8-segment hardware meters
indicate playback level of the iD mixer
app, so it is suggested that end users
observe their DAW metering for input
levels.
Status LED
The status LED indicates connection via
USB to your computer. A solidly
lit light means that there is stable
communication between iD44 and your
computer.
Kensington Lock
For those who work in educational
establishments or in situations where
your equipment is public facing and
subject to possible theft opportunities,
we have provideda Kensington lock hole
to enable you to protect your iD44.
Hardware Features Hardware Features

2928
Input Channels - Channel Types
The iD mixer application features three
types of input channels:
• Mic Inputs
These are the inputs where you will
see the signal from the iD44’s four
analogue inputs
• Digital Inputs
These are the inputs from the iD’s
optical inputs. The number of digital
inputs present on the iD mixer
application depends on the digital
input type (S/PDIF or ADAT) and the
sample rate being used.
• Daw Returns
These are the signals being played
back from your DAW. The iD44 has
8 Daw Return Channels allowing you
set up multiple cue mixes or sends to
hardware outboard gear.
Using these three channel types, you
can build up your main monitor mix and
up to four additional cue mixes.
Its important to note that the iD mixer
application only controls the monitoring
of the iD44. Changes made to the iD
mixer application won’t aect the level
present in your DAW or audio software.
Software Features
Software Features
Software Features

30 31
Channel
Name
Phase Flip
Pan Control
Stereo
Grouping
Mute
Solo
Fader
Meters
Channel Features
Channel Name
By double clicking on the name of the
channel you can rename it to help you
organsie your iD mixer application. You
could name a channel ‘Kick’ or ‘Snare’ for
example.
Phase Flip
Inverts the polarity of the signal by
180° to stop phase cancellation. This is
useful if you a micing the rear of a guitar
amplifier or the underside of a snare
drum.
Pan Control
Allows you to send the audio to the left,
to the right or anywhere between on
your Main Monitor Mix or Cue Mixes.
Stereo Grouping
Allows you to group two ajacent
channels together into a stereo channel
with a single fader controlling the level of
both channels. When a channel is stereo
grouped, the pans will automatically be
set to far left and far right.
Solo
The Solo button mutes all other channels
other than the one that is currently solo’d.
Multiple channels can be solo’d at one time.
Mute
The Mute button stops this channel from
outputting audio whilst it is engaged.
Fader
The fader controls the amount of signal that
is sent to currently selected mix. This can be
set to anywhere between -inf dB to +6dB.
Meter
The meter shows the current signal level in
dBFS. Should the signal level exceed 0dBFS
then the peak indicators will illuminate red to
indicate a peak. The peak indicators can be
turned o by clicking in them. You can also
turn o all peak indicators using Alt + Click.
Software Features Software Features

3332
Mix Selection
Cue Mix
Name
Mix Solo
Cue Mix
Level
Channel
Views
Monitor
Controls
Mix
Meters
Chronometer
Master Section Features Channel Features
Mix Selection
Clicking on one of mixes allows you to
make changes to that mix. When a mix is
selected, it expands to reveal additonal
controls for that mix.
Cue Mix Name
Double clicking on a Cue Mixes name
allows you to rename the Cue Mix. If for
example you were creating mixes for four
seperatebandmembers,youcouldname
them ‘Drummer’, ‘Guitarist’, ‘Bassist’... etc.
Mix Solo
The Solo button allows you to audition
each of the Cue mixes through your
monitors.
Mix level
The Mix level allows you to control the
overall level of the Cue mix that is sent to
the outputs.
Mix Meters
The Mix meters show the master signal
level of the selected Mix.
Chronometer
The Histogram Meters allow you to see
not only the current signal level but
also the signal level from a few seconds
previously.
This can be great to track down a sudden
loud tranisent on a particular cue mix or
to monitor the change in level over time
as you make changes to a mix.
Channel Views
These three buttons allow you control
which of the three channel types are
shown in the mixer. If for example you
weren’t using the digital inputs for a
particular project, you can simply hide
the optical channels by clicking on the
OPT control.
Monitor Controls
These six buttons control various
aspects of the iD44’s monitor controller
capability. The function of each control
can be found below:
• TB (Talkback)
The talkback button switches
talkback on and o. More information
regarding talkback and its various
settings can be found in the ‘System
Panel’ sectin of this manual.
Software Features Software Features

34 35
System Panel
Digital I/O
Format
Clock
Source
Selection
Output
Routing
Selection
Routing
Matrix
Mono
Mode
Dim Level
Alt Speaker
Level
Talkback
Device
Talkback
Source
Input
Source
• ø (Phase Flip)
Pressing this switch flips the phase
of one side of the stereo field. Used
in conjunction with the mono button,
this can be a great way to remove
centred elements from a mix. in order
to hear the hidden elements of a mix.
• Mono
The mono button sums the stereo
outputs down to mono. This can
be used to quickly check the
mono compatability of your mix to
make sure it’ll sound great almost
anywhere!
• Alt
Alt allows you to quickly switch your
monitor path to a seconary set of
monitors to let you check how your
mix translates on various speakers.
You can select which outputs the ALT.
monitor control flips to in the System
Panel
• Dim
Reduces the output level by a preset
amount which can be great if you
get a call or need to quickly chat to
someone during a session.
• Cut
The cut button cuts the signal to the
monitors.
All these controls can be controlled
from the iD44 itself, either by
assigning them to an F-Key, or using
the dedicated Dim and Cut controls.
Assigning F-Keys
Various functions of the iD mixer
application can be assigned to the
Function Keys of the iD44 to allow you
to quickly control your monitoring at the
click of a button.
To assign a monitor control to an F-Key,
simply right click on the control and
select the F-Key.
Software Features Software Features

3736
System Panel Features
Digital I/O Format
Allows you to select whether each
optical input or output uses ADAT or
S/PDIF digital format.
Prefered Clock Source
The Clock source can be selected from
either the internal clock or one of the two
optical inputs. More information about
choosing a clock source can be found in
the clocking section of this manual.
When using an external clock source the
indicator beside the selector shows the
current status of the clock on that input.
• Red - No clock signal detected on
input
• Amber - A clock signal is detected but
at a dierent sample rate to iD44
• Green - A clock signal is detected and
is at the correct sample rate.
For an external clock source to be
working correctly you would want the
indicator to be green. If the indicator
isn’t green, iD44 will default back to the
internal clock until it detects a valid clock
input
Mono Mode
When the iD44’s Mono feature is
engaged this option controls whether
the mono signal is sent to the left, right
or both monitors.
Dim Level
When the iD44’s dim button is pressed,
this control defines how much the level
is reduced by.
Alt Speaker Level
This control defines the level drop/
boost when the iD44 is switched to ALT
speaker mode. This is used to balance
levels between dierent speaker brands
or types.
Output Routing Selection
Opens the routing matrix for either the
Analogue Outputs, Digital Output 1,
Digital Output 2 or the Talkback channel
Routing Matrix
The Routing Matrix allows you to control
the audio source for each of the iD44’s
outputs from the following options
• Main Mix - This takes signal from the
Master Mix of the iD mixer. This is what
is usually used for most standard
playback.
• Alt - This takes signal the Master Mix
but only when the Alt speaker mode.
is active.
• Cue A, B , C, D - This takes signal from
the four cue mixes which can be
created using the iD mixer. Please
note that the hardware volume
control does not aect these mixes
and the Cue’s have sperate trims
which can be adjusted when the
cue mix is selected in the Main Mixer
Window
• DAW THRU - This takes signal directly
from the audio driver and bypasses
both the routing and volume control
of the iD mixer. This is best used with
outboard equipment or monitor
controllers where a full line level
signal is required.
Software Features Software Features

3938
Talkback Source
The Talkback source allows the
talkback input to be taken from on the
iD44’s internal inputs or from a device
connected to the host computer
(Such as a built-in microphone or USB
microphone)
Talkback Device
If an external device is selected then this
allows you to select which connected
device is used.
Saving & Loading Mixer Presets
To allow you to quickly setup your iD
mixer during a session you can save and
quickly load various presets. This is great
if you are moving between recording
scenarios quite often.
Mixer presets can be saved and loaded
in two ways:
• Using the File menu and selecting
either Save or Open
• Using standard keyboard shortcuts :
Save: Mac - Cmd + S
Windows - Ctrl + S
Load: Mac - Cmd+ O
Windows - Ctrl + O
Saving a Preset.
To save a preset, simply setup your
mixer the way that you’d like to save.
Then select File > Save as explained
above. The mixer window should then
show the Save dialog.
Simply enter the name of your preset
and press save.
It is also possible to export your preset
files in order to send them to friends or
to simply save them within your DAW
session files for easy recall later on. To do
this, select Export Mixer Configuration at
the base of the Save screen.
Loading a Mixer Configuration
To load a previously saved preset, select
File > Open to bring up the Load screen.
The previosuly saved configuration will
appear in a list. Select the configration
you wish to use and click Load.
You can also open a mixer configuration
directly from your file by selecting Load
From File.
Software Features Software Features
Other manuals for iD44
3
Table of contents
Other Audient Accessories manuals
Popular Accessories manuals by other brands

V2
V2 SENSIVA-180 manual

Work Sharp
Work Sharp Combo user guide

Panasonic
Panasonic Light Emitting Diodes LNJ024X4ARA1 Specifications

Oregon Scientific
Oregon Scientific THGN122N user manual

PCB Piezotronics
PCB Piezotronics ICP E106B/061A60 Installation and operating manual

METALTEK
METALTEK PLAYMATE PICKLEBALL owner's manual