Audio-Techica AT-LP3XBT User manual

AT-LP3XBT
Automatic Wireless Turntable
User Manual
English

4
Notes on use
Turntable body
Do not set and use the product in locations that are considerably hot or humid, dirty, or subject to extreme vibrations.
The product should be positioned on a flat, level surface.
When closing the dust cover, close it completely.
When using this product with a Bluetooth device connected to it, be sure to also read the user manual for the
Bluetooth device.
Cartridge
Attach the provided protector to the cartridge when the product is not in use.
Do not touch the stylus of the cartridge with your finger.
Do not allow the stylus to bump against the platter, felt mat, or edge of the record.

5
Package contents
Make sure that you have all the included items before using this product.
If some items are missing or damaged, contact your local Audio-Technica dealer.
After purchase, we suggest that you save all packaging materials for possible future storage, moving, or shipping.
1
89 10
7
6
3
4 5
2
11
12 13
1
Turntable body
2
Platter
3
Drive belt
4
Dust cover
5
Felt mat
6
Dust cover hinges

Package contents
6
7
Headshell (AT-HS3 BK) with VM stereo cartridge (AT-VM95C)
8
Counterweight
9
45 RPM adapter
10
AC Adapter
11
RCA audio cable (Approx. 1.0 m (3.3'))
12
Quick Start Guide
13
Caution Guide

7
Part names and functions
Top view
1
5
7
2
4
10
9
3
6
8
1
45 RPM adapter (shown in receptacle)
Select the platter speed (33-1/3 or 45 RPM).
2
Felt mat
3
Spindle
4
Drive belt
5
Motor pulley (brass-colored)
6
Bluetooth indicator LED
Indicates the Bluetooth connection status with solidly lit or flashing light.
7
Wireless function button
Use to connect this product to a Bluetooth device.
8
Platter
9
Tonearm
10
Size selector
Switch between 12" and 7", according to the size of the record.

Part names and functions
8
Front view
1 2 3
1
Platter speed button
Selects the platter speed (33-1/3 or 45 RPM).
2
START button
Spins the platter and moves the tonearm.
3
STOP button
Returns the tonearm to its original position and stops the platter.
Rear view
1 12 23 4 5 6
1
Dust cover hinge holders
Attachment points for dust cover hinges.
2
Feet
Adjust the level of the product.
3
Pre-amplifier selector switch
If connecting to an amplifier’s PHONO input jack, set this switch to the PHONO position. If connecting to the AUX
jack of an amplifier, set this switch to the LINE position.
4
Stereo output terminals
Connect the RCA audio cable. Connect it to either the amplifier’s PHONO input jack or its line input jack. The red
terminal is the right channel and the white terminal is the left channel.

Part names and functions
9
5
Ground (earth) terminal
Connect the amplifier’s ground (earth) terminal to this terminal using the RCA audio cable’s ground line.
6
Power input jack
Connect the AC adapter.
Tonearm
1
5
7
2
4
3
6
8
9
1
Counterweight
Balances the tonearm and adjusts to provide the proper tracking force.
2
Tracking force gauge ring
Use to adjust the tracking force.
3
Anti-skate control dial
While the record is playing, a force acts on the stylus tip to pull it inward. This force can be counteracted by setting
the same values for anti-skate and the tracking force.
4
Tonearm lift
Moves the tonearm vertically to and from the face of the record.

Part names and functions
10
5
Tonearm lift control lever
Operates the tonearm lift.
6
Tonearm rest
7
Tonearm
8
Locking ring
Rotate the ring to the left (counterclockwise) to secure the headshell. To remove the headshell, rotate the ring to the
right.
9
Headshell and cartridge
The cartridge is attached to the headshell.

11
Preparation for use
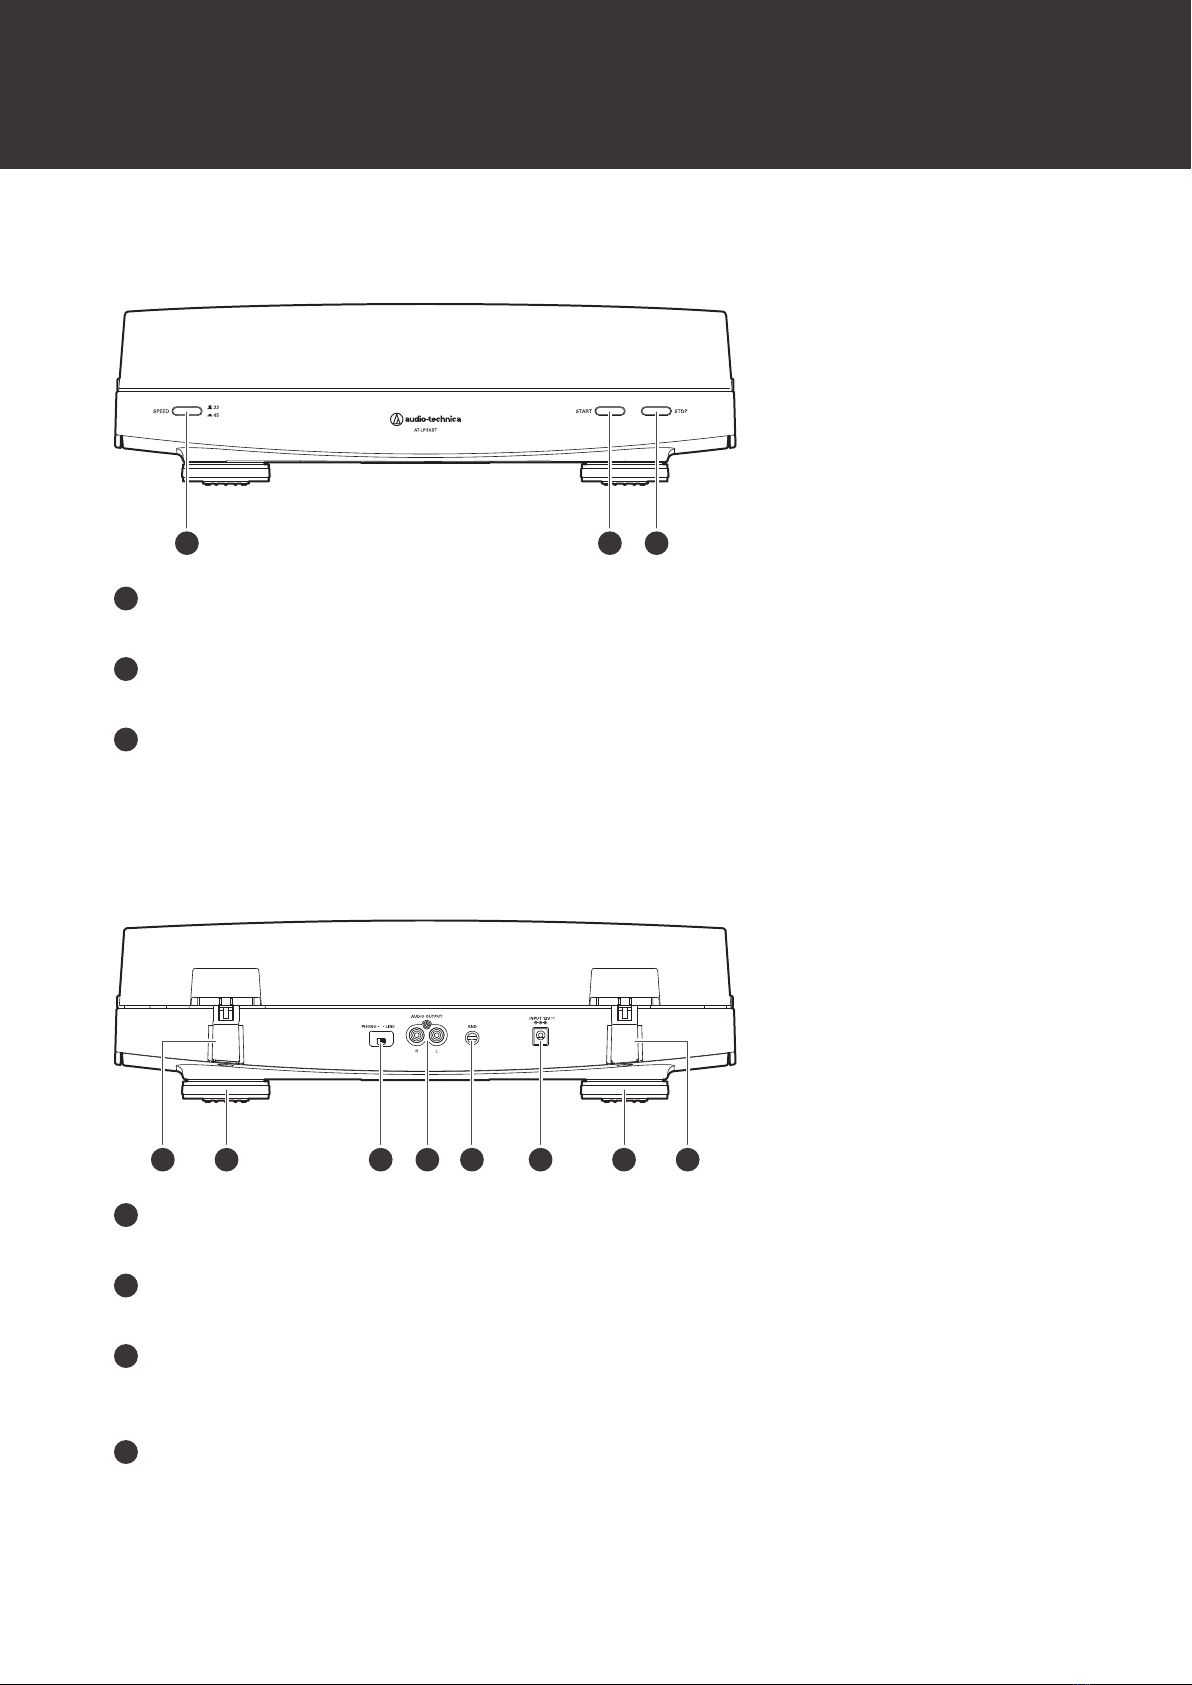
Setting up the turntable
Position the product on a level surface.
To avoid the effects of vibrations and acoustic pressure, do not mount the product next to such items as speakers.
The product may pick up radio static if placed next to a radio. Therefore, try to keep the product away from radios.
If the product is near equipment (cell phone, etc.) that emits strong radio waves, noise may occur.
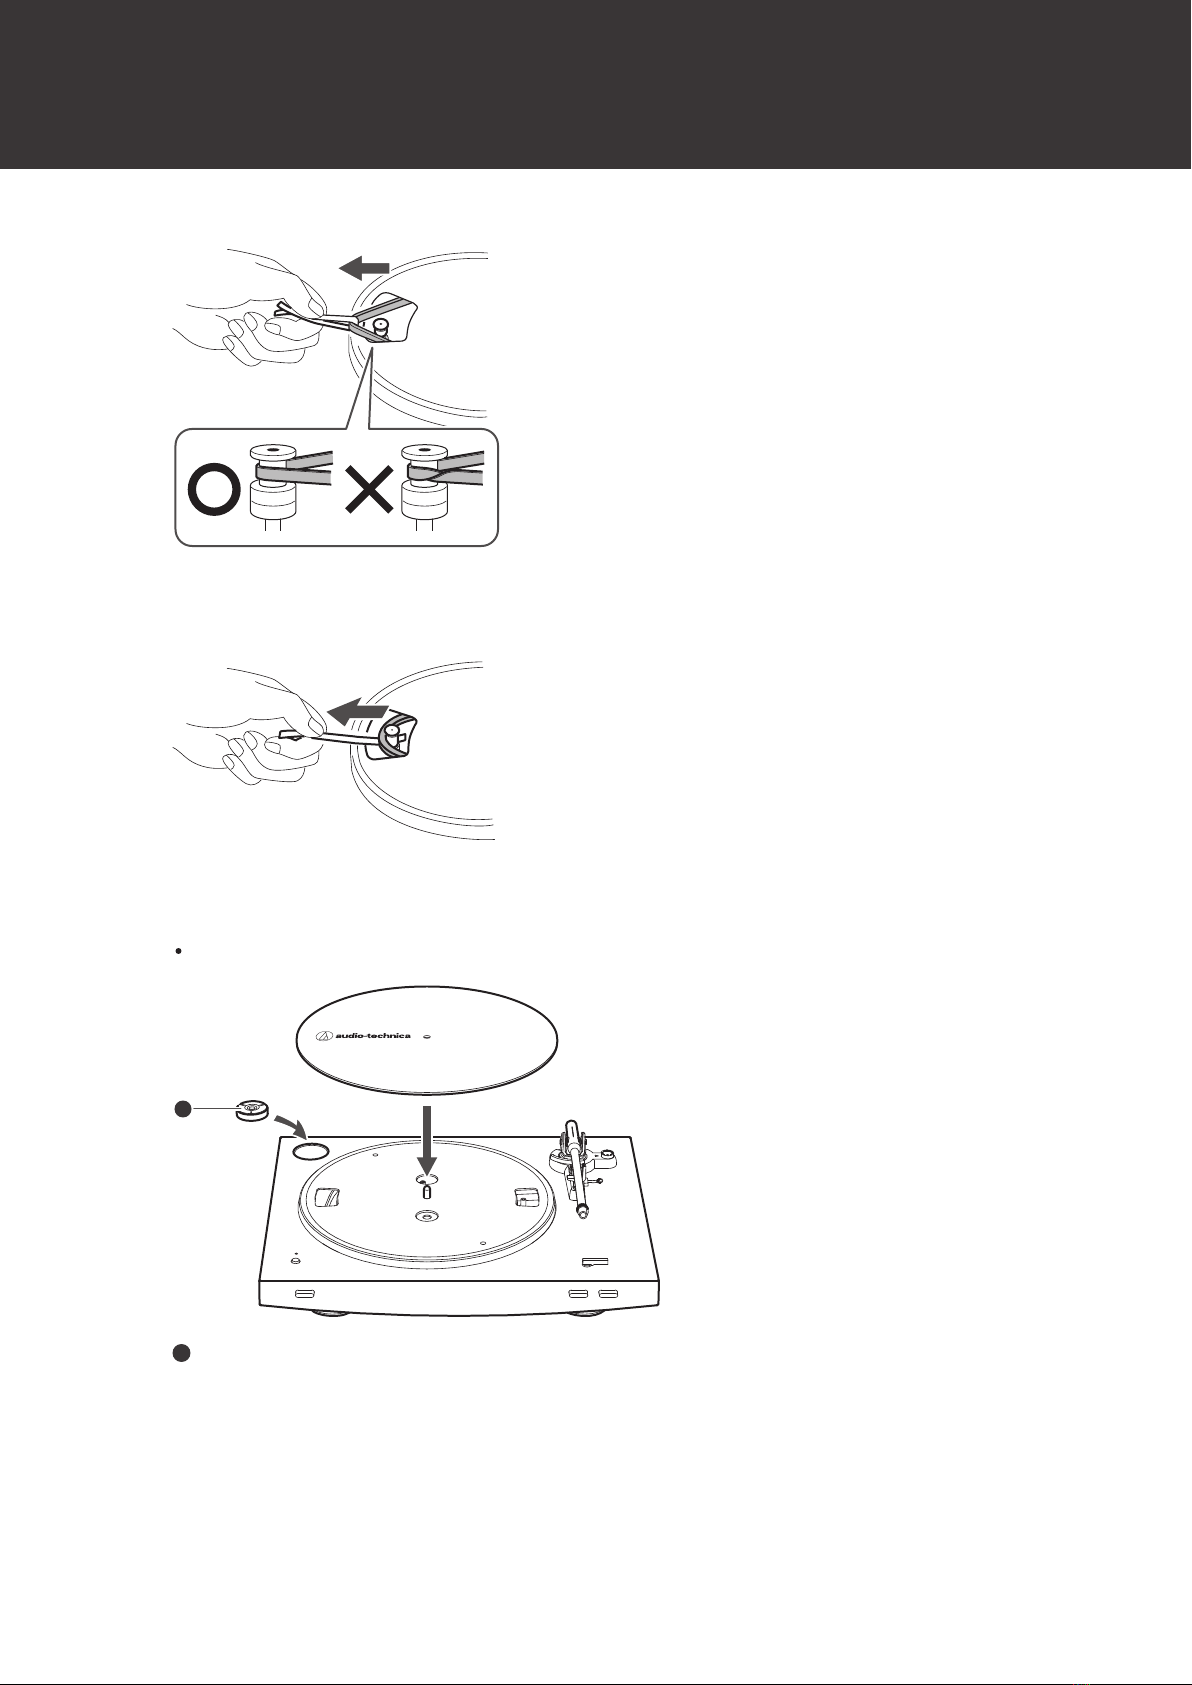
Placing the platter and the felt mat
This product requires some assembly before using it for the first time. Do not connect the AC adapter until assembly is
complete.
1Set the platter on the spindle.
Make certain that the platter is fully seated on the spindle.
Align one of the openings with the position of the motor pulley (brass-colored) (See the diagram below).
To avoid damaging the spindle when seating the platter, align the positions of the spindle and the platter’s
hole, and then slowly seat the platter.
1
1
Motor pulley (brass-colored)
2Attach the drive belt to the motor pulley (brass-colored).
Align one of the platter openings with the brass motor pulley, and, while pulling both ends of the red ribbon
that comes attached to the belt, place the belt on the motor pulley, as per the diagram. When doing this, be
careful not to twist the belt.

Preparation for use
12
3Remove the red ribbon from the belt.
4Set the felt mat on the platter.
After setting the felt mat, put the 45 RPM adapter into the space made for it on the upper left.
1
1
45 RPM adapter

Preparation for use
13
Rotating the platter
1Using your hands, rotate the platter ten times.
Raise the tonearm lift control lever to lift the tonearm. Slowly rotate the turntable ten times by hand in the
direction of the arrow.
You may want to hold the tonearm to prevent it from moving. This step is for getting rid of any twists in the
belt and making sure the belt rides smoothly along the drive rim on the underside of the platter.
Assembling the tonearm
1Remove the cable tie used to secure the tonearm at the time of delivery.
2Insert the headshell into the tonearm.
Hold the right and left edges of the headshell so that you do not damage the stylus or cut the cartridge’s
wires.
3With the headshell inserted, turn the locking ring counterclockwise (to the left).
4Attach the counterweight to the back of the tonearm and slowly turn it counterclockwise (to the
left).

Preparation for use
14
Tonearm balance and tracking force
In order for the cartridge to pick up sound correctly from the record’s grooves, the tonearm’s balance and tracking force
must be adjusted to fit the specifications of the cartridge.
If the tonearm’s balance and tracking force are not properly adjusted, the record or the cartridge’s stylus may become
damaged.
Do not drag the cartridge’s stylus across the record or felt mat when adjusting the tonearm’s balance or tracking
force. Doing so may damage the stylus.
Setting tonearm balance
1Remove the cartridge’s protector.
1
1
Protector
2Lift the tonearm lift control lever and move the tonearm over the felt mat. Lower the tonearm lift
control lever while holding the headshell.
Be careful not to allow the stylus tip to touch the felt mat.
3While still lightly holding the headshell, turn the counterweight to adjust the tonearm’s balance.
Adjust the balance so that the tonearm is level when you release the headshell.

Preparation for use
15
1
4Return the tonearm to the tonearm rest.
Setting tracking force
1While supporting the counterweight so that it does not move, turn the tracking force gauge ring so
that its “0” position lines up with the centerline on the back of the tonearm.
The tracking force is not adjusted simply by turning the tracking force gauge ring.
1
1
Tracking force gauge ring
2Turn the counterweight and the tracking force gauge ring counterclockwise (to the left) to set the
tracking force to the recommended tracking force value for the cartridge you are using.
Refer to the cartridge maker’s specifications for the recommended tracking force value.
The tracking force value for the cartridge provided with this product is 2.0 g.
Setting the anti-skate adjustment
While the record is playing, a force acts on the stylus tip to pull it inward. This force can be counteracted by setting the
same values for anti-skate and the tracking force.

Preparation for use
16
1Adjust the anti-skate control dial to have the same value as the tracking force value.
The tracking force value for the cartridge provided with this product is 2.0 g.
1
1
Anti-skate control dial
Installing the dust cover
The dust cover is designed to protect the product’s sensitive components when the product is not in use.
1Attach the dust cover hinges to the slots on the dust cover.
2Insert the hinges of the dust cover into the two dust cover hinge holders on the back of the body.
When removing the dust cover, slowly pull the dust cover out from the dust cover hinge holders on the
body.
The dust cover should remain open or off while records are playing.

17
Wireless/wired connection
Depending on your usage environment, you can use the wireless connection via Bluetooth or the wired connection to
active speakers or the like using the RCA audio cable.
Connecting wirelessly
To wirelessly connect the product to connectable equipment using Bluetooth, refer to "Using the product with wireless
connection" (p. 18).
1
1
Wireless headphones or wireless speakers
Connecting with wires
To connect the product to connectable equipment using the RCA audio cable, refer to "Using the product with a wired
connection" (p. 25).
1
1
Active speakers or amplifier
If the speaker to which the product is connected has no volume control function, you cannot control the
volume.

18
Using the product with wireless connection
This product is Bluetooth compatible. You can connect this product to the Bluetooth-compatible headphones, speakers,
etc. (hereinafter referred to as a Bluetooth device).
About pairing
To connect this product to a Bluetooth device, first pair (register) the product with the device. Once they are paired, you
do not need to pair them again.
You will need to pair them again in the following cases:
If the product is deleted from the connection history of the Bluetooth device.
If the product is sent out for repair.
If the product is paired with nine or more devices. (This product can be paired with up to eight devices. If you pair a
new device after eight devices have already been paired, the pairing information of the new device will overwrite the
information of the device that has the oldest connection date and time among the registered devices.)
Pairing a Bluetooth device
Also read the user manual of the Bluetooth device.
Place the Bluetooth device within 1 m (3.3') of this product to perform pairing.
Please be aware that operation of Bluetooth devices connected to this product is not guaranteed.
1Plug the AC adapter into an outlet.
For safety, raise the tonearm by lifting the tonearm lift control lever to the UP position.
This product does not have a power switch. A standby current is always running through the product, even
when it is not being used; disconnect the AC adapter from the outlet when not using the product for a long
period of time.
Connect the AC adapter to the outlet without removing the cartridge’s protector. If the platter has rotated,
press the STOP button without touching the tonearm, and then wait until the tonearm returns to its original
position.
If you play a record immediately after plugging the AC adapter into an outlet, the sound that is played may be
garbled. Wait a short time (about 30 seconds) after plugging the AC adapter into the outlet before playing a
record.
2Set the pre-amplifier selector switch to LINE.
3Put the Bluetooth device you want to use (Bluetooth-compatible headphones, speakers, etc.) into
pairing mode.

Using the product with wireless connection
19
4Hold down the wireless function button (approx. 2 seconds).
The Bluetooth indicator LED starts flashing red and blue.
1
1
Wireless function button
5When pairing is completed, the Bluetooth indicator LED lights in blue.
The pairing mode of this product automatically ends after a fixed amount of time (approx. 30 seconds). If
pairing is not completed successfully, follow the same pairing steps again.

Using the product with wireless connection
20
Bluetooth indicator LED
Pairing
Operating status Indicator display pattern
Searching for devices Flashing blue and red
Connecting
Operating status Indicator display pattern
Waiting for connection Flashing blue
Connecting Lit in blue
Disconnecting Lit in red
Before playing a record
1Remove the cartridge’s protector.
Pull the protector straight forward to remove it.
2Place the record on the felt mat so that the center hole aligns with the spindle.
At 33-1/3 RPM

Using the product with wireless connection
21
At 45 RPM
To play a 45 RPM record, attach the 45 RPM adapter.
3Turn on the power of the Bluetooth device.
When this product is correctly connected to the Bluetooth device, the product’s Bluetooth indicator LED lights
in blue.
When the Bluetooth indicator LED lights in red, press the wireless function button to reconnect to the
Bluetooth device.
If amplifiers or active speakers already connected to the product with wires are left on, sound will be played
from both the wire-connected equipment and from the Bluetooth device when it is connected to the product
via Bluetooth. Only turn on the device you want to use for playback.
Automatic operation
Lower the volume of the wireless headphones, wireless speakers, etc. sufficiently.
1Select the size with the size selector.
Select “12"” for an LP record with a 12" diameter, and “7"” for a 45 RPM record with a 7" diameter.
2Press the speed with the platter speed button.
Select “33” for a 33-1/3 RPM record and “45” for a 45 RPM record.
3Press the START button.
Do not subject the product to strong impact during playback.

Using the product with wireless connection
22
Do not switch the record size selection while the record is playing. Doing so can cause the product to
malfunction.
Playback starts.
Manual operation
Lower the volume of the wireless headphones, wireless speakers, etc. sufficiently.
1Raise the tonearm by lifting the tonearm lift control lever to the UP position.
Table of contents
Other Audio-Techica Turntable manuals

Audio-Techica
Audio-Techica AT-LPW50BT User manual

Audio-Techica
Audio-Techica AT-LP60XBT-USB User manual

Audio-Techica
Audio-Techica AT-LPW50PB User manual

Audio-Techica
Audio-Techica AT-LP120XBT-USB User manual

Audio-Techica
Audio-Techica AT-LP60XBT User manual

Audio-Techica
Audio-Techica AT-LP7 User manual

Audio-Techica
Audio-Techica AT-LP60XHP User manual

Audio-Techica
Audio-Techica AT-LP1240-USBXP User manual

Audio-Techica
Audio-Techica AT-LP140XP User manual

Audio-Techica
Audio-Techica AT-LP60X User manual