manuals.online logo
Brands
  1. Home
  2. •
  3. Brands
  4. •
  5. AudioQuest
  6. •
  7. Recording Equipment
  8. •
  9. AudioQuest Niagara 3000AP User manual

AudioQuest Niagara 3000AP User manual

Other AudioQuest Recording Equipment manuals

AudioQuest Niagara 3000UK User manual

AudioQuest

AudioQuest Niagara 3000UK User manual

AudioQuest PT-9 Extreme User manual

AudioQuest

AudioQuest PT-9 Extreme User manual

AudioQuest Niagara 3000EU User manual

AudioQuest

AudioQuest Niagara 3000EU User manual

AudioQuest Niagara 3000 User manual

AudioQuest

AudioQuest Niagara 3000 User manual

Popular Recording Equipment manuals by other brands

ThermoFisher Scientific Dionex DRS 600 Installation checklist

ThermoFisher Scientific

ThermoFisher Scientific Dionex DRS 600 Installation checklist

Shure ANIUSB-Matrix user guide

Shure

Shure ANIUSB-Matrix user guide

Nady Audio HE-1 user guide

Nady Audio

Nady Audio HE-1 user guide

AUDAC APM 01 User manual & installation guide

AUDAC

AUDAC APM 01 User manual & installation guide

Teac GF-350 owner's manual

Teac

Teac GF-350 owner's manual

Fractal Audio MFC-101 MARK III owner's manual

Fractal Audio

Fractal Audio MFC-101 MARK III owner's manual

bmcm USB-OI16 manual

bmcm

bmcm USB-OI16 manual

HHB BurnIT CDR-830 Service manual

HHB

HHB BurnIT CDR-830 Service manual

GE VersaMax IC200CPUE05 manual

GE

GE VersaMax IC200CPUE05 manual

IntesisBox MH-RC-MBS-1 user manual

IntesisBox

IntesisBox MH-RC-MBS-1 user manual

Attero Tech unD4l user manual

Attero Tech

Attero Tech unD4l user manual

Sennheiser UI 765 instruction manual

Sennheiser

Sennheiser UI 765 instruction manual

Sony RCD-W1 Operating Instructions  (primary... Service manual

Sony

Sony RCD-W1 Operating Instructions (primary... Service manual

Roland Planet-P  MKS-10 owner's manual

Roland

Roland Planet-P MKS-10 owner's manual

Roland BOSS GT-PRO Turbostart

Roland

Roland BOSS GT-PRO Turbostart

8x8 Inc Valcom V-2001A manual

8x8 Inc

8x8 Inc Valcom V-2001A manual

Waves SUB Align user guide

Waves

Waves SUB Align user guide

Mitsubishi Electric MAC-334IF-E installation manual

Mitsubishi Electric

Mitsubishi Electric MAC-334IF-E installation manual

manuals.online logo
manuals.online logoBrands
  • About & Mission
  • Contact us
  • Privacy Policy
  • Terms and Conditions

Copyright 2025 Manuals.Online. All Rights Reserved.

Owner’s Manual
Niagara 3000aP
Low-Z Power
|
Noise-Dissipation System
2
Niagara 3000AP Features 3
Introduction 3
Installation 5
Unpacking 5
Safety Information/Warnings 5
Servicing/Return to AudioQuest 5
Power Source 5
Placement 5
Connection to Audio/Video Components 6
AC Cable Routing 6
High Current/Low-Z Power Banks 6
Level-X Linear Noise-Dissipation System Power Outlets 7
Suggested AC Connections 8
Operation and Continuous Use 9
Power Switch/Circuit Breaker and LED Power Indicator 9
Rear-Panel Power Correction Switch/Niagara 3000AP Current Draw 9
Extreme Voltage Indicator 10
Break-in Time/Continuous Use 10
Specications 11
Trouble-Shooting Guide 12
Warranty 15
3
Niagara 3000AP Features
¡Transient Power Correction provides power ampliers a current reservoir of over 55 amps peak
(up to 25mS), even when plugged into a 15-amp outlet
¡Patented Ground-Noise Dissipation System yields lower distortion and greater resolution from
audio, video, and digital components with grounded AC cords/circuits
¡Level-XLinearNoise-DissipationTechnology:AC dierential-mode ltering with linear response,
optimized for varying line and load impedance, assures superior resolution for audio, video, and
digital signals
¡7 Low-Z NRG Series AC Power outlets: 2 High-Current Low-Z Power; 5 Level-X Linear Filtered
Power (source components) Outlets feature thick direct-silver plating over beryllium copper. This
assures the most ecient dissipation of induced radio frequency noise possible.
Introduction
The science of AC power is not simple; it demands focus, and the devil is in the details. In fact, the mammoth
increase in airborne and AC-line-transmitted radio signals, combined with overtaxed utility lines and the ever-
increasing demands from high-denition audio/video components, has rendered our utilities’ AC power an
antiquated technology.
Where Alternating Current (AC) is concerned, we’re relying on a century-old technology created for incandescent
lights and electric motors—technology that was certainly never meant to power the sophisticated analog and
digital circuits used in premium audio/video systems. To properly accommodate the promise of today’s ever-
increasing bandwidth and dynamic range, we must achieve extraordinarily low noise across a wide range of
frequencies.
Further, today’s power ampliers are being taxed for instantaneous peak-current demand, even when they’re
driven at modest volumes. Although we have seen a substantial increase in both dynamics and bass content from
our audio software, the loudspeakers we employ to reproduce them are no more ecient than they were two
to four decades ago. This places great demands on an amplier’s power supply, as well as the source AC power
supplying it.
Our systems’sensitive components need better alternating current—a fact that has resulted in a host of AC power
conditioning, isolation transformers, regeneration ampliers, and battery back-up system topologies. Through
dierential sample tests and spectrum analysis, it can be proven that up to a third of a high-resolution (low-level)
audio signal can be lost, masked, or highly distorted by the vast levels of noise riding along the AC power lines
that feed our components. This noise couples into the signal circuitry as current noise and through AC ground,
permanently distorting and/or masking the source signal.
All sincere attempts to solve this problem must be applauded since once the audio/video signal is gone, it’s
gone forever…
For AudioQuest, honoring the source is never a matter of simply using premium“audiophile-grade parts”or relying
on a proprietary technology—common approaches used within the audiophile market. For years, we have all
been witness to the same, seemingly endless audiophile debates: Valves versus transistors. Analog versus digital.
Can cables really make a dierence? The debates go on and on. While we, too, can brag about our many unique
technologies, we realize that true audio/video optimization is never a matter of any one secret or exotic circuit.
When it comes to noise dissipation for AC power, many approaches can yield meaningful results. However, they
may also impart ringing, current compression, and non-linear distortions that are worse than the disease.
The Niagara 3000AP uses both our patented AC Ground-Noise Dissipation System and the widest bandwidth-
linearized noise-dissipation circuit in its class. Our unique passive/activeTransient Power Correction Circuit features
4
an instantaneous current reservoir of over 55 amps peak, specically designed for modern current-starved power
ampliers. Most AC power products featuring “high-current outlets” merely minimize current compression; the
Niagara 3000AP corrects it.
Though it’s easy to boast, it’s quite another thing to create a solution that is consistent, holistic, functional, and
that honors veriable science. It’s not enough to reduce AC line noise and its associated distortions at just one
octave, thus leaving vulnerable the adjacent octaves and octave partials to noise, resonant peaking, or insucient
noise reduction. Consistency is key. We should never accept superior resolution in one octave, only to suer from
masking eects a half-octave away and ringing artifacts two octaves from there. This is the principal criterion for
AudioQuest’s Low-Z Power Noise-Dissipation System.
The Niagara 3000AP represents over 20 years of exhaustive research and proven AC power products designed
for audiophiles, broadcast engineers, and professional audio applications. Every conceivable detail has been
addressed: In the Niagara 3000AP, you’ll nd optimized radio-frequency lead directionality; run-in capacitor
forming technologies developed by Jet Propulsion Laboratories and NASA; and AC inlet and outlet contacts with
thick direct silver plating over beryllium copper, assuring superior conductivity and the tightest grip possible.
A great system is built from a solid foundation, and that foundation starts with power. With an AudioQuest Niagara
3000AP, you’ll experience for the rst time the clarity, dimensionality, frequency extension, dynamic contrast, and
grip your system has always been capable of delivering—if only the power had been right!
We welcome you to experience the Niagara 3000AP and hear rsthand the remarkable results of highly optimized
power management: startlingly deep silences, stunning dynamic freedom, outstanding retrieval of ambience
cues, and gorgeous delineation of instruments and musicians in space. Once you’ve experienced it, it may seem
so elegant, so logical, and so fundamental that you nd yourself wondering why it hadn’t been done before.
For a comprehensive discussion on AC power technology, including everything that makes AudioQuest’s Niagara
a more eective AC power solution, please download our“Power Demystied” whitepaper at
https://www.audioquest.com/content/aq/pdf/Power-Demystied-whitepaper-8-23-18.zip
—Garth Powell, Senior Director of Engineering, AudioQuest
5
Installation | Unpacking
Before unpacking your Niagara 3000AP, inspect the carton for any obvious damage to the boxes and internal
protective materials. If internal damage is likely, contact the carrier who delivered the unit. If shipping damage is
evident on the product, then please contact your shipping carrier. Please save all shipping and packing materials.
Should you move or otherwise need to transport your Niagara 3000AP, these packing materials will ensure the
safest transportation.
The double box set should contain the Niagara 3000AP (NEMA-15 AC Outlets), two foam inserts, owner’s manual,
Quick-Start Guide, front-panel polishing cloth, rack-mount kit, and warranty registration card. Registration is
recommended. In the event that your original ownership documents are lost, your registration can be used to
establish whether the unit is within the warranty period.
Safety Information | Warnings
Before operating the Niagara 3000AP, please read and observe all safety and operating instructions (or, at the very
least, the Quick-Start Guide). Retain these instructions for future reference.
¡Do not disassemble or in any way modify the Niagara 3000AP.There are no user-serviceable parts inside.
¡Keep away from moisture and avoid excessive humidity.
¡Do not allow liquids or foreign objects to enter the unit.
Servicing | Return to AudioQuest
Servicing of the Niagara 3000AP must be performed by AudioQuest, and is only required when:
¡The Niagara 3000AP has been exposed to rain, ooding, or extreme moisture.
¡The Niagara 3000AP does not appear to operate normally. (See“Trouble-Shooting Guide.”)
¡The Niagara 3000AP has been dropped and sustained considerable physical damage.
If sending the Niagara 3000AP to AudioQuest for servicing (or shipping it for any reason), please use the factory
approved packaging materials. If you have lost any of these (double carton, two foam inserts, one poly bag),
please contact AudioQuest for replacements. We will provide replacement packaging materials for a nominal
charge; shipping costs will be paid by the individual or company requesting the packaging material. Please do not
rely on other methods of packaging, including those provided or suggested by packaging/mailing stores. These
methods and materials could seriously damage the product, as well as its nish. Even the loss of the thick polybag
is enough to permanently damage the nish during transport. If you have lost the original packaging material,
please request replacement materials from AudioQuest.
Power Source
Ideally, the power source to which the Niagara 3000AP is connected should be adequate for use at 220-240V
single phase nominal voltage, 10 - 16 amps (current capacity RMS or greater).
For proper (best) operation, the Niagara 3000AP requires a safety ground (supplied via the power utility AC
wall outlet).
Placement
The Niagara 3000AP is manufactured with four rubber textured polymer feet for safe, secure placement on any
table, cabinet, shelf, or oor. When rack-mounting is required, these feet may be removed with a standard Phillips
screwdriver. The Niagara 3000AP’s design obviates the need for compliant or high-Q isolation feet. Although
6
many audio/video products benet greatly from these devices, in most cases, the Niagara 3000AP will not. You
are welcome to experiment.
Placement or proximity to other components is not critical, and, under standard use, the Niagara 3000AP does
not produce any appreciable heat. The Niagara 3000AP may be rack-mounted in a standard 19”rack by attaching
the included Niagara Series 2-RU rack ears. To attach the optional rack ears to the Niagara 3000AP chassis, rst
remove the threeTorx athead screws from the front portion of both the left and right sides of the cover assembly.
Next, mount the rack ears ush against the back of the Niagara 3000AP’s front panel. Finally, secure the rack ears
into place by installing the rack-mount kit’s Phillips pan head SEMS screws.
When tight installations do not provide adequate room in a rack, shelf, or cabinet, the Niagara 3000AP can actually
be placed on its side. Such placement will pose no safety or performance compromises, but we recommend
placing a soft towel or carpet under the unit to prevent the chassis and front panel from being scratched or
marred in any way.
Connection to Audio/Video Components
AC Cable Routing
Once the Niagara 3000AP is placed, a 10-amp-rated (or greater), high-current AC cord must be connected to
the rear-panel AC inlet (IEC-C14) connector. The AC cord must have an IEC-C13 female end connector and a
grounded male NEMA-15 plug or any other appropriate plug that is required for the country in question. We
highly recommend the use of any AudioQuest NRG-Z,Wind Series, or High-Current Storm Series AC cable. Because
these cables feature conductors that have been meticulously controlled for proper low-noise directionality, they
will ensure the best possible results from the Niagara 3000AP’s Ground-Noise Dissipation Technology.
When facing the Niagara 3000AP’s rear panel, the IEC-C14 inlet is located on the unit’s lower-left side. The AC
inlet cord must be connected to an appropriate AC outlet (see “Power Source,” page 4).
Whenever possible, it is best to keep at least three inches (approximately 7cm) between AC cables and any signal
cable. When this is not possible in a practical layout of system cabling, crossing the AC cables to signal cables at
90 degrees is best to minimize induced noise.
High-Current | Low-Z Power Outlets
There are two High-Current/Low-Z Power outlets (labeled “1” and “2”). These outlets feature our Transient Power
Correction Technology (55 amps peak - up to 25 mS duration), and are designed to enhance the performance
of power ampliers via our circuit’s low-impedance transient current reservoir. Power ampliers, monoblock
ampliers, integrated ampliers, powered receivers, or powered subwoofers should be connected to these two
outlets. Please set the rear panel switch to “energized” or “1,” as the default position. This aects a portion of the
Transient Power Correction Circuit. (See “Rear-Panel Power Correction Switch.”)
Regardless of class of operation or circuit topology (valve, solid-state, digital, or otherwise), the Transient Power
Correction Circuit will not compress the current of any power amplier. Quite to the contrary, it will improve the
amplier’s performance by supplying the low-impedance current source that the amplier’s power supply so
desperately needs.
However, the other ve AC outlets (Level-X Linear Noise-Dissipation System), are not optimized for most power
7
ampliers (*with one exception; see below). They have been optimized for line-level audio preampliers, DACs,
universal players, turntables, and video products that utilize constant-current voltage amplier circuits. These
circuits never suer from current compression, but their lower input level and higher gain require a more robust
means of noise dissipation. This is key to the Niagara 3000AP’s discrete AC power banks, in that not every circuit is
treated the same, but rather isolated bank by bank and optimized for best performance.
*Compared to its larger Niagara siblings, the Niagara 3000AP is unique. Even its Source power banks are capable
of passing extraordinarily high transient current before soft-clipping (in excess of 50 amps peak). So, if you have
one or two main power ampliers and an additional one to two subwoofers, use the High-Current AC outlets for
the power amps. The subwoofers will still yield superb results when connected to any of the ve AC source outlets.
Level-X Linear Noise-Dissipation System Power Outlets
There are ve outlets that utilize this technology within the Niagara 3000AP. All ve of these are in turn isolated
from the High-Current/Low-Z outlets 1 and 2. This oers a great advantage in controlling the complex interactions
of RF (radio frequency) and other induced noises present in the AC power supplied from your utility, the noise that
will be present on and in every AC cord, and the noise that is produced within your system’s components and that
“backwashes” into the Niagara 3000AP’s output circuits.
Though it would be simple to recommend putting the digital or video components into outlets 3 and 4, and
the line-level audio components and turntables into outlets 6 and 7, the quest for optimal performance is more
complex.This scenario will work, and likely work well, but a certain amount of experimentation is best given the fact
that no lter can eliminate 100% of all noise. The size of many of these RF-induced waveforms possess sinewaves
as small as the edge of a piece of paper, and the interactions are complex. So long as the power ampliers are in
their appropriate outlets (1 and 2), and the other components are in outlets 3 through 7, you should experience
exemplary performance. Still, for the audiophile with patience, the reward will be system performance with the
highest possible resolution and lowest possible noise.
To achieve that optimal performance, we recommend the following guidelines. For systems that utilize very
few components, placing a DAC and/or streamer into one isolated group (3 through 5), and a preamplier and
turntable in another (6 and 7), would be an excellent way to start. For systems that are much larger and require
more outlets, try starting with the most basic setup, then adding one component at a time. The combination that
sounds best (yielding the greatest resolution) is the best one for system!
8
Suggested AC Connections
220-240 VAC 50Hz
10 AMPS MAXIMUM
POWER CORRECTION (1 = ENERGIZED)
HIGH CURRENT |LOW-Z POWER CORRECTION
10 AMPS RMS MAXIMUM OUTPUT
LEVEL-X LINEAR NOISE-DISSIPATION SYSTEM
NIAGARA-3000 DESIGNED AND TESTED IN U.S.A. - ASSEMBLED IN TAIWAN
220-240 VAC 50Hz
10 AMPS MAXIMUM
POWER CORRECTION (1 = ENERGIZED)
HIGH CURRENT |LOW-Z POWER CORRECTION
10 AMPS RMS MAXIMUM OUTPUT
LEVEL-X LINEAR NOISE-DISSIPATION SYSTEM
NIAGARA-3000 DESIGNED AND TESTED IN U.S.A. - ASSEMBLED IN TAIWAN
1
2
“Energized”
position must be
default setting.
“Energized”
position must be
default setting.
15 Amp
Rated
AC Cord
15 Amp
Rated
AC Cord
Note: Outlets 3 through 7 are subject to many variables and circuit conditions, so experimentation
for best results is encouraged. Power ampliers must be connected to outlets 1 or 2.
Stereo
Amplier
Monoblock
Line-Level
Preamp
Line-Level
Preamp
Phono
Pre-
amplier
Phono
Pre-
amplier
Turntable
Turntable
Flat Screen
Monitor /
Projector
Cable /
Satellite
Box
Universal /
CD Player
DAC
Phono Amp
Cable / Sat Box DAC
Line-Level Pre Amp
Mono Block
Phono Amp
Cable / Sat Box DAC
Line-Level Pre Amp
Mono Block
Phono Amp
Cable / Sat Box DAC
Line-Level Pre Amp
Mono Block
Phono Amp
Cable / Sat Box DAC
Line-Level Pre Amp
Mono Block
Phono Amp
Cable / Sat Box DAC
Line-Level Pre Amp
Mono Block
Phono Amp
Cable / Sat Box DAC
Line-Level Pre Amp
Mono Block
Phono Amp
Cable / Sat Box DAC
Line-Level Pre Amp
Mono Block
Phono Amp
Cable / Sat Box DAC
Line-Level Pre Amp
Mono Block
Phono Amp
Cable / Sat Box DAC
Line-Level Pre Amp
Mono Block
Phono Amp
Cable / Sat Box DAC
Line-Level Pre Amp
Mono Block
Phono Amp
Cable / Sat Box DAC
Line-Level Pre Amp
Mono Block
Phono Amp
Cable / Sat Box DAC
Line-Level Pre Amp
Mono Block
Phono Amp
Cable / Sat Box DAC
Line-Level Pre Amp
Mono Block
Phono Amp
Cable / Sat Box DAC
Line-Level Pre Amp
Mono Block
Monoblock
Subwoofer
Streamer
Universal /
CD Player DAC
Phono Amp
Cable / Sat Box DAC
Line-Level Pre Amp
Mono Block
Phono Amp
Cable / Sat Box DAC
Line-Level Pre Amp
Mono Block
Phono Amp
Cable / Sat Box DAC
Line-Level Pre Amp
Mono Block
Phono Amp
Cable / Sat Box DAC
Line-Level Pre Amp
Mono Block
Phono Amp
Cable / Sat Box DAC
Line-Level Pre Amp
Mono Block
9
Operation and Continuous Use
Power Switch | Circuit Breaker and LED Power Indicator
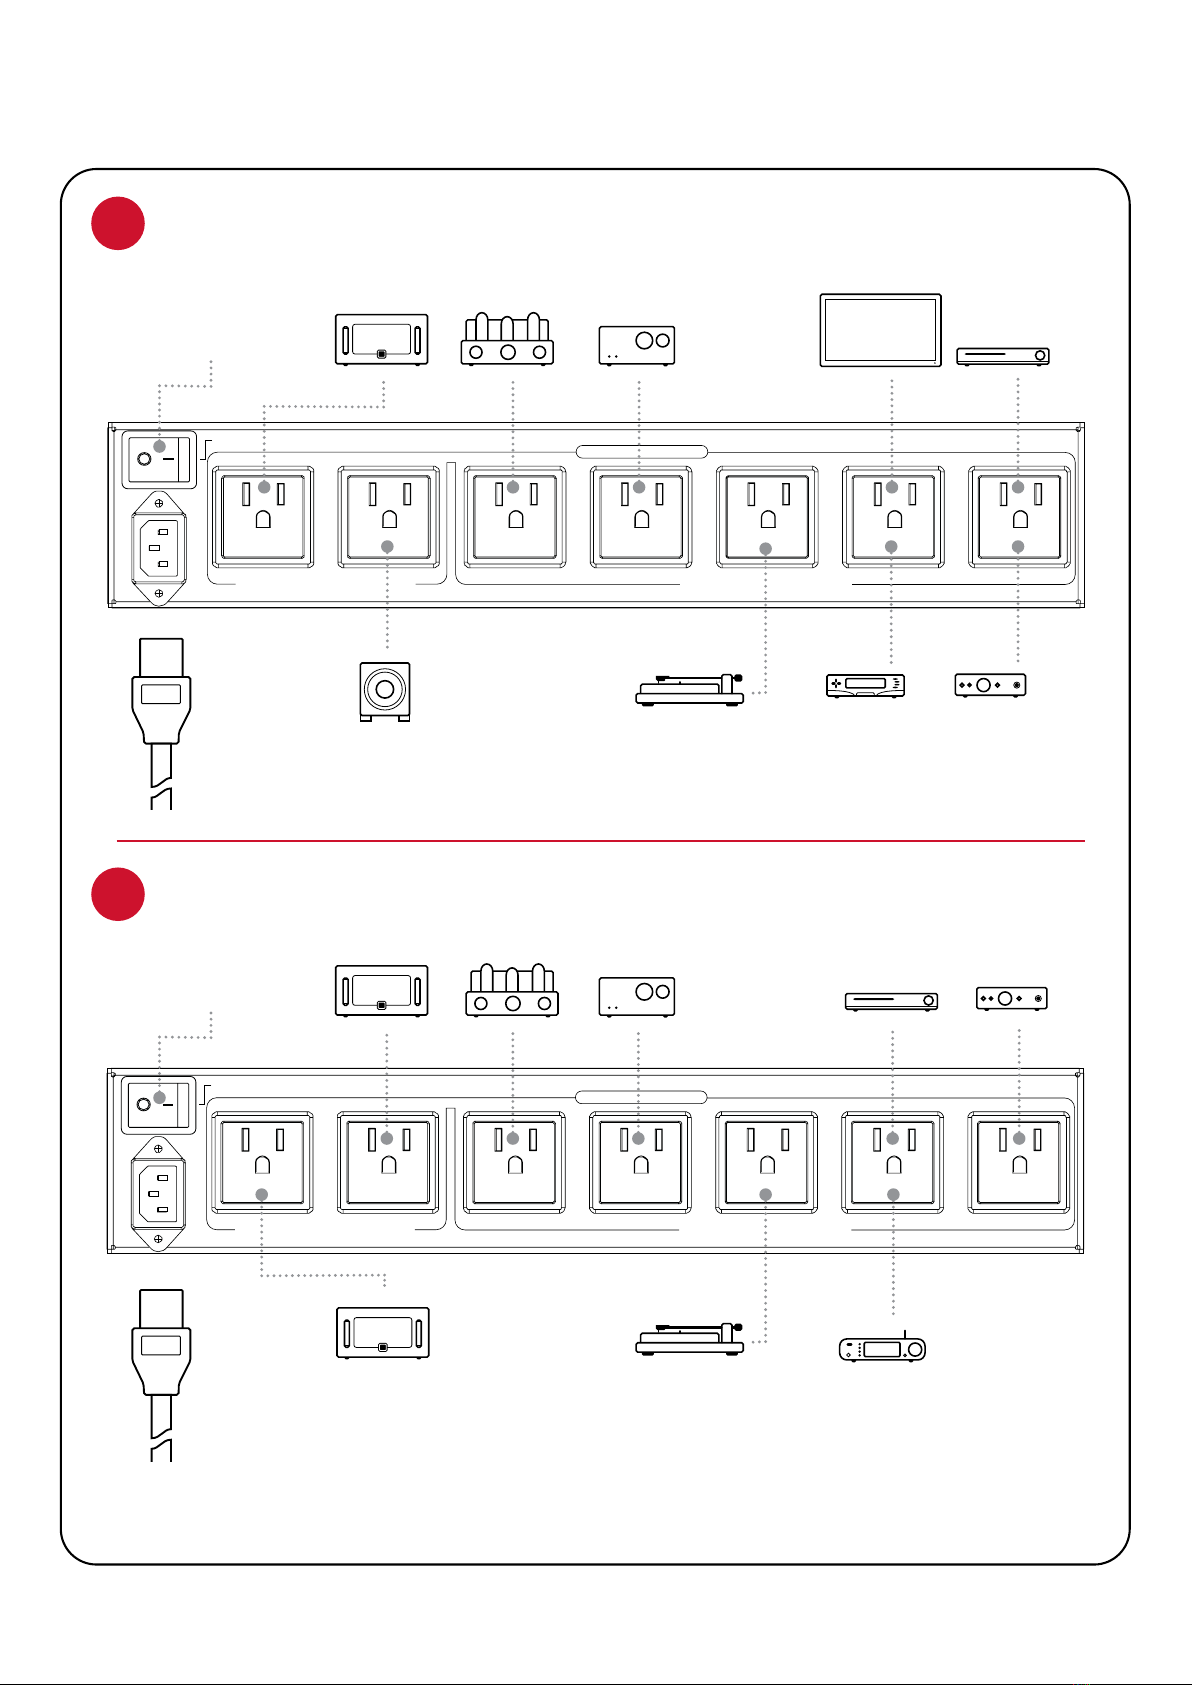
Once the AC cords are properly connected to the AC source tap, and the components are connected to the
appropriate outlet banks, it is safe to energize the Niagara 3000AP. On the right-hand side of the Niagara 3000AP’s
front panel, there is a black rocker switch. Firmly press the rocker switch so that its upper portion is ush with the
front panel. Typically, within a couple of seconds, you should hear an audible “clack” sound(s) from one or more
relays within the Niagara 3000AP. At the same time, the front-panel LED power indictor will glow blue, signifying
that the unit is operational. (If this does not occur, see the “Trouble-Shooting Guide” in this manual.)
Rear-Panel Power Correction Switch | Niagara 3000AP Current Draw
The default position for this switch should always be “energized” or “1”—even for applications in which there
are no power ampliers of any kind powered by the Niagara 3000AP. Defaulting to “energized”/“1” serves two
functions: It activates the full Transient Power Correction Circuit for power ampliers that would be energized
by outlets 1 or 2, and also provides a portion of the Level-X Linear Noise-Dissipation Circuit for outlets 3 through
7. Although no damage to the Niagara or the connected components will occur, performance will be somewhat
compromised when this switch is not set to the “energized”/“1”position.
The “0” setting of the rear-panel switch disengages a portion of the transient power correction circuit. The switch
was created for instances in which there is either extraordinary amounts of harmonic distortion present on the
utility AC power line (creating easily audible acoustic buzzing from the listening position—rare), or there is some
concern about smart-meter power consumption. These potential issues can be immediately alleviated by placing
the rear-panel switch in the“0” position. The Transient Power Correction Circuit creates a reactive current draw of
as much as 4 to 5 amps RMS at idle (real-world draw is a small fraction of an amp), and electrical technicians who
connect a current probe to a product such as this are frequently alarmed: They suspect that the product is either
broken or that it is drawing a distressingly high amount of current from the wall outlet (akin to a power amplier
left in full operational mode).
This is actually far from the truth. If the Niagara 3000AP was consuming that much current (or even 30% of that
level), it would need to dissipate the energy loss in heat. It would be quite warm (even hot) to the touch, just like
most power ampliers while in operation. In fact, the Niagara 3000AP runs cool, precisely because this current
reading is false. The circuit utilizes massive capacitive reactance across the AC line, which, akin to a battery, will
both absorb and immediately release the current several times per second. Further, when incorporated with
power supplies such as those found in power ampliers, the current readings actually come down. This is due to
what’s known as a vector load, and it’s quite dynamic in an audio/video system. In this scenario, there is one thing
that can run somewhat warmer than it might otherwise: the AC cord that supplies power to the Niagara 3000AP.
This is because the wiring and the circuit breaker that supply power to Niagara 3000AP simply look at RMS current
and do not distinguish between reactive loads, resistive loads, or inductive loads, but your utility does.
This circuit and many like it have been utilized for many years, and, when tested into buildings with absolutely
no loads present aside from the transient power correction circuit, there was virtually zero power draw from the
utilities’ power meter. Still, in an age where so-called “smart meters” are omnipresent, and some utilities may or
may not change their standards for “what type of power or current is suitable for billing,” we have gone to great
lengths to oer an alternative to those who may be concerned, but who nevertheless wish to achieve the best
possible audio/video performance.
10
Extreme Voltage Indicator
One portion of the Niagara 3000AP’s non-sacricial surge protection is dedicated to a fast-acting extreme voltage
shutdown circuit. If more than 270VAC is present on the incoming AC line for more than a quarter of a second,
the circuit will instantly open a high-current relay that will disengage the AC power from all of the Niagara
3000AP’s AC outlets, activating the red front-panel LED “Extreme Voltage” warning indicator. Once the event has
passed, or the building wiring fault has been corrected, the circuit will automatically re-engage.
Break-in Time/Continuous Use
The Niagara 3000AP is made of a variety of passive and active components. Though every attempt has been
made to reduce the necessity of so-called “break-in,”“burn-in,” or “run-in” time—including high-power run-in of
every critical capacitor in the Level-X Linear Noise-Dissipation Circuits—the Niagara 3000AP will benet from
continuous use, just like any other audio/video component. This is not to say that you will be made to “suer”
through weeks or months of intolerable performance until that “magic day” when the parts are fully formed
and ready. On the contrary, the Niagara 3000AP will perform very well from the rst moment you use it. It will
improve gradually, in small increments, over a period of approximately two weeks. While leaving the Niagara
3000AP turned on during this period will aid the process, it is also perfectly acceptable to turn the unit o; doing
so will simply increase the time it takes to reach nal “break-in.”
The Niagara 3000AP has a 5-year warranty, but it was designed to last for over two decades. Provided that the
Niagara 3000AP is used inside a home, store, studio, or oce with a reasonable climate (7 degrees to 38 degrees
Celcius, with less than 20% humidity), it can be left on continuously; there are no parts that will wear out.