Audioroot eSMART K-ART User manual

eSMART K-ART
Location sound cart dual battery power distribution system with universal fuel
gauge
Version 1.2 Updated 14/10/2019
The AU IOROOT eSMART K-ART is a low footprint power distribution box with a total of 16
direct C power outputs and 4 x USB 5V ground isolated outputs. The K-A T includes 10 led
illuminated pushbutton power switches, a main pushbutton power switch and 2 battery fuel gauges.
Like it’s little brother eSMA T BG-DU the K-ART is fully compatible with any type of battery ranging
from 9 to 18V. When used with our eSMA T Li-xxWh or LiFe-xxxWh batteries the K-A T provides full
battery informations without any calibration routine.
This product was designed for use on small to medium size location sound carts. The power
distributor can be connected to 2 batteries at once. The 2 batteries will discharge simultaneously thru an
integrated ideal diode. These batteries can be of any type of chemistry (SLA, NI-MH or LI-ION) and the 2
fuel gauges provide all the informations required to monitor the batteries state of charge (voltage,
current, power, etc…).
The eSMART K-ART uses internal coulomb counters and a calibration routine to measure each
battery’s true capacity and display it’s remaining capacity in real time. This power distributor is also fully
compatible with our full line of smart batteries. When plugging an AUDIO OOT eSMA T battery to the K-
A T the user will have access to all the battery’s information without the need to perform any type of
calibration.
Key features :
•
10 switchable C power paths via led illuminated push button switches (on/off state of each
switch is stored and recalled automatically on each power up)
•
1 main power illuminated push button switch
•
12 x HRS 4 DC power outputs (2 on the front, 10 on the rear of the unit, all Hirose outputs are
switched on and off by pairs)
•
4 x XLR 4 DC power outputs (1 on the front, 3 on the rear of the unit). Each XL 4 output has it’s
own power switch
•
4 ground isolated USB ports (allways on). 2 outputs are located on the front of the unit and 2
outputs are located on the rear of the unit. The K-A T can source up to a total of 3Amps on the 4
USB ports.
•
Real time SOC battery monitoring : remaining capacity (%), run time estimation, battery
voltage, power consumption, power and coulomb counter
•
Polyswitch 2.5A resetable fuses on each output
•
Polyswitch 8.0A resetable fuses on each battery input
•
A blinking LE for each battery indicates when the battery capacity falls below 10 %
•
Compatible with any battery ranging from 9 to 18V C
•
Lightweight aluminum anodized enclosure
•
Size : 228 x 120 x 44mm
•
Weight : 700g
Ce document est la propriété d'AUDIO OOT, et ne peut-être reproduit ou communiqué sans autorisation

Ce document est la propriété d'AUDIO OOT, et ne peut-être reproduit ou communiqué sans autorisation
Warning
Do not try to repair this product or replace any of it's elements if this user manual does not give
specific instructions on how to do so. This equipement was built with surface mount
components and needs special tooling for repair. The removal of the electronic PCB needs
special technical skills.
Warranty
The unit has a one year warranty from date of purchase. Only officially appointed dealers or
Audioroot are allowed to warranty repair of Audioroot products. Any damage caused by
tampering, misuse or dismantling of the instrument will not be covered by the warranty and
could be considered a reason for rendering the warranty null and void. eturn shipping fees
are allways at the customer's charge.
UNPACKING AN INSPECTION
The
K-A T power
products are carefully checked for good condition before being shipped from the
factory. Despite the protective carton and rugged design, shipping may damage the unit. Check
for possible carton damage when unpacking the unit. Please save the carton for return shipment
if required. AUDIO OOT does not warrant against damage caused by returning products in other
cartons than the original ones or improperly packing the products. If shipping damage is evident,
notify the transportation company immediately. Only the consignee can file a claim with the
carrier for shipping damage. AUDIO OOT will fully co-operate in such an event. Be sure to save
the carton for the shipper to inspect.

UNIT CONNECTIONS AN CONTROLS:
1. Main power pushbutton illuminated switch
•
A short button press will power up the K-A T by activating the power paths and fuel gauge
OLEDs.
•
A long button press (3 secs) will shutdown the K-A T, all it's power paths and fuel gauge
OLEDs.
•
A 750ms push-release press will toggle the front LEDs dimming function. (this feature is only
available on units shipped after February 1
st
2014. Previous units cannot be modified to have
this feature).
•
A integrated bright white LED indicates is the unit is ON or OFF .
2. OLED displays
•
The K-A T has 2 full color OLED displays (one for each battery input).
•
The displays show to the user all the needed information regarding the state of charge of the
battery.
•
Each OLED display is powered on/off automaticaly when a battery is plugged in/out.
3. Low battery level led indicators
•
These LEDs start to blink when the corresponding battery's capacity falls under 10%.
4. Power paths pushbutton illuminated switches
•
The K-A T has 10 pushbutton illuminated switches that are used to control the operation of the
10 different power path outputs.
•
A short button press on a power path pushbutton will activate it's corresponding output(s).
•
A long button press on a power path pushbutton will shut off it's corresponding output(s).
•
The state of each power path is indicated by the integrated red LEDs.
•
The ON/OFF state of the 10 power paths is automatically saved and recalled on each power-up.
5. Power path #9 outputs (2 x H S4) – 2.5A polyswitch fuse protected
Ce document est la propriété d'AUDIO OOT, et ne peut-être reproduit ou communiqué sans autorisation

6. 5V USB power ports (x2)
•
The K-A T's USB power ports are allways on. This allows the user to recharge USB peripherals
even when the unit is turned OFF.
7. Power path #10 output (XL 4) – 4.0A polyswitch fuse protected
1. Power path #1 output (XL 4) – 4.0A polyswitch fuse protected
•
This power output can be fitted with a 12V/20W regulated and ground isolated DC/DC
converter (ref: K-A T OPT 20W)
2. Power path #2 output (XL 4) – 4.0A polyswitch fuse protected
•
This power output can be fitted with a 12V/20W regulated and ground isolated DC/DC
converter (ref: K-A T OPT 20W)
3. Power path #3 output (XL 4) – 4.0A polyswitch fuse protected
4. Power path #4 outputs (2 x H S4) – 2.5A polyswitch fuse protected
•
This power output can be fitted with a 12V/12W regulated and ground isolated DC/DC
converter (ref: K-A T OPT 12W)
5. Power path #5 outputs (2 x H S4) – 2.5A polyswitch fuse protected
•
This power output can be fitted with a 12V/12W regulated and ground isolated DC/DC
converter (ref: K-A T OPT 12W)
6. Power path #6 outputs (2 x H S4) – 2.5A polyswitch fuse protected
7. Power path #7 outputs (2 x H S4) – 2.5A polyswitch fuse protected
8. Power path #8 outputs (2 x H S4) – 2.5A polyswitch fuse protected
9. 5V USB power ports (x2)
•
The K-A T's USB power ports are allways on. This allows the user to recharge USB peripherals
even when the unit is turned OFF.
Ce document est la propriété d'AUDIO OOT, et ne peut-être reproduit ou communiqué sans autorisation

10. Battery power input #1 (XL 4M)
11. Battery power input #2 (XL 4M)
CONNECTORS WIRING:
•
Hirose 4 pin power output connectors (power paths 4,5,6,7,8 and 9)
◦
1 : C -
◦
2 : Not connected
◦
3 : Not connected
◦
4 : C +
•
XL 4 pin power output connectors (power paths 1,2,3 and 10)
◦
1 : C -
◦
2 : Not connected
◦
3 : Not connected
◦
4 : C +
•
F ONT USB power ports (500mA charging current)
◦
1 : Vcc (5V)
◦
2 : 2.0V (thru dividing resistors)
◦
3 : 2.0V (thru dividing resistors)
◦
4 : GN
•
EA USB power ports (1000mA charging current)
◦
1 : Vcc (5V)
◦
2 : 2.8V (thru dividing resistors)
◦
3 : 2.0V (thru dividing resistors)
◦
4 : GN
PLEASE NOTE : The USB ports are configured to allow charging of Apple devices and most other
smartphones. This feature is not available on early units shipped prior to september 2013. Please
contact your dealer if you wish your unit to be updated with this feature.
For units shipped after February 1
st
2014 the 2 front USB ports can charge an iDevice or other
smartphone with a current of up to 500mA. The rear USB ports of the K-A T charge an iDevice or
other equipement with a current of up to 1000mA.
•
XL 4 pin battery input connectors (batt 1 and 2)
◦
1 : C -
◦
2 : eSMART AT
◦
3 : eSMART CLK
◦
4 : C +
WARNING : Pins 2 and 3 of the XLR 4 battery input connectors should never be connected to
pin 4 ( C+) or the internal fuel gauge could be destroyed. Please check wiring of your power
cables prior to use with the eSMART K-ART.
Ce document est la propriété d'AUDIO OOT, et ne peut-être reproduit ou communiqué sans autorisation
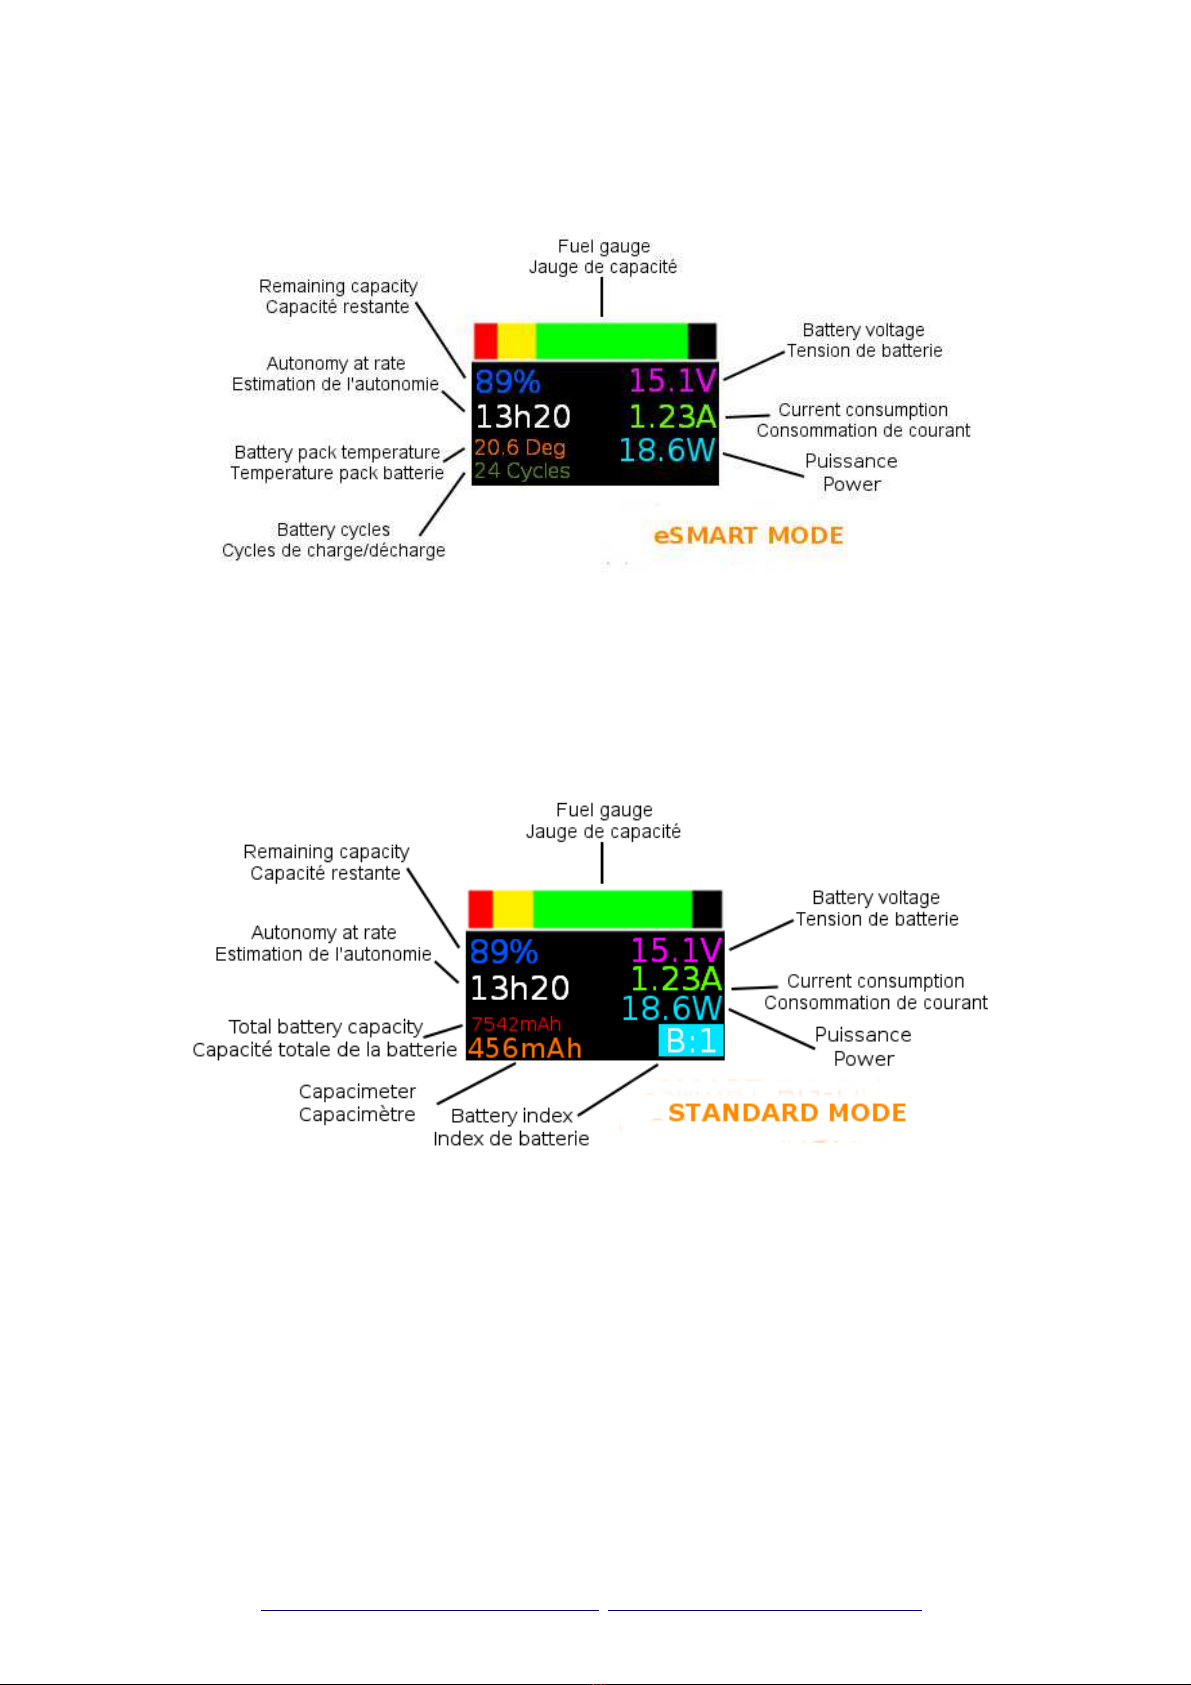
FUNCTIONNAL MO ES :
•
eSMART MO E (or AUTO MO E) – This mode is automatically selected when an
AUDIO OOT eSMA T Li-xxWh or LiFe-xxxWh battery is connected to one of the K-A T's
battery input. The K-A T's micro controller communicates with the battery and retrieves all
informations regarding it's state of charge and displays them on the OLED like this :
•
Standard MO E – This mode is selected by default when no eSMA T Li-xxWh was
detected on the input connector. In standard mode the fuel gauge uses it's own collected
data (current, voltage, etc...) and the learned total battery capacity to display the battery's
state of charge and to predict the autonomy of the system.The total battery capacity is
measured by the fuel gauge when running the calibration process. This process must be
runned by the user manually.The figure below illustrates the OLED screen display
arrangement in standard mode.
Total battery capacity : This value indicates the total capacity of the battery that was
measured during the calibrating process. This value is related to the battery index number. Up
to 8 different capacity values can be saved and selected for use.
Capacimeter : The capacimeter shows in mAh the total current that has been drawn by the
system since the battery has been connected. The closest this value gets from the total
battery capacity the more the battery gets empty. The capacimeter's value is reset as soon as
the battery is disconnected from the fuel gauge. This value is not reset when the K-A T is
switched off (only when the battery is removed).
Battery index : This number indicates which battery is actually selected. It's value can be
changed using the 2 push buttons located on the front panel of the unit.
Ce document est la propriété d'AUDIO OOT, et ne peut-être reproduit ou communiqué sans autorisation

Calibration process :
Please note : This process does not need to be executed when using our AUDIOROOT eSMART
Li xxWh or LiFe xxxWh batteries. The 2 push buttons of the front panel are inoperative when
an eSMART battery is connected to the system.
The K-A T's calibration process is very similar to it's little brother eSMA T BG-DU. The main
difference is that the K-A T can be connected to 2 batteries simultaneously. The K-A T's fuel gauges are
fully independent and do not share battery calibration informations. In other words this means that a
battery that has been calibrated while being connected to battery input #1 should allways be used on the
same input #1. If the user wishes to use the battery on either battery input he will need to perform the
claibration process twice (once on each battery input).
We therefore recommend to identify your batteries with a letter/digit pair. For example the user
can identify his batteries as 1.A, 1.B, 2.A ,2.B, 3.A, 3.B, etc... were battery 1.A will allways be connected
to input #1 and battery 1.B will allways be connected to input #2.
Here are the steps to perform calibration of 2 batteries at a time :
1. Label the 2 batteries you wish to calibrate with a number ranging from 1 to 8 and adding the suffix
.A or .B to identify each unit. In this example we will use batteries 3.A and 3.B. The 2 batteries
must be fully charged before launching the calibration process.
2. Plug the two batteries on the eSMA T K-A T power distributor with a compatible power cable
( leave pins 2 and 3 on the XL 4 connectors unused). In our example we will connect battery
labeled 3.A to input #1 and battery labeled 3.B to input #2.
3. Plug all the equipment that will be used in normal operation (for exemple a mixer, a recorder and
several wireless receivers).
4. Power up the K-A T using the main power pushbutton switch (short press).
5. Activate all used outputs with a short press on each corresponding pushbutton switch (short press)
and power ON all your equipment.
6. By using the 2 push buttons select the battery index that was chosen in step 1. In this example
battery index is 3. You need to select the battery index on both fuel gauges.
7. Initiate the calibration process by pushing simultaneously the 2 push buttons. This must be done
on both fuel gauges.
You can also calibrate only one battery at a time. To do this simply execute the calibration steps
above with only one battery connected to the K-A T.
The fuel gauges will now keep measuring and saving the value of the total current drawn. This
process can be ended only when the batteries are empty.
In the case of a li-ion or LIFEPO4 battery the calibration process will stop automatically when the
low voltage protection circuit of the battery trips.
When calibrating a battery of another chemistry type ( lead acid or nimh) the user needs to
disconnect the battery manually when it's voltage level gets too low in order to achieve the calibration
process correctly ( for exemple the low voltage level of a 6 cell lead acid battery is 10.5 Volts : this value
can be used to terminate the calibration process of a standard SLA battery).
The fuel gauge is now aware of the batteries' total capacity. The user only needs to recall the
corresponding battery pair index number to monitor it's state of charge efficiently and accordingly.
PLEASE NOTE: A battery that has been previously calibrated must allways be connected fully
charged to the eSMART K ART or the state of charge indications will be inaccurate.
Ce document est la propriété d'AUDIO OOT, et ne peut-être reproduit ou communiqué sans autorisation
Table of contents
Other Audioroot Power Distribution Unit manuals


