manuals.online logo
Brands
  1. Home
  2. •
  3. Brands
  4. •
  5. Audiosystem
  6. •
  7. Subwoofer
  8. •
  9. Audiosystem XFIT EVO 2 User manual

Audiosystem XFIT EVO 2 User manual

XFIT ANLEITUNG/MANUAL
AUDI A3 8V – AUDI Q5 8R – AUDI R8 4S
XVW-V1-EVO2-22.06.2020
2x AS 200 EVO
2x HS25 INSTALL EVO2 SCREWS M5x16 3.5X20
2x
LSR
200
VAG EVO
2x MBR200
2x FWK TW EVO 2x LSR-UNI-TW
2x CONNECTOR 018 011
2x FWK MW
Vielen Dank Thank You
Wir beglückwünschen Sie zum Erwerb eines hochwertigen
AUDIO SYSTEM Produktes inklusiv GERMAN SOUND.
Wichtig: Lesen Sie diese Bedienungsanleitung vor der Installation
und Inbetriebnahme des Gerätes vollständig durch.
Achtung: Beachten Sie die Vorschriften und Hinweise Ihres
Automobilherstellers und achten Sie beim Anschließen auf die
richtige Polarität.
Wichtig: Ihr Kaufbeleg dient als Garantienachweis für etwaige
Reparaturen oder Austausch. Heben Sie Ihren Kaufbeleg, diese
Bedienungsanleitung und die Originalverpackung sorgfältig auf.
Achtung: Der Gebrauch von Musikanlagen kann das Hören von
wichtigen Verkehrsgeräuschen behindern. AUDIO
SYSTEM GERMANY übernimmt keine Verantwortung für
Gehörschäden, körperliche Schäden oder Sachschäden, die aus
dem Gebrauch oder Missbrauch seiner Produkte entstehen. Wir
empfehlen Ihnen, die Installation von einer Fachwerkstatt
Einbauspezialist vornehmen zu lassen, da ein fachgerechter
Einbau und Anschluss die Voraussetzung für ein klanglich
perfektes Ergebnis ist.
Congratulations on purchasing a high-quality
AUDIO SYSTEM product incl. GERMAN SOUND.
Important: Completely read this operating instruction before
installation and use of the device.
Attention: Pay attention to advices and instructions of the car
manufacturer. Check the polarity when connecting the speakers.
Important: You will need your purchase receipt as proof of
purchase for any and all warranty repairs and for insurance
purposes. Keep your receipt, owner´s manual and packing
materials in a safe location for possible future use.
Attention: Use of sound components can impair your ability to
hear necessary traffic sounds and may constitute a hazard while
driving your automobile. AUDIO SYSTEM GERMANY
accepts no liability for hearing loss, bodily injury or property
damage as a result of use or misuse of our products.
We recommend installing the equipment by an authorized service
center or dealer. A professional fitting and connection is the
requirement for further warranty and perfect sound.
Montage Tips Mechanical Installation Tip
WARNUNG: Trennen Sie vor der Montage den Masse-Pol (-) von
der Fahrzeugbatterie. Kontrollieren Sie alle Anschlüsse auf
richtige Polung, dies kann sonst zu Kurzschlüssen an der
Fahrzeugelektrik führen. Die besten Einbaupositionen sind die
Originalplätze zwecks Originalität und einfacher Montage.
Beachten Sie, dass die Lautsprecher plan und stabil eingebaut
werden. Die Qualität des Einbaues entscheidet sehr stark das
Klangbild, daher sollte auf Dämmung und Sorgfalt bei der
Installation geachtet werden. Beachten Sie, dass die Lautsprecher
vor Hitze, Sonneneinstrahlung, mechanischen Einflüssen,
Feuchtigkeit und Nässe durch Zubehör von AUDIO
SYSTEM geschützt sind.
ACHTUNG: Verlegen Sie Ihre Kabel so, dass diese nicht
gequetscht werden oder über scharfe Kanten verlaufen. Dies kann
zu Kurzschlüssen mit Beschädigungen führen.
Vorsicht: Beim Entfernen von Innenverkleidungen können
Befestigungsteile beschädigt werden, diese müssen Si
e ersetzen.
Warning: First disconnect negative pole of your car battery.
Check-polarity, changing polarity may cause serious damage to
your car electric. Best speaker positions are the original build in
positions. Easy installation and original look are the reasons.
Please note that the speakers are installed flat and stable. The
quality of the installation decides very much the sound, therefore,
attention should be paid to insulation and care during installation.
Please note that the speakers are protected from heat, sunlight,
mechanical influences, moisture and wetness by accessories
from AUDIO SYSTEM.
Attention: Install all cables as straight as possible without
squashing or laying them over sharp edges. Otherwise this can
cause short circuit or damages to your whole installation.
Attention: Be careful removing original plastic parts of your car.
The fitting parts could be damaged and have to be replaced.
Important: The right polarity of all speakers is extremely
important for the sound of your car audio system. We
X-Series
ANLEITUNG USER MANUAL
www.audio-system .de
audio system ermany - falltorstrasse 6 - 76707 hambrückeN
Wichtig: Die richtige Polarität der Lautsprecher zueinander
beeinflusst das Klangbild entscheidend. Dies kann z.B. durch
gemeinsames Verpolen der Hochtöner verbessert werden.
Ausprobieren und hören bzw. messen ist hier sinnvoll!
recommend changing polarity of the tweeter finding out the best
possible sound.
The best is to listen and or to measure it.
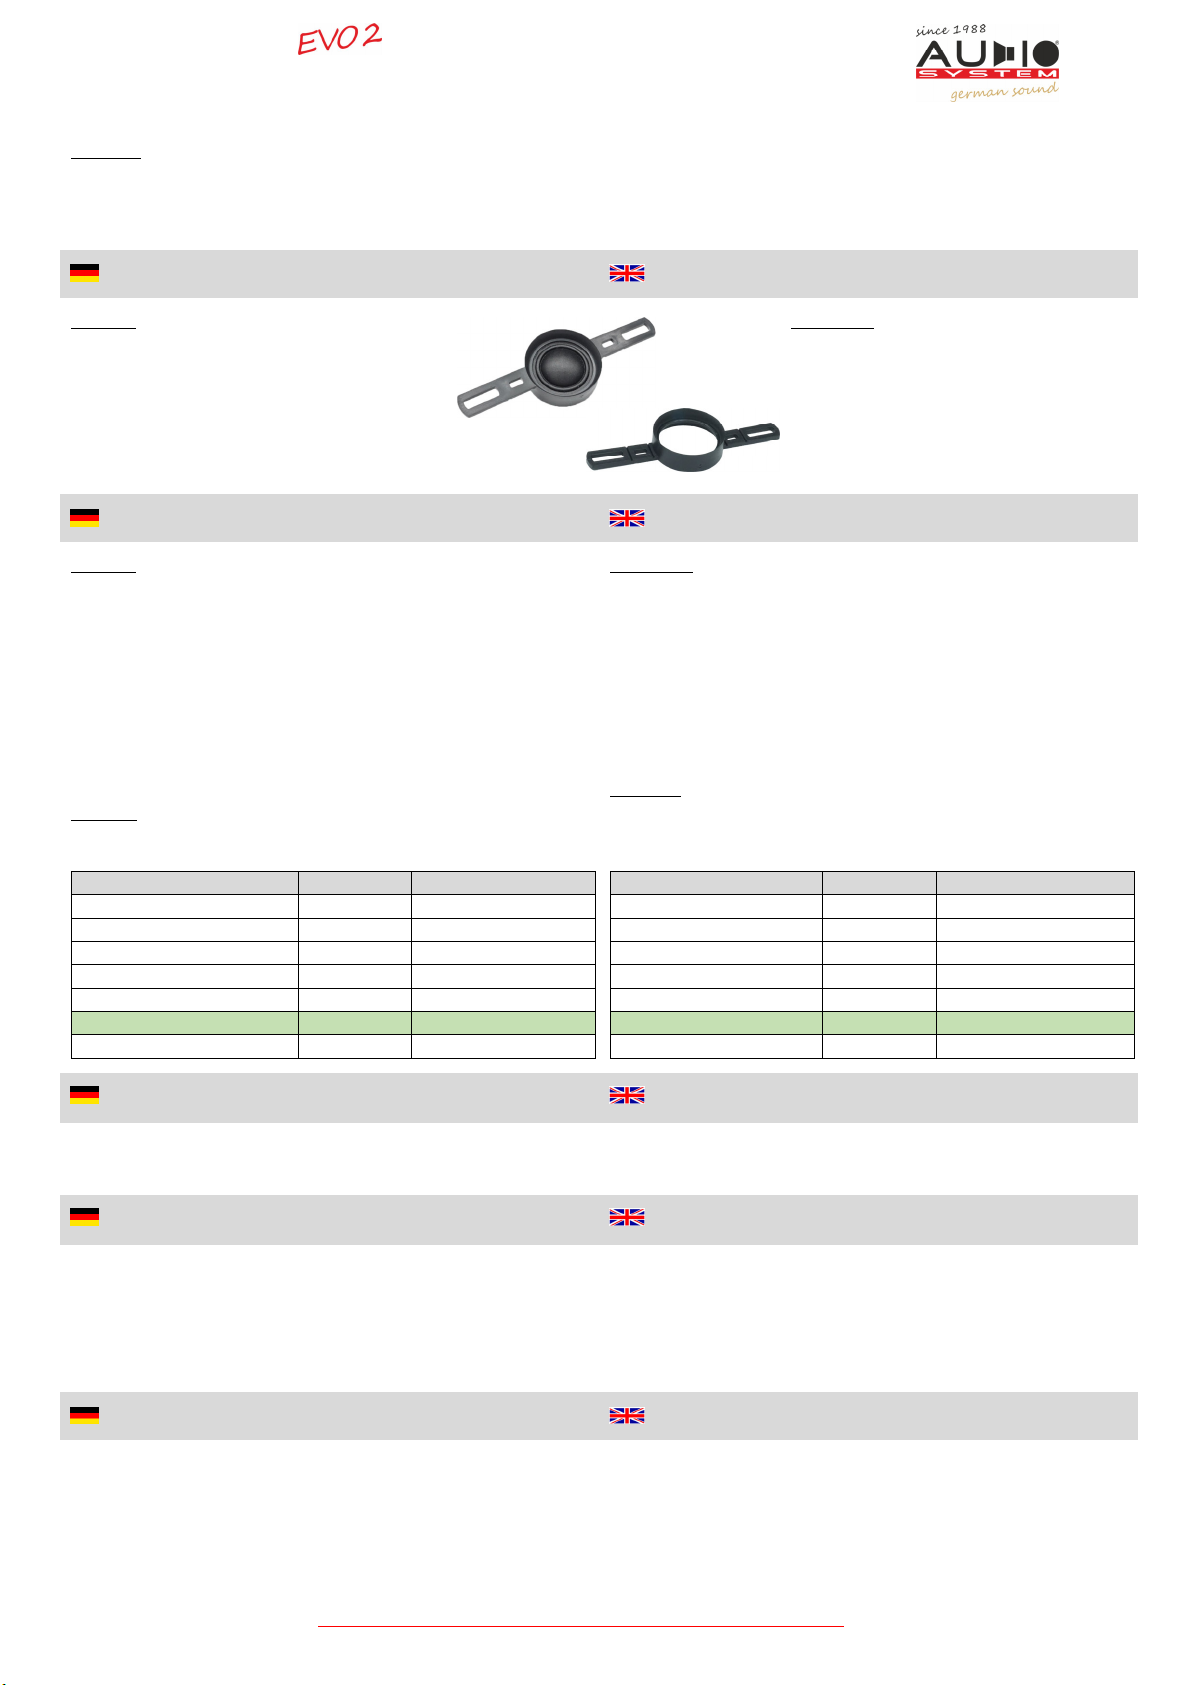
Einbauhalter des Hochtöners Install Tweeter Mounting
Wichtig:
Der beiliegende Einbauhalter wird bei einigen
Fahrzeugen benötigt um den Hochtöner in
bestimmten Fahrzeugen Einbaupositionen zu
installieren. Dafür muss der Hochtöner in
den Hochtonhalter fixiert werden, dies ist
möglich von beiden Seiten.
Important:
The enclosed mounting bracket is needed
to install the tweeter in certain vehicles
mounting positions.
For this, the tweeter must be fixed in the
tweeter, this is from both sides possible.
Hochtöner (Frequenzweiche FWK TW EVO) Tweeter (Crossover FWK TW EVO)
Wichtig: Das Lautsprechersystem lässt sich an die jeweilige
Akustik des Fahrzeuges, Musikrichtung und an den persönlichen
Geschmack über die Frequenzweiche anpassen. Je nach Lage der
Lautsprecher kann die Weiche so eingestellt werden, dass der
Frequenzgang mit diesen geometrischen Gegebenheiten optimiert
wird.
Je nach Installationsort des Hochtöners ist es nötig, den
Frequenzgang tonal sowie den Lautstärkepegel anzupassen, z.B.
bei einer Montage des Hochtöners in der A-Säule, im
Spiegeldreieck oder in der Türverkleidung.
Achtung: Freie Kabelenden müssen unbedingt isoliert werden.
Nichtbeachtung kann zu einem Kurzschluss führen!
Important: The speaker system can be adapted to the particular
acoustics of the vehicle, the genre of music and to the personal
taste via the crossover. Depending on the position of the
speakers, the switch can be adjusted so that the frequency
response is optimized with these geometric conditions.
Depending on the installation location of the tweeter, it is
necessary to adjust the frequency response tonal and volume
technology, e.g. when mounting the tweeter in the A-pillar, in the
mirror triangle or in the door trim.
Attention: Free cable ends must be isolated.
Non-compliance can lead to a short circuit!
Farbe Signal Verwendung
Rot(4.8mm Stecker) Eingang + Zu CONNECTOR 018 +
Schwarz(2.8mm Stecker) Eingang - Zu CONNECTOR 018 -
Rot(Rundhülse) Hochtöner + Zum Hochtöner +
Schwarz(Rundstecker) Hochtöner - Zum Hochtöner -
Jumper 2,7µF + Parking -3dB
(2.7µF)
HT im Spiegeldreieck
Jumper 3,9µF + Parking 0dB
(3,9µF)
HT in der Türverkleidung
Jumper 2,7µF + 3,9µF +3dB
(6.6µF)
HT in der A-Säule
Color Signal Application
Red(4.8mm Plug) Input + To Connector 018 +
Black(2.8mm Plug) Input - To Connector 018 -
Red(Round Sleeve) Tweeter + Connect to Tweeter +
Black(Round Plug) Tweeter - Connect to Tweeter -
Jumper 2.7µF + Parking -3dB
(2.7µF)
Tweeter in Mirror Cover
Jumper 3.9µF + Parking 0dB
(3.9µF)
Tweeter in Door Panel
Jumper 2.7µF + 3.9µF +3dB
(6.6µF)
Tweeter in A-Pillar
Tief
-
Mitteltöner (Frequenzweiche FWK MW)
Midrange
S
peaker
(Crossover FWK MW
)
Bitte verbinden Sie die Frequenzweiche FWK MW mit dem
CONNECTOR 011. Es sind keine Einstellmöglichkeiten vorhanden.
Please connect the crossover FWK MW with CONNECTOR 011. It
is a non-configurable fixed crossover.
Spritzwasser
schutz MBR
200
Rain Protection MBR
200
Bitte verbauen Sie den Spritzwasserschutz MBR200 zwischen
Tieftöner AS 200 EVO und dem Lautsprecherring LSR200AUDI1.
Die Wasserschutzkappe muss dabei oberhalb des Magneten sein.
Unter Umständen muss der Spritzwasserschutz mit geeigneten
Mitteln (Schere, Cutter, etc) angepasst werden.
Please attach the rain protection MBR200 between speaker
adapter LSR200AUDI1 and speaker AS 200 EVO.
The water cap must be upward of the magnet.
In some cases the rain protection has to be cutted for proper
fitting with a suitable tool (scissor, cutter, etc).
Optionales Einbauzubehör
Optional Mounting Accessories
- ALUBUTYL 1500, 2000
EVO
, 3000
EVO
und 4000, ALU 200
EVO
und ALU 500
EVO
selbstklebende Dämmmatten
- Dämmung: DOORKIT 1.0 und DOORKIT 2.0
- Z-(T)SC 0.75, 1.5, 2.5, 4.0 Lautsprecherkabel
- ALUBUTYL 1500, 2000
EVO
, 3000
EVO
und 4000,ALU 200
EVO
and ALU 500
EVO
Self Adhesive Damping Material
- Damping: Doorkit 1.0 and Doorkit 2.0
- Z-(T)SC 0.75, 1.5, 2.5, 4.0 Oxygen-Free Speaker Cable

Other Audiosystem Subwoofer manuals

Audiosystem M 15 User manual

Audiosystem

Audiosystem M 15 User manual

Audiosystem CO 165 User manual

Audiosystem

Audiosystem CO 165 User manual

Audiosystem X 200 BMW PLUS EVO User manual

Audiosystem

Audiosystem X 200 BMW PLUS EVO User manual

Audiosystem CARBON Series User manual

Audiosystem

Audiosystem CARBON Series User manual

Audiosystem EX 80 SQ EVO User manual

Audiosystem

Audiosystem EX 80 SQ EVO User manual

Audiosystem RADION Series User manual

Audiosystem

Audiosystem RADION Series User manual

Audiosystem EX 100 SQ User manual

Audiosystem

Audiosystem EX 100 SQ User manual

Audiosystem Ax 165-2 EVO 2 User manual

Audiosystem

Audiosystem Ax 165-2 EVO 2 User manual

Audiosystem XFIT VW EVO 2 User manual

Audiosystem

Audiosystem XFIT VW EVO 2 User manual

Audiosystem MXC 165 User manual

Audiosystem

Audiosystem MXC 165 User manual

Audiosystem XFIT VW T5 EVO 2 User manual

Audiosystem

Audiosystem XFIT VW T5 EVO 2 User manual

Audiosystem M 10 User manual

Audiosystem

Audiosystem M 10 User manual

Audiosystem R Series User manual

Audiosystem

Audiosystem R Series User manual

Audiosystem AX 165-4 EVO 2 User manual

Audiosystem

Audiosystem AX 165-4 EVO 2 User manual

Audiosystem EX 130 SQ User manual

Audiosystem

Audiosystem EX 130 SQ User manual

Audiosystem AX08 FLAT EVO 2 User manual

Audiosystem

Audiosystem AX08 FLAT EVO 2 User manual

Audiosystem R Series User manual

Audiosystem

Audiosystem R Series User manual

Audiosystem M Series User manual

Audiosystem

Audiosystem M Series User manual

Audiosystem AX 08 FLAT User manual

Audiosystem

Audiosystem AX 08 FLAT User manual

Audiosystem SUBFRAME R10 FLAT EVO User manual

Audiosystem

Audiosystem SUBFRAME R10 FLAT EVO User manual

Audiosystem Active M Series User manual

Audiosystem

Audiosystem Active M Series User manual

Audiosystem H 18 spl User manual

Audiosystem

Audiosystem H 18 spl User manual

Audiosystem M Series User manual

Audiosystem

Audiosystem M Series User manual

Audiosystem R Series User manual

Audiosystem

Audiosystem R Series User manual

Popular Subwoofer manuals by other brands

Sony SAW2500 - SA Subwoofer Service manual

Sony

Sony SAW2500 - SA Subwoofer Service manual

Genelec 1091A Dimensions

Genelec

Genelec 1091A Dimensions

OSD Audio BLACK TREVOCE Series install guide

OSD Audio

OSD Audio BLACK TREVOCE Series install guide

Sony XS-GTX101LW Installation/connections

Sony

Sony XS-GTX101LW Installation/connections

JL Audio Stealtbox SB-K-SL-12W0v2 installation guide

JL Audio

JL Audio Stealtbox SB-K-SL-12W0v2 installation guide

Kicker KICKER CompVT CVT10 owner's manual

Kicker

Kicker KICKER CompVT CVT10 owner's manual

Sony XS-AW8 operating instructions

Sony

Sony XS-AW8 operating instructions

K-array KU210 user guide

K-array

K-array KU210 user guide

Rockford Fosgate P1L-1X10 Installation & operation

Rockford Fosgate

Rockford Fosgate P1L-1X10 Installation & operation

Focal PERFORMANCEEXPERT DSA 500 RT user manual

Focal

Focal PERFORMANCEEXPERT DSA 500 RT user manual

REL Acoustics 212/SE operating instructions

REL Acoustics

REL Acoustics 212/SE operating instructions

Sonus Faber GRAVIS VI owner's manual

Sonus Faber

Sonus Faber GRAVIS VI owner's manual

MAC Audio Micro Cube 108 D owner's manual

MAC Audio

MAC Audio Micro Cube 108 D owner's manual

Pioneer HTV-SW1 Service manual

Pioneer

Pioneer HTV-SW1 Service manual

Sound Town CARPO Series product manual

Sound Town

Sound Town CARPO Series product manual

SVS SVS PB1-Plus owner's guide

SVS

SVS SVS PB1-Plus owner's guide

Sony XS-L102P5S Installation/connections

Sony

Sony XS-L102P5S Installation/connections

DLS CLASSIC W308B manual 

DLS

DLS CLASSIC W308B manual 

manuals.online logo
manuals.online logoBrands
  • About & Mission
  • Contact us
  • Privacy Policy
  • Terms and Conditions

Copyright 2025 Manuals.Online. All Rights Reserved.