Audiovox AXT-2411 User manual

- 1 -
User'sManual
Congratulations on your selection of the AXT2411 from AUDIOVOX
Phones.This quality 2.4GHz cordless telephone with Caller ID and Call
Waiting,like all Genuine AUDIOVOX products,has been designed to give
you many years of continuous service and represents the best value for
your money,It requires little maintenance and is easy to setup and operate.

- 2 -
IMPORTANT SERVICE INFORMATION
Read this manual before attempting to setup or use this instrument. It contains important information regarding safe installation
and use. Keep this manual for future reference. Also save the carton, packing and proof of purchase to simplify and accelerate
any needed action.
• WARNING
To prevent fire or shock hazard, do not expose this product to rain or any type of excess moisture. If accidentally dropped into
water, the AC adaptor should immediately be
unplugged from the wall along with the telephone line cord.
THIS SYMBOL IS INTENDED TO ALERT THE USER OF THE
PRESENCE OF IMPORTANT OPERATING AND MAINTENANCE
(SERVICING) INSTRUCTIONS IN THE OWNER’S MANUAL.
AXT2411
CARTON CONTENTS
· AXT2411 Base and Handset
· Rechargeable Ni-MH Battery Pack
· Telephone Line Cord
· ACAdaptor
· User’sManual
· WarrantyCard

- 3 -
TABLE OF CONTENTS
Important Service Information...........................................................................................1
Warning...............................................................................................................................1
Carton Contents.................................................................................................................1
Safety Instructions.............................................................................................................4
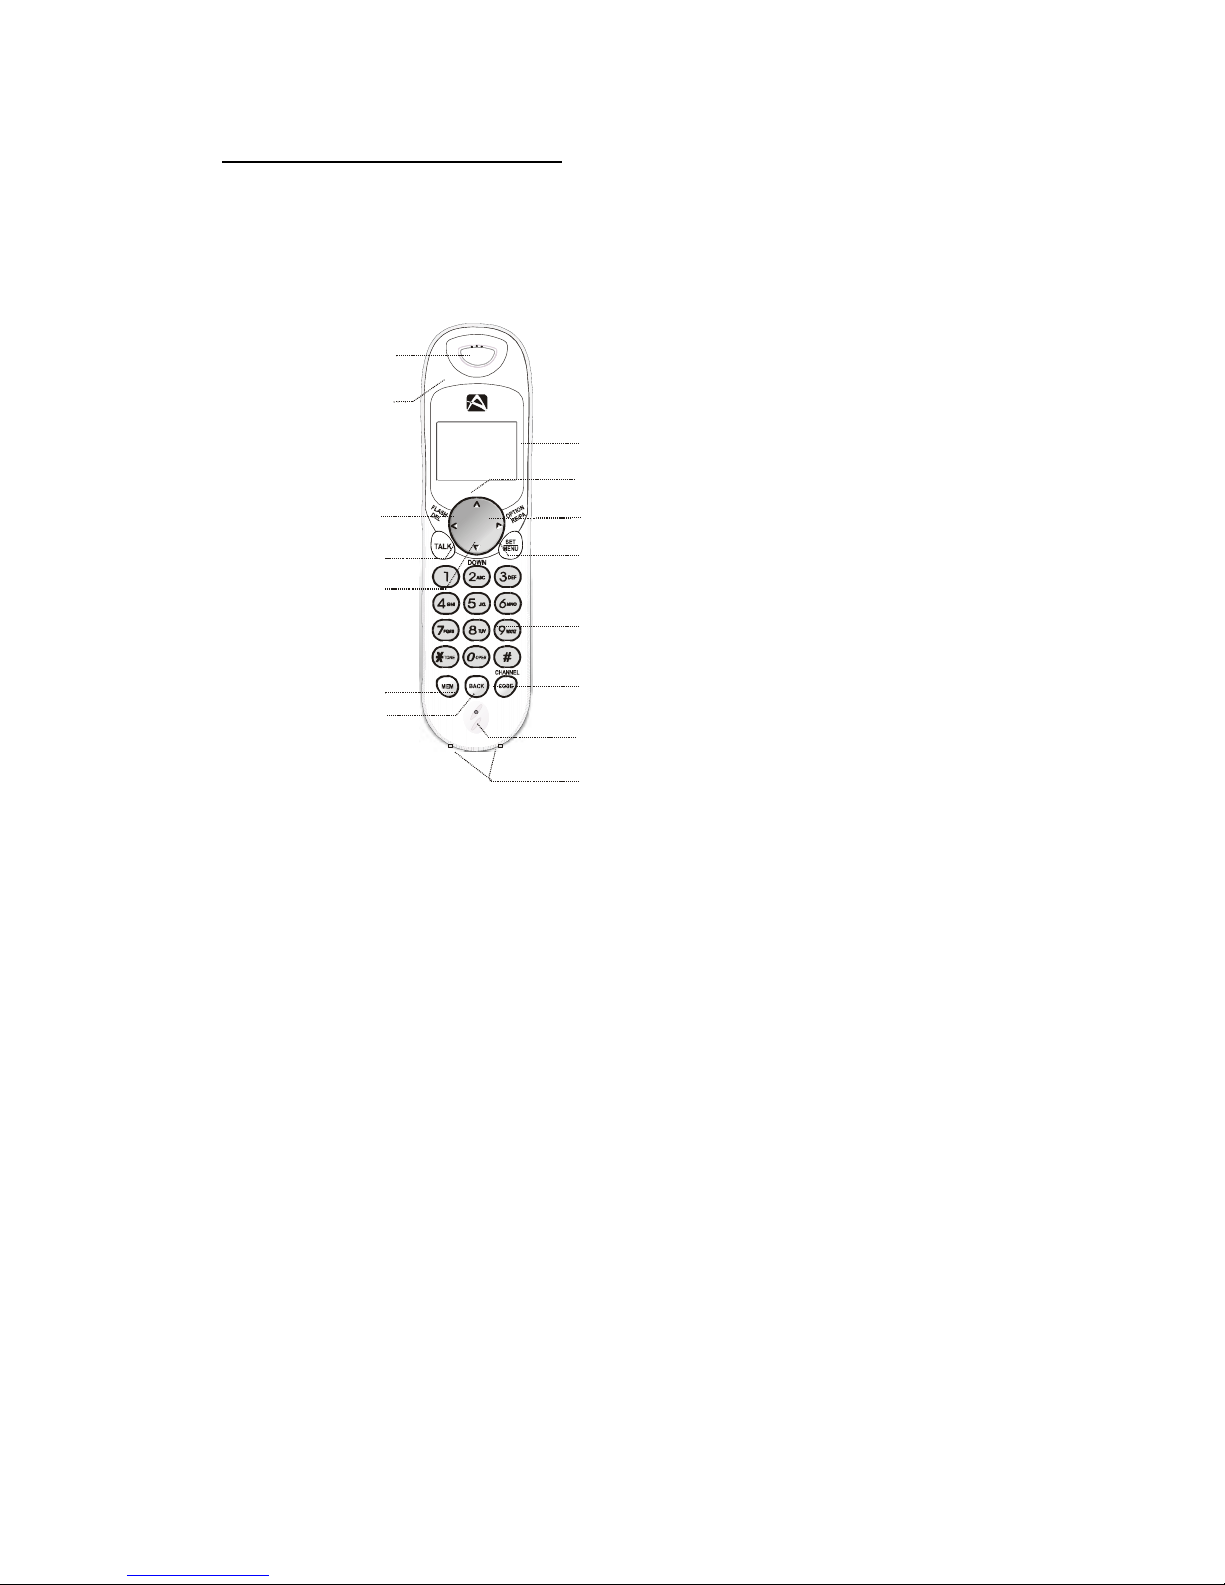
Handset Controls................................................................................................................6
BaseUnitControls.............................................................................................................8
Getting Started...................................................................................................................9
Cordless Telephone Operation...........................................................................................11
Preparing for Use..........................................................................................................11
Receiving Calls..............................................................................................................11
Placing Calls..................................................................................................................12
Redial Feature...............................................................................................................12
Using the Headset Feature............................................................................................13
Caller ID System Operation...............................................................................................14
Caller ID System..........................................................................................................14
Viewing Caller Information During Incoming Calls......................................................14
Caller ID with Call Waiting...........................................................................................15
Message Waiting...........................................................................................................15
One-Touch Voice Mail Dialing.....................................................................................15
Caller List.....................................................................................................................16
Viewing the Caller List...........................................................................................16
Placing a Call from the Caller List..........................................................................16
Storing Caller ID Records into the Directory (Phone book) ................................17
Deleting a Single Record.........................................................................................17
Deleting all Records................................................................................................17
Name and Telephone Number Directory (Phone book) ....................................................18
Viewing the Directory (Phone book) ....................................................................18
Storing Phone Numbers..........................................................................................18
Telephone Keypad Characters...............................................................................19
Placing Calls from the Directory (Phone book) .....................................................20
Editing a Stored Number in the Directory (Phone book) ......................................20

- 4 -
Deleting a Stored Number in the Directory (Phone book) ....................................21
Preferred Calls........................................................................................................21
Blocked Calls......................................................................................................21
Function Settings.............................................................................................................22
A. Setting the Ringer Level.....................................................................................23
B. Changing the Language.............................................................................23
C. Turning the First Ring ON or OFF..............................................................24
D. Setting the Time and Date..........................................................................24
E. Adjusting the Contrast.................................................................................24
F. Setting the PBX Number..............................................................................25
G. Changing the Flash Time...........................................................................25
H. Changing the Pause Time..........................................................................26
I. Programming One-Touch Voice Mail Dialing..........................................26
J. Deleting Message Waiting Indication......................................................26
K. Setting the Area Code..................................................................................27
Security System................................................................................................................28
Recharging the Battery Pack.........................................................................................29
Changing the Battery Pack............................................................................................29
Problem Solving..............................................................................................................30
Technical Information......................................................................................................32
Industry Canada Notice..................................................................................................33

- 5 -
SAVE THESE INSTRUCTIONS
IMPORTANT SAFETY INSTRUCTIONS
To reduce the risk of fire, electric shock and/or injury, always follow these basic safety precautions when using your cordless
telephone equipment.
1. Read and understand all instructions.
2. Follow all warnings and instructions marked on the telephone.
3. Do not use this telephone near a bathtub, wash bowl, kitchen sink, or laundry tub, in a wet basement, near a swimming pool, or
anywhere else where there is water.
4. Avoid using a telephone (other than a cordless type) during an electrical storm. There may be a remote risk of electric shock from
lightning.
5. Do not use the telephone to report a gas leak in the vicinity of the leak.
6. Use only the Power Cord and Battery Pack indicated in the Owner’s Manual. Do not dispose of the Battery Pack in a fire. The
Battery Pack may explode. Check with local codes for possible special disposal instructions.
7. Operate this telephone using the electrical voltage as stated on the Base Unit or in the
Owner’s Manual. If you are not sure of the voltage in your home, consult your dealer or
local power company.
8. Unplug this telephone from the wall outlet before cleaning or replacing the Battery Pack.
Do not use liquid cleaners or aerosol cleaners on the telephone. Use a damp cloth for
cleaning.
9. Place this telephone on a stable surface. Serious damage and/or injury may result if the
telephone falls.
10. Do not cover the slots and openings on this telephone. This telephone should never be
placed near or over a radiator or heat register. This telephone should not be placed in a
built-in installation unless proper ventilation is provided.
11. Do not place anything on the power cord. Install the telephone where no one will step or
trip on the cord.
12. Do not overload wall outlets or extension cords as this can increase the risk of fire or electric shock.
13. Never push any objects through the slots in the telephone. They could touch dangerous voltage points or short out parts that could
result in a risk of fire or electric shock. Never spill liquid of any kind on the telephone.
14. To reduce the risk of electric shock, do not take this telephone apart. If service or repair work is required on this telephone, take it
to a qualified service representative. Opening or removing covers may expose you to dangerous voltage or other risks. Incorrect
reassembly can cause electric shock when the appliance is subsequently used.
15. Unplug this telephone from the wall outlet and consult a qualified service representative
in any of the following situations.
A.When the power supply cord is frayed or damaged.
B.If liquid has been spilled into the telephone.
C. If the telephone has been exposed to rain or water.

- 6 -
D. If the telephone does not operate normally by following the operating instructions.
Adjust only those controls that are covered by the operating instructions. Improper
adjustment may require extensive work by a qualified technician to restore the
telephone to normal operation.
E. If the telephone has been dropped or the case has been damaged.
F. If the telephone exhibits a distinct change in performance.
INSTALLATION PRECAUTIONS
1. Never install telephone wiring during a lightning storm.
2. Never install telephone jacks in wet locations unless the jack is specifically designed for
wet locations.
3. Never touch uninsulated telephone wires or terminals unless the telephone line has
been disconnected at the network interface.
4. Use caution when installing or modifying telephone lines.
BATTERY CAUTIONARY INSTRUCTION
CAUTION:
Risk of explosion if Battery Pack is replaced by an incorrect type. Replace only with the same or equivalent type. Dispose of used
batteries according to the instructions. To reduce the risk of fire or personal injury, read and follow this instructions.
1. Use only the following type and size of Battery Pack:
3.6V DC, 600mAh Rechargeable Ni-MH Battery Pack
2. Do not dispose of the Battery Pack in a fire. It may explode. Check with local codes for
possible special disposal instructions.
3. Do not open or mutilate the Battery Pack. Released electrolyte from a Battery Pack is
corrosive and may cause damage to the eyes or skin. Electrolyte may be toxic if
swallowed.
4. Exercise care in handling the Battery Pack to prevent shorting the Battery Pack with
conductive materials such as rings, bracelets and keys. The Battery Pack or conductor
may overheat and cause burns.
5. Charge the Battery Pack provided with (or identified for use with) this telephone only
in accordance with the instructions and limitations specified in this manual.
6. Observe proper polarity orientation between the Battery Pack and Battery Charger.
ATTENTION:
The telephone that you have purchased contains a rechargeable Battery Pack. The Battery
Pack is recyclable. At the end of its useful life, under various state and local laws, it may be
illegal to dispose of this Battery Pack into the municipal waste stream. Check with your local
solid waste officials for details in your area for recycling options or proper disposal.

- 7 -
INDUSTRY CANADA CERTIFIED
RINGER EQUIVALENCE NUMBER
NOTICE: The ringer equivalence number (REN) assigned to each terminal device provides and indication of maximum number
of terminals allowed to be connected to a telephone interface. The termination on an interface may consist of any combination of
devices subject only to the requirement that the sum of the ringer equivalence numbers of all devices does not exceed 5.
INDUSTRY CANADA NOTICE
NOTICE: The industry of Canada label identifies certified equipment. This certification means that the equipment meets certain
telecommunication network protective, operational and safety requirements. The Department does not guarantee the equipment
will operate to the user’s satisfaction.
Before installing this equipment, users should ensure that it is permissible to be connected to the facilities of the local
telecommunications company.
The equipment must also be installed using an approved method of connection. The customer should be aware that compliance
with the above conditions may not prevent degradation of service in some situations.
Repairs to certified equipment should be made by authorized Canadian maintenance facility designated by the supplier. Any
repairs or alterations made by the user to this equipment, or equipment malfunctions, may give the telecommunications company
cause to request the user to disconnect the equipment.
User should ensure for their own protection that the electrical ground connections of the power utility, telephone lines and
internal metallic water pipe system, if present, are connected together. This precaution may be particularly in rural areas.
CAUTION: User should not attempt to make such connections themselves, but should contact the appropriate
electric inspection authority, or electrician, as appropriate
AC ADAPTOR:
For base unit-use only Class II, 120 Volt AC/9V DC Adaptor, 300mA.
The center tip must be positive and the plug must correctly fit the unit’s DC 9V jack.

- 8 -
LCD DISPLAY
OPTION/REDIAL/
PAUSE BUTTON
SCROLL UP/VOLUME/
MUTE BUTTON
Key Pad
MICROPHONE
MENU/SETBUTTON
CHANNEL/CODEBUTTON
FLASH/DELBUTTON
TALK BUTTON
BACKBUTTON
Receiver
MEM / BUTTON
SCROLL DOWN /
VOLUME/
MUTE BUTTON
New Call / MSG Waiting
(Message Waiting) LED
Indicator
UP
MSG
NEW CALL
CHARGE CONTACT
AXT 2411 CONTROLS DIAGRAM

- 9 -
DESCRIPTION:
HANDSET CONTROLS:
1. Receiver - Listen to the phone on the receiver.
2. SCROLL UP-DOWN - Press to move around the large LCD Screen.
3. FLASH/DEL (Delete) Button - (FLASH) - Press to answer a call if you have Call
Waiting./ (DELETE) - Press to delete items or individual characters.
4. TALK button - Press to answer an incoming call or to place a call. Press to end a call.
5. Volume DOWN / MUTE Button - Press to temporarily Turn Off the microphone on the
handset. Press again Turn On the microphone on the handset..
6. MEM (Memory) / Temporary Tone (*) Button - MEM (MEMORY) Press to review
the memory status of the handset / Temporary Tone (*) - Press to temporarily change the
dialing mode from PULSE to TONE for Rotary Service Users. (Press once before
entering numbers to access the answering system or electronic banking services, etc.)
7. BACK Button - Press to return the handset to standby mode.
8. Large LCD Screen - Shows call information, phone status, prompts and Directory
Phone book items.
9. Volume UP / MUTE Button - Press to temporarily Turn Off the microphone on the
handset. Press again Turn On the microphone on the handset..
10. OPT(option) /RE (Redial)/PA (Pause) Button - (REDIAL)Presstoredialthelast
number dialed on the handset. (Pause) Press to insert a pause while dialing. (You will need
theRe/Pa button to dial numbers which use an alternative Long Distance Access Code.)
/ Option - Press to changed the displayed number to 7,10 or 11 digits in the Call Back
Function Feature.
11. MENU/SET Button - MENU - Press to access the Special Functions operation in
standby mode. / SET - Press to save the changes on the listed items on the Menu or Caller
ID Phonebook.
12. Keypad - press to dial the numbers you wish to call, or input information into the Caller
ID Phonebook.
13. CHANNEL / CODE - CHANNEL - Press to change the operating channel when you hear
Interference. / CODE - Press to add additional handset (Optional to two or more handset
Function only)
14. Microphone - Talk on the handset using the microphone.
15. Charge Contacts - For Charging the Battery Pack inside the Handset. We recommend
cleaning the Charge Contacts periodically with a damp cloth.
16. New Call /MSG Waiting LED Indicator - (New Call) Blinks to indicate that you have
a new Caller ID call stored in memory.(Message Waiting) Blinks when receiving a Message
Waiting signal, if you have subscribed to a Voice Mail message service from your local
Telephone company.(see page 15.)

- 10 -
AXT 2411 CONTROLS DIAGRAM
R
PAGE
POWER JACK
LINEJACK
IN USE /CHARGE
Light Indicator
BaseCharge
Terminal
TONE/PULSE
Switch (Bottom)
(Baseunitfrontview)
(Baseunitrearview)
DESCRIPTION:
BASE UNIT CONTROLS:
1. TONE/PULSE Select Switch - to select Tone or Pulse Mode.
2. Power in Connection Jack
3. Telephone Line Connection Jack
4. Base Charge Terminals - For Charging the Handset Battery Pack. For best
performance, clean the charge terminals periodically with damp cloth.
5. In use / Charge Light Indicator - (IN USE) Lights up to indicate that the handset is
in TALK Mode. (CHARGE) lights up when the handset is placed on the base unit for
Charging.

- 11 -
Battery pack
(DC 9V/300mA adaptor)
Power Jack
Telephone Jack
Line Cord
INSTALLATION
Connecting Your Phone
This section is a reference guide to the basic functions and operations of your cordless telephone. For more detailed descriptions of the
operations and features of this telephone, refer to the
Contents on page 2.
1. Carefully remove your cordless telephone from its shipping carton. If there is any visible
damage, do not attempt to operate this equipment. Return it to the place of purchase.
2. Check to be sure you have all items that come with this cordless telephone system. You
should have one Handset, One Base Unit, one AC ADAPTOR,
one Battery Pack, Telephone Line Cord, and Owner’s Manual.
POWER CONNE CTION
CAUTION:
For BASE Unit - Use only Class II, 120 Volt AC / 9V DC Adaptor, 300mA.
The center tip must be positive and the plug must correctly fit the unit’s DC 9V jack.
1. Insert the small plug on the end of the AC ADAPTOR into the Power-In Connection Jack
at the back of the Base Unit or Charger Unit.
2. Plug the AC ADAPTOR into a 120V AC wall outlet.
3. Insert one plug of the Telephone Line cord into the house telephone Jack and the other end
into the Telephone Line Connection Jack at the back of the base unit. (If you have an older
4-prong Telephone jack, you will need an RJ-11C Telephone jack adaptor. this adaptor is
available at the same place you purchased your telephone)
Battery Installation
1. Install the Handset Battery Pack by plugging it into the Battery Connector inside
the
BatteryCompartment.
2. Place the Battery Pack inside the Battery Compartment.
3. Slide the Handset Battery Compartment
Cover firmly into place in its closed position.
4. IMPORTANT: Before initial use, charge the Handset for 12
hours. Place the Handset on the Base Unit and make sure
that the CHARGE LED indicator on the Base Unit lights up.

- 12 -
INITIAL SET UP
Before you can use your cordless telephone, you must charge the Handset for 12 hours. Failure to do so will require more
frequent charging of the Battery Pack.
1. Place the Handset on the Base Unit, and another Handset on the Charger Unit for 12
hours.
2. After 12 hours, remove the Handset from the Base Unit.
Setting the TONE/PULSE Switch
A. If your home is equipped with a tone dialing system, set the TONE/PULSE Select
Switch to the TONE position.
B. If you have a rotary dialing system, set the TONE/PULSE Select Switch to the PULSE
position.
C. If you are not sure which system you have, set the TONE/PULSE Select Switch to the
TONE position. Press the Talk button on the Handset and make a call. If the call
connects, leave the switch as is; otherwise set to the PULSE position.
CAUTION: The cordless telephone operates at a frequency that cause interference to nearby TVs and VCRs; the base phone
should not be placed near, or on top of a TV or VCR. If interference is experienced, moving the cordless telephone far away from
the TV or VCR will often reduce or eliminate the interference.
Handset Registration to Base Unit (For two or more Handsets Only)
The Base Unit is capable of Registering maximum up to Three Handsets. To register the handset or additional handset, At Stand
By Mode - Press and Hold Base PAGE button until all extension Handset are successfully registered to the Base. The Base LED
will light up to indicate it is waiting for the “registration” of additional handset. Press CH/CODE button of Handset 1 until a
“beep” is heard, press the CH/CODE button of Handset 2 until a “beep” is heard, and press the CH/CODE button of Handset 3
until a “beep” is heard. Release the Page button after the last handset is successfully registered.
NOTE: If you have an existing single handset and wish to add another handset, you should re-register the existing handset after
registering the new handset.

- 13 -
TELEPHONE OPERATION
To Place a Call
1. Pressthe TALK button.
2. Wait until you hear a dial tone and then
dial the phone number.
3. When you have finished your call, press
the TALK button again or place the
Handset on the Base Unit.
OR
1. Dial the phone number. If you made any
mistake during the input of number, you can
delete the number by pressing FLASH/DEL to
correct or change the number.
2. Press the TALK button. The number
displayed will be dialed out.
3. When you have finished with your call,
press the TALK button again or place
the Handset on the Base Unit.
NOTE: The Call Timer will start to count 10 seconds after you press the TALK button.
To Receive a Call
1. When the phone rings, the LCD Screen
will show “RING.” If you have Caller ID,
the LCD Screen will show the Caller ID
information after the first ring.
2. With the Handset off the Base Unit,
pressthe TALK button.Startyour
conversation. The Call Timer starts to
count after 10 seconds.
3. To end your conversation, either press the
TALK button or place the Handset on the
Base Unit. If you place the Handset on the
Base Unit charge cradle, you activate the
Automatic standby feature.
TA LK
Call Timer Display
02 08
Minutes
Seconds

- 14 -
Redial Feature
1. If you get a busy tone, press the TALK
button or place the Handset on the Base
Unit to hang up.
2. Later, press the TALK button again.
3. Listen for a dial tone.
4. Press the OPTION/RE/PA button. This
will automatically redial the last telephone
number you called.
5. When you have finished with your call,
press the TALK button again or place
the Handset on the Base Unit.
Call Transfer Feature (For Two or More Handsets Only)
At Talk Mode - Press the SET button followed by Handset number you wish to transfer the call. i.e. The call is now on Handset 1
and you wish to transfer the call to Handset 2, to do this - Press SET button on Handset 1 and Press key number 2, both handsets
will ring, Handset 2 can take the call from Handset 1 by pressing the TALK button on Handset 2.
Handset Volume Setting
While the Handset is at TALK Mode, you can adjust the receiver volume by pressing the UP or DOWN button to Low, Medium
and High setting.
Mute Function
At Talk mode - Press and HOLD the UP arrow Key for 2 seconds to Mute the microphone on the handset, the LCD d will show
“MUTE” to indicate the handset Microphone is Temporarily turned OFF, the Called Party can not hear you. To go back to TALK
mode with the Called Party, Press and HOLD the UP arrow key for 2 seconds to go back to TALK mode, the handset LCD will
display “TALK”.
Multi Channel Access
Your cordless telephone lets you select a channel from 40 frequencies available to transmit signals between the base unit and the
handset. When you notice interference from other cordless telephones, change to another channel by pressing the
CHANNEL/CODE button on the handset.

- 15 -
Flash Function
Used to access custom Calling Features such as Call Waiting or Three-Way Calling provided by your local phone company.
Consult your local phone company for more details.
Used to reset the Dial Tone - In case the number you dialed is busy, you can Press FLASH/DEL to reset the Dial tone without
cutting off the telephone line connection.
Back Funtion
Used to reset the Handset to Standby mode. Press BACK button to exit and return to standy in case of any invalid input during
Menu programming or unwanted operation done.
Pause Function
In some cases such as PBX or long distance service, a pause may be needed in the dialing sequence. Pressing the Pause
(OPTION/RE/PA) button on the handset inserts a few seconds of delay between dialed numbers. Pause(s) can be inserted into the
programmed dialing sequence in the memory dialing.
Mixed Mode Dialing (Temporary Tone Dialing)
If you only have pulse dialing available in your area, accessing special services (bank by phone, etc.) require a tone signal. ensure
that your TONE/PULSE switch is set to PULSE. While in TALK mode, press the TONE (*) button to switch from Pulse to Tone
dialing temporarily. Pulse dialing mode resumes when the call is ended.
PAGE Function
If you have misplaced the handset or need to alert the person nearby the handset, press the PAGE button on the base unit.
Pressing this button once will activate the handset to ring for thirty seconds, provided that the handset is on standby mode and
located within transmitting range. The handset LCD panel will light up while the base unit is paging it. Press Page buttong again
to stop.
Low Battery Warning Indication
At Talk Mode - When the handset battery voltage level is low, the BATT LOW icon on the handset LCD panel will start to blink
and a “beep” sound will be heard every 8 seconds interval. Return the handset to its cradle on the Base unit or Charger Unit for
charging.
At Standby Mode - When the handset battery voltage level is low, the “LOW BATTERY” will be displayed on the handset LCD.
Return the handset to its cradle on the Base unit or Charger Unit for charging.

- 16 -
551645611234 88 8526911020
OUT OF AREA
PRIVATE
CALLER ID OPERATION
This telephone automatically displays an incoming caller’s name and telephone number together with the date and time of the call. It
records up to 30 calls and stores the data in
Memory.
IMPORTANT: You must subscribe to the Caller ID service from your local telephone company to utilize this feature.
Viewing Caller Information During Incoming Calls
When there is an incoming call, the name and the telephone number of the caller will automatically appear after the first ring. Press the
UP or DOWN button to view a name or number with more than 12 characters.
OR
Caller’s telephone number will appear if the caller’s name is
not available.
OR
“OUT OF AREA” will appear when Caller ID information is
not available. The origin of the call does not support the
Caller ID system (including international calls).
OR
“PRIVATE” will appear if the caller’s name and/or
telephone number is blocked.
OR
“MESSAGE” will appear when a Voice Mail Message
has been received and is stored by the Message Waiting
service provided by the telephone company.

- 17 -
Caller ID with Call Waiting
When you subscribe to Call Waiting service from your local telephone company, this Mixed Mode Dialing (Temporary Tone Dialing)
telephone will display the name and number of the second caller while you are having a phone conversation
with the first caller.
When a new call comes in while you are talking, you will hear a notification beep from the Handset
and the volume is momentarily muted. The new caller’s name and phone number, if available,
appears on the display.
1. When you receive a “Call Waiting” call and you want to connect the call, press the
FLASH/DEL button and start talking with the second caller. The active call will be placed
onHold.
2. Press the FLASH/DEL button to alternate between calls.
3. Press the TALK button or place the Handset on the Base Unit to end the call.
“MESSAGE” (Message Waiting)
The Message Waiting LED indicator will blink when there is a message for you from your telephone company if you have subscribed to
Voice Mail message service and if you have requested Visual Message Indication from your local telephone company. “MESSAGE”
will appear on the LCD Screen in standby mode. (can turn off)
NOTE: This function requires voice mail subscription from the local telephone company. Furthermore, the local phone company must
provide a type of voice mail signaling called “FSK” (Frequency Shift Key). Not all telephone companies have the visual message
waiting feature available. Please contact your local telephone company to check if this is available in your area.

- 18 -
88 8526911020
111- 2 2 22
10
6 2 6 - 111- 2 2 2 2
10
1- 6 2 6 - 111- 2 2 22
10
Caller List
This phone automatically stores the last 30 calls received. It records call information such as caller’s name and telephone number
together with the date and time of the call. The NEW CALL LED indicator will blink to indicate that you have a new Caller ID call
stored in
memory.
Viewing the Caller List
1. With the Handset in standby mode, press the SCROLL UP or DOWN button.
2. Any unviewed (new) calls will be displayed first.
The most recent call will be displayed. The
information on the call will be displayed with the name,
number, date and time that the call was received.
3. To scroll to the next call, press the SCROLL UP or DOWN button. Pressing the
SCROLL DOWN button will go through the calls from the last call received to the first
Caller ID record. Pressing the SCROLL UP button will allow you to view the calls from
the first call received to the last.
4. The name or number with 12 characters or less will be displayed on the LCD screen, if there
are more than 12 digit numbers or characters, it will be displayed right after the first 12
characters are displayed on the LCD screen.
5. Press FLASH/DEL two times if you want to delete the current reviewed number or press the
BACK button to return to STANDBY mode.
Placing a Call from the Caller List
You can place a call from the Caller List by using the Caller ID Callback feature.
1. Press the SCROLL UP or DOWN button to find the Caller ID record you wish to
call back.
2. Press the OPTION/RE/PA button to change the displayed number to 7, 10, or 11 digits.
The first dialing option displayed after pressing
OPTION/RE/PA once is the Incoming Caller’s
number.
Press once the OPTION/RE/PA button for
the second time, the displayed number will
beLocalAreaCode+IncomingCaller’s
number
Press twice the OPTION/RE/PA button for the
third time, the displayed number will be Long
Distance Code + Local Area Code + Incoming Caller’s number.
3. Press the TALK button to dial the displayed number.
4. To end a call, either press the TALK button or
place the Handset on the Base Unit.

- 19 -
Saving the Name and Number in the Caller List into the Directory (PHONE BOOK)
1. Press the SCROLL UP or DOWN button to find the record you wish to store into
the Directory (Phone book).
2. Press and hold the MEM button.
3. You will hear a “beep” tone confirmation to
indicate the number has been save into the
Phonebook.
4. If the number you wish to save is already in
the Phonebook, The handset will display
“REPEAT” and will not be save into the Phonebook.
5. If you wish to edit the newly stored number,
edit it in the Directory (Phone book)
(XXX “Editing a Stored Number”).
6. Press the BACK button to exit the Caller ID list.
Deleting Caller ID Records
When viewing the Caller ID information you can delete a single call record or all of the call records.
Deleting a Single Record
1. Press the SCROLL UP or DOWN button
to find the record you wish to delete.
2. Press the FLASH/DEL button. The LCD
Screen will display “DELETE ?”
3. To delete the record, press the FLASH/DEL
button again. You will hear a “beep” tone
confirmation to indicate the number has been
deleted from the CID Records
4. Press the BACK button to exit the Caller ID list.
Deleting All Records
1. Press the SCROLL UP or DOWN button once,
The Handset will display the CID Information summary.
2. Press and hold the FLASH/DEL button. The LCD
Screen will prompt “DELETE ALL?”
3. To delete all of the Caller ID records, press the
FLASH/DEL button. The LCD Screen will show
“DELETED” and then return to standby mode.

- 20 -
UP
MSG
NEW CALL
Name and Telephone Number Directory (PHONE BOOK)
This Directory (Phone book) lets you scroll through the list to find the person you need
for one touch dialing. You can store up to 30 names and telephone numbers in the Memory.
Viewing the Directory (Phone book)
1. Press the MEM (Memory) button, the handset
will show the total number of Memory available.
2. Press the Telephone Keypad 2/ABC to 9/WXYZ
button that corresponds to the first letter of a
Caller’s name . Press the SCROLL UP or DOWN
button to find the record you wish to view.
3. Press the UP or DOWN button to
view a name or number with more than 12
characters (as indicated by the arrows in the top
line of the display).
4. Press the MEM (Memory) button to exit the
Memory (Phone book).
Storing Phone Numbers
1. With the Handset in standby mode, dial the telephone number
you wish to store, using the telephone keypad 1 to 0 buttons
you can store up to 24 digits, briefly press the OPTION/RE/PA
button to insert a pause into the number.
2. Press MEM button to enter the name store, enter the name you wish to store using the
Telephone Keypad 2/ABC to 9/WXYZ buttons to enter the name, press 1 button to create
a space or to enter a new letter.
3. Press and hold the MEM button to store the number into memory.
NOTES:
1. If there are no memory locations left in the speed dial Directory (Phone book)
the LCD Screen will display “MEMORY FULL.” To continue with memory
programming, you must delete or edit existing speed dial numbers.
2. If you mis-type entering the phone number, you can move through the number and
edit it by pressing the UP or DOWN button. To delete a character
or number inside the cursor, press the FLASH/DEL button.
Table of contents
Other Audiovox Cordless Telephone manuals

Audiovox
Audiovox CDM-8200 User manual

Audiovox
Audiovox Dual Handset Cordless Phone User manual

Audiovox
Audiovox DT 911 Operation manual

Audiovox
Audiovox GX2401c User manual

Audiovox
Audiovox GX2411ci User manual

Audiovox
Audiovox DST 961 Operation manual

Audiovox
Audiovox DT921C User manual

Audiovox
Audiovox gx2400 User manual

Audiovox
Audiovox TDM-2500 Operation manual