audium Comp 8.3 User manual

Comp 8.3 / 9.3
Passive
User Manual

- 2 -
Thank you very much for your trust in AUDIUM products!
This AUDIUM speakers are the key to a realistic, three-dimensional
music reproduction with outstanding dynamics and details.
Please read this manual before installing your loudspeakers.
It provides all the necessary information and hints to set up, and to achieve the best music
reproduction with your AUDIUM loudspeakers.
Thank you very much,
Your AUDIUM team!
Contents:
2x AUDIUM Loudspeakers
2x Foam Plug
8x Spikes (M8 thread)
1x User Manual

- 3 -
General information
Warranty
By registering your product, you extend the legal warranty on speakers to 5 years and
electronics to 3 years. This is independent of your dealer / distributor.
Visit www.audium.com/registration within 2 weeks after purchase these speakers.
Warning - Safety instructions
1. Read this manual and follow the instructions provided.
Keep this manual as a reference for future questions.
2. Do not operate the speakers in damp places or near water.
3. These speakers are intended for use inside buildings.
Do not operate them outdoors.
4. Do not use the speakers near heat sources such. Eg. Radiant heaters, stoves,
fireplaces, amplifiers, ... or other devices that produce heat.
Do not try to repair the speakers in case of damage or malfunction.
Always contact your dealer or authorized service personnel.
Handling, Cleaning and Care
For cleaning, use a soft dry or slightly damp cloth.
Please avoid aggressive cleaning agents as well as special furniture polishes or any other
cleaning fluids. Dust from the chassis can be removed gently by using a tiny furniture
brush.
Warning: Avoid touching the chassis and membranes!
They are very sensitive and can be easily damaged!

- 4 -
Unpacking the Speakers
The AUDIUM speakers are delivered in separate cartons. Alter opening them, remove the
poly-foam protection elements and the textile bag. Do not dispose the packaging - you
can carry the speakers in a save way only when using the original packaging.
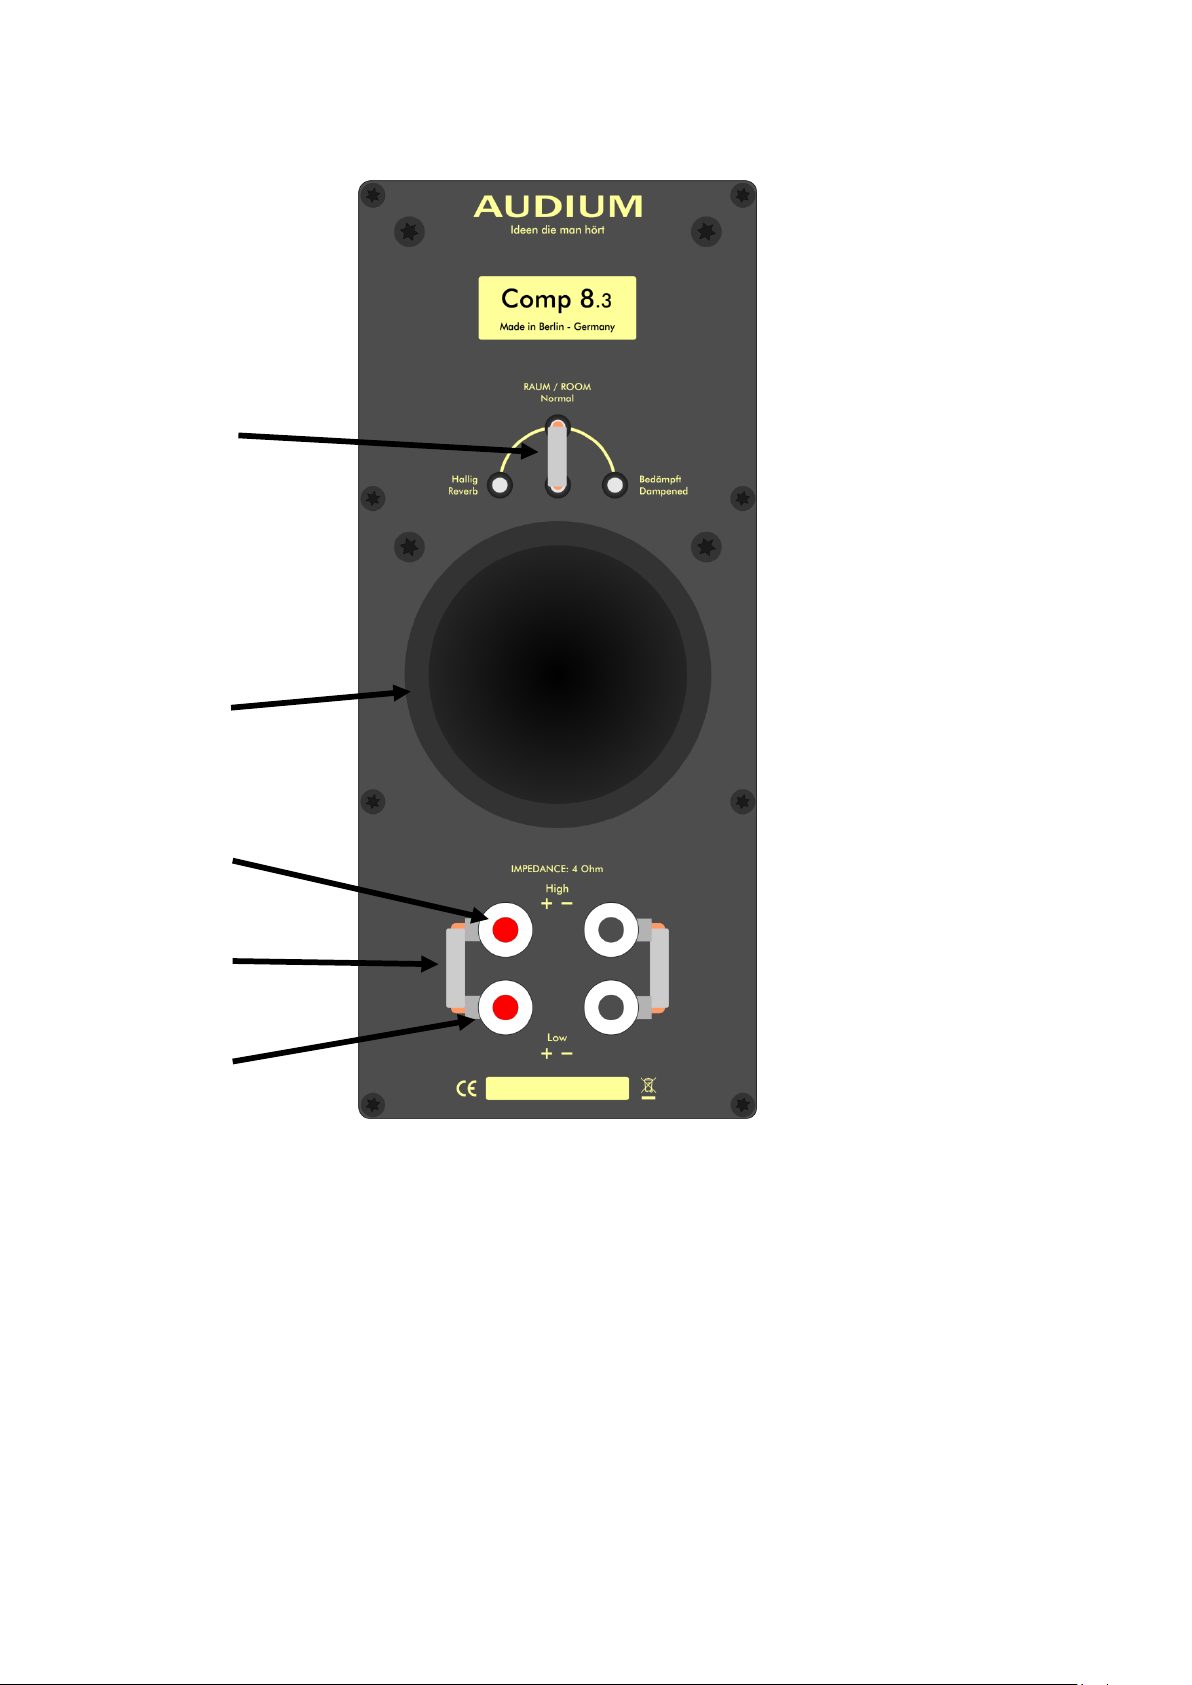
Spikes
AUDIUM floor speakers radiate sound best when the front baffle is inclined for a few
degrees. Therefor screw the front spikes for 5mm, the rear spikes totally into the
designated winding-drills. Take care that the speaker has a steady position.
Finally, tighten the spikes with the appropriate screw nuts.
Further information on the installation below in the chapter "Installation".
Note: To protect wooden floors, we recommend the use of washers, which you can get
from your dealer. Alternatively, you can also use any metal discs for bridging.
Dust-Caps
The loudspeakers are equipped with dust-caps per default. These are simply attached
to the speaker front and can be removed with low force through pulling them oft, it you
desire.
Even though these dust-caps have been designed according to acoustic aspects, the best
sound performance can be achieved when they are removed from the loudspeakers
Burn-In
Loudspeakers are equipped with moveable parts. Thus they require a specific “Burn-In
time” until these parts can move in the required tolerance range. After this period, the
loudspeakers can develop their full acoustic potentials.
For the burn-in of your new AUDIUM speakers you can play back music signals with a very
broad frequency spectrum for 1-2 days. Preferably you can use a special burn-in CD (e.g.
containing pink noise signal) or a radio receiver after turning it to an unassigned
frequency.
After a period of time when you do not listen to music, the speakers also will fall back into
a state close to being new. So again, give them some time to warm up again.
You will notice the effect the “burn” them in from minute to minute.

- 5 -
Speaker Placement
Listening Position
As shown in the illustration, the two speakers and your
listening position ideally form an isosceles triangle with
the edge lengths A and B. The distance A between the
Speakers should be smaller than the distance B between
the speakers and yours Listening position. Distance A
should be min. 2 meters (6.5 feet).
Position in your listening room:
Because of physical laws, a positioning of the speaker closer as 80 cm to a wall causes an
increase of the bass reproduction. So you should try to keep this as the minimum distance.
By changing this distance you can adjust the bass intensity.
Angling:
Depending on the orientation and angle of your speakers you can change the brilliance,
the depth of the stage and the room reproduction.
The installation of the speakers is authoritative for the resulting sound.
Experiment with different settings and let your hearing to judge!
An alignment of the speakers in parallel
heading to your listening position ensures gentler heights.
An angling of the speakers towards the listening position
provides present heights / more brilliance.
In many rooms, it is good to tilt the speakers backwards, i.e. turn the
front spikes far out and the back far into it. This may result in a
larger sound image with higher image.
In contrast, straight alignment of the speakers will cause that the
stage is more compact and more come to the forefront.

- 6 -
Connectors of the Speakers
1. Connectors + and –for the fullrange driver
2. Connectors + and –for the woofer
3. Bi-Wiring bridges
4. Jumper for the Room-Adjustment (Comp 9.3 only!)
5. Bass-Reflex tube emits deep frequencies
2
1
4
3
5

- 7 -
Connecting the speakers
After placing the speakers in the desired location, connect them to your music source.
Use a high quality loudspeaker cable to connect the speaker to your amplifier.
Note:
Again, the basic principle applies: a chain is never stronger than its weakest link. Therefore
do not try to think too cost-effective when choosing the speaker cables. save you They
need to transfer all the music information from the amplifier to the speakers.
A general rules says: Invest 10% of the cost of your electronics for the cabling!
Bi-Wiring or Bi-Amping
For Bi-Wiring or Bi-Amping remove the Bi-Wiring bridges (3) from the speaker terminals
and use a Bi-Wiring speaker cable to connect them to your amplifier
or 2 speaker cables to connect them to both power amplifiers.
Note:
Do not forget to remove the Bi-Wiring Bridges
before connecting the speakers to two power amplifiers!
Otherwise you may cause damage to your amplifiers!
Note:
I case of questions fell free to ask your AUDIUM dealer!

- 8 -
Room-Adjustment (Comp 9.3 only!)
The Room-Adjustment Jumper allows an adaption of the speaker sound
to your listening room.
By placing the jumper in an appropriate position you can adjust the amount of produced
high-frequency energy.
You can choose between 3 positions:
1. Normal Room
You have a “normal”equipped listening room.
So playback from the speaker will be neutral
2. Dampened Room
Your listening room contains furniture absorbing sonic.
E.g: curtains, bookshelves, carpets or a wooden floor.
So place the jumper in this position and the speakers will put more energy in the
higher frequencies to compensate this.
3. Room with reverb
You have a plain listening room with few furniture inside.
E.g.: free walls, windows and glass, marble floor.
So place the jumper in this position and the speakers will reduce the amount of energy
in the higher frequencies to compensate this.
Experiment with different settings and let your hearing to judge!
Bass-Adjustment
It is a physical law that speakers positioned close to a wall
produce more bass then placed free in a room.
This effect is even more intense when you place a speaker in a
corner of a room.
One way to compensate this is to stuff the bass-reflex tube with the delivered semi-
permeable foam stopper. By putting it into the tube you can reduce the bass reproduction
of the speakers.

- 9 -
Impressum:
This User Manual © 2023:
AUDIUM - Siegesleitner & Urban GbR
Grossbeerenstr. 146
12277 Berlin
Germany
Version 1.1.0 –Freitag, 10. März 2023
ist a registered Trademark
This manual suits for next models
1
Table of contents
Other audium Speakers manuals