August international DVB425 User manual
August International Ltd
United Kingdom
Tel:+44 (0) 845 250 0586
www.augustint.com
DVB-T2 HEVC TV Receiver and Multimedia Player
Ricevitore TV DVB-T2 HEVC e Lettore Multimediale
Sintonizador TDT HD DVB-T2 HEVC y Reproductor Multimedia
Récepteur TNT HD DVB-T2 HEVC avec Multimédia Player
DVB-T2 HEVC TV Receiver und Multimedia Player
DVB425
EN
FR
DE
IT
ES

User Manual
Thank you for purchasing the August DVB425 TV Receiver. You may
already be familiar with using similar products but please take the time to
read these instructions carefully. They are designed to familiarise you with
the product’s features and to ensure that you get the very best from your
purchase.
Please read the safety instructions before using this product to ensure
your safety and the safety of others.
Please ensure the product and its accessories are disposed in
compliance with WEEE (Waste Electrical and Electronic Equipment)
Directive and any other applicable regulations. Please check with your
local authority for current disposal regulations.
If you need help, please contact our customer service:
Telephone: +44 (0) 845 250 0586
Email: [email protected]
Safety
Disposal
Declaration of Conformity
The Declaration of Conformity can be found on our website at
http://www.augustint.com/en/declaration/
Customer Service
English

Contents
English
Quick Start Guide
DVB425
1. It is recommended that you use a rooftop aerial when searching for TV channels
for the first time.
2. Connect the DVB425 to a TV or monitor using the provided HDMI cable or a
SCART cable
3. Optionally, connect the DVB425 to a wired internet connection using an Ethernet
cable.
4. Connect the DVB425 to the mains power and press the power button on the
remote control or the box to switch on the device.
5. When you turn on the device for the first time, the Installation Guide will appear.
Select the desired Country, OSD Language, Resolution and Aspect Ratio, then
press to start the automatic channel scan. Once the search has finished, press
or to select channels. Press TV/RADIO to switch between Freeview TV and
Radio channels.
6.If you have performed the installation process before and would like to search for
channels again, press and go to Channel Search, select Auto Search,
then press to start a new search. Once the search has finished, press or
to select channels. Press TV/RADIO to switch between Freeview TV and Radio
channels.
7. To play music, photos, movies or PVR recordings from a USB storage device,
insert the storage device into the USB port, press and go to Media
Player. Choose between Music, Photo, Movie or PVR and press to view the file
list. Then, select a file and press to Play.
8. Please note that the signal strength in some areas may not be sufficient to
support TV reception using a portable aerial. The distance from the closest
transmitter and other factors such as surrounding buildings, the walls of your house,
weather and electromagnetic interference caused by power and telecommunication
infrastructure may affect signal strength. Changing location may improve signal
reception and a rooftop aerial designed for digital TV can be used to achieve the
best possible reception.
9. For any further queries, please telephone the August International Ltd helpline on
+44 (0) 845 250 0586 or email [email protected]
OK
▲ ▼
MENU
OK ▲ ▼
MENU
OK
OK
1. Safety Instructions ----------------------------------------------1
2. Main Features ----------------------------------------------------2
3. Box Contents -----------------------------------------------------2
4. Part Names and Functions ------------------------------------3
4.1 Front ---------------------------------------------------------------3
4.2 Back ---------------------------------------------------------------3
4.3 Remote Control --------------------------------------------------4
4.3.1 Remote Button Functions----------------------------------------------4
4.3.2 Use of the Remote Control---------------------------------------------5
5. Connection -------------------------------------------------------6
6. Operation ---------------------------------------------------------7
6.1 Initial Installation -----------------------------------------------7
6.2 TV Mode (Quick access to functions) ---------------------7
6.2.1 Subtitle--------------------------------------------------------------7
6.2.2 Channel Information--------------------------------------------------7
6.2.3 Channel List----------------------------------------------------------8
6.2.4 Teletext--------------------------------------------------------------8
6.2.5 Last Channel Watched------------------------------------------------8
6.2.6 EPG-----------------------------------------------------------------8
6.2.7 Timer----------------------------------------------------------------9
6.2.8 Live Recording------------------------------------------------------10
6.2.9 Time Shift-----------------------------------------------------------10
6.2.10 Audio--------------------------------------------------------------11
6.2.11 Colour buttons------------------------------------------------------11
6.2.12 Media Player from USB Storage--------------------------------------11
6.2.13 Recorded Programs-------------------------------------------------11
6.3 Radio Mode -----------------------------------------------------12
6.4 Media player ----------------------------------------------------12
6.4.1 Music---------------------------------------------------------------13
6.4.2 Photo Viewer--------------------------------------------------------13
6.4.3 Video---------------------------------------------------------------14
6.4.4 PVR----------------------------------------------------------------14
7 Main Menu (detailed access to functions) -----------------14
7.1 Channel-----------------------------------------------------------15
7.1.1 TV Channel Manager-------------------------------------------------15
7.1.2 Radio Channel Manager----------------------------------------------15
7.1.3 Delete All------------------------------------------------------------16
7.1.4 Channel Play Type---------------------------------------------------16
7. 2 Channel Search -----------------------------------------------16
7.2.1 Auto Search---------------------------------------------------------16
7.2.2 Manual Search------------------------------------------------------16
7.2.3 Aerial Power---------------------------------------------------------17
7.2.4 Standby Loopthrough-------------------------------------------------17
7.2.5 LCN-----------------------------------------------------------------17
7. 3 System Setup --------------------------------------------------17
7.3.1 Language-----------------------------------------------------------18
7.3.2 TV System----------------------------------------------------------18
7.3.3 Date/Time Settings--------------------------------------------------19
7.3.4 Timer Settings-------------------------------------------------------19
7.3.5 Parental Lock--------------------------------------------------------19
7.3.6 OSD Settings--------------------------------------------------------20
7.3.7 Favourite -----------------------------------------------------------20
7.3.8 Multiview Settings----------------------------------------------------20
7.3.9 Auto Standby--------------------------------------------------------21
7. 4 Tools -------------------------------------------------------------21
7.4.1 Information----------------------------------------------------------21
7.4.2 Factory Reset--------------------------------------------------------21
7.4.3 Software Update-----------------------------------------------------21
7.4.4 Remove USB Device Safely ------------------------------------------22
7. 5 Network ---------------------------------------------------------22
7. 6 Media Player ---------------------------------------------------23
7.6.1 USB Device Information----------------------------------------------23
7.6.2 PVR Settings--------------------------------------------------------23
8. Specifications----------------------------------------------------24
9. Troubleshooting -----------------------------------------------25
10. Warranty --------------------------------------------------------27
-1-
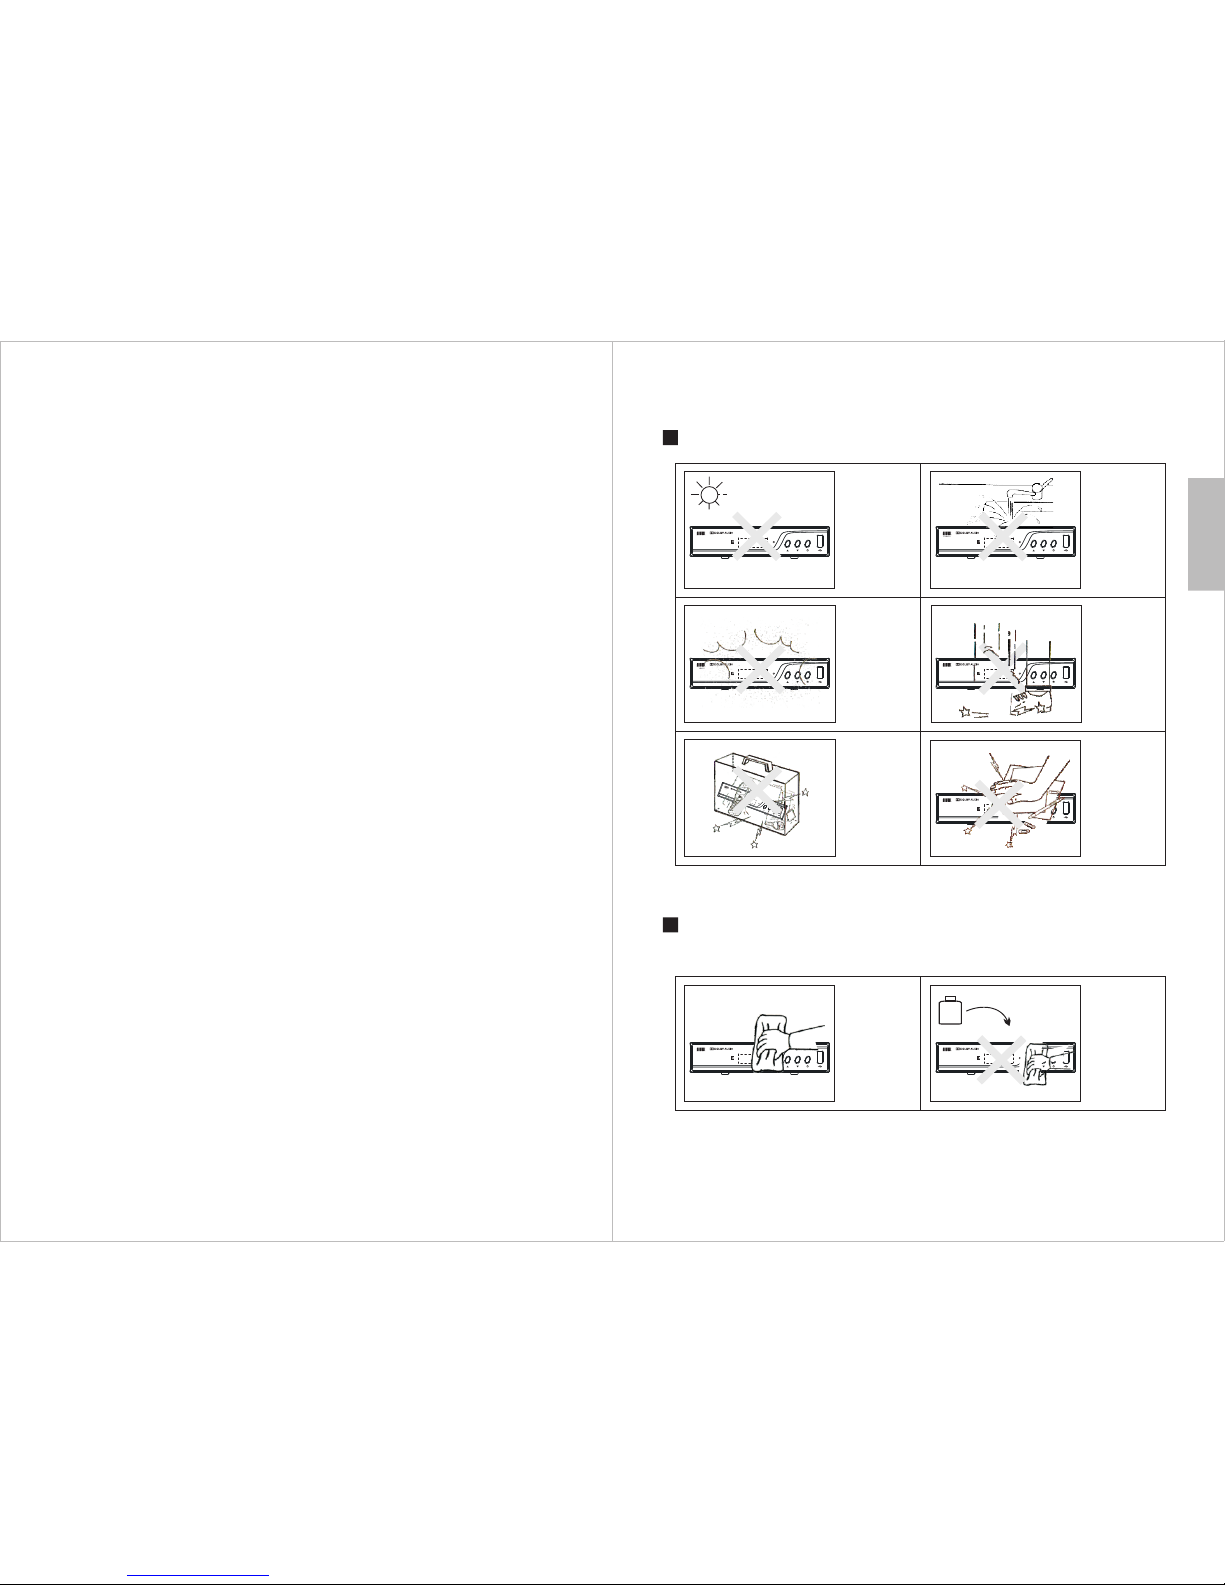
1. Safety Instructions
Storage and Use
DVB425 D VB425
DVB425
DVB425
DVB425 D VB425
DVB425DVB425
Maintenance
Please unplug all external wires before cleaning the machine.
Alcoh ol
Do not expose the
device to hot or
cold conditions.
The working
temperature of
the device is 0゚C~
50゚C. The
storage
temperature is-
10゚C ~ 60゚C.
Keep the receiver
away from water
and damp
environments.
Do not expose the
receiver to
moisture, dust, oil
or smoke.
Be careful to
avoid dropping or
striking the
device.
When
transporting the
device, store
securely to avoid
impact damage.
Do not touch the
machine with
sharp objects.
Wipe the
machine with a
soft cloth. Only
clean the screen
with professional
LCD TV screen
cleanser.
Do not wipe the
machine with an
abrasive cloth,
detergent,
powder, alcohol,
benzene or any
propellants or
chemical cleaning
products.
English
English
-2-
For safety reasons, please switch off the receiver when not in use by pressing the
power button.
Please ensure that the DVB425 is located so that it has adequate ventilation.
Special Notice
In the case of a fault with the DVB425, do not attempt to repair the device yourself.
Turn off the receiver immediately and notify August or the seller from which you
purchased the item. Any disassembly or modification may lead to further damage
and will invalidate the warranty.
Precautions
2. Main Features
HD Freeview Set Top Box - Watch Free to Air Digital TV in HD quality
PVR Style USB Recorder - Record TV programmes straight onto USB Media
Coaxial Digital Output - Highest sound purity and quality
Enjoy Digital Features - Record Function, Time Shift, EPG
(Electronic Programme Guide)
Max Resolution: 1080p - Video Output: HDMI / SCART - Audio Output: HDMI /
SCART / Coaxial
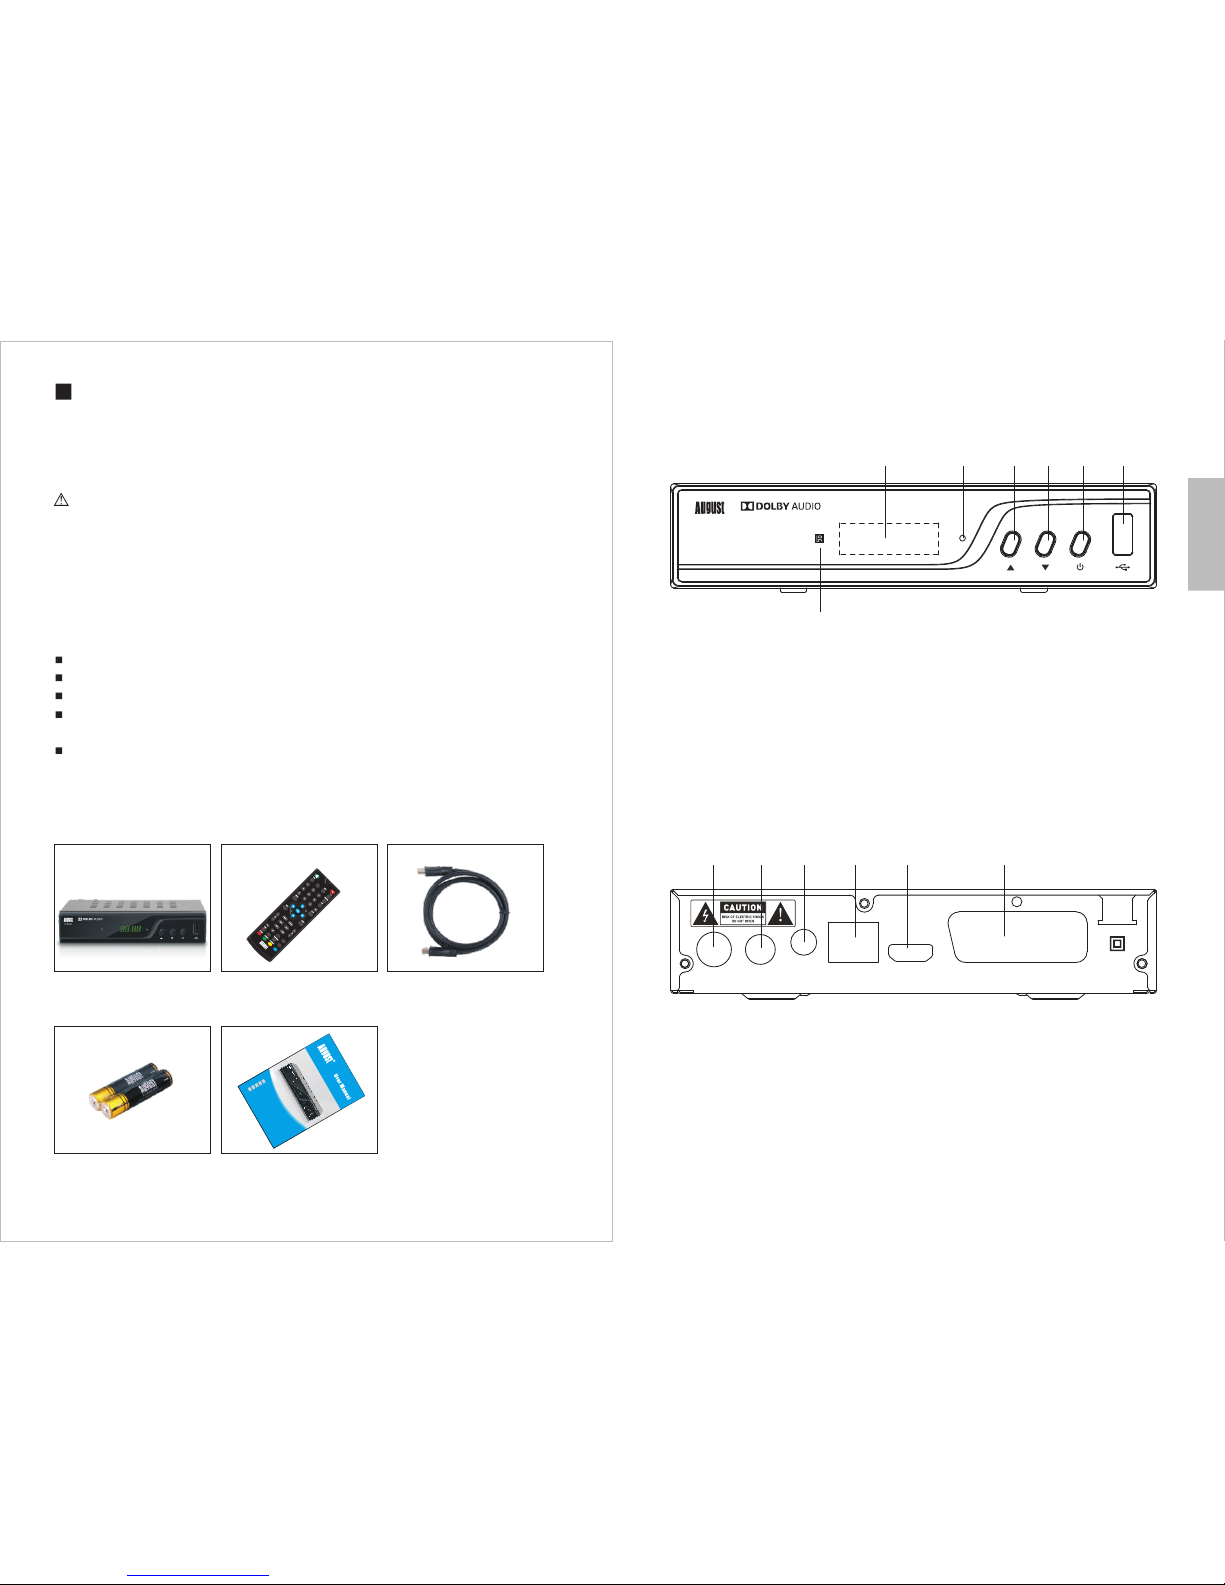
3.Box Contents
DVB425 Remote Control HDMI Cable
2 x AAA Batteries User Manual
SUB-T
AUDIO
DVB425
USB TIMER
MP
DVB-T 2 HEVC TV Re cei ver and Mult imed ia Play er
Ricevit ore TV DV B-T 2 HEVC e Lett ore Multi media le
Sinton iza dor TD T HD D VB-T2 HEVC y Repr oduc tor M ulti med ia
Réce pte ur TNT H D DV B-T2 HEV C avec Mul timé dia Pl ayer
DVB-T2 HEVC TV Receiver und Mul tim edia Playe r
DVB425
EN
FR
DE
IT
ES
-3-
4.1 Front
1.Display
2.Status LED
3.Up
4.Down
5.Power Button
6.USB Port
7. Remote Control Sensor
4.2 Back
1.Antenna In
2.Antenna Out (Loop Through)
3.Coaxial Audio Out
4.LAN Port
5.HDMI Output
6.SCART Output
4. Part Names and Functions
1
DVB425
RF IN
LOOP
THROUGH COA XIAL L AN TV SCART
HDMI
220-240V~
50/60Hz
2 3 4 5
1 2 3 4 5 6
6
7
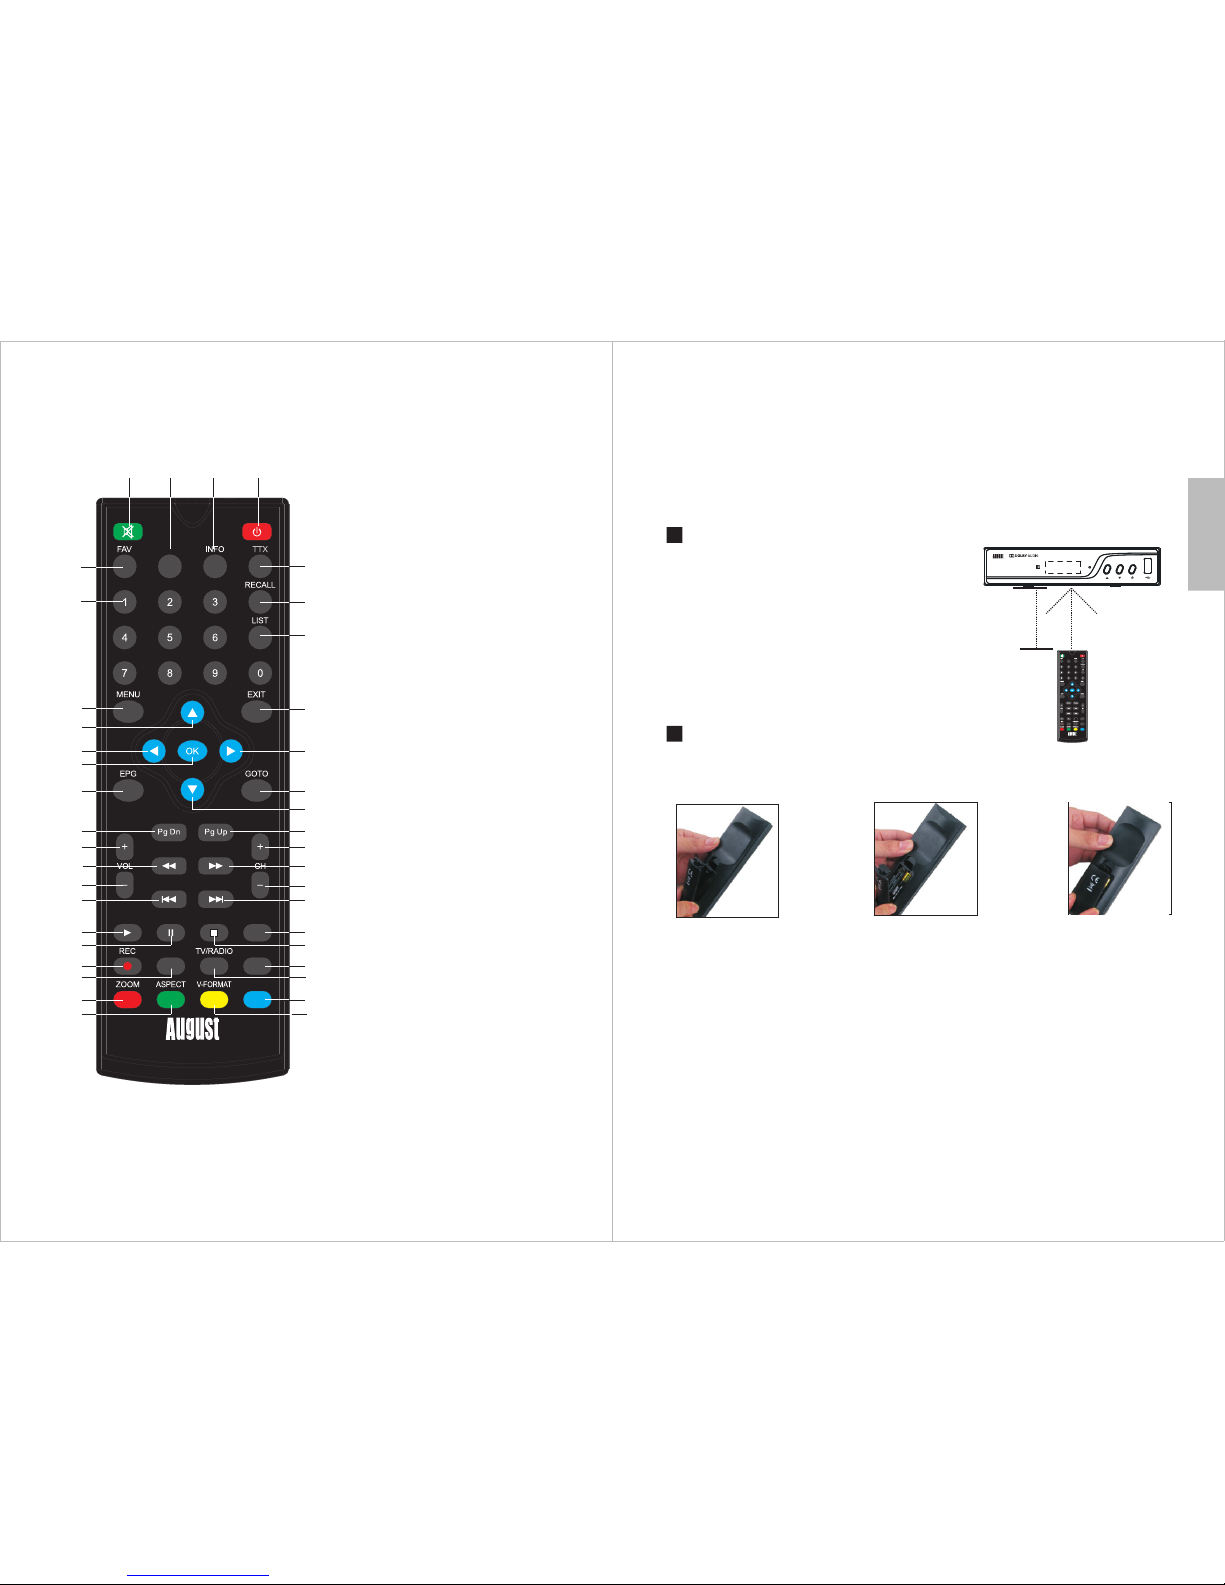
4.3 Remote Control
4.3.1 Remote Button Functions
English
SUB-T
AUDIO
DVB425
USB TIMER
MP
9
6
78
10 11
12
13
14 15
16
17 18
20
19
21
22
23
24
28
27
29
30 31
32
33 36
34 35
37 40
3
25 26
12
5
4
38 39
1. Mute / Unmute
2. Power
3. Favourite Channel List
4. Subtitle
5. Information
6. Teletext (not available in UK)
7. Numbers
8. RecallLast Channel Viewed
9. Recorded files
10. Main Menu
11. Exit
12. Up
13. Down
14. Left
15. Right
16. Confirm
17. Electronic Program Guide
18. Go To Function
19. Page Down
20. Page Up
21. Channel Up
22. Channel Down
23. Volume Up
24. Volume Down
25. Rewind
26. Forward
27. Previous Track
28. Next Track
29. Play
30. Pause
31. Stop
32. Audio Language
33. Record
34. USB Multimedia Player
35. TV / Radio
36. Timer
37. Zoom in
38. Aspect ratio
39. Resolution
40. MP
-4-
Operating range
1. The IR sensor on the remote control should be
aimed directly at the sensor on the front of the
DVB425. It may not be possible to operate the
device if there are obstacles between it and the
sensor on the remote control.
2. Use the remote control no further than 8 meters
away from the sensor.
3. The receiving angle range should be ±30°.
Replacing the Batteries
If the remote control does not function or if the operating range becomes reduced,
replace the old battery with a new one.
Pull out the battery holder
and remove the old battery.
Replace the battery holder.Insert the new battery into the battery
holder with the + side facing upwards.
30°
<8m 30°
-5-
*Note:
1. Please ensure the proper disposal of used batteries.
2. To prevent leakage of fluid from the lithium battery, remove the battery when the
remote control will not be in use for a long period of time. If the battery leaks fluid,
carefully wipe it out of the battery case, then change to a new lithium battery.
SUB-T
AUDIO
DVB425
USB TIMER
MP
DVB4 25
4.3.2 Use of the Remote Control
Please remove the PVC packaging before using the remote control for the first time.
1. Do not expose the remote control to direct sunlight or any other source of strong
or bright light.
2. Be careful not to drop the remote control, step on it or subject it to shocks.
3. Do not expose the remote control to hot or humid conditions.
4. Keep the remote control away from water.
-6-
English
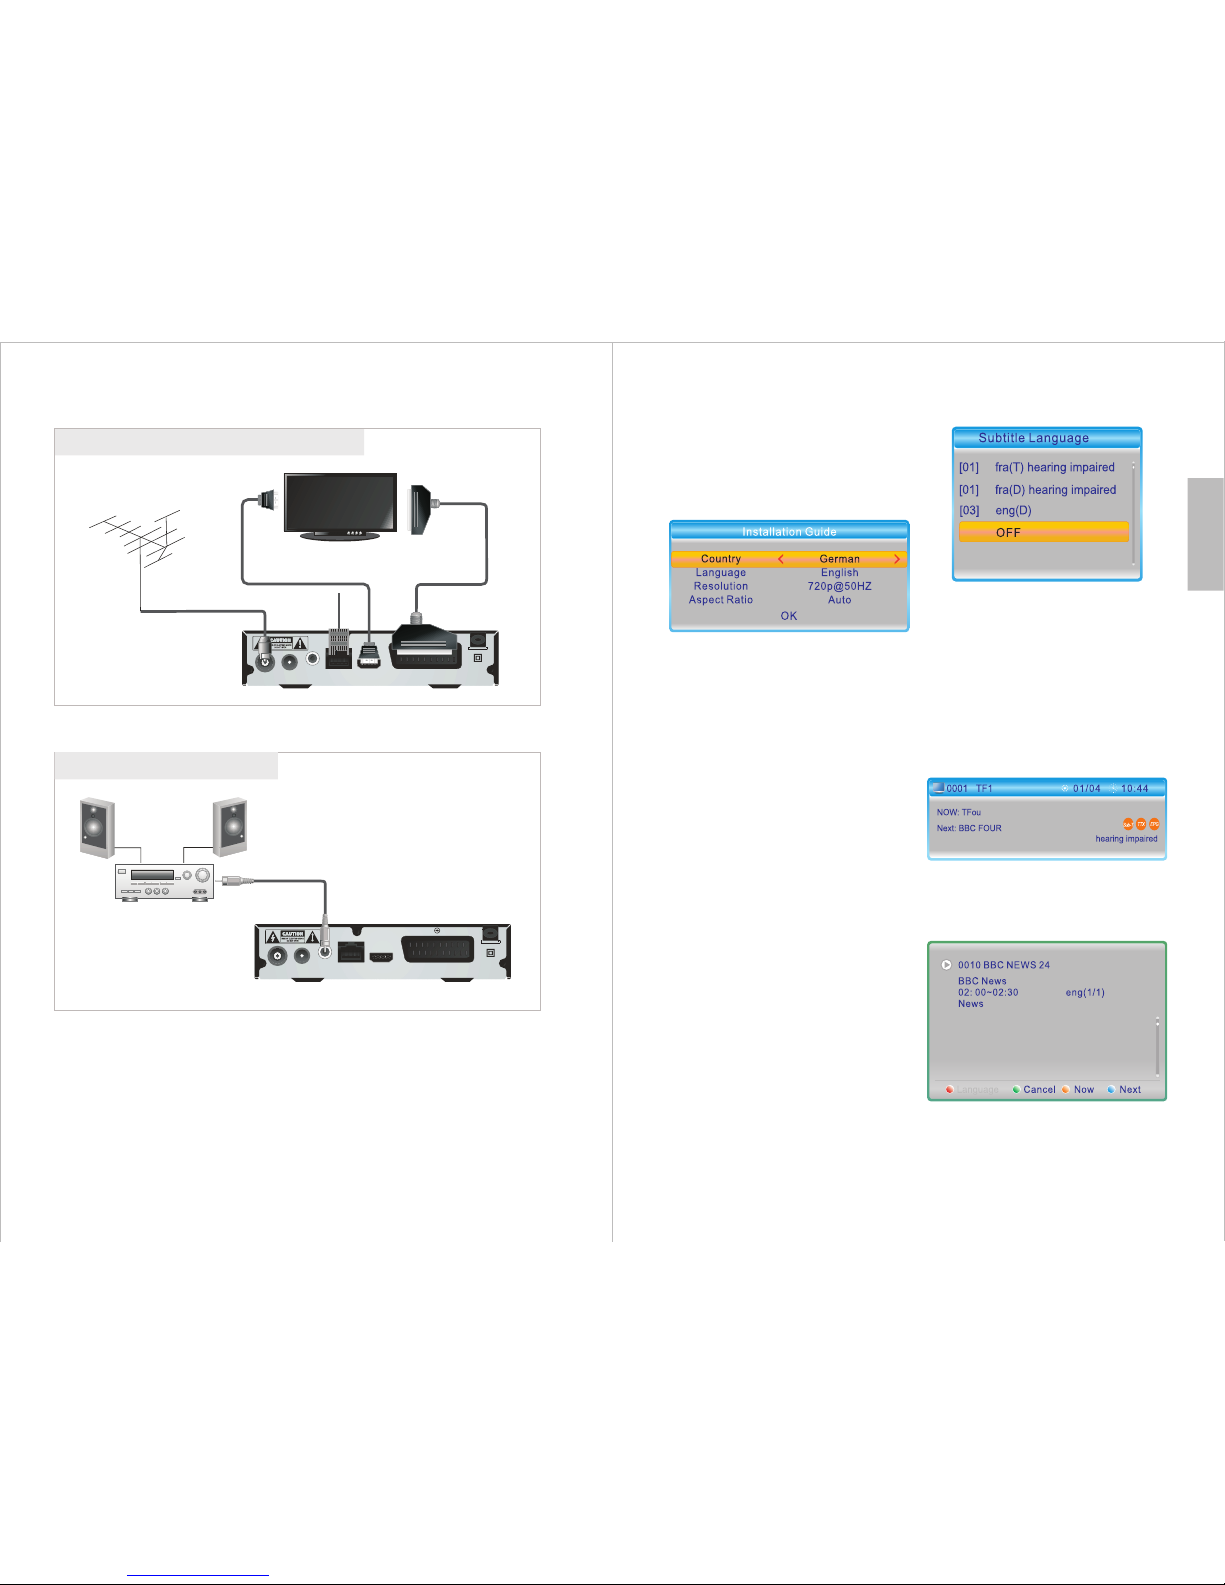
5. Connection
Connecting to a TV
Connecting a HiFi system
Coaxial cable
Hi-Fi
HDMI cable
RF cable
TV
Scart cable
Aerial
LAN
RF IN
LOO P
THR OU GH CO AXI AL L AN TV S CART
HDM I
220-240V~
50/60Hz
RF IN
LOO P
THR OU GH CO AXI AL L AN TV S CART
HDM I
220 -2 40V ~
50/ 60 Hz
-7-
6. Operation
6.1 Initial Installation
When you first switch on the device,
you will see an installation guide that
allows you to set your preferences
and search for channels.
Use ▲ or ▼ to navigate between
settings and use ◄ or ► to adjust the
selected setting.
1. Select the desired Country.
2. Select the desired Language.
3. Navigate to Resolution and press
OK to enter the resolution settings
menu. Select the desired resolution,
then press OK to confirm.
4. Select Yes from the pop-up window
to save the settings or No to cancel.
5. Select the desired Aspect Ratio.
6. Select OK, then press OK to start
the Auto Channel Search.
After the search has finished, you can
start watching any channels which
have been found.
Press TV/RADIO to switch between
Freeview TV and Radio channels. If
no channels are found, the device will
return to the installation guide.
6.2 TV Mode (Quick access to
functions)
This section will explain how to
access functions quickly using the
remote control when watching TV.
6.2.1 Subtitle
1. Press the SUB-T button.
2. Use ▲ and ▼ to select the subtitle
language or select OFF to disable
subtitles.
3.Press OK to confirm or press EXIT
to cancel.
6.2.2 Channel Information
1. Press INFO to show information
about the current and next programs.
2. Press INFO again to show more
detailed information.

-8-
English
3. Press INFO once more to display
channel information such as
frequency, signal strength and signal
quality.
4. Press EXIT at any time to close the
information window.
6.2.3 Channel List
1.Press OK to view the channel list.
2. Use ▲ or ▼ to navigate between
channels and press OK to begin
watching the selected channel. Press
Pg Up or Pg Dn to move to the
previous or next page respectively.
3.Press EXIT to close the channel
list.
6.2.4 Teletext
Press TTX to access the teletext
service.
Note: Not all channels support
teletext.
6.2.5 Last Channel Watched
Press RECALL to return to the last
channel that was being watched.
6.2.6 EPG
The EPG (Electronic Program Guide)
is the schedule of programs due to be
broadcasted in the next 7 days.
1.Press EPG to open the EPG page.
2.Use ▲ and ▼ to navigate between
channels and use ◄ and ► to
navigate through the scheduled
programs.
3.Press OK to view more detailed
information about the selected
program.
4.Press to enable the following
enhanced navigation options. Press
<EXIT> to return.
Select ‘ ’ and ‘ ’ to navigate
through programs one by one.
Select ‘ ’ and ‘ ’ to navigate
through programs by steps of 2
hours.
Select ‘ ’ and ‘ ’ to navigate
through programs by steps of 24
hours.
Note: Not all channels support EPG.
Navigation
-9-
- Schedule Recording
To add a timer for a scheduled
recording, press TIMER or EPG,
then when watching TV.
Use ▲ or ▼ to navigate between
settings and use ◄ or ► to adjust the
selected setting.
1.Select the desired Timer Mode: Off,
Once, Daily, Weekly or Monthly.
2.For Action, select Record.
Note: When selecting Record, ensure
that a USB storage device with
sufficient free space is inserted in the
USB port.
Tips: When creating a timer from the
EPG, the program time, date and
duration will be set automatically
according to information transmitted
by the broadcaster.
Should you wish to change these
settings:
1.Select the desired Channel.
2.Input the Date by using the keypad
numbers.
3.Input the Time by using the keypad
numbers (time format: hh/mm).
4.Input the Duration by using the
keypad numbers (time format:
hh/mm). Duration is the period for
which the selected channel will be
recorded.
5.Select Save and press OK to
confirm or select Cancel and press
OK to cancel.
6.2.7 Timer
- Schedule Viewing
To add a timer for a scheduled
viewing, press TIMER or EPG, then
when watching TV.
Use ▲ or ▼ to navigate between
settings and use ◄ or ► to adjust the
selected setting.
1.Select the desired Timer Mode: Off,
Once, Daily, Weekly or Monthly.
2. For Action, select View.
Tips: When creating a timer from the
EPG, the program time, date and
duration will be set automatically
according to information transmitted
by the broadcaster.
Should you wish to change these
settings:
1.Select the desired Channel.
2.Input the Date by using the keypad
numbers.
3.Input the Time by using the keypad
numbers (time format: hh/mm)
4.Input the Duration by using the
keypad numbers (time format:
hh/mm). Duration is the period for
which the selected channel will be
recorded.
5.Select Save and press OK to
confirm or select Cancel and press
OK to cancel.
Action
Action
-10-
English
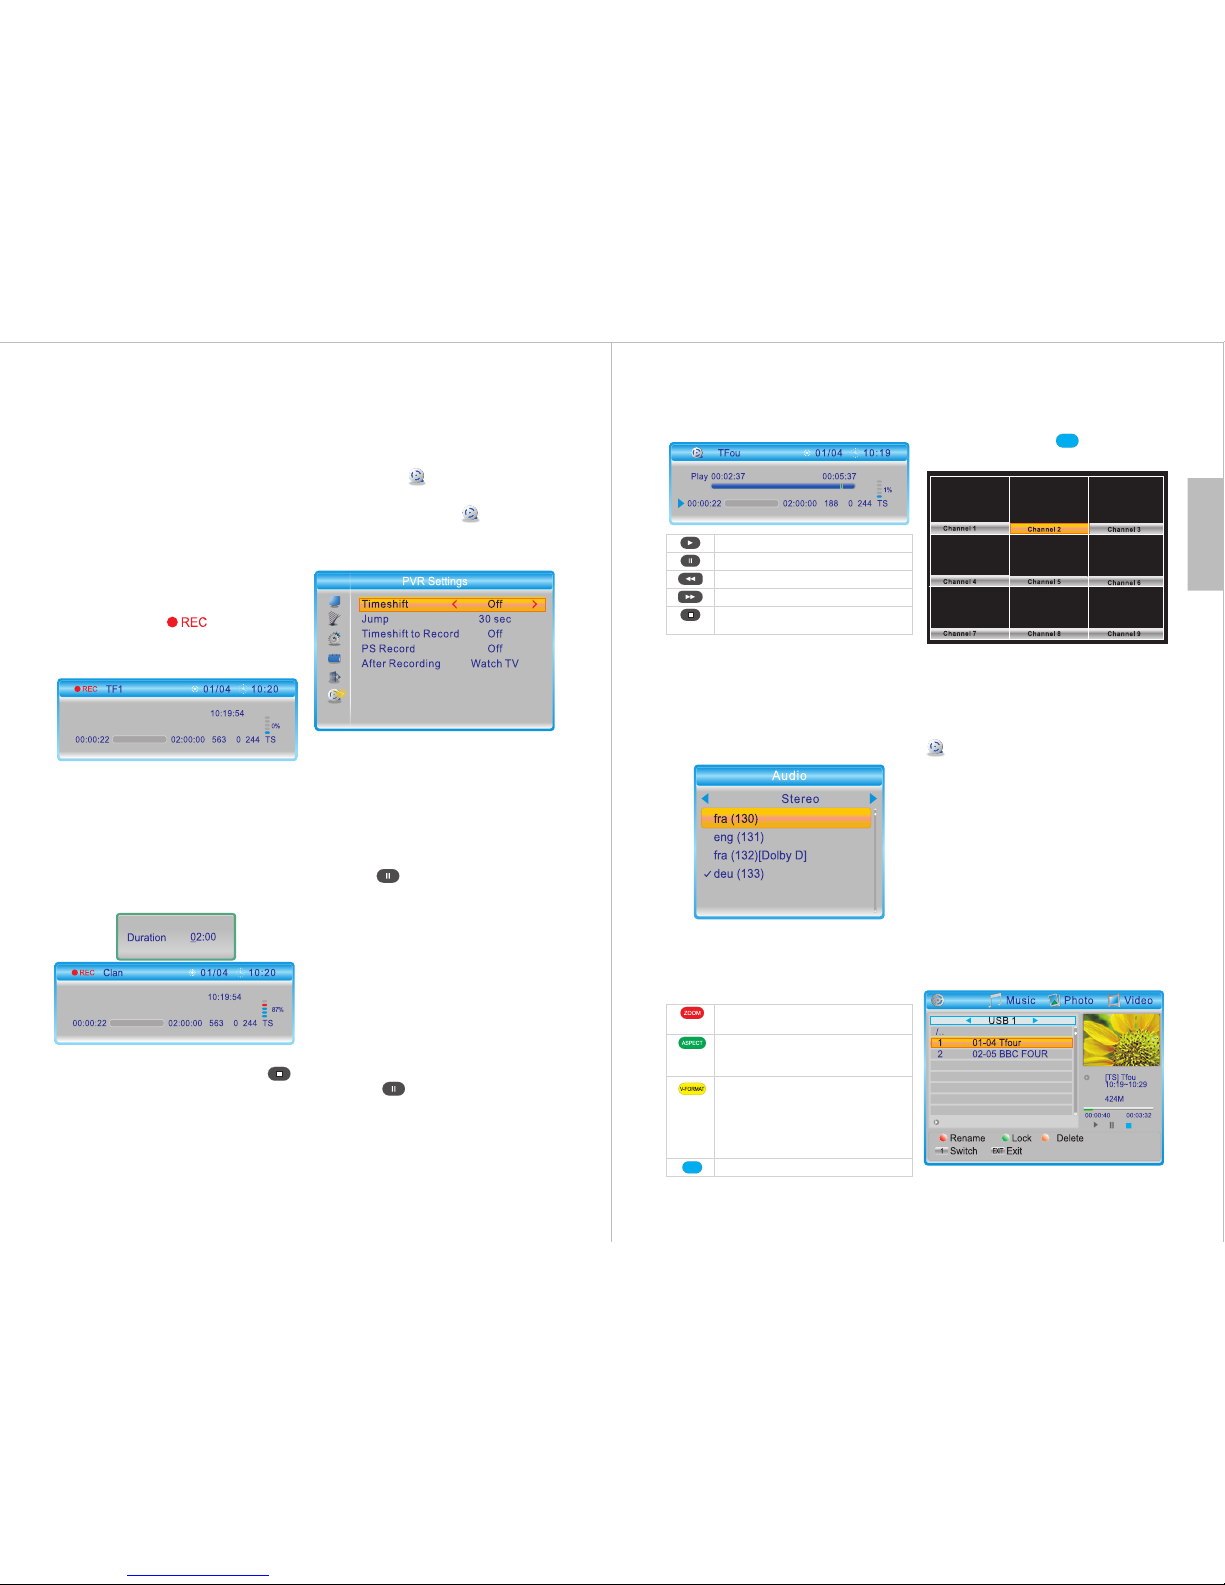
6.2.9 Timeshift
Timeshift allows you to control a live
TV program by pausing it and
resuming it later.
To enable or disable Timeshift:
Path: MENU > Media Player >
PVR Settings >Timeshift
1.Press MENU, select Media
Player and press OK.
2.Select and enter PVR Settings.
3.Select Timeshift, then use
◄ and ► to change between Off,
Auto and Pause.
Off disables the Timeshift function.
Auto enables the Timeshift function
all the time.
Pause allows you to use Timeshift by
pressing while watching live TV.
Select Timeshift to Record, then use
◄ and ► to change between On and
Off.
Note: If Timeshift to Record is set to
On, the program will be recorded
while time shifting.
When Timeshift is set to Auto, the
Timeshift function is enabled all the
time.
When Timeshift is set to Pause, you
can press while watching live
TV to begin using the Timeshift
function.
Note: When programming a
recording, we recommend that you
check the After Recording option in
the PVR Settings menu to determine
what will happen after the recording
concludes. Please refer to section
7.6.2.
6.2.8 Live Recording
Insert a USB storage device with
sufficient free space into the USB
port.
1.Press REC to start a live recording.
Whilst recording will flash on
the top right hand corner of the
screen.
2.While recording, press REC to
show detailed recording information.
3.Whilst the detailed recording
information is displayed, press REC
to set the duration. Use
◄ or ► to navigate and use the
keypad numbers to input the time.
4.To stop a live recording, press ,
then select Yes to finish or No to
return.
-11-
Multi-view mode allows you to view
multiple channels at once. Use the
arrow keys to select and preview a
channel. Press OK, or EXIT to
return to the live broadcast.
6.2.12 Media Player from USB
Storage
In TV or Radio mode, press USB to
enter the media player or select
Media Player from the menu
window.
Note: A USB storage device such as
a USB stick or hard drive must be
inserted in the USB port.
For detailed information about media
player options, please refer to section
6.4.
6.2.13 Recorded Programs
To watch recorded programs, press
LIST to enter the recorded program
list (PVR).
Record
When Timeshift is active, use the
following buttons to control the live
broadcasting:
6.2.10 Audio
1.Press the AUDIO button.
2.Use ▲ and ▼ to select an available
audio language.
3.Press OK to confirm or press EXIT
to cancel.
6.2.11 Colour buttons
In TV mode, the coloured buttons
perform the following functions:
MP
Resume
Pause
Rewind
Fast forward
Exit time shift and return
to the live broadcast
MP
Zoom in. Once zoomed in, use ▲
/▼/◄/► to select the display area
Cycle through the following
Aspect Ratio settings: Auto,
4:3PS, 4:3LB and 16:9
Cycle through the following
Resolution settings: 480i, 480p,
576i, 576p, 720p (50Hz), 720p
(60Hz), 1080i (50Hz), 1080i
(60Hz), 1080p (50Hz) and 1080p
(60Hz)
Multi-view window
English
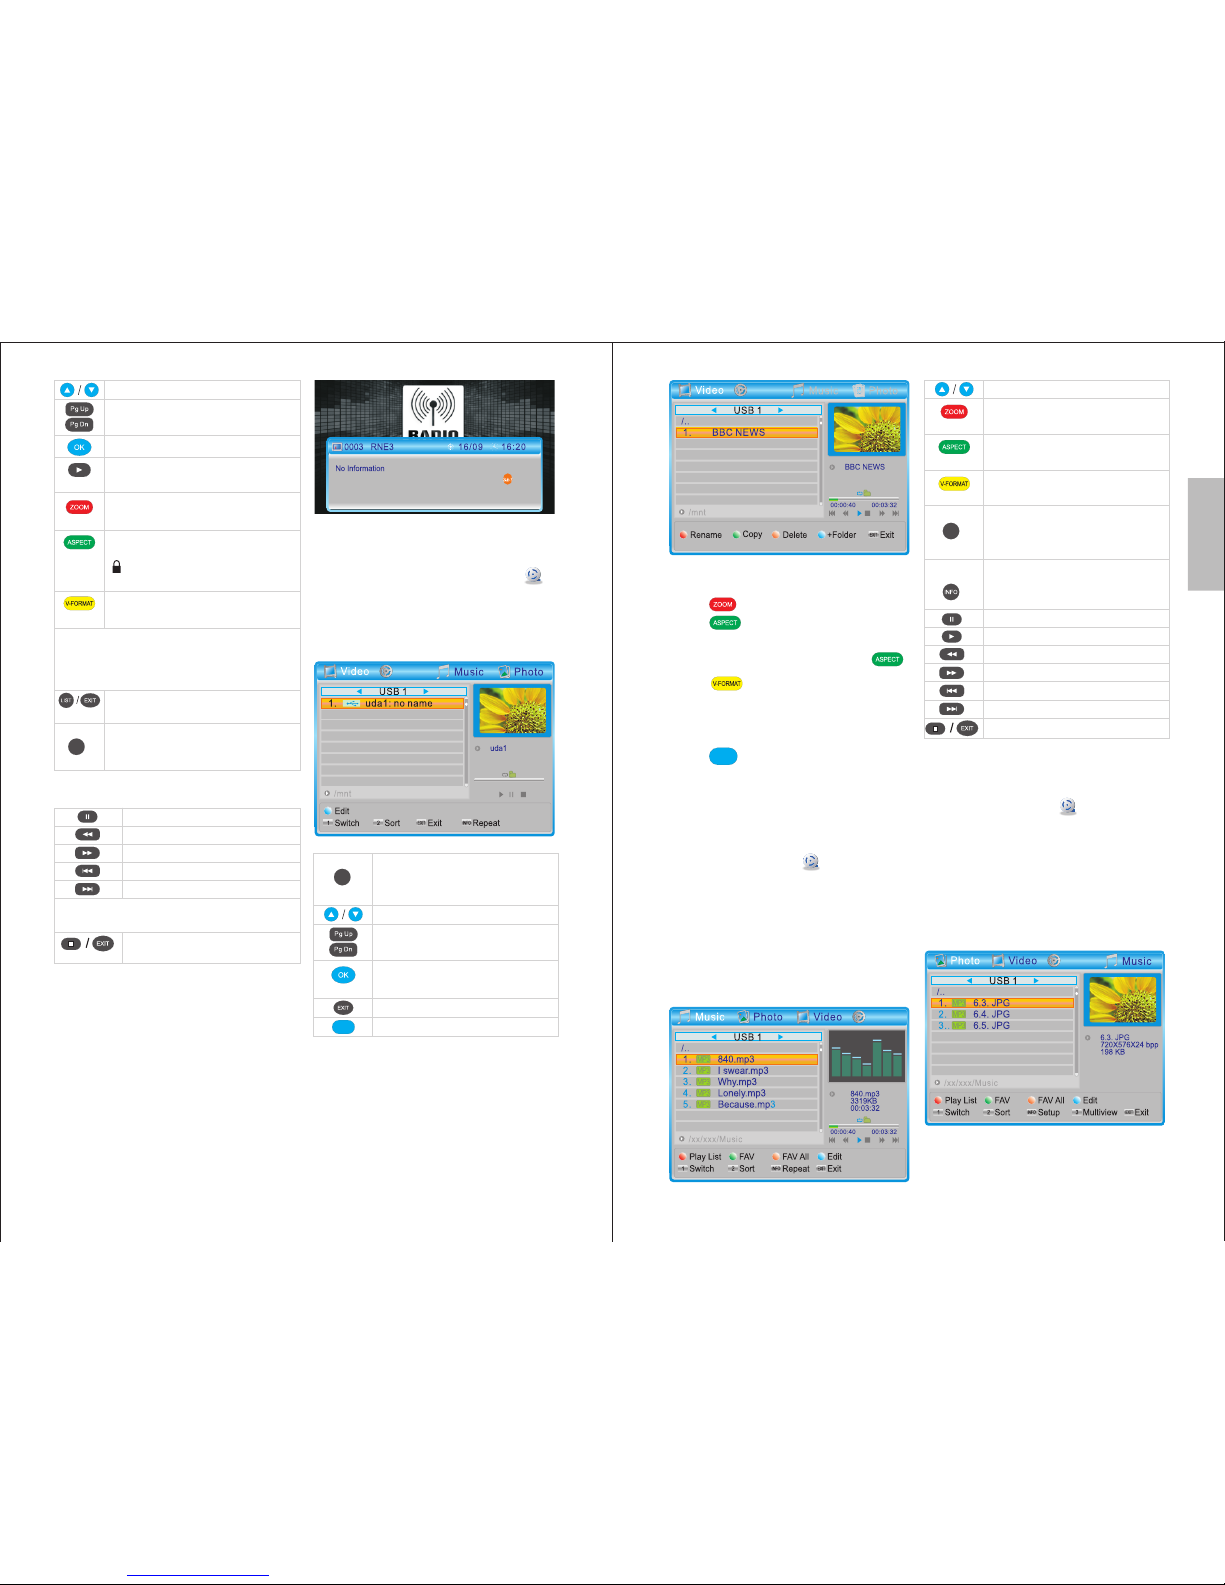
6.4 Media player
In TV or Radio mode, press USB to
enter the media player or select
Media Player from the main menu. A
USB storage device must be inserted
into the USB port.
Record
-12-
6.3 Radio Mode
Press TV/RADIO to switch between
TV mode and Radio mode.
Pause
Rewind
Fast forward
Jump Backwards
Jump Forward
Note: The Jump period can be set in
section 7.6.2
Return to the list of recorded
files.
Select a recorded file
Go to previous/next page
Play selected file in full screen
Play selected file in the preview
window
Rename a file using the onscreen
keyboard
Lock/unlock a file. The default
password is 0000.Once locked,
will appear next to the locked
file
Mark file for deletion.
Multiple files can be marked
Warning: E xiting the list of recorded
programs or changing to another
media type will automatically delete the
marked files.
Exit and return to live
broadcasting
Switch to other media file types
(Photo, Video, Music or PVR
Recording)
- Full Screen mode Options
1
MP
Switch between media file types
(Photo, Video, Music and
Recordings)
Select a folder or video file
Go to previous/next page
Enter folder or play the
selected file
Go Back
Enter Edit mode
1
-13-
- In edit mode:
Press to rename a folder or file.
Press to copy the selected
folder or file, then choose the
directory to copy it to and press .
Press to mark one or more files
or folders for deletion. When you exit
Edit mode, the marked files will be
deleted.
Press to add a new folder.
Press EXIT to go back to the previous
folder.
Press MENU to exit Edit mode.
6.4.1 Music
Press MENU, select Media Player
and press OK. Then, select Music
and press OK. Alternatively, if you are
already in Media Player mode, press
<1> to switch between media types
until you reach Music.
- File Options
6.4.2 Photo Viewer
Press MENU, select Media Player
and press OK. Then, select Photo
and press OK. Alternatively, if you are
already in Media Player mode, press
<1> to switch between media types
until you reach Photo.
- File Options
MP
Record
Record
Select a folder or music file
Show or edit the list of
favourites
Add or remove a file from the
list of favourites
Add or remove all files from
the list of favourites
Sort the files in the current
directory by Name, Time, Size
or Favourite
Change the repeat mode
between repeat one,
repeat folder and random
Pause
Resume
Rewind
Fast forward
Previous video
Next video
Return to the video list
2
Record
English
-14-
6.4.4 PVR
Please refer to section 6.2.13
Recorded Programs.
7 Main Menu (detailed acces to
functions)
In TV or Radio mode press MENU to
enter the main menu. Press EXIT or
MENU to close the menu.
In the main menu, use ▲ and ▼ to
navigate between the Channel,
Channel Search, System Setup,
Tools, Network and Media Player
menus.
Press OK or ► to enter a menu or
EXIT to go back to the main menu.
6.4.3 Video
Press MENU, select Media Player
and press OK. Then, select Video and
press OK. Alternatively, if you are
already in Media Player mode, press
<1> to switch between media types
until you reach Video.
Record
Select a folder or video file
Sort files in the current
directory by Name, Time or
Size
Change the repeat mode
between repeat one and
repeat folder
Play file in full screen
Pause
Resume
Rewind
Fast forward
Previous video
Next video
Return to the video list
- Full Screen mode Options
- File Options
Note: The selected file will be played in
the preview window.
2
- Full Screen mode Options
Select a folder or photo
Show or edit the list of
favourites
Add or remove a file from the
list of favourites
Add or remove all files from
the list of favourites
Sort files in the current
directory by Name, Time, Size
or Favourite
Edit slide show options
Pause slideshow
Resume slideshow
Zoom in
Restore to original size
Go to next photo
Go previous photo
Rotate the photo
View photos in multi-view
mode
View photos in full screen
mode or start a slideshow
2
3
-15-
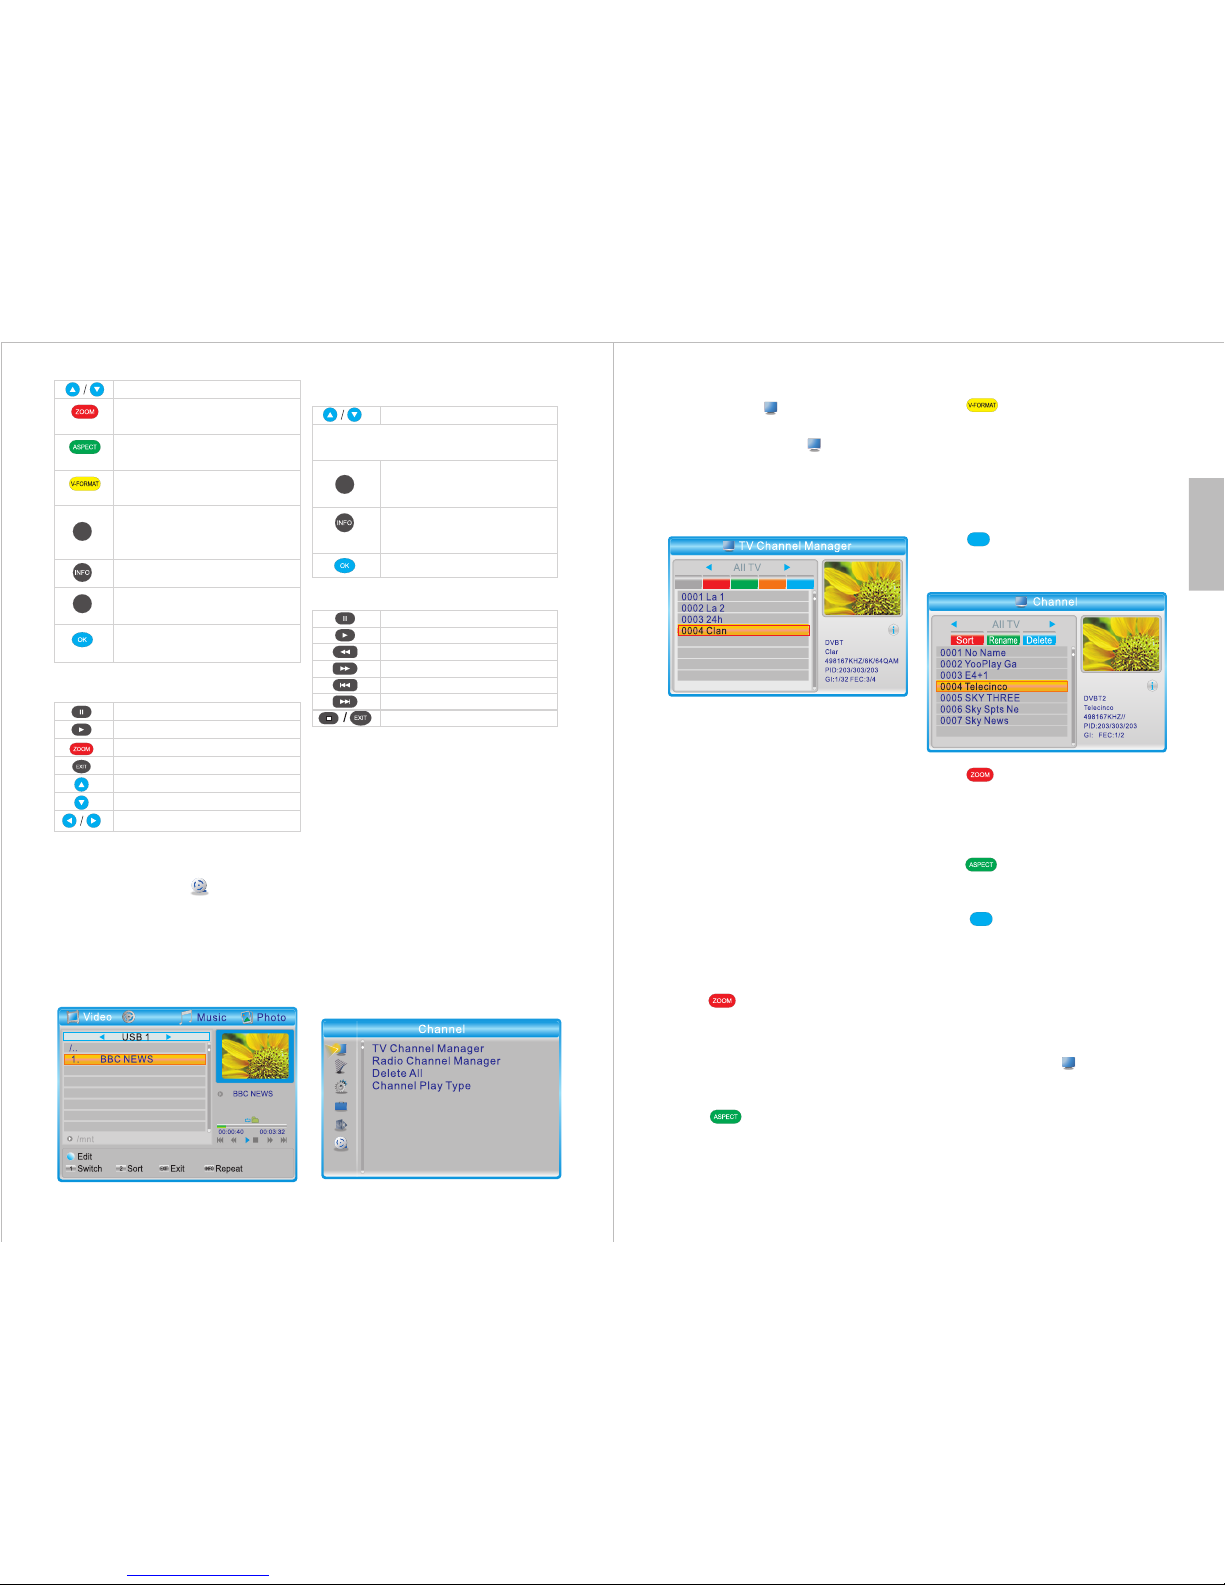
7.1 Channel
Path: MENU > Channel >
Channel Manager
Press MENU, select Channel and
press OK. Then, select TV Channel
Manager and press OK.
7.1.1 TV Channel Manager
▲ / ▼ : Select a channel.
EXIT: Return to the Channel
submenu.
When you press EXIT, if any changes
have been made, select Yes to
confirm or select No to cancel.
- Favourites
Press FAV to enable / disable the
favourites function.
Select a channel, then press OK to
see the favourites lists.
Select a list, then press OK to add /
remove.
Press EXIT to go back.
- Lock
Press to enable / disable the
lock function.
Select a channel and press OK to lock
/ unlock that channel.
The default password is 0000.
- Skip
Press to enable / disable the
skip function.
Select a channel then press OK to
skip / unskip.
- Move
Press to enable / disable the
move function.
Select a channel and press OK to
move it.
Use ▲ or ▼ to move the channel.
Press OK to finish moving.
- Edit
Press to enter the Edit Channel
submenu, from which you can sort,
rename and delete channels.
Press to sort the channels in a
different order. Select between Name
(A-Z), Name (Z-A), Free/Scramble or
Lock, then press OK to confirm or
press EXIT to cancel.
Press to enable the rename
function. Select a channel, then press
OK to rename.
Press to enable / disable the
delete function. Select a channel, then
press OK to delete. The default
password is 0000.
Press EXIT to exit the Edit Channel
submenu.
7.1.2 Radio Channel Manager
Press Menu, select Channel and
press OK. Then, select Radio Channel
Manager. Alternatively, if you are in TV
Channel Manager mode, press
TV/Radio to switch to the Radio
Channel Manager.
MP
MP
FAV Lock Skip
Move
Edit

-16-
English
The Radio Channel Manager
operates in the same way as the TV
Channel Manager. Please refer to
section 7.1.1 for further instructions.
Press TV/RADIO to switch between
the TV Channel Manager and the
Radio Channel Manager.
Press EXIT to go back to the previous
submenu.
7.1.3 Delete All
Press MENU, select Channel and
press OK. Select Delete All and press
OK.
This option will reset the TV and
Radio channel lists.
Press OK, then input the password to
delete all channels.
The default password is 0000.
Select Yes to confirm or No to cancel.
7.1.4 Channel Play Type
Press MENU, select Channel and
press OK. Then, select Channel Play
Type, press OK and use ◄ and ► to
change the type of channel displayed
between All, Free and Scrambled.
Press EXIT to return to the Channel
submenu.
7.2 Channel Search
Press MENU, select Channel
Search and press OK.
7.2.1 Auto Search
Path: MENU > Channel Search >
Auto Search
Press MENU, select Channel
Search and press OK. Then, select
Auto Search and press OK.
Use ◄ or ► to alter the selected
setting.
FTA Only: Enable this option to
search for free to air channels only.
T2 Signal Only: Enable this option to
search for HD channels only.
Select Search and select Yes to start
searching or select No to cancel.
Note: When performing a new scan,
the channel list will not be updated
but will be replaced by the channels
that are found.
7.2.2 Manual Search
Path: MENU > Channel Search >
Manual Search
Press MENU, select Channel
Search and press OK. Then, select
Manual Search and press OK.
-17-
Use ◄ or ► to alter the selected
setting.
Search Mode: Choose either By
Channel or By Frequency.
Selecting By Channel allows you to
select a channel number and search
for it using the default frequency of
that channel.
Navigate to Channel No. and use ◄
and ► to change the channel.
Selecting By Frequency allows you to
enter a specific frequency to search.
Navigate to Frequency and use the
number keys to enter the desired
frequency.
Network Search: Enable the
Network Search option to allow the
DVB425 to search all channels with
ONID (Original Network ID) on the
selected frequency.
Note: Prior to scanning, a preview of
the signal strength and quality for the
selected channel or frequency will be
displayed on the screen.
Select Search and press OK to start
scanning.
7.2.3 Aerial Power
The DVB425 can output 5V power
from the coaxial aerial socket. This
allows you to power compatible
indoor amplified aerials.
Path: Menu > Channel Search >
Aerial Power
Press MENU, select Channel
Search and press OK. Then, select
Aerial Power and press OK.
Note: DO NOT activate this function if
using a rooftop aerial or if your indoor
aerial is powered by a power adaptor
as it will negatively affect the signal
quality.
7.2.4 Standby Loopthrough
While in standby mode, the DVB425
can provide an antenna point for a
second receiver or TV. Follow the
instructions below to ensure that the
Loopthrough function is enabled, then
connect the second device to the
Antenna Out (Please see section 4.2).
Path: Menu > Channel Search >
Loopthrough in Standby
Press MENU, select Channel
Search and press OK. Then, select
Loop Through in Standby and press
OK. Finally, select On to enable the
loopthrough function or Off to disable
it.
7.2.5 LCN
Path: MENU > Channel Search >
LCN
Press MENU, select Channel
Search and press OK. Then, select
LCN and press OK.
LCN (Logical Channel Number)
provides channel sorting as intended
by the broadcaster 1 = BBC1, 2 =
BBC2 etc.
Enable/disable this function using
◄ / ► to sort channels by LCN.
Tip: We strongly recommend leaving
this function enabled.
7.3 System Setup
Path: MENU > System Setup
Favourite
Date/Time Settings
-18-
English
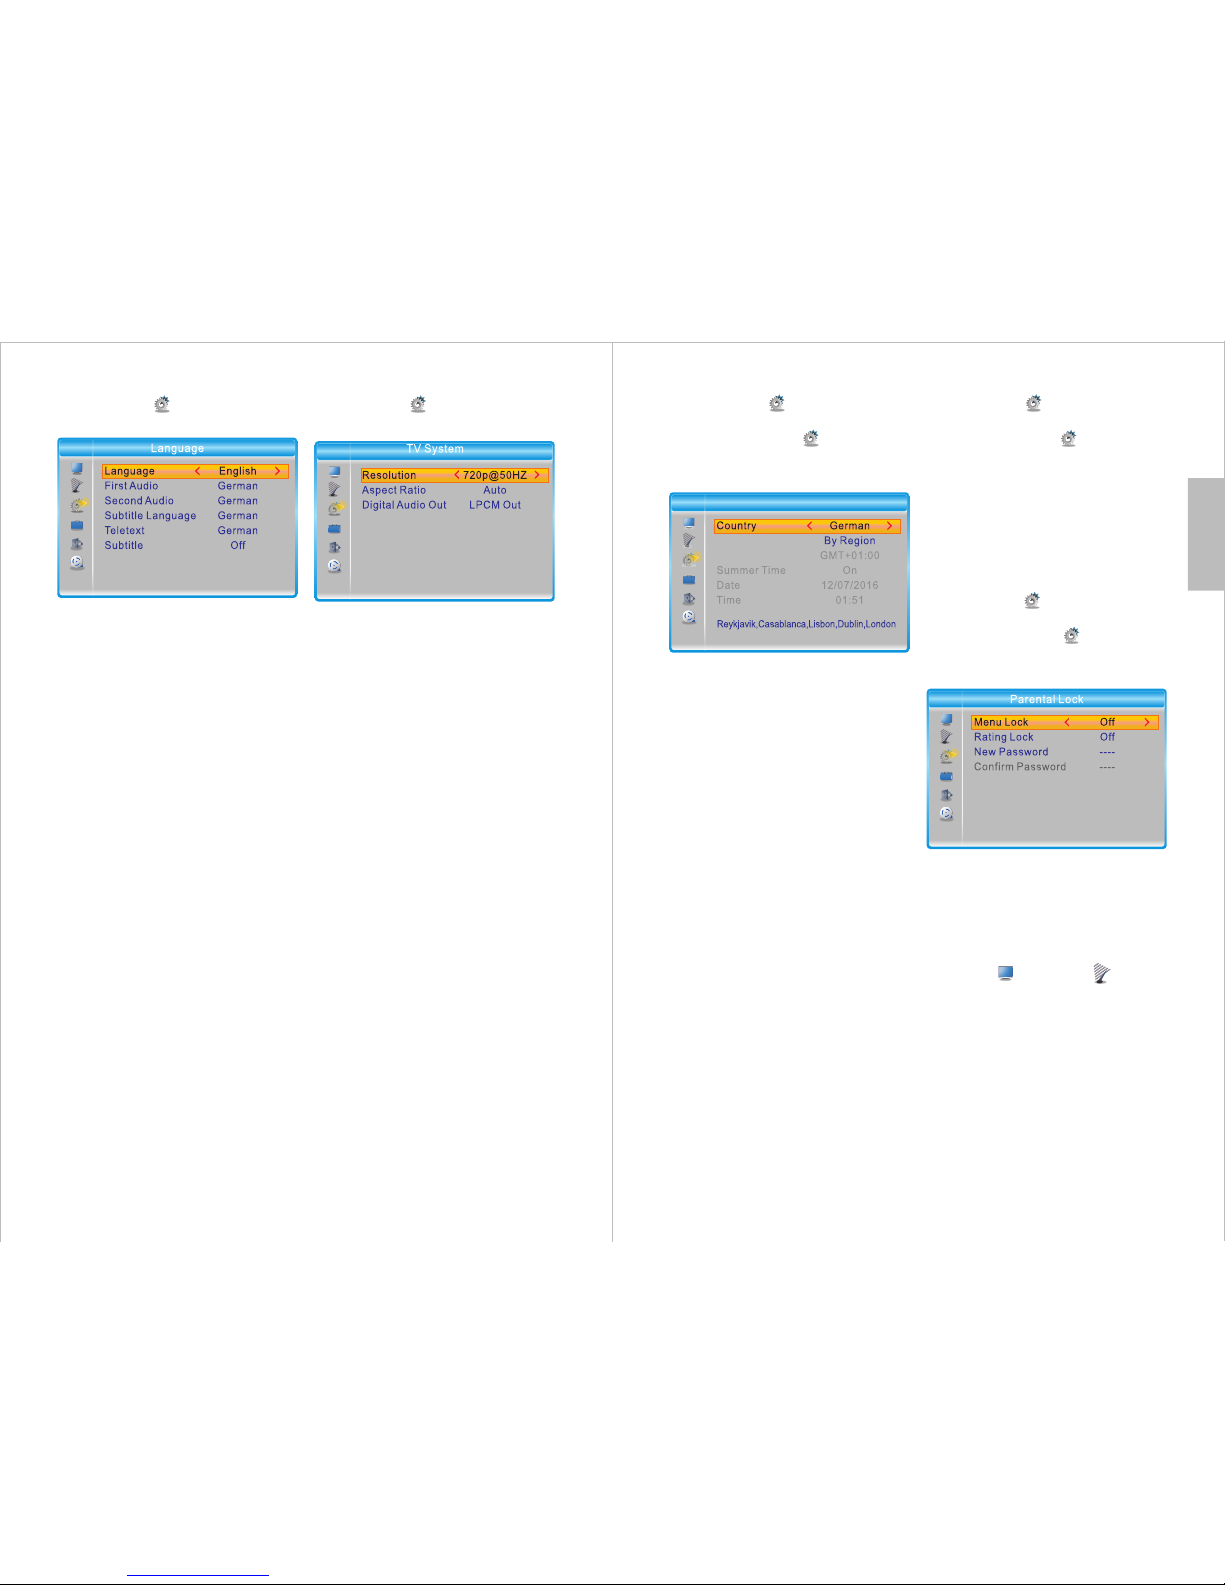
7.3.1 Language
Path: MENU > System Setup >
Language
▲ / ▼: Navigate through the submenu.
◄ / ►: Change the selected setting.
- Language
Select your preferred system
language from among English,
French, German, Italian and Spanish.
- First Audio
Select the default audio language for
TV from among English, French,
German, Italian and Spanish.
- Second Audio
Select the second audio language for
TV from among English, French,
German, Italian and Spanish.
- Subtitle Language
Select the subtitle language from
among English, French, German,
Italian and Spanish.
- Teletext
Select the teletext language from
among English, French, German,
Italian and Spanish.
- Subtitle
Set Subtitle to Normal or Hard of
Hearing to enable subtitles. Set it to
Off to disable subtitles.
Note: Subtitles are not provided by all
programs.
7.3.2 TV System
Path: MENU > System Setup > TV
System
▲ / ▼: Navigate through the list of
options and submenus.
OK: Enter a submenu or confirm
changes.
- Resolution
Select the desired resolution from
among the following options:
By Source, By Native TV, 480i, 480p,
576i, 576p, 720p@50Hz,
720p@60Hz, 1080i@50Hz,
1080i@60Hz, 1080p@50Hz or
1080p@60Hz.
In the pop-up window, select Yes to
confirm the new resolution or No to
revert to the previous setting.
- Aspect Ratio
Select the desired aspect ratio from
among Auto, 4:3PS, 4:3LB or 16:9
and confirm.
- Digital Audio Out
Choose either LPCM Out or BS Out
and confirm.
Note: BS stands for Bitstream. LPCM
stands for Linear Pulse-code
modulation.
Tip: We strongly recommend using
LPCM Out.
-19-
7.3.3 Date/Time Settings
Path: MENU > System Setup >
Date/Time Settings
Press MENU, select System Setup
and press OK. Then, select
Date/Time Settings and press OK.
- Country
Select Country, press OK then
choose one of United Kingdom,
France, Spain, Germany or Italy.
Press OK to confirm.
- Time Zone
Select Time Zone, press OK and
choose one of By Region, User
Defined or Off. Press OK to confirm.
By Country: When Time Zone is set
to By Country, all clock settings will
be set automatically according to the
country selected.
Tip: We strongly recommend setting
Time Zone to By Country.
User Defined: Setting Time Zone to
User Defined allows you to set the
Time Offset and Summer Time
options manually.
Off: Setting Time Zone to Off allows
you to set the Date and Time
manually.
To input the time and date manually,
select Off, go to Date or Time, then
use ◄ and ► to select the number to
change and use the number keys to
enter the new number.
7.3.4 Timer Settings
Path: MENU > System Setup >
Timer Settings
Press MENU, select System
Setup and press OK. Then, select
Timer Settings and press OK.
Select a timer, then press OK to enter.
Please refer to section 6.2.7 for more
detailed information.
Up to 8 timers can be added.
7.3.5 Parental Lock
Path: MENU > System Setup >
Parental Lock
Press MENU, select System
Setup and press OK. Then, select
Parental Lock and press OK.
Input the password to enter the
Parental Lock menu. The default
password is 0000.
- Menu Lock:
If the Menu Lock is On, you will be
required to enter the password to
access the Channel or Channel
Search menus.
- Rating Lock:
Press OK to adjust the Rating Lock.
Select Off or an age rating between
AGE 4 and AGE 18.
- New password
To set a new password, use the
keypad numbers to enter the new
password, then enter the new
password again to confirm. Select
Yes to return.
Time Zone
Time Offset
Date/Time Settings
English
-20-
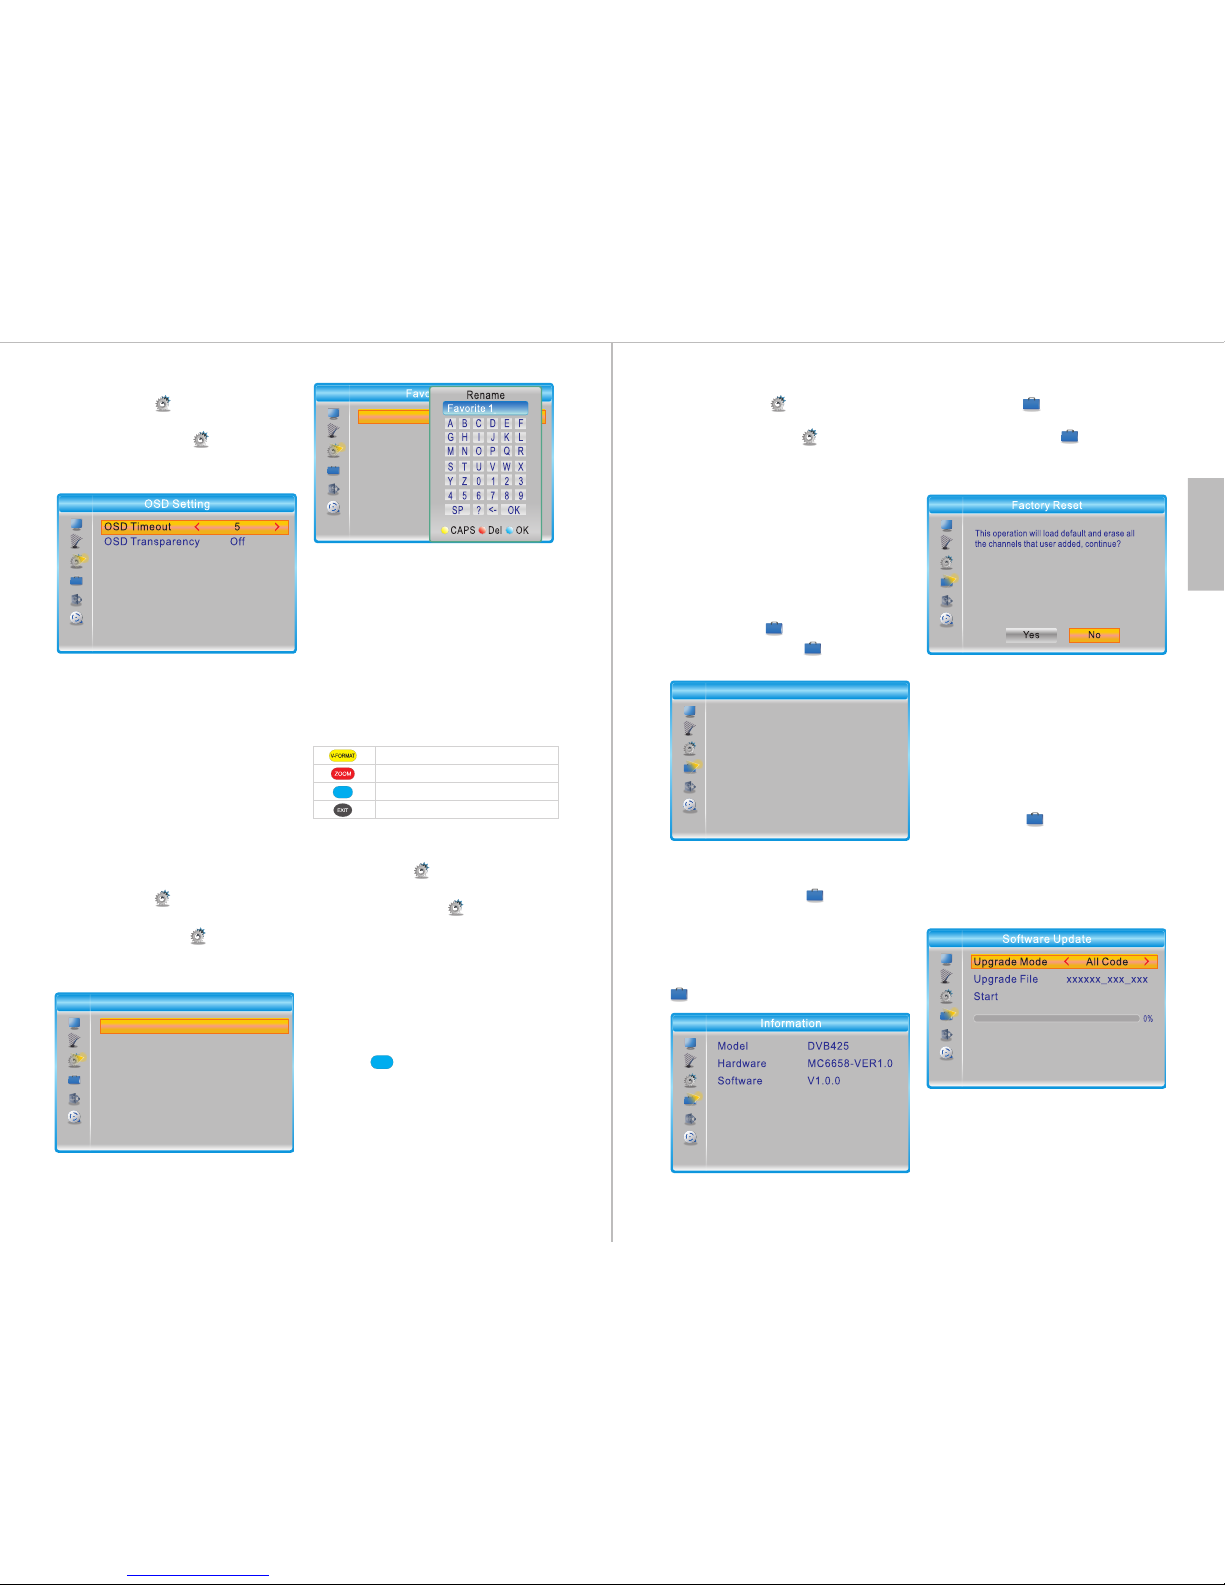
The Favourite submenu allows you to
create up to 8 lists of favourite
channels. You can then add channels
to a list through the TV Channel
Manager (please refer to section
7.1.1) .
To rename a Favourite list, select the
list, press OK, then enter the new
name using the onscreen keyboard.
Press OK to confirm.
7.3.8 Multiview Settings
Path: MENU > System Setup >
Multiview Settings
Press MENU, select System Setup
and press OK. Then, select Multiview
Settings and press OK.
Choose between 3x3 Pictures and
4+1 Pictures to change the picture
layout of the multi-view window.
You can access the multi-view
window while watching TV by
pressing .
7.3.6 OSD Settings
Path: MENU > System Setup >
OSD Settings
Press MENU, select System
Setup and press OK. Then, select
OSD Settings and press OK.
- OSD Timeout
OSD Timeout refers to the time that
information remains on screen before
disappearing. Select the desired
onscreen display time from 1 second
to 10 seconds in steps of 1 second.
- OSD Transparency
Set the transparency of the onscreen
display by choosing from among Off,
10%, 20%, 30% and 40%.
7.3.7 Favourite
Path: MENU > System Setup >
Favourite
Press MENU, select System Setup
and press OK. Then, select Favourite
and press OK.
MP
1 Favourite 1
2 Favourite 2
3 Favourite 3
4 Favourite 4
5 Favourite 5
6 Favourite 6
7 Favourite 7
8 Favourite 8
MP
Enable / disable caps lock
Delete
Confirm
Cancel
-21-
7.3.9 Auto Standby
Path: MENU > System Setup >
Auto Standby
Press MENU, select System Setup
and press OK. Then, select Auto
Standby and press OK.
The Auto Standby function causes
the DVB425 to go into standby mode
automatically if no action is taken
within the selected time.
Choose between Off, 30 Min, 1 Hour,
2 Hours and 3 Hours.
7.4 Tools
Path: MENU > Tools
Press MENU, select Tools and
press OK.
7.4.1 Information
Path: MENU > Tools > Information
Press MENU, select Tools and
press OK. Then, select Information
and press OK.
From here, you can see the Model,
Hardware version and Software
version. Press EXIT to return to the
Tools menu.
7.4.2 Factory Reset
Path: MENU > Tools > Factory
Reset
Press MENU, select Tools and
press OK. Next, select Factory Reset
and press OK. Then, enter the
password.
Select Yes to reset the device to the
default factory settings or select No
to cancel and exit.
Once the default factory settings
have been restored, the Installation
Guide will appear. Please refer to
section 6.1 for further instructions.
7.4.3 Software Update
Path: MENU > Tools > Software
Update
This function allows you to update the
software of the DVB425.
To find the most recent software,
please go to our website:
www.augustint.com
1.Download the software to a USB
storage device and insert it into the
DVB425's USB port.
2.Select Software Update and press
OK.
3.For Upgrade Mode, select All Code.
Tools
Information
Factory Reset
Software Update
Remove USB device safely
1 Favourite 1
2 Favourite 2
3 Favourite 3
4 Favourite 4
5 Favourite 5
6 Favourite 6
7 Favourite 7
8 Favourite 8
Favourite
English
-22-
4.Go to Upgrade File, then use ◄ and
► to select the file.
5.Select Start, then press OK .
6.Select Yes to update or select No to
return.
Once updated, the Installation Guide
will appear. Please refer to section
6.1 for further instructions.
7.4.4 Remove USB Device Safely
Path: MENU > Tools > Remove
USB Device Safely
Press MENU, select System Setup
and press OK. Then, select Remove
USB device safely and press OK.
Next, press ▼, then press OK and
remove the USB device.
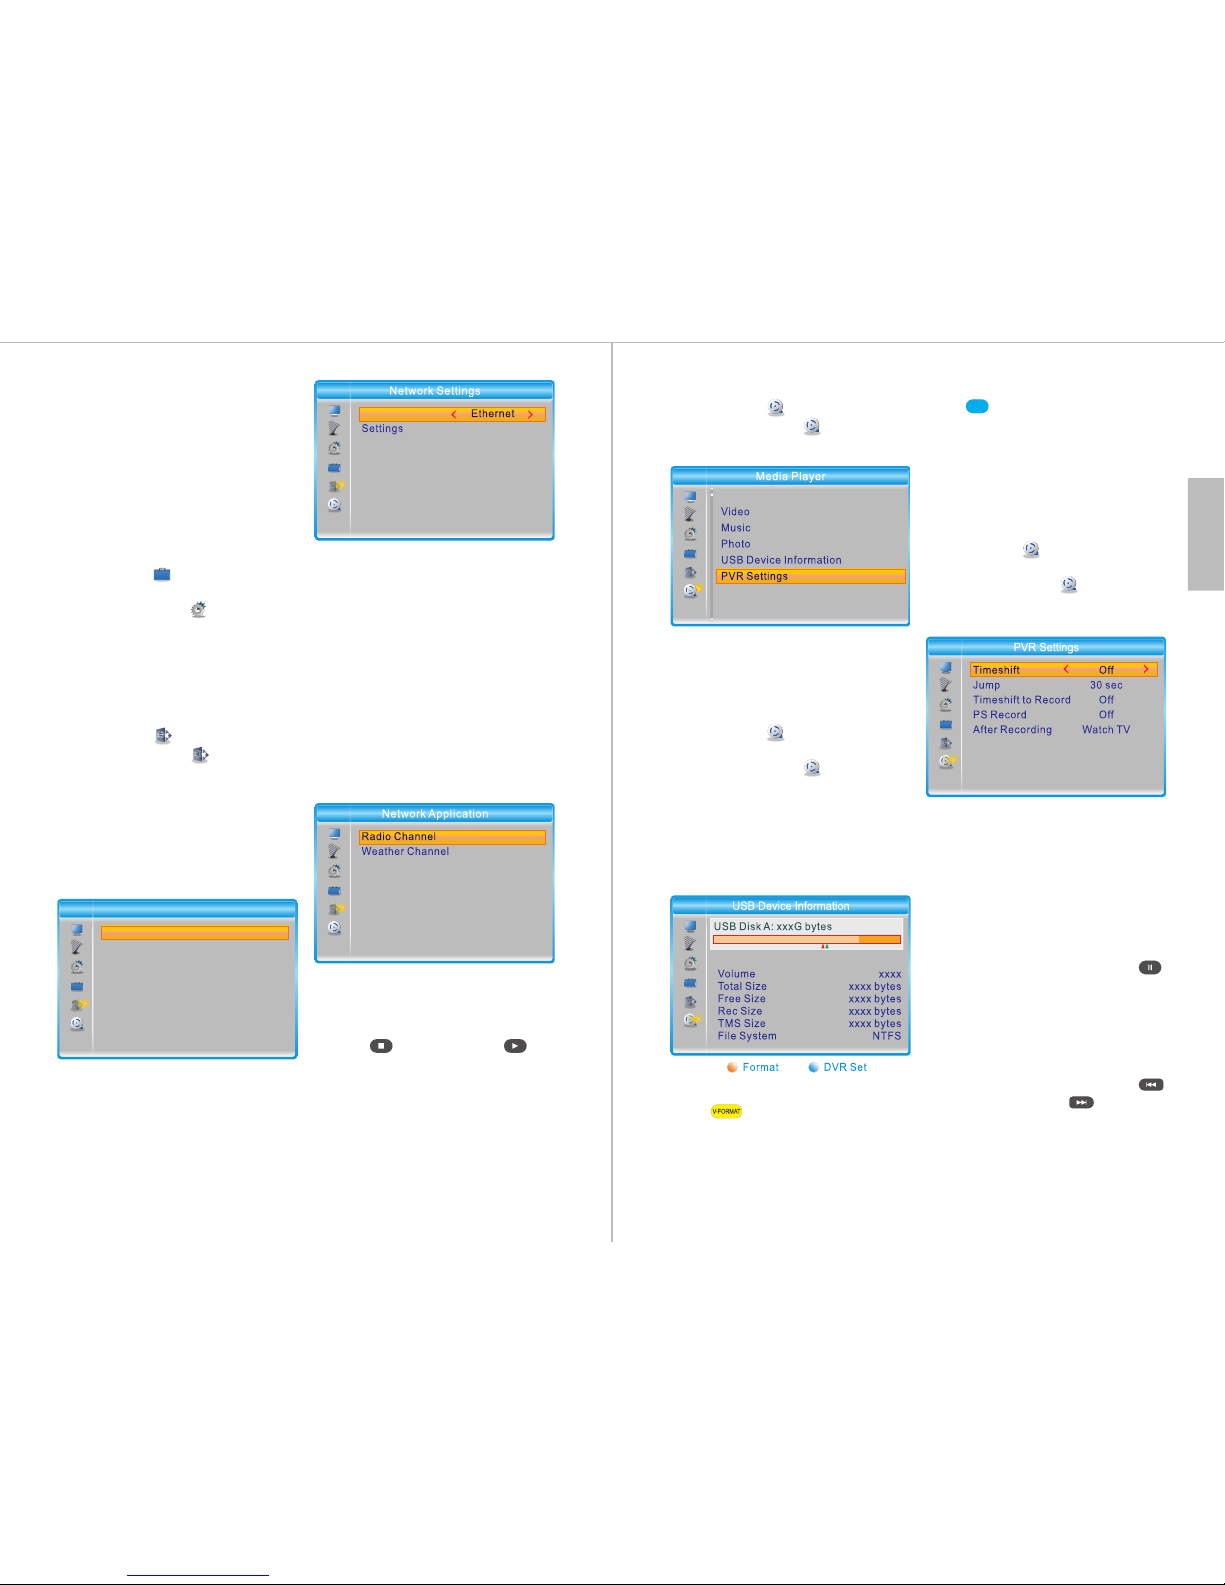
7.5 Network
Path: MENU > Network
Press MENU, select Network and
press OK.
From here, you can set the network
options, listen to online radio or
check the weather forecast. In order
to use these functions, please ensure
that the DVB425 is connected to the
internet via an Ethernet cable.
- Network Settings:
Network: Select between Ethernet
and None to enable or disable the
network function.
Settings: Select between On and Off
for DHCP.
Selecting On allows the DVB425 to
set DHCP information automatically.
Selecting Off allows you to set DHCP
information such as IP Address or
DNS manually.
To input the settings manually, use
◄ and ► to select the digit to change
and use the keypad to enter the new
number.
Select Apply and press OK to save
the settings or press EXIT to return.
- Network Applications:
Radio Channel:
1. Press OK to enter.
2. Select a country.
3. Select a radio station.
4. Press to stop or press
to play.
Weather Channel:
1. Press OK to enter.
2. Select a country.
3. Select a city to see its weather.
Press Pg Dn and Pg Up for faster
navigation.
Network Setting
Network Application
Network
Network
-23-
7.6 Media Player
Path: MENU > Media Player
Press MENU, select Media Player
and press OK.
For instructions concerning the PVR,
Video, Music and Photo functions,
please refer to section 6.4.
7.6.1 USB Device Information
Path: MENU > Media Player >
USB Device Information
Press MENU, select Media Player
and press OK. Select USB Device
Information and press OK.
From here, you can see information
about the USB storage device, format
the device or change its DVR
settings.
-Formatting your USB Device
Press to format the USB
device.
Choose either FAT or NTFS format,
then select OK to confirm or Cancel to
return.
- USB Usage
Press to adjust whether the USB
device will be used for recording only,
timeshifting only or both recording
and timeshifting.
Select OK to confirm or select Cancel
to return.
7.6.2 PVR Settings:
Path: MENU > Media Player >
PVR Settings
Press MENU, select Media Player
and press OK. Then, select PVR
Settings and press OK.
- Timeshift:
◄ / ► : Choose between Off, Auto
and Pause.
Select Off to disable the Timeshift
function.
Select Auto to enable the Timeshift
function all the time.
Select Pause so that the Timeshift
function can be used by pressing
while watching live TV.
- Jump:
◄ / ► : Change duration between 30
seconds, 1 minute, 5 min, 10min,
15min, 20min and 30 minutes.
While watching a recording, press
to jump backwards or to jump
forwards by the selected amount.
Record
MP
English
-24-
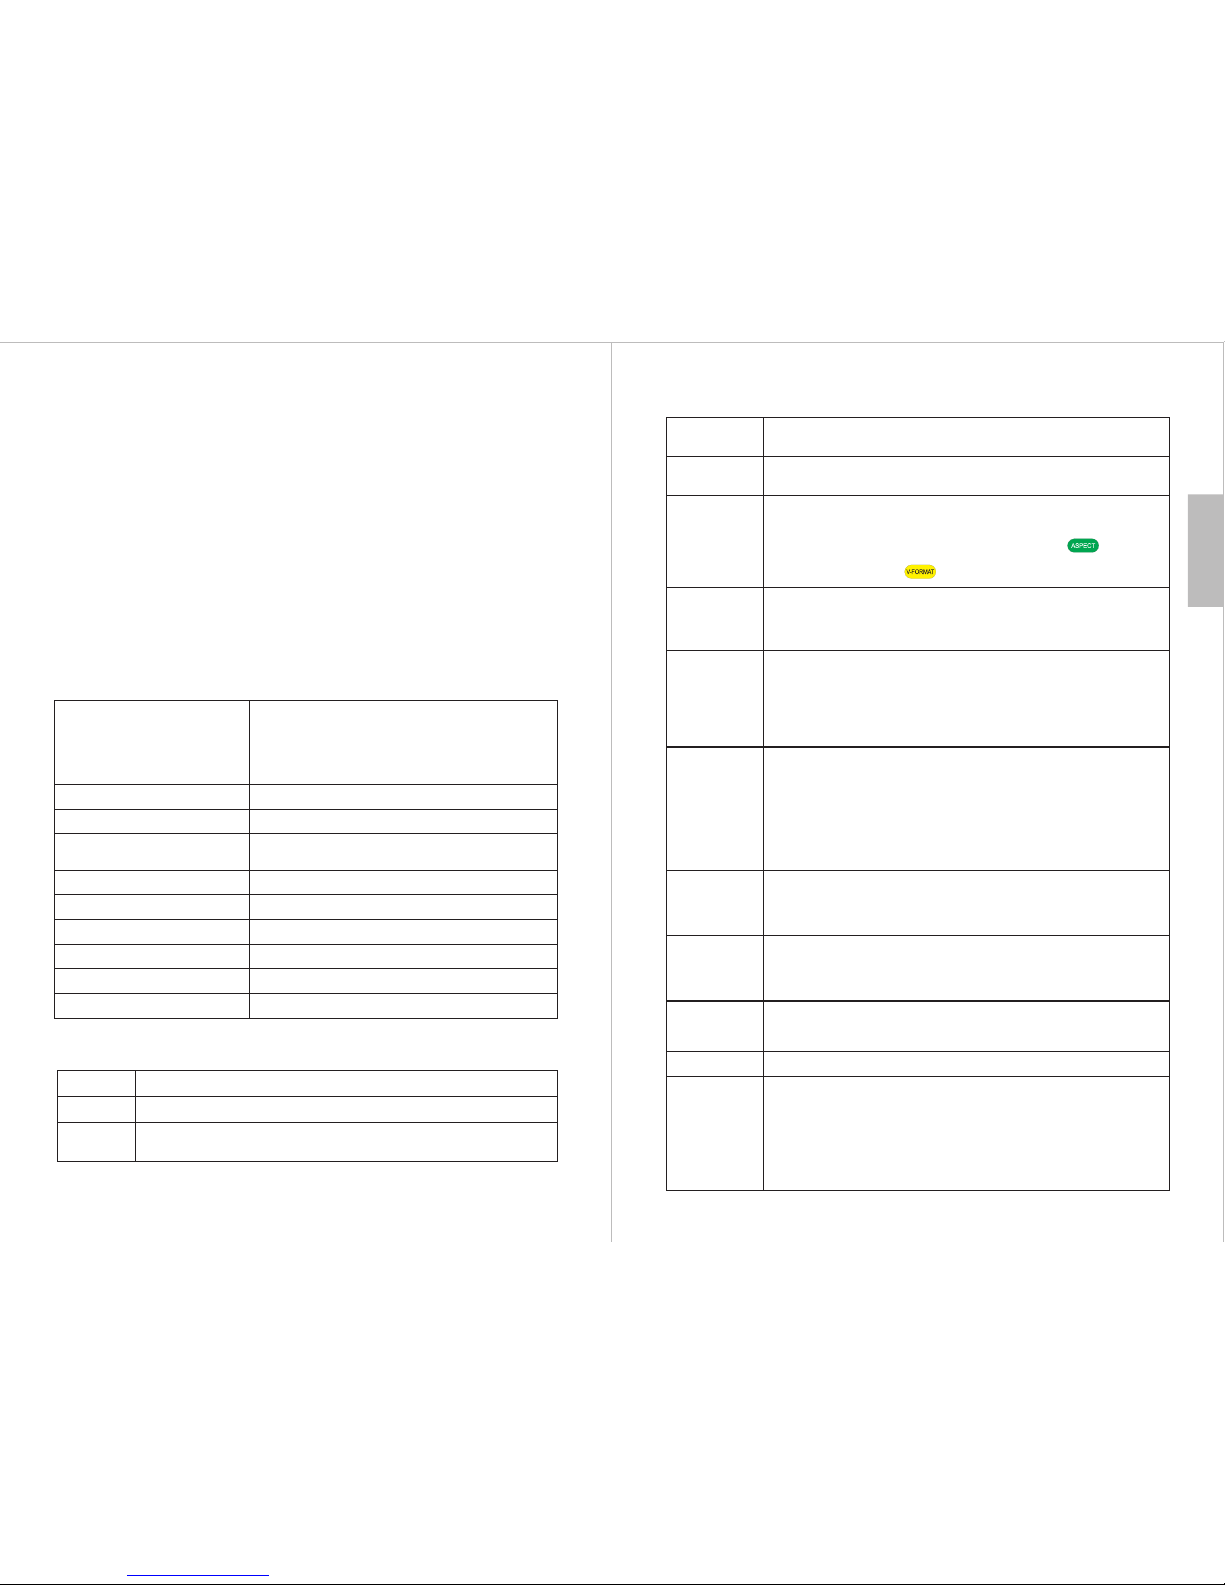
8. Specifications
DVB-T/T2 Band 6, 7, 8MHz
DVB-T/T2 Frequency VHF: 177.5~226.5MH
UHF: 474~858MHz
z
Video Output HDMI, SCART
USB Port USB 2.0 host (5V)
Power Input AC 220~240V 50/60Hz
Power consumption < 12.0 W
Dimensions 168 x 118 x 37 mm
Net Weight 338g
DVB-T/T2 Video Decoder MPEG-2 MP@HL
HEVC/H.265 up to 1920 x 1080 50/60Hz
AVC/H.264,
MPEG4 A SP
DVB-T/T2 Audio Decoder MP3 WAV AAC AC3 WMA
Media Formats
mp3, ac3, m4a, aac, wav, wma, ogg, flag
jpg jpeg, bmp, png,
mpg, mpeg, dat, ts, trp, tp, m2ts, vob, mp4, mov,
mkv, divx(optional), avi, flv, 3gp
Music
Photo
Movie
- Timeshift to Record:
Use ◄ and ► to change between On and Off.
Note: if Timeshift to Record is set to On, the program will be recorded while
time shifting.
- PS Record:
The PS Record (Program Stream Record) function allows you to record only
the current program. Enabling this function will reduce the size of the
recording file.
◄ / ► : Change between On and Off.
- After Recording:
Use ◄ and ► to change between Watch TV and Go to Stand-by Mode.
-25-
Problems
9. Troubleshooting
No Power • Plug the power cord into the wall socket tightly and turn on the device.
• The status LED lights green while switched on and red in standby mode.
• Check the connection to the TV or monitor.
• Ensure the correct source is selected.
• Check the video input on your TV or monitor.
• Change the aspect ratio of the DVB425 by pressing .
• Change the Video Format of the DVB425 to reduce the resolution of
the image by pressing .
Possible Causes and Solutions
No Signal
• The signal provided by the aerial may be too weak or the aerial may be
improperly connected.
• If you are using a rooftop aerial, ensure that the DVB425's Antenna
Power option is set to Off. Please refer to section 7.2.3.
• If you are using an indoor aerial, try moving it around or changing
its position.
• Try using another connection cable.
Picture Freezing,
Sound Distorting
• If the signal is too weak, please try using a rooftop aerial or an
amplified aerial.
• You are using a rooftop aerial, ensure that the Antenna Power option
is Off. Please refer to section 7.2.3 for further instructions.
• If you are using an indoor aerial, try moving it around or changing
its position.
• Change the batteries.
• Ensure that you are within the remote control's operating range
(max 8 meters, 30°)
• Move the DVB425 away from direct sunlight.
.
Remote control
does not work
• Ensure that a USB storage device is connected to the USB port.
• Ensure that there is sufficient free space on the USB storage device.
• Try using another USB storage device with sufficient space.
• Please refer to section 6.2.8.
No Recording
No Timeshift • The Timeshift function is not enabled by default. Please refer to
section 6.2.9 for instructions on how to enable it.
• Ensure that there is sufficient free space on the USB storage device.
No sound
No image
• Press <MUTE> to unmute.
• Press <VOL+> to increase the volume.
• Check the volume on the TV or monitor.
• Check cable connections.
Password • The default password is 0000.
Factory reset •
• Go to Tools and press OK to enter.
• Select Factory Reset.
• Press OK, then enter the password. The default
password is 0000.
• Select Yes to reset the device to the default factory settings or
select No to exit. Once the default settings have been restored, the
Installation Guide will appear.
Press MENU to access the main menu.
-26-
English
Warning
Warning
This operation instruction manual is intended only for reference. No further
notice is required for any modification to the information contained therein. Due
to continuing improvements, the features and design are subject to change
without notice.
No user serviceable components are fitted inside this Receiver. Do not attempt
any repairs, as this will invalidate the warranty. Any repairs must be carried out
by either the manufacturer or their nominated service centre. Parts inside this
set are subject to high voltage.
Manufactured under license from Dolby Laboratories.
Dolby and the double-D symbol are trademarks of Dolby Laboratories.
-27-
This product is guaranteed for twelve months from the date of the original purchase.
In the unlikely event of any defect arising due to faulty materials or workmanship,
the unit will be either replaced or repaired free of charge (where possible) during this
period. An alternative product will be offered in case the product is no longer
available or repairable.
This warranty is subject to the following conditions:
The warranty is only valid within the country where the product was purchased.
The product must be correctly installed and operated in accordance with the
instructions given in this user manual.
The product must be used solely for domestic purposes.
The warranty only covers the main units and does not cover the accessories.
The warranty does not cover damage caused by misuse, negligence,
accident or natural disaster.
The warranty will be rendered invalid if the product is resold or has been
damaged by inexpert repairs. The manufacturers disclaim any liability for
incidental or consequential damages.
Please consult one of our customer service advisers before returning any
product. We are not responsible for any unexpected product returns.
Any faulty product must be kept and returned in the original packaging with all
the accessories and the original copy of the purchase receipt.
The warranty is in addition to, and does not diminish, your statutory or legal rights.
Customer Service:
Telephone: +44 (0) 845 250 0586
Email: [email protected]
10. Warranty
This product is in compliance with the essential requirements and other relevant
provisions of Directive 2014/30/EU. The Declaration of conformity may be consulted
online at http://www.augustint.com/en/declaration.
Table of contents


